大数据系列 | 详解基于Zookeeper或ClickHouse Keeper的ClickHouse集群部署
- 1. ClickHouse与MySQL的区别
- 2. 在群集的所有机器上安装ClickHouse服务端
- 2.1. 在线安装clickhouse
- 2.2. 离线安装clickhouse
- 3. ClickHouse Keeper/Zookeeper集群安装
- 4. 在配置文件中设置集群配置
- 5. 在每个实例上创建本地表
- 6. 创建一个分布式表
- 7. 同一环境创建多个ClickHouse集群
1. ClickHouse与MySQL的区别
● 数据存储方式:
MySQL是关系型数据库管理系统(RDBMS),它使用表格来组织数据,并支持SQL查询语言。
ClickHouse是列式数据库管理系统(Columnar DBMS),它以列为单位存储数据,这使得它在处理大量数据时非常高效。
● 用途:
MySQL通常用于事务处理(OLTP)工作负载,比如Web应用程序的后端数据库,支持高并发的读写操作。
ClickHouse则更适合于分析型(OLAP)工作负载,用于大规模数据分析和报告,以及实时数据分析。
● 性能:
ClickHouse在处理大量数据时通常比MySQL更快,尤其是在数据分析和聚合查询方面。
MySQL在处理事务处理方面可能更快,因为它是为支持事务处理而设计的。
● 数据复制和高可用性:
MySQL有成熟的复制和高可用性方案,如MySQL Replication和Galera Cluster,可以确保数据的可靠性和可用性。
ClickHouse也有一些复制和高可用性的解决方案,但相对来说还不如MySQL那么成熟。
事务的概念:
事务(Transaction)是指数据库管理系统执行的一组操作,被视为一个逻辑工作单元,要么全部执行成功,要么全部不执行。事务具有以下四个特性,通常称为 ACID 特性:
原子性(Atomicity):事务是一个原子操作,要么全部执行成功,要么全部不执行。如果事务中的任何一部分操作失败,整个事务都会被回滚(Rollback),即撤销之前的操作,保持数据库状态一致性。
一致性(Consistency):事务执行的结果必须使数据库从一个一致性状态转变到另一个一致性状态。换句话说,事务执行后,数据库必须保持满足预定义的约束和完整性规则的状态。
隔离性(Isolation):并发执行的事务之间应该相互隔离,即一个事务的执行不应该受到其他事务的影响。事务应该像是在独立的执行环境中运行一样,尽管它们可能同时运行。
持久性(Durability):一旦事务提交(Commit),其结果应该永久保存在数据库中,即使系统崩溃或重启,也应该能够恢复到提交后的状态。
接下来通俗的案例来解释MySQL中的事务:
假设你在网上有一个小型的书店,你的网站上允许人们购买书籍。现在你需要确保每一次购买都是可靠的,避免出现错误的情况。现在,让我们来看看一次典型的购买流程,以及如何使用MySQL的事务来保证它的可靠性:
开始事务:当有人点击购买按钮时,你需要开始一个事务。这就好像给购买过程打了个标记,告诉系统:“我现在要进行一次购买操作了,请注意!”
扣除库存:在购买过程中,你需要检查库存是否充足,并且将库存数量相应地减少。这一步是在事务中完成的,如果库存不足或者出现其他错误,你可以回滚事务,即取消这次购买操作。
生成订单:如果库存充足,你就可以为购买生成一个订单,记录购买者的信息、购买的书籍以及付款信息等。这个过程也在事务中进行,确保订单的生成是原子性的操作,要么全部成功,要么全部失败。
扣款:最后,你需要从购买者的银行账户中扣款,完成支付过程。同样地,在事务中进行,以保证支付的准确性和可靠性。
提交事务:如果上述所有步骤都顺利完成,你可以提交事务,告诉系统:“购买操作已经完成,可以更新数据库并通知用户了!”
完成购买:一旦事务提交成功,购买操作就完成了。你可以更新库存数量,发送确认邮件给购买者,以及做其他必要的处理。
通过MySQL的事务的原子性,购买过程中的每个步骤要么全部成功执行,要么全部失败回滚。即使在处理过程中出现了错误,也可以保证数据库的一致性(库存一致性、订单一致性、支付一致性)和完整性。
2. 在群集的所有机器上安装ClickHouse服务端
官网部署文档:https://clickhouse.com/docs/zh/getting-started/tutorial
RPM软件包下载:https://packages.clickhouse.com/rpm/stable/
hostnamectl set-hostname ck1
hostnamectl set-hostname ck2
hostnamectl set-hostname ck3
hostnamectl set-hostname ck4
cat /etc/hosts
127.0.0.1 localhost
127.0.0.1 vm10-1-248-33.cloud.local

10.1.248.33  ck1
10.1.248.247 ck2
10.1.248.68  ck3
10.1.248.16  ck4
在线安装或者离线安装任选其中一种方式,每台节点都需要安装
各个节点之间要做无密钥登录
2.1. 在线安装clickhouse
推荐使用CentOS、RedHat和所有其他基于rpm的Linux发行版的官方预编译rpm包。
首先,您需要添加官方存储库:
yum install -y yum-utils
yum-config-manager --add-repo https://packages.clickhouse.com/rpm/clickhouse.repo
yum install -y clickhouse-server clickhouse-client
rpm -qa | grep clickhouse-server
clickhouse-server-24.6.2.17-1.x86_64

rpm -qa | grep clickhouse-client
clickhouse-client-24.6.2.17-1.x86_64
/etc/init.d/clickhouse-server start
 chown -R clickhouse: '/var/run/clickhouse-server/'
Will run sudo --preserve-env -u 'clickhouse' /usr/bin/clickhouse-server --config-file /etc/clickhouse-server/config.xml --pid-file /var/run/clickhouse-server/clickhouse-server.pid --daemon
Waiting for server to start
Waiting for server to start
Server started
设置登录密码:
方式一(随机):
PASSWORD=$(base64 < /dev/urandom | head -c8); echo "$PASSWORD"; echo -n "$PASSWORD" | sha256sum | tr -d '-'
xS3UbICi
019a756a1aaf0d0df25f3507978bbb0c375ed97cfa6282832cbc95143e7b7e4e

方式二(指定):
echo -n 123456 | openssl dgst -sha256
<password_sha256_hex>8d969eef6ecad3c29a3a629280e686cf0c3f5d5a86aff3ca12020c923adc6c92</password_sha256_hex>
修改users.xml使密码生效:
vim /etc/clickhouse-server/users.xml
<!-- <password></password> -->   // 注销此行
<password_sha256_hex>019a756a1aaf0d0df25f3507978bbb0c375ed97cfa6282832cbc95143e7b7e4e</password_sha256_hex>
systemctl restart clickhouse-server
systemctl enable clickhouse-server
clickhouse-client    			// 如果没有密码直接使用此命令执行
clickhouse-client --password	// 如果有密码需要指定--password
ClickHouse client version 24.6.2.17 (official build).
Password for user (default):    // 输入密码
Connecting to localhost:9000 as user default.
Connected to ClickHouse server version 24.6.2.

Warnings:
 * Linux transparent hugepages are set to "always". Check /sys/kernel/mm/transparent_hugepage/enabled
 * Maximum number of threads is lower than 30000. There could be problems with handling a lot of simultaneous queries.

clickhouse1 :) quit
Bye.
2.2. 离线安装clickhouse
export LATEST_VERSION=24.6.2.17

curl -O https://packages.clickhouse.com/rpm/stable/clickhouse-client-$LATEST_VERSION.x86_64.rpm
curl -O https://packages.clickhouse.com/rpm/stable/clickhouse-common-static-$LATEST_VERSION.x86_64.rpm
curl -O https://packages.clickhouse.com/rpm/stable/clickhouse-common-static-dbg-$LATEST_VERSION.x86_64.rpm
curl -O https://packages.clickhouse.com/rpm/stable/clickhouse-server-$LATEST_VERSION.x86_64.rpm
clickhouse-common-static :ClickHouse编译的二进制文件。
clickhouse-server :创建clickhouse-server软连接,并安装默认配置服务
clickhouse-client :创建clickhouse-client客户端工具软连接,并安装客户端配置文件。
clickhouse-common-static-dbg :带有调试信息的ClickHouse二进制文件
rpm -ivh clickhouse-common-static-24.6.2.17.x86_64.rpm
rpm -ivh clickhouse-common-static-dbg-24.6.2.17.x86_64.rpm
rpm -ivh clickhouse-client-24.6.2.17.x86_64.rpm
rpm -ivh clickhouse-server-24.6.2.17.x86_64.rpm
ClickHouse binary is already located at /usr/bin/clickhouse
Symlink /usr/bin/clickhouse-server already exists but it points to /clickhouse. Will replace the old symlink to /usr/bin/clickhouse.
Creating symlink /usr/bin/clickhouse-server to /usr/bin/clickhouse.
Symlink /usr/bin/clickhouse-client already exists but it points to /clickhouse. Will replace the old symlink to /usr/bin/clickhouse.
Creating symlink /usr/bin/clickhouse-client to /usr/bin/clickhouse.
Symlink /usr/bin/clickhouse-local already exists but it points to /clickhouse. Will replace the old symlink to /usr/bin/clickhouse.
Creating symlink /usr/bin/clickhouse-local to /usr/bin/clickhouse.
Symlink /usr/bin/clickhouse-benchmark already exists but it points to /clickhouse. Will replace the old symlink to /usr/bin/clickhouse.
Creating symlink /usr/bin/clickhouse-benchmark to /usr/bin/clickhouse.
Symlink /usr/bin/clickhouse-obfuscator already exists but it points to /clickhouse. Will replace the old symlink to /usr/bin/clickhouse.
Creating symlink /usr/bin/clickhouse-obfuscator to /usr/bin/clickhouse.
Creating symlink /usr/bin/clickhouse-git-import to /usr/bin/clickhouse.
Symlink /usr/bin/clickhouse-compressor already exists but it points to /clickhouse. Will replace the old symlink to /usr/bin/clickhouse.
Creating symlink /usr/bin/clickhouse-compressor to /usr/bin/clickhouse.
Symlink /usr/bin/clickhouse-format already exists but it points to /clickhouse. Will replace the old symlink to /usr/bin/clickhouse.
Creating symlink /usr/bin/clickhouse-format to /usr/bin/clickhouse.
Symlink /usr/bin/clickhouse-extract-from-config already exists but it points to /clickhouse. Will replace the old symlink to /usr/bin/clickhouse.
Creating symlink /usr/bin/clickhouse-extract-from-config to /usr/bin/clickhouse.
Symlink /usr/bin/clickhouse-keeper already exists but it points to /clickhouse. Will replace the old symlink to /usr/bin/clickhouse.
Creating symlink /usr/bin/clickhouse-keeper to /usr/bin/clickhouse.
Symlink /usr/bin/clickhouse-keeper-converter already exists but it points to /clickhouse. Will replace the old symlink to /usr/bin/clickhouse.
Creating symlink /usr/bin/clickhouse-keeper-converter to /usr/bin/clickhouse.
Creating symlink /usr/bin/clickhouse-disks to /usr/bin/clickhouse.
Symlink /usr/bin/ch already exists. Will keep it.
Symlink /usr/bin/chl already exists. Will keep it.
Symlink /usr/bin/chc already exists. Will keep it.
Creating clickhouse group if it does not exist.
groupadd -r clickhouse
Creating clickhouse user if it does not exist.
 useradd -r --shell /bin/false --home-dir /nonexistent -g clickhouse clickhouse
Will set ulimits for clickhouse user in /etc/security/limits.d/clickhouse.conf.
Creating config directory /etc/clickhouse-server/config.d that is used for tweaks of main server configuration.
Creating config directory /etc/clickhouse-server/users.d that is used for tweaks of users configuration.
Config file /etc/clickhouse-server/config.xml already exists, will keep it and extract path info from it.
/etc/clickhouse-server/config.xml has /var/lib/clickhouse/ as data path.
/etc/clickhouse-server/config.xml has /var/log/clickhouse-server/ as log path.
Users config file /etc/clickhouse-server/users.xml already exists, will keep it and extract users info from it.
Creating log directory /var/log/clickhouse-server/.
Creating data directory /var/lib/clickhouse/.
Creating pid directory /var/run/clickhouse-server.
 chown -R clickhouse:clickhouse '/var/log/clickhouse-server/'
 chown -R clickhouse:clickhouse '/var/run/clickhouse-server'
 chown  clickhouse:clickhouse '/var/lib/clickhouse/'
Enter password for the default user:     // 输入密码(xS3UbICi)
Password for the default user is saved in file /etc/clickhouse-server/users.d/default-password.xml.
Setting capabilities for clickhouse binary. This is optional.
Cannot set 'net_admin' or 'ipc_lock' or 'sys_nice' or 'net_bind_service' capability for clickhouse binary. This is optional. Taskstats accounting will be disabled. To enable taskstats accounting you may add the required capability later manually.
 chown -R clickhouse:clickhouse '/etc/clickhouse-server'

ClickHouse has been successfully installed.

Start clickhouse-server with:
 sudo clickhouse start

Start clickhouse-client with:
 clickhouse-client --password

Created symlink from /etc/systemd/system/multi-user.target.wants/clickhouse-server.service to /usr/lib/systemd/system/clickhouse-server.service.
查看保存的密码(使用sha256编码格式存储的):
cat /etc/clickhouse-server/users.d/default-password.xml
<clickhouse>
    <users>
        <default>
            <password remove='1' />
            <password_sha256_hex>019a756a1aaf0d0df25f3507978bbb0c375ed97cfa6282832cbc95143e7b7e4e</password_sha256_hex>
        </default>
    </users>
</clickhouse>
启动clickhouse-server:
systemctl start clickhouse-server
[root@clickhouse2 ~]# ps -ef | grep clickhouse
clickho+ 24511     1  0 13:50 ?        00:00:00 clickhouse-watchdog        --config=/etc/clickhouse-server/config.xml --pid-file=/run/clickhouse-server/clickhouse-server.pid
clickho+ 24512 24511 27 13:50 ?        00:00:01 /usr/bin/clickhouse-server --config=/etc/clickhouse-server/config.xml --pid-file=/run/clickhouse-server/clickhouse-server.pid
clickhouse-client --password
ClickHouse client version 24.6.2.17 (official build).
Password for user (default):
Connecting to localhost:9000 as user default.
Connected to ClickHouse server version 24.6.2.

Warnings:
 * Linux transparent hugepages are set to "always". Check /sys/kernel/mm/transparent_hugepage/enabled
 * Maximum number of threads is lower than 30000. There could be problems with handling a lot of simultaneous queries.

clickhouse2 :)
3. ClickHouse Keeper/Zookeeper集群安装
为什么使用zookeeper?不用也可以,但建议还是使用。ClickHouse提供了非常高级的基于zookeeper的表复制方式,同时也提供了基于Cluster的复制方式。
clickhouse keeper可以和clickhouse集群使用相同的主机,也可以单独运行在其他主机上
clickhouse keeper包含在clickhouse软件包中,所以如果clickhouse keeper单独出来部署一个集群,也是需要安装clickhouse-server软件,然后按照如下配置config.xml文件内容,再启动clickhouse-server服务
<listen_host>0.0.0.0</listen_host>
<keeper_server>
    <tcp_port>2181</tcp_port>
    <server_id>1</server_id>     // 每台主机的id不一样

    <raft_configuration>
        <server>
            <id>1</id>
            <hostname>keeper1</hostname>
            <port>9444</port>
        </server>

        <server>
            <id>2</id>
            <hostname>keeper2</hostname>
            <port>9444</port>
        </server>

        <server>
            <id>3</id>
            <hostname>keeper3</hostname>
            <port>9444</port>
        </server>
    </raft_configuration>
</keeper_server>
4. 在配置文件中设置集群配置
ClickHouse的配置主要为config.xml、user.xml
修改config.xml文件:
cp /etc/clickhouse-server/config.xml /etc/clickhouse-server/config.xml.bak
vim /etc/clickhouse-server/config.xml
配置listen_host字段:
<listen_host>0.0.0.0</listen_host>
配置remote_server字段:
找到配置文件中的remote_server标签,发现它里面有很多的内容,我们没有都用到,它只是给我一个例子,把里面的内容都删除,粘贴上我们自己想要的:
配置2个分片,每个分片包含2个副本:
    <remote_servers>
        <cluster1>			// 集群名称
            <shard>
                <replica>
                    <host>ck1</host>
                    <port>9000</port>
                    <user>default</user>
                    <password>123.com</password>
                </replica>
                <replica>
                    <host>ck3</host>
                    <port>9000</port>
                    <user>default</user>
                    <password>123.com</password>
                </replica>
                <internal_replication>true</internal_replication>   // 将内部复制设置为true
            </shard>
            <shard>
                <replica>
                    <host>ck2</host>
                    <port>9000</port>
                    <user>default</user>
                    <password>123.com</password>
                </replica>
                <replica>
                    <host>ck4</host>
                    <port>9000</port>
                    <user>default</user>
                    <password>123.com</password>
                </replica>
                <internal_replication>true</internal_replication>
            </shard>
        </cluster1>
    </remote_servers>
四台配置完成后检查ClickHouse是否在集群系统表中显示新的Cluster集群配置:
ck1 :) SELECT cluster FROM system.clusters;

SELECT cluster
FROM system.clusters

Query id: 0f8461fd-c06c-4a39-8f13-9dee83ada84a

Password for user (default):
Connecting to localhost:9000 as user default.
Connected to ClickHouse server version 24.6.2.

   ┌─cluster──┐
1. │ cluster1 │
2. │ cluster1 │
3. │ cluster1 │
4. │ cluster1 │
   └──────────┘

4 rows in set. Elapsed: 0.002 sec.
配置macros字段: 根据每台机器的分片副本配置:
CK1节点配置如下:
<macros>
    <shard>1</shard>
    <replica>1</replica>
</macros>
修改CK3节点配置如下:
<macros>
    <shard>1</shard>
    <replica>2</replica>
</macros>
修改CK2节点配置如下:
<macros>
    <shard>2</shard>
    <replica>1</replica>
</macros>
修改CK4节点配置如下:
<macros>
    <shard>2</shard>
    <replica>2</replica>
</macros>
配置文件是热更新的,所以修改配置后无需要重启服务
ck1 :) SELECT cluster,shard_num,replica_num,host_name,port FROM system.clusters WHERE cluster = 'cluster1' ORDER BY shard_num ASC,replica_num ASC;

SELECT
    cluster,
    shard_num,
    replica_num,
    host_name,
    port
FROM system.clusters
WHERE cluster = 'cluster1'
ORDER BY
    shard_num ASC,
    replica_num ASC

Query id: 47c42f7b-50b6-4988-bff6-49b9792662ff

   ┌─cluster──┬─shard_num─┬─replica_num─┬─host_name─┬─port─┐
1. │ cluster1 │         1 │           1 │ ck1       │ 9000 │
2. │ cluster1 │         1 │           2 │ ck3       │ 9000 │
3. │ cluster1 │         2 │           1 │ ck2       │ 9000 │
4. │ cluster1 │         2 │           2 │ ck4       │ 9000 │
   └──────────┴───────────┴─────────────┴───────────┴──────┘

4 rows in set. Elapsed: 0.004 sec.
为了集群复制需要配置zookeeper字段:
无论是使用clickhouse keeper还是zookeeper,配置都使用zookeeper节点
    <zookeeper>
        <node>
            <host>10.1.248.23</host>
            <port>2181</port>
        </node>
        <node>
            <host>10.1.248.59</host>
            <port>2181</port>
        </node>
        <node>
            <host>10.1.248.173</host>
            <port>2181</port>
        </node>
    </zookeeper>
配置完成后重启clickhouse,检查并查看zookeeper系统数据库是否存在:
ck1 :) SELECT * FROM system.zookeeper WHERE path IN ('/','clickhouse');

SELECT *
FROM system.zookeeper
WHERE path IN ('/', 'clickhouse')

Query id: cc0bbdb1-60b8-4be6-8f56-b73ad616586b

   ┌─name───────┬─value─┬─path───────┐
1. │ sessions   │       │ clickhouse │
2. │ task_queue │       │ clickhouse │
3. │ zookeeper  │       │ /          │
4. │ clickhouse │       │ /          │
   └────────────┴───────┴────────────┘

4 rows in set. Elapsed: 0.003 sec.
其他clickhouse节点也需要进行同样的配置
在clickhouse中执行的DDL语句在zookeeper中就存在消息队列,查看zookeeper中的消息队列:
[zk: localhost:2181(CONNECTED) 4] ls /clickhouse/task_queue/ddl
[query-0000000000]
删除消息队列:
deleteall /clickhouse/task_queue/ddl
5. 在每个实例上创建本地表
ck1 :) CREATE TABLE default.local_table(EventDate DateTime, Number UInt32, id UInt32 ) ENGINE = MergeTree() PARTITION BY toYYYYMM(EventDate) ORDER BY (Number, EventDate, intHash32(id)) SAMPLE BY intHash32(id);

CREATE TABLE default.local_table
(
    `EventDate` DateTime,
    `Number` UInt32,
    `id` UInt32
)
ENGINE = MergeTree
PARTITION BY toYYYYMM(EventDate)
ORDER BY (Number, EventDate, intHash32(id))
SAMPLE BY intHash32(id)

Query id: f9b0e82d-f288-424b-9d2e-f9ef13b0f389

Ok.

0 rows in set. Elapsed: 0.007 sec.

ck1 :) show tables;

SHOW TABLES

Query id: 3a3c8a9e-5a5c-4e0c-96b5-e71cdd91b819

   ┌─name────────┐
1. │ local_table │
   └─────────────┘

1 row in set. Elapsed: 0.003 sec.
加上on cluster创建一个集群表:
使用on cluster子句对cluster1执行创建数据库的DDL查询,clickhouse将自动在所有4台主机上创建数据库:
ck1 :) CREATE DATABASE my_db ON CLUSTER cluster1;

CREATE DATABASE my_db ON CLUSTER cluster1

Query id: 20cfe4e4-8001-4009-a132-076c0e13c816

   ┌─host─┬─port─┬─status─┬─error─┬─num_hosts_remaining─┬─num_hosts_active─┐
1. │ ck1  │ 9000 │      0 │       │                   3 │                0 │
2. │ ck4  │ 9000 │      0 │       │                   2 │                0 │
3. │ ck2  │ 9000 │      0 │       │                   1 │                0 │
4. │ ck3  │ 9000 │      0 │       │                   0 │                0 │
   └──────┴──────┴────────┴───────┴─────────────────────┴──────────────────┘

4 rows in set. Elapsed: 0.069 sec.
如果创建失败,查看clickhouse日志报如下错误:
tail -f /var/log/clickhouse-server/clickhouse-server.log
2024.07.15 05:02:11.192027 [ 26122 ] {} <Debug> DDLWorker: Scheduling tasks
2024.07.15 05:02:11.192125 [ 26141 ] {} <Debug> DDLWorker: Cleaning queue
2024.07.15 05:02:11.194949 [ 26122 ] {} <Trace> DDLWorker: scheduleTasks: initialized=true, size_before_filtering=5, queue_size=5, entries=query-0000000000..query-0000000004, first_failed_task_name=none, current_tasks_size=0, last_current_task=none, last_skipped_entry_name=query-0000000003
2024.07.15 05:02:11.194979 [ 26122 ] {} <Debug> DDLWorker: Will schedule 1 tasks starting from query-0000000004
2024.07.15 05:02:11.194992 [ 26122 ] {} <Trace> DDLWorker: Checking task query-0000000004
2024.07.15 05:02:11.197936 [ 26122 ] {} <Debug> DDLWorker: Will not execute task query-0000000004: There is no a local address in host list
2024.07.15 05:02:11.197985 [ 26122 ] {} <Debug> DDLWorker: Waiting for queue updates
故障原因是因为我使用的云主机,在
remote_servers的配置中一定要使用网卡的IP地址,不要使用云主机的弹性IP
ck4 :) show databases

SHOW DATABASES

Query id: c8f89ea9-9125-4c47-8ba7-a7937ce5d670

   ┌─name───────────────┐
1. │ INFORMATION_SCHEMA │
2. │ default            │
3. │ information_schema │
4. │ my_db              │
5. │ system             │
   └────────────────────┘

5 rows in set. Elapsed: 0.002 sec.
接下来创建一个复制表,再次使用on cluster子句针对cluster1,clickhouse将自动在每个主机上创建四个表(2个分片2个副本),主机1和主机3上的两个表是两个分片中的一个的两个副本。主机2和主机4上的两个表是另一个分片的副本。
复制型合并树表需要两个参数才可以正常工作,第一个是zookeeper的路径,这是指表的元数据路径,第二个是表的副本名称。所有其其它副本会定期从相同的zookeeper路径中拉取复制日志,他们会注意新的条目并读取它,然后通过内部http复制协议从源副本下载新数据
CREATE TABLE my_db.my_table1 ON CLUSTER cluster1
(
    `WatchID` UInt64,
    `JavaEnable` UInt8,
    `Title` String,
    `GoodEvent` Int16,
    `EventTime` DateTime,
    `EventDate` Date,
    `CounterID` UInt32,
    `ClientIP` UInt32,
    `ClientIP6` FixedString(16),
    `RegionID` UInt32,
    `UserID` UInt64,
    `CounterClass` Int8,
    `OS` UInt8,
    `UserAgent` UInt8,
    `URL` String,
    `Referer` String,
    `URLDomain` String,
    `RefererDomain` String,
    `Refresh` UInt8,
    `IsRobot` UInt8,
    `RefererCategories` Array(UInt16),
    `URLCategories` Array(UInt16),
    `URLRegions` Array(UInt32),
    `RefererRegions` Array(UInt32),
    `ResolutionWidth` UInt16,
    `ResolutionHeight` UInt16,
    `ResolutionDepth` UInt8,
    `FlashMajor` UInt8,
    `FlashMinor` UInt8,
    `FlashMinor2` String,
    `NetMajor` UInt8,
    `NetMinor` UInt8,
    `UserAgentMajor` UInt16,
    `UserAgentMinor` FixedString(2),
    `CookieEnable` UInt8,
    `JavascriptEnable` UInt8,
    `IsMobile` UInt8,
    `MobilePhone` UInt8,
    `MobilePhoneModel` String,
    `Params` String,
    `IPNetworkID` UInt32,
    `TraficSourceID` Int8,
    `SearchEngineID` UInt16,
    `SearchPhrase` String,
    `AdvEngineID` UInt8,
    `IsArtifical` UInt8,
    `WindowClientWidth` UInt16,
    `WindowClientHeight` UInt16,
    `ClientTimeZone` Int16,
    `ClientEventTime` DateTime,
    `SilverlightVersion1` UInt8,
    `SilverlightVersion2` UInt8,
    `SilverlightVersion3` UInt32,
    `SilverlightVersion4` UInt16,
    `PageCharset` String,
    `CodeVersion` UInt32,
    `IsLink` UInt8,
    `IsDownload` UInt8,
    `IsNotBounce` UInt8,
    `FUniqID` UInt64,
    `HID` UInt32,
    `IsOldCounter` UInt8,
    `IsEvent` UInt8,
    `IsParameter` UInt8,
    `DontCountHits` UInt8,
    `WithHash` UInt8,
    `HitColor` FixedString(1),
    `UTCEventTime` DateTime,
    `Age` UInt8,
    `Sex` UInt8,
    `Income` UInt8,
    `Interests` UInt16,
    `Robotness` UInt8,
    `GeneralInterests` Array(UInt16),
    `RemoteIP` UInt32,
    `RemoteIP6` FixedString(16),
    `WindowName` Int32,
    `OpenerName` Int32,
    `HistoryLength` Int16,
    `BrowserLanguage` FixedString(2),
    `BrowserCountry` FixedString(2),
    `SocialNetwork` String,
    `SocialAction` String,
    `HTTPError` UInt16,
    `SendTiming` Int32,
    `DNSTiming` Int32,
    `ConnectTiming` Int32,
    `ResponseStartTiming` Int32,
    `ResponseEndTiming` Int32,
    `FetchTiming` Int32,
    `RedirectTiming` Int32,
    `DOMInteractiveTiming` Int32,
    `DOMContentLoadedTiming` Int32,
    `DOMCompleteTiming` Int32,
    `LoadEventStartTiming` Int32,
    `LoadEventEndTiming` Int32,
    `NSToDOMContentLoadedTiming` Int32,
    `FirstPaintTiming` Int32,
    `RedirectCount` Int8,
    `SocialSourceNetworkID` UInt8,
    `SocialSourcePage` String,
    `ParamPrice` Int64,
    `ParamOrderID` String,
    `ParamCurrency` FixedString(3),
    `ParamCurrencyID` UInt16,
    `GoalsReached` Array(UInt32),
    `OpenstatServiceName` String,
    `OpenstatCampaignID` String,
    `OpenstatAdID` String,
    `OpenstatSourceID` String,
    `UTMSource` String,
    `UTMMedium` String,
    `UTMCampaign` String,
    `UTMContent` String,
    `UTMTerm` String,
    `FromTag` String,
    `HasGCLID` UInt8,
    `RefererHash` UInt64,
    `URLHash` UInt64,
    `CLID` UInt32,
    `YCLID` UInt64,
    `ShareService` String,
    `ShareURL` String,
    `ShareTitle` String,
    `ParsedParams` Nested(
        Key1 String,
        Key2 String,
        Key3 String,
        Key4 String,
        Key5 String,
        ValueDouble Float64),
    `IslandID` FixedString(16),
    `RequestNum` UInt32,
    `RequestTry` UInt8
)
ENGINE = ReplicatedMergeTree ('/clickhouse/tables/my_table1/{shard}', '{replica}')
PRIMARY KEY(CounterID,EventDate,UserID,EventTime,WatchID);

Query id: 4f2bd2f5-1e2f-49b9-bb67-5db6c8842efa

   ┌─host─┬─port─┬─status─┬─error─┬─num_hosts_remaining─┬─num_hosts_active─┐
1. │ ck1  │ 9000 │      0 │       │                   3 │                0 │
2. │ ck4  │ 9000 │      0 │       │                   2 │                0 │
3. │ ck2  │ 9000 │      0 │       │                   1 │                0 │
4. │ ck3  │ 9000 │      0 │       │                   0 │                0 │
   └──────┴──────┴────────┴───────┴─────────────────────┴──────────────────┘

4 rows in set. Elapsed: 0.167 sec.
// 修改数据类型
ALTER table my_db.my_table1_distributed on cluster cluster1 MODIFY COLUMN ClientIP Int64;
建表语句基本语法如下:
CREATE TABLE [IF NOT EXISTS] [db.]table_name ON CLUSTER cluster
(
    name1 [type1] [DEFAULT|MATERIALIZED|ALIAS expr1],
    name2 [type2] [DEFAULT|MATERIALIZED|ALIAS expr2],
    ...
    INDEX index_name1 expr1 TYPE type1(...) GRANULARITY value1,
    INDEX index_name2 expr2 TYPE type2(...) GRANULARITY value2
) ENGINE = engine_name()
[PARTITION BY expr]
[ORDER BY expr]
[PRIMARY KEY expr]
[SAMPLE BY expr]
[SETTINGS name=value, ...];
选项描述:
● db:指定数据库名称,如果当前语句没有包含‘db’,则默认使用当前选择的数据库为‘db’。
● cluster:指定集群名称,目前固定为default。ON CLUSTER 将在每一个节点上都创建一个本地表。
● type:该列数据类型,例如 UInt32。
● DEFAULT:该列缺省值。如果INSERT中不包含指定的列,那么将通过表达式计算它的默认值并填充它。
● MATERIALIZED:物化列表达式,表示该列不能被INSERT,是被计算出来的; 在INSERT语句中,不需要写入该列;在SELECT *查询语句结果集不包含该列。
● ALIAS :别名列,这样的列不会存储在表中。 它的值不能够通过INSERT写入,同时使用SELECT查询星号时,这些列也不会被用来替换星号。 但是它们可以用于SELECT中,在这种情况下,在查询分析中别名将被替换。
物化列与别名列的区别: 物化列是会保存数据,查询的时候不需要计算,而别名列不会保存数据,查询的时候需要计算,查询时候返回表达式的计算结果
以下选项与表引擎相关,只有MergeTree系列表引擎支持:
● PARTITION BY:指定分区键。通常按照日期分区,也可以用其他字段或字段表达式。
● ORDER BY:指定 排序键。可以是一组列的元组或任意的表达式。
● PRIMARY KEY: 指定主键,默认情况下主键跟排序键相同。因此,大部分情况下不需要再专门指定一个 PRIMARY KEY 子句。
● SAMPLE BY :抽样表达式,如果要用抽样表达式,主键中必须包含这个表达式。
● SETTINGS:影响 性能的额外参数。
● GRANULARITY :索引粒度参数。
● {shard},{replica} 参数不需要赋值。
高可用集群(双副本),要用ReplicatedMergeTree等Replicated系列引擎,否则副本之间不进行数据复制,导致数据查询结果不一致。
分别在4个节点都查看下是否同步了新建表:
ck1 :) use my_db;

USE my_db

Query id: 4b1be3f0-f408-41fc-ac85-044190111512

Ok.

0 rows in set. Elapsed: 0.002 sec.

ck1 :) show tables;

SHOW TABLES

Query id: 92639317-9f4d-4dfd-8b6f-25fc475b9cc9

   ┌─name──────┐
1. │ my_table1 │
   └───────────┘

1 row in set. Elapsed: 0.004 sec.
ck2 :) use my_db;

USE my_db

Query id: 732b124f-4c5e-4224-8a40-0dbe6cd45071

Ok.

0 rows in set. Elapsed: 0.002 sec.

ck2 :) show tables;

SHOW TABLES

Query id: 2a6b6ccb-bf35-4542-87a1-3c2125a7c381

   ┌─name──────┐
1. │ my_table1 │
   └───────────┘

1 row in set. Elapsed: 0.004 sec.
ck3 :) use my_db;

USE my_db

Query id: 3282e619-d2b4-4227-9e86-2bef0705e77d

Ok.

0 rows in set. Elapsed: 0.002 sec.

ck3 :) show tables;

SHOW TABLES

Query id: 8352c44e-13e6-435c-aace-c2337e262b4f

   ┌─name──────┐
1. │ my_table1 │
   └───────────┘

1 row in set. Elapsed: 0.006 sec.
ck4 :) use my_db;

USE my_db

Query id: b8e06690-7a12-45a5-bc2c-01d8575a0f1b

Ok.

0 rows in set. Elapsed: 0.002 sec.

ck4 :) show tables;

SHOW TABLES

Query id: 9720c5d2-b8c0-4509-87d3-e426859c56f0

   ┌─name──────┐
1. │ my_table1 │
   └───────────┘

1 row in set. Elapsed: 0.004 sec.
6. 创建一个分布式表
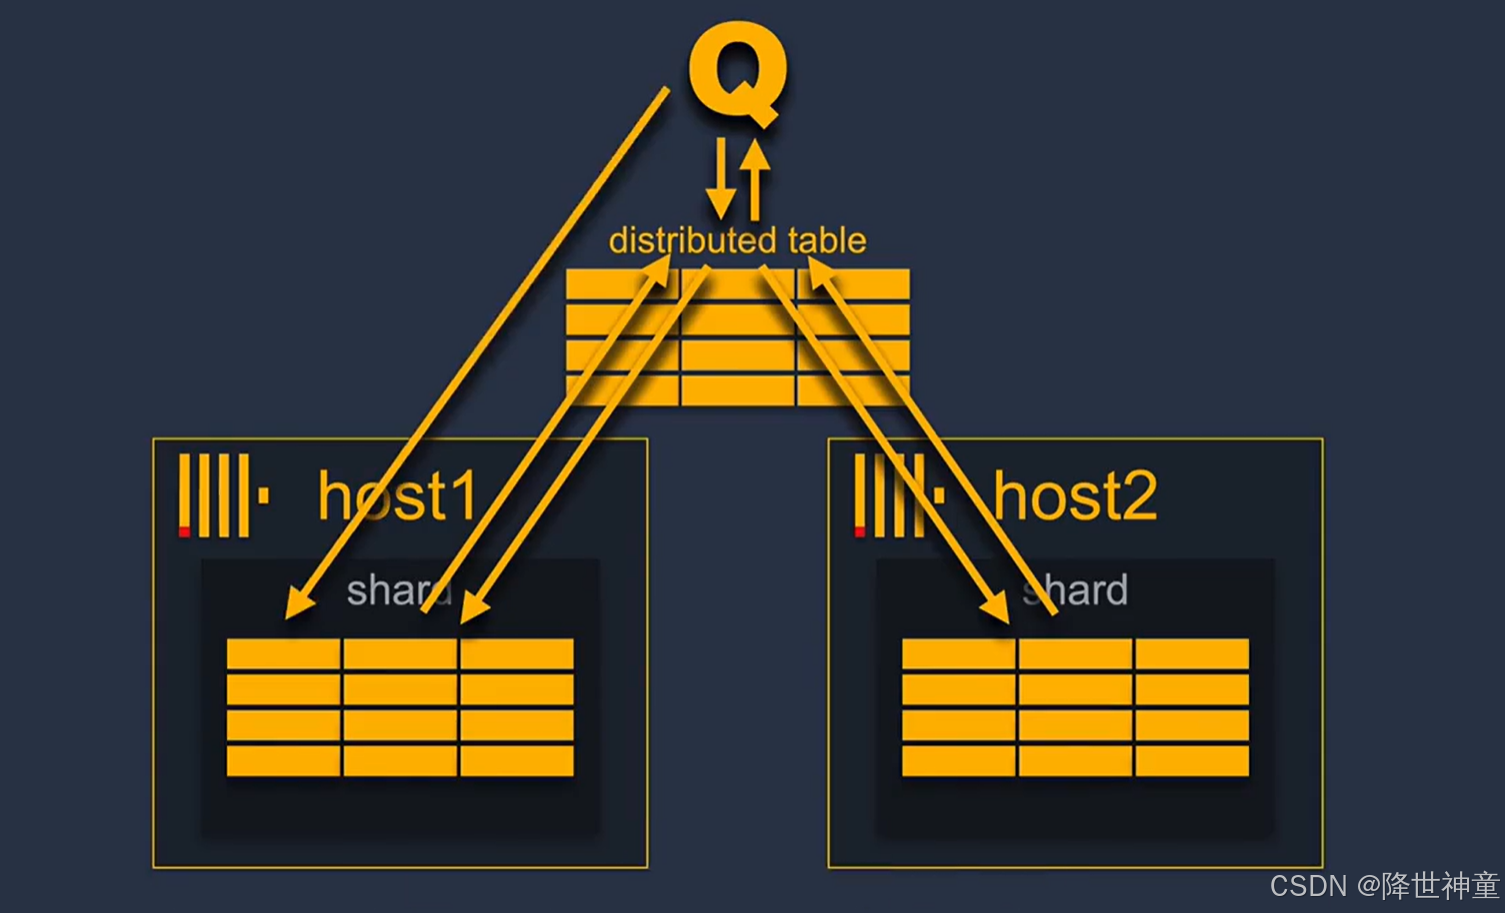
分布式表本身不存储任何数据, 但是它提供了一个单一的表接口,用于统一访问位于不同主机上的远程表。
可以在一台或者多台主机上创建分布式表,当查询针对分布式表时,分布式表会将查询转发给所有主机,等待来自分片的查询结果,然后计算并返回整个查询结果
直接将一个查询发送到其中一个远程表也是可以的,有时出于特定的数据分布原因这样做也是合理的
分片和复制是完全独立的,复制用于数据完整性和自动故障转移,分片用于集群的水平扩展,也可以不使用分片。仅使用复制来保证数据的高度可用
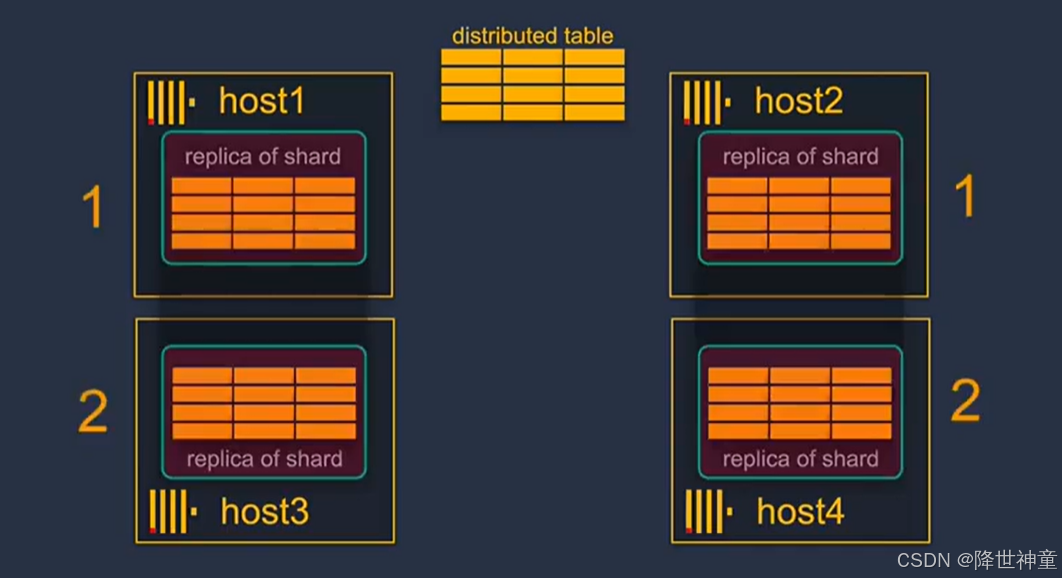
host3主机故障之后,host1也会正常对外提供服务,当host3主机恢复后,host1的会自动同步副本给host3
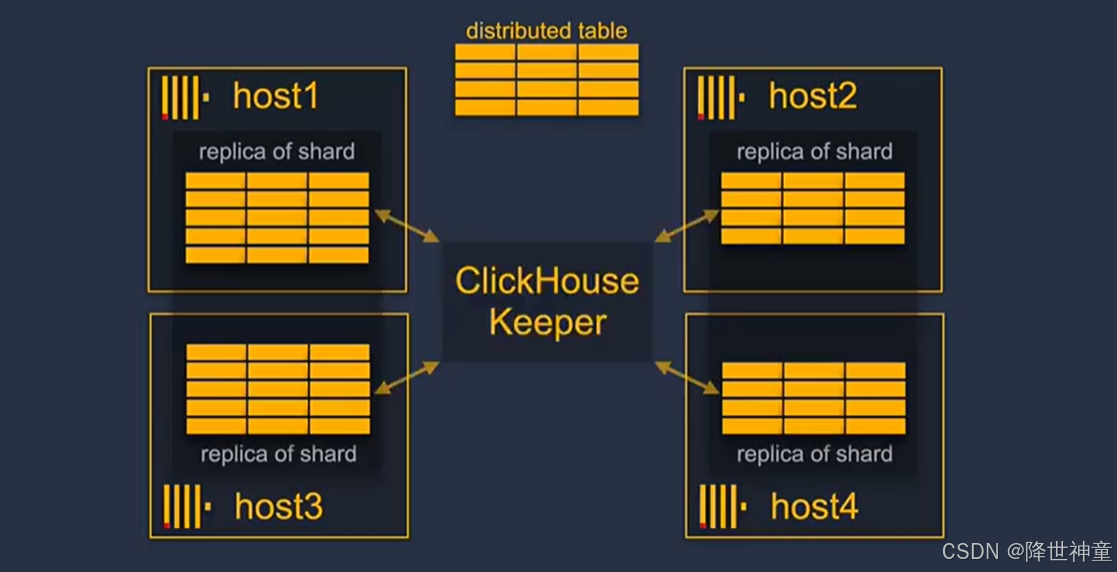
clickhouse keeper或者zookeeper提供了数据复制的协调系统,用于通知分片的副本状态变化,以确保分片的所有副本按照相同的顺序执行相同的操作
clickhouse keeper只在clickhouse中存储元数据
接下来创建一个分布式表,以便位于不同主机上的远程表提供单一表接口的统一登录。可以在一个或者多个主机上创建分布式表:
当分布式表指向当前服务器上创建的表时,可以使用as子句自动采用该表的模式
ck1 :) CREATE TABLE my_db.my_table1_distributed ON CLUSTER cluster1
AS my_db.my_table1
ENGINE = Distributed(cluster1,my_db,my_table1, rand());

CREATE TABLE my_db.my_table1_distributed ON CLUSTER cluster1 AS my_db.my_table1
ENGINE = Distributed(cluster1, my_db, my_table1, rand())

Query id: 4e8d8a6b-defe-4436-bfd8-36c50c888af9

   ┌─host─┬─port─┬─status─┬─error─┬─num_hosts_remaining─┬─num_hosts_active─┐
1. │ ck1  │ 9000 │      0 │       │                   3 │                0 │
2. │ ck2  │ 9000 │      0 │       │                   2 │                0 │
3. │ ck4  │ 9000 │      0 │       │                   1 │                0 │
4. │ ck3  │ 9000 │      0 │       │                   0 │                0 │
   └──────┴──────┴────────┴───────┴─────────────────────┴──────────────────┘

4 rows in set. Elapsed: 0.069 sec.
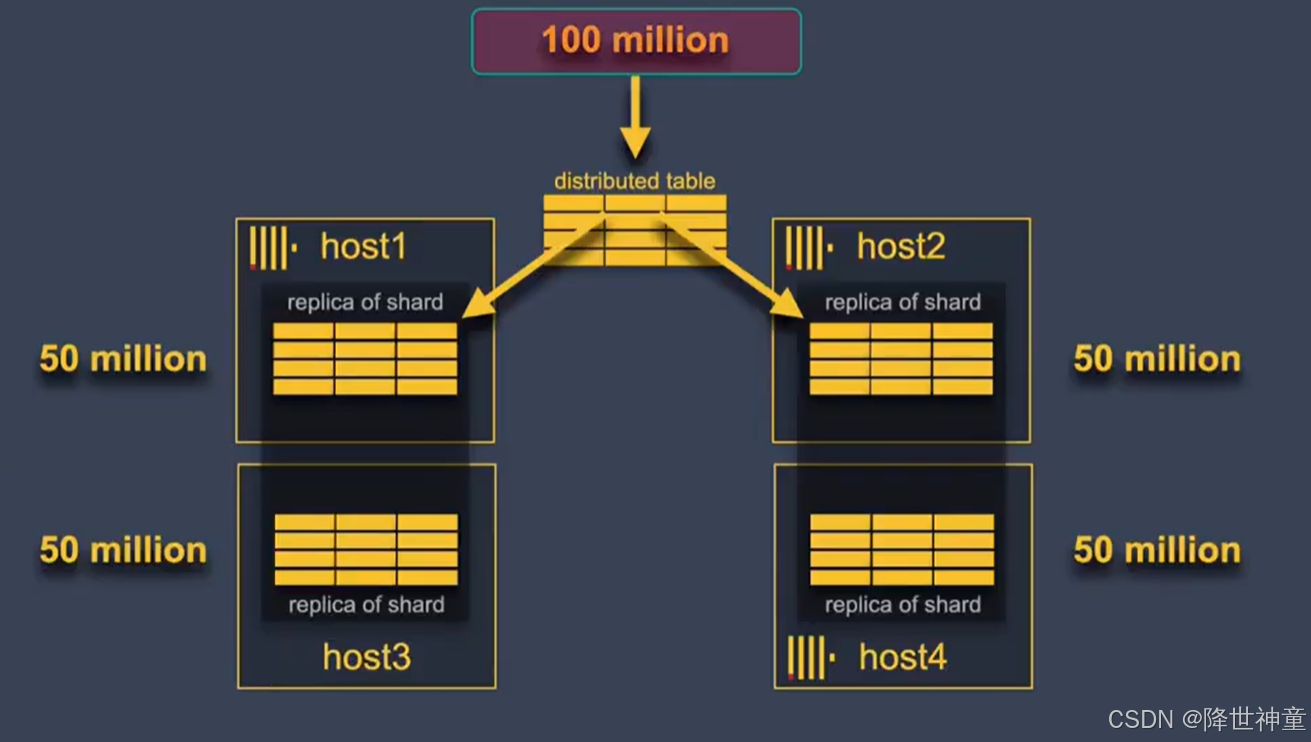
为展示ClickHouse的性能,下载一个ClickBench数据集,包含一亿条记录。接下来将一亿条记录加载到刚才创建的分布式表中。
因为上面创建的分布式表使用了rand()函数作为分布式表的分片键,rand函数返回一个在所有整数中均匀分布的伪随机整数,因此一亿条记录将均匀分布在ClickHouse集群的两个分片上,每个分片应该包含大约五千万条记录,每个分片的两个副本最终应该包含相同的五千万行
ClickBench下载地址:https://github.com/ClickHouse/ClickBench
https://datasets.clickhouse.com/hits_compatible/hits.tsv.gz
wget https://datasets.clickhouse.com/hits_compatible/hits.tsv.gz --no-check-certificate
gzip -d hits.tsv.gz
ls -lh hits.tsv
-rw-r--r-- 1 root root 70G Jul 17 14:10 hits.tsv

clickhouse-client --password --time --query "INSERT INTO my_db.my_table1_distributed FORMAT TSV" < hits.tsv
ck1 :) SELECT formatReadableQuantity(count()) FROM my_db.my_table1_distributed;
接下来发送一个典型的分析查询,将查询发送到分布式表,分布式表将查询转发给分片,更准确的说是转发给每个分片的一个副本,然后它返回一个组合结果
ck3 :) SELECT
           URL,
           COUNT(*) AS PageViews
           FROM my_db.my_table1_distributed
       WHERE
           (CounterID = 62) AND
           (EventDate >= '2013-07-01') AND
           (EventDate <= '2013-07-31') AND
           (DontCountHits = 0) AND
           (Refresh = 0) AND
           (URL != '')
       GROUP BY URL
       ORDER BY PageViews DESC
       LIMIT 10;
7. 同一环境创建多个ClickHouse集群
在该环境下再配置一个cluster2的集群,它由四个非复制的分片组成,可以用于一些非关键任务数据,这些数据需要高吞吐量
    <remote_servers>
        <cluster1>
            <shard>
                <replica>
                    <host>ck1</host>
                    <port>9000</port>
                    <user>default</user>
                    <password>123.com</password>
                </replica>
                <replica>
                    <host>ck3</host>
                    <port>9000</port>
                    <user>default</user>
                    <password>123.com</password>
                </replica>
                <internal_replication>true</internal_replication>
            </shard>
            <shard>
                <replica>
                    <host>ck2</host>
                    <port>9000</port>
                    <user>default</user>
                    <password>123.com</password>
                </replica>
                <replica>
                    <host>ck4</host>
                    <port>9000</port>
                    <user>default</user>
                    <password>123.com</password>
                </replica>
                <internal_replication>true</internal_replication>
            </shard>
        </cluster1>

        <cluster2>
            <shard>
                <replica>
                    <host>ck1</host>
                    <port>9000</port>
                </replica>
                <replica>
                    <host>ck4</host>
                    <port>9000</port>
                    <user>default</user>
                    <password>123.com</password>
                </replica>
                <internal_replication>true</internal_replication>
            </shard>
        </cluster1>

        <cluster2>
            <shard>
                <replica>
                    <host>ck1</host>
                    <port>9000</port>
                    <user>default</user>
                    <password>123.com</password>
                </replica>
            </shard>
            <shard>
                <replica>
                    <host>ck2</host>
                    <port>9000</port>
                    <user>default</user>
                    <password>123.com</password>
                </replica>
            </shard>
            <shard>
                <replica>
                    <host>ck3</host>
                    <port>9000</port>
                    <user>default</user>
                    <password>Newtv123.com</password>
                </replica>
            </shard>
            <shard>
                <replica>
                    <host>ck4</host>
                    <port>9000</port>
                    <user>default</user>
                    <password>123.com</password>
                </replica>
            </shard>
        </cluster2>
    </remote_servers>