一、官方文档
Object Storage Install Guide — Swift 2.29.3.dev5 documentation
二、环境准备
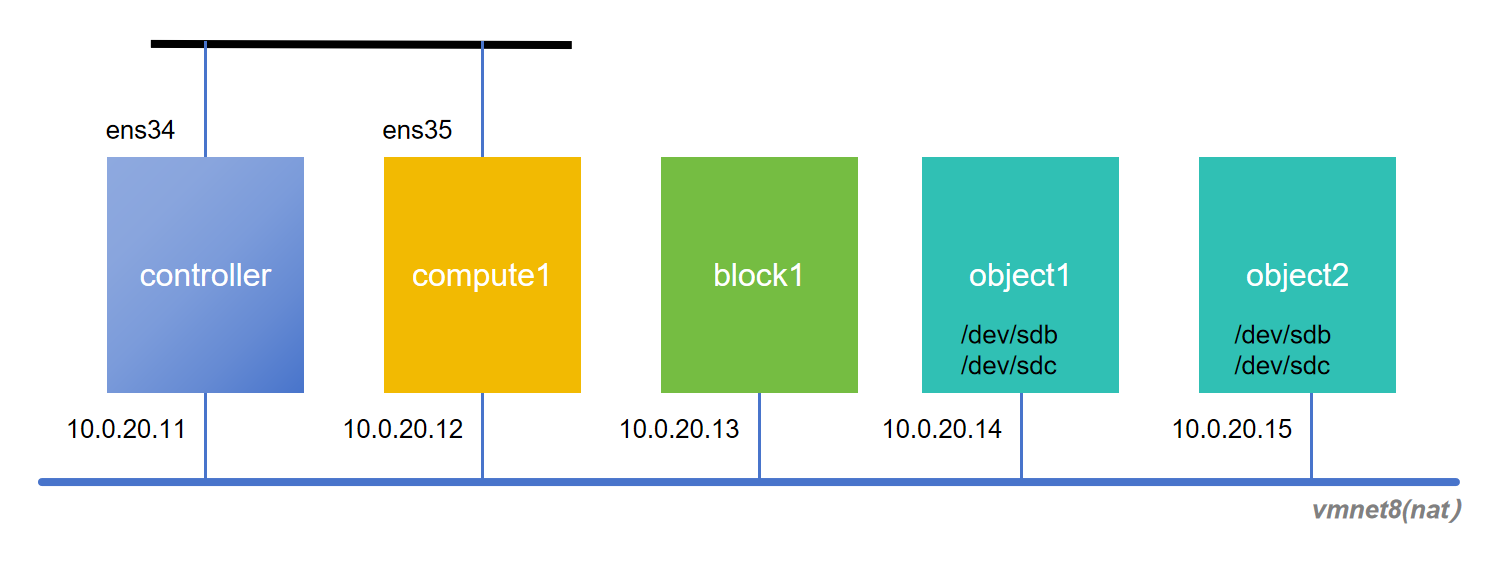
之前的实验,已经有controller, compute1, block1节点,并已经完成Keystone、Glance、Nova、Neutron、Cinder等主要OpenStack Service的安装。
此处新增加object1、object2节点,参考《OpenStack Yoga版安装笔记(二)环境安装》进行环境准备,object1、object2各新增加2块硬盘/dev/sdb,/dev/sdc。
1、安装vim/ping

2、网卡设置
root@object1:~# cat /etc/netplan/00-installer-config.yaml
# This is the network config written by 'subiquity'
network:
  ethernets:
    ens32:
      addresses:
      - 10.0.20.14/24
      nameservers:
        addresses:
        - 10.0.20.2
        search: []
      routes:
      - to: default
        via: 10.0.20.2
  version: 2

3、hostname设置
root@object1:~# hostname
object1

4、/etc/hosts文件修改
root@object1:~# cat /etc/hosts
127.0.0.1 localhost
# 127.0.1.1 host2

# The following lines are desirable for IPv6 capable hosts
::1     ip6-localhost ip6-loopback
fe00::0 ip6-localnet
ff00::0 ip6-mcastprefix
ff02::1 ip6-allnodes
ff02::2 ip6-allrouters

10.0.20.11 controller
10.0.20.12 compute1
10.0.20.13 block1
10.0.20.14 object1
10.0.20.15 object2

5、NTP设置
root@object1:~# cat /etc/chrony/chrony.conf
...
# pool ntp.ubuntu.com        iburst maxsources 4
# pool 0.ubuntu.pool.ntp.org iburst maxsources 1
# pool 1.ubuntu.pool.ntp.org iburst maxsources 1
# pool 2.ubuntu.pool.ntp.org iburst maxsources 2

server controller iburst
...
root@object1:~# chronyc sources
MS Name/IP address         Stratum Poll Reach LastRx Last sample
===============================================================================
^* controller                    3   6   377    44  +2058ns[-4498ns] +/-   28ms
root@object1:~#

6、新增两块硬盘:/dev/sdb,/dev/sdc
root@object1:~# lsblk
NAME                      MAJ:MIN RM  SIZE RO TYPE MOUNTPOINTS
sda                         8:0    0   20G  0 disk
├─sda1                      8:1    0    1M  0 part
├─sda2                      8:2    0  1.8G  0 part /boot
└─sda3                      8:3    0 18.2G  0 part
  └─ubuntu--vg-ubuntu--lv 253:0    0   10G  0 lvm  /
sdb                         8:16   0   20G  0 disk
sdc                         8:32   0   20G  0 disk
sr0                        11:0    1    2G  0 rom
root@object1:~#
三、Object Storage service overview
OpenStack对象存储(Swift)是一个多租户的对象存储系统,具有高度的可扩展性,能够通过RESTful HTTP API以低成本管理大量非结构化数据。其架构模块化,便于扩展和维护。以下是Swift的主要组件及其功能:
1. Proxy servers(swift-proxy-server)
-
功能:接收并处理来自客户端的API请求和raw HTTP请求,负责文件上传、元数据修改和容器创建等操作,同时向Web浏览器提供文件或容器(contaiener的列表。
-
性能优化:可与memcache等缓存系统配合使用,以提高性能。
2. Account servers(swift-account-server)
-
功能:管理在对象存储中定义的账户。
-
数据存储:使用SQLite数据库存储账户信息。
3. Container servers(swift-container-server)
-
功能:管理容器或文件夹在对象存储中的映射关系。
-
数据存储:使用SQLite数据库存储容器信息。
4. Object Servers(swift-object-server)
-
功能:管理存储节点上的实际对象(如文件)。
-
数据存储:将对象存储在磁盘上,并使用扩展文件属性(xattr)存储元数据。
5. Various periodic processes
-
功能:执行对大数据存储的日常维护任务。
-
主要进程:
-
复制服务(replication service):确保数据在集群中的一致性和可用性。
-
审计员(Auditor):检查数据的完整性。
-
更新程序(Updater):更新数据的元信息。
-
回收程序(Reaper):删除过期或无效的数据。
-
6. WSGI middleware
-
功能:处理身份验证,通常与OpenStack身份认证系统(Keystone)结合使用。
7. Swift客户端(swift client)
-
功能:允许用户通过命令行客户端向REST API提交命令,命令可以由admin user、reseller user或swift user授权执行。
8. Swift初始化脚本(swift-init)
-
功能:初始化环文件的构建,接受守护进程名称作为参数,并提供相关命令。
-
文档:详见官方文档。
swift-init是 OpenStack Swift 的初始化脚本,用于管理和启动 Swift 的各个守护进程。它简化了服务的启动、停止、重启等操作,尤其在需要同时管理多个服务时尤为方便。📌 功能概述
swift-init允许管理员通过统一的命令管理 Swift 的各个服务,而无需单独调用每个服务的初始化脚本。它支持对单个服务、多个服务或所有服务进行操作。🛠 常用命令
swift-init的基本语法如下:
swift-init <server> <command>
<server>:指定要操作的服务,可以是以下之一:
proxy:Swift 代理守护进程
account、container、object:分别对应账户、容器和对象服务
all:所有服务
main:主要服务(proxy、account、container、object)
rest:所有 REST 相关服务
<command>:要执行的操作,常见的有:
start:启动服务
stop:停止服务
restart:重启服务
shutdown:优雅地关闭服务
reload:重新加载服务配置
reload-seamless:无缝重新加载服务配置
9. Swift监控工具(swift-recon)
-
功能:用于检索由swift-recon中间件收集的集群指标和遥测信息。
-
用途:帮助管理员监控集群的健康状态。
10. Swift环构建工具(swift-ring-builder)
-
功能:构建和重新平衡存储环。
-
用途:确保数据在集群中的均匀分布。
-
文档:详见官方文档。
swift-ring-builder是 OpenStack Swift 中用于构建和管理存储环(Ring)的命令行工具。存储环是 Swift 存储系统的核心组件,决定了数据如何在集群中分布。通过该工具,管理员可以创建、修改和维护账户、容器和对象服务的环配置。🔧
swift-ring-builder的主要功能
创建环文件:初始化一个新的环配置文件。
swift-ring-builder <ring_file> create <part_power> <replicas> <min_part_hours>
<ring_file>:环配置文件的名称,如account.builder、container.builder或object.builder。
<part_power>:分区数量的指数(2 的幂次方)。
<replicas>:每个分区的副本数量。
<min_part_hours>:在重新分配分区之前,分区必须存在的最短时间(以小时为单位)。添加设备到环中:将存储节点的设备添加到环配置中。
swift-ring-builder <ring_file> add --region <region> --zone <zone> --ip <ip> --port <port> --device <device> --weight <weight>
<region>:设备所在的区域编号。
<zone>:设备所在的可用区编号。
<ip>:设备的管理 IP 地址。
<port>:服务端口号(如 6000、6001、6002)。
<device>:设备名称(如sda、sdb)。
<weight>:设备的权重,影响分区的分配比例。重平衡环:根据当前的设备配置重新分配分区,以确保数据均匀分布。
swift-ring-builder <ring_file> rebalance写入环文件:生成
.ring.gz文件,供 Swift 服务使用。swift-ring-builder <ring_file> write_ring- 验证环配置:检查环配置的有效性。
swift-ring-builder <ring_file> validate
🧠 理解环参数
part_power:决定分区数量的指数,2^part_power即为总分区数。
replicas:每个分区的副本数量,影响数据的冗余度。
min_part_hours:分区在被重新分配之前必须存在的最短时间,有助于减少频繁的分区迁移。
⚠️ 使用建议
备份
.builder文件:在修改环配置之前,建议备份.builder文件,以防止数据丢失。定期重平衡:在添加或移除设备后,执行重平衡操作,确保数据均匀分布。
监控环状态:使用
swift-ring-builder <ring_file> validate检查环配置的有效性。
Swift的架构设计强调高可用性、高持久性和高并发性,适用于大规模数据存储需求。通过上述组件的协作,Swift能够提供可靠的对象存储服务。
四、Configure networking
在前面环境准备中已完成。
五、Install and configure the controller node(选择Ubuntu)
本节描述如何安装和配置proxy service。在 OpenStack Swift 中,代理服务(Proxy Service)是连接客户端请求与后端存储服务的关键组件。它负责处理账户(Account)、容器(Container)和对象(Object)服务的请求,并将请求路由到相应的存储节点。
为了简单起见,本指南在控制节点上安装和配置代理服务。然而,您可以在任何能够连接到存储节点网络的节点上运行代理服务。此外,您还可以在多个节点上安装和配置代理服务,以提高性能和冗余性。
5.1 Prerequisites
在 OpenStack Swift 中,代理服务(Proxy Server)负责处理账户、容器和对象服务的请求。虽然它通常依赖于身份认证与授权机制(如 OpenStack Identity 服务),但也提供了一个内部机制,使其在没有其他 OpenStack 服务的情况下也能运行。在配置对象存储服务之前,必须创建服务凭证和 API 端点。
注:对象存储服务不在控制节点上使用SQL数据库,而是使用每个存储节点上的分布式SQLite数据库。
在 OpenStack Swift 中,对象存储服务(Object Storage) 的架构设计强调去中心化和高可用性。与许多传统存储系统依赖集中式 SQL 数据库不同,Swift 采用分布式 SQLite 数据库,分别部署在每个存储节点上,以管理账户、容器和对象的元数据。
1、Source the admin credentials to gain access to admin-only CLI commands:
root@osclient:~# source admin-openrc
root@osclient ~(admin/amdin)# cat admin-openrc
export OS_PROJECT_DOMAIN_NAME=Default
export OS_USER_DOMAIN_NAME=Default
export OS_PROJECT_NAME=admin
export OS_USERNAME=admin
export OS_PASSWORD=openstack
export OS_AUTH_URL=http://controller:5000/v3
export OS_IDENTITY_API_VERSION=3
export OS_IMAGE_API_VERSION=2
export PS1='\u@\h \W(admin/amdin)\$ '
root@osclient ~(admin/amdin)#
2、To create the Identity service credentials, complete these steps:
- Create the
swiftuser:
root@osclient ~(admin/amdin)# openstack user create --domain default --password-prompt swift
User Password:
Repeat User Password:
+---------------------+----------------------------------+
| Field               | Value                            |
+---------------------+----------------------------------+
| domain_id           | default                          |
| enabled             | True                             |
| id                  | fc098317d7ed4e2cbe2e4a80886c3109 |
| name                | swift                            |
| options             | {}                               |
| password_expires_at | None                             |
+---------------------+----------------------------------+
root@osclient ~(admin/amdin)#- Add the
adminrole to theswiftuser:
root@osclient ~(admin/amdin)# openstack role add --project service --user swift admin
root@osclient ~(admin/amdin)# - Create the
swiftservice entity:
root@osclient ~(admin/amdin)# openstack service create --name swift \
>   --description "OpenStack Object Storage" object-store
+-------------+----------------------------------+
| Field       | Value                            |
+-------------+----------------------------------+
| description | OpenStack Object Storage         |
| enabled     | True                             |
| id          | 2df36ab13b3f452bad5f7a2faecca327 |
| name        | swift                            |
| type        | object-store                     |
+-------------+----------------------------------+
root@osclient ~(admin/amdin)#
3、Create the Object Storage service API endpoints:
root@osclient ~(admin/amdin)# openstack endpoint create --region RegionOne \
>   object-store public http://controller:8080/v1/AUTH_%\(project_id\)s
+--------------+-----------------------------------------------+
| Field        | Value                                         |
+--------------+-----------------------------------------------+
| enabled      | True                                          |
| id           | 2a487d3946fa4393a0b7232703f1be39              |
| interface    | public                                        |
| region       | RegionOne                                     |
| region_id    | RegionOne                                     |
| service_id   | 2df36ab13b3f452bad5f7a2faecca327              |
| service_name | swift                                         |
| service_type | object-store                                  |
| url          | http://controller:8080/v1/AUTH_%(project_id)s |
+--------------+-----------------------------------------------+
root@osclient ~(admin/amdin)# openstack endpoint create --region RegionOne \
>   object-store internal http://controller:8080/v1/AUTH_%\(project_id\)s
+--------------+-----------------------------------------------+
| Field        | Value                                         |
+--------------+-----------------------------------------------+
| enabled      | True                                          |
| id           | 87dae0b29b8f4f3385e7f9f831351d56              |
| interface    | internal                                      |
| region       | RegionOne                                     |
| region_id    | RegionOne                                     |
| service_id   | 2df36ab13b3f452bad5f7a2faecca327              |
| service_name | swift                                         |
| service_type | object-store                                  |
| url          | http://controller:8080/v1/AUTH_%(project_id)s |
+--------------+-----------------------------------------------+
root@osclient ~(admin/amdin)# openstack endpoint create --region RegionOne \
>   object-store admin http://controller:8080/v1
+--------------+----------------------------------+
| Field        | Value                            |
+--------------+----------------------------------+
| enabled      | True                             |
| id           | 33632ba9186848299ff0e712134269ce |
| interface    | admin                            |
| region       | RegionOne                        |
| region_id    | RegionOne                        |
| service_id   | 2df36ab13b3f452bad5f7a2faecca327 |
| service_name | swift                            |
| service_type | object-store                     |
| url          | http://controller:8080/v1        |
+--------------+----------------------------------+
root@osclient ~(admin/amdin)#
在 OpenStack Swift 的默认配置中,端口 8080 是用于对象存储服务的 代理服务(
swift-proxy-server)的端口。具体来说,代理服务会接收客户端的请求,处理对象存储的 API 请求,并将请求路由到后端的存储节点。其他端口(如 6000、6001、6002):用于 Swift 存储节点的对象服务、容器服务和账户服务。
5.2 Install and configure components
1、Install the packages(出现问题并解决):
root@controller:~# apt-get install swift swift-proxy python-swiftclient \
>   python-keystoneclient python-keystonemiddleware \
>   memcached
Reading package lists... Done
Building dependency tree... Done
Reading state information... Done
E: Unable to locate package python-swiftclient
E: Unable to locate package python-keystoneclient
E: Unable to locate package python-keystonemiddleware
root@controller:~# 将python改为python3(参考:https://www.server-world.info/en/note?os=Ubuntu_22.04&p=openstack_bobcat3&f=12):
root@controller:~# apt-get install swift swift-proxy python3-swiftclient \
>   python3-keystoneclient python3-keystonemiddleware \
>   memcached
Reading package lists... Done
Building dependency tree... Done
Reading state information... Done
python3-keystoneclient is already the newest version (1:4.4.0-0ubuntu1).
python3-keystoneclient set to manually installed.
python3-swiftclient is already the newest version (1:3.13.1-0ubuntu1).
python3-swiftclient set to manually installed.
memcached is already the newest version (1.6.14-1ubuntu0.1).
python3-keystonemiddleware is already the newest version (9.4.0-0ubuntu1.1).
python3-keystonemiddleware set to manually installed.
The following additional packages will be installed:
  liberasurecode1 libgf-complete1 libjerasure2 python3-pyeclib python3-swift python3-xattr
Suggested packages:
  libisal2 swift-bench
The following NEW packages will be installed:
  liberasurecode1 libgf-complete1 libjerasure2 python3-pyeclib python3-swift python3-xattr swift swift-proxy
0 upgraded, 8 newly installed, 0 to remove and 110 not upgraded.
Need to get 907 kB of archives.
After this operation, 4909 kB of additional disk space will be used.
Do you want to continue? [Y/n] y
Get:1 http://cn.archive.ubuntu.com/ubuntu jammy/main amd64 liberasurecode1 amd64 1.6.2-1build2 [43.3 kB]
Get:2 http://cn.archive.ubuntu.com/ubuntu jammy/main amd64 python3-pyeclib amd64 1.6.0-7build1 [28.6 kB]
Get:3 http://cn.archive.ubuntu.com/ubuntu jammy/main amd64 libgf-complete1 amd64 1.0.2+2017.04.10.git.ea75cdf-7build1 [70.2 kB]
Get:4 http://cn.archive.ubuntu.com/ubuntu jammy/main amd64 libjerasure2 amd64 2.0.0+2017.04.10.git.de1739cc84-2build2 [29.3 kB]
Get:5 http://cn.archive.ubuntu.com/ubuntu jammy/main amd64 python3-xattr amd64 0.9.7-1build4 [16.3 kB]
Get:6 http://cn.archive.ubuntu.com/ubuntu jammy-updates/main amd64 python3-swift all 2.29.2-0ubuntu1 [653 kB]
Get:7 http://cn.archive.ubuntu.com/ubuntu jammy-updates/main amd64 swift all 2.29.2-0ubuntu1 [26.7 kB]
Get:8 http://cn.archive.ubuntu.com/ubuntu jammy-updates/main amd64 swift-proxy all 2.29.2-0ubuntu1 [39.1 kB]
Fetched 907 kB in 5s (188 kB/s)
debconf: delaying package configuration, since apt-utils is not installed
Selecting previously unselected package liberasurecode1:amd64.
(Reading database ... 168181 files and directories currently installed.)
Preparing to unpack .../0-liberasurecode1_1.6.2-1build2_amd64.deb ...
Unpacking liberasurecode1:amd64 (1.6.2-1build2) ...
Selecting previously unselected package python3-pyeclib.
Preparing to unpack .../1-python3-pyeclib_1.6.0-7build1_amd64.deb ...
Unpacking python3-pyeclib (1.6.0-7build1) ...
Selecting previously unselected package libgf-complete1:amd64.
Preparing to unpack .../2-libgf-complete1_1.0.2+2017.04.10.git.ea75cdf-7build1_amd64.deb ...
Unpacking libgf-complete1:amd64 (1.0.2+2017.04.10.git.ea75cdf-7build1) ...
Selecting previously unselected package libjerasure2:amd64.
Preparing to unpack .../3-libjerasure2_2.0.0+2017.04.10.git.de1739cc84-2build2_amd64.deb ...
Unpacking libjerasure2:amd64 (2.0.0+2017.04.10.git.de1739cc84-2build2) ...
Selecting previously unselected package python3-xattr.
Preparing to unpack .../4-python3-xattr_0.9.7-1build4_amd64.deb ...
Unpacking python3-xattr (0.9.7-1build4) ...
Selecting previously unselected package python3-swift.
Preparing to unpack .../5-python3-swift_2.29.2-0ubuntu1_all.deb ...
Unpacking python3-swift (2.29.2-0ubuntu1) ...
Selecting previously unselected package swift.
Preparing to unpack .../6-swift_2.29.2-0ubuntu1_all.deb ...
Unpacking swift (2.29.2-0ubuntu1) ...
Selecting previously unselected package swift-proxy.
Preparing to unpack .../7-swift-proxy_2.29.2-0ubuntu1_all.deb ...
Unpacking swift-proxy (2.29.2-0ubuntu1) ...
Setting up python3-xattr (0.9.7-1build4) ...
Setting up liberasurecode1:amd64 (1.6.2-1build2) ...
Setting up libgf-complete1:amd64 (1.0.2+2017.04.10.git.ea75cdf-7build1) ...
Setting up libjerasure2:amd64 (2.0.0+2017.04.10.git.de1739cc84-2build2) ...
Setting up python3-pyeclib (1.6.0-7build1) ...
Setting up python3-swift (2.29.2-0ubuntu1) ...
Setting up swift (2.29.2-0ubuntu1) ...
Setting up swift-proxy (2.29.2-0ubuntu1) ...
Created symlink /etc/systemd/system/multi-user.target.wants/swift-proxy.service → /lib/systemd/system/swift-proxy.service.
Processing triggers for libc-bin (2.35-0ubuntu3.9) ...
debconf: unable to initialize frontend: Dialog
debconf: (No usable dialog-like program is installed, so the dialog based frontend cannot be used. at /usr/share/perl5/Debconf/FrontEnd/Dialog.pm line 78.)
debconf: falling back to frontend: Readline
Scanning processes...
Scanning linux images...

Running kernel seems to be up-to-date.

No services need to be restarted.

No containers need to be restarted.

No user sessions are running outdated binaries.

No VM guests are running outdated hypervisor (qemu) binaries on this host.
root@controller:~#
b. Create the /etc/swift directory
目录已经存在。
root@controller:/etc/swift# ls
account-server.conf  container-server.conf  object-expirer.conf  object-server.conf
c. Obtain the proxy service configuration file from the Object Storage source repository:
root@controller:/etc/swift# curl -o /etc/swift/proxy-server.conf https://opendev.org/openstack/swift/raw/branch/master/etc/proxy-server.conf-sample
  % Total    % Received % Xferd  Average Speed   Time    Time     Time  Current
                                 Dload  Upload   Total   Spent    Left  Speed
100 62649  100 62649    0     0  63461      0 --:--:-- --:--:-- --:--:-- 63409
root@controller:/etc/swift# ls
account-server.conf  container-server.conf  object-expirer.conf  object-server.conf  proxy-server.conf
root@controller:/etc/swift#
d. Edit the /etc/swift/proxy-server.conf file and complete the following actions:
- In the
[DEFAULT]section, configure the bind port, user, and configuration directory:
[DEFAULT]
...
bind_port = 8080
user = swift
swift_dir = /etc/swift
...
- In the
[pipeline:main]section, remove thetempurlandtempauthmodules and add theauthtokenandkeystoneauthmodules:
[pipeline:main]
...
# pipeline = catch_errors gatekeeper healthcheck proxy-logging cache listing_formats container_sync bulk tempurl ratelimit tempauth copy container-quotas account-quotas slo dlo versioned_writes symlink proxy-logging proxy-server
pipeline = catch_errors gatekeeper healthcheck proxy-logging cache container_sync bulk ratelimit authtoken keystoneauth container-quotas account-quotas slo dlo versioned_writes proxy-logging proxy-server
...- In the
[app:proxy-server]section, enable automatic account creation:
[app:proxy-server]
use = egg:swift#proxy
account_autocreate = True- In the
[filter:keystoneauth]section, configure the operator roles:
[filter:keystoneauth]
use = egg:swift#keystoneauth
operator_roles = admin,myrole <--需要添加需要的role,这里添加“myrole"
use = egg:swift#keystoneauth指定使用 Swift 自带的 Keystone 认证中间件,它会拦截 API 请求,将 Keystone 的令牌与 Swift 账户映射并进行权限校验 OpenStack 文档。
operator_roles列表中的角色(逗号分隔)定义了哪些 Keystone 角色被视为“操作者”角色,只有当用户在其项目(tenant)中拥有其中任一角色时,才允许访问或操作该项目对应的 Swift 账户(如列出容器、创建容器等)。若将
operator_roles = admin,user,则具有admin或user角色的 Keystone 用户都可以对对应项目下的 Swift 账户进行操作。通常,user是普通租户用户的默认角色,而admin则是管理角色由于在之前,已经创建“myuser" user以 "myrole" role访问”myproject" project,这里需要增加“myrole" role,以便后续使用。
- In the
[filter:authtoken]section, configure Identity service access:
[filter:authtoken]
paste.filter_factory = keystonemiddleware.auth_token:filter_factory
www_authenticate_uri = http://controller:5000
auth_url = http://controller:5000
memcached_servers = controller:11211
auth_type = password
project_domain_id = default
user_domain_id = default
project_name = service
username = swift
password = openstack
delay_auth_decision = True- In the
[filter:cache]section, configure thememcachedlocation:
[filter:cache]
use = egg:swift#memcache
memcache_servers = controller:11211
六、Install and configure the storage nodes(选择Ubuntu)
本节描述了如何安装和配置运行Account、Container和Object服务的存储节点。为了简单起见,此配置引用了两个存储节点,每个节点包含两个空的本地块存储设备。说明中使用了/dev/sdb和/dev/sdc,但您可以根据您的特定节点替换为不同的值。
虽然对象存储支持任何具有扩展属性(xattr)的文件系统,但测试和基准测试表明,XFS在性能和可靠性方面表现最佳。有关水平扩展环境的更多信息,请参阅部署指南。
6.1 Prerequisites
在存储节点上安装和配置对象存储服务(Object Storage Service)之前,您必须先准备好存储设备。
注:每个存储节点都需要执行这些步骤。
6.1.1 object1先决条件
1. Install the supporting utility packages:
root@object1:~#  apt-get install xfsprogs rsync
Reading package lists... Done
Building dependency tree... Done
Reading state information... Done
Suggested packages:
  python3-braceexpand xfsdump acl attr quota
The following NEW packages will be installed:
  rsync
The following packages will be upgraded:
  xfsprogs
1 upgraded, 1 newly installed, 0 to remove and 61 not upgraded.
Need to get 1308 kB of archives.
After this operation, 814 kB of additional disk space will be used.
Get:1 http://archive.ubuntu.com/ubuntu jammy-updates/main amd64 rsync amd64 3.2.7-0ubuntu0.22.04.4 [437 kB]
Get:2 http://archive.ubuntu.com/ubuntu jammy-updates/main amd64 xfsprogs amd64 5.13.0-1ubuntu2.1 [870 kB]
Fetched 1308 kB in 4s (370 kB/s)
debconf: delaying package configuration, since apt-utils is not installed
Selecting previously unselected package rsync.
(Reading database ... 101894 files and directories currently installed.)
Preparing to unpack .../rsync_3.2.7-0ubuntu0.22.04.4_amd64.deb ...
Unpacking rsync (3.2.7-0ubuntu0.22.04.4) ...
Preparing to unpack .../xfsprogs_5.13.0-1ubuntu2.1_amd64.deb ...
Unpacking xfsprogs (5.13.0-1ubuntu2.1) over (5.13.0-1ubuntu2) ...
Setting up xfsprogs (5.13.0-1ubuntu2.1) ...
update-initramfs: deferring update (trigger activated)
Setting up rsync (3.2.7-0ubuntu0.22.04.4) ...
rsync.service is a disabled or a static unit, not starting it.
Processing triggers for libc-bin (2.35-0ubuntu3.9) ...
Processing triggers for initramfs-tools (0.140ubuntu13.4) ...
update-initramfs: Generating /boot/initrd.img-5.15.0-136-generic
debconf: unable to initialize frontend: Dialog
debconf: (No usable dialog-like program is installed, so the dialog based frontend cannot be used. at /usr/share/perl5/Debconf/FrontEnd/Dialog.pm line 78.)
debconf: falling back to frontend: Readline
Scanning processes...
Scanning linux images...

Running kernel seems to be up-to-date.

No services need to be restarted.

No containers need to be restarted.

No user sessions are running outdated binaries.

No VM guests are running outdated hypervisor (qemu) binaries on this host.
root@object1:~#
xfsprogs:是一个包含 XFS 文件系统工具的软件包。XFS 是一种高性能的文件系统,常用于需要大容量存储和高吞吐量的场景。xfsprogs提供了用于创建、管理和维护 XFS 文件系统的工具,例如mkfs.xfs(用于格式化 XFS 文件系统)和xfs_db(用于调试 XFS 文件系统)。
rsync:是一个用于同步文件和目录的工具,支持本地和远程同步。它通过比较文件的大小和修改时间来高效地同步数据,仅传输发生变化的部分,从而节省时间和带宽。rsync常用于备份、镜像和数据迁移等场景。在对象存储服务(如 OpenStack Swift)的部署中,
xfsprogs用于格式化存储设备为 XFS 文件系统,而rsync可能用于数据同步或其他相关操作。
2. Format the /dev/sdb and /dev/sdc devices as XFS:
root@object1:~# mkfs.xfs /dev/sdb
meta-data=/dev/sdb               isize=512    agcount=4, agsize=1310720 blks
         =                       sectsz=512   attr=2, projid32bit=1
         =                       crc=1        finobt=1, sparse=1, rmapbt=0
         =                       reflink=1    bigtime=0 inobtcount=0
data     =                       bsize=4096   blocks=5242880, imaxpct=25
         =                       sunit=0      swidth=0 blks
naming   =version 2              bsize=4096   ascii-ci=0, ftype=1
log      =internal log           bsize=4096   blocks=2560, version=2
         =                       sectsz=512   sunit=0 blks, lazy-count=1
realtime =none                   extsz=4096   blocks=0, rtextents=0
root@object1:~# mkfs.xfs /dev/sdc
meta-data=/dev/sdc               isize=512    agcount=4, agsize=1310720 blks
         =                       sectsz=512   attr=2, projid32bit=1
         =                       crc=1        finobt=1, sparse=1, rmapbt=0
         =                       reflink=1    bigtime=0 inobtcount=0
data     =                       bsize=4096   blocks=5242880, imaxpct=25
         =                       sunit=0      swidth=0 blks
naming   =version 2              bsize=4096   ascii-ci=0, ftype=1
log      =internal log           bsize=4096   blocks=2560, version=2
         =                       sectsz=512   sunit=0 blks, lazy-count=1
realtime =none                   extsz=4096   blocks=0, rtextents=0
root@object1:~#
3. Create the mount point directory structure:
root@object1:~# mkdir -p /srv/node/sdb
root@object1:~# mkdir -p /srv/node/sdc
root@object1:~#
-p:是mkdir的一个选项,表示递归创建目录。如果目标路径中的某些中间目录不存在,-p选项会自动创建这些中间目录,确保最终路径能够成功创建。在 OpenStack Swift 的部署中,
/srv/node/sdb目录可能被用作存储对象数据的挂载点,或者用于存放与该存储设备相关的索引和元数据。
4. Find the UUID of the new partitions:
root@object1:~# blkid
/dev/sr0: BLOCK_SIZE="2048" UUID="2024-02-16-23-52-30-00" LABEL="Ubuntu-Server 22.04.4 LTS amd64" TYPE="iso9660" PTTYPE="PMBR"
/dev/mapper/ubuntu--vg-ubuntu--lv: UUID="25617d2f-0882-4c87-8946-da5a2ea9aa40" BLOCK_SIZE="4096" TYPE="ext4"
/dev/sda2: UUID="b1700072-ccb5-44aa-92b0-2ef041c3b62e" BLOCK_SIZE="4096" TYPE="ext4" PARTUUID="d4e50be8-05b8-4321-9573-40e6b76c00e8"
/dev/sda3: UUID="2PHsFv-fjte-CEay-sfKx-HkST-9U0s-hHOitW" TYPE="LVM2_member" PARTUUID="ae32aeb7-bed1-4d81-b7ae-4ce0d23ee252"
/dev/sdb: UUID="d760b7ed-e476-4afa-9ff8-eff2e85095bd" BLOCK_SIZE="512" TYPE="xfs"
/dev/sdc: UUID="8f76817c-6812-424a-ae0b-02b88719e484" BLOCK_SIZE="512" TYPE="xfs"
/dev/sda1: PARTUUID="8e25ab6a-e3f5-4885-aa99-e2df0c2363f7"
root@object1:~#
5. Edit the /etc/fstab file and add the following to it:
root@object1:~# vi /etc/fstab
# /etc/fstab: static file system information.
#
# Use 'blkid' to print the universally unique identifier for a
# device; this may be used with UUID= as a more robust way to name devices
# that works even if disks are added and removed. See fstab(5).
#
# <file system> <mount point>   <type>  <options>       <dump>  <pass>
# / was on /dev/ubuntu-vg/ubuntu-lv during curtin installation
/dev/disk/by-id/dm-uuid-LVM-gpAAX0VN55VQhctf2KC2IWzccIxI6LrTtoIY7oEheHYOVX7LaS7krjxWkAe71soK / ext4 defaults 0 1
# /boot was on /dev/sda2 during curtin installation
/dev/disk/by-uuid/b1700072-ccb5-44aa-92b0-2ef041c3b62e /boot ext4 defaults 0 1
UUID="d760b7ed-e476-4afa-9ff8-eff2e85095bd" /srv/node/sdb xfs noatime 0 2
UUID="8f76817c-6812-424a-ae0b-02b88719e484" /srv/node/sdc xfs noatime 0 2
这段内容是
/etc/fstab文件的内容,它定义了系统启动时自动挂载的文件系统以及挂载的选项。以下是逐行解释:
# <file system> <mount point> <type> <options> <dump> <pass>
这是一条注释,说明了
/etc/fstab文件中每一列的含义:
<file system>:文件系统的设备或标识符(如 UUID 或设备路径)。
<mount point>:挂载点路径。
<type>:文件系统类型(如 ext4、xfs 等)。
<options>:挂载选项。
<dump>:用于备份工具的备份选项(通常设置为 0)。
<pass>:在启动时进行文件系统检查的顺序(通常设置为 1 或 2,根文件系统为 1,其他文件系统为 2)。
UUID="d760b7ed-e476-4afa-9ff8-eff2e85095bd" /srv/node/sdb xfs noatime 0 2
这一行定义了
/srv/node/sdb的挂载信息:
设备标识符:
UUID="d760b7ed-e476-4afa-9ff8-eff2e85095bd"(通过 UUID 指定设备)。挂载点:
/srv/node/sdb。文件系统类型:
xfs。挂载选项:
noatime(不更新文件的访问时间戳,可以提高性能)。
<dump>:0。
<pass>:2(表示在启动时会进行文件系统检查,但优先级低于根文件系统)。
6. Mount the devices:
root@object1:~# mount /srv/node/sdb
root@object1:~# mount /srv/node/sdc
7. Create or edit the /etc/rsyncd.conf file to contain the following:
root@object1:~# vi /etc/rsyncd.conf

uid = swift
gid = swift
log file = /var/log/rsyncd.log
pid file = /var/run/rsyncd.pid
address = 10.0.20.14

[account]
max connections = 2
path = /srv/node/
read only = False
lock file = /var/lock/account.lock

[container]
max connections = 2
path = /srv/node/
read only = False
lock file = /var/lock/container.lock

[object]
max connections = 2
path = /srv/node/
read only = False
lock file = /var/lock/object.lock
注:rsync 服务不需要进行身份验证,因此在生产环境中,建议将其运行在私有网络上。
8. Edit the /etc/default/rsync file and enable the rsync service:
root@object1:~# ls /etc/default/rsync
/etc/default/rsync
root@object1:~# vi /etc/default/rsync
...
RSYNC_ENABLE=true
...
9. Start the rsync service:
root@object1:~# service rsync start
root@object1:~#
6.1.2 object2先决条件
1、
root@object2:~# apt-get install xfsprogs rsync

2、
root@object2:~# mkfs.xfs /dev/sdb
meta-data=/dev/sdb               isize=512    agcount=4, agsize=1310720 blks
         =                       sectsz=512   attr=2, projid32bit=1
         =                       crc=1        finobt=1, sparse=1, rmapbt=0
         =                       reflink=1    bigtime=0 inobtcount=0
data     =                       bsize=4096   blocks=5242880, imaxpct=25
         =                       sunit=0      swidth=0 blks
naming   =version 2              bsize=4096   ascii-ci=0, ftype=1
log      =internal log           bsize=4096   blocks=2560, version=2
         =                       sectsz=512   sunit=0 blks, lazy-count=1
realtime =none                   extsz=4096   blocks=0, rtextents=0
root@object2:~# mkfs.xfs /dev/sdc
meta-data=/dev/sdc               isize=512    agcount=4, agsize=1310720 blks
         =                       sectsz=512   attr=2, projid32bit=1
         =                       crc=1        finobt=1, sparse=1, rmapbt=0
         =                       reflink=1    bigtime=0 inobtcount=0
data     =                       bsize=4096   blocks=5242880, imaxpct=25
         =                       sunit=0      swidth=0 blks
naming   =version 2              bsize=4096   ascii-ci=0, ftype=1
log      =internal log           bsize=4096   blocks=2560, version=2
         =                       sectsz=512   sunit=0 blks, lazy-count=1
realtime =none                   extsz=4096   blocks=0, rtextents=0
root@object2:~#

3、
root@object2:~# mkdir -p /srv/node/sdb
root@object2:~# mkdir -p /srv/node/sdc
root@object2:~#

4、
root@object2:~# blkid
/dev/sr0: BLOCK_SIZE="2048" UUID="2024-02-16-23-52-30-00" LABEL="Ubuntu-Server 22.04.4 LTS amd64" TYPE="iso9660" PTTYPE="PMBR"
/dev/mapper/ubuntu--vg-ubuntu--lv: UUID="25617d2f-0882-4c87-8946-da5a2ea9aa40" BLOCK_SIZE="4096" TYPE="ext4"
/dev/sda2: UUID="b1700072-ccb5-44aa-92b0-2ef041c3b62e" BLOCK_SIZE="4096" TYPE="ext4" PARTUUID="d4e50be8-05b8-4321-9573-40e6b76c00e8"
/dev/sda3: UUID="2PHsFv-fjte-CEay-sfKx-HkST-9U0s-hHOitW" TYPE="LVM2_member" PARTUUID="ae32aeb7-bed1-4d81-b7ae-4ce0d23ee252"
/dev/sdb: UUID="70e984de-a7eb-4c77-a6d7-0d71fe6e87c4" BLOCK_SIZE="512" TYPE="xfs"
/dev/sdc: UUID="a68ad547-cfcf-49ab-b722-7ee12ce9c044" BLOCK_SIZE="512" TYPE="xfs"
/dev/sda1: PARTUUID="8e25ab6a-e3f5-4885-aa99-e2df0c2363f7"
root@object2:~#

5、
root@object2:~# vi /etc/fstab
# /etc/fstab: static file system information.
#
# Use 'blkid' to print the universally unique identifier for a
# device; this may be used with UUID= as a more robust way to name devices
# that works even if disks are added and removed. See fstab(5).
#
# <file system> <mount point>   <type>  <options>       <dump>  <pass>
# / was on /dev/ubuntu-vg/ubuntu-lv during curtin installation
/dev/disk/by-id/dm-uuid-LVM-gpAAX0VN55VQhctf2KC2IWzccIxI6LrTtoIY7oEheHYOVX7LaS7krjxWkAe71soK / ext4 defaults 0 1
# /boot was on /dev/sda2 during curtin installation
/dev/disk/by-uuid/b1700072-ccb5-44aa-92b0-2ef041c3b62e /boot ext4 defaults 0 1
UUID="70e984de-a7eb-4c77-a6d7-0d71fe6e87c4" /srv/node/sdb xfs noatime 0 2
UUID="a68ad547-cfcf-49ab-b722-7ee12ce9c044" /srv/node/sdc xfs noatime 0 2

6、
root@object2:~# mount /srv/node/sdb
root@object2:~# mount /srv/node/sdc
root@object2:~#

7、
root@object2:~# vi /etc/rsyncd.conf
         uid = swift
gid = swift
log file = /var/log/rsyncd.log
pid file = /var/run/rsyncd.pid
address = 10.0.20.15

[account]
max connections = 2
path = /srv/node/
read only = False
lock file = /var/lock/account.lock

[container]
max connections = 2
path = /srv/node/
read only = False
lock file = /var/lock/container.lock

[object]
max connections = 2
path = /srv/node/
read only = False
lock file = /var/lock/object.lock

8、
root@object2:~# vi /etc/default/rsync
...
RSYNC_ENABLE=true
...

9、
root@object2:~# service rsync start
root@object2:~#
6.2 Install and configure components
注:每个存储节点都需要执行这些步骤。
6.2.1 object1安装配置
1. Install the packages:(安装过程有出错信息,未解决)
root@object1:~# apt-get install swift swift-account swift-container swift-object执行过程有报错信息,暂时无解决办法。
root@object1:~# apt-get install swift swift-account swift-container swift-object
...
Setting up swift-account (2.29.2-0ubuntu1) ...
Created symlink /etc/systemd/system/multi-user.target.wants/swift-account-auditor.service → /lib/systemd/system/swift-account-auditor.service.
Could not execute systemctl:  at /usr/bin/deb-systemd-invoke line 142.
Created symlink /etc/systemd/system/multi-user.target.wants/swift-account-reaper.service → /lib/systemd/system/swift-account-reaper.service.
Could not execute systemctl:  at /usr/bin/deb-systemd-invoke line 142.
Created symlink /etc/systemd/system/multi-user.target.wants/swift-account-replicator.service → /lib/systemd/system/swift-account-replicator.service.
Could not execute systemctl:  at /usr/bin/deb-systemd-invoke line 142.
Created symlink /etc/systemd/system/multi-user.target.wants/swift-account.service → /lib/systemd/system/swift-account.service.
Could not execute systemctl:  at /usr/bin/deb-systemd-invoke line 142.
Setting up swift-container (2.29.2-0ubuntu1) ...
Created symlink /etc/systemd/system/multi-user.target.wants/swift-container-auditor.service → /lib/systemd/system/swift-container-auditor.service.
Could not execute systemctl:  at /usr/bin/deb-systemd-invoke line 142.
Created symlink /etc/systemd/system/multi-user.target.wants/swift-container-reconciler.service → /lib/systemd/system/swift-container-reconciler.service.
Created symlink /etc/systemd/system/multi-user.target.wants/swift-container-replicator.service → /lib/systemd/system/swift-container-replicator.service.
Could not execute systemctl:  at /usr/bin/deb-systemd-invoke line 142.
Created symlink /etc/systemd/system/multi-user.target.wants/swift-container-sharder.service → /lib/systemd/system/swift-container-sharder.service.
Could not execute systemctl:  at /usr/bin/deb-systemd-invoke line 142.
Created symlink /etc/systemd/system/multi-user.target.wants/swift-container-sync.service → /lib/systemd/system/swift-container-sync.service.
Could not execute systemctl:  at /usr/bin/deb-systemd-invoke line 142.
Created symlink /etc/systemd/system/multi-user.target.wants/swift-container-updater.service → /lib/systemd/system/swift-container-updater.service.
Could not execute systemctl:  at /usr/bin/deb-systemd-invoke line 142.
Created symlink /etc/systemd/system/multi-user.target.wants/swift-container.service → /lib/systemd/system/swift-container.service.
Could not execute systemctl:  at /usr/bin/deb-systemd-invoke line 142.
Setting up swift (2.29.2-0ubuntu1) ...
Setting up swift-object (2.29.2-0ubuntu1) ...
Created symlink /etc/systemd/system/multi-user.target.wants/swift-object-auditor.service → /lib/systemd/system/swift-object-auditor.service.
Could not execute systemctl:  at /usr/bin/deb-systemd-invoke line 142.
Created symlink /etc/systemd/system/multi-user.target.wants/swift-object-reconstructor.service → /lib/systemd/system/swift-object-reconstructor.service.
Could not execute systemctl:  at /usr/bin/deb-systemd-invoke line 142.
Created symlink /etc/systemd/system/multi-user.target.wants/swift-object-replicator.service → /lib/systemd/system/swift-object-replicator.service.
Could not execute systemctl:  at /usr/bin/deb-systemd-invoke line 142.
Created symlink /etc/systemd/system/multi-user.target.wants/swift-object-updater.service → /lib/systemd/system/swift-object-updater.service.
Could not execute systemctl:  at /usr/bin/deb-systemd-invoke line 142.
Created symlink /etc/systemd/system/multi-user.target.wants/swift-object.service → /lib/systemd/system/swift-object.service.
Could not execute systemctl:  at /usr/bin/deb-systemd-invoke line 142.
debconf: unable to initialize frontend: Dialog
debconf: (No usable dialog-like program is installed, so the dialog based frontend cannot be used. at /usr/share/perl5/Debconf/FrontEnd/Dialog.pm line 78.)
debconf: falling back to frontend: Readline
Scanning processes...
Scanning linux images...
...
2、Obtain the accounting, container, and object service configuration files from the Object Storage source repository:
root@object1:/etc/swift# curl -o /etc/swift/container-server.conf https://opendev.org/openstack/swift/raw/branch/master/etc/container-server.conf-sample
  % Total    % Received % Xferd  Average Speed   Time    Time     Time  Current
                                 Dload  Upload   Total   Spent    Left  Speed
100 23165  100 23165    0     0  18922      0  0:00:01  0:00:01 --:--:-- 18925
root@object1:/etc/swift#

root@object1:/etc/swift# curl -o /etc/swift/object-server.conf https://opendev.org/openstack/swift/raw/branch/master/etc/object-server.conf-sample
  % Total    % Received % Xferd  Average Speed   Time    Time     Time  Current
                                 Dload  Upload   Total   Spent    Left  Speed
100 34028  100 34028    0     0  32302      0  0:00:01  0:00:01 --:--:-- 32315

root@object1:/etc/swift# curl -o /etc/swift/object-server.conf https://opendev.org/openstack/swift/raw/branch/master/etc/object-server.conf-sample
  % Total    % Received % Xferd  Average Speed   Time    Time     Time  Current
                                 Dload  Upload   Total   Spent    Left  Speed
100 34028  100 34028    0     0  37240      0 --:--:-- --:--:-- --:--:-- 37229
root@object1:/etc/swift#

root@object1:/etc/swift# ls
account-server.conf  account-server.conf.bak  container-server.conf  container-server.conf.bak  object-expirer.conf  object-server.conf  object-server.conf.bak
root@object1:/etc/swift#
3. Edit the /etc/swift/account-server.conf file and complete the following actions:
root@object1:~# vi /etc/swift/account-server.conf

[DEFAULT]
bind_ip = 10.0.20.14
user = swift
swift_dir = /etc/swift
devices = /srv/node
mount_check = True
bind_port = 6202
...
[pipeline:main]
# pipeline = healthcheck recon backend_ratelimit account-server
pipeline = healthcheck recon account-server
...
[filter:recon]
use = egg:swift#recon
recon_cache_path = /var/cache/swift
...
4. Edit the /etc/swift/container-server.conf file and complete the following actions:
root@object1:~# vi /etc/swift/container-server.conf

[DEFAULT]
bind_ip = 10.0.20.14
bind_port = 6201
user = swift
swift_dir = /etc/swift
devices = /srv/node
mount_check = True
...
[pipeline:main]
# pipeline = healthcheck recon backend_ratelimit container-server
pipeline = healthcheck recon container-server
...
[filter:recon]
use = egg:swift#recon
recon_cache_path = /var/cache/swift
5. Edit the /etc/swift/object-server.conf file and complete the following actions:
root@object1:~# vi /etc/swift/object-server.conf

[DEFAULT]
bind_ip = 10.0.20.14
bind_port = 6200
user = swift
swift_dir = /etc/swift
devices = /srv/node
mount_check = True
...
[pipeline:main]
# pipeline = healthcheck recon backend_ratelimit object-server
pipeline = healthcheck recon object-server
...
[filter:recon]
use = egg:swift#recon
recon_cache_path = /var/cache/swift
recon_lock_path = /var/lock
6. Ensure proper ownership of the mount point directory structure:
root@object1:~# chown -R swift:swift /srv/node
root@object1:~# ls -l /srv/node
total 0
drwxr-xr-x 2 swift swift 6 Apr 19 02:23 sdb
drwxr-xr-x 2 swift swift 6 Apr 19 02:23 sdc
root@object1:~#
7. Create the recon directory and ensure proper ownership of it:
root@object1:~# mkdir -p /var/cache/swift
root@object1:~# chown -R root:swift /var/cache/swift
root@object1:~# chmod -R 775 /var/cache/swift
root@object1:~# ls -l /var/cache/swift
total 0
root@object1:~# ls -l /var/cache
total 36
drwxr-xr-x 3 root      root   4096 Feb 16  2024 PackageKit
drwxr-xr-x 3 root      root   4096 Aug 11  2024 apparmor
drwxr-xr-x 3 root      root   4096 Apr 19 03:22 apt
drwxr-xr-x 2 root      root   4096 Apr 19 03:22 debconf
drwx------ 2 root      root   4096 Apr 19 03:21 ldconfig
drwxr-x--- 2 pollinate daemon 4096 Aug 11  2024 pollinate
drwx------ 2 root      root   4096 Feb 16  2024 private
drwxr-xr-x 2 root      root   4096 Apr 18 22:50 snapd
drwxrwxr-x 2 root      swift  4096 Feb  8  2023 swift
root@object1:~#
6.2.2 object2安装配置
1、
root@object2:~# apt-get install swift swift-account swift-container swift-object
(有相同报错信息)

2、
root@object2:~# curl -o /etc/swift/account-server.conf https://opendev.org/openstack/swift/raw/branch/master/etc/account-server.conf-sample
  % Total    % Received % Xferd  Average Speed   Time    Time     Time  Current
                                 Dload  Upload   Total   Spent    Left  Speed
100 13445  100 13445    0     0  15897      0 --:--:-- --:--:-- --:--:-- 15892
root@object2:~# curl -o /etc/swift/container-server.conf https://opendev.org/openstack/swift/raw/branch/master/etc/container-server.conf-sample
  % Total    % Received % Xferd  Average Speed   Time    Time     Time  Current
                                 Dload  Upload   Total   Spent    Left  Speed
100 23165  100 23165    0     0  18894      0  0:00:01  0:00:01 --:--:-- 18910
root@object2:~# curl -o /etc/swift/object-server.conf https://opendev.org/openstack/swift/raw/branch/master/etc/object-server.conf-sample
  % Total    % Received % Xferd  Average Speed   Time    Time     Time  Current
                                 Dload  Upload   Total   Spent    Left  Speed
100 34028  100 34028    0     0  32231      0  0:00:01  0:00:01 --:--:-- 32254
root@object2:~#

3、
root@object2:~# vi /etc/swift/account-server.conf

[DEFAULT]
bind_ip = 10.0.20.15
bind_port = 6202
user = swift
swift_dir = /etc/swift
devices = /srv/node
mount_check = True
...
[pipeline:main]
# pipeline = healthcheck recon backend_ratelimit account-server
pipeline = healthcheck recon account-server
...
[filter:recon]
use = egg:swift#recon
recon_cache_path = /var/cache/swift

4、
root@object2:~# vi /etc/swift/container-server.conf

[DEFAULT]
bind_ip = 10.0.20.15
bind_port = 6201
user = swift
swift_dir = /etc/swift
devices = /srv/node
mount_check = True
...
[pipeline:main]
# pipeline = healthcheck recon backend_ratelimit container-server
pipeline = healthcheck recon container-server
...
[filter:recon]
use = egg:swift#recon
recon_cache_path = /var/cache/swift

5、
root@object2:~# vi /etc/swift/object-server.conf
[DEFAULT]
bind_ip = 10.0.20.15
bind_port = 6200
user = swift
swift_dir = /etc/swift
devices = /srv/node
mount_check = True
...
[pipeline:main]
# pipeline = healthcheck recon backend_ratelimit object-server
pipeline = healthcheck recon object-server
...
[filter:recon]
use = egg:swift#recon
recon_cache_path = /var/cache/swift
recon_lock_path = /var/lock

6、
root@object2:~# chown -R swift:swift /srv/node
root@object2:~# ls -l /srv/node
total 0
drwxr-xr-x 2 swift swift 6 Apr 19 03:46 sdb
drwxr-xr-x 2 swift swift 6 Apr 19 03:46 sdc
root@object2:~#

7、
root@object2:~# mkdir -p /var/cache/swift
root@object2:~# chown -R root:swift /var/cache/swift
root@object2:~# chmod -R 775 /var/cache/swift
root@object2:~# ls -l /var/cache
total 36
drwxr-xr-x 3 root      root   4096 Feb 16  2024 PackageKit
drwxr-xr-x 3 root      root   4096 Aug 11  2024 apparmor
drwxr-xr-x 3 root      root   4096 Apr 19 06:06 apt
drwxr-xr-x 2 root      root   4096 Apr 19 06:06 debconf
drwx------ 2 root      root   4096 Apr 19 06:06 ldconfig
drwxr-x--- 2 pollinate daemon 4096 Aug 11  2024 pollinate
drwx------ 2 root      root   4096 Feb 16  2024 private
drwxr-xr-x 2 root      root   4096 Apr 18 22:50 snapd
drwxrwxr-x 2 root      swift  4096 Feb  8  2023 swift
root@object2:~#
七、Create and distribute initial rings
在启动Object Storage Services之前,您必须创建初始的账户、容器和对象环(initial account, container, and object ring)。环构建器(ring builder)会创建每个节点用于确定和部署存储架构的配置文件。
为了简单起见,本指南使用一个区域和两个存储区,最大分区数为 2^10(1024),每个对象有 3 个副本,分区移动的最小间隔时间为 1 小时。(1个region,2个zone,2^10 maximum partitions,3 replicas of each object)
对于对象存储,分区(partition)表示存储设备上的一个目录,而不是传统意义上的分区表。有关更多信息,请参阅部署指南。
注:在控制节点执行这些步骤
7.1 Create account ring
The account server uses the account ring to maintain lists of containers.
1. Change to the /etc/swift directory.
2. Create the base account.builder file:
root@controller:~# cd /etc/swift
root@controller:/etc/swift# swift-ring-builder account.builder create 10 3 1
root@controller:/etc/swift#
3. Add each storage node to the ring:
root@controller:/etc/swift# swift-ring-builder account.builder add \
>   --region 1 --zone 1 --ip 10.0.20.14 --port 6202 --device sdb --weight 100
Device d0r1z1-10.0.20.14:6202R10.0.20.14:6202/sdb_"" with 100.0 weight got id 0
root@controller:/etc/swift# swift-ring-builder account.builder add \
>   --region 1 --zone 1 --ip 10.0.20.14 --port 6202 --device sdc --weight 100
Device d1r1z1-10.0.20.14:6202R10.0.20.14:6202/sdc_"" with 100.0 weight got id 1
root@controller:/etc/swift# swift-ring-builder account.builder add \
>   --region 1 --zone 2 --ip 10.0.20.15 --port 6202 --device sdb --weight 100
Device d2r1z2-10.0.20.15:6202R10.0.20.15:6202/sdb_"" with 100.0 weight got id 2
root@controller:/etc/swift# swift-ring-builder account.builder add \
>   --region 1 --zone 2 --ip 10.0.20.15 --port 6202 --device sdc --weight 100
Device d3r1z2-10.0.20.15:6202R10.0.20.15:6202/sdc_"" with 100.0 weight got id 3
root@controller:/etc/swift#
4. Verify the ring contents:
root@controller:/etc/swift# swift-ring-builder account.builder
account.builder, build version 4, id 87a8bdffe7e24adea2fa9f3896ee1524
1024 partitions, 3.000000 replicas, 1 regions, 2 zones, 4 devices, 100.00 balance, 0.00 dispersion
The minimum number of hours before a partition can be reassigned is 1 (0:00:00 remaining)
The overload factor is 0.00% (0.000000)
Ring file account.ring.gz not found, probably it hasn't been written yet
Devices:   id region zone ip address:port replication ip:port  name weight partitions balance flags meta
            0      1    1 10.0.20.14:6202     10.0.20.14:6202   sdb 100.00          0 -100.00
            1      1    1 10.0.20.14:6202     10.0.20.14:6202   sdc 100.00          0 -100.00
            2      1    2 10.0.20.15:6202     10.0.20.15:6202   sdb 100.00          0 -100.00
            3      1    2 10.0.20.15:6202     10.0.20.15:6202   sdc 100.00          0 -100.00
root@controller:/etc/swift#
Ring file account.ring.gz not found, probably it hasn't been written yet
提示没有找到
account.ring.gz文件,这通常是因为环文件尚未生成。在构建环的过程中,swift-ring-builder会生成.ring.gz文件,用于存储环的最终配置。这段输出显示了账户环的构建状态。目前,所有设备的分区数量为 0,平衡度为 -100.00,表示分区尚未分配到设备上。下一步通常需要运行
swift-ring-builder的rebalance命令来重新分配分区,确保它们均匀分布到各个设备上。
5. Rebalance the ring:
root@controller:/etc/swift#  swift-ring-builder account.builder rebalance
Reassigned 3072 (300.00%) partitions. Balance is now 0.00.  Dispersion is now 0.00
root@controller:/etc/swift#
在 Swift 的环配置中,分区数量是预先定义的,通常设置为 2^10(1024)、2^18 或其他 2 的幂次方值。在你的例子中,初始分区数量是 1024。但是,当你运行
swift-ring-builder account.builder rebalance命令时,输出显示重新分配了 3072 个分区。这是因为在 Swift 中,分区数量实际上是初始分区数量乘以副本数量。
7.2 Create container ring
The container server uses the container ring to maintain lists of objects. However, it does not track object locations.
1. Change to the /etc/swift directory.
2. Create the base container.builder file:
root@controller:/etc/swift# swift-ring-builder container.builder create 10 3 1
root@controller:/etc/swift#
3. Add each storage node to the ring:
root@controller:/etc/swift# swift-ring-builder container.builder add \
>   --region 1 --zone 1 --ip 10.0.20.14 --port 6201 --device sdb --weight 100
Device d0r1z1-10.0.20.14:6201R10.0.20.14:6201/sdb_"" with 100.0 weight got id 0
root@controller:/etc/swift# swift-ring-builder container.builder add \
>   --region 1 --zone 1 --ip 10.0.20.14 --port 6201 --device sdc --weight 100
Device d1r1z1-10.0.20.14:6201R10.0.20.14:6201/sdc_"" with 100.0 weight got id 1
root@controller:/etc/swift# swift-ring-builder container.builder add \
>   --region 1 --zone 2 --ip 10.0.20.15 --port 6201 --device sdb --weight 100
Device d2r1z2-10.0.20.15:6201R10.0.20.15:6201/sdb_"" with 100.0 weight got id 2
root@controller:/etc/swift# swift-ring-builder container.builder add \
>   --region 1 --zone 2 --ip 10.0.20.15 --port 6201 --device sdc --weight 100
Device d3r1z2-10.0.20.15:6201R10.0.20.15:6201/sdc_"" with 100.0 weight got id 3
root@controller:/etc/swift#
4. Verify the ring contents:
root@controller:/etc/swift# swift-ring-builder container.builder
container.builder, build version 4, id b46c41f56ebe4e0fa95b17cccc34cbe5
1024 partitions, 3.000000 replicas, 1 regions, 2 zones, 4 devices, 100.00 balance, 0.00 dispersion
The minimum number of hours before a partition can be reassigned is 1 (0:00:00 remaining)
The overload factor is 0.00% (0.000000)
Ring file container.ring.gz not found, probably it hasn't been written yet
Devices:   id region zone ip address:port replication ip:port  name weight partitions balance flags meta
            0      1    1 10.0.20.14:6201     10.0.20.14:6201   sdb 100.00          0 -100.00
            1      1    1 10.0.20.14:6201     10.0.20.14:6201   sdc 100.00          0 -100.00
            2      1    2 10.0.20.15:6201     10.0.20.15:6201   sdb 100.00          0 -100.00
            3      1    2 10.0.20.15:6201     10.0.20.15:6201   sdc 100.00          0 -100.00
root@controller:/etc/swift#
5. Rebalance the ring:
root@controller:/etc/swift# swift-ring-builder container.builder rebalance
Reassigned 3072 (300.00%) partitions. Balance is now 0.00.  Dispersion is now 0.00
root@controller:/etc/swift#
7.3 Create object ring
The object server uses the object ring to maintain lists of object locations on local devices.
1. Change to the /etc/swift directory.
2. Create the base object.builder file:
root@controller:/etc/swift# swift-ring-builder object.builder create 10 3 1
root@controller:/etc/swift#
3. Add each storage node to the ring:
root@controller:/etc/swift# swift-ring-builder object.builder add \
>   --region 1 --zone 1 --ip 10.0.20.14 --port 6200 --device sdb --weight 100
Device d0r1z1-10.0.20.14:6200R10.0.20.14:6200/sdb_"" with 100.0 weight got id 0
root@controller:/etc/swift# swift-ring-builder object.builder add \
>   --region 1 --zone 1 --ip 10.0.20.14 --port 6200 --device sdc --weight 100
Device d1r1z1-10.0.20.14:6200R10.0.20.14:6200/sdc_"" with 100.0 weight got id 1
root@controller:/etc/swift# swift-ring-builder object.builder add \
>   --region 1 --zone 2 --ip 10.0.20.15 --port 6200 --device sdb --weight 100
Device d2r1z2-10.0.20.15:6200R10.0.20.15:6200/sdb_"" with 100.0 weight got id 2
root@controller:/etc/swift# swift-ring-builder object.builder add \
>   --region 1 --zone 2 --ip 10.0.20.15 --port 6200 --device sdc --weight 100
Device d3r1z2-10.0.20.15:6200R10.0.20.15:6200/sdc_"" with 100.0 weight got id 3
root@controller:/etc/swift#
4. Verify the ring contents:
root@controller:/etc/swift# swift-ring-builder object.builder
object.builder, build version 4, id 04968feeaabf4c0aa6edd713cf7187fb
1024 partitions, 3.000000 replicas, 1 regions, 2 zones, 4 devices, 100.00 balance, 0.00 dispersion
The minimum number of hours before a partition can be reassigned is 1 (0:00:00 remaining)
The overload factor is 0.00% (0.000000)
Ring file object.ring.gz not found, probably it hasn't been written yet
Devices:   id region zone ip address:port replication ip:port  name weight partitions balance flags meta
            0      1    1 10.0.20.14:6200     10.0.20.14:6200   sdb 100.00          0 -100.00
            1      1    1 10.0.20.14:6200     10.0.20.14:6200   sdc 100.00          0 -100.00
            2      1    2 10.0.20.15:6200     10.0.20.15:6200   sdb 100.00          0 -100.00
            3      1    2 10.0.20.15:6200     10.0.20.15:6200   sdc 100.00          0 -100.00
root@controller:/etc/swift#
5. Rebalance the ring:
root@controller:/etc/swift# swift-ring-builder object.builder rebalance
Reassigned 3072 (300.00%) partitions. Balance is now 0.00.  Dispersion is now 0.00
root@controller:/etc/swift#
7.4 Distribute ring configuration files
重新平衡后,Swift 会生成一个新的环文件(如 account.ring.gz)。可以通过以下命令查看环文件是否存在:
root@controller:/etc/swift# pwd
/etc/swift
root@controller:/etc/swift# ls -l *.gz
-rw-r--r-- 1 root root 1493 Apr 19 06:31 account.ring.gz
-rw-r--r-- 1 root root 1479 Apr 19 06:48 container.ring.gz
-rw-r--r-- 1 root root 1461 Apr 19 06:55 object.ring.gz
root@controller:/etc/swift#
Copy the account.ring.gz, container.ring.gz, and object.ring.gz files to the /etc/swift directory on each storage node and any additional nodes running the proxy service.
root@controller:/etc/swift# rsync -a /etc/swift/account.ring.gz 10.0.20.14:/etc/swift
The authenticity of host '10.0.20.14 (10.0.20.14)' can't be established.
ED25519 key fingerprint is SHA256:qu0pX938LLAbrtNZIX+5jNS0Q8+svp1N8IdkRBLCu9Y.
This key is not known by any other names
Are you sure you want to continue connecting (yes/no/[fingerprint])? yew^Hs
Please type 'yes', 'no' or the fingerprint: yes
Warning: Permanently added '10.0.20.14' (ED25519) to the list of known hosts.
root@10.0.20.14's password:
root@controller:/etc/swift# rsync -a /etc/swift/account.ring.gz 10.0.20.15:/etc/swift
The authenticity of host '10.0.20.15 (10.0.20.15)' can't be established.
ED25519 key fingerprint is SHA256:qu0pX938LLAbrtNZIX+5jNS0Q8+svp1N8IdkRBLCu9Y.
This host key is known by the following other names/addresses:
    ~/.ssh/known_hosts:1: [hashed name]
Are you sure you want to continue connecting (yes/no/[fingerprint])? yes
Warning: Permanently added '10.0.20.15' (ED25519) to the list of known hosts.
root@10.0.20.15's password:
root@controller:/etc/swift# rsync -a /etc/swift/container.ring.gz 10.0.20.14:/etc/swift
root@10.0.20.14's password:
root@controller:/etc/swift# rsync -a /etc/swift/container.ring.gz 10.0.20.15:/etc/swift
root@10.0.20.15's password:
root@controller:/etc/swift# rsync -a /etc/swift/object.ring.gz 10.0.20.14:/etc/swift
root@10.0.20.14's password:
root@controller:/etc/swift# rsync -a /etc/swift/object.ring.gz 10.0.20.15:/etc/swift
root@10.0.20.15's password:
controller:
root@controller:/etc/swift# ls -l *.gz
-rw-r--r-- 1 root root 1493 Apr 19 06:31 account.ring.gz
-rw-r--r-- 1 root root 1479 Apr 19 06:48 container.ring.gz
-rw-r--r-- 1 root root 1461 Apr 19 06:55 object.ring.gz
root@controller:/etc/swift#
object1:
root@object1:/etc/swift# ls -l *.gz
-rw-r--r-- 1 root root 1493 Apr 19 06:31 account.ring.gz
-rw-r--r-- 1 root root 1479 Apr 19 06:48 container.ring.gz
-rw-r--r-- 1 root root 1461 Apr 19 06:55 object.ring.gz
root@object1:/etc/swift#
object2:
root@object2:~# cd /etc/swift
root@object2:/etc/swift# ls -l *.gz
-rw-r--r-- 1 root root 1493 Apr 19 06:31 account.ring.gz
-rw-r--r-- 1 root root 1479 Apr 19 06:48 container.ring.gz
-rw-r--r-- 1 root root 1461 Apr 19 06:55 object.ring.gz
root@object2:/etc/swift#
八、Finalize installation(选择Ubuntu)
1. Obtain the /etc/swift/swift.conf file from the Object Storage source repository:
root@controller:/etc/swift# curl -o /etc/swift/swift.conf \
>   https://opendev.org/openstack/swift/raw/branch/master/etc/swift.conf-sample
  % Total    % Received % Xferd  Average Speed   Time    Time     Time  Current
                                 Dload  Upload   Total   Spent    Left  Speed
100  8755  100  8755    0     0   6121      0  0:00:01  0:00:01 --:--:--  6118
root@controller:/etc/swift#
2. Edit the /etc/swift/swift.conf file and complete the following actions:
root@controller:/etc/swift# vi swift.conf

[swift-hash]

swift_hash_path_suffix = openstack
swift_hash_path_prefix = openstack

[storage-policy:0]
name = Policy-0
default = yes
3. Copy the swift.conf file to the /etc/swift directory on each storage node and any additional nodes running the proxy service.
root@controller:/etc/swift# rsync -a /etc/swift/swift.conf 10.0.20.14:/etc/swift
root@10.0.20.14's password:
root@controller:/etc/swift# rsync -a /etc/swift/swift.conf 10.0.20.15:/etc/swift
root@10.0.20.15's password:
root@controller:/etc/swift#

object1:
root@object1:/etc/swift# ls swift.conf
swift.conf

object2:
root@object2:/etc/swift# ls swift.conf
swift.conf
root@object2:/etc/swift#
4. On all nodes, ensure proper ownership of the configuration directory:
controller:
root@controller:/etc/swift# chown -R root:swift /etc/swift
root@controller:/etc/swift# ls -l /etc/swift
total 144
-rw-r----- 1 root swift   205 Feb  8  2023 account-server.conf
-rw-r--r-- 1 root swift  9858 Apr 19 06:31 account.builder
-rw-r--r-- 1 root swift  1493 Apr 19 06:31 account.ring.gz
drwxr-xr-x 2 root swift  4096 Apr 19 06:55 backups
-rw-r----- 1 root swift   236 Feb  8  2023 container-server.conf
-rw-r--r-- 1 root swift  9858 Apr 19 06:48 container.builder
-rw-r--r-- 1 root swift  1479 Apr 19 06:48 container.ring.gz
-rw-r----- 1 root swift   284 Feb  8  2023 object-expirer.conf
-rw-r----- 1 root swift   200 Feb  8  2023 object-server.conf
-rw-r--r-- 1 root swift  9858 Apr 19 06:55 object.builder
-rw-r--r-- 1 root swift  1461 Apr 19 06:55 object.ring.gz
-rw-r--r-- 1 root swift 63357 Apr 19 02:00 proxy-server.conf
-rw-r--r-- 1 root swift  8757 Apr 19 07:17 swift.conf
root@controller:/etc/swift#
object1:
root@object1:/etc/swift# chown -R root:swift /etc/swift
root@object1:/etc/swift# ls -l /etc/swift
total 116
-rw-r----- 1 root swift 13586 Apr 19 05:19 account-server.conf
-rw-r----- 1 root swift   205 Apr 19 04:18 account-server.conf.bak
-rw-r--r-- 1 root swift  1493 Apr 19 06:31 account.ring.gz
-rw-r----- 1 root swift 23328 Apr 19 05:24 container-server.conf
-rw-r----- 1 root swift   236 Apr 19 04:18 container-server.conf.bak
-rw-r--r-- 1 root swift  1479 Apr 19 06:48 container.ring.gz
-rw-r----- 1 root swift   284 Feb  8  2023 object-expirer.conf
-rw-r----- 1 root swift 34187 Apr 19 05:27 object-server.conf
-rw-r----- 1 root swift   200 Apr 19 04:18 object-server.conf.bak
-rw-r--r-- 1 root swift  1461 Apr 19 06:55 object.ring.gz
-rw-r--r-- 1 root swift  8757 Apr 19 07:17 swift.conf
root@object1:/etc/swift#
object2:
root@object2:/etc/swift# chown -R root:swift /etc/swift
root@object2:/etc/swift# ls -l /etc/swift
total 104
-rw-r----- 1 root swift 13605 Apr 19 06:28 account-server.conf
-rw-r--r-- 1 root swift  1493 Apr 19 06:31 account.ring.gz
-rw-r----- 1 root swift 23328 Apr 19 06:31 container-server.conf
-rw-r--r-- 1 root swift  1479 Apr 19 06:48 container.ring.gz
-rw-r----- 1 root swift   284 Feb  8  2023 object-expirer.conf
-rw-r----- 1 root swift 34187 Apr 19 06:34 object-server.conf
-rw-r--r-- 1 root swift  1461 Apr 19 06:55 object.ring.gz
-rw-r--r-- 1 root swift  8757 Apr 19 07:17 swift.conf
root@object2:/etc/swift#
5. On the controller node and any other nodes running the proxy service, restart the Object Storage proxy service including its dependencies:
root@controller:/etc/swift# service memcached restart
root@controller:/etc/swift# service swift-proxy restart
root@controller:/etc/swift#

root@controller:/etc/swift# systemctl status memcached
● memcached.service - memcached daemon
     Loaded: loaded (/lib/systemd/system/memcached.service; enabled; vendor preset: enabled)
     Active: active (running) since Sat 2025-04-19 07:23:06 UTC; 29s ago
       Docs: man:memcached(1)
   Main PID: 27846 (memcached)
      Tasks: 10 (limit: 9350)
     Memory: 2.9M
        CPU: 46ms
     CGroup: /system.slice/memcached.service
             └─27846 /usr/bin/memcached -m 64 -p 11211 -u memcache -l 10.0.20.11 -P /var/run/memcached/memcached.pid

Apr 19 07:23:06 controller systemd[1]: Started memcached daemon.
root@controller:/etc/swift# systemctl status swift-proxy
● swift-proxy.service - OpenStack Swift proxy server
     Loaded: loaded (/lib/systemd/system/swift-proxy.service; enabled; vendor preset: enabled)
     Active: active (running) since Sat 2025-04-19 07:23:14 UTC; 32s ago
       Docs: man:swift-proxy-server(1)
   Main PID: 27870 (swift-proxy-ser)
      Tasks: 5 (limit: 9350)
     Memory: 99.6M
        CPU: 1.293s
     CGroup: /system.slice/swift-proxy.service
             ├─27870 /usr/bin/python3 /usr/bin/swift-proxy-server /etc/swift/proxy-server.conf
             ├─27875 /usr/bin/python3 /usr/bin/swift-proxy-server /etc/swift/proxy-server.conf
             ├─27876 /usr/bin/python3 /usr/bin/swift-proxy-server /etc/swift/proxy-server.conf
             ├─27877 /usr/bin/python3 /usr/bin/swift-proxy-server /etc/swift/proxy-server.conf
             └─27878 /usr/bin/python3 /usr/bin/swift-proxy-server /etc/swift/proxy-server.conf

Apr 19 07:23:15 controller proxy-server[27878]: STDERR: The option "log_name" is not known to keystonemiddleware
Apr 19 07:23:15 controller proxy-server[27878]: STDERR: The option "auth_url" is not known to keystonemiddleware
Apr 19 07:23:15 controller proxy-server[27878]: STDERR: The option "project_domain_id" is not known to keystonemiddleware
Apr 19 07:23:15 controller proxy-server[27878]: STDERR: The option "user_domain_id" is not known to keystonemiddleware
Apr 19 07:23:15 controller proxy-server[27878]: STDERR: The option "project_name" is not known to keystonemiddleware
Apr 19 07:23:15 controller proxy-server[27878]: STDERR: The option "username" is not known to keystonemiddleware
Apr 19 07:23:15 controller proxy-server[27878]: STDERR: The option "password" is not known to keystonemiddleware
Apr 19 07:23:15 controller proxy-server[27878]: STDERR: The option "__name__" is not known to keystonemiddleware
Apr 19 07:23:15 controller proxy-server[27878]: AuthToken middleware is set with keystone_authtoken.service_token_roles_required set to False. This is backwards compatible but deprecated behaviour. Please set this to Tru
e.
Apr 19 07:23:15 controller proxy-server[27870]: Started child 27878 from parent 27870
root@controller:/etc/swift#
6. On the storage nodes, start the Object Storage services:
object1:
root@object1:/etc/swift# swift-init all start
Starting account-replicator...(/etc/swift/account-server.conf)
Starting account-auditor...(/etc/swift/account-server.conf)
Starting object-reconstructor...(/etc/swift/object-server.conf)
Starting object-auditor...(/etc/swift/object-server.conf)
Starting object-server...(/etc/swift/object-server.conf)
Starting object-updater...(/etc/swift/object-server.conf)
Starting container-sync...(/etc/swift/container-server.conf)
Starting object-replicator...(/etc/swift/object-server.conf)
Starting container-replicator...(/etc/swift/container-server.conf)
Starting container-sharder...(/etc/swift/container-server.conf)
Unable to locate config for container-reconciler
Starting container-auditor...(/etc/swift/container-server.conf)
Starting account-server...(/etc/swift/account-server.conf)
Starting container-updater...(/etc/swift/container-server.conf)
Starting account-reaper...(/etc/swift/account-server.conf)
Starting container-server...(/etc/swift/container-server.conf)
Unable to load internal client from config: '/etc/swift/internal-client.conf' ([Errno 2] No such file or directory: '/etc/swift/internal-client.conf')

root@object1:/etc/swift#

查看服务状态,如果有问题,reboot后查看:

root@object1:~# systemctl list-units --type=service --all | grep swift
  swift-account-auditor.service                                                             loaded    active   running OpenStack Swift account auditor
  swift-account-reaper.service                                                              loaded    active   running OpenStack Swift account reaper
  swift-account-replicator.service                                                          loaded    active   running OpenStack Swift account replicator
  swift-account.service                                                                     loaded    active   running OpenStack Swift account server
  swift-container-auditor.service                                                           loaded    active   running OpenStack Swift container auditor
  swift-container-reconciler.service                                                        loaded    inactive dead    OpenStack Swift container reconciler
  swift-container-replicator.service                                                        loaded    active   running OpenStack Swift container replicator
● swift-container-sharder.service                                                           loaded    failed   failed  OpenStack Swift container sharder
  swift-container-sync.service                                                              loaded    active   running OpenStack Swift container sync
  swift-container-updater.service                                                           loaded    active   running OpenStack Swift container updater
  swift-container.service                                                                   loaded    active   running OpenStack Swift container server
  swift-object-auditor.service                                                              loaded    active   running OpenStack Swift object auditor
  swift-object-reconstructor.service                                                        loaded    active   running OpenStack Swift object reconstructor
  swift-object-replicator.service                                                           loaded    active   running OpenStack Swift object replicator
  swift-object-updater.service                                                              loaded    active   running OpenStack Swift object updater
  swift-object.service                                                                      loaded    active   running OpenStack Swift object server
root@object1:~#
object2:
root@object2:/etc/swift# swift-init all start
Starting container-sharder...(/etc/swift/container-server.conf)
Starting object-updater...(/etc/swift/object-server.conf)
Starting object-reconstructor...(/etc/swift/object-server.conf)
Unable to locate config for container-reconciler
Starting account-server...(/etc/swift/account-server.conf)
Starting container-sync...(/etc/swift/container-server.conf)
Starting object-server...(/etc/swift/object-server.conf)
Starting account-reaper...(/etc/swift/account-server.conf)
Starting container-updater...(/etc/swift/container-server.conf)
Starting object-replicator...(/etc/swift/object-server.conf)
Starting object-auditor...(/etc/swift/object-server.conf)
Starting account-replicator...(/etc/swift/account-server.conf)
Starting container-auditor...(/etc/swift/container-server.conf)
Starting container-server...(/etc/swift/container-server.conf)
Starting container-replicator...(/etc/swift/container-server.conf)
Starting account-auditor...(/etc/swift/account-server.conf)
Unable to load internal client from config: '/etc/swift/internal-client.conf' ([Errno 2] No such file or directory: '/etc/swift/internal-client.conf')

root@object2:/etc/swift#

查看服务状态,如果有问题,reboot后查看:

root@object2:~# systemctl list-units --type=service --all | grep swift
  swift-account-auditor.service                                                             loaded    active   running OpenStack Swift account auditor
  swift-account-reaper.service                                                              loaded    active   running OpenStack Swift account reaper
  swift-account-replicator.service                                                          loaded    active   running OpenStack Swift account replicator
  swift-account.service                                                                     loaded    active   running OpenStack Swift account server
  swift-container-auditor.service                                                           loaded    active   running OpenStack Swift container auditor
  swift-container-reconciler.service                                                        loaded    inactive dead    OpenStack Swift container reconciler
  swift-container-replicator.service                                                        loaded    active   running OpenStack Swift container replicator
● swift-container-sharder.service                                                           loaded    failed   failed  OpenStack Swift container sharder
  swift-container-sync.service                                                              loaded    active   running OpenStack Swift container sync
  swift-container-updater.service                                                           loaded    active   running OpenStack Swift container updater
  swift-container.service                                                                   loaded    active   running OpenStack Swift container server
  swift-object-auditor.service                                                              loaded    active   running OpenStack Swift object auditor
  swift-object-reconstructor.service                                                        loaded    active   running OpenStack Swift object reconstructor
  swift-object-replicator.service                                                           loaded    active   running OpenStack Swift object replicator
  swift-object-updater.service                                                              loaded    active   running OpenStack Swift object updater
  swift-object.service                                                                      loaded    active   running OpenStack Swift object server
root@object2:~#
九、Verify operation
Verify operation of the Object Storage service.
1、Source the demo credentials:
root@controller:~# source demo-openrc
root@controller ~(myproject/myuser)# cat demo-openrc
export OS_PROJECT_DOMAIN_NAME=Default
export OS_USER_DOMAIN_NAME=Default
export OS_PROJECT_NAME=myproject
export OS_USERNAME=myuser
export OS_PASSWORD=openstack
export OS_AUTH_URL=http://controller:5000/v3
export OS_IDENTITY_API_VERSION=3
export OS_IMAGE_API_VERSION=2
export PS1='\u@\h \W(myproject/myuser)\$ '
root@controller ~(myproject/myuser)#
2、Show the service status:
root@controller ~(myproject/myuser)# swift stat
                        Account: AUTH_f5e75a3f7cc347ad89d20dcfe70dae01
                     Containers: 0
                        Objects: 0
                          Bytes: 0
Containers in policy "policy-0": 0
   Objects in policy "policy-0": 0
     Bytes in policy "policy-0": 0
                   Content-Type: text/plain; charset=utf-8
                    X-Timestamp: 1745065868.91993
                  Accept-Ranges: bytes
    X-Account-Project-Domain-Id: default
                           Vary: Accept
                     X-Trans-Id: tx2212ee64f1ec492691b12-006803998d
         X-Openstack-Request-Id: tx2212ee64f1ec492691b12-006803998d
root@controller ~(myproject/myuser)#
3. Create container
root@controller ~(myproject/myuser)# openstack container create container1
+---------------------------------------+------------+------------------------------------+
| account                               | container  | x-trans-id                         |
+---------------------------------------+------------+------------------------------------+
| AUTH_f5e75a3f7cc347ad89d20dcfe70dae01 | container1 | txda19ce939dbb47c191f1f-00680399b2 |
+---------------------------------------+------------+------------------------------------+
root@controller ~(myproject/myuser)#
4. Upload a test file to the container1 container:
root@controller ~(myproject/myuser)# openstack object create container1 testswift.txt
+---------------+------------+----------------------------------+
| object        | container  | etag                             |
+---------------+------------+----------------------------------+
| testswift.txt | container1 | 0e62820c77565ac3f1a5f2afbb9a384b |
+---------------+------------+----------------------------------+
root@controller ~(myproject/myuser)#
5. List files in the container1 container:
root@controller ~(myproject/myuser)# openstack object list container1
+---------------+
| Name |
+---------------+
| testswift.txt |
+---------------+
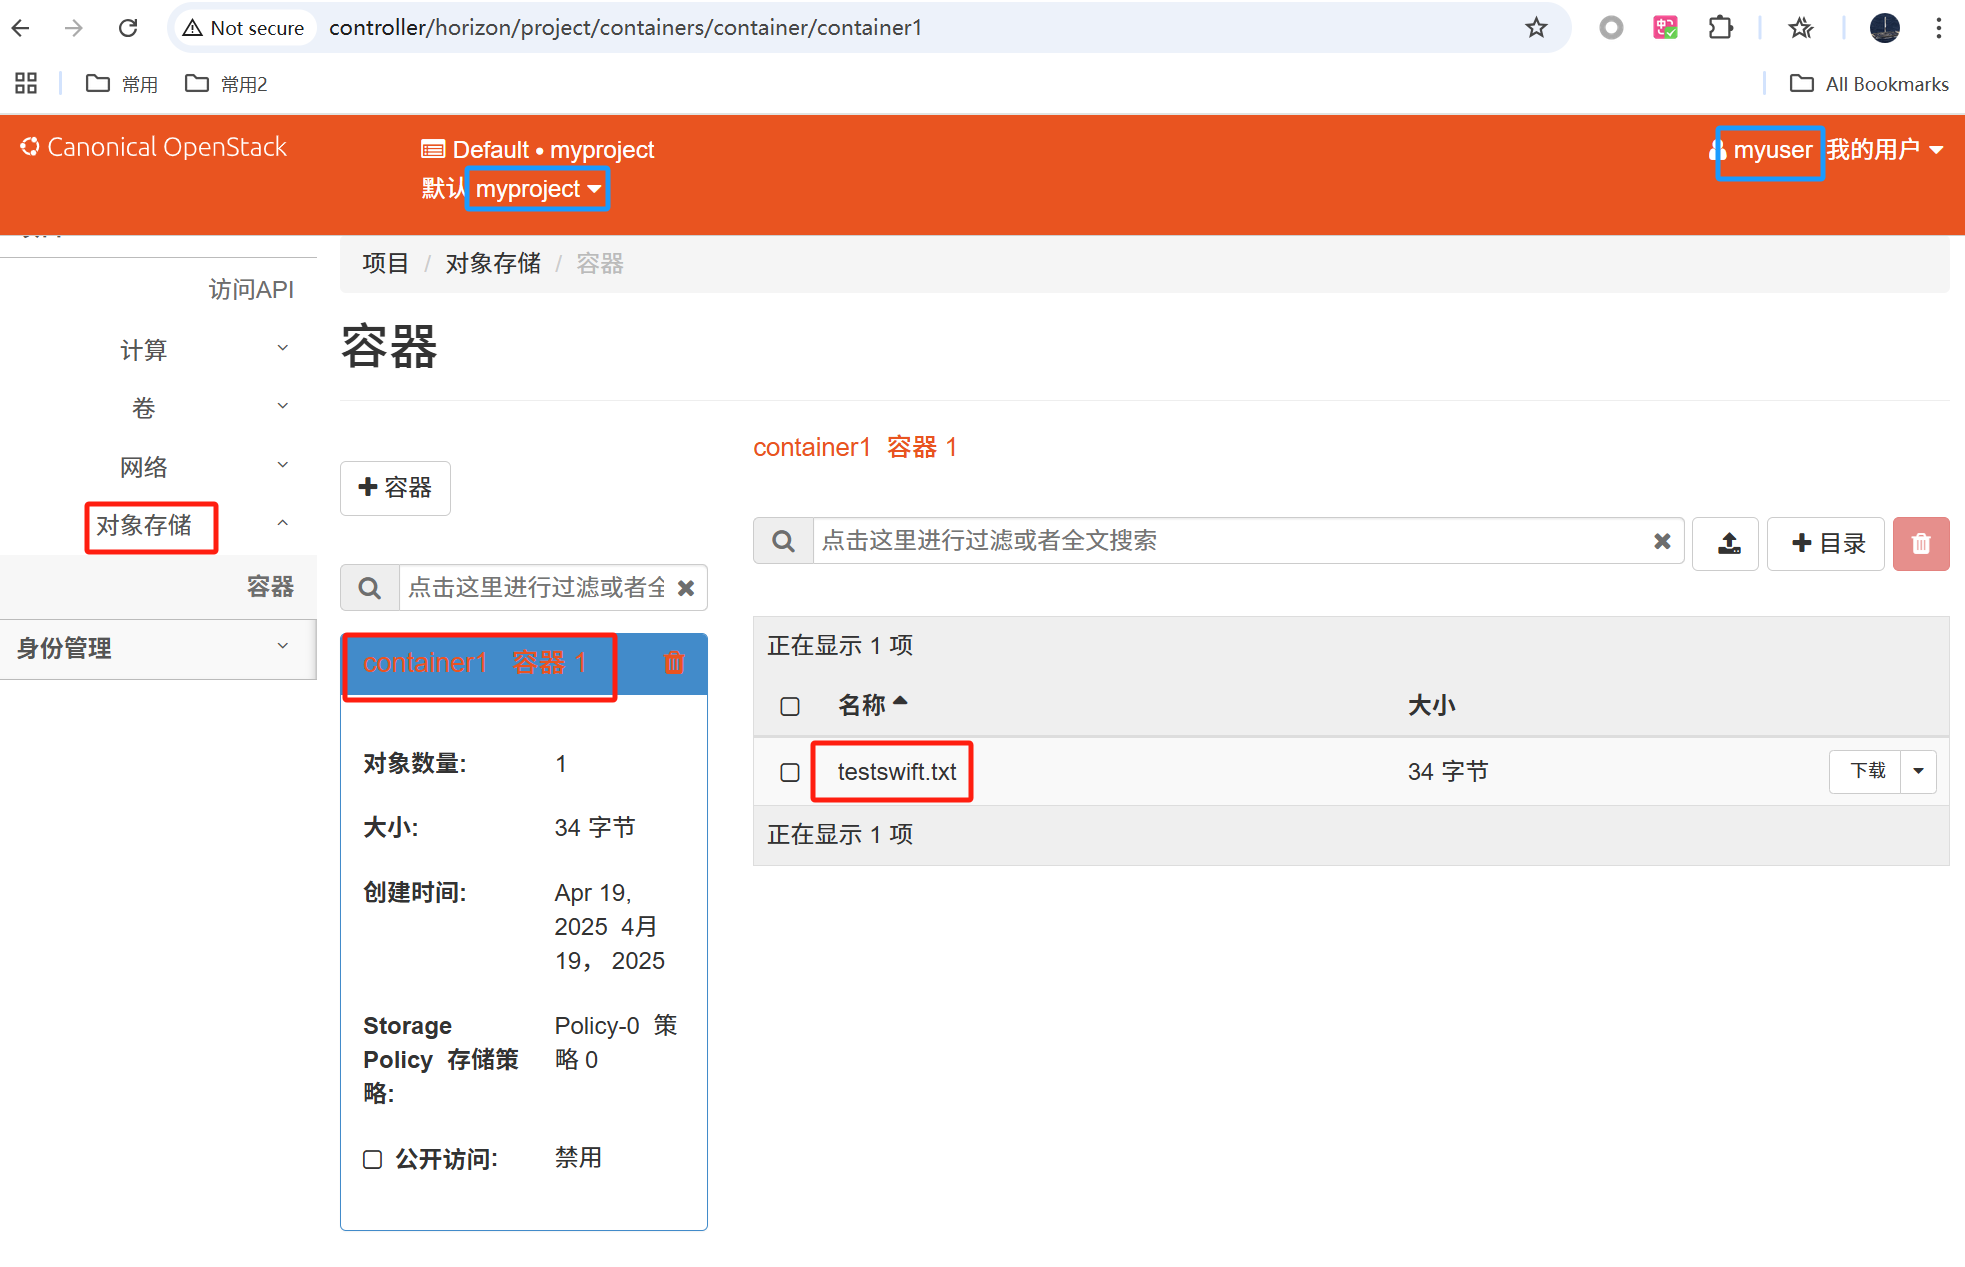
root@controller ~(myproject/myuser)# 6. Download a test file from the container1 container:
root@controller ~(myproject/myuser)# openstack object save container1 testswift.txt7. Horizon下查看: