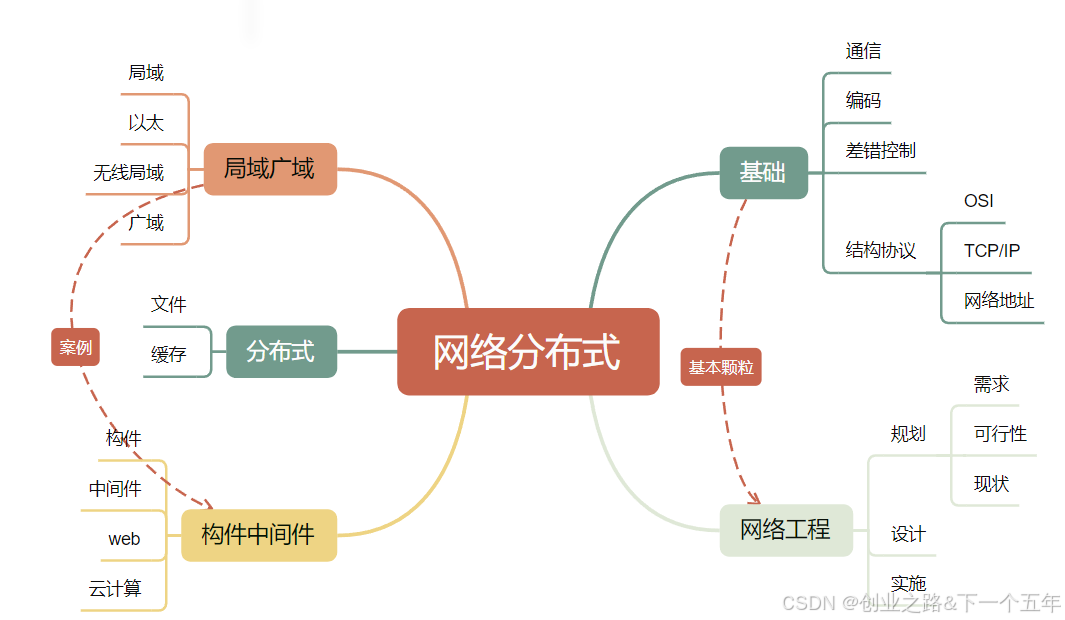
目录
一、引言
二、浅拷贝与深拷贝的基本概念
2.1 浅拷贝
2.2 深拷贝
在C++ 中, string 类的深浅拷贝有着重要的区别。
浅拷贝
深拷贝
string 类中的其他构造函数及操作
resize 构造
= 构造(赋值构造)
+ 构造(拼接构造)
cin 和 cin.get 的区别
三、C++中string类的默认行为
四、自定义字符串类并实现深浅拷贝
4.1 未重载拷贝构造函数和赋值运算符(默认浅拷贝)
4.2 实现深拷贝(重载拷贝构造函数和赋值运算符)
五、比较运算符的重载(> < >= <= == !=)
六、resize函数的实现
七、赋值运算符的深入探讨
7.1 自赋值情况的处理
7.2 移动赋值运算符(C++11及以后)
八、 + 运算符的重载
一、引言
在C++编程中, string 是一个常用的类,用于处理字符串。在涉及对象的复制、传递等操作时,深拷贝和浅拷贝的概念至关重要。理解 string 的深浅拷贝机制,能够帮助我们编写出更健壮、高效且无内存错误的代码。本文将深入探讨 string 的深浅拷贝原理,并结合具体代码示例进行详细分析。
二、浅拷贝与深拷贝的基本概念
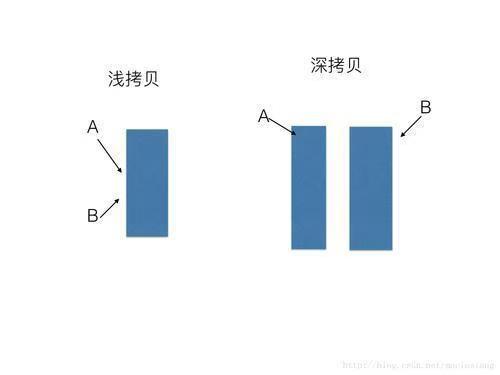
2.1 浅拷贝
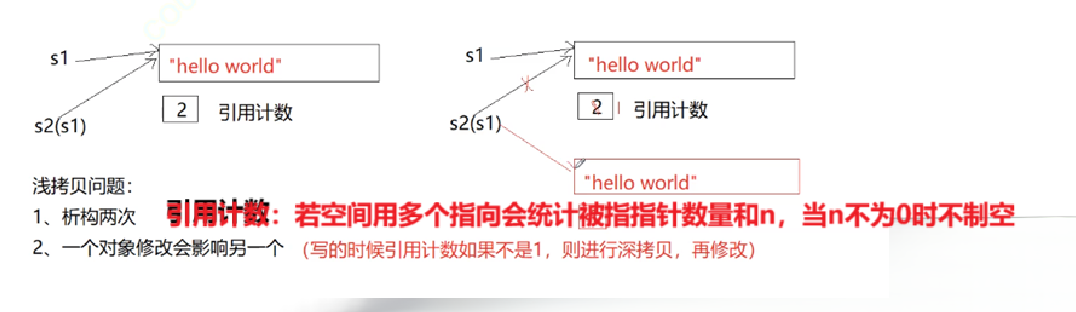
浅拷贝是指在对象复制时,只复制对象中成员变量的值。如果成员变量是指针类型,浅拷贝仅仅复制指针的值(即地址),这就导致源对象和拷贝对象的指针指向同一块内存区域。当其中一个对象释放该内存时,另一个对象的指针就会变成悬空指针,进而引发程序崩溃或未定义行为。
2.2 深拷贝
深拷贝则是在对象复制时,不仅复制成员变量的值,对于指针类型的成员变量,会重新分配内存空间,并将源对象所指向内存中的数据复制到新分配的内存中。这样源对象和拷贝对象就拥有各自独立的内存,互不影响,避免了悬空指针等问题 。
在C++ 中, string 类的深浅拷贝有着重要的区别。
浅拷贝
浅拷贝是指在对象复制时,只复制对象中指针的值,而不复制指针所指向的内存空间。对于 string 类,如果进行浅拷贝,那么两个 string 对象会共享同一块字符数组内存。例如,当使用默认的拷贝构造函数(如果没有自定义拷贝构造函数)时,可能会发生浅拷贝。
cpp

#include <iostream>

#include <string>


int main() {

    std::string str1 = "Hello";

    std::string str2 = str1; // 这里可能是浅拷贝(实际string类在现代实现中通常是深拷贝)


    std::cout << "str1: " << str1 << ", str2: " << str2 << std::endl;


    return 0;

}
在上述代码中,如果 string 类是浅拷贝实现,那么 str1 和 str2 的内部指针会指向同一块存储 "Hello" 的内存。但实际上,C++ 标准库中的 string 类现代实现通常采用深拷贝。
深拷贝
深拷贝是指在对象复制时,不仅复制对象中指针的值,还会为指针所指向的内存空间分配新的内存,并将原内存中的数据复制到新的内存中。对于 string 类,当进行深拷贝时,会为新的 string 对象分配独立的内存来存储字符串内容。
cpp

#include <iostream>

#include <string>


int main() {

    std::string str1 = "World";

    // 自定义深拷贝构造函数(这里假设string类没有默认的深拷贝构造函数)

    std::string str2(str1.begin(), str1.end());


    std::cout << "str1: " << str1 << ", str2: " << str2 << std::endl;


    return 0;

}
在这个例子中,通过 str2 的构造函数,从 str1 的起始位置到结束位置复制字符,实现了深拷贝。这样 str1 和 str2 就拥有了各自独立的字符串内存空间。
string 类中的其他构造函数及操作
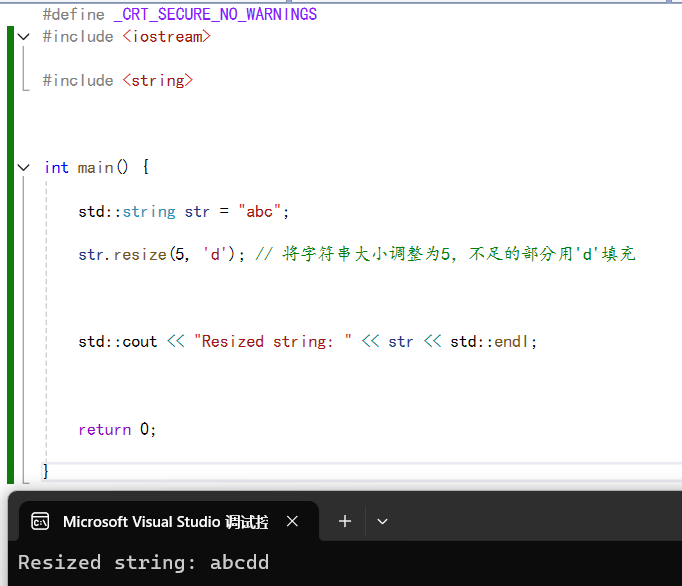
resize 构造
resize 函数用于改变 string 对象的大小。
cpp

#include <iostream>

#include <string>


int main() {

    std::string str = "abc";

    str.resize(5, 'd'); // 将字符串大小调整为5,不足的部分用'd'填充


    std::cout << "Resized string: " << str << std::endl;


    return 0;

}
= 构造(赋值构造)
= 操作符用于给 string 对象赋值。
传统写法(带自我赋值检查)
cpp

string& operator=(const string& s)
{
    if (this!= &s)
    {
        string tmp(s);
        std::swap(_str, tmp._str);
        std::swap(_size, tmp._size);
        std::swap(_capacity, tmp._capacity);
    }
    return *this;
}
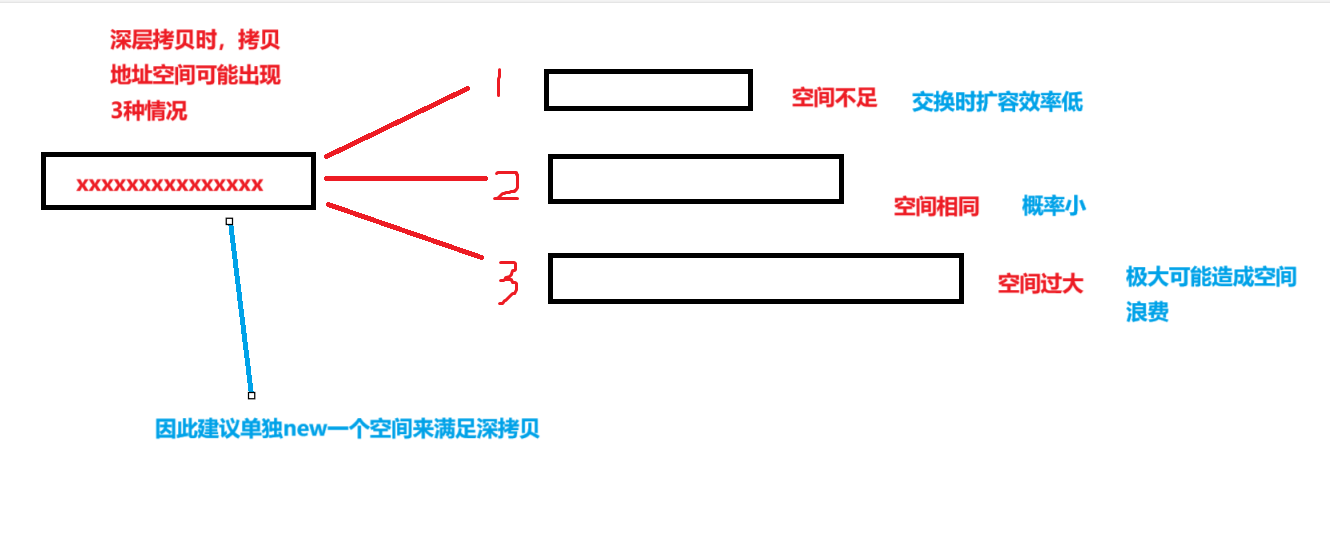
这段代码首先进行了自我赋值检查,也就是判断当前对象( this 所指向的对象)和要赋值的对象 s 是不是同一个。如果不是,就创建一个临时的 string 对象 tmp ,并使用 s 来初始化它。然后通过 std::swap 函数,把当前对象和临时对象的字符串指针( _str )、字符串长度( _size )、字符串容量( _capacity )进行交换。这样就巧妙地实现了把 s 的内容赋值给当前对象,同时还避免了一些潜在的内存管理问题,比如释放内存不当等。
现代写法(利用移动语义)
cpp

string& operator=(string tmp)
{
    swap(tmp);
    return *this;
}
这种写法更加简洁高效,它利用了C++ 的移动语义。这里直接把传入的 string 对象 tmp 作为参数(注意这里没有 const 修饰),在函数内部调用 swap 函数(这里的 swap 函数应该是类内部自定义的交换函数,用于交换当前对象和 tmp 的内部成员)。这种写法的好处在于,当 tmp 是一个临时对象时,能避免不必要的深拷贝操作,提高赋值操作的效率,在处理大量字符串数据时,能显著提升程序性能。
cpp

#include <iostream>

#include <string>


int main() {

    std::string str1 = "apple";

    std::string str2;

    str2 = str1; // 使用赋值构造


    std::cout << "str1: " << str1 << ", str2: " << str2 << std::endl;


    return 0;

}
+ 构造(拼接构造)
+ 操作符用于拼接两个 string 对象。
cpp

#include <iostream>

#include <string>


int main() {

    std::string str1 = "Hello";

    std::string str2 = " World";

    std::string str3 = str1 + str2; // 拼接两个字符串


    std::cout << "str3: " << str3 << std::endl;


    return 0;

}
cin 和 cin.get 的区别
cin 和 cin.get 都是用于从标准输入读取数据,但它们有一些区别。
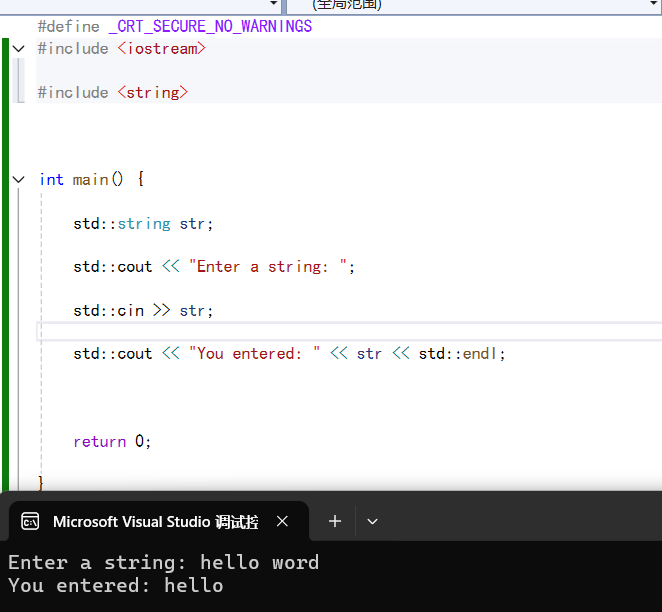
- cin : cin 使用空白字符(空格、制表符、换行符)作为输入数据的分隔符。当使用 cin 读取 string 时,它会在遇到空白字符时停止读取。
cpp

#include <iostream>

#include <string>


int main() {

    std::string str;

    std::cout << "Enter a string: ";

    cin >> str;

    std::cout << "You entered: " << str << std::endl;


    return 0;

}
如果输入 "Hello World" , cin 只会读取到 "Hello" ,因为它遇到空格就停止了。
- cin.get : cin.get 可以读取包括空白字符在内的所有字符。它有多种重载形式,常用的一种是读取单个字符,另一种是读取一行字符串。
cpp

#include <iostream>

#include <string>
using namespace std;


int main() {

	std::string str;

	std::cout << "Enter a string: ";

	std::getline(cin, str); // 读取一行字符串,最多读取99个字符(第100个字符留给'\0')

	std::cout << "You entered: " << str << std::endl;


	return 0;

}
}
在这个例子中, cin.getline 会读取整行输入,包括空格等空白字符,直到遇到换行符或者达到指定的读取字符数上限。
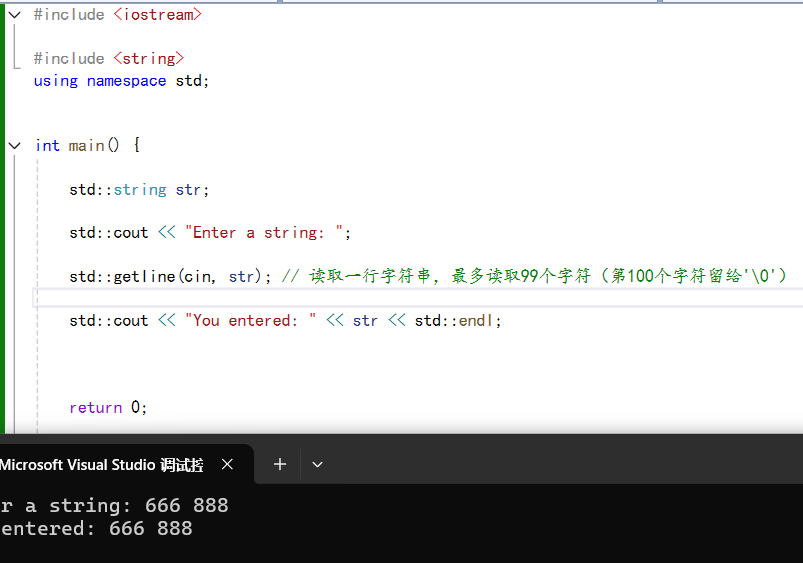
总的来说, cin 适合读取以空白字符分隔的单个数据,而 cin.get 更适合读取包含空白字符的完整字符串或行数据。
三、C++中string类的默认行为
在C++标准库中, string 类已经对拷贝构造函数和赋值运算符进行了重载,实现了深拷贝。下面通过简单的代码示例来验证:
cpp

#include <iostream>

#include <string>


int main() {

    std::string original = "Hello, World!";

    // 调用拷贝构造函数

    std::string copy1(original);

    // 调用赋值运算符

    std::string copy2 = original;


    std::cout << "Original: " << original << std::endl;

    std::cout << "Copy 1: " << copy1 << std::endl;

    std::cout << "Copy 2: " << copy2 << std::endl;


    // 修改其中一个字符串

    copy1[0] = 'h';

    std::cout << "After modification:" << std::endl;

    std::cout << "Original: " << original << std::endl;

    std::cout << "Copy 1: " << copy1 << std::endl;

    std::cout << "Copy 2: " << copy2 << std::endl;


    return 0;

}
在上述代码中:
1. std::string copy1(original); 调用了 string 的拷贝构造函数。
2. std::string copy2 = original; 调用了 string 的赋值运算符。
运行结果显示,修改 copy1 后, original 和 copy2 不受影响,说明 string 的默认拷贝行为是深拷贝,每个 string 对象都有独立的内存存储字符串内容。
四、自定义字符串类并实现深浅拷贝
为了更深入理解深浅拷贝的原理,我们手动实现一个简单的字符串类 MyString ,并分别展示浅拷贝和深拷贝的实现方式。
4.1 未重载拷贝构造函数和赋值运算符(默认浅拷贝)
cpp

#include <iostream>

#include <cstring>


class MyString {

private:

    char* data;

public:

    MyString(const char* str) {

        data = new char[strlen(str) + 1];

        strcpy(data, str);

    }

    ~MyString() {

        delete[] data;

    }

    // 未重载拷贝构造函数和赋值运算符,默认浅拷贝

};


int main() {

    MyString s1("Hello");

    // 默认浅拷贝,s1和s2的data指针指向同一块内存

    MyString s2 = s1;

    return 0;

}
在上述代码中, MyString 类没有重载拷贝构造函数和赋值运算符,会使用编译器默认生成的浅拷贝版本。当程序结束时, s1 和 s2 的析构函数会先后调用,导致同一块内存被释放两次,从而引发程序崩溃。
4.2 实现深拷贝(重载拷贝构造函数和赋值运算符)
cpp

#include <iostream>

#include <cstring>


class MyString {

private:

    char* data;

public:

    MyString(const char* str) {

        data = new char[strlen(str) + 1];

        strcpy(data, str);

    }

    // 拷贝构造函数

    MyString(const MyString& other) {

        data = new char[strlen(other.data) + 1];

        strcpy(data, other.data);

    }

    // 赋值运算符

    MyString& operator=(const MyString& other) {

        if (this != &other) {

            delete[] data;

            data = new char[strlen(other.data) + 1];

            strcpy(data, other.data);

        }

        return *this;

    }

    ~MyString() {

        delete[] data;

    }

    const char* get_data() const {

        return data;

    }

};


int main() {

    MyString s1("Hello");

    MyString s2(s1); // 调用拷贝构造函数

    MyString s3 = s1; // 调用赋值运算符


    std::cout << "s1: " << s1.get_data() << std::endl;

    std::cout << "s2: " << s2.get_data() << std::endl;

    std::cout << "s3: " << s3.get_data() << std::endl;


    s2 = MyString("World"); // 再次调用赋值运算符

    std::cout << "After modification:" << std::endl;

    std::cout << "s1: " << s1.get_data() << std::endl;

    std::cout << "s2: " << s2.get_data() << std::endl;

    std::cout << "s3: " << s3.get_data() << std::endl;


    return 0;

}
在上述代码中:
- 拷贝构造函数:为新对象分配独立的内存空间,并将源对象的字符串内容复制到新内存中。
- 赋值运算符:首先检查自赋值情况( if (this != &other) ),避免释放自身内存后无法访问 other 的数据;然后释放当前对象的内存,再分配新内存并复制数据。
运行结果表明,每个 MyString 对象都有独立的字符串数据,修改一个对象不会影响其他对象,实现了深拷贝。
五、比较运算符的重载(> < >= <= == != >>)
为了使自定义的 MyString 类能像标准库 string 类一样进行比较操作,我们需要重载比较运算符。以下是具体的实现代码:
cpp

#include <iostream>

#include <cstring>


class MyString {

private:

    char* data;

public:

    MyString(const char* str) {

        data = new char[strlen(str) + 1];

        strcpy(data, str);

    }

    MyString(const MyString& other) {

        data = new char[strlen(other.data) + 1];

        strcpy(data, other.data);

    }

    MyString& operator=(const MyString& other) {

        if (this != &other) {

            delete[] data;

            data = new char[strlen(other.data) + 1];

            strcpy(data, other.data);

        }

        return *this;

    }

    ~MyString() {

        delete[] data;

    }

    const char* get_data() const {

        return data;

    }

    // 重载大于运算符

    bool operator>(const MyString& other) const {

        return strcmp(data, other.data) > 0;

    }

    // 重载小于运算符

    bool operator<(const MyString& other) const {

        return strcmp(data, other.data) < 0;

    }

    // 重载大于等于运算符

    bool operator>=(const MyString& other) const {

        return strcmp(data, other.data) >= 0;

    }

    // 重载小于等于运算符

    bool operator<=(const MyString& other) const {

        return strcmp(data, other.data) <= 0;

    }

    // 重载等于运算符

    bool operator==(const MyString& other) const {

        return strcmp(data, other.data) == 0;

    }

    // 重载不等于运算符

    bool operator!=(const MyString& other) const {

        return strcmp(data, other.data) != 0;

    }

};


int main() {

    MyString s1("apple");

    MyString s2("banana");


    std::cout << "s1 > s2: " << (s1 > s2 ? "true" : "false") << std::endl;

    std::cout << "s1 < s2: " << (s1 < s2 ? "true" : "false") << std::endl;

    std::cout << "s1 >= s2: " << (s1 >= s2 ? "true" : "false") << std::endl;

    std::cout << "s1 <= s2: " << (s1 <= s2 ? "true" : "false") << std::endl;

    std::cout << "s1 == s2: " << (s1 == s2 ? "true" : "false") << std::endl;

    std::cout << "s1 != s2: " << (s1 != s2 ? "true" : "false") << std::endl;


    return 0;

}
在上述代码中,我们通过调用 strcmp 函数来实现各个比较运算符的逻辑。 strcmp 函数会按照字典序比较两个字符串,并返回相应的值,根据这个返回值来确定比较结果。
but strcmp遇到'\0'会终止,需要大家结合实际用例判断是否修改他
六、resize函数的实现
resize 函数用于改变字符串的长度,以下是 MyString 类中 resize 函数的实现:
cpp

#include <iostream>

#include <cstring>


class MyString {

private:

    char* data;

public:

    MyString(const char* str) {

        data = new char[strlen(str) + 1];

        strcpy(data, str);

    }

    MyString(const MyString& other) {

        data = new char[strlen(other.data) + 1];

        strcpy(data, other.data);

    }

    MyString& operator=(const MyString& other) {

        if (this != &other) {

            delete[] data;

            data = new char[strlen(other.data) + 1];

            strcpy(data, other.data);

        }

        return *this;

    }

    ~MyString() {

        delete[] data;

    }

    const char* get_data() const {

        return data;

    }

    void resize(size_t new_size, char fill_char = '')
    {

        char* new_data = new char[new_size + 1];

        size_t len = strlen(data);

        if (new_size < len) {

            strncpy(new_data, data, new_size);

            new_data[new_size] = '\0';

        } else {

            strcpy(new_data, data);

            for (size_t i = len; i < new_size; ++i) {

                new_data[i] = fill_char;

            }

            new_data[new_size] = '\0';

        }

        delete[] data;

        data = new_data;

    }

};


int main() {

    MyString s("Hello");

    std::cout << "Original: " << s.get_data() << std::endl;


    s.resize(3);

    std::cout << "After resize to 3: " << s.get_data() << std::endl;


    s.resize(8, 'x');

    std::cout << "After resize to 8 with fill char 'x': " << s.get_data() << std::endl;


    return 0;

}
在上述 resize 函数中:
1. 首先分配新的内存空间来存储调整长度后的字符串。
2. 根据新的长度 new_size 与原字符串长度 len 的关系进行处理:
- 如果 new_size 小于 len ,则将原字符串的前 new_size 个字符复制到新字符串中,并添加字符串结束符 '\0' 。
- 如果 new_size 大于 len ,先复制原字符串,然后用填充字符 fill_char 填充剩余的位置,最后添加字符串结束符 '\0' 。
3. 释放原字符串的内存,并将 data 指针指向新分配的内存。
七、赋值运算符的深入探讨
前面已经实现了基本的赋值运算符 operator=(const MyString& other) ,它用于处理对象之间的赋值操作,实现深拷贝。但在实际应用中,还有一些特殊情况和性能优化的考虑。
7.1 自赋值情况的处理
在之前的赋值运算符实现中,我们通过 if (this != &other) 来检查自赋值情况。这是非常必要的,因为如果不检查自赋值,在释放 this 对象的 data 内存后,就无法再访问 other 对象的 data 了(因为它们已经是同一个对象),从而导致错误。
例如,以下代码展示了如果不处理自赋值情况会发生什么:
cpp

MyString s("Test");

s = s; // 自赋值
如果赋值运算符没有自赋值检查,就会先释放 s 的 data 内存,然后尝试从已经释放的内存中复制数据,这会导致未定义行为。
7.2 移动赋值运算符(C++11及以后)
C++11引入了移动语义,为了提高性能,我们可以实现移动赋值运算符 operator=(MyString&& other) 。移动赋值运算符用于处理右值(临时对象)的赋值操作,它可以直接转移资源(如 data 指针)的所有权,而不需要进行深拷贝,从而避免不必要的内存分配和复制操作。
以下是移动赋值运算符的实现代码:
cpp

MyString& operator=(MyString&& other) noexcept {

    if (this != &other) {

        delete[] data;

        data = other.data;

        other.data = nullptr;

    }

    return *this;

}
在上述代码中:
1. 同样先检查自赋值情况。
2. 释放 this 对象原来的 data 内存。
3. 将 other 对象的 data 指针赋值给 this 对象的 data ,并将 other 对象的 data 指针置为 nullptr ,这样就完成了资源的转移。
4. 最后返回 *this ,以支持链式赋值。
通过实现移动赋值运算符,当我们对右值进行赋值操作时,就可以提高程序的性能。例如:
cpp

MyString s1("Hello");

MyString s2("World");

s2 = std::move(s1); // 调用移动赋值运算符
这里 std::move 函数将 s1 转换为右值,从而触发移动赋值运算符,直接转移 s1 的资源给 s2 ,而不是进行深拷贝。
八、 + 运算符的重载
为了让自定义的 MyString 类能够像标准库中的 string 类一样进行字符串连接操作,我们需要重载 + 运算符。 + 运算符的重载有两种常见形式:一种是将两个 MyString 对象连接,另一种是将 MyString 对象和一个 C 风格字符串( const char* )连接。
以下是实现代码:
cpp

#include <iostream>

#include <cstring>


class MyString {

private:

    char* data;

public:

    MyString(const char* str = "") {

        data = new char[strlen(str) + 1];

        strcpy(data, str);

    }

    MyString(const MyString& other) {

        data = new char[strlen(other.data) + 1];

        strcpy(data, other.data);

    }

    MyString& operator=(const MyString& other) {

        if (this != &other) {

            delete[] data;

            data = new char[strlen(other.data) + 1];

            strcpy(data, other.data);

        }

        return *this;

    }

    MyString& operator=(MyString&& other) noexcept {

        if (this != &other) {

            delete[] data;

            data = other.data;

            other.data = nullptr;

        }

        return *this;

    }

    ~MyString() {

        delete[] data;

    }

    const char* get_data() const {

        return data;

    }

    // 重载大于运算符

    bool operator>(const MyString& other) const {

        return strcmp(data, other.data) > 0;

    }

    // 重载小于运算符

    bool operator<(const MyString& other) const {

        return strcmp(data, other.data) < 0;

    }

    // 重载大于等于运算符