Vue3高级用法
- 响应式
- Vue2:Object.defineProperty
- Object.defineProperty
- this.$set设置响应式
- Vue3:Proxy
- composition API
- Vue2 option API和Vue3 compositionAPI
- reactive和shallowReactive
- readonly效果
- toRefs效果
- 生命周期
- main.js
- index.html
- LifeCycle.vue
- 异步组件元素节点
- 正常写
- index.html
- main.js
- Async.vue
- AsyncComp.vue
- 使用异步
- main.js
- teleport 传送门—createPortal React
- index.html
- main.js
- Dialog.vue
- 自定义hooks
- index.html
- main.js
- useMousePosition.js
- MouseMove.vue
作业:Vue3官网所有内容过一遍 Vue3
响应式
- Vue2:Object.defineProperty
- Vue3:Proxy
Vue2:Object.defineProperty
Object.defineProperty
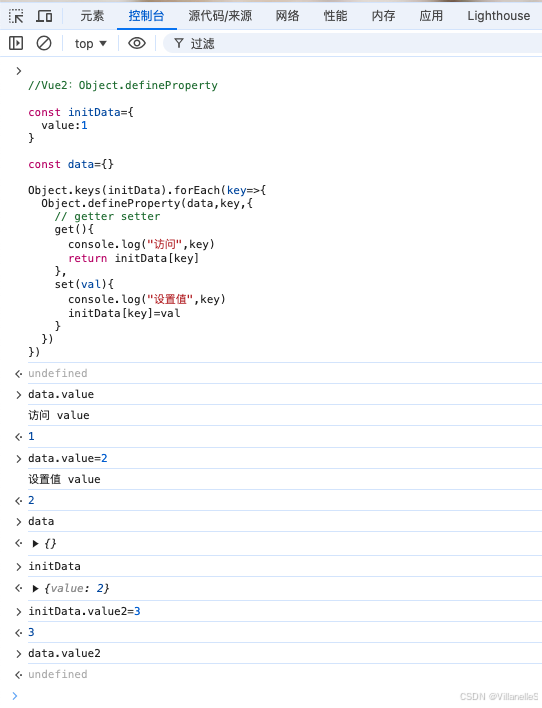
//Vue2:Object.defineProperty

const initData={
  value:1
}

const data={}

Object.keys(initData).forEach(key=>{
  Object.defineProperty(data,key,{
    // getter setter
    get(){
      console.log("访问",key)
      return initData[key]
    },
    set(val){
      console.log("设置值",key)
      initData[key]=val
    }
  })
})
this.$set设置响应式
set给目的对象添加响应式属性后,并触发事件更新
this.$set(data,a,1)


Vue3:Proxy
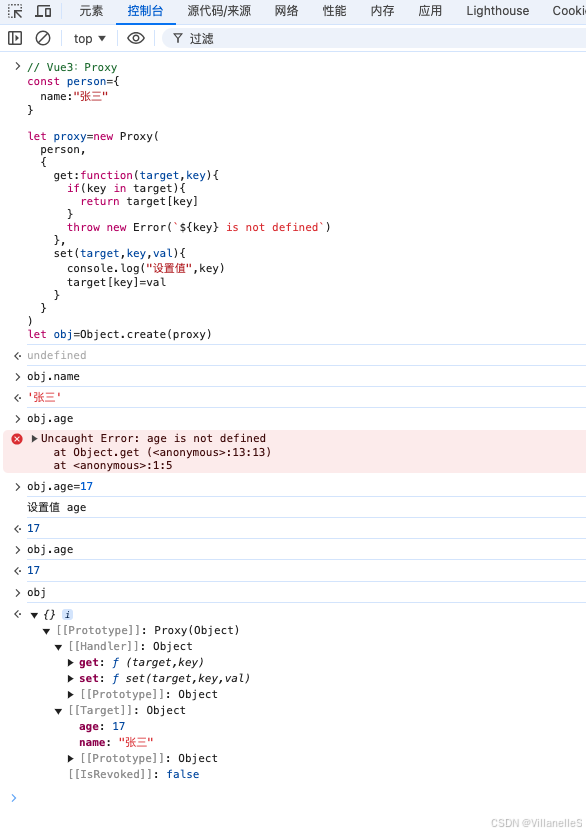
// Vue3:Proxy
const person={
  name:"张三"
}

let proxy=new Proxy(
  person,
  {
    get:function(target,key){
      if(key in target){
        return target[key]
      }
      throw new Error(`${key} is not defined`)
    },
    set(target,key,val){
      console.log("设置值",key)
      target[key]=val
    }
  }
)
let obj=Object.create(proxy)
proxy的正规写法:
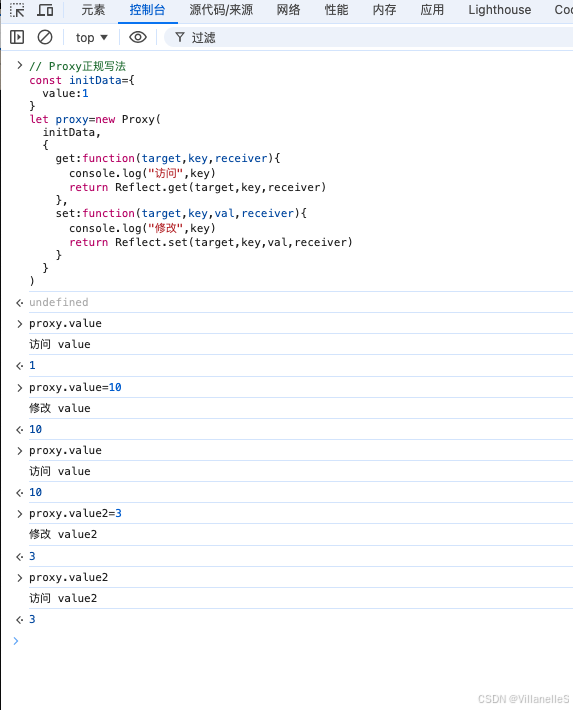
// Proxy正规写法
const initData={
  value:1
}
let proxy=new Proxy(
  initData,
  {
    get:function(target,key,receiver){
      console.log("访问",key)
      return Reflect.get(target,key,receiver)
    },
    set:function(target,key,val,receiver){
      console.log("修改",key)
      return Reflect.set(target,key,val,receiver)
    }
  }
)
拓展
怎么将esNext转换为es5写法?
通过babel,国外主流的swc转换
composition API
Vue2 option API和Vue3 compositionAPI
Vue3的compositionAPI和Vue2的optionsAPI的最大的区别是:更加倾向于函数式编程以及Vue3支持多个根节点
Vue2:
<template>
   <!--XXXX-->
</template>
<script>
  export default {
     data(){
       return{ XXXX }
     },
     methods:{},
     computed:{}
  }
</script>
<style></style>
Vue2最容易产生的问题是:写一个文件一开始还好,写着写着就发现这个文件内容非常非常多,非常非常繁琐。
OptionAPI非常非常容易导致一个文件内容非常非常多,越往后越难改,非常非常容易出bug
Rect相对于Vue不容易写出那么夸张的效果
Vue2的mixin将组件单一内容拆解到一个文件,太灵活了,对多人协作不友好
=>Vue3主要解决的就是这个问题,将明确的逻辑抽象到一起
React=>自定义hook,将一部分的逻辑功能放到单一组件里去维护
App.vue
<template>
<div class="mine"></div>
</template>
<script>
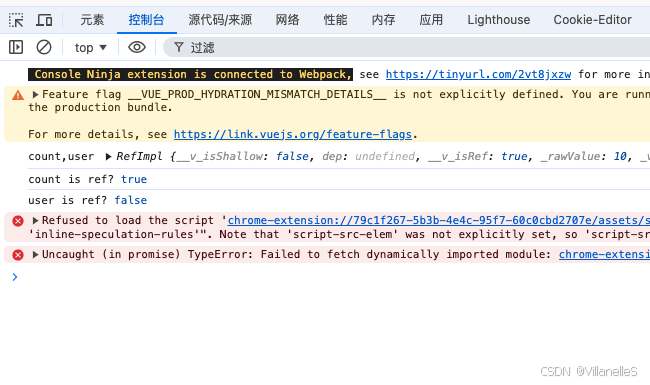
import {defineComponent,ref,isRef} from 'vue'
export default defineComponent({
// 相当于Vue2生命周期中的beforeCreate,created
setup(){
const count=ref(10)
const user="张三"
console.log("count,user",count,count.value,user)
console.log("count is ref?",isRef(count))
console.log("user is ref?",isRef(user))
}
})
</script>
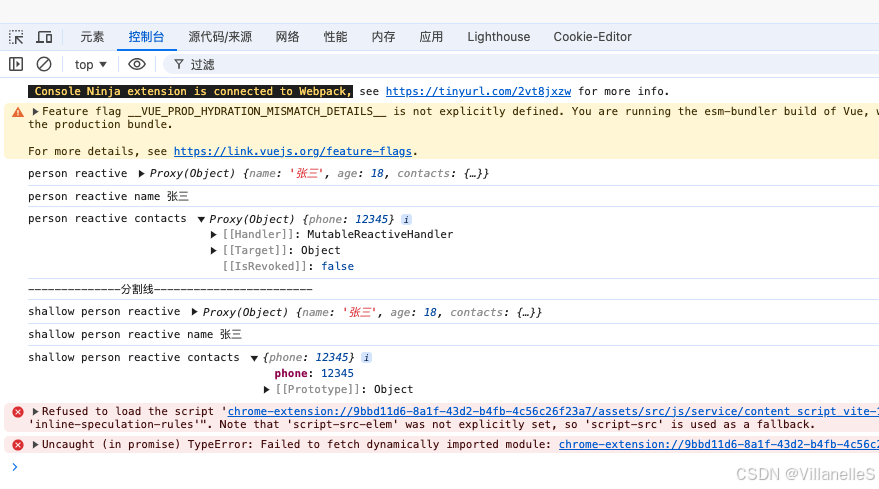
reactive和shallowReactive
<template>
  <div class="mine"></div>
</template>

<script>
import {defineComponent,reactive,shallowReactive} from 'vue'
export default defineComponent({
  // 相当于Vue2生命周期中的beforeCreate,created
  setup(){
    const person={
      name:"张三",
      age:18,
      contacts:{
        phone:12345
      }
    }

    const personReactive=reactive(person)
    console.log("person reactive",personReactive)
    console.log("person reactive name",personReactive.name)
    console.log("person reactive contacts",personReactive.contacts)

    console.log("--------------分割线------------------------")

    const shallowPersonReactive=shallowReactive(person)
    console.log("shallow person reactive",shallowPersonReactive)
    console.log("shallow person reactive name",shallowPersonReactive.name)
    console.log("shallow person reactive contacts",shallowPersonReactive.contacts)


  }
})
</script>
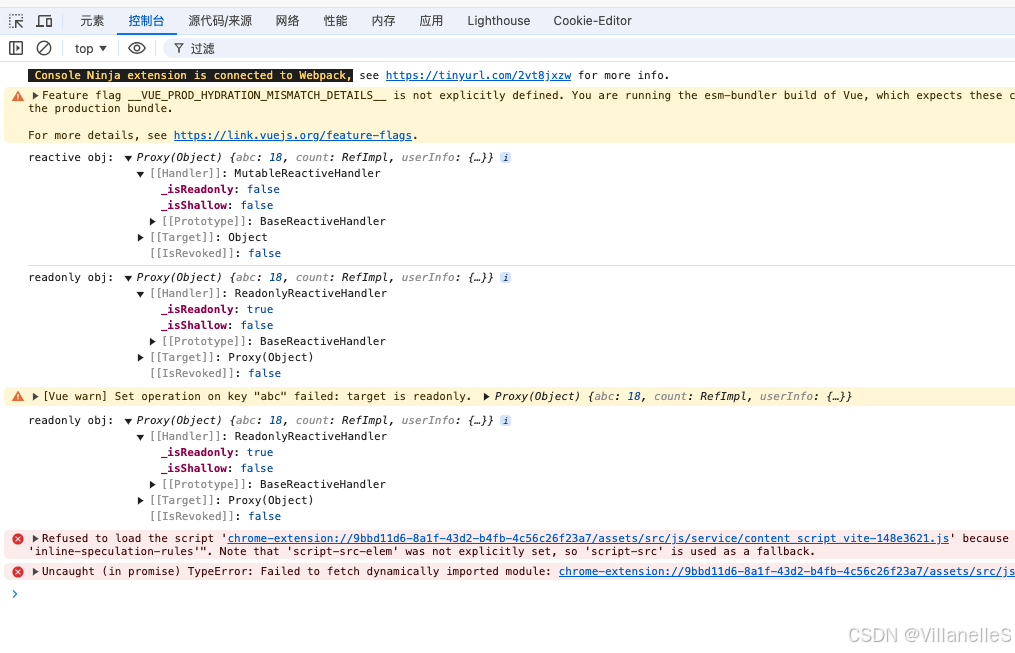
readonly效果
<template>
  <div class="mine"></div>
</template>

<script>
import {defineComponent,ref,reactive,readonly} from 'vue'
export default defineComponent({
  // 相当于Vue2生命周期中的beforeCreate,created
  setup(){
    const count=ref(10)
    const obj=reactive({
      abc:18,
      count,
      userInfo:{
        age:66
      }
    })

    console.log("reactive obj:",obj)
    // 在Proxy的set中,是不允许做修改的
    const objOnly=readonly(obj)

    console.log("readonly obj:",objOnly)
    objOnly.abc=100
    console.log("readonly obj:",objOnly)

  }
})
</script>
toRefs效果
<template>
  <div class="mine"></div>
</template>

<script>
import {defineComponent,ref,isRef,reactive,shallowReactive,readonly, toRefs} from 'vue'
export default defineComponent({
  // 相当于Vue2生命周期中的beforeCreate,created
  setup(){
    const count=ref(10)
    const obj=reactive({
      abc:18,
      count,
      userInfo:{
        age:66
      }
    })

    console.log("reactive obj:",obj)

    console.log("toRefs obj",toRefs(obj))

  }
})
</script>
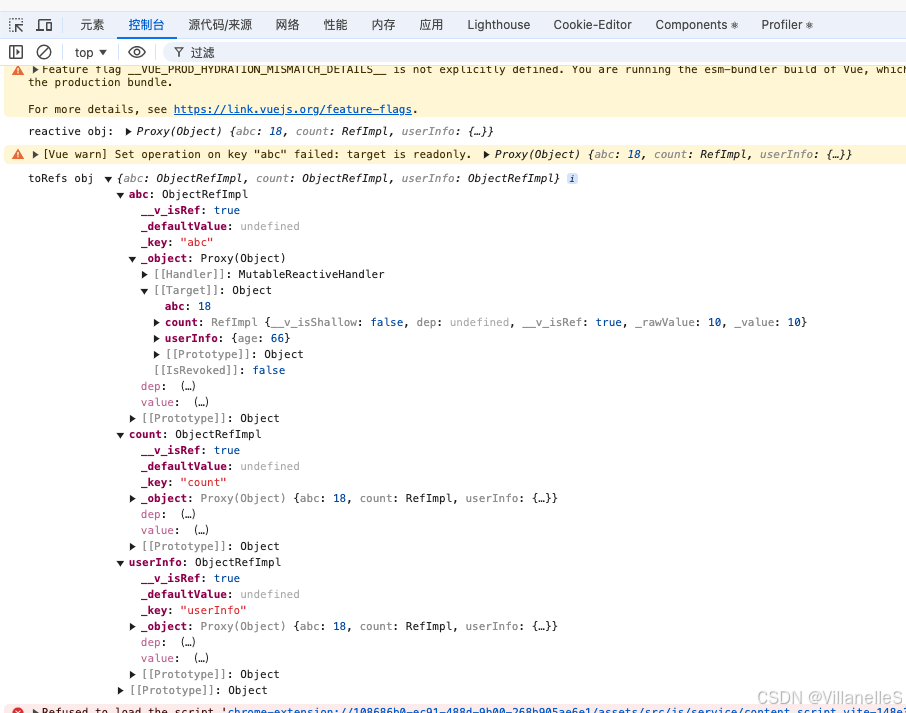
如果是通过ref创建出来的,一般是RefImpl,如果是通过toRefs创建出来的,一般把toRefs视为一个对象,针对对象里的所有属性,全部转换为toRefs的效果
生命周期
经常应用的场景:
1.初始化 mount
2.数据变化 update
3.卸载 unmount
加入LiftCycle组件
main.js
import { createApp } from 'vue'
import App from './App.vue'

import LifeCycle from './LifeCycle.vue'

createApp(App).mount('#app')

createApp(LifeCycle).mount('#lifeCycle')
index.html
<div id="lifeCycle"></div>
全部:
<!DOCTYPE html>
<html lang="">
  <head>
    <meta charset="utf-8">
    <meta http-equiv="X-UA-Compatible" content="IE=edge">
    <meta name="viewport" content="width=device-width,initial-scale=1.0">
    <link rel="icon" href="<%= BASE_URL %>favicon.ico">
    <title><%= htmlWebpackPlugin.options.title %></title>
  </head>
  <body>
    <noscript>
      <strong>We're sorry but <%= htmlWebpackPlugin.options.title %> doesn't work properly without JavaScript enabled. Please enable it to continue.</strong>
    </noscript>
    <div id="app"></div>
    <!-- built files will be auto injected -->
     <div id="lifeCycle"></div>
  </body>
</html>
LifeCycle.vue
<template>
    <div>
      {{ count }}
      {{ name }}
    </div>
    <button @click="addNumber">+1</button>
    <button @click="updateName">update name</button>
</template>
<script>
export default {
   data() {
      return {
        count:0,
        name:"张三"
      }
   },
   methods:{
    addNumber(){
      this.count++
    },
    updateName(){
      this.name = "李四"
    }
   },
  //  1.初始化,data还不能用
   beforeCreate(){
    console.log("beforeCreate")
   },
  //   data可以用,dom不可用
   created(){
    console.log("created")
   },
  //   挂载之前,DOM还没有生成
   beforeMount(){
    console.log("beforeMount")
   },
  //   在VNode(初次渲染/更新)渲染时调用
   renderTracked({key,target,type}){
    console.log("renderTracked",key,target,type)
   },
  //  挂载之后,DOM已经生成
   mounted(){
    console.log("mounted")
    console.log("-------------------------------------------------------------")
   },


   //  2.update
  renderTriggered({key,target,type}){
    console.log("renderTriggered",key,target,type)
  },
  beforeUpdate(){
    console.log("beforeUpdate")
  },
  renderTracked({key,target,type}){
    console.log("renderTriggered",key,target,type)
  },
  updated(){
    console.log("updated")
  },

  // 3.卸载
  beforeUnmount(){
    console.log("beforeUnmount")
  },
  unmounted(){
    console.log("unmounted")
  }
}
</script>
<style scoped>

</style>
异步组件元素节点
正常写
- src
- Async.vue
- components
- AsyncComp.vue
index.html
<!-- 3.异步组件元素节点 -->
<div id="async"></div>
<!DOCTYPE html>
<html lang="">
  <head>
    <meta charset="utf-8">
    <meta http-equiv="X-UA-Compatible" content="IE=edge">
    <meta name="viewport" content="width=device-width,initial-scale=1.0">
    <link rel="icon" href="<%= BASE_URL %>favicon.ico">
    <title><%= htmlWebpackPlugin.options.title %></title>
  </head>
  <body>
    <noscript>
      <strong>We're sorry but <%= htmlWebpackPlugin.options.title %> doesn't work properly without JavaScript enabled. Please enable it to continue.</strong>
    </noscript>
    <!-- 1.composition 元素节点 -->
    <div id="app"></div>
    <!-- built files will be auto injected -->
     <!-- 2.生命周期元素节点 -->
     <div id="lifeCycle"></div>
     <!-- 3.异步组件元素节点 -->
      <div id="async"></div>
  </body>
</html>
main.js
import { createApp } from 'vue'
import App from './App.vue'

import LifeCycle from './LifeCycle.vue'

import Async from './Async.vue'
import AsyncComp from './components/AsyncComp.vue'

createApp(App).mount('#app')

createApp(LifeCycle).mount('#lifeCycle')

const async=createApp(Async)
async.component("async-comp",AsyncComp)
async.mount('#async')
Async.vue
<template>
  ASYNC
  <async-comp></async-comp>
</template>

<script setup lang="ts">

</script>

<style scoped>

</style>
AsyncComp.vue
<template>
  <div>async defineComponent</div>
</template>

<script setup lang="ts">

</script>

<style scoped>

</style>
但是这样执行
pnpm run build
打包后,只会生成一个js文件

使用异步
main.js
const AsyncComp=defineAsyncComponent(()=>import('./components/AsyncComp.vue'))

async.component("async-comp",AsyncComp)
全部代码:
import { createApp,defineAsyncComponent } from 'vue'
import App from './App.vue'

import LifeCycle from './LifeCycle.vue'

import Async from './Async.vue'
// import AsyncComp from './components/AsyncComp.vue'

createApp(App).mount('#app')

createApp(LifeCycle).mount('#lifeCycle')

const async=createApp(Async)

const AsyncComp=defineAsyncComponent(()=>import('./components/AsyncComp.vue'))

async.component("async-comp",AsyncComp)
async.mount('#async')
再执行
pnpm run build
会生成两个js文件

这两个文件是将我们异步的组件给单独拿出来,将异步组件单独拿出来的效果是,因为要做的是异步组件的动态引入,一般是额外使用或之后去用,就没有必要跟原先代码单独一起打包。
对应的是React.lazy和React中的suspense
const myComponent=React.lazy(()=>import('./Component'))

function MyComponent(){
    return (
        <div>
            <Suspense fallback={<Loading />}>
              <Component />
            </Suspense>
        </div>
    )
}
teleport 传送门—createPortal React
将子节点渲染到父节点以外的DOM的方式
- src
- Dialog.vue
index.html
<!-- 4.teleport 元素节点 -->
<div id="dialog"></div>
全部代码:
<!DOCTYPE html>
<html lang="">
  <head>
    <meta charset="utf-8">
    <meta http-equiv="X-UA-Compatible" content="IE=edge">
    <meta name="viewport" content="width=device-width,initial-scale=1.0">
    <link rel="icon" href="<%= BASE_URL %>favicon.ico">
    <title><%= htmlWebpackPlugin.options.title %></title>
  </head>
  <body>
    <noscript>
      <strong>We're sorry but <%= htmlWebpackPlugin.options.title %> doesn't work properly without JavaScript enabled. Please enable it to continue.</strong>
    </noscript>
    <!-- 1.composition 元素节点 -->
    <div id="app"></div>
    <!-- built files will be auto injected -->
     <!-- 2.生命周期元素节点 -->
     <div id="lifeCycle"></div>
     <!-- 3.异步组件元素节点 -->
      <div id="async"></div>
      <!-- 4.teleport 元素节点 -->
       <div id="dialog"></div>
  </body>
</html>
main.js
const dialog=createApp(Dialog)
dialog.mount('#dialog')
全部代码:
import { createApp,defineAsyncComponent } from 'vue'
import App from './App.vue'

import LifeCycle from './LifeCycle.vue'

import Async from './Async.vue'
import Dialog from './Dialog.vue'
// import AsyncComp from './components/AsyncComp.vue'

createApp(App).mount('#app')

createApp(LifeCycle).mount('#lifeCycle')

const async=createApp(Async)

const AsyncComp=defineAsyncComponent(()=>import('./components/AsyncComp.vue'))

async.component("async-comp",AsyncComp)
async.mount('#async')

const dialog=createApp(Dialog)
dialog.mount('#dialog')
Dialog.vue
<template>
  <div class="portals">
    <button @click="showNotification">切换弹窗</button>
    <teleport to="#dialog">
      <div v-if="isOpen" class="notification">
        这是一个弹窗
      </div>
    </teleport>
  </div>
</template>
<script>
import { ref } from 'vue';

export default {
    setup(){
        const isOpen=ref(false)
        let closePopup
        const showNotification=()=>{
            isOpen.value=true

            clearTimeout(closePopup)

            closePopup=setTimeout(()=>{
                isOpen.value=false
            },20000)
        }

        return {
            isOpen,
            showNotification
        }
    }
}
</script>
<style scoped>
.notification{
    position: fixed;
    bottom: 20px;
    background-color: #fff;
    border: 1px solid #ccc;
    width: 300px;
    padding:30px;
}
</style>
弹窗是挂载在dialog下的,而不是protals下

自定义hooks
hooks最重要的特点:对于我们来说,不需要关心内部的逻辑,而且与Vue2相比,提供了一个非常合理的方式,使用Vue2的option API很容易写出三五千行的代码,但是对于函数式编程来说,按照逻辑功能拆分下来,一个文件至少包含一个功能,其他功能引用即可。
- public
- index.html
- src
- hooks
- useMousePosition.js
- MouseMove.vue
- main.js
- hooks
index.html
<!-- 5.自定义hook -->
<div id="mousemove"></div>
全部代码:
<!DOCTYPE html>
<html lang="">
  <head>
    <meta charset="utf-8">
    <meta http-equiv="X-UA-Compatible" content="IE=edge">
    <meta name="viewport" content="width=device-width,initial-scale=1.0">
    <link rel="icon" href="<%= BASE_URL %>favicon.ico">
    <title><%= htmlWebpackPlugin.options.title %></title>
  </head>
  <body>
    <noscript>
      <strong>We're sorry but <%= htmlWebpackPlugin.options.title %> doesn't work properly without JavaScript enabled. Please enable it to continue.</strong>
    </noscript>
    <!-- 1.composition 元素节点 -->
    <div id="app"></div>
    <!-- built files will be auto injected -->
    <!-- 2.生命周期元素节点 -->
    <div id="lifeCycle"></div>
    <!-- 3.异步组件元素节点 -->
    <div id="async"></div>
    <!-- 4.teleport 元素节点 -->
    <div id="dialog"></div>
    <!-- 5.自定义hook -->
    <div id="mousemove"></div>
  </body>
</html>
main.js
import MouseMove from './MouseMove.vue'

const mousemove=createApp(MouseMove)
mousemove.mount('#mousemove')
全部代码:
import { createApp,defineAsyncComponent } from 'vue'
import App from './App.vue'

import LifeCycle from './LifeCycle.vue'

import Async from './Async.vue'
import Dialog from './Dialog.vue'
// import AsyncComp from './components/AsyncComp.vue'
import MouseMove from './MouseMove.vue'


// createApp(App).mount('#app')

// createApp(LifeCycle).mount('#lifeCycle')

// const async=createApp(Async)

// const AsyncComp=defineAsyncComponent(()=>import('./components/AsyncComp.vue'))

// async.component("async-comp",AsyncComp)
// async.mount('#async')

// const dialog=createApp(Dialog)
// dialog.mount('#dialog')

const mousemove=createApp(MouseMove)
mousemove.mount('#mousemove')
useMousePosition.js
import { onMounted, onUnmounted, ref } from "vue";

function useMousePosition() {
  const x=ref(0)
  const y=ref(0)


  const updateMouse=e=>{
    x.value=e.pageX
    y.value=e.pageY
  }

  onMounted(()=>{
    document.addEventListener('click',updateMouse)
  })

  onUnmounted(()=>{
    document.removeEventListener('click',updateMouse)
  })

  return{
    x,
    y
  }
}

export default useMousePosition
MouseMove.vue
<!-- 提供鼠标位置自定义hooks -->
<template>
  <div>
    <p>X:{{x}}</p>
    <p>Y:{{y}}</p>
  </div>
</template>

<script>
import { defineComponent } from 'vue';
import useMousePosition from './hooks/useMousePosition';

export default defineComponent({
  setup(){
    const {x,y}=useMousePosition()
    return {
      x,y
    }
  }
})
</script>

<style scoped>

</style>