一、手写Spring框架
$ 准备工作
- 创建新的模块 myspring
- 我们采用边测试边写框架的方式,所以还需要我们提供待测试的类
- 一号嘉宾——User类:用于一般类型传值测试
package com.powernode.myspring.bean; /** * @author Bonbons * @version 1.0 */ public class User { private String name; private int age; public void setAge(int age) { this.age = age; } public void setName(String name) { this.name = name; } @Override public String toString() { return "User{" + "name='" + name + '\'' + ", age=" + age + '}'; } }- 二号嘉宾——UserDao类:提供一个insert方法,主要用于创建对象后被UserService类调用
package com.powernode.myspring.bean; /** * @author Bonbons * @version 1.0 */ public class UserDao { public void insert(){ System.out.println("向数据库中插入一条记录!"); } }- 三号嘉宾——UserService类:演示非一般类型传递参数,此处也就是让对象产生关系
package com.powernode.myspring.bean; /** * @author Bonbons * @version 1.0 */ public class UserService { private UserDao userDao; public void save(){ userDao.insert(); } } - 编写我们的配置文件,这个是假设使用者用我们提供的框架时写的配置文件
<?xml version="1.0" encoding="UTF-8"?> <beans> <!--注意我们不使用spring为我们提供的头文件--> <bean id="user" class="com.powernode.myspring.bean.User"> <property id="name" value="白居易"/> <property id="age" value="20" /> </bean> <bean id="userDaoBean" class="com.powernode.myspring.bean.UserDao"/> <bean id="userService" class="com.powernode.myspring.bean.UserService"> <property value="userDao" ref="userDaoBean"/> </bean> </beans> - 我们的框架有什么使用条件?
- 简单类型只包括:八种基本类型、八种包装类、字符串类型
- 通过getBean方法获取对象的时候,只能传入Bean的id,无法直接指定对象类型,但是可以强转
- 只提供了通过类路径加载XML文件
- 我们仅实现了通过 set 方法注入
- 我们的框架只实现了几个单一的功能:
- 可以根据我们传入的Spring配置文件,解析XML
- 通过getBean方法可以获取Bean的实例
$ 编写接口和实现类
-
在前面我们测试spring的程序中知道:
- 我们解析XML文件的时候,编译类型为 ApplicationContext,运行类型为 ClassPathXMLApplicationContext
- 通过getBean方法获取实例,然后可以输出对象也可以调用对象的方法和属性
-
所以,我们选择以下的设计方案:
- 编写一个ApplicationContext接口,接口中有一个getBean方法
package org.myspringframework.core; /** * MySpring框架应用上下文 * @author Bonbons * @version 1.0 */ public interface ApplicationContext { /** *为了简化框架,无需传入Bean的类型,我们返回Object类型的Bean * @param beanName bean的id * @return 根据指定的Bean返回Object对象 */ Object getBean(String beanName); }- 编写一个接口的实现类ClassPathXmlApplicationContext,通过有参构造方法完成对象的创建,getBean方法返回Bean
- 整个解析过程分为两个部分:一部分是曝光,另一部分是注入参数值
- 我们需要额外创建一个Map集合模拟三级缓存,但是我们这只有一个,曝光=创建的Bean添加到集合中
- 注入参数我们通过反射机制调用对应的set方法
package org.myspringframework.core;

import org.dom4j.Element;
import org.slf4j.Logger;
import org.slf4j.LoggerFactory;


import org.dom4j.Document;
import org.dom4j.Node;
import org.dom4j.io.SAXReader;

import java.io.InputStream;

import java.lang.reflect.Constructor;
import java.lang.reflect.Field;
import java.lang.reflect.Method;
import java.util.HashMap;
import java.util.List;
import java.util.Map;

/**
 * @author Bonbons
 * @version 1.0
 */
public class ClassPathXmlApplicationContext implements ApplicationContext{

    // 利用集合保存我们创建的对象
    private Map<String, Object> singletonObjects = new HashMap<>();
    // 创建日志对象
    private static final Logger logger = LoggerFactory.getLogger(ClassPathXmlApplicationContext.class);

    /**
     * 利用构造方法解析我们传入的配置文件 >> 创建所有的Bean对象[scope="singleton"]
     * @param configLocation spring配置文件
     */
    public ClassPathXmlApplicationContext(String configLocation){
        try{
            // 创建dom4j解析XML文件的核心对象
            SAXReader reader = new SAXReader();
            // 我们从类路径下获取一个数据流
            InputStream in = ClassLoader.getSystemClassLoader().getResourceAsStream(configLocation);
            // 读取文件,获得配置文件的文档
            Document document = reader.read(in);
            // 从文档中获取所有的bean标签
            List<Node> nodes = document.selectNodes("//bean");
            nodes.forEach(node -> {
                try{
                    // 将我们获取到的bean向下转型,因为Element中方更丰富
                    Element beanElt = (Element) node;
                    // 通过attributeValue方法获取我们的属性值
                    String id = beanElt.attributeValue("id");
                    String className = beanElt.attributeValue("class");
                    // 获取类
                    Class<?> aClass = Class.forName(className);
                    // 获取类的无参构造方法
                    Constructor<?> defaultCon = aClass.getDeclaredConstructor();
                    // 通过无参构造方法创建类的对象
                    Object bean = defaultCon.newInstance();
                    // 将我们的实例添加到集合中 >> 曝光
                    singletonObjects.put(id, bean);
                }catch (Exception e){
                    e.printStackTrace();
                }

            });

        // 再次遍历所有的Bean,因为我们要为属性赋值
        nodes.forEach(node -> {
            try{
                // 将元素类型转换为 Element
                Element beanElt = (Element) node;
                // 获取Bean的id和class
                String id = beanElt.attributeValue("id");
                String className = beanElt.attributeValue("class");
                // 根据类名获取类
                Class<?> clazz = Class.forName(className);
                // 获取所有子元素,也就是所有的property标签
                List<Element> propertys = beanElt.elements("property");
                // 遍历所有属性标签
                propertys.forEach(property ->{
                    try{
                        // 获取属性名
                        String propertyName = property.attributeValue("name");

                        // 获取Filed(属性)
                        Field field = clazz.getDeclaredField(propertyName);
                        // 拼接出set方法名
                        String setMethodName = "set" + propertyName.toUpperCase().charAt(0) + propertyName.substring(1);
                        // 创建set方法
                        Method setMethod = clazz.getDeclaredMethod(setMethodName, field.getType());
                        // 获取属性值
                        String value = property.attributeValue("value");
                        String ref = property.attributeValue("ref");
                        // 调用set方法
                        if(value != null){
                            // 我们需要根据属性的类型,转换属性值的类型,因为我们获取到的属性值是String类型的
                            Object actualValue = null;
                            String propertyTypeSimpleName = field.getType().getSimpleName();

                            // 分情况处理
                            switch (propertyTypeSimpleName){
                                case "byte":
                                    actualValue = Byte.parseByte(value);
                                    break;
                                case "short":
                                    actualValue = Short.parseShort(value);
                                    break;
                                case "int":
                                    actualValue = Integer.valueOf(value);
                                    break;
                                case "long":
                                    actualValue = Long.parseLong(value);
                                    break;
                                case "float":
                                    actualValue = Float.parseFloat(value);
                                    break;
                                case "double":
                                    actualValue = Double.parseDouble(value);
                                    break;
                                case "char":
                                    actualValue = value.charAt(0);
                                    break;
                                case "boolean":
                                    actualValue = Boolean.parseBoolean(value);
                                    break;
                                case "Byte":
                                    actualValue = Byte.valueOf(value);
                                    break;
                                case "Short":
                                    actualValue = Short.valueOf(value);
                                    break;
                                case "Integer":
                                    actualValue = Integer.valueOf(value);
                                    break;
                                case "Long":
                                    actualValue = Long.valueOf(value);
                                    break;
                                case "Float":
                                    actualValue = Float.valueOf(value);
                                    break;
                                case "Double":
                                    actualValue = Double.valueOf(value);
                                    break;
                                case "Boolean":
                                    actualValue = Boolean.valueOf(value);
                                    break;
                                case "Character":
                                    actualValue = Character.valueOf(value.charAt(0));
                                    break;
                                case "String":
                                    actualValue = value;
                                    break;
                            }
                            // 属性值是简单类型
                            setMethod.invoke(singletonObjects.get(id), actualValue);
                        }
                        if(ref != null){
                            // 属性值非简单类型
                            setMethod.invoke(singletonObjects.get(id), singletonObjects.get(ref));
                        }

                    }catch (Exception e){
                        e.printStackTrace();
                    }

                });

            }catch (Exception e){
                e.printStackTrace();
            }
        });
    }catch (Exception e){
        e.printStackTrace();
    }

}

    @Override
    public Object getBean(String beanName) {
        return singletonObjects.get(beanName);
    }
}
$ 打包测试
- 通过Maven提供的package完成打包:
右侧 Maven >> 找到我们的模块 >> Lifecycle >> package
- 创建新模块 myspring-test 进行测试
- 提供三个类、一个配置文件、一个测试方法对我们的框架进行测试
编写我们的 Vip 类
package com.powernode.myspring.bean;

/**
 * @author Bonbons
 * @version 1.0
 */
public class Vip {
    private String name;
    private int age;
    private double height;

    public void setName(String name) {
        this.name = name;
    }

    public void setAge(int age) {
        this.age = age;
    }

    public void setHeight(double height) {
        this.height = height;
    }

    @Override
    public String toString() {
        return "Vip{" +
                "name='" + name + '\'' +
                ", age=" + age +
                ", height=" + height +
                '}';
    }
}
编写我们的 orderDao 类
package com.powernode.myspring.bean;

/**
 * @author Bonbons
 * @version 1.0
 */
public class OrderDao {
    public void insert(){
        System.out.println("正在保存订单信息...");
    }
}
编写我们的 orderService 类
package com.powernode.myspring.bean;

/**
 * @author Bonbons
 * @version 1.0
 */
public class OrderService {
    private OrderDao orderDao;
    public void generate(){
        orderDao.insert();
    }

    public void setOrderDao(OrderDao orderDao) {
        this.orderDao = orderDao;
    }

    @Override
    public String toString() {
        return "OrderService{" +
                "orderDao=" + orderDao +
                '}';
    }
}
编写我们的测试方法 >> 程序可以正常执行 >> 框架测试成功
package com.powernode.myspring.test;

import com.powernode.myspring.bean.OrderService;
import com.powernode.myspring.bean.Vip;
import org.junit.Test;
import org.myspringframework.core.ApplicationContext;
import org.myspringframework.core.ClassPathXmlApplicationContext;

/**
 * @author Bonbons
 * @version 1.0
 */
public class MySpringTest {
    @Test
    public void testMySpring(){
        ApplicationContext applicationContext = new ClassPathXmlApplicationContext("spring.xml");
        Vip vip = (Vip) applicationContext.getBean("vip");
        System.out.println(vip);
        OrderService orderService = (OrderService) applicationContext.getBean("orderService");
        orderService.generate();
    }
}

框架Jar包阿里云盘连接
二、Spring Ioc 注解式开发
- 在Spring6中提倡全注解开发,不使用XML文件进行配置
- 本部分的主要内容为结合案例讲解各种注解如何使用,以及运行过程中遇到的问题如何解决
$ 回顾注解
-
注解分为哪些类型?普通注解、元注解、自定义注解
- 普通注解包括三个:
- @Override 用于重写父类的方法声明
- @Deprecated 用于对废弃方法的声明
- @SuppressWarings 用于抑制警告的声明
- 元注解包括五个:
- @Documented 代表用javadoc记录这个文档
- @Inherited 代表子类如果没有任何注解修饰,就会继承这个父类的注解
- @Repeatable 代表标记的注解可以多次应用与相同的声明或类型
- @Target 代表注解的应用范围:
- ElementType.PACKAGE:可作用在包上
- ElementType.TYPE:可作用在类、接口、枚举上
- ElementType.ANNOTATION_TYPE:可以作用在注解上
- ElementType.FIELD:可作用在属性上
- ElementType.CONSTRUCTOR:可作用在构造方法上
- ElementType.METHOD:可作用在方法上
- ElementType.PARAMETER:可作用在方法参数上
- ElementType.LOCAL_VARIABLE:可作用在局部变量上,例如方法中定义的变量
- ElementType.TYPE_PARAMETER:可作用在类参数的声明上【JDK1.8之后】
- ElementType.TYPE_USE:可作用在使用的类型 【JDK1.8之后】
- @Retention注解包括三个:
- RetentionPolicy.SOURCE: 保留在源代码阶段,编译时就会被丢弃
- RetentionPolicy.CLASS: 保留到编译的时候,但是不会加载到JVM中
- RetentionPolicy.RUNTIME:加载到JVM中(内存中),可以通过反射机制获取到
- 自定义注解:我们自己定义的注解,分为定义和解析两部分的工作
- 普通注解包括三个:
🌔 1、如何自定义以及使用注解呢?
-
使用 @interface 声明,使用元注解来注解我们的自定义注解
package com.powernode.annotation; import java.lang.annotation.ElementType; import java.lang.annotation.Retention; import java.lang.annotation.RetentionPolicy; import java.lang.annotation.Target; /** * 自定义注解 * @author Bonbons * @version 1.0 */ // 此处的Target注解代表我们的Component注解可以用在类和属性上 @Target(value = {ElementType.TYPE, ElementType.FIELD}) // 此处的 Retention注解代表注解保留到JVM中 @Retention(value = RetentionPolicy.RUNTIME) public @interface Component { String value(); } -
如何使用我们的注解呢?
- 上面我们定义的注解可以会用在类和方法上,我们就在类上演示
package com.powernode.bean; import com.powernode.annotation.Component; /** * @author Bonbons * @version 1.0 */ @Component(value = "userBean") public class User { }- 对于注解的属性值为value可以直接省略
- 如果属性值为数组,然而数组只有一个值,我们可以省略大括号
🌔 2、反射机制是如何读取注解的呢?
- 需求:我们只知道包名,现在让我们根据包名获得包下的所有文件,如果使用了@Component注解那么就为其实例化
- 准备工作:
- 创建 com.powernode.bean 包
- 包下有两个文件 User、Vip、Order
- 编写我们的三个文件,Vip不使用指定的注解
编写我们的 User 类
package com.powernode.bean;

import com.powernode.annotation.Component;

/**
 * @author Bonbons
 * @version 1.0
 */
@Component(value = "userBean")
public class User {
}
编写我们的 Vip 类
package com.powernode.bean;

import com.powernode.annotation.Component;

/**
 * @author Bonbons
 * @version 1.0
 */
public class Vip {
}
编写我们的 Order 类
package com.powernode.bean;

import com.powernode.annotation.Component;

/**
 * @author Bonbons
 * @version 1.0
 */
@Component("orderBean")
public class Order {
}
编写我们的测试文件:[探索反射机制是如何读取注解的]
package com.powernode.client;

import com.powernode.annotation.Component;

import java.io.File;
import java.net.URL;
import java.util.Arrays;
import java.util.HashMap;
import java.util.Map;

/**
 * @author Bonbons
 * @version 1.0
 */
public class ComponentScan {
    public static void main(String[] args) throws Exception{
        /* 需求:我们给出一个包名,然后加载包下所有的文件
           对于使用Component注解的类,我们为其创建对象并添加
           到集合中
         */

        // 给出的包名
        String packageName = "com.powernode.bean";
        // 通过Map集合存储我们创建的对象
        Map<String, Object> map = new HashMap<>();
        // 将包名通过字符串替换转化为路径[正则表达式 \. 代表普通的点,Java中 \\ 代表一个\]
        String packagePath = packageName.replaceAll("\\.", "/");
        // 使用类加载器的类加载方法获取路径
        URL url = ClassLoader.getSystemClassLoader().getResource(packagePath);
        // 获取绝对路径
        String path = url.getPath();
        // 获取一个路径下的所有文件
        File file = new File(path);
        File[] files = file.listFiles();
        // 遍历我们的所有文件
        Arrays.stream(files).forEach(f -> {
            try {
            // 获得我们的全限定类名
            String className = packageName + "." + f.getName().split("\\.")[0];
            // 通过反射机制解析注解
                Class<?> aClass = Class.forName(className);
                // 判断是否使用了Component注解
                if (aClass.isAnnotationPresent(Component.class)) {
                    // 我们需要获取注解的value当做对象的id
                    Component annotation = aClass.getAnnotation(Component.class);
                    String id = annotation.value();
                    // 创建类的对象
                    try {
                        Object obj = aClass.newInstance();
                        // 添加到集合中
                        map.put(id, obj);
                    }catch (Exception e){
                        e.printStackTrace();
                    }

                }
            } catch (ClassNotFoundException e) {
                throw new RuntimeException(e);
            }
        });
        System.out.println(map);
    }
}

- 我们可以思考一下,之前写一个Spring模块的流程:
- 编写我们的类,然后去配置文件中声明Bean,参数注入
- 测试我们的程序,通过getBean获取Bean对象,然后调用
- 接下来我们逐步通过注解来完成这些工作
$ 注解声明 Bean
-
负责声明Bean的常用注解有四个:
- @Component 通用
package com.powernode.annotation; import java.lang.annotation.ElementType; import java.lang.annotation.Retention; import java.lang.annotation.RetentionPolicy; import java.lang.annotation.Target; @Target(value = {ElementType.TYPE}) @Retention(value = RetentionPolicy.RUNTIME) public @interface Component { String value(); }- @Controller 用于控制器
package org.springframework.stereotype; import java.lang.annotation.Documented; import java.lang.annotation.ElementType; import java.lang.annotation.Retention; import java.lang.annotation.RetentionPolicy; import java.lang.annotation.Target; import org.springframework.core.annotation.AliasFor; @Target({ElementType.TYPE}) @Retention(RetentionPolicy.RUNTIME) @Documented @Component public @interface Controller { @AliasFor( annotation = Component.class ) String value() default ""; }- @Service 用于业务层
package org.springframework.stereotype; import java.lang.annotation.Documented; import java.lang.annotation.ElementType; import java.lang.annotation.Retention; import java.lang.annotation.RetentionPolicy; import java.lang.annotation.Target; import org.springframework.core.annotation.AliasFor; @Target({ElementType.TYPE}) @Retention(RetentionPolicy.RUNTIME) @Documented @Component public @interface Service { @AliasFor( annotation = Component.class ) String value() default ""; }- @Repository 用于持久层
package org.springframework.stereotype; import java.lang.annotation.Documented; import java.lang.annotation.ElementType; import java.lang.annotation.Retention; import java.lang.annotation.RetentionPolicy; import java.lang.annotation.Target; import org.springframework.core.annotation.AliasFor; @Target({ElementType.TYPE}) @Retention(RetentionPolicy.RUNTIME) @Documented @Component public @interface Repository { @AliasFor( annotation = Component.class ) String value() default ""; } -
其实其他三个都是Component的别名,只是为了配合MVC三层架构,可以增强程序的可读性
-
String value() 代表为属性值的类型为String
- 加上 default “” 之后代表默认为空串
- 用于指明我们Bean的id,如果不传递 value的值,那么默认为类名首字母变小写后的结果
-
@AliasFor 代表别名的注解
$ 使用注解
-
要想使用我们的注解要满足一下几个条件:
- 第一步,模块中要有 aop 依赖 >> 我们添加spring-context依赖后会默认关联上aop依赖
- 第二步,如果使用配置文件,那么需要我们添加context命名空间 【后期可以完全注解式开发,配置文件都不需要】
- 第三步,在配置文件中使用context的标签来指定我们扫描哪些包
- 第四步,在Bean类上使用我们的注解
-
需求:扫描多个包,使用不同的Bean声明注解,使用配置文件演示使用value、省略value、省略属性值使用我们的注解
创建一个新模块 spring6-008-ioc-annotation,创建两个包 com.powernodespring6.bean、com.powernodespring6.bean_other
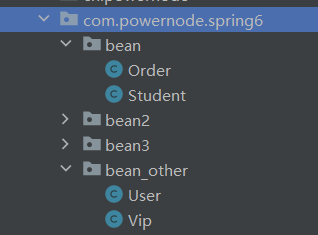
编写我们的四个文件: Order、Student、User、Vip >> Order、Vip不使用属性、Student省略value关键字、User使用了value关键字
package com.powernode.spring6.bean;

import org.springframework.stereotype.Repository;

/**
 * @author Bonbons
 * @version 1.0
 */
@Repository()
public class Order {
}
package com.powernode.spring6.bean;

import org.springframework.stereotype.Service;

/**
 * @author Bonbons
 * @version 1.0
 */
@Service("studnetBean")
public class Student {
}
package com.powernode.spring6.bean_other;

import org.springframework.stereotype.Component;

/**
 * @author Bonbons
 * @version 1.0
 */
@Component(value = "userBean")
public class User {
}
package com.powernode.spring6.bean_other;

import org.springframework.stereotype.Controller;

/**
 * @author Bonbons
 * @version 1.0
 */
@Controller
public class Vip {
}
接下来编写我们的配置文件 spring.xml,使用context命名空间,扫描多个包用逗号分开
<?xml version="1.0" encoding="UTF-8"?>
<beans xmlns="http://www.springframework.org/schema/beans"
       xmlns:xsi="http://www.w3.org/2001/XMLSchema-instance"
       xmlns:context="http://www.springframework.org/schema/context"
       xsi:schemaLocation="http://www.springframework.org/schema/beans http://www.springframework.org/schema/beans/spring-beans.xsd
                           http://www.springframework.org/schema/context http://www.springframework.org/schema/context/spring-context.xsd">
    <!--配置context命名空间-->
    <!--配置我们要扫描哪些包下的文件-->
    <context:component-scan base-package="com.powernode.spring6.bean,com.powernode.spring6.bean_other"/>
</beans>
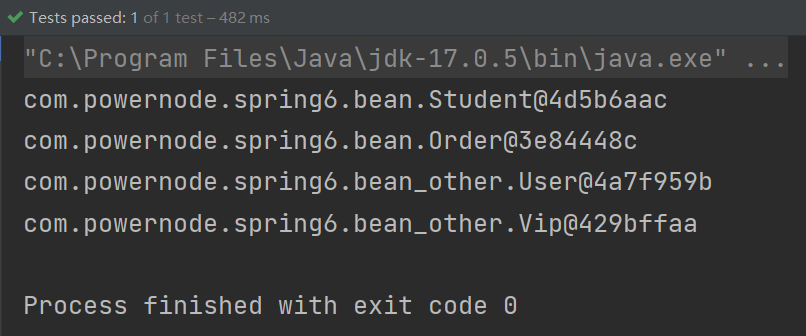
编写我们的测试程序
public class IoCAnnotationTest {
    @Test
    public void testBeanComponent(){
        // 创建我们的四个Bean的实例并打印
        ApplicationContext applicationContext = new ClassPathXmlApplicationContext("spring.xml");
        Student studentBean = applicationContext.getBean("studentBean", Student.class);
        Order orderBean = applicationContext.getBean("order", Order.class);
        User userBean = applicationContext.getBean("userBean", User.class);
        Vip vipBean = applicationContext.getBean("vip", Vip.class);
        System.out.println(studentBean);
        System.out.println(orderBean);
        System.out.println(userBean);
        System.out.println(vipBean);
    }
}
我们可以看到,可以正常通过Spring容器创建Bean的实例
$ 选择性实例化 Bean
-
上面的案例我们将得到Bean注解声明的类都实例化了,那么我们能否选择让使用某些注解的Bean实例化呢?
-
我们有两种方案可以满足上面这个需求,都是在配置文件中进行配置
- 方法一:
- 在扫描bean包的时候,通过
use-default-filters="false"使所有注解都不生效 - 然后内部通过
<context:include-filter type="annotation" expression="注解的全限定类名"/>指定哪个注解生效
- 在扫描bean包的时候,通过
- 方法二:
- 在扫描bean包的时候,让所有注解都生效(默认)
- 然后内部通过
<context:exclude-filter type="annotation" expression="注解的全限定类名"/>指定哪些注解失效
- 方法一:
-
需求:我们在一个源文件中创建多个类,然后配置一下让哪些注解生效,两种方式演示
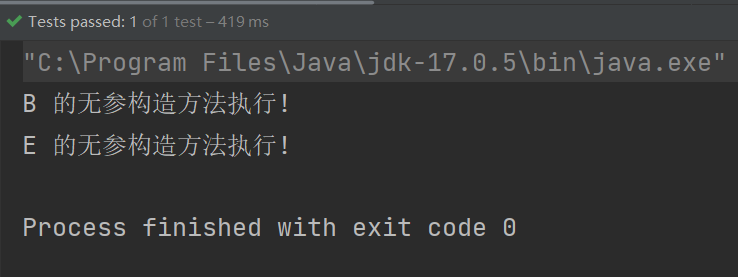
编写我们的源文件 A.java,为了方便查看哪些注解生效了,我们通过无参构造方法打印一句话
package com.powernode.spring6.bean2;

import org.springframework.stereotype.Component;
import org.springframework.stereotype.Controller;
import org.springframework.stereotype.Repository;
import org.springframework.stereotype.Service;

/**
 * @author Bonbons
 * @version 1.0
 */
@Component
public class A {
    public A() {
        System.out.println("A 的无参构造方法执行!");
    }
}
@Controller
class B {
    public B() {
        System.out.println("B 的无参构造方法执行!");
    }
}
@Repository
class C {
    public C() {
        System.out.println("C 的无参构造方法执行!");
    }
}
@Service
class D {
    public D() {
        System.out.println("D 的无参构造方法执行!");
    }
}
@Controller
class E {
    public E() {
        System.out.println("E 的无参构造方法执行!");
    }
}
编写我们的配置文件,此处我就直接给出了两种配置方法
<?xml version="1.0" encoding="UTF-8"?>
<beans xmlns="http://www.springframework.org/schema/beans"
       xmlns:xsi="http://www.w3.org/2001/XMLSchema-instance"
       xmlns:context="http://www.springframework.org/schema/context"
       xsi:schemaLocation="http://www.springframework.org/schema/beans http://www.springframework.org/schema/beans/spring-beans.xsd
                           http://www.springframework.org/schema/context http://www.springframework.org/schema/context/spring-context.xsd">

    <!--扫描-->
    <!--
        我们想让指定的注解生效,其余的都不发生作用:
            方法一:我们让这个包下所有配置的Bean注解都不生效,然后使用include标签让指定的注解生效
            方法二:我们让这个包下所有配置的Bean注解全部生效,然后使用exclude标签让指定的注解失效
    -->
    <context:component-scan base-package="com.powernode.spring6.bean2" use-default-filters="false">
        <context:include-filter type="annotation" expression="org.springframework.stereotype.Controller"/>
    </context:component-scan>
    <!--
    <context:component-scan base-package="com.powernode.spring6.bean2">
        <context:exclude-filter type="annotation" expression="org.springframework.stereotype.Controller"/>
    </context:component-scan>
    -->
</beans>
编写测试程序验证一下,因为默认无参构造方法在我们获取XML文件的时候就会调用,通过对应构造方法是否被调用就知道注解是否生效
@Test
public void testChooseComponent(){
	ApplicationContext applicationContext = new ClassPathXmlApplicationContext("spring-choose.xml");
}
- 这里我们只是实例化Bean,但是并没有给注入属性,接下来我们探讨如何通过注解注入属性值
$ 注解注入属性值
- 给Bean的属性赋值常用注解有四个:
- @Value 为简单类型的属性注入属性值
- @Autowired 采用byType的方式为非简单类型的属性注入属性值
- @Qualifier 与 @Autowired注解配合使用,采用byName的方式注入属性值
- @Resource 由JDK提供的注解,采用byName的方式注入
- 如果没有指定 name ,那么默认name为属性名首字母变小写后的结果
- 如果根据name没有找到,就会采用byType注入的方式
- 接下来我们分别展开论述
$$ Value 注解
- 当属性为简单类型的时候,我们可以通过 @Value 注解注入
- 该注解可以出现在属性上、setter方法上、以及构造方法的形参上
- 需求:我们设计一个案例,分别在属性上、set方法上、构造方法上使用该注解注入属性值,最后测试数据是否注入成功
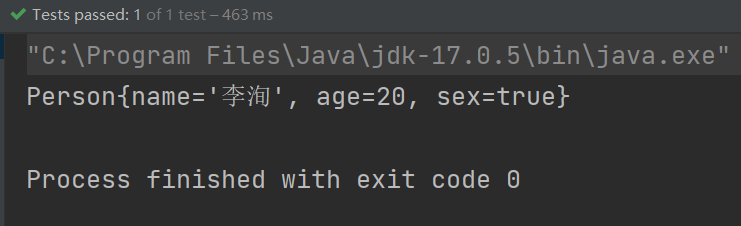
第一步,编写我们的Bean类 Person.java,这个类有三个私有属性,为了更好的演示这三种不同位置的注解注入方式,我采用:
通过在属性名上方使用注解为 name 属性注入
通过在set方法上方使用注解为 age 属性注入
通过在构造方法形参前面使用注解为 sex 属性注入 【此处的构造方法只为一个属性赋值】
package com.powernode.spring6.bean_other;

import org.springframework.beans.factory.annotation.Value;
import org.springframework.stereotype.Component;

/**
 * @author Bonbons
 * @version 1.0
 */
@Component
public class Person {
    @Value("李洵")
    private String name;
    private int age;
    private boolean sex; // true 代表男, false 代表女
    @Value("20")
    public void setAge(int age) {
        this.age = age;
    }
    public Person(@Value("true") boolean sex) {
        this.sex = sex;
    }
    @Override
    public String toString() {
        return "Person{" +
                "name='" + name + '\'' +
                ", age=" + age +
                ", sex=" + sex +
                '}';
    }
}
编写我们的配置文件
<beans xmlns="http://www.springframework.org/schema/beans"
       xmlns:xsi="http://www.w3.org/2001/XMLSchema-instance"
       xmlns:context="http://www.springframework.org/schema/context"
       xsi:schemaLocation="http://www.springframework.org/schema/beans http://www.springframework.org/schema/beans/spring-beans.xsd
                           http://www.springframework.org/schema/context http://www.springframework.org/schema/context/spring-context.xsd">
    <context:component-scan base-package="com.powernode.spring6.bean_other"/>
</beans>
编写我们的测试程序
@Test
public void testPerson(){
	ApplicationContext applicationContext = new ClassPathXmlApplicationContext("spring.xml");
	Person person = applicationContext.getBean("person", Person.class);
	System.out.println(person);
}
$$ Autowired 注解
-
该注解是通过byType的方式对非简单类型属性赋值的【类型装配】
-
该注解可以应用的位置:
- 属性上
- set 方法上
- 构造方法上
- 构造方法的形参前
-
当只存在有参构造方法,且待注入的Bean的id与构造方法中的形参名相同,可以不使用注解
-
该注解还有一个 required 属性,我们来看一下他的源码:
package org.springframework.beans.factory.annotation;

import java.lang.annotation.Documented;
import java.lang.annotation.ElementType;
import java.lang.annotation.Retention;
import java.lang.annotation.RetentionPolicy;
import java.lang.annotation.Target;

@Target({ElementType.CONSTRUCTOR, ElementType.METHOD, ElementType.PARAMETER, ElementType.FIELD, ElementType.ANNOTATION_TYPE})
@Retention(RetentionPolicy.RUNTIME)
@Documented
public @interface Autowired {
	boolean required() default true;
}
这个属性默认为 true,代表我们待注入的Bean必须存在,否则会报错;
我们使用@Autowired(required = false)关闭,有对应Bean就注入,没有也不报错 -
需求:我们通过一个综合案例,演示在以上四个位置通过该注解注入属性值
编写我们的综合Bean类 Four.java
package com.powernode.spring6.bean_other;

import org.springframework.stereotype.Component;

/**
 * @author Bonbons
 * @version 1.0
 */
@Component
public class Four {
}
@Component
class A{

}
@Component
class B{

}
@Component
class C{

}
@Component
class D{

}
编写我们的Service 类 SpecialService.java
package com.powernode.spring6.bean_other;

import org.springframework.beans.factory.annotation.Autowired;
import org.springframework.stereotype.Component;

import java.text.Format;

/**
 * @author Bonbons
 * @version 1.0
 */
@Component
public class SpecialService {
    @Autowired
    private A a;

    private B b;
    @Autowired
    public void setB(B b) {
        this.b = b;
    }

    private C c;
    @Autowired
    public SpecialService(C c) {
        this.c = c;
    }

    private D d;
    public SpecialService(@Autowired D d) {
        this.d = d;
    }

    @Override
    public String toString() {
        return "SpecialService{" +
                "a=" + a +
                ", b=" + b +
                ", c=" + c +
                ", d=" + d +
                '}';
    }
}
这么写其实是有点问题的,第二个利用构造方法创建的对象为空 >> 也就是d为空;
我们把上面那个构造方法+@Autowired注解注释掉,c为空 >> d就正常实例化了
因为我们只是为了简化案例,实际是不会这么使用构造方法的,大可不必担心

还有一种情况我们没测试,就是不用注解,我们就再写个类,属性只有一个 Four 类
package com.powernode.spring6.bean_other;

import org.springframework.stereotype.Component;

/**
 * @author Bonbons
 * @version 1.0
 */
@Component
public class SpecialService2 {
    private Four four;

    public SpecialService2(Four four) {
        this.four = four;
    }
}
我们测试一下,不使用注解,构造方法只有一个【再加一个无参构造方法都不行】是否能找到对应形参名的bean并注入
@Test
public void testSpecial2(){
	ApplicationContext applicationContext = new ClassPathXmlApplicationContext("spring.xml");
	SpecialService2 specialService2 = applicationContext.getBean("specialService2", SpecialService2.class);
	System.out.println(specialService2);
}
- 因为是根据类型匹配,如果我们的属性是一个接口,这个接口有两个或以上的实现类都托管Spring了,那么这种注入方式就不再适用了
- 那么我们应该怎么办呢?
$$ Qualifier 注解
- @Autowired注解和@Qualifier注解联合起来,在@Qualifier注解中指定Bean名称【id】
- 这种方式是基于byName的注入方式,两个注解缺一不可
- 需求:我们一个接口、两个实现类、一个Service类,然后根据名称自动装配我们指定的Bean,测试是否会报错
编写我们的接口 OrderDao
package org.powernode.dao;

/**
 * @author Bonbons
 * @version 1.0
 */
public interface OrderDao {
    public void insert();
}
编写我们的两个接口实现类 OrderDaoImplForOracle、OrderDaoImplForMySQL
package org.powernode.dao.impl;

import org.powernode.dao.OrderDao;
import org.springframework.stereotype.Repository;

/**
 * @author Bonbons
 * @version 1.0
 */
@Repository
public class OrderDaoImplForOracle implements OrderDao {
    @Override
    public void insert() {
        System.out.println("Oracle 数据库正在存储订单信息...");
    }
}
package org.powernode.dao.impl;

import org.powernode.dao.OrderDao;
import org.springframework.stereotype.Repository;


/**
 * @author Bonbons
 * @version 1.0
 */
@Repository
public class OrderDaoImplForMySql implements OrderDao {
    @Override
    public void insert() {
        System.out.println("MySQL正在存储订单信息...");
    }
}
编写我们的业务类 OrderService
package org.powernode.service;

import org.powernode.dao.OrderDao;
import org.springframework.beans.factory.annotation.Autowired;
import org.springframework.beans.factory.annotation.Qualifier;
import org.springframework.stereotype.Service;

/**
 * @author Bonbons
 * @version 1.0
 */
@Service
public class OrderService {

    @Autowired
    @Qualifier("orderDaoForOracle")
    private OrderDao orderDao;

    public void generate(){
        orderDao.insert();
    }
}
编写我们的测试程序
@Test
public void testAutoWire(){
	ApplicationContext applicationContext = new ClassPathXmlApplicationContext("spring-autowire.xml");
	OrderService orderService = applicationContext.getBean("orderService", OrderService.class);
	// 调用业务层的数据保存方法
	orderService.generate();
}
$$ Resource 注解
- 该注解也是用于非简单类型参数注入的,只不过不是有Spring框架提供的,而是由JDK提供的
- 注入方式:
- 默认byName注入,没有指定name时把属性名当做name
- 根据name找不到时,才会byType注入,byType注入时,某种类型的Bean只能有一个
- 有一个需要注意的,就是我们的注解用在set方法上不指定name,则默认name为方法名去掉set+首字母变小写
- 注入位置:属性名上、setter方法上 【name可以指定也可以采用默认的】
- 使用Resource注解需要配置相关依赖
- 在 Spring6+ 中,我们配置下面的依赖
<dependency> <groupId>jakarta.annotation</groupId> <artifactId>jakarta.annotation-api</artifactId> <version>2.1.1</version> </dependency>- 在 Spring5- 中,我们配置下面的依赖
<dependency> <groupId>javax.annotation</groupId> <artifactId>javax.annotation-api</artifactId> <version>1.3.2</version> </dependency> - 需求:我们创建一个综合案例演示利用 Resource 注解在不同位置使用,测试是否注入成功
编写我们的基础Bean类,我们还是使用上面创建的 Four.java
package com.powernode.spring6.bean_other;

import org.springframework.stereotype.Component;

/**
 * @author Bonbons
 * @version 1.0
 */
@Component
public class Four {
}
@Component
class A{

}
@Component
class B{

}
@Component
class C{

}
@Component
class D{

}
编写我们的 SpecialService3.java
package com.powernode.spring6.bean_other;

import jakarta.annotation.Resource;
import org.springframework.stereotype.Component;

/**
 * @author Bonbons
 * @version 1.0
 */
@Component
public class SpecialService3 {
    @Resource(name = "a")
    private A a;
    @Resource
    private B b;
    private C c;
    @Resource(name = "c")
    public void setC(C c) {
        this.c = c;
    }

    private D d;
    @Resource
    public void setD(D d) {
        this.d = d;
    }

    @Override
    public String toString() {
        return "SpecialService3{" +
                "a=" + a +
                ", b=" + b +
                ", c=" + c +
                ", d=" + d +
                '}';
    }
}
context 命名空间扫描包下文件
<?xml version="1.0" encoding="UTF-8"?>
<beans xmlns="http://www.springframework.org/schema/beans"
       xmlns:xsi="http://www.w3.org/2001/XMLSchema-instance"
       xmlns:context="http://www.springframework.org/schema/context"
       xsi:schemaLocation="http://www.springframework.org/schema/beans http://www.springframework.org/schema/beans/spring-beans.xsd
                           http://www.springframework.org/schema/context http://www.springframework.org/schema/context/spring-context.xsd">package="com.powernode.spring6.bean,com.powernode.spring6.bean_other"/>-->

    <context:component-scan base-package="com.powernode.spring6.bean_other"/>
</beans>
编写测试程序 >> 注入指定的Bean的实例成功
@Test
public void testSpecial3(){
	ApplicationContext applicationContext = new ClassPathXmlApplicationContext("spring.xml");
	SpecialService3 specialService3 = applicationContext.getBean("specialService3", SpecialService3.class);
System.out.println(specialService3);
}

$ 全注解式开发
- 尽管上面我们用了注解代替了一部分配置,但是仍在使用配置文件,全注解开发可以不用XML文件
- 我们编写一个配置类代替配置文件【之所以能成为配置类需要特殊的注解声明】
- 需求:我们以UserDao、UserService为例,完成全注解式开发的演示
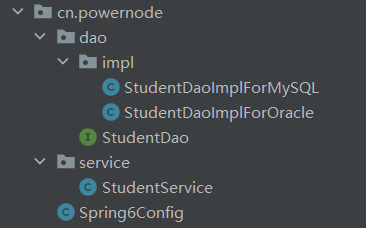
编写StudentDao接口
package cn.powernode.dao;

/**
 * @author Bonbons
 * @version 1.0
 */
public interface StudentDao {
    public void deleteById();
}
编写我们的接口实现类 StudentDaoImplForMySQL 、StudentDaoImplForOracle
package cn.powernode.dao.impl;

import cn.powernode.dao.StudentDao;
import org.springframework.stereotype.Repository;

/**
 * @author Bonbons
 * @version 1.0
 */
//@Repository
public class StudentDaoImplForMySQL implements StudentDao {
    @Override
    public void deleteById() {
        System.out.println("MySQL正在删除学生信息...");
    }
}
package cn.powernode.dao.impl;

import cn.powernode.dao.StudentDao;
import org.springframework.stereotype.Repository;

/**
 * @author Bonbons
 * @version 1.0
 */
@Repository("studentDao")
public class StudentDaoImplForOracle implements StudentDao {
    @Override
    public void deleteById() {
        System.out.println("Oracle数据库正在删除学生信息...");
    }
}
编写我们的业务类 StudentService
package cn.powernode.service;

import cn.powernode.dao.StudentDao;
import cn.powernode.dao.impl.StudentDaoImplForMySQL;
import jakarta.annotation.Resource;
import org.springframework.stereotype.Repository;
import org.springframework.stereotype.Service;

/**
 * @author Bonbons
 * @version 1.0
 */
@Service
public class StudentService {
    /*
        @Resource注解的用法:
            (1)可以放在我们的属性上面和set方法上面
            (2)是由JDK提供的,默认根据名字自动装配,如果没有指定名字,就以属性名作为id查找。找不到时才会根据类型装配
            (3)需要通过参数 name = "bala" 指定待注入Bean的id
     */
    @Resource // 不指定name,会根据属性名去查找Bean
    private StudentDao studentDao;
    public void delete(){
        studentDao.deleteById();
    }

    public void setStudentDao(StudentDao studentDao) {
        this.studentDao = studentDao;
    }
}
编写我们的配置类 Spring6Config
package cn.powernode;

import org.springframework.context.annotation.ComponentScan;
import org.springframework.context.annotation.ComponentScans;
import org.springframework.context.annotation.Configuration;

/**
 * @author Bonbons
 * @version 1.0
 */
@Configuration
@ComponentScan({"cn.powernode.dao", "cn.powernode.service"})
public class Spring6Config {
}
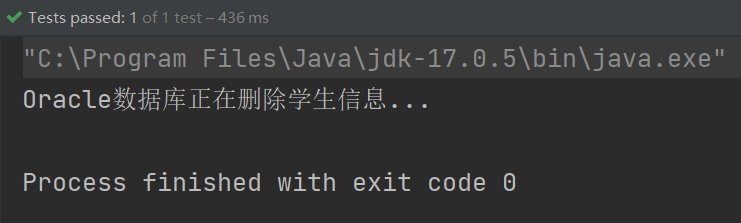
编写我们的测试程序 testNoXML
@Test
public void testNoXML(){
	// 不再使用 ClassPathXmlApplicationContext加载XML文件了
	AnnotationConfigApplicationContext context = new AnnotationConfigApplicationContext(Spring6Config.class);
	StudentService studentService = context.getBean("studentService", StudentService.class);
	studentService.delete();
}