【Java】使用Java调用Python的四种方法
fastjson的使用——JSON字符串、JSON对象、Java对象的互转
使用idea给Java程序打jar包(超简单 超详细)
1 环境准备
(1)新建Maven类型的项目,D:\processPython。
右键src/main/java,创建java类。
(2)在使用Java调用python之前,需要导入依赖环境。
如,在maven项目中,需要导入如下依赖:
目前只有2.7.X版本有相关依赖包。
<dependencies>
        <dependency>
            <groupId>org.python</groupId>
            <artifactId>jython-standalone</artifactId>
            <!--python版本是2.x还是3.x在这里指定-->
            <version>2.7.1</version>
        </dependency>
    </dependencies>
2 调用
2.1 在java类中直接执行python语句
创建Java类JavaRunPython。
import org.python.util.PythonInterpreter;
public class JavaRunPython {
    public static void main(String[] args) {
        //首先调用python的解释器
        PythonInterpreter interpreter = new PythonInterpreter();
        //选择执行的的Python语句
        interpreter.exec("import sys; ");
        interpreter.exec("a='hello world123'; ");
        interpreter.exec("print(sys.version,a);");
    }
}
输出如下:
('2.7.1 (default:0df7adb1b397, Jun 30 2017, 19:02:43)
[Java HotSpot(TM) 64-Bit Server VM (Oracle Corporation)]',
'hello world123')
在正常的情况下,Java工程师只需要调用python开发工程师写的脚本就行了,不会再在代码中加入python语句了。因为在Java语言中添加入其他语言,使Java的可读性下降、执行意义也不是很大。
2.2 在java中直接调用python脚本
这种方式是有些Java程序员使用调用。
(1)首先将准备好的脚本,如plus.py。
import sys
a = 100
b = 200
print(sys.version,a+b)
(2)创建java类JavaPythonFile
import org.python.util.PythonInterpreter;
public class JavaPythonFile {
    public static void main(String[] args) {
        PythonInterpreter interpreter = new PythonInterpreter();
        //我在这里使用绝对路径
        interpreter.execfile("D:\\processPython\\src\\main\\java\\plus.py");
    }
}
输出如下:
('2.7.1 (default:0df7adb1b397, Jun 30 2017, 19:02:43)
[Java HotSpot(TM) 64-Bit Server VM (Oracle Corporation)]', 300)
2.3 用Runtime.getRuntime()执行python脚本
这种办法可以让进程与程序交互,可以看到出现的问题,便于解决。
(1)首先将准备好的脚本,如plus.py。
a = 100
b = 200
print(a+b)
(2)创建java类RuntimeFunction
2.3.1 方式一系统默认python
import java.io.BufferedReader;
import java.io.IOException;
import java.io.InputStreamReader;
public class RuntimeFunction {
public static void main(String[] args) {
Process proc;
try {
proc = Runtime.getRuntime().exec("python D:\\processPython\\src\\main\\java\\plus.py");
BufferedReader in = new BufferedReader(new InputStreamReader(proc.getInputStream()));
String line = null;
while ((line = in.readLine()) != null) {
System.out.println(line);
}
in.close();
proc.waitFor();
} catch (IOException e) {
e.printStackTrace();
} catch (InterruptedException e) {
e.printStackTrace();
}
}
}
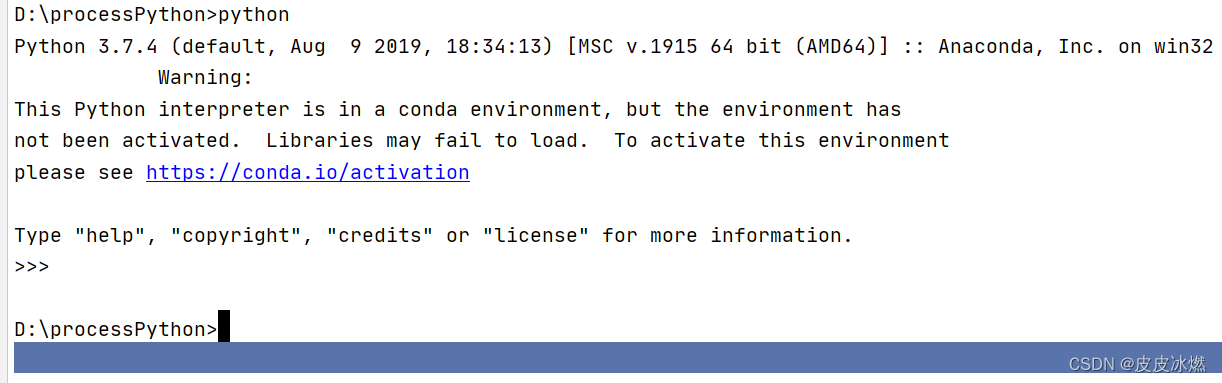
输出如下
3.7.4 (default, Aug 9 2019, 18:34:13) [MSC v.1915 64 bit (AMD64)] 300
查看系统的python版本为3.7.4。
2.3.2 方式二指定python
String[] args1=new String[]{"/home/huan/anaconda2/bin/python","/home/huan/myfile/helloword.py"};
Process pr=Runtime.getRuntime().exec(args1);
附加:String数组里的那一行很重要。
首先一定要设置好你所使用的python的位置,切记不要直接使用python,因为系统会默认使用自带的python,所以一定要设置好你所使用的python的位置,否则可能会出现意想不到的问题(比如说我使用的是anaconda中的python,而ubuntu系统会默认调用自带的python,而我自带的python中并没有numpy库,所以会造成相应的代码不会执行的问题,所以设置好python的位置是很重要的)。还有就是要设置好py文件的位置,使用绝对路径。还有就是可以看出,此方法可以满足我们python代码中调用第三方库的情况,简单实用。
import java.io.BufferedReader;
import java.io.IOException;
import java.io.InputStreamReader;
public class RuntimeFunction {
    public static void main(String[] args) {
        Process proc;
        try {
            String[] args1=new String[]{"D:\\Anaconda3\\envs\\python38\\python","D:\\processPython\\src\\main\\java\\plus.py"};
            proc = Runtime.getRuntime().exec(args1);
            BufferedReader in = new BufferedReader(new InputStreamReader(proc.getInputStream()));
            String line = null;
            while ((line = in.readLine()) != null) {
                System.out.println(line);
            }
            in.close();
            proc.waitFor();
        } catch (IOException e) {
            e.printStackTrace();
        } catch (InterruptedException e) {
            e.printStackTrace();
        }
    }
}
首先,为什么要创建Process proc。ProcessBuilder.start()和Runtime.exec两个方法会生成一个本地的进程,然后返回一个Processs子类的实例。通过这个实例可以控制进程以及获得关于进程的信息。这个Process类为进程提供可用于执行来自的输入的方法,然后执行输出到这个进程中,等待完成后,检查进程退出时的状态,然后停止这个进程。——换句话说,这个实例就是监视整个进程的。
通过Process的getInputStream(),getOutputStream()和getErrorStream()方法可以得到输入输出流,然后通过InputStream可以得到程序对控制台的输出信息,通过OutputStream可以给程序输入指令,这样就达到了程序的交换功能。
3 java处理json
如果使用的是maven,需要在pom.xml文件中加入依赖:
<dependency>
	<groupId>com.alibaba</groupId>
	<artifactId>fastjson</artifactId>
	<version>1.2.78</version>
</dependency>
3.1 json字符串-简单对象
import com.alibaba.fastjson.JSON;
import com.alibaba.fastjson.JSONArray;
import com.alibaba.fastjson.JSONObject;
public class JavaJsonProcess {
    public static void main(String[] args) {
        //json字符串-简单对象
        String jsonStr = "{\"studentName\":\"张三\",\"studentAge\":18}";
        //简单对象
        JSONObject jsonObj = JSON.parseObject(jsonStr);
        System.out.println(jsonStr);
        System.out.println(jsonObj);
    }
}
3.2 json字符串-数组类型
import com.alibaba.fastjson.JSON;
import com.alibaba.fastjson.JSONArray;
import com.alibaba.fastjson.JSONObject;
public class JavaJsonProcess {
    public static void main(String[] args) {
        //json字符串-数组类型
        String jsonArrStr = "[{\"studentName\":\"张三\",\"studentAge\":18},{\"studentName\":\"李四\",\"studentAge\":17}]";
        //数组类型
        JSONArray jsonArray = JSON.parseArray(jsonArrStr);
        //遍历JSONArray方法1
        for(int i = 0; i < jsonArray.size(); i++){
            JSONObject jsonObj = jsonArray.getJSONObject(i);
            System.out.println(jsonObj);
        }

        //遍历JSONArray方法2
        for(Object obj : jsonArray){
            JSONObject jsonObject = (JSONObject) obj;
            System.out.println(jsonObject);
        }
	}
}
3.3 json字符串-复杂对象
import com.alibaba.fastjson.JSON;
import com.alibaba.fastjson.JSONArray;
import com.alibaba.fastjson.JSONObject;
public class JavaJsonProcess {
    public static void main(String[] args) {
        //json字符串-复杂对象
        String complexJsonStr= "{\"teacherName\":\"李寻欢\",\"teacherAge\":30,\"course\":{\"courseName\":\"武术\",\"code\":110},\"students\":[{\"studentName\":\"张三\",\"studentAge\":18},{\"studentName\":\"李四\",\"studentAge\":19}]}";
        //复杂对象
        JSONObject jsonObj = JSON.parseObject(complexJsonStr);
        //取出复杂对象中各项内容
        String teacherName = jsonObj.getString("teacherName");
        Integer teacherAge = jsonObj.getInteger("teacherAge");
        JSONObject course = jsonObj.getJSONObject("course");
        JSONArray students = jsonObj.getJSONArray("students");
        System.out.println(teacherName);
        System.out.println(teacherAge);
        System.out.println(course);
        System.out.println(students);
    }
}
输出如下:
李寻欢
30
{"courseName":"武术","code":110}
[{"studentAge":18,"studentName":"张三"},{"studentAge":19,"studentName":"李四"}]
4 方式一:传递json参数
用sys.argv接收参数。
4.1 依赖引用pom.xml
如果使用的是maven,需要在pom.xml文件中加入依赖:
<dependency>
	<groupId>com.alibaba</groupId>
	<artifactId>fastjson</artifactId>
	<version>1.2.78</version>
</dependency>
4.2 配置文件pythonuse.properties
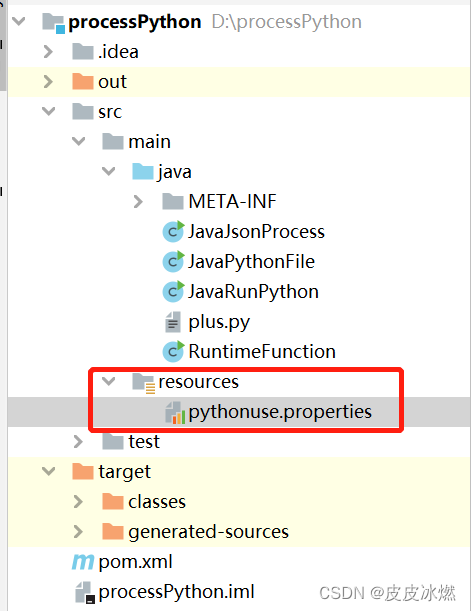
#python.path = python
python.path = D:\\Anaconda3\\envs\\python38\\python33
python.package = C:\\Users\\user\\Desktop\\aa_main.py
4.3 代码RuntimeFunction.java
import java.io.BufferedReader;
import java.io.IOException;
import java.io.InputStream;
import java.io.InputStreamReader;
import java.util.Properties;
import com.alibaba.fastjson.JSON;
import com.alibaba.fastjson.JSONObject;
public class RuntimeFunction {
    public static void main(String[] args) {
        Process proc;
        try {
            //通过java反射机制获取配置文件
            InputStream is = RuntimeFunction.class.getClassLoader().getResourceAsStream("pythonuse.properties");
            Properties pro = new Properties();
            try {
                pro.load(is);
            } catch (IOException e1) {
                e1.printStackTrace();
            }
            String pythonpath = pro.getProperty("python.path");
            String pythonpackage = pro.getProperty("python.package");

            //json字符串-简单对象
            String jsonStr = "{\"name\":\"张三\",\"time\":\"2022-12-10 16:16:45.256\",\"age\":18}";
            System.out.println(jsonStr);
            //简单对象
            JSONObject jsonObj = JSON.parseObject(jsonStr);
            //简单对象转换为字符串
            String re_str = jsonObj.toJSONString();
            System.out.println(re_str);
            //将“替换成\"
            re_str = re_str.replaceAll("\"","\\\\\"");
            System.out.println(re_str);

            //String[] args1=new String[]{"D:\\Anaconda3\\envs\\python38\\python","C:\\Users\\user\\Desktop\\aa_main.py",re_str};
            String[] args1=new String[]{pythonpath,pythonpackage,re_str};
            //System.out.println(args1);
            proc = Runtime.getRuntime().exec(args1);
            BufferedReader in = new BufferedReader(new InputStreamReader(proc.getInputStream()));
            String line = null;
            while ((line = in.readLine()) != null) {
                System.out.println(line);
                JSONObject jsonObj1 = JSON.parseObject(line);
                System.out.println(jsonObj1);
            }
            in.close();
            proc.waitFor();
        } catch (IOException e) {
            e.printStackTrace();
        } catch (InterruptedException e) {
            e.printStackTrace();
        }
    }
}
4.4 代码aa_main.py
# -*- coding: UTF-8 -*-
import sys
import json
import sys
if __name__ == "__main__":
    # 1 当作命令行参数,容易出现时间戳中的空格,被拆分成了多个参数
    receive_msg = " ".join(sys.argv[1:]) # 用空格把分隔的参数合并起来
    # 2 解析
    receive_dict = json.loads(receive_msg)
    # print(receive_dict["name"],receive_dict["age"],receive_dict["time"])
    out_dict = {
        "接收到":receive_dict
    }
    # 3 序列化
    msg = json.dumps(out_dict)
    msg = msg.replace('"','\"')
    print(msg)
4.5 打包和运行
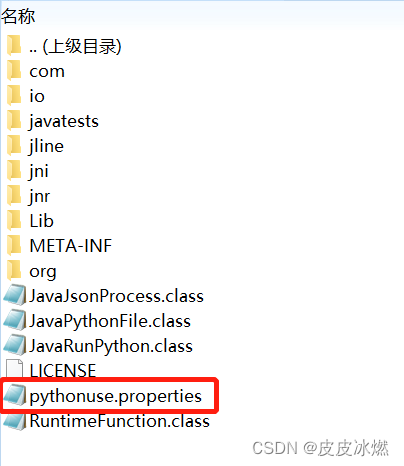
(1)打包后会自动将配置文件加载到与类文件同一级目录
(2)执行命令
java -cp processPython.jar RuntimeFunction main

5 方式二:传递json参数
将json参数传递到控制台的命令行。
5.1 代码RuntimeFunction.java
import java.io.*;
import java.util.Properties;
import com.alibaba.fastjson.JSON;
import com.alibaba.fastjson.JSONObject;
public class RuntimeFunction {
    public static void main(String[] args) {
        Process proc;
        try {
            //通过java反射机制获取配置文件
            InputStream is = RuntimeFunction.class.getClassLoader().getResourceAsStream("pythonuse.properties");
            Properties pro = new Properties();
            try {
                pro.load(is);
            } catch (IOException e1) {
                e1.printStackTrace();
            }
            String pythonpath = pro.getProperty("python.path");
            String pythonpackage = pro.getProperty("python.package");

            //json字符串-简单对象
            String jsonStr = "{\"name\":\"张三\",\"time\":\"2022-12-10 16:16:45.256\",\"age\":18}";
            System.out.println(jsonStr);
            //简单对象
            JSONObject jsonObj = JSON.parseObject(jsonStr);
            //简单对象转换为字符串
            String re_str = jsonObj.toJSONString();
            System.out.println(re_str);

            //String[] args1=new String[]{"D:\\Anaconda3\\envs\\python38\\python","C:\\Users\\user\\Desktop\\aa_main.py",re_str};
            String[] args1=new String[]{pythonpath,pythonpackage};
            proc = Runtime.getRuntime().exec(args1);
            // 向控制台的命令行中写入参数
            PrintStream ps = new PrintStream(proc.getOutputStream());
            ps.print(re_str);
            ps.flush();
            ps.close();

            // 从控制台的命令行读取返回的参数
            BufferedReader in = new BufferedReader(new InputStreamReader(proc.getInputStream()));
            String line = null;
            while ((line = in.readLine()) != null) {
                System.out.println(line);
                JSONObject jsonObj1 = JSON.parseObject(line);
                System.out.println(jsonObj1);
            }
            in.close();
            proc.waitFor();
        } catch (IOException e) {
            e.printStackTrace();
        } catch (InterruptedException e) {
            e.printStackTrace();
        }
    }
}
5.2 代码aa_main.py
# -*- coding: UTF-8 -*-
import sys
import json
import sys
if __name__ == "__main__":
    # 方式二:直接从命令行
    x = sys.stdin
    for line in x:
        # 2 解析
        receive_dict = json.loads(line)
        # print(receive_dict["name"],receive_dict["age"],receive_dict["time"])
        out_dict = {
            "接收到":receive_dict
        }
        # 3 序列化
        msg = json.dumps(out_dict,ensure_ascii=False)
        print(msg)
        break
6 打包运行
6.1 打包
1.file ---> project structure --->Artifacts--->+ --->JAR--->
From  modules with dependencies...---> Main class(选择启动类)--->
OK--->apply --->OK
2.build ---> build Artifacts--->xxx.jar ---> build
6.2 运行
直接通过命令指定运行,运行时指定的main方法:
java -cp huobi-client.jar com.huobi.start.LoadPrice main

![[前端笔记——CSS] 10.层叠与继承+选择器](https://img-blog.csdnimg.cn/fbbfd08c59d4420d9bb683ae6779cad2.png)