一、Sentinel Dashboard 规则联动持久化方案
Sentinel 是阿里开源的一个流量控制组件,它提供了一种流量控制、熔断降级、系统负载保护等功能的解决方案。并且我们通过 Sentinel Dashboard 可以非常便捷的添加或修改规则策略,但是如果细心的小伙伴应该可以发现,默认情况下通过 Sentinel Dashboard 添加或修改的规则并没有进行持久化,服务重启后先前的规则也就消失了,这对于生产环境肯定是不允许的,那如何进行持久化操作呢?
Sentinel 官方已经提供了几种持久化方案,比如可以将规则存放在 Nacos、Redis、ZK、Apollo 等等,但是这些操作都没有和 Sentinel Dashboard 做联动,我们需要手动编写规则,如 json 格式,存放在持久化引擎中。
这里我以 Nacos 为例,通过添加 sentinel-datasource-nacos 依赖可以将配置持久化到 Nacos 配置引擎中:
<dependency>
    <groupId>com.alibaba.csp</groupId>
    <artifactId>sentinel-datasource-nacos</artifactId>
</dependency>
比如我们将如下配置在 Nacos 中:
[
 {
 "resource": "mylimit",
 "controlBehavior": 0,
 "count": 1.0,
 "grade": 1,
 "limitApp": "default",
 "strategy": 0
 }
]
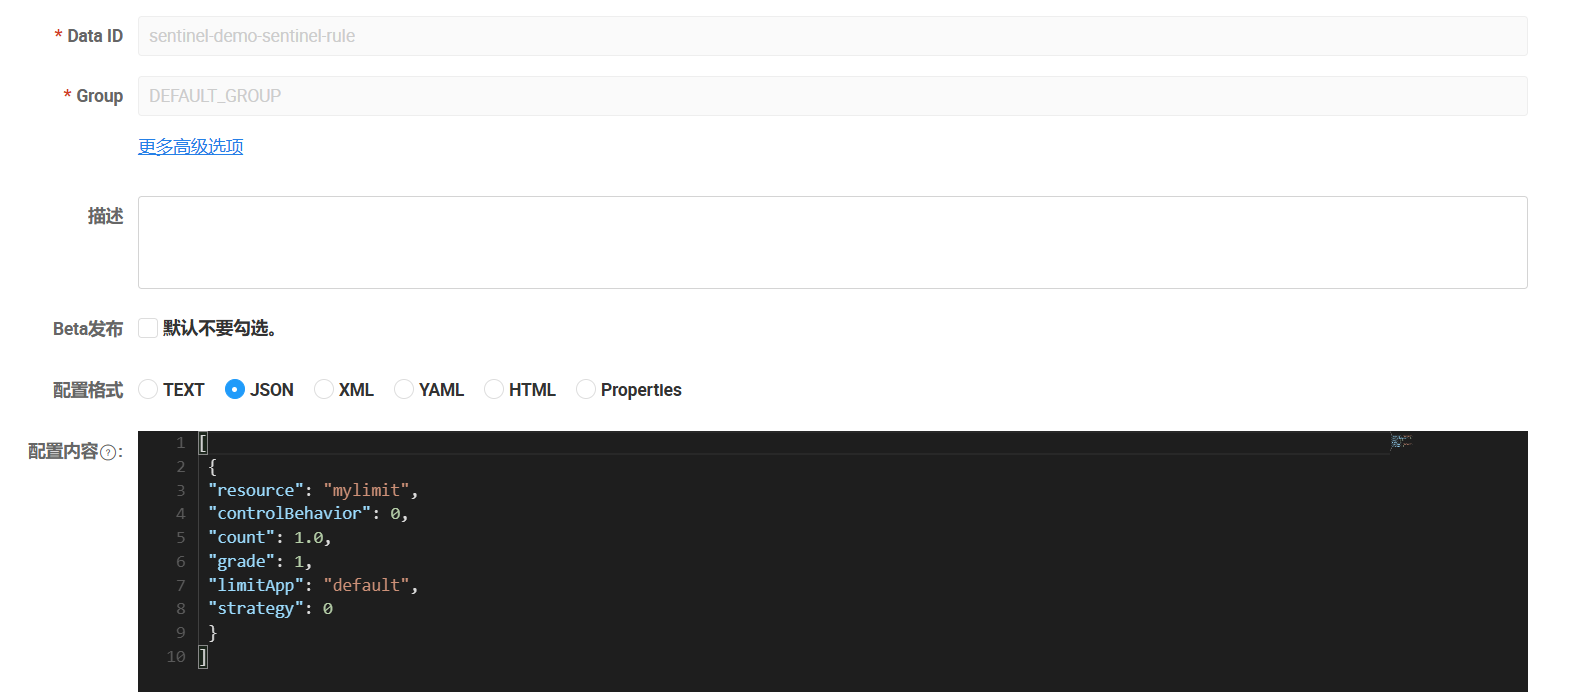
此时可以在 Sentinel Dashboard 中看到该规则:
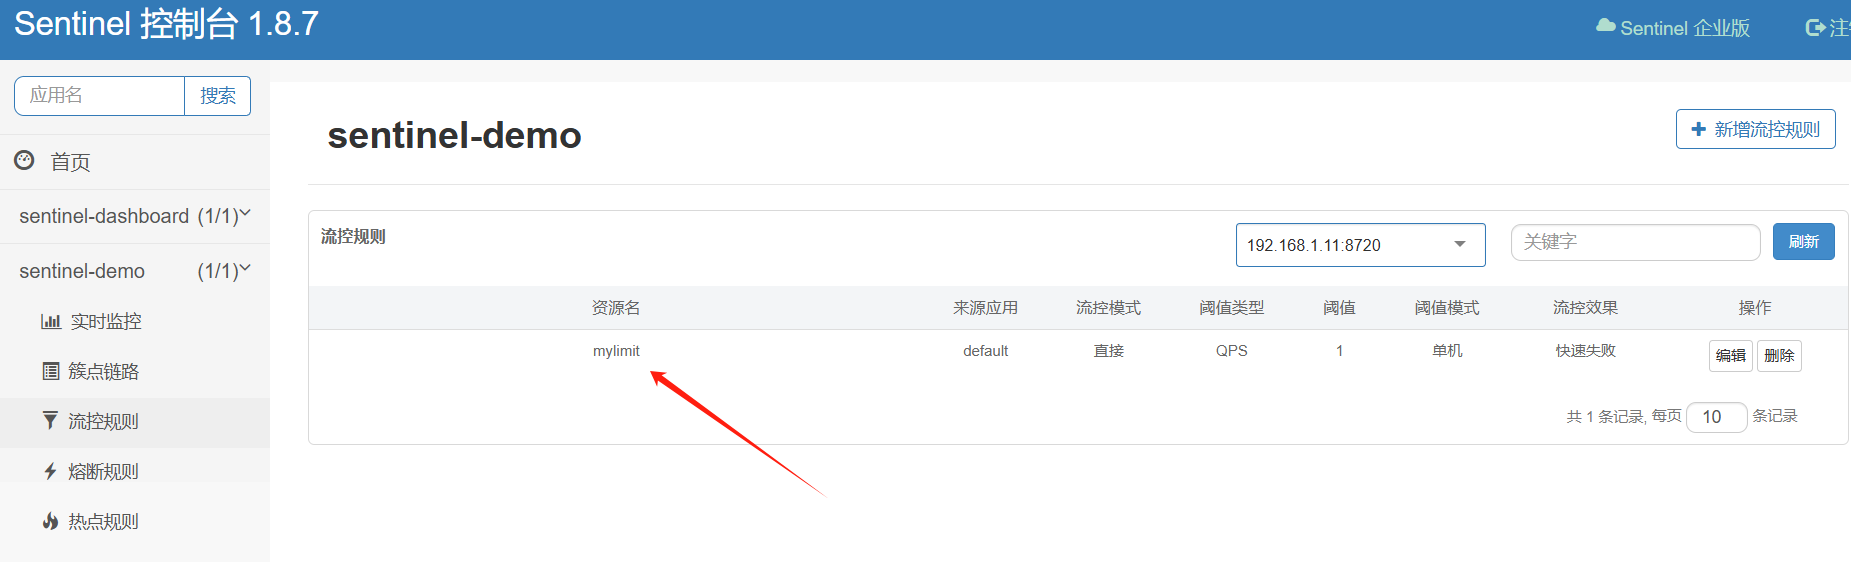
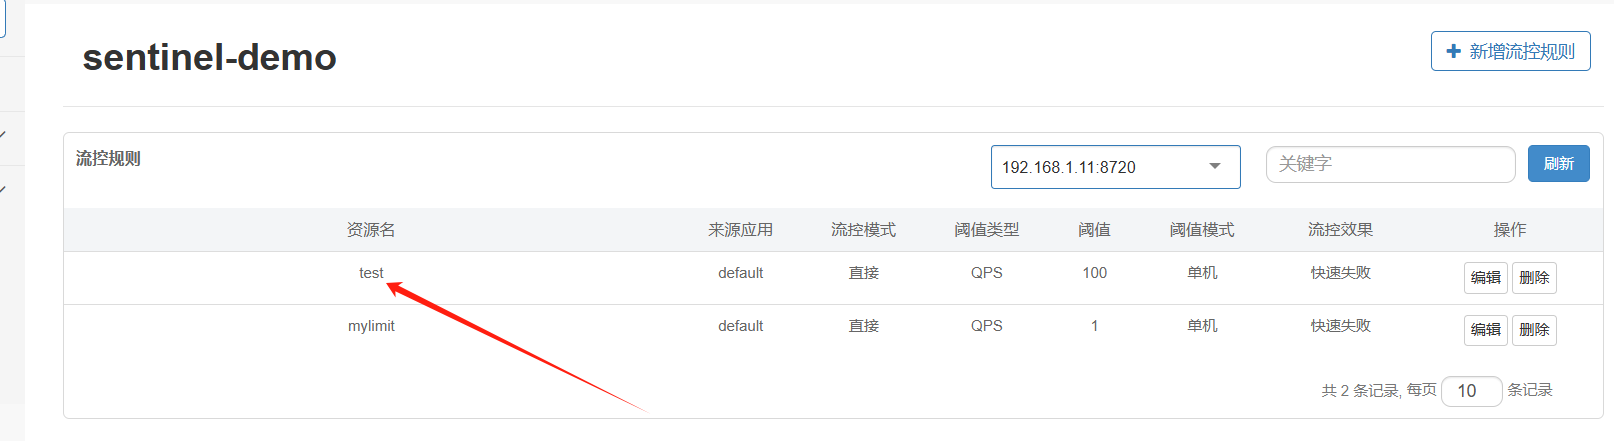
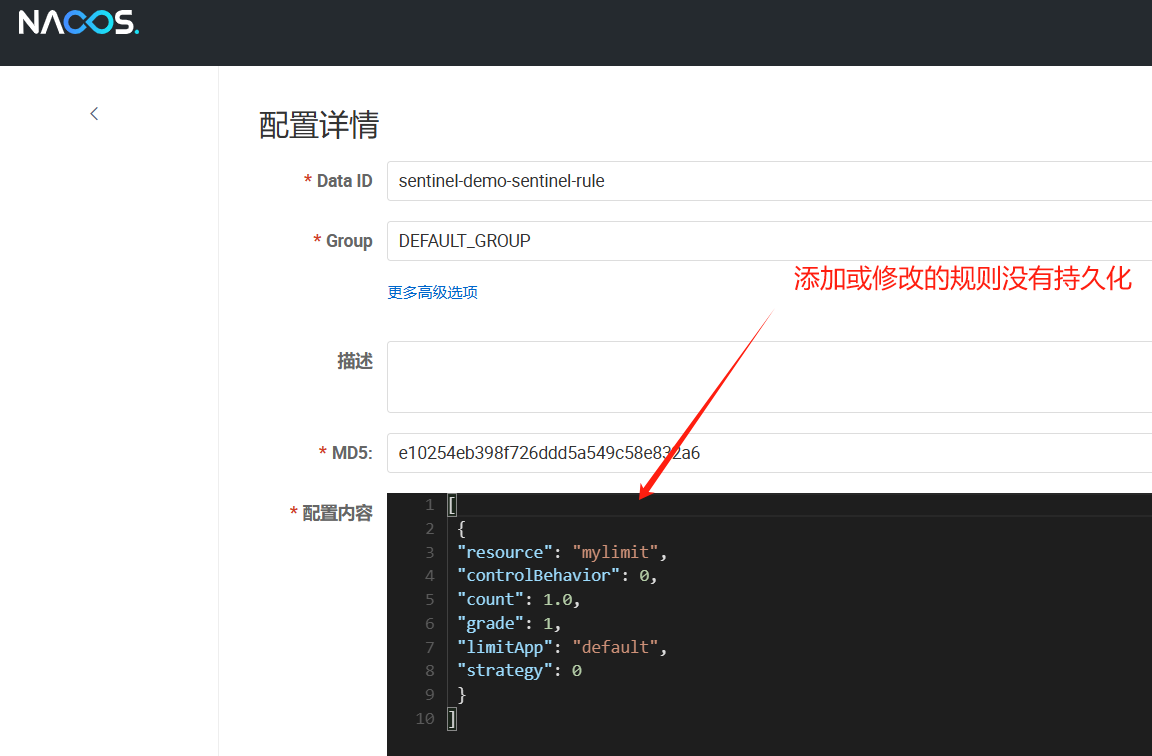
但是返回来在 Sentinel Dashboard 添加或修改的规则并没有反向持久化到 Nacos 中,并且随着服务的重启修改的规则会丢失。
因此解决上述问题,可以从两个方向入手,一个是拉模式、一个是推模式:
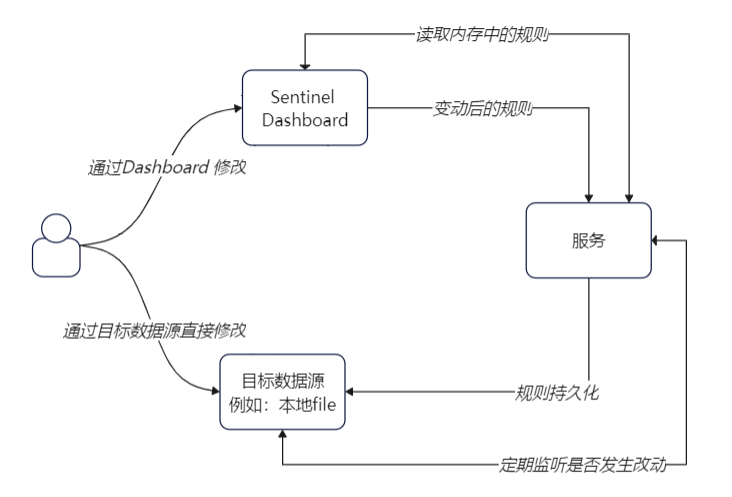
- 拉模式:通过
sentinel-datasource-extension包,扩展读数据源RefreshableDataSource,定期扫描目标数据源,比如服务器下的某个文件,如果发生变动便加载到内存中。以及写数据源WritableDataSource,当在Sentinel Dashboard中变动规则时 ,由服务同步将规则持久化到数据源中。
- 推模式:服务通过监有事件通知能力的目标数据源,如
nacos、redis、zk、Apollo等,当目标数据源中的规则发生变动时,通过事件监听通知服务更新规则,而Sentinel Dashboard则不直接将规则发往服务,而是主动持久化到目标数据源中。这种方式需要修改Sentinel Dashboard的源码,将原先的通知逻辑修改为存储到目标数据源。
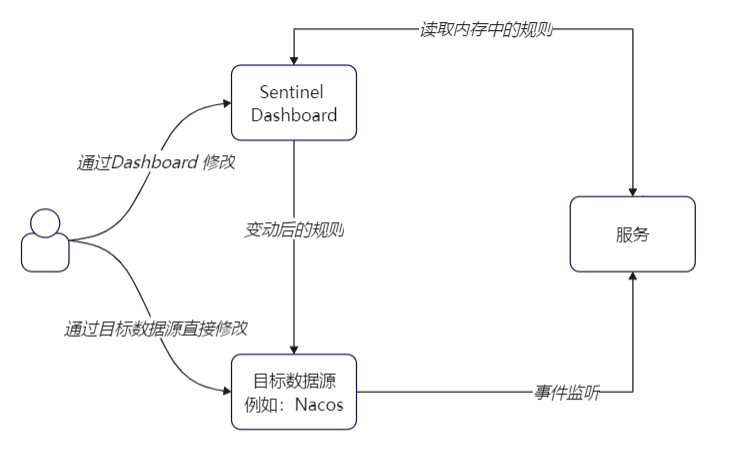
两种方式都有各自的优缺点,例如 拉模式 下,如果主动改动数据源的数据,需要等到下次扫描时才能生效,而 推模式 由于采用事件监听的方式,可以保证修改的实时性。但是 拉模式 下无需修改源码,在官方提供的依赖基础上就可以实现,而推模式 需要根据源码定制化开发需求。
下面一起实践下两种方案。
为了方便后续的测试,这里提前创建一个接口,指定资源名称为 r1:
@RestController
@RequestMapping("/test")
public class TestController {

    @SentinelResource(value = "r1",
            blockHandler = "blockHandler")
    @GetMapping("/t1")
    public String t1(){
        return "success";
    }

    public String blockHandler(BlockException exception){
        return "降级了!!!!";
    }

}
二、拉模式
首先需要引入 sentinel-datasource-extension 依赖:
<dependency>
    <groupId>com.alibaba.csp</groupId>
    <artifactId>sentinel-datasource-extension</artifactId>
</dependency>
这里使用本地文件的方式存储规则,也是 extension 依赖中已经实现好的方式,如果需要存储到其他数据源中,可以模仿 FileRefreshableDataSource 以及 FileWritableDataSource 进行修改。并且还需要实现 InitFunc接口,在init方法中指定DataSource初始化逻辑,并利用spi机制实现加载。
对于规则 Sentinel 中有多种类型,这里实现了 流量、熔断、权限、系统 四个方面的规则持久化:
public class FileDataSourceInit implements InitFunc {
    /**
     * 规则文件
     */
    private static final String RULE_FILE_PATH = System.getProperty("user.dir") + File.separator;
    private static final String FLOW_RULE_FILE_NAME = "FlowRule.json";
    private static final String DEGRADE_RULE_FILE_NAME = "DegradeRule.json";
    private static final String AUTHORITY_RULE_FILE_NAME = "AuthorityRule.json";
    private static final String SYSTEM_RULE_FILE_NAME = "SystemRule.json";

    @Override
    public void init() throws Exception {
        disposeRules();
    }

    private void disposeRules() throws FileNotFoundException {
        String flowRuleFilePath = RULE_FILE_PATH + FLOW_RULE_FILE_NAME;
        String degradeRuleFilePath = DEGRADE_RULE_FILE_NAME + FLOW_RULE_FILE_NAME;
        String authorityRuleFilePath = AUTHORITY_RULE_FILE_NAME + FLOW_RULE_FILE_NAME;
        String systemRuleFilePath = SYSTEM_RULE_FILE_NAME + FLOW_RULE_FILE_NAME;

        FileRefreshableDataSource<List<FlowRule>> flowRuleRead = new FileRefreshableDataSource<>(
                flowRuleFilePath, source -> JSON.parseObject((String) source,
                new TypeReference<List<FlowRule>>() {
                })
        );

        FileRefreshableDataSource<List<DegradeRule>> degradeRuleRead = new FileRefreshableDataSource<>(
                degradeRuleFilePath, source -> JSON.parseObject((String) source,
                new TypeReference<List<DegradeRule>>() {
                })
        );

        FileRefreshableDataSource<List<AuthorityRule>> authorityRuleRead = new FileRefreshableDataSource<>(
                authorityRuleFilePath, source -> JSON.parseObject((String) source,
                new TypeReference<List<AuthorityRule>>() {
                })
        );

        FileRefreshableDataSource<List<SystemRule>> systemRuleRead = new FileRefreshableDataSource<>(
                systemRuleFilePath, source -> JSON.parseObject((String) source,
                new TypeReference<List<SystemRule>>() {
                })
        );

        FlowRuleManager.register2Property(flowRuleRead.getProperty());
        DegradeRuleManager.register2Property(degradeRuleRead.getProperty());
        SystemRuleManager.register2Property(systemRuleRead.getProperty());
        AuthorityRuleManager.register2Property(authorityRuleRead.getProperty());


        WritableDataSource<List<FlowRule>> flowRuleData = new FileWritableDataSource<>(
                flowRuleFilePath, this::encodeJson
        );

        WritableDataSource<List<DegradeRule>> degradeRuleData = new FileWritableDataSource<>(
                degradeRuleFilePath, this::encodeJson
        );

        WritableDataSource<List<AuthorityRule>> authorityRuleData = new FileWritableDataSource<>(
                authorityRuleFilePath, this::encodeJson
        );

        WritableDataSource<List<SystemRule>> systemRuleData = new FileWritableDataSource<>(
                systemRuleFilePath, this::encodeJson
        );

        WritableDataSourceRegistry.registerFlowDataSource(flowRuleData);
        WritableDataSourceRegistry.registerDegradeDataSource(degradeRuleData);
        WritableDataSourceRegistry.registerSystemDataSource(systemRuleData);
        WritableDataSourceRegistry.registerAuthorityDataSource(authorityRuleData);
    }


    private <T> String encodeJson(T t) {
        return JSON.toJSONString(t);
    }

}
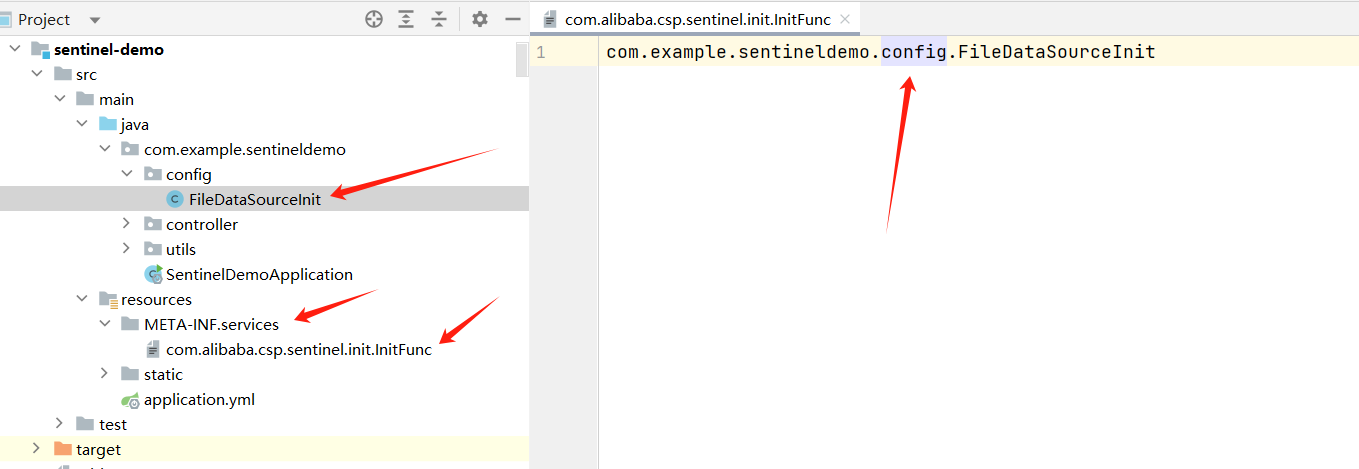
然后在 resources 下,创建 META-INF.services 包,然后在该包下新建 com.alibaba.csp.sentinel.init.InitFunc 文件,文件的内容就是上面类的完整包名地址:
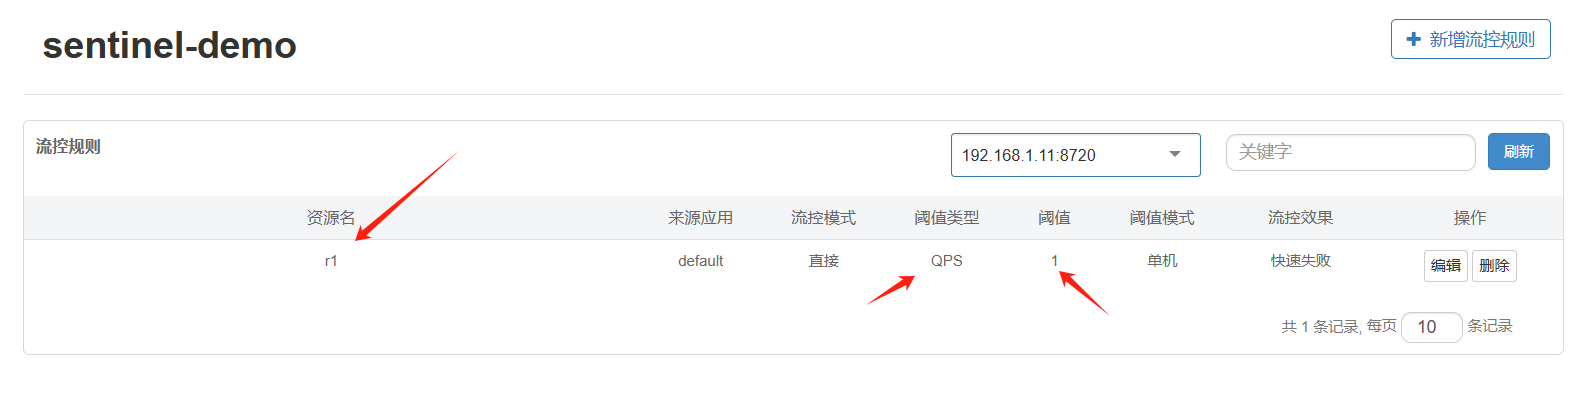
然后启动项目,在 Sentinel Dashboard 中添加一个规则:
可以在项目根目录发现已经创建了 FlowRule.json 文件,并且存储的内容就是 JSON 格式的规则信息:
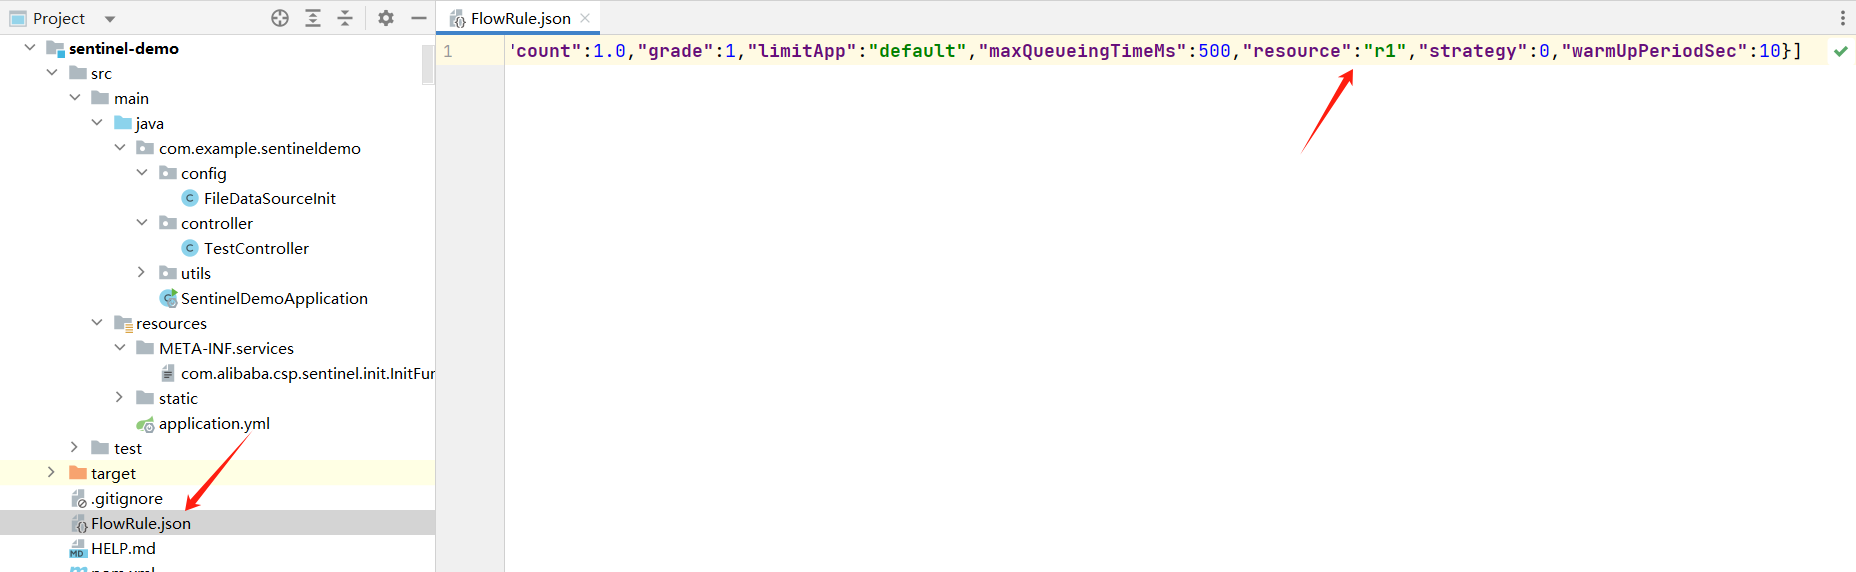
如果此时将服务重启,再次查看 Sentinel Dashboard 可以发现原有的规则依然存在。
并且多次访问 t1 测试接口,可以看到规则依然有效:

三、推模式
推模式下可以通过事件监听更及时的通知到目标服务,这里采用 Nacos 作为目标数据源进行实验。上面实验拉模式可以感觉出 Sentinel 不同类型的规则是单独控制的,这里为了方便演示,以流量规则的修改为例进行实践。
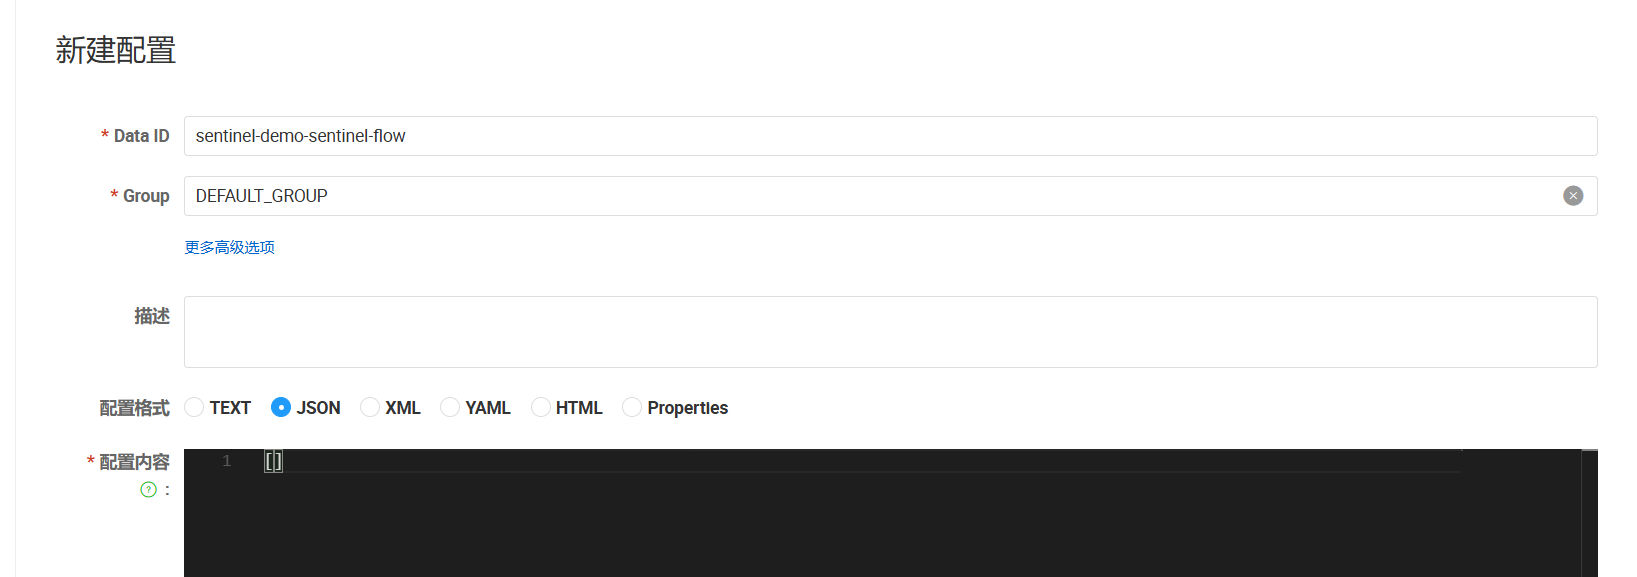
同时做好Nacos中配置文件名的约定为 {application name}-sentinel-{type},例如:这里的实验项目名称为 sentinel-demo 的流量规则的名字为:sentinel-demo-sentinel-flow。
在 Nacos 中创建目标配置:
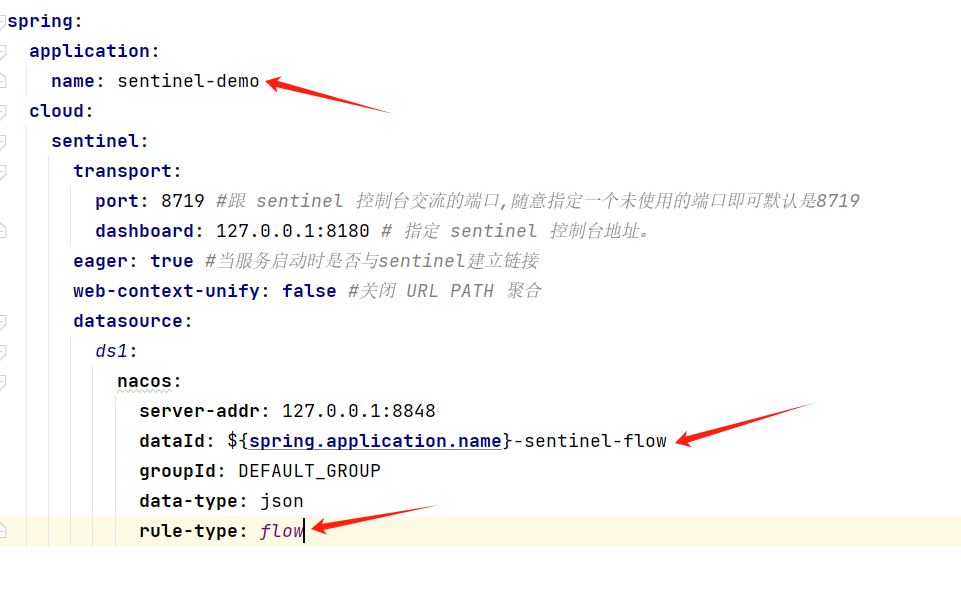
然后在目标服务中配置flow规则指向该配置:
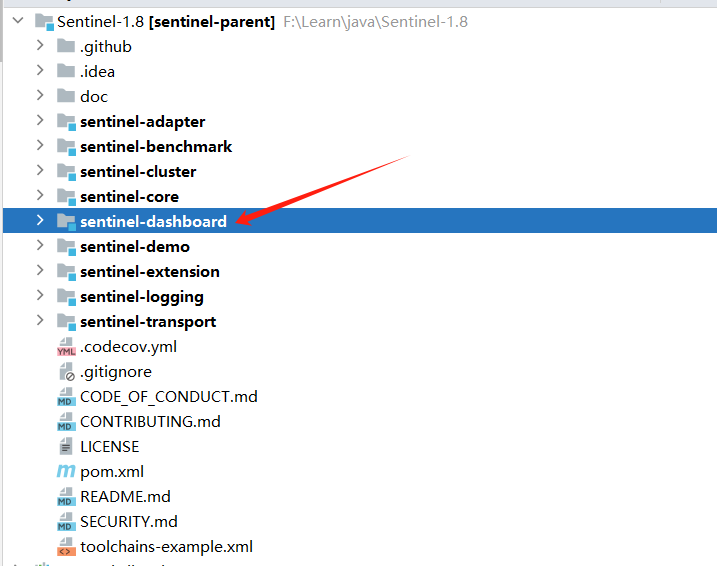
上面提到推模式需要修改源码,这里先将 Sentinel 的源码拉取下来:
git clone https://github.com/alibaba/Sentinel.git
使用 IDEA 打开项目,其中 sentinel-dashboard 就是下面我们需要修改的项目:
从Sentinel1.4.0开始,sentinel-dashboard项目就提供了 DynamicRulePublisher和DynamicRuleProvider 两个接口用于实现自定义的规则推送和拉取操作,因此我们后续的操作也是基于这两个接口:

首先在该项目中加入 nacos-client 的依赖:
<dependency>
    <groupId>com.alibaba.nacos</groupId>
    <artifactId>nacos-client</artifactId>
    <version>1.4.2</version>
</dependency>
先实现一个 RuleNacosConfig 类,用来定义和 Nacos 的约定信息,以及声明出 ConfigService :
@Configuration
public class RuleNacosConfig {
    /**
     * Nacos 配置所在组
     */
    public static final String GROUP_ID = "DEFAULT_GROUP";
    /**
     * Nacos 流量规则的名称后缀
     */
    public static final String FLOW_DATA_ID_POSTFIX = "-sentinel-flow";

    /**
     *  Nacos 信息, 最好读取配置信息,这里演示,先写死
     */
    @Bean
    public ConfigService nacosConfigService() throws Exception {
        return ConfigFactory.createConfigService("127.0.0.1:8848");
    }
}
实现 DynamicRuleProvider ,根据不同的服务从 Nacos 中拉取配置:
@Component("flowRuleNacosProvider")
public class FlowRuleNacosProvider implements DynamicRuleProvider<List<FlowRuleEntity>> {

    @Autowired
    private ConfigService configService;

    @Override
    public List<FlowRuleEntity> getRules(String appName) throws Exception {
        String rules = configService.getConfig(appName + RuleNacosConfig.FLOW_DATA_ID_POSTFIX,
                RuleNacosConfig.GROUP_ID, 3000);
        if (StringUtil.isEmpty(rules)) {
            return new ArrayList<>();
        }
        return JSON.parseArray(rules, FlowRuleEntity.class);
    }
}
然后实现 DynamicRulePublisher ,将修改后的规则持久化到 Nacos:
@Component("flowRuleNacosPublisher")
public class FlowRuleNacosPublisher implements DynamicRulePublisher<List<FlowRuleEntity>> {

    @Autowired
    private ConfigService configService;

    @Override
    public void publish(String app, List<FlowRuleEntity> rules) throws Exception {
        if (StringUtils.isBlank(app)) {
            throw new RuntimeException("Server app is null!");
        }
        if (rules == null) {
            return;
        }
        configService.publishConfig(app + RuleNacosConfig.FLOW_DATA_ID_POSTFIX,
                RuleNacosConfig.GROUP_ID, JSON.toJSONString(rules));
    }
}
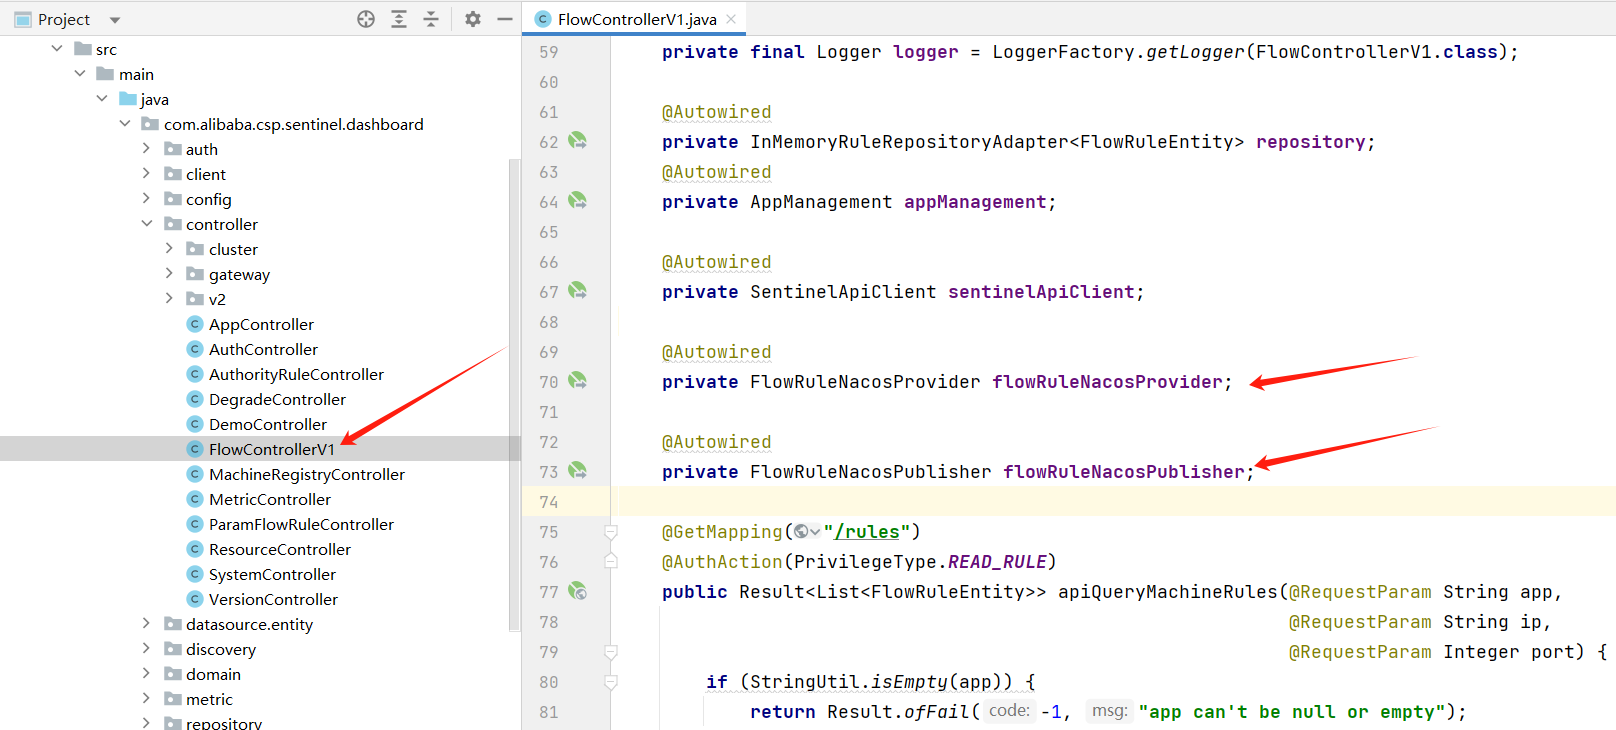
接着修改 com.alibaba.csp.sentinel.dashboard.controller.FlowControllerV1 类,先将上面创建的 FlowRuleNacosProvider 和 FlowRuleNacosPublisher 注入进来:
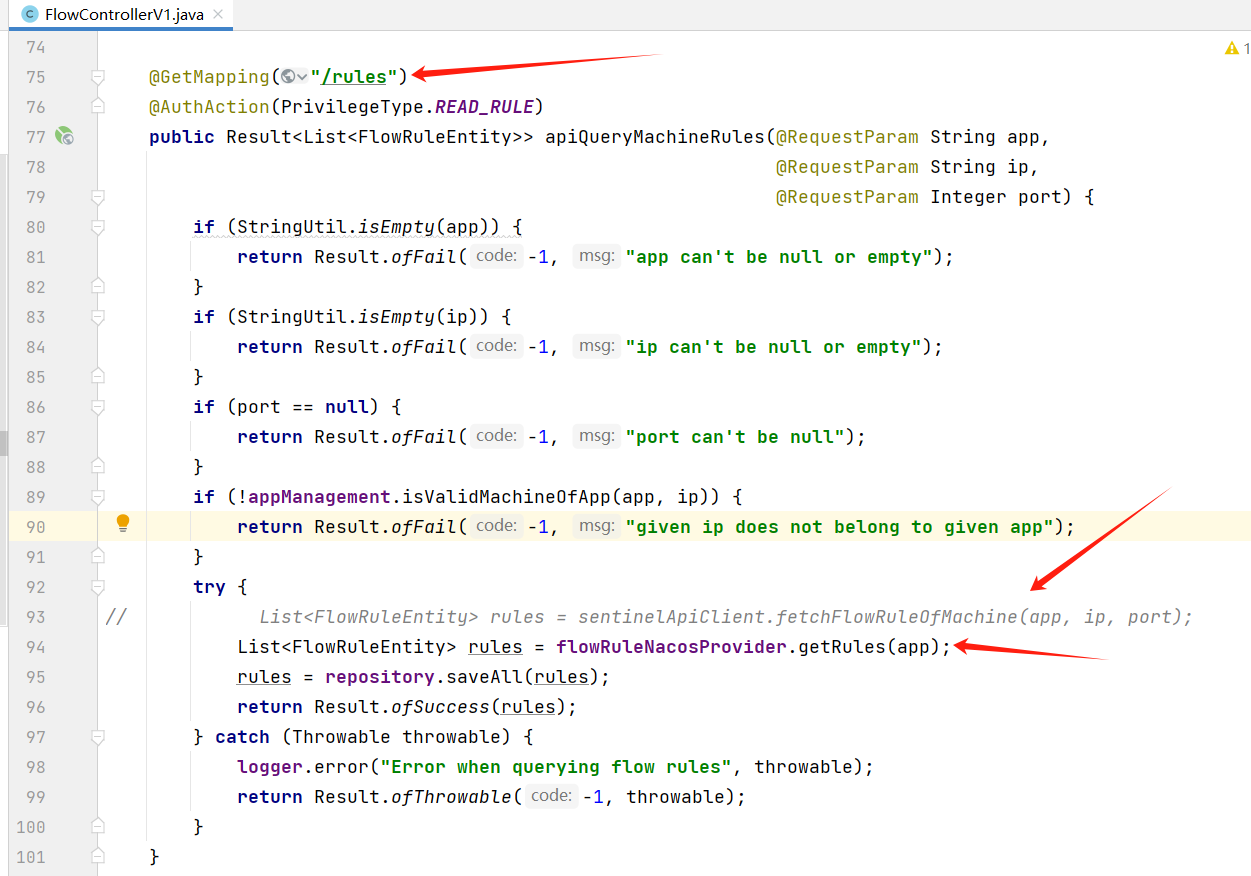
下面需要修改 /rules 和 /rule 两个接口,使用上面我们自定义逻辑,首先在 /rules 接口中,注释掉原来的 sentinelApiClient.fetchFlowRuleOfMachine ,替换成:
List<FlowRuleEntity> rules = flowRuleNacosProvider.getRules(app);
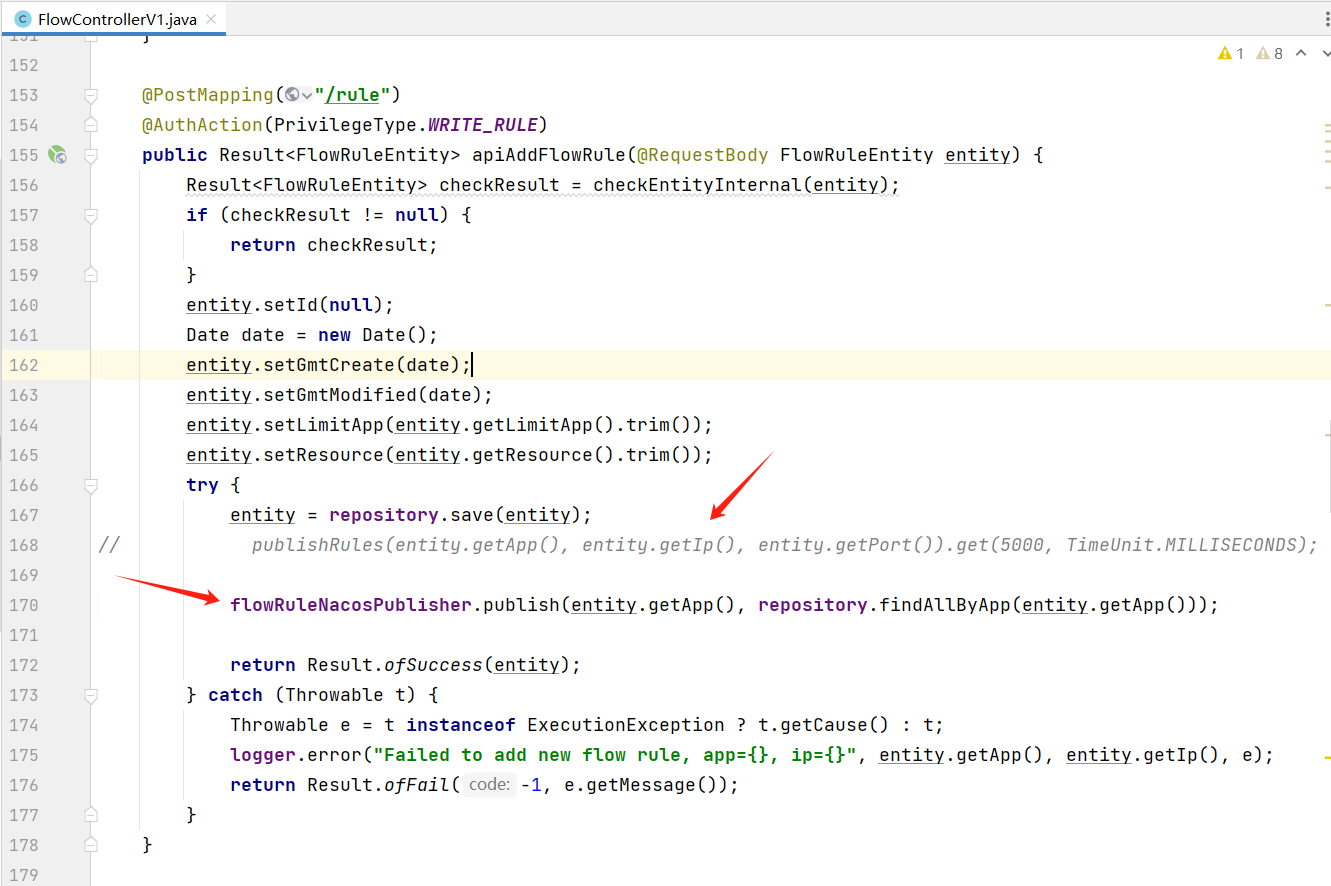
然后在 /rule 接口,注释掉 publishRules 方法的调用,换成:
flowRuleNacosPublisher.publish(entity.getApp(), repository.findAllByApp(entity.getApp()));
停止掉原有的 Sentinel Dashboard 控制台服务,然后本地启动新的 Sentinel Dashboard 服务,或者打包成 jar 包后启动 。
浏览器访问新的 Sentinel Dashboard 控制台。
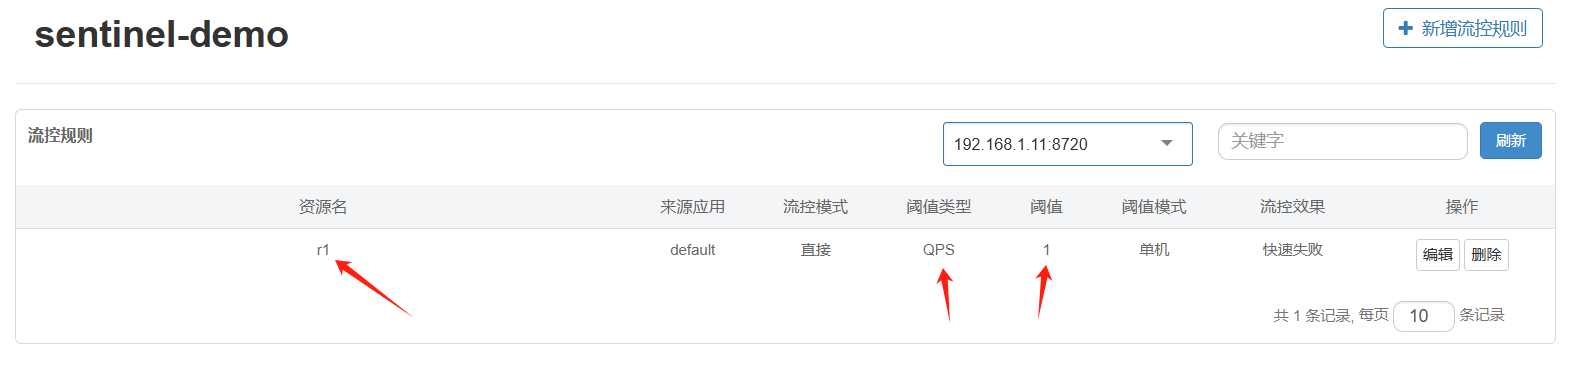
这里测试增加一个流控规则:
下面查看 Nacos 中对应的配置内容:
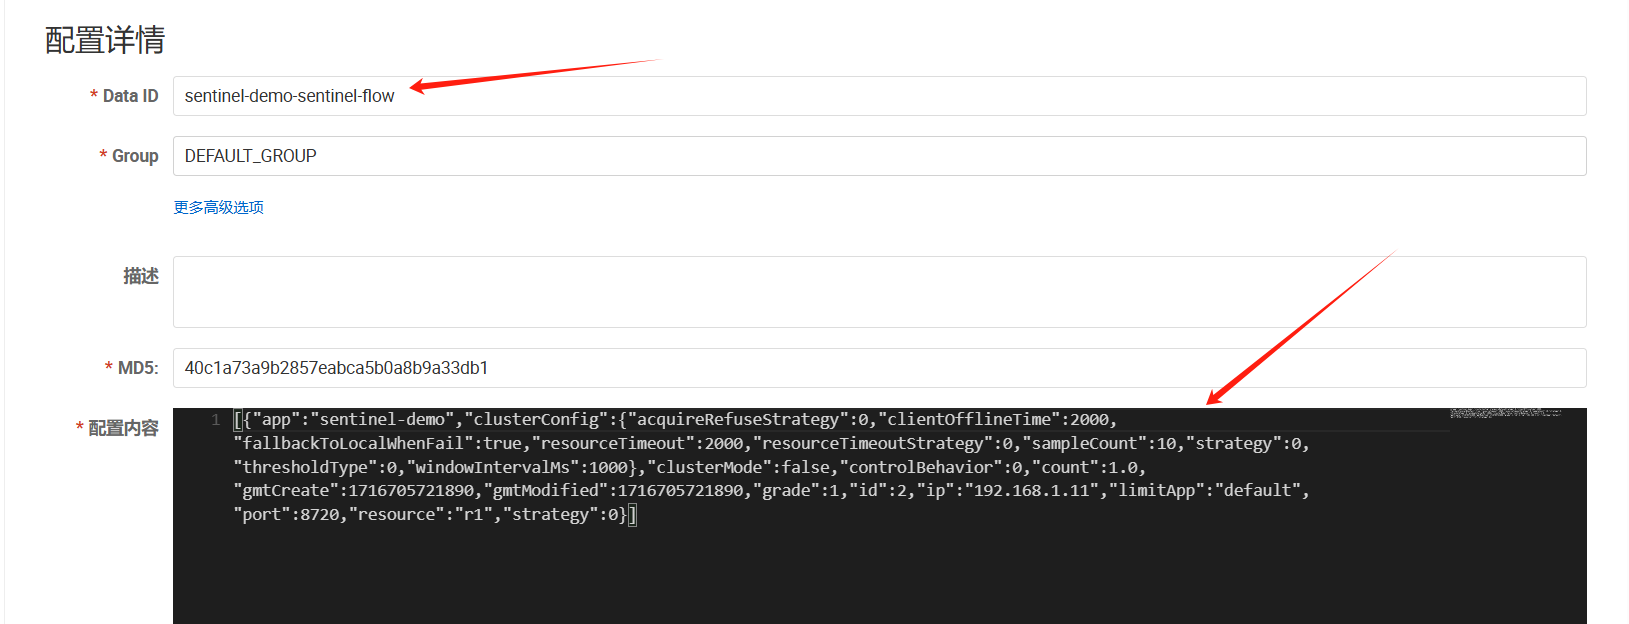
已经主动持久化到 Nacos 中了,并且多次访问测试接口,规则也依然生效:

到此整个修改过程就结束了,虽然上面仅针对流量控制进行了整合,其他模式也是一样的处理方式,有兴趣的小伙伴可以继续补充完善。