一、概述
本篇文章讲解的是分析IntentService源码并使用,安卓API迭代更新的太快,IntentService已经在Android8.0 (API 26)之后就不推荐使用了,在Android API 30正式弃用,官方建议用JobIntentService 或 WorkManager替代,但它的实现源码和思想也值得再回味一下。读本篇文章之前,请移步笔者的另外一篇文章:
HandlerThread源码理解_broadview_java的博客-CSDN博客 , 理解HandlerThread的用法后,对理解IntentService 也会事半功倍。
二、IntentService是什么
2.1 概述
IntentService 继承了Service,并且它是一个抽象类,它又比普通的Service增加了额外的功能。那Google为什么要引入IntentService呢?
1. 我们知道Service它是一个服务,是Android四大组件之一,它和应用程序处于同一个进程之中
2. Service也不是一个线程,和线程完全没有关系,所以你在Service中直接处理耗时的任务,容易引起ANR。如果要做耗时任务,还必须要手动开启一个线程去处理任务。
3. 从Service的生命周期管理角度来看,startService启动服务,当做完任务后,还需要调用stopService停止服务。
但是 IntentService 就不需要考虑这么多,它既不需要去我们手动去开线程,也不需要我们做完任务后手动停止服务。
2.2 特征
1. IntentService 会创建单独的work线程来处理所有的Intent请求,开发者无需处理多线程问题
2. IntentService可用于执行后台耗时任务,当所有请求处理完成后,IntentService会自动停止
3. IntentService是一个服务,四大组件之一,所以它的优先级肯定要比单独创建出来一个线程优先级要高,因此也不容易被系统kill掉,可以保证后台任务能完成。
三、源码分析
//IntentService首先是一个抽象类,类中只有一个abstarct抽象方法:onHandleIntent
//所以我们需要重写onHandleIntent这个方法
public abstract class IntentService extends Service {
    private volatile Looper mServiceLooper;
    @UnsupportedAppUsage
    private volatile ServiceHandler mServiceHandler;
    private String mName;
    private boolean mRedelivery;

    //内部ServiceHandler,用于线程间通信
    //这里是消息处理端,对应于 onStar()消息发送端
    private final class ServiceHandler extends Handler {
        public ServiceHandler(Looper looper) {
            super(looper);
        }

        @Override
        public void handleMessage(Message msg) {
            //此方法用于处理耗时逻辑任务
            onHandleIntent((Intent)msg.obj);
            //当所有任务执行完毕后,就停止服务
            stopSelf(msg.arg1);
        }
    }

    /**
     * Creates an IntentService.  Invoked by your subclass's constructor.
     * 通过名称来创建IntentService
     * @param name Used to name the worker thread, important only for debugging.
     */
    public IntentService(String name) {
        super();
        mName = name;
    }

    /**
     * Sets intent redelivery preferences.  Usually called from the constructor
     * with your preferred semantics.
     *
     * <p>If enabled is true,
     * {@link #onStartCommand(Intent, int, int)} will return
     * {@link Service#START_REDELIVER_INTENT}, so if this process dies before
     * {@link #onHandleIntent(Intent)} returns, the process will be restarted
     * and the intent redelivered.  If multiple Intents have been sent, only
     * the most recent one is guaranteed to be redelivered.
     *
     * <p>If enabled is false (the default),
     * {@link #onStartCommand(Intent, int, int)} will return
     * {@link Service#START_NOT_STICKY}, and if the process dies, the Intent
     * dies along with it.
     */
    public void setIntentRedelivery(boolean enabled) {
        mRedelivery = enabled;
    }


    @Override
    public void onCreate() {
        super.onCreate();
        //内部还是由 HandlerThread  +  Handler 来实现的
        HandlerThread thread = new HandlerThread("IntentService[" + mName + "]");
        //HandlerThread在线程内部创建Looper和消息队列,并且在线程启动之后开启消息循环
        thread.start();

        //获取工作线程的Looper
        mServiceLooper = thread.getLooper();
        //创建ServiceHandler,绑定工作线程的Looper,这样子ServiceHandler就可以往消息队
        //中分发消息
        mServiceHandler = new ServiceHandler(mServiceLooper);
    }

    @Override
    public void onStart(@Nullable Intent intent, int startId) {
        Message msg = mServiceHandler.obtainMessage();
        msg.arg1 = startId;
        msg.obj = intent;
        //发送消息,添加到消息队列
        mServiceHandler.sendMessage(msg);
    }

    /**
     * You should not override this method for your IntentService. Instead,
     * override {@link #onHandleIntent}, which the system calls when the IntentService
     * receives a start request.
     * @see android.app.Service#onStartCommand
      自定义的IntentService 可以不用复写 onStartCommand方法,但是一定要复写onHandleIntent方法
     */
    @Override
    public int onStartCommand(@Nullable Intent intent, int flags, int startId) {
        //调用onStart(intent, startId)方法
        onStart(intent, startId);
        return mRedelivery ? START_REDELIVER_INTENT : START_NOT_STICKY;
    }

    @Override
    public void onDestroy() {
        mServiceLooper.quit();
    }

    /**
     * Unless you provide binding for your service, you don't need to implement this
     * method, because the default implementation returns null.
     * @see android.app.Service#onBind
     */
    @Override
    @Nullable
    public IBinder onBind(Intent intent) {
        return null;
    }

    /**
     * This method is invoked on the worker thread with a request to process.
     * Only one Intent is processed at a time, but the processing happens on a
     * worker thread that runs independently from other application logic.
     * So, if this code takes a long time, it will hold up other requests to
     * the same IntentService, but it will not hold up anything else.
     * When all requests have been handled, the IntentService stops itself,
     * so you should not call {@link #stopSelf}.
     *
     * @param intent The value passed to {@link
     *               android.content.Context#startService(Intent)}.
     *               This may be null if the service is being restarted after
     *               its process has gone away; see
     *               {@link android.app.Service#onStartCommand}
     *               for details.
     */
    //在自己的IntentService中重写此方法
    @WorkerThread
    protected abstract void onHandleIntent(@Nullable Intent intent);
}
3.1 onCreate()方法
@Override
    public void onCreate() {
        super.onCreate();
        //内部还是由 HandlerThread  +  Handler 来实现的
        HandlerThread thread = new HandlerThread("IntentService[" + mName + "]");
        //HandlerThread在线程内部创建Looper和消息队列,并且在线程启动之后开启消息循环
        thread.start();

        //获取工作线程的Looper
        mServiceLooper = thread.getLooper();
        //创建ServiceHandler,绑定工作线程的Looper,这样子ServiceHandler就可以往消息队
        //中分发消息
        mServiceHandler = new ServiceHandler(mServiceLooper);
    }
参考之前写的HandlerThread源码理解,我们知道 IntentService 其实内部封装了 HandlerThread + Handler ,这也解释了它可以用来执行后台任务,而不会阻塞UI线程引起ANR。
3.2 onStartCommand()方法
@Override
    public int onStartCommand(@Nullable Intent intent, int flags, int startId) {
        //调用onStart(intent, startId)方法
        onStart(intent, startId);
        return mRedelivery ? START_REDELIVER_INTENT : START_NOT_STICKY;
    }
补充一下基础知识,在Service生命周期中,当第一次用startService方法启动服务时回调:
onCreate()---->onStartCommand() ; 如果再启动该正在运行的服务,它不会再走onCreate()
只会走onStartCommand() ,源码中接着会调用onStart(intent, startId) 方法,这里也可以延伸一下,我们在实际应用中,就可以多次调用startService()方法来执行多项后台任务,IntentService也会多次调用 onStart(intent, startId)方法 ,我们来看看此方法
3.3 onStart(@Nullable Intent intent, int startId) 方法
    @Override
    public void onStart(@Nullable Intent intent, int startId) {
        Message msg = mServiceHandler.obtainMessage();
        msg.arg1 = startId;
        msg.obj = intent;
        //发送消息,添加到消息队列
        mServiceHandler.sendMessage(msg);
    }
也就是每调用一下此方法,就会封装一个不同 startID 的Message对象,然后通过mServiceHandler分发到工作线程中去处理,由于HandlerThread 是单线程工作,所以这些任务就需要排队一个一个的处理,待处理完毕,就停止服务,这也是设计巧妙的地方,避免了多次创建IntentService.
3.4 onDestory()方法
    @Override
    public void onDestroy() {
        mServiceLooper.quit();
    }
Looper消息轮询器退出
3.5 stopSelf(int startId)方法
此方法不同于Service的stopSelf()方法,当onHandlerIntent方法执行结束后,IntentService会通过stopSelf(int startId)方法来尝试停止服务。这里之所以采用stopSelf(int startId)而不是stopSelf()方法,那是因为stopSelf()会立即停止运行的服务,而这个时候可能还有其他消息未处理,stopSelf(int startId)则会等待所有的消息都处理完毕后才会停止服务。一般来说stopSelf(int startId)在尝试停止服务之前会判断最近启动的服务次数是否和startId相等,如果相等就立刻停止服务,不相等则不停止服务,这个策略可以从 AMS 的 public boolean stopServiceToken(ComponentName className, IBinder token, int startId) 这个方法中去查证。
四、实例演示
首先我在IntentService源码中加两句打印log:
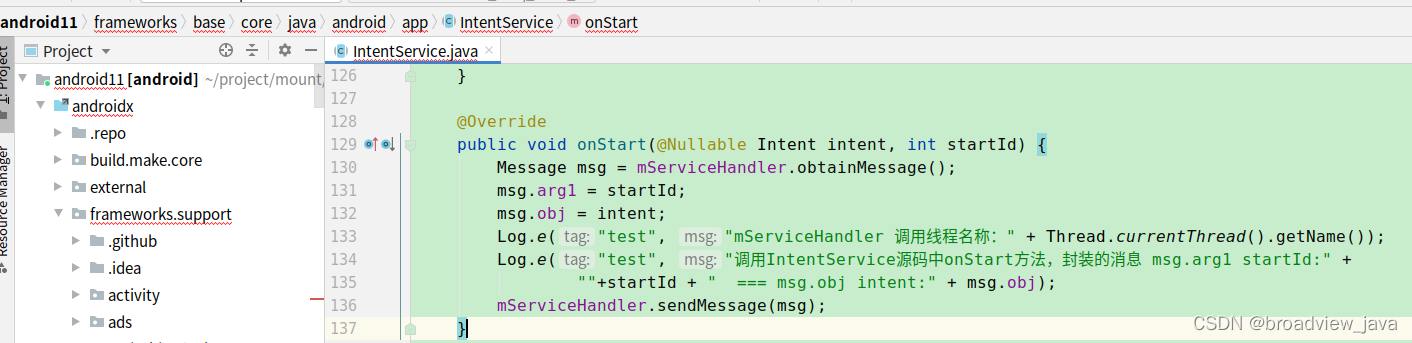
然后编译替换 framework.jar
下面是Demo代码:
public class MainActivity extends AppCompatActivity {

    private Button mStartButton;
    private Button mStopButton;

    @Override
    protected void onCreate(Bundle savedInstanceState) {
        super.onCreate(savedInstanceState);
        setContentView(R.layout.activity_main);

        mStartButton = findViewById(R.id.service_start);

        Intent intent = new Intent(this, MyIntentService.class);

        mStartButton.setOnClickListener(new View.OnClickListener() {
            @Override
            public void onClick(View v) {
                intent.putExtra("task_id", "任务1");
                startService(intent);

                intent.putExtra("task_id", "任务2");
                startService(intent);

                intent.putExtra("task_id", "任务3");
                startService(intent);
            }
        });

    }
}
public class MyIntentService extends IntentService {
public MyIntentService() {
super("myIntentService");
}
@Override
public void onCreate() {
super.onCreate();
Log.d("test", "=====MyIntentService====onCreate====");
}
@Override
protected void onHandleIntent(@Nullable Intent intent) {
String taskName = intent.getStringExtra("task_id");
Log.e("test", "mServiceHandler 处理线程名称:" + Thread.currentThread().getName());
Log.d("test", "======通过线程睡眠10秒模拟耗时任务==="+ taskName + "====start======");
try {
Thread.sleep(10000);
} catch (InterruptedException e) {
}
Log.d("test", "======"+ taskName + "====end======");
}
@Override
public void onDestroy() {
Log.e("test", "=====MyIntentService====onDestroy====");
super.onDestroy();
}
运行打印log如下:
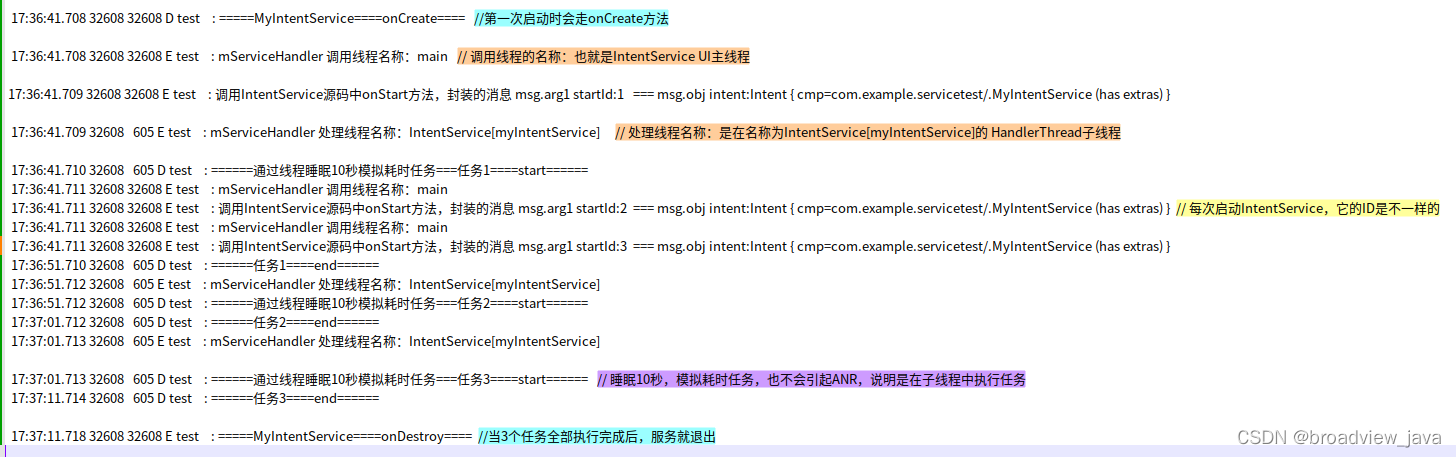
通过上述log分析,我们可以得出如下结论:
1. 当执行多个耗时任务时,它的工作模式是单服务(一个IntentService),单线程顺序执行任务(任务1执行---> 执行任务2 ----> 执行任务3 )----->退出服务
2. 睡眠10秒,模拟耗时任务,也不会引起ANR,说明是在子线程中执行任务,也和源码中IntentService 内部实现是HandlerThread 可以对应上。
我们把源码中IntentService加的log去掉,只打印任务执行相关的log,也更加清楚其执行过程:
11-18 18:06:20.251  3085  3085 D ok      : =====MyIntentService====onCreate====

11-18 18:06:20.253  3085  3159 D ok      : ======通过线程睡眠10秒模拟耗时任务===任务1====start======
11-18 18:06:30.253  3085  3159 D ok      : ======任务1====end======
11-18 18:06:30.255  3085  3159 D ok      : ======通过线程睡眠10秒模拟耗时任务===任务2====start======
11-18 18:06:40.255  3085  3159 D ok      : ======任务2====end======
11-18 18:06:40.257  3085  3159 D ok      : ======通过线程睡眠10秒模拟耗时任务===任务3====start======
11-18 18:06:50.257  3085  3159 D ok      : ======任务3====end======

11-18 18:06:50.261  3085  3085 E ok      : =====MyIntentService====onDestroy====
好了,到这里就应该对IntentService的使用差不多明白了,多打印log调试理解的更深一点。