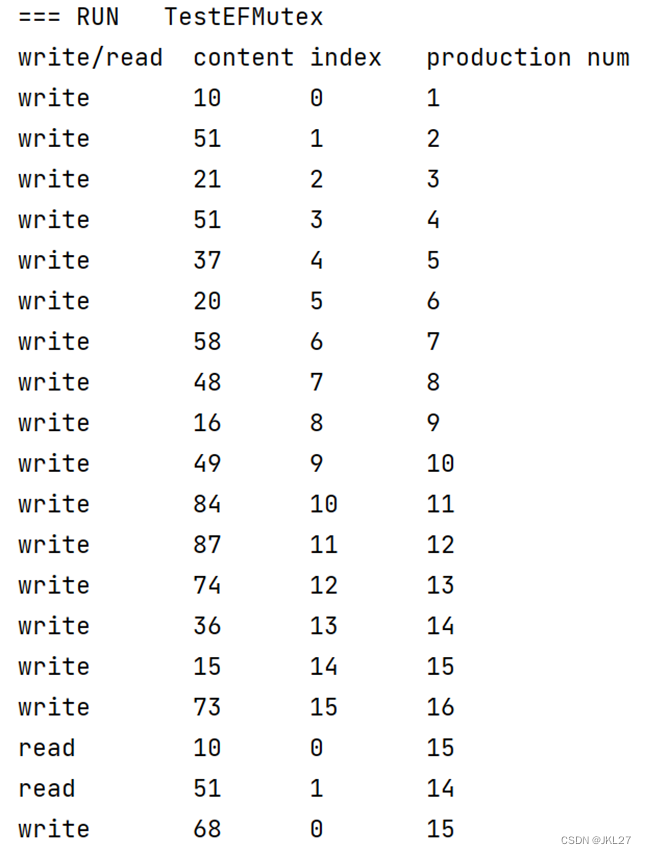
1 Spring简介
Spring是一个轻量级的JavaEE应用框架,对比EJB(Enterprise Java Beans)技术是官方制定的重量级的JavaEE解决方案。EJB的重的表现:编码必须实现EJB内置的组件、必须部署在支持EJB的服务器中才能运行测试。EJB有很强的侵入性,造成开发的代码庞大而且无法通用。Spring框架非侵入性,在开发、测试、扩展方面都远超EJB,已经是JavaEE开发的事实标准。
Spring构建于众多优秀的设计模式之上,比如:工厂设计模式、代理设计模式、模板方法设计模式、策略设计模式…。
设计模式:前人总结的,用于解决特定问题的优秀的方案。学习Spring,本质上就是在学这些设计模式解决了哪些问题?
2 工厂设计模式
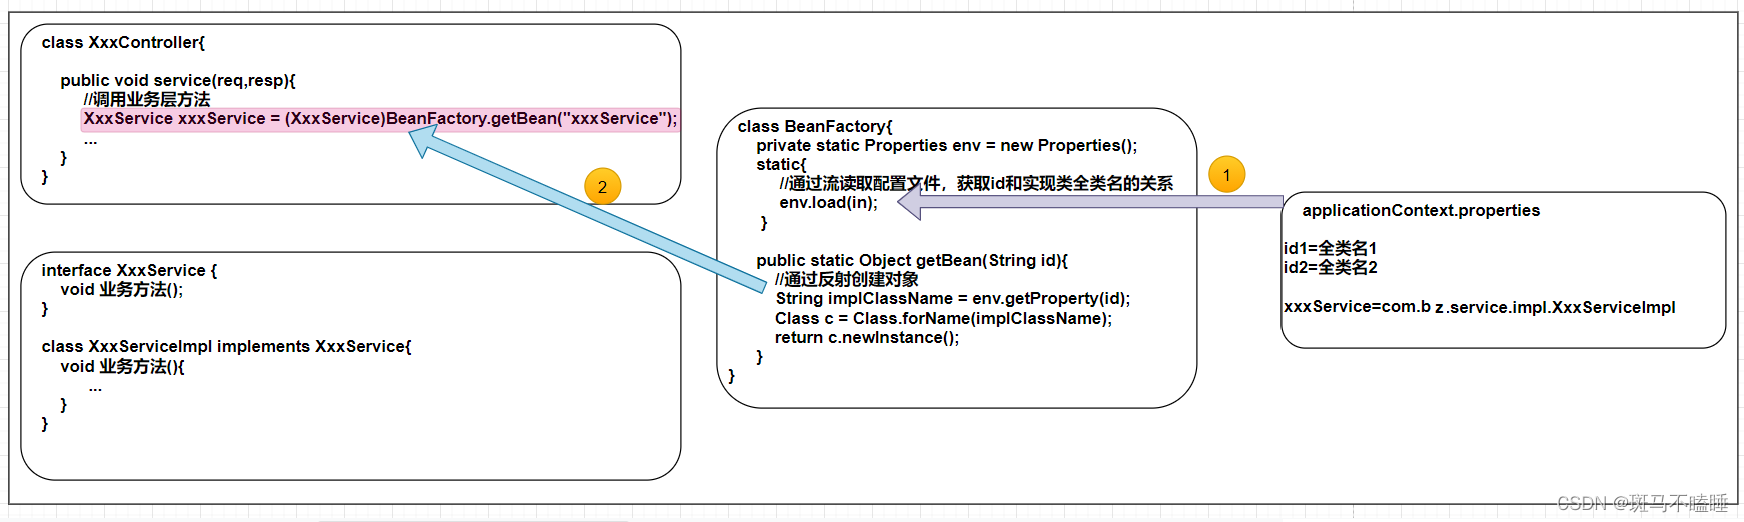
工厂设计模式:使用工厂类创建对象,替换传统的new创建对象。
new创建对象的问题:
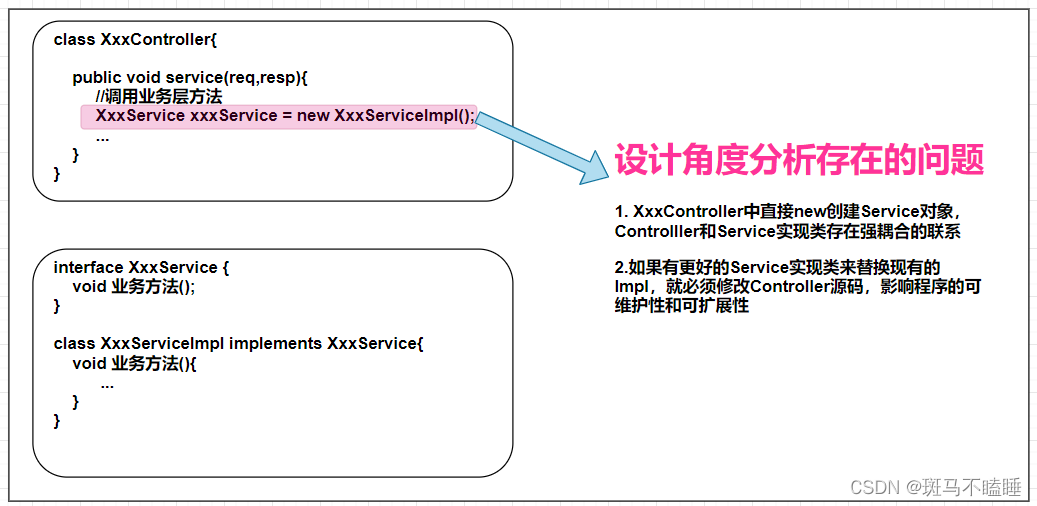
new模式下:类和类之间是强耦合,如果要扩展程序,必须要修改源码,违背开闭原则。
解决方案:工厂模式(解耦合)
-
创建一个工厂类BeanFactory+配置文件(applicationContext.properties)
applicationContext.properties
userService=com.bz.service.impl.UserServiceImpl2BeanFactory.java
public class BeanFactory { private static Properties env = new Properties(); static { InputStream in = BeanFactory.class.getResourceAsStream("/applicationContext.properties"); try { env.load(in); in.close(); }catch(IOException e){ e.printStackTrace(); throw new RuntimeException(e); } } //用于创建对象 public static Object getBean(String id){ //通过流读取配置文件,获取id和全类名的对应关系 try { //通过反射创建对象 Class c = Class.forName(env.getProperty(id)); return c.newInstance(); }catch(Exception e){ e.printStackTrace(); throw new RuntimeException(e); } } } -
将new替换为工厂创建对象
-
面向接口编程(定义接口类型的引用)
UserService service = //面向接口编程
    (UserService) BeanFactory.getBean("userService");
总结:工厂模式特点:配置文件+反射+面向接口编程。好处:解耦合
3 第1个Spring程序
Spring框架最基本的使用:对象工厂(容器)。通过Spring工厂创建对象,解耦合从而提高程序的可维护性和扩展性。
3.1 Spring工厂的使用步骤
-
搭建开发环境
-
新建项目
-
导入依赖
<!-- https://mvnrepository.com/artifact/org.springframework/spring-context --> <dependency> <groupId>org.springframework</groupId> <artifactId>spring-context</artifactId> <version>5.2.8.RELEASE</version> </dependency> -
导入配置文件
applicationContext.xml 位置任意,建议resources根目录下
-
-
编码+配置
配置:在applicationContext.xml中配置要创建哪些对象
<bean id="唯一标识" class="全类名"/>编码:从Spring工厂中获取对象
ApplicationContext 工厂类型(接口)
实现类:
ClassPathXmlApplicationContext (非web环境)
XmlWebApplicationContext (Web环境)
方法:
Object getBean(String id)
3.2 实战
配置:
<!-- new UserServiceImpl1() -->
    <!--<bean id="唯一标识" class="全类名"/>-->
    <bean id="userService" class="com.bz.service.impl.UserServiceImpl1"/>
编码:
//创建Spring工厂
ApplicationContext context = new ClassPathXmlApplicationContext("applicationContext.xml");

//从工厂中获取对象
UserService userService = (UserService) context.getBean("userService");
userService.removeUser(1);
3.3 获取Bean的多种方法
@Test
public void testGetBean(){
    //1 创建Spring工厂
    ApplicationContext ctx = new ClassPathXmlApplicationContext("classpath:applicationContext.xml");
    //2 调用方法从工厂获取对象
    XxxService xxxService = (XxxService) ctx.getBean("xxxService");//根据id从工厂中获取bean
    System.out.println("xxxService = " + xxxService);

    //XxxService xxxService2 = ctx.getBean(XxxService.class);//根据指定的类型从工厂中获取对象,此时要求满足类型的bean最多只能有1个
    //System.out.println("xxxService2 = " + xxxService2);

    //根据id和类型从工厂中获取匹配的bean
    XxxService xxxService3 = ctx.getBean("xxxService", XxxService.class);
    System.out.println("xxxService3 = " + xxxService3);

    System.out.println("=========================");
    //获取指定类型的所有bean
    Map<String, XxxService> beansOfType = ctx.getBeansOfType(XxxService.class);
    beansOfType.forEach((k,v)->{
        System.out.println(k+ "= " + v);
    });


}
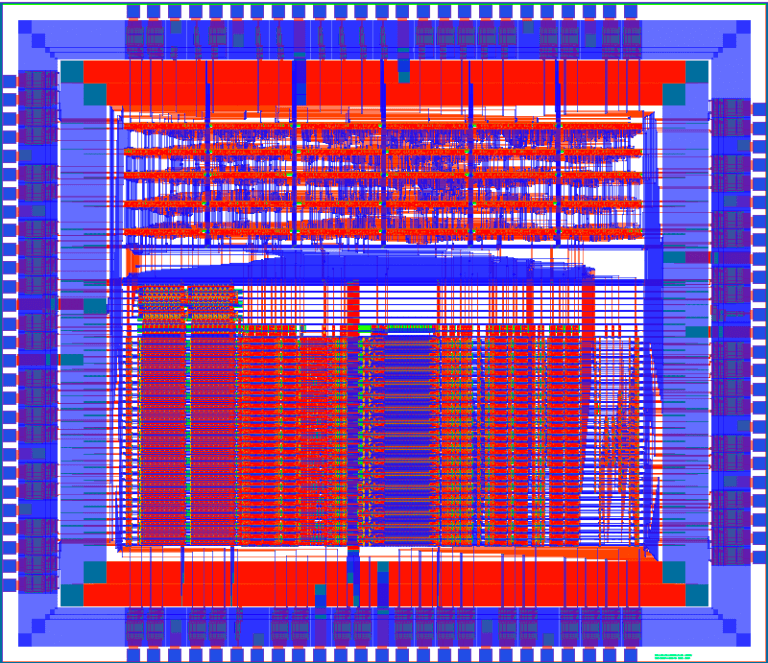
4 Spring框架的模块一览
![[外链图片转存失败,源站可能有防盗链机制,建议将图片保存下来直接上传(img-YeaDoy8l-1673343439887)(Spring day01.assets/image-20200330140458611.png)]](https://img-blog.csdnimg.cn/b98917e2f89e43fe8c981313bd615eb5.png)
- Test:简化Spring项目的测试
- 核心容器:Spring作为工厂的实现
- AOP:面向切面编程,是面向对象编程有利的补充,可以非侵入的为代码添加额外功能。
- 辅助功能
- Data Access:提供数据库访问
- Web:Spring对JavaWeb开发的支持
Spring族系的框架种类丰富:SpringMVC、SpringData、SpringTask、SpringSecurity、SpringBoot、SpringCloud…。除此之外,Spring框架可以轻松的和其它框架整合,调度其它框架。
5 Spring工厂的实现原理
Spring工厂创建对象:读取配置文件(applicationContext.xml)中的信息,获取class属性配置的全类名,通过反射,默认调用类的无参构造方法创建对象。
bean标签的scope属性控制创建的对象是否是单例的。
scope 属性值
singleton(默认值)单例 Spring在工厂创建时随即创建对象
prototype 多例 Spring工厂默认不主动创建,直到getBean时创建
Spring工厂创建对象为什么默认单例?节省内存资源。
可以被用户共用(单例):dao 、service、 Controller、sqlSessionFactory
不可以被用户公用(多例):connection、sqlSession、ShoppingCart
步骤:
1.引入依赖
<dependency>
    <groupId>org.springframework</groupId>
    <artifactId>spring-context</artifactId>
    <version>5.2.8.RELEASE</version>
    <scope>runtime</scope>
</dependency>
2.创建配置文件
<?xml version="1.0" encoding="UTF-8"?>
<beans xmlns="http://www.springframework.org/schema/beans"
       xmlns:xsi="http://www.w3.org/2001/XMLSchema-instance"
       xsi:schemaLocation="http://www.springframework.org/schema/beans http://www.springframework.org/schema/beans/spring-beans.xsd">
    <!--配置bean -->
    <bean class="com.bz.service.impl.XxxServiceImpl" id="xxxService"></bean>
</beans>
3.创建测试类
package com.bz.test;

import com.bz.service.XxxService;
import org.springframework.context.ApplicationContext;
import org.springframework.context.support.ClassPathXmlApplicationContext;

public class Test {
    @org.junit.Test
    public void a(){
        //获取spring中的bean对象
        //1.创建工厂内对象
        //ApplicationContext是Spring常用的工厂类型,继承了Factory接口
        // classpath  main/java main/resources都属于classpath的路径
        ApplicationContext ac= new ClassPathXmlApplicationContext("classpath:application.xml");
        //2.获取bean对象   getBean("id");
        XxxService xxxService = (XxxService) ac.getBean("xxxService");
        xxxService.deleteXxxById(8);
    }
}
6 注入(Injection)
为对象的属性赋值(注入值)。
6.1 Set注入
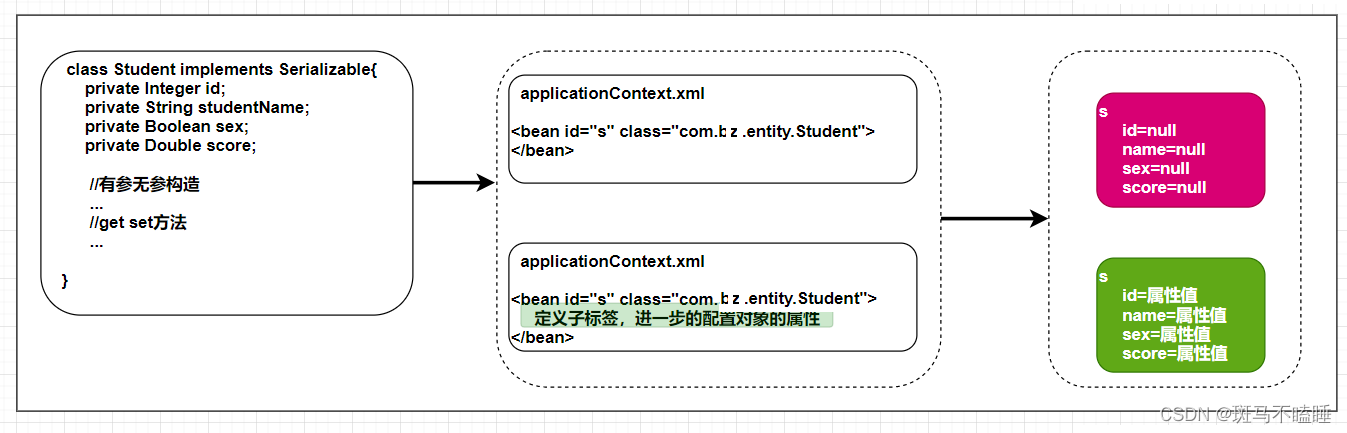
本质:通过无参构造方法创建对象后,调用属性的set方法赋值。
前提:类中必须有无参构造方法,属性必须提供set方法。
操作:在bean标签中,定义property子标签给属性赋值。
6.1.1 简单类型(基本类型、包装类+String)
用法:
<property name="属性名">
    <value>基本类型或String数据</value>
</property>

<property name="属性名" value="基本类型或String数据"/>
示例:
<bean id="s1" class="com.bz.entity.Student" scope="prototype">
        <!--<property name="id">
            <value>1</value>
        </property>
        <property name="name">
            <value>xiaohei</value>
        </property>
        <property name="sex">
            <value>true</value>
        </property>
        <property name="score">
            <value>100.0</value>
        </property>-->
        <property name="id" value="1"/>
        <property name="name" value="xiaohei"/>
        <property name="sex" value="true"/>
        <property name="score" value="100.0"/>
    </bean>
6.1.2 自定义类型
用法:
<property name="属性名">
	<ref bean="另外一个Bean的id属性"/>
</property>

<property name="属性名" ref="另外一个Bean的id属性"/>

示例:
 <bean class="com.bz.entity.Address" id="ad">
        <property name="city" value="郑州市"></property>
        <property name="street" value="航海路"></property>
    </bean>
    <bean class="com.bz.entity.Teacher" id="teacher">
        <property name="id" value="1"></property>
        <property name="name" value="2"></property>
        <property name="age" value="33"></property>
        <property name="address" ref="ad"></property>
    </bean>
6.1.3 数组、List、Set类型
用法:
<property name="数组属性名">
	<array>
    	<value>基本类型或者String</value>
        <ref bean="另外一个bean的id"/>
        ...
    </array>
</property>

<property name="数组属性名">
	<list>
    	<value>基本类型或者String</value>
        <ref bean="另外一个bean的id"/>
        ...
    </list>
</property>

<property name="数组属性名">
	<set>
    	<value>基本类型或者String</value>
        <ref bean="另外一个bean的id"/>
        ...
    </set>
</property>

示例:
<bean class="com.bz.entity.User" id="user">
        <property name="id" value="1"></property>
        <property name="name" value="张三"></property>
        <!--数组类型 -->
        <property name="os" >
            <array>
                <value>1</value>
                <value>张三</value>
                <ref bean="ad"></ref>
                <ref bean="teacher"></ref>
            </array>
        </property>
        <!--list类型 -->
        <property name="myList">
            <list>
                <value>1</value>
                <value>试试</value>
                <ref bean="student"></ref>
            </list>
        </property>
        <property name="mhySet">
            <set>
                <value>1</value>
                <value>撒旦</value>
                <ref bean="student"></ref>
            </set>
        </property>


    </bean>

注意:array、list、set 3个标签通用,但仍建议针对性使用。
6.1.4 Map类型
用法:
<property name="map属性名">
	<map>
    	<entry key="基本类型或String的key" value="基本类型或String的value"/>
        <entry key="基本类型或String的key" value-ref="bean的id"/>
    </map>
</property>

示例:
 <property name="myMap">
            <map>
                <entry key="1" value="zsf"></entry>
                <entry key="总是丢失" value="wqe"></entry>
                <entry key="asd" value-ref="teacher"></entry>
                <entry key-ref="student" value-ref="ad"></entry>
            </map>
 </property>
6.1.5 Properties类型
用法:
<property name="properties属性名">
	<props>
    	<prop key="键字符串">值字符串</prop>
        ...
    </props>
</property>

示例:
<property name="properties">
    <props>
        <!-- 每一个键值对都是String -->
        <prop key="name">xiaohei</prop>
        <prop key="age">18</prop>
    </props>
</property>
6.2 构造注入
本质:在调用有参构造方法创建对象时,为属性赋值。
前提:类中必须有有参构造方法。
操作:在bean标签中添加constructor-arg子标签进行配置。
6.2.1基本使用
/*当形参数量不同时,直接根据constructor-arg的数量进行匹配,按照constructor-arg标签的顺序给参数赋值。*/

package com.bz.entity;

public class Student {
    private int id;
    private String name;
    private int age;
    private String sex;

    public Student() {
    }

    public Student(int id, String name) {
        this.id = id;
        this.name = name;
    }

    public Student(int id, String name, int age) {
        this.id = id;
        this.name = name;
        this.age = age;
    }

    public Student(int id, String name, int age, String sex) {
        this.id = id;
        this.name = name;
        this.age = age;
        this.sex = sex;
    }
//省略get/set
}
 <!--通过构造注入为属性赋值-->
 <!--    两个参数的构造方法-->
    <bean class="com.bz.entity.Student" id="s1">
        <constructor-arg value="1"></constructor-arg>
        <constructor-arg value="张三"></constructor-arg>
    </bean>
    <!--    三个参数的构造方法-->
    <bean class="com.bz.entity.Student" id="s2">
        <constructor-arg value="1"></constructor-arg>
        <constructor-arg value="张三"></constructor-arg>
        <constructor-arg value="18"></constructor-arg>
    </bean>
在contructor-arg的基本使用中,Spring会根据数量匹配构造方法,并严格按照顺序为属性赋值。
6.2.2 type属性
type属性设置参数的类型,解决构造方法数量相同类型不同的匹配难题。
public User(Integer id) {
    System.out.println("id = [" + id + "]");
    this.id = id;
}
public User(String name) {
    System.out.println("name = [" + name + "]");
    this.name = name;
}
 <!--一个参数,类型不同 -->
    <bean class="com.bz.entity.Student" id="s4">
        <constructor-arg value="1" type="int"></constructor-arg>
    </bean>
    <bean class="com.bz.entity.Student" id="s5">
        <constructor-arg value="张三" type="java.lang.String"></constructor-arg>
    </bean>
注意:当构造参数多个时,一旦使用type属性,constructor-arg标签的顺序和构造方法参数的顺序不再严格对照。
6.2.3 index属性
index属性用于设置constructor-arg标签的参数顺序,配合type属性一起解决形参数量相同、形参类型相同但顺序不同的匹配难题。
 public Student(int id, String name) {
        this.id = id;
        this.name = name;
    }

    public Student(String name, int age) {
        this.name = name;
        this.age = age;
    }
  <bean class="com.bz.entity.Student" id="s6">
        <constructor-arg value="张三" type="java.lang.String" index="0"></constructor-arg>
        <constructor-arg value="1" type="java.lang.Integer" index="1"></constructor-arg>
    </bean>
对应源码地址:https://download.csdn.net/download/qq_36827283/87378024