此篇博客进行一个简单实例进行展示服务注册和服务的调用,以订单与库存模块为例,其结构图如下:

目 录
1、创建订单模块与库存模块
1.1、编写stock模块
1.2、编写order模块
2、访问地址进行测试
3、总结
1、创建订单模块与库存模块
创建两个模块,其结构如下

1.1、编写stock模块
pom文件引入相关依赖
<dependencies>
        <dependency>
            <groupId>org.springframework.boot</groupId>
            <artifactId>spring-boot-starter-web</artifactId>
        </dependency>

        <!-- 配置中心    -->
        <dependency>
            <groupId>com.alibaba.cloud</groupId>
            <artifactId>spring-cloud-starter-alibaba-nacos-config</artifactId>
        </dependency>

        <!--   服务注册/发现     -->
        <dependency>
            <groupId>com.alibaba.cloud</groupId>
            <artifactId>spring-cloud-starter-alibaba-nacos-discovery</artifactId>
        </dependency>
    </dependencies>
application.yml配置文件
server:
  port: 8092
  servlet:
    context-path: /

spring:
  application:
    name: nacos-stock
  cloud:
    nacos:
      discovery:
        server-addr: 127.0.0.1:8848
NacosStockApplication类(其中注解@EnableDiscoveryClient 作用为:在nacos中进行注册,并且让其他服务能够被发现,进而能够被调用)
package com.ljy;

import org.springframework.boot.SpringApplication;
import org.springframework.boot.autoconfigure.SpringBootApplication;
import org.springframework.cloud.client.discovery.EnableDiscoveryClient;

/**
 * @Author 不要有情绪的  ljy
 * @Date 2023/1/10 14:13
 * @Description:
 */
@SpringBootApplication
@EnableDiscoveryClient
public class NacosStockApplication {
    public static void main(String[] args) {
        SpringApplication.run(NacosStockApplication.class, args);
    }

}
StockController类
package com.ljy.controller;

import org.springframework.web.bind.annotation.RequestMapping;
import org.springframework.web.bind.annotation.RestController;

/**
 * @Author 不要有情绪的  ljy
 * @Date 2023/1/10 14:26
 * @Description:
 */
@RestController
@RequestMapping("/stock")
public class StockController {

    @RequestMapping("/test")
    public String test(String info) {
        return "库存模块接收到的信息:" + info;
    }
}
1.2、编写order模块
pom文件引入相关依赖(其中依赖openfeign是为了能够调用stock模块而引入)
<dependencies>
        <dependency>
            <groupId>org.springframework.boot</groupId>
            <artifactId>spring-boot-starter-web</artifactId>
        </dependency>

        <!-- 配置中心    -->
        <dependency>
            <groupId>com.alibaba.cloud</groupId>
            <artifactId>spring-cloud-starter-alibaba-nacos-config</artifactId>
        </dependency>

        <!--   服务注册/发现     -->
        <dependency>
            <groupId>com.alibaba.cloud</groupId>
            <artifactId>spring-cloud-starter-alibaba-nacos-discovery</artifactId>
        </dependency>

        <!--  openfeign   -->
        <dependency>
            <groupId>org.springframework.cloud</groupId>
            <artifactId>spring-cloud-starter-openfeign</artifactId>
        </dependency>
    </dependencies>
application.yml配置文件
server:
  port: 8091
  servlet:
    context-path: /

spring:
  application:
    name: nacos-order
  cloud:
    nacos:
      discovery:
        server-addr: 127.0.0.1:8848
NacosOrderApplication类(不要忘记@EnableFeignClients(basePackages = "com.ljy.feign"),不然不会扫描到feign包)
package com.ljy;

import org.springframework.boot.SpringApplication;
import org.springframework.boot.autoconfigure.SpringBootApplication;
import org.springframework.cloud.client.discovery.EnableDiscoveryClient;
import org.springframework.cloud.openfeign.EnableFeignClients;

/**
 * @Author 不要有情绪的  ljy
 * @Date 2023/1/10 10:39
 * @Description:
 */
@EnableDiscoveryClient
@SpringBootApplication
@EnableFeignClients(basePackages = "com.ljy.feign")
public class NacosOrderApplication {
    public static void main(String[] args) {
        SpringApplication.run(NacosOrderApplication.class, args);
    }
}
OrderController类
package com.ljy.controller;

import com.ljy.feign.StockFeignService;
import org.springframework.beans.factory.annotation.Autowired;
import org.springframework.web.bind.annotation.RequestMapping;
import org.springframework.web.bind.annotation.RestController;

/**
 * @Author 不要有情绪的  ljy
 * @Date 2023/1/10 14:34
 * @Description:
 */
@RestController
@RequestMapping("/order")
public class OrderController {

    @Autowired
    private StockFeignService stockFeignService;

    @RequestMapping("/test")
    public String test(){
        return stockFeignService.test("我是订单模块,我给库存模块发消息!!!");
    }
}
在feign包下编写StockFeignService接口(其作用为:能够调用到库存模块)
package com.ljy.feign;

import org.springframework.cloud.openfeign.FeignClient;
import org.springframework.web.bind.annotation.RequestMapping;
import org.springframework.web.bind.annotation.RequestParam;

/**
 * @Author 不要有情绪的  ljy
 * @Date 2023/1/10 14:30
 * @Description:
 */
@FeignClient("nacos-stock")
public interface StockFeignService {

    @RequestMapping("/stock/test")
    public String test(@RequestParam("info") String info);
}
2、访问地址进行测试
http://localhost:8091/order/test
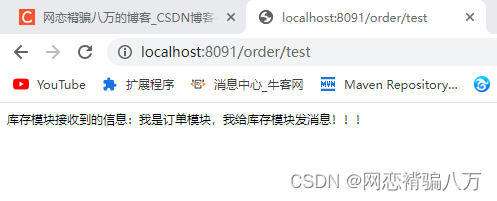
3、总结
以上就是nacos的服务注册与调用的简单实例展示过程,其过程为引入相关依赖,在nacos中进行服务注册,其目的是让其他服务能够发现,再引入openfeign依赖,为了能够让相关模块调用到。希望我的书写能够帮助到你。
学习之所以会想睡觉,是因为那是梦开始的地方。
ଘ(੭ˊᵕˋ)੭ (开心) ଘ(੭ˊᵕˋ)੭ (开心)ଘ(੭ˊᵕˋ)੭ (开心)ଘ(੭ˊᵕˋ)੭ (开心)ଘ(੭ˊᵕˋ)੭ (开心)
------不写代码不会凸的小刘