Qt 定时器事件

news2025/6/19 16:53:49

文章目录

  • 1 定时器事件
    • 1.1 界面布局
    • 1.2 关联信号槽
    • 1.3 重写timerEvent
    • 1.4 实现槽函数 启动定时器
  • 2 定时器类

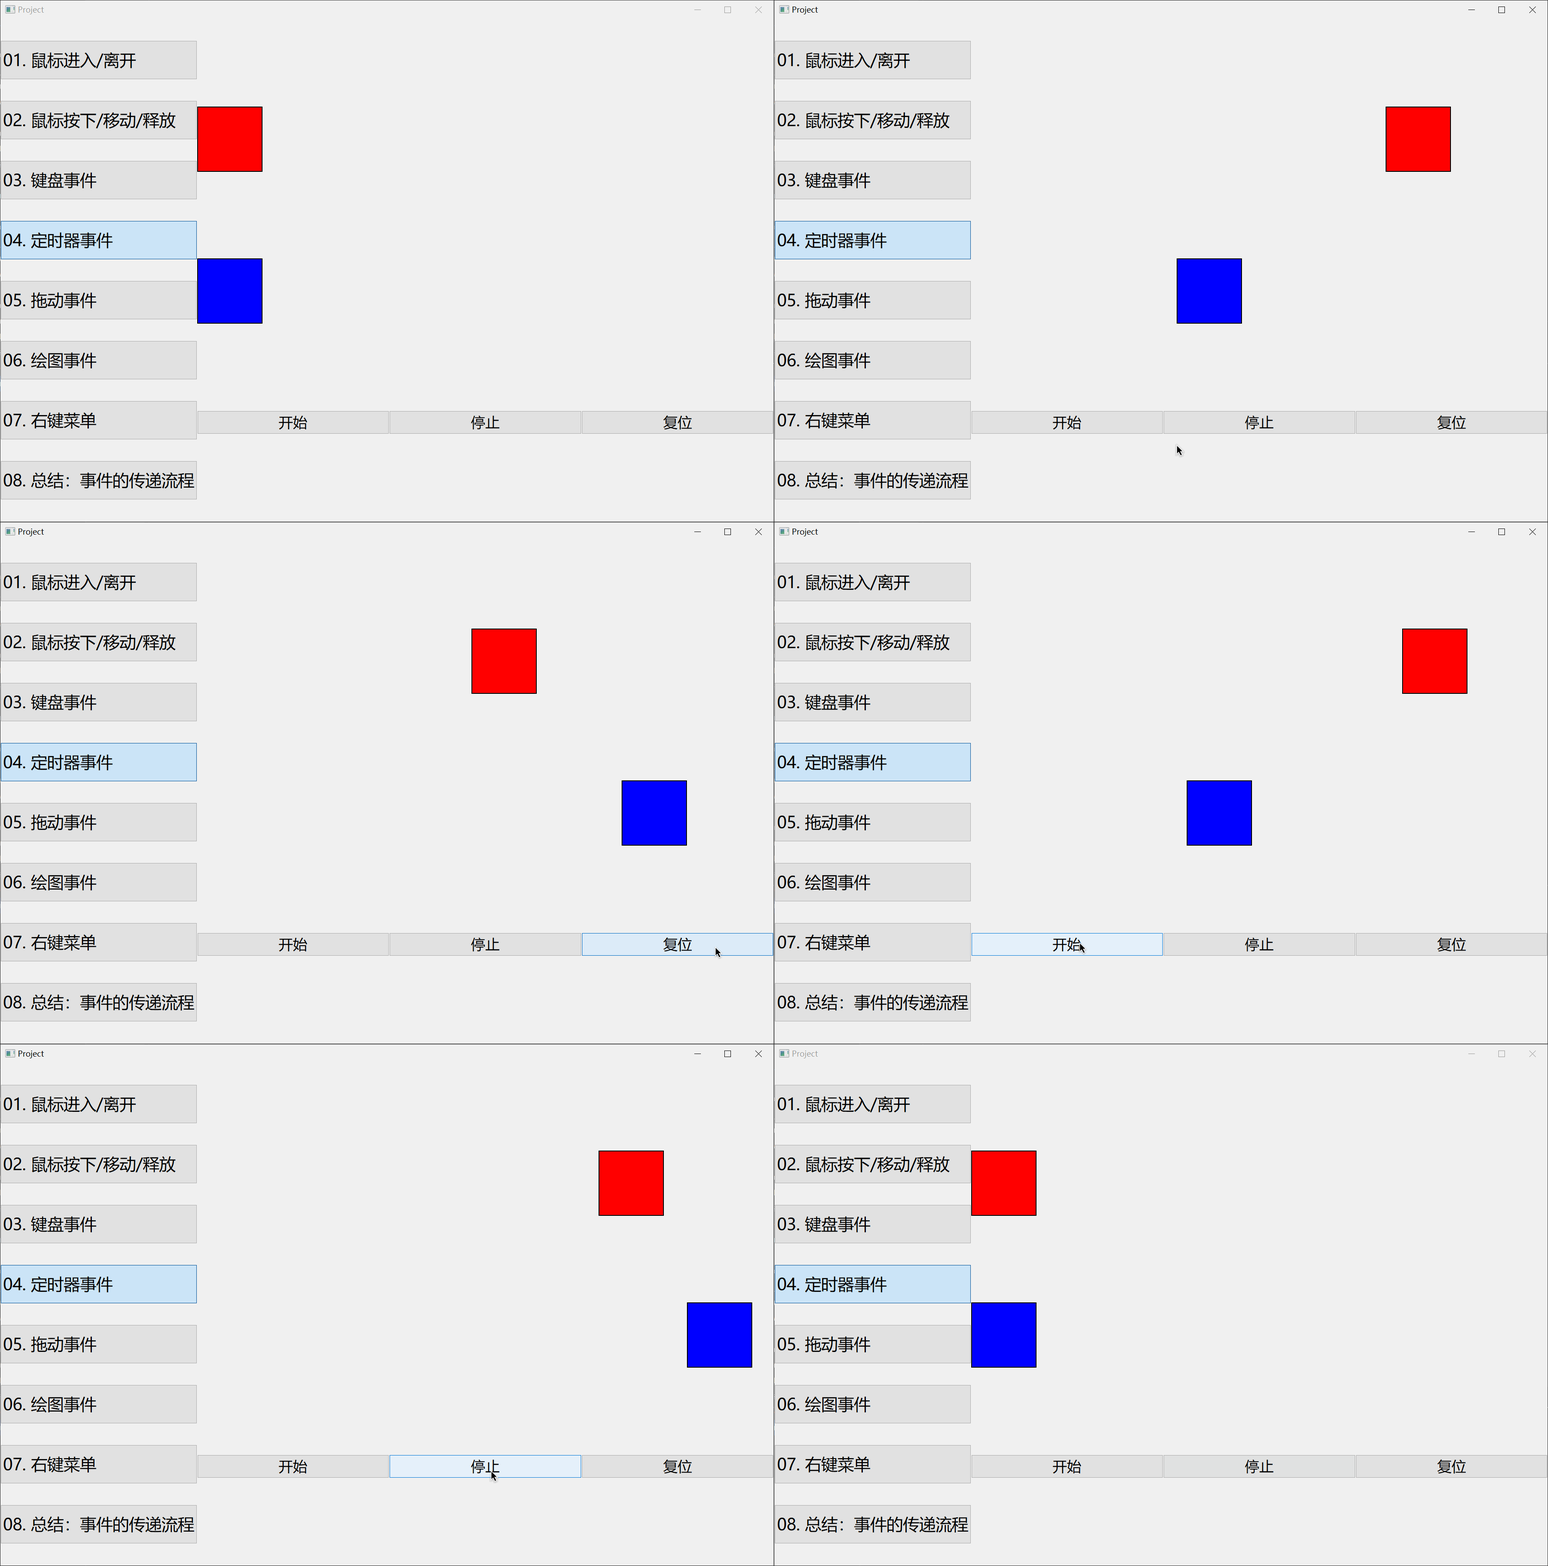
在这里插入图片描述

项目完整的源代码

QT中使用定时器,有两种方式:

  • 定时器类:QTimer
  • 定时器事件:QEvent::Timer,对应的子类是QTimerEvent

1 定时器事件

1.1 界面布局

把两个标签以及“启动”、“停止"、“复位”三个按钮布局在界面上。

首先,来到timer_widget.h,声明两个标签:

// timer_widget.h
private:
    QLabel *lbl1;
    QLabel *lbl2;

timer_widget.cpp 中 实现布局

// timer_widget.cpp

TimerWidget::TimerWidget(QWidget* parent) : QWidget{parent} {
    QVBoxLayout* verticalLayout = new QVBoxLayout(this);
    verticalLayout->setSpacing(0);
    verticalLayout->setContentsMargins(0, 0, 0, 0);

    // 第一个标签控件
    lbl1 = new QLabel(this);
    lbl1->setFrameShape(QFrame::Box);
    lbl1->setFixedSize(100, 100);
    lbl1->setStyleSheet("background-color: red;");
    verticalLayout->addWidget(lbl1);

    // 第二个标签控件
    lbl2 = new QLabel(this);
    lbl2->setFrameShape(QFrame::Box);
    lbl2->setFixedSize(100, 100);
    lbl2->setStyleSheet("background-color: blue;");
    verticalLayout->addWidget(lbl2);

    // 添加水平布局 - 三个按钮
    QHBoxLayout* horizontalLayout = new QHBoxLayout(this);
    horizontalLayout->setSpacing(0);
    horizontalLayout->setContentsMargins(0, 0, 0, 0);
    verticalLayout->addLayout(horizontalLayout);

    QPushButton* btnStart = new QPushButton(this);
    QPushButton* btnStop = new QPushButton(this);
    QPushButton* btnReset = new QPushButton(this);
    btnStart->setText("开始");
    btnStop->setText("停止");
    btnReset->setText("复位");
    horizontalLayout->addWidget(btnStart);
    horizontalLayout->addWidget(btnStop);
    horizontalLayout->addWidget(btnReset);

    this->setStyleSheet(R"(
        QPushButton {
            font-Size: 22px;
        }
    )");

    connect(btnStart, &QPushButton::clicked, this,
            &TimerWidget::onStartClicked);
    connect(btnStop, &QPushButton::clicked, this, &TimerWidget::onStopClicked);
    connect(btnReset, &QPushButton::clicked, this,
            &TimerWidget::onResetClicked);
}

1.2 关联信号槽

关联按钮与槽函数

// 点击按钮触发开启定时器函数
connect(btnStart, &QPushButton::clicked, this,
            &TimerWidget::onStartClicked);
// 点击按钮触发关闭定时器函数
    connect(btnStop, &QPushButton::clicked, this, &TimerWidget::onStopClicked);
// 点击按钮触发标签复位
    connect(btnReset, &QPushButton::clicked, this,
            &TimerWidget::onResetClicked);

1.3 重写timerEvent

timer_widget.cpp 文件中重写timerEvent函数

// timer_widget.cpp

void TimerWidget::timerEvent(QTimerEvent* event) {
    // id1 的时间为 10ms 时间到了 做这件事
    if (event->timerId() == id1) {
        lbl1->move(lbl1->x() + 5, lbl1->y());
        if (lbl1->x() > this->width()) {
            lbl1->move(0, lbl1->y());
        }
        // id2 的时间为 20ms 时间到了 做这件事
    } else if (event->timerId() == id2) {
        lbl2->move(lbl2->x() + 5, lbl2->y());
        if (lbl2->x() > this->width()) {
            lbl2->move(0, lbl2->y());
        }
    }
}

1.4 实现槽函数 启动定时器

timer_widget.cpp

void TimerWidget::onStartClicked() {
    // 启动定时器 - timerEvent
    // 时间到了自动执行timerEvent函数
    id1 = startTimer(10);  // 10ms
    id2 = startTimer(20);
}

void TimerWidget::onStopClicked() {
    killTimer(id1);
    killTimer(id2);
}

void TimerWidget::onResetClicked() {
    lbl1->move(0, lbl1->y());
    lbl2->move(0, lbl2->y());
}

2 定时器类

接下来,使用定时器类QTimer来实现以上同样的效果

首先,在timer_widget.h声明两个定时器类的对象,以及定时超时的槽函数:

// timer_widget.h
private slots:
    void onTimerout1();
    void onTimerout2();

private:
    QTimer *timer1;
    QTimer *timer2;

然后,在timer_widget.cpp中实现两个定时超时槽函数:

// timer_widget.cpp
void TimerWidget::onTimerout1() {
    lbl1->move(lbl1->x() + 5, lbl1->y());
    if (lbl1->x() > this->width()) {
        lbl1->move(0, lbl1->y());
    }
}

void TimerWidget::onTimerout2() {
    lbl2->move(lbl2->x() + 5, lbl2->y());
    if (lbl2->x() > this->width()) {
        lbl2->move(0, lbl2->y());
    }
}

关联结束时间信号触发槽

// timer_widget.cpp
    timer1 = new QTimer(this);
    timer2 = new QTimer(this);
    connect(timer1, &QTimer::timeout, this, &TimerWidget::onTimerout1);
    connect(timer2, &QTimer::timeout, this, &TimerWidget::onTimerout2);

实现槽函数 启动定时器

void TimerWidget::onStartClicked() {
    timer1->start(10);
    timer2->start(20);
}

void TimerWidget::onStopClicked() {
    timer1->stop();
    timer2->stop();
}

本文来自互联网用户投稿,该文观点仅代表作者本人,不代表本站立场。本站仅提供信息存储空间服务,不拥有所有权,不承担相关法律责任。如若转载,请注明出处:http://www.coloradmin.cn/o/1503487.html

如若内容造成侵权/违法违规/事实不符,请联系多彩编程网进行投诉反馈,一经查实,立即删除!

相关文章

Vue.js+SpringBoot开发大学计算机课程管理平台

目录 一、摘要1.1 项目介绍1.2 项目录屏 二、功能模块2.1 实验课程档案模块2.2 实验资源模块2.3 学生实验模块 三、系统设计3.1 用例设计3.2 数据库设计3.2.1 实验课程档案表3.2.2 实验资源表3.2.3 学生实验表 四、系统展示五、核心代码5.1 一键生成实验5.2 提交实验5.3 批阅实…

Clock Verification IP

Clock Verification IP IP 参数及接口 IP 例化界面 相关函数 start_clock //产生时钟 <hierarchy_path>.IF.start_clockstop_clock //停止时钟 <hierarchy_path>.IF.stop_clockset_initial_value //设置时钟初始值为 0 <hierarchy_path>IF.set_initia…

Solidity攻击合约:“被偷走的资金”

在以太坊智能合约开发中&#xff0c;Solidity是最常用的编程语言。然而&#xff0c;由于代码编写不当或缺乏安全意识&#xff0c;合约可能面临各种攻击。本文将通过一个简单的Solidity合约示例&#xff0c;展示一个潜在的攻击合约&#xff0c;并分析其相对于原本合约的危害以及…

TS项目实战三:Express实现登录注册功能后端

使用express实现用户登录注册功能&#xff0c;使用ts进行代码开发&#xff0c;使用mysql作为数据库&#xff0c;实现用户登录、登录状态检测、验证码获取接口及用户注册相关接口功能的实现。 源码下载&#xff1a;[点击下载] (https://download.csdn.net/download/m0_37631110/…

设计模式-行为型模式-观察者模式

观察者模式定义了一种一对多的依赖关系&#xff0c;让多个观察者对象同时监听某一个主题对象。这个主题对象在状态发生变化时&#xff0c;会通知所有观察者对象&#xff0c;使它们能够自动更新自己。[DP] //首先是Observer接口&#xff0c;定义了观察者需要实现的更新方法&…

【Claude 3】一文谈谈Anthropic(Claude) 亚马逊云科技(Bedrock)的因缘际会

文章目录 前言1. Anthropic的诞生2. Anthropic的“代表作”——Claude 3的“三驾马车”3. 亚马逊云科技介绍4. 强大的全托管服务平台——Amazon Bedrock5. 亚马逊云科技(AWS)和Anthropic的联系6. Claude 3模型与Bedrock托管平台的关系7. Clude 3限时体验入口分享【⚠️截止3月1…

[贰],万能开篇HelloWorld

1&#xff0c;新建项目 File/New/Project Android/Android Application Project 输入程序名字HelloWorld Next Next 选择Blank Activity 修改为HelloWorldActivity 2&#xff0c;异常点 No resource found that matches the given name Theme.AppCompat.Light import andro…

c++中string的使用!!!(适合初学者 浅显易懂)

我们先初步的认识一下string,string底层其实是一个模版类 typedef basic_string<char> string; 我们先大致的把string的成员函数列举出来 class string { private: char * str; size_t size; size_t capacity; }; 1.string的六大默认函数 1.1 构造函数、拷贝构造 注&am…

Hadoop生态选择(一)

一、项目框架 1.1技术选型 技术选型主要考虑因素:维护成本、总成本预算、数据量大小、业务需求、行业内经验、技术成熟度。 数据采集传输:Flume&#xff0c;Kafka&#xff0c;DataX&#xff0c;Maxwell&#xff0c;Sqoop&#xff0c;Logstash数据存储:MySQL&#xff0c;HDFS…

【数据库】多表查询:子查询|关联查询 inner join 、left join、right join

一、外键&#xff1a; 就是把一张表的主键拿到另一张表中作为一个普通的字段 通过外键 可以把两张表连接起来 比如&#xff0c;下面【部门】表里的主键 拿到【员工】表里做普通字段&#xff08;外键&#xff09; 员工 部门 1员工&#xff0c;XXX&#xff0c;1部门 1部门&a…

CraxsRat7.4 安卓手机远程管理软件

CRAXSRAT 7.4 最新视频 https://v.douyin.com/iFjrw2aD/ 官方网站下载 http://craxsrat.cn/ 不要问我是谁&#xff0c;我是活雷锋。 http://craxsrat.cn/ CraxsRat CraxsRat7 CraxsRat7.1 CraxsRat7.2 CraxsRat7.3 CraxsRat7.4

[java基础揉碎]super关键字

super关键字: 基本介绍 super代表父类的引用&#xff0c;用于访问父类的属性、方法、构造器 super给编程带来的便利/细节 1.调用父类的构造器的好处(分工明确&#xff0c;父类属性由父类初始化&#xff0c;子类的属性由子类初始化) 2.当子类中有和父类中的成员(属性和方法)重…

R语言更新版本

目录 一、更新R语言 1、安装最新的R语言版本 2、移动之前安装的packages 3、将Rstudio连接到最新的R语言 二、Rstudio更新 一、更新R语言 1、安装最新的R语言版本 查看当前R语言版本&#xff1a; R.version.string 下载最新的R语言安装包&#xff1a;R: The R Project…

链表|19.删除链表的倒数第N个节点

力扣题目链接 struct ListNode* removeNthFromEnd(struct ListNode* head, int n) {//定义虚拟头节点dummy 并初始化使其指向headstruct ListNode* dummy malloc(sizeof(struct ListNode));dummy->val 0;dummy->next head;//定义 fast slow 双指针struct ListNode* f…

SkyWalking链路追踪上下文TraceContext的traceId生成的实现原理剖析

结论先行 【结论】 SkyWalking通过字节码增强技术实现&#xff0c;结合依赖注入和控制反转思想&#xff0c;以SkyWalking方式将追踪身份traceId编织到链路追踪上下文TraceContext中。 是不是很有趣&#xff0c;很有意思&#xff01;&#xff01;&#xff01; 【收获】 skywal…

CSS的盒子模型:掌握网页设计的基石!

&#x1f90d; 前端开发工程师、技术日更博主、已过CET6 &#x1f368; 阿珊和她的猫_CSDN博客专家、23年度博客之星前端领域TOP1 &#x1f560; 牛客高级专题作者、打造专栏《前端面试必备》 、《2024面试高频手撕题》 &#x1f35a; 蓝桥云课签约作者、上架课程《Vue.js 和 E…

C#学习:初识各类应用程序

编写我们第一个程序——Hello,World! 1.编程不是“学”出来的&#xff0c;而是“练”出来的 2.在反复应用中积累&#xff0c;忽然有一天就会顿悟 3.学习原则&#xff1a; 3.1从感官到原理 3.2从使用别人的到创建自己的 3.3必需亲自动手 3.4必需学以致用&#xff0c;紧跟实际…

P4551 最长异或路径

最长异或路径 题目描述 给定一棵 n n n 个点的带权树&#xff0c;结点下标从 1 1 1 开始到 n n n。寻找树中找两个结点&#xff0c;求最长的异或路径。 异或路径指的是指两个结点之间唯一路径上的所有边权的异或。 输入格式 第一行一个整数 n n n&#xff0c;表示点数…

机器人扫地 二分答案

#include<bits/stdc.h> using namespace std; int i,n,a[100009],k,ans0; bool check(int mid){int pos0,t;//pos前面清扫过的位置for(i0;i<k;i){ //已经清扫的位置还没到当前机器人的位置a[i]//一个位置机器人是要去回&#xff0c;一个格子消耗两个时间 tmid;//贪心…

turtle绘制小猪佩奇

turtle绘制小猪佩奇 import turtle as t 使用python的turtle绘制小猪佩奇 # 设置线条粗细为4 t.pensize(4) # 使海龟不可见 #t.hideturtle() # 后续表示三原色的r,g,b必须在0~255之间 t.colormode(255) # 设置画笔颜色和填充颜色 t.color((255, 155, 192), "pink")…