目录标题
- 一、文档地址
- 二、文档目录索引简介
- (一)Spring Web MVC
- 1. 常用注解的使用
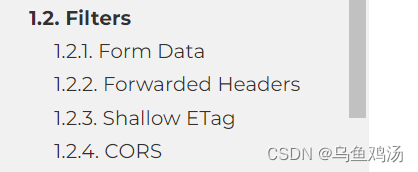
- 2. 过滤器
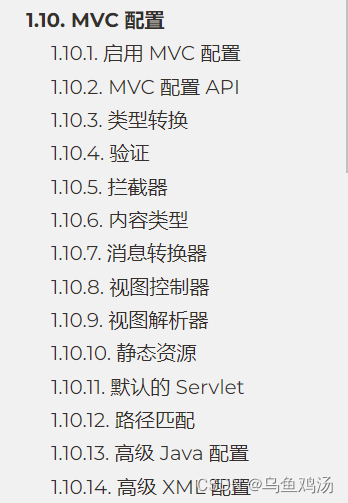
- 3. WebMvcConfigurer
- (二)RestTemplate
- (三)WebSocket
- 三、Spring Web MVC
- (一)@Controller@RestController
- 1. @Controller
- 2. @RestController
- (二)@RequestMapping
- 1. url
- 2. 缩小@RequestMapping匹配的url
- (三)Handler Methods
- 1. 方法参数
- ~HttpServletRequest、MultipartHttpServletRequest
- ~MultipartFile 文件上传
- ~@PathVariable
- ~@MatrixVariable
- ~@RequestParam
- ~@RequestHeader
- ~@RequestBody
- ~@CookieValue
- ~@SessionAttribute
- ~SessionStatus+ @SessionAttributes
- ~@ModelAttribute
- ~@RequestAttribute
- 2. 方法返回值
- ~重定向(redirect:)
- ~@ResponseBody
- ~ResponseEntity
- ~@JsonView
- 3. model
- 4. 数据绑定@InitBinder
- 5. 异常处理器@ExceptionHandler
一、文档地址
官方文档:spring mvc
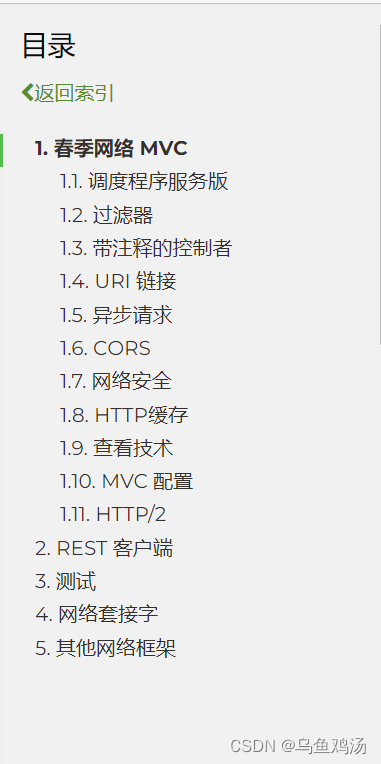
二、文档目录索引简介
从目录索引快速了解文档有什么内容。
注意:文档内容经过浏览器翻译
目前文档分为5部分内容,比较重要的(文档介绍得比较详细的)是:1. Spring Web MVC、4. WebSocket
(一)Spring Web MVC
spring web mvc 这个部分是核心部分,里面介绍了常用注解、拦截器、过滤器、异常处理器、以及核心配置类WebMvcConfigurer的使用。
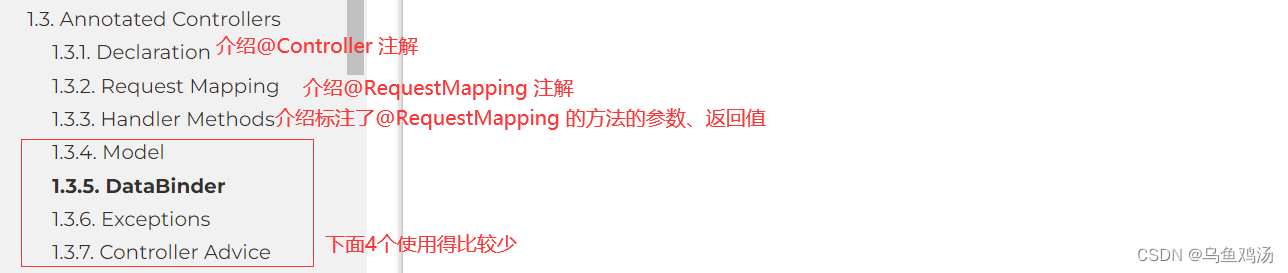
1. 常用注解的使用
关于spring mvc注解相关的内容文档几乎都在这里详细介绍:跳转
2. 过滤器
3. WebMvcConfigurer
跳转

(二)RestTemplate
(三)WebSocket
三、Spring Web MVC
(一)@Controller@RestController
1. @Controller
返回视图
@Controller
public class HelloController {

    @GetMapping("/hello")
    public String handle(Model model) {
        model.addAttribute("message", "Hello World!");
        return "index";
    }
}
2. @RestController
返回字符串(json),前后端分离使用。
@Controller
public class HelloController {

    @GetMapping("/hello")
    public String handle(Model model) {
        model.addAttribute("message", "Hello World!");
        return "index";
    }
}
(二)@RequestMapping
还有特定于 HTTP 方法的快捷方式变体:@RequestMapping
-
@GetMapping
-
@PostMapping
-
@PutMapping
-
@DeleteMapping
-
@PatchMapping
@RestController
@RequestMapping("/persons")
class PersonController {

    @GetMapping("/{id}")
    public Person getPerson(@PathVariable Long id) {
        // ...
    }

    @PostMapping
    @ResponseStatus(HttpStatus.CREATED)
    public void add(@RequestBody Person person) {
        // ...
    }
}
1. url
您可以使用以下 glob 模式和通配符映射请求:
-
?匹配一个字符
-
*匹配路径段中的零个或多个字符
-
**匹配零个或多个路径段
@RequestMapping("/hello/test?")
public String test2(){
    return "6666";
}
/hello/test1 yes ; /hello/test11 no ; /hello/test/ no
还可以声明 URI 变量并使用 、 访问其值 如以下示例所示:@PathVariable
@GetMapping("/owners/{ownerId}/pets/{petId}")
public Pet findPet(@PathVariable Long ownerId, @PathVariable Long petId) {
    // ...
}
这种url访问方式,为RestFul 风格 url只使用 / 分隔。传统的为https://www.baidu.com/s?ie=utf-8&f=8&rsv_bp=1,?号后面跟参数,参数之间用&分隔。传统风格容易泄露请求参数名称。RestFul 风格可以避免,因为url上只有值,没有变量名。
url甚至可以使用正则表达式去匹配。
@GetMapping("/{name:[a-z-]+}-{version:\\d\\.\\d\\.\\d}{ext:\\.[a-z]+}")
public void handle(@PathVariable String version, @PathVariable String ext) {
    // ...
}
2. 缩小@RequestMapping匹配的url
@RequestMapping 注解中提供了很多属性。
-
method
要映射到的HTTP请求方法,缩小主要映射:GET、POST、HEAD、OPTIONS、PUT、PATCH、DELETE、TRACE。 在类型级别和方法级别都支持!当在类型级使用时,所有方法级映射都继承此HTTP方法限制。 -
param
映射请求的参数,缩小主映射。 适用于任何环境的格式相同:一系列“myParam=myValue”样式表达式,只有在发现每个这样的参数具有给定值时才会映射请求。表达式可以使用“!”=“操作符,如"myParam!=myValue”。“myParam”风格的表达式也被支持,这样的参数必须出现在请求中(允许有任何值)。最后,”!myParam”样式表达式表明指定的参数不应该出现在请求中。 在类型级别和方法级别都支持!当在类型级使用时,所有方法级映射都继承此参数限制。 -
header
映射请求的标头,缩小主映射。 同样的格式适用于任何环境:“My-Header=myValue”样式表达式序列,只有当每个这样的头被发现具有给定值时才会映射请求。表达式可以使用“!”=“操作符,如"My-Header!=myValue”。“My-Header”样式的表达式也被支持,这样的头必须出现在请求中(允许有任何值)。最后,”!My-Header”样式表达式表明指定的头不应该出现在请求中。 还支持媒体类型通配符(),用于头部,如Accept和Content-Type。例如, @RequestMapping(value = “/something”, headers = "content-type=text/“) 将匹配请求的内容类型为"text/html”, "text/plain"等。 在类型级别和方法级别都支持!当在类型级使用时,所有方法级映射都继承此标头限制。 -
consumes
按映射处理程序可以使用的媒体类型缩小主映射。由一个或多个媒体类型组成,其中一个必须与请求的Content-Type报头匹配。例子: 消费= “text/plain” 消费= {“text/plain”, “application/*”} consume = MediaType。TEXT_PLAIN_VALUE 表达式可以使用“!”运算符求反,如“!”text/plain”,它匹配除“text/plain”以外的所有内容类型的请求。 在类型级别和方法级别都支持!如果在两个级别上都指定,则方法级消耗条件将覆盖类型级条件。 -
produces
根据映射处理程序可以生成的媒体类型缩小主映射。由一个或多个媒体类型组成,其中一个必须通过与请求的“可接受”媒体类型进行内容协商来选择。通常它们是从“Accept”报头中提取的,但也可以从查询参数或其他参数中派生。例子: Produces = “text/plain” 生成= {“text/plain”, “application/*”} produces = MediaType。TEXT_PLAIN_VALUE “text/plain;charset=UTF-8” 如果声明的媒体类型包含一个参数(例如:“charset=UTF-8”, “type=feed”, “type=entry”),如果来自请求的兼容媒体类型也有该参数,那么参数值必须匹配。否则,如果来自请求的媒体类型不包含该参数,则假定客户端接受任何值。 表达式可以使用“!”运算符求反,如“!”text/plain”,它匹配除“text/plain”以外的所有请求。 在类型级别和方法级别都支持!如果在两个级别上都指定,则方法级别生成的条件将覆盖类型级别的条件。
如果出现乱码可以通过这个属性就行处理: @RequestMapping(value = “/hello”,produces = “application/json;charset=UTF-8”)
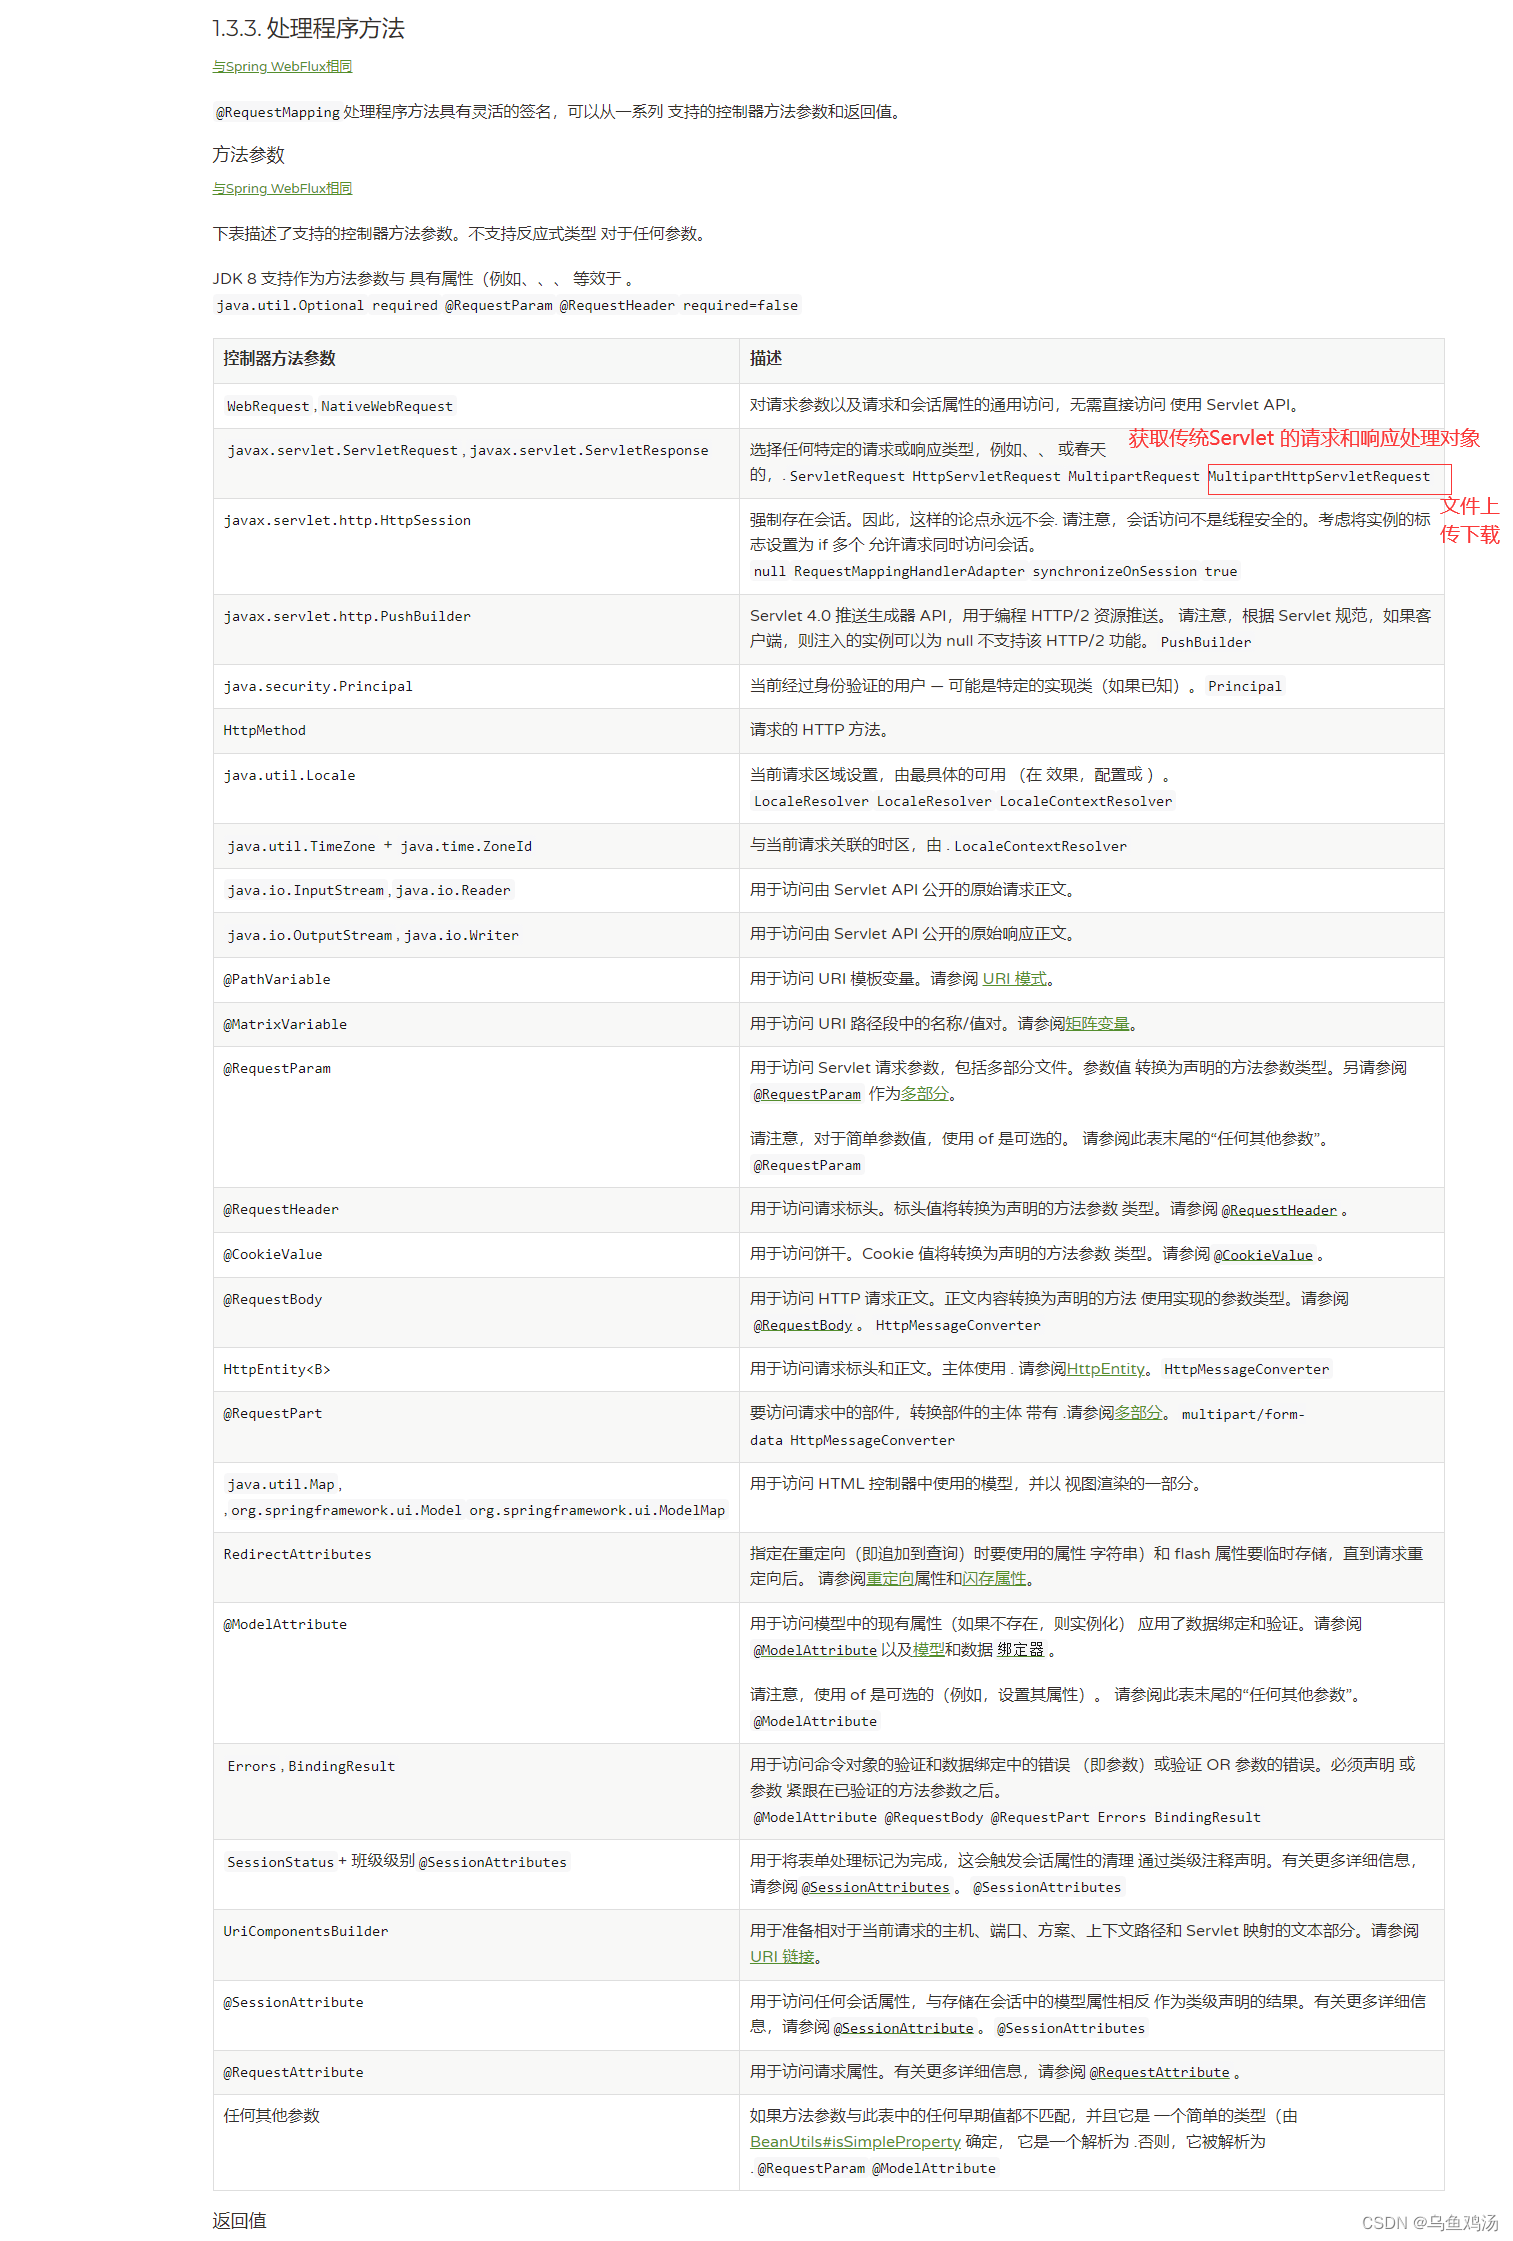
(三)Handler Methods
@RequestMapping处理程序方法具有灵活的签名,可以从一系列 支持的控制器方法参数和返回值。
1. 方法参数
链接
~HttpServletRequest、MultipartHttpServletRequest
Request、 ServletRequest、HttpServletRequest的区别与联系
@RequestMapping("/index")
public String index(HttpServletRequest request, HttpServletResponse response){

   //获取请求url
   System.out.println(request.getRequestURI());
   //获取请求传进来的参数
   Object key = request.getAttribute("key");

   //设置一个值给jsp展示
   request.setAttribute("key","value");

   //获取Session
   HttpSession session = request.getSession();
   session.setAttribute("key","value");
   Object key1 = session.getAttribute("key");

   //添加Cookie
   Cookie c = new Cookie("key","value");
   response.addCookie(c);


   Cookie[] cookies = request.getCookies();

   for (Cookie cookie : cookies) {

   }
   //

   return "index";
}
~MultipartFile 文件上传
package com.lihua.springbootweb;

import org.springframework.stereotype.Controller;
import org.springframework.web.bind.annotation.GetMapping;
import org.springframework.web.bind.annotation.PostMapping;
import org.springframework.web.bind.annotation.RequestParam;
import org.springframework.web.bind.annotation.ResponseBody;
import org.springframework.web.multipart.MultipartFile;

import java.io.File;
import java.io.IOException;
import java.util.List;

/**
 * @author lihua
 * @date 2022/12/30 9:09
 **/
@Controller
public class FileUploadController {

    //单个文件
    @PostMapping("/form")
    @ResponseBody
    public String handleFormUpload( String note,
                                   MultipartFile upfile) {

        System.out.println(note);

        if (!upfile.isEmpty()) {
            String name = upfile.getOriginalFilename();

            File fileDirectory = new File("C:\\test");

            fileDirectory.mkdir();

            //文件上传到哪里
            File file = new File("C:\\test\\"+name);

            try {
                //将接收到的文件传输到给定的目标文件。
                upfile.transferTo(file);
            } catch (IOException e) {
                e.printStackTrace();
            }
            // store the bytes somewhere
            return "uploadSuccess";
        }
        return "uploadFailure";
    }

    //多个文件
    @PostMapping("/form")
    @ResponseBody
    public String handleFormUploads( String note,
                                     List<MultipartFile> upfiles) {

        System.out.println(note);

        for (MultipartFile upfile : upfiles) {
            if (!upfile.isEmpty()) {
                String name = upfile.getOriginalFilename();

                File fileDirectory = new File("C:\\test");

                fileDirectory.mkdir();

                //文件上传到哪里
                File file = new File("C:\\test\\"+name);

                try {
                    //将接收到的文件传输到给定的目标文件。
                    upfile.transferTo(file);
                } catch (IOException e) {
                    e.printStackTrace();
                }
                // store the bytes somewhere
                return "uploadSuccess";
            }
        }
        return "uploadFailure";
    }

    @GetMapping("/form")
    public String formIndex(){
        return "file-upload";
    }
}
<!DOCTYPE html>
<html lang="en">
<head>
    <meta charset="UTF-8">
    <title>Title</title>
</head>
<body>
<div>http://localhost:8080/form/div>
<form method="POST" enctype="multipart/form-data" action="http://localhost:8080/form">
    File to upload: <input type="file" name="upfile"><br/>
    Notes about the file: <input type="text" name="note"><br/>
    <br/>
    <input type="submit" value="Press"> to upload the file!
</form>
</body>
</html>
MultipartFile multipartFile 参数名要和请求的FormData对应的key 一样。
MultipartFile 参考
SpringMVC的MultipartHttpServletRequest
~@PathVariable
用于访问 URI 模板变量。
 @RequestMapping("/hello1/{id}")
 public String test1(@PathVariable("id") String id){}
~@MatrixVariable
一般以矩阵变量的方式传递参数,则url有多种格式
/cars/sell;low=34;brand=bmw;brand=audi;brand=benz这是在;后面以key=value形式加上参数,之间用;分开/cars/sell;low=34;brand=bmw,audi,benz这是将相同key的value值以,分开/boss/1;age=20/2;age=18这是以/boss/{bossId}/{empId}的形式,并且在bossId和empId中分别带上了参数- 矩阵变量是绑定在路径变量中的。比如,对于
/cars/sell;low=34;brand=bmw,audi,benz这个url,在Controller方法上的@RequestMapping中的url为/cars/{path}
注意:想要使用@MatrixVariable 需要配置WebMvcConfigurer
配置:
/**
 * @author lihua
 * @date 2022/12/28 11:38
 **/
@Configuration
@EnableWebMvc
public class WebConfig implements WebMvcConfigurer{
    @Override
    public void configurePathMatch(PathMatchConfigurer configurer) {
        UrlPathHelper urlPathHelper = new UrlPathHelper();
        urlPathHelper.setRemoveSemicolonContent(false);
        configurer.setUrlPathHelper(urlPathHelper);
    }
}
使用:
@RequestMapping(value = "/test5/{id}",method = RequestMethod.GET )
public String test5(@PathVariable("id") int id,@MatrixVariable("name") String name, @MatrixVariable("hobbies") List<String> hobbies){

    System.out.println(id);
    System.out.println(name);
    System.out.println(hobbies);
    return "8888";
}
~@RequestParam
指示方法参数应绑定到web请求参数。(让请求的参数正确绑定到 controller的方法的参数)
-
对与get请求,如果你方法的名字不等于url的名字,会报404。如果你想两者名字不一样时也能请求成功,那么你可以试试使用@RequestParam(“urlParamName”) 注解。
-
对于post请求一样。如果表单里面的name属性对应的值,不等于对应方法的参数的名字,你也可以使用它。
@RequestMapping(value = "/test7",method = RequestMethod.GET )
public String test8(int id,@RequestParam("name123") String name){

    System.out.println(id+";"+name);
    return "66666";
}
url : http://localhost:8080/test7?name123=lihua
注意:对于@RequestParam(value = “name”) 如果请求中缺少参数name,则会引发异常。 如果您希望在请求中没有参数时使用空值,则将属性required 的值切换为false。@RequestParam(value = “name”,required = false)
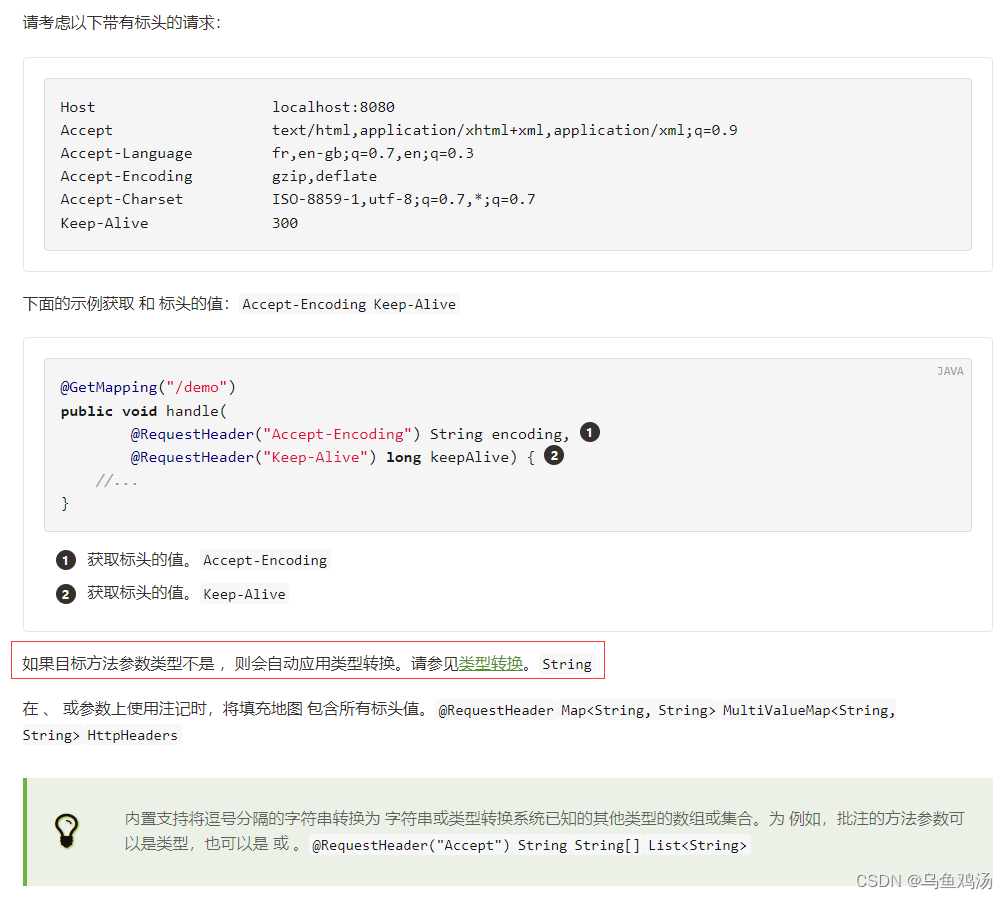
~@RequestHeader
你可以通过这个注解捕获请求的请求头的参数。
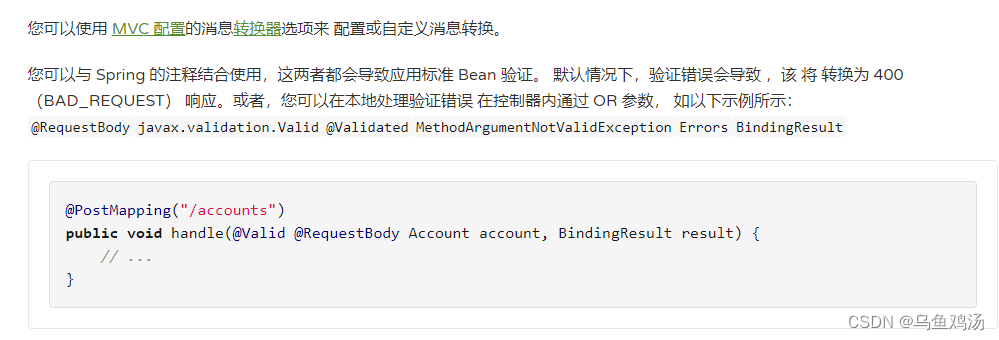
~@RequestBody
将注解标注的参数反序列化为对象。
如:post 请求携带参数user={“id”: “1”, “name”: “xiaoming”, “age”: “18” },会将json串转换成user对象。
@PostMapping("/user")
public void handle(@RequestBody User user) {
    // ...
}

// user: id, name, age
~@CookieValue
先访问 /login 再访问 /getLoginState
 //设置cookie
@RequestMapping(value = "/login",method = RequestMethod.GET )
public String test8(HttpServletRequest request, HttpServletResponse response){

    Cookie cookie = new Cookie("isLogin","true");
    response.addCookie(cookie);
    return "66666";
}

//获取cookie
@RequestMapping(value = "/getLoginState",method = RequestMethod.GET )
public String test9(@CookieValue("isLogin") String isLogin){

    //获取CookieValue
    System.out.println(isLogin);

    return isLogin;
}
~@SessionAttribute
 //先创建一个session
@RequestMapping("/setSession")
public String setSession(HttpServletRequest request){
   //从请求中获取session操作对象
   HttpSession session = request.getSession();
   //设置一个session
   session.setAttribute("isLogin","true");

   return "ok";
}

//通过@SessionAttribute注解访问session
@RequestMapping("/getSession")
public String getSession(@SessionAttribute("isLogin") String isLogin){

	//通过注解 @SessionAttribute 获取session
   return isLogin;
}
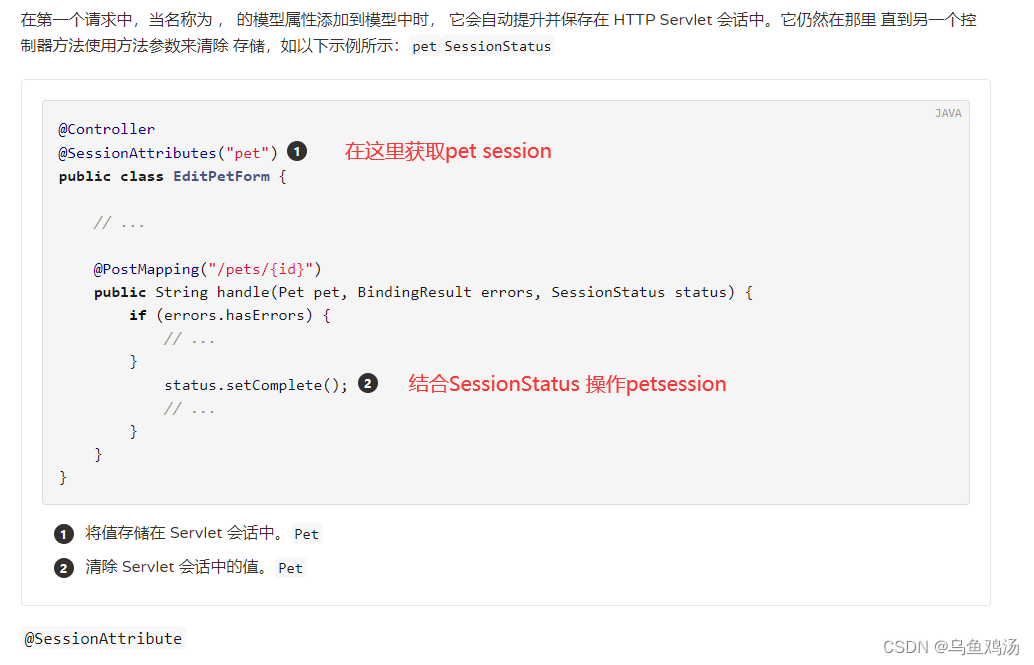
~SessionStatus+ @SessionAttributes
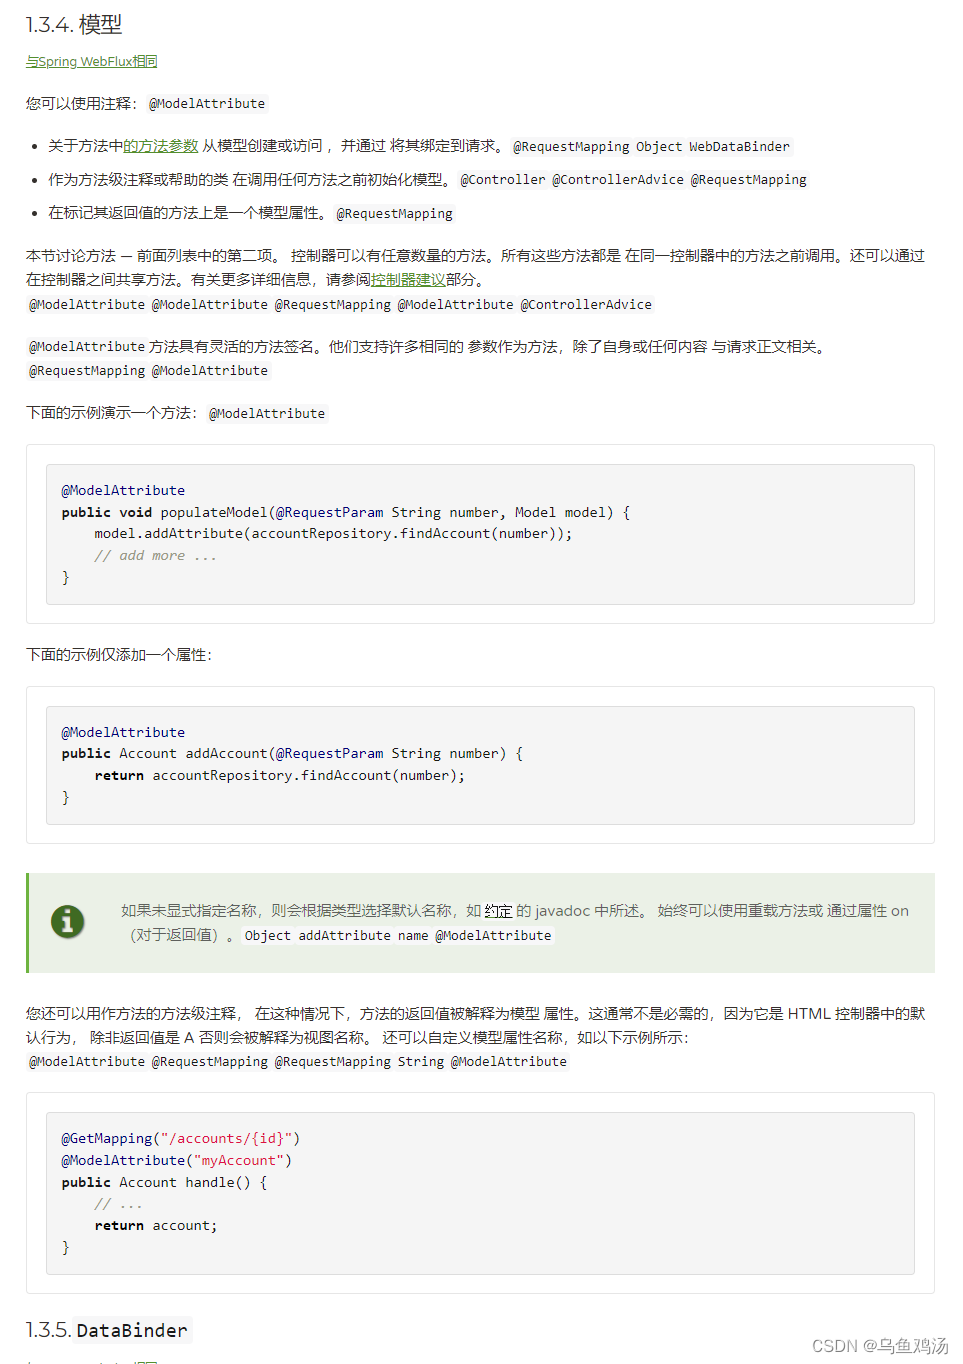
~@ModelAttribute
这个注解是将一些数据存放到模式中,给前台使用。这个注解的作用有点类似Model model
- 在controller 处理方法中使用
 //这里声明了一个User 的model。在这个controller中(这个类) 所有请求的访问都会先运行这个getUser的方法,再运行请求方法
@ModelAttribute("MyUser")
public User getUser() {
   User user = new User();
   user.setName("winclpt");
   user.setAge(25);
   return user;
}

//使用@ModelAttribute 注解,将模型MyUser 放到update 提供访问。
@RequestMapping("/update")
public void update(@ModelAttribute("MyUser") User user) {
   System.out.println(user.toString());
}
- 在jsp 、index(结合模板引擎)使用
@ModelAttribute("MyUser")
public User getUser() {
   User user = new User();
   user.setName("winclpt");
   user.setAge(25);
   return user;
}

@RequestMapping("/test11")
public String index(){
   return "test";
}
test.html 结合 thymeleaf
<!DOCTYPE html>
<html lang="en" xmlns:th="http://www.thymeleaf.org">
<head>
    <meta charset="UTF-8">
    <title>Title</title>
</head>
<body>
<!--所有的html元素都可以被 thymeleaf 替换接管 th:元素名-->
<div th:text="${MyUser.name}"></div>
<!--循环-->

</body>
</html>
这个注解能放到方法上、方法参数、方法返回值。不同地方作用不太一样。
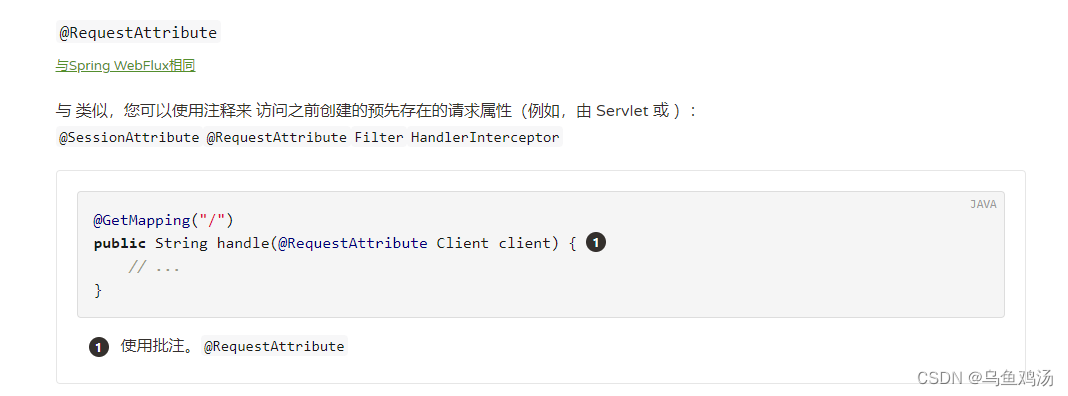
~@RequestAttribute
与@ModelAttribute 功能相反,是jsp、index设置一个值到RequestAttribute 中。给controller 方法访问。
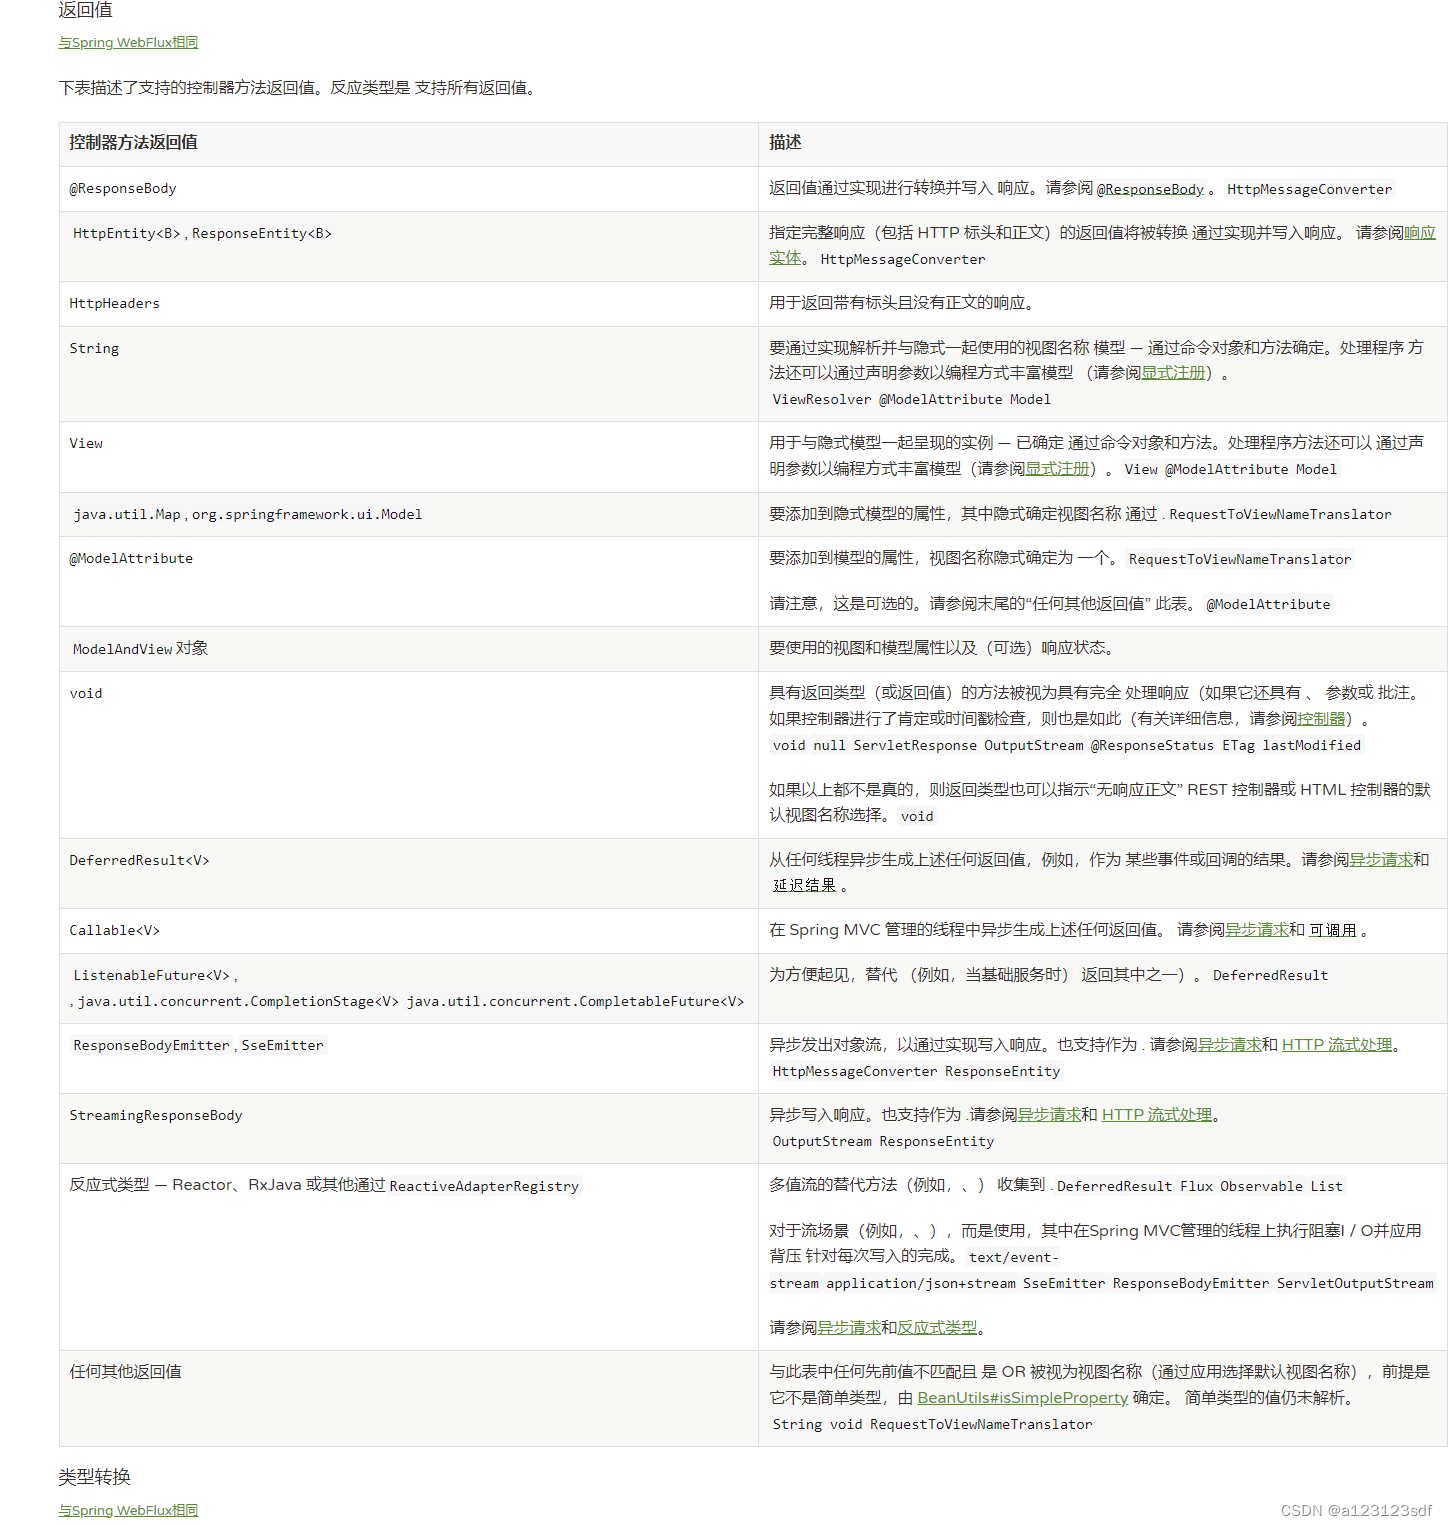
2. 方法返回值
链接
~重定向(redirect:)
在return时在前面增加 redirect: 表示重定向。
// 不能是@RestController
@Controller
public class ReturnTestController {

    @GetMapping("/redirect/1/2/3")
    public String testRedirect() {

        return "redirect:/index";
    }
	@PostMapping("/files/{path}")
	public String upload(...) {
	    // ...
	    return "redirect:files/{path}";
	}
}
~@ResponseBody
@ResponseBody 可以让方法返回值,返回对象序列化后的json串。
@GetMapping("/accounts/{id}")
@ResponseBody
public Account handle() {
    // ...
}
值得注意的是 如果在类上标注@RestController ,那么等同于类中的全部方法上都标注了@ResponseBody 注解。如下:
@RestController
@Slf4j
public class UserController {

	@GetMapping("/getUser")
    public User getUserInfo() {
        return new User(1,"lihua",19);
    }

}
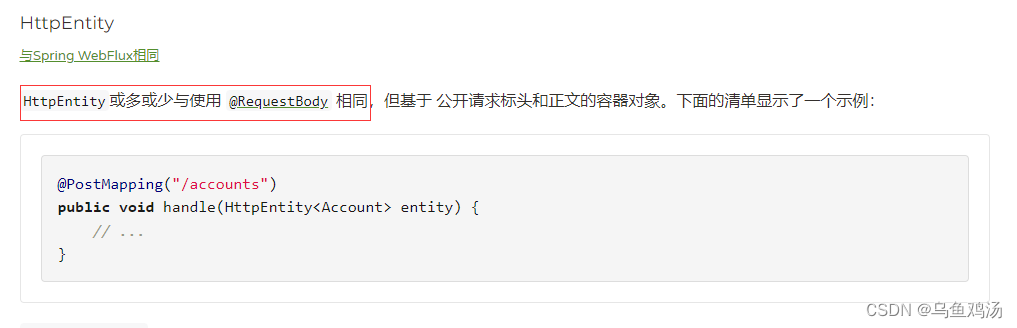
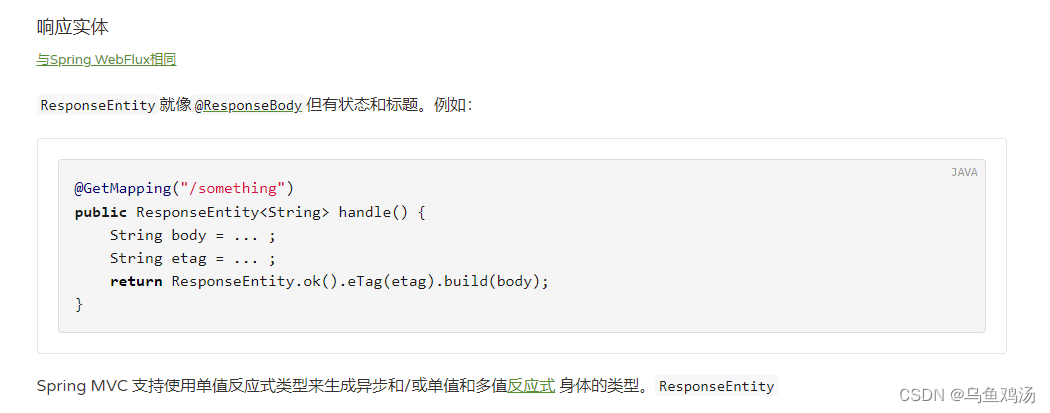
~ResponseEntity
与@ResponseBody 功能相似。
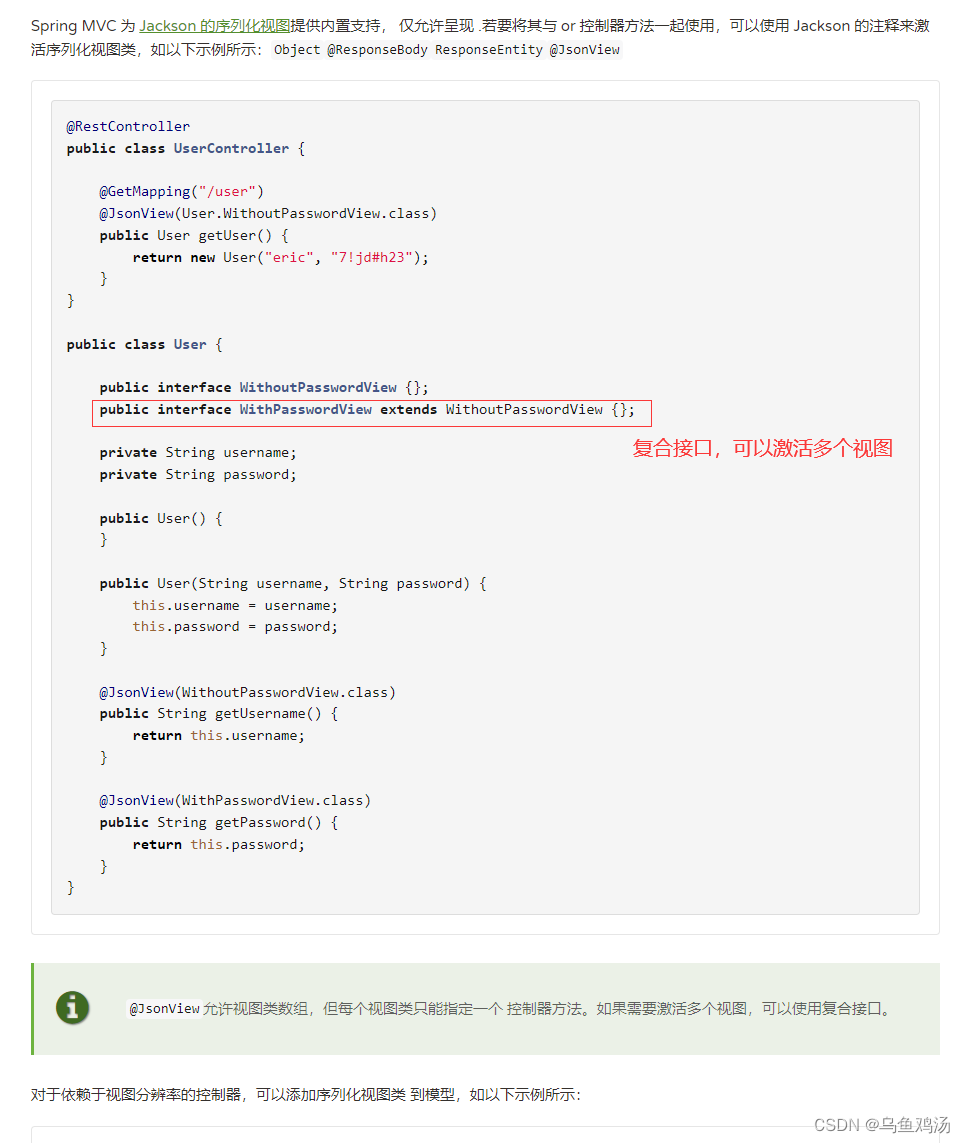
~@JsonView
JsonView 看名字可以知道是json 视图。这里的json视图和数据库的视图相似。数据库的视图可以有选择性的添加字段到视图中,屏蔽不想给用户看到的数据。这里的@JsonView 注解也有类似的功能,在序列化对象时,如果定义了视图,那么按照视图中的属性序列化,并返回。
使用@JsonView 注解分为三步:
- 定义视图
视图要确保唯一性,在java中Class可以确保的唯一性 。因此@JsonView 中给了一个Class<?>[] value() default {};属性用来绑定视图。 - 将属性添加到视图中。在对象的实体类的属性上添加@JsonView(视图.class) 注解
- 使用视图。在controller 的方法上标注@JsonView(视图.class) 使用视图
实体类:
package com.lihua.springbootweb.pojo;

import com.fasterxml.jackson.annotation.JsonView;
import lombok.AllArgsConstructor;
import lombok.Data;
import lombok.NoArgsConstructor;
import lombok.ToString;

/**
 * @author lihua
 * @date 2022/12/27 16:57
 **/
@Data
@AllArgsConstructor
@NoArgsConstructor
@ToString
public class User {

	//第一步:声明一个接口,当作一个视图
    public interface UserSimpView{};

    private int id;

	//第二步:将这个属性添加到UserSimpView.class 视图中。
    @JsonView(UserSimpView.class)
    private String name;

	//pass一般不给用户看到,可以不将他加入视图
    private String pass;


    @JsonView(UserSimpView.class)
    private int age;

    @JsonView(UserSimpView.class)
    private Family family;

    public User(int id, String name, String pass, int age) {
        this.id = id;
        this.name = name;
        this.pass = pass;
        this.age = age;
    }

    public User(int id, String name, int age) {
        this.id = id;
        this.name = name;
        this.age = age;
    }
}
Controller
//第三步:使用定义好的 User.UserSimpView.class视图
@GetMapping("/getUser")
@JsonView(User.UserSimpView.class)
public User getUserInfo() {
    return new User(1,"lihua","123",19);
}
官网的描述和例子:
3. model
Model 类跟@ModelAttribute 注解功能类似。需要配合jsp 或者模板引擎使用。
4. 数据绑定@InitBinder
@Controller或者类可以具有以下方法 初始化 的实例,而这些实例又可以:@ControllerAdvice@InitBinderWebDataBinder
-
将请求参数(即表单或查询数据)绑定到模型对象。
-
转换基于字符串的请求值(例如请求参数、路径变量、 标头、Cookie 等)到控制器方法参数的目标类型。
-
在呈现 HTML 表单时将模型对象值的格式设置为值。String
以时间为例,在Controller中接收的是Date类型,而请求的参数为String类型时,如果没有加@InitBinder的效果会得不到想要的结果。加了数据绑定会根据绑定的方法自动将字符串转换成时间Date类型。
/**
 * @author lihua
 * @date 2022/12/30 17:06
 **/
@RestController
public class InitBinderController {

    @InitBinder
    public void initBinder(WebDataBinder binder) {
        SimpleDateFormat dateFormat = new SimpleDateFormat("yyyy-MM-dd");
        dateFormat.setLenient(false);
        //绑定Date.class类型
        binder.registerCustomEditor(Date.class, new CustomDateEditor(dateFormat, false));
    }

    //url: http://localhost:8080/initBinder?date=2022-12-30
    @GetMapping("/initBinder")
    public String initBinder(Date date) {
        return String.valueOf(date);
    }
}
- 访问:http://localhost:8080/initBinder?date=2022-12-30
- 结果:Fri Dec 30 00:00:00 CST 2022
5. 异常处理器@ExceptionHandler
当访问请求发生异常时,不想前台返回一些用户看不懂的错误信息,提供用户体验,那么你可以试试这个注解。
/**
 * @author lihua
 * @date 2022/12/30 17:22
 **/
@RestController
public class ExceptionHandlerController {

    @ExceptionHandler
    public  String handle(Exception ex) {
        System.out.println(ex.getMessage());
        return "系统发生问题了,请联系我。电话:111";
    }

    @RequestMapping(value = "/testExceptionHandler")
    public String test(){
        int i = 1/0;
        return "ok! 点赞、收藏、关注吧!";
    }
}
注意:异常类型匹配才会调用对应的异常处理器,比如异常处理器是:IOException ,那么无法捕获ArithmeticException 异常。
- 异常处理器提供了以下参数,你可以在处理方法上增加以下参数。
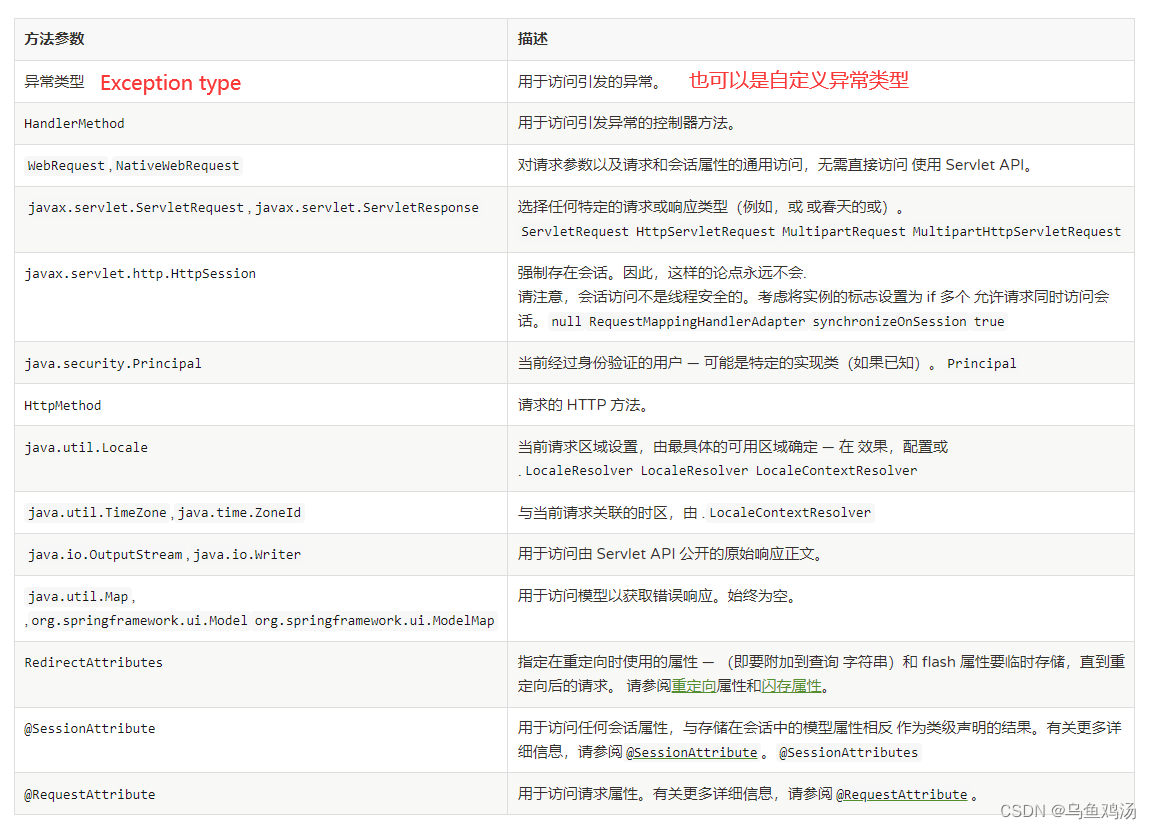
@ExceptionHandler
public  String handle(Exception ex, HandlerMethod handlerMethod, HttpMethod httpMethod, ServletRequest request,ServletResponse response) {
    System.out.println(ex.getMessage());
    System.out.println(handlerMethod.getMethod().getName());
    System.out.println(httpMethod.name());
    System.out.println(request.getCharacterEncoding());
    response.setCharacterEncoding("ISO-8859-1");
    response.setContentType("text/html;charset=ISO-8859-1");
    return "系统发生问题了,请联系我。电话:111";
}
- 异常处理器,返回值设置

- 返回一个自定义错误页面
把类上的@RestController 改为@Controller
/**
 * @author lihua
 * @date 2022/12/30 17:22
 **/
@Controller
public class ExceptionHandlerController {

    @ExceptionHandler
    public  String handle(Exception ex){
        System.out.println(ex.getMessage());
        return "error";
    }

    @RequestMapping(value = "/testExceptionHandler")
    public String test(){
        int i = 1/0;
        return "index";
    }
}
error.html
<!DOCTYPE html>
<html lang="en">
<head>
    <meta charset="UTF-8">
    <title>Title</title>
</head>
<body>
<h2>error</h2>
</body>
</html>
- 不返回视图
/**
 * @author lihua
 * @date 2022/12/30 17:22
 **/
@Controller
public class ExceptionHandlerController {

    @ExceptionHandler
    public @ResponseBody  String handle(Exception ex){
        System.out.println(ex.getMessage());
        return "error";
    }

    @RequestMapping(value = "/testExceptionHandler")
    public String test(){
        int i = 1/0;
        return "index";
    }
}


![P1047 [NOIP2005 普及组] 校门外的树](https://img-blog.csdnimg.cn/cfc61a2309ef4f40af94b1f7d216e8ee.png)