应用可以通过接口发送通知消息,提醒用户关注应用中的变化。用户可以在通知栏查看和操作通知内容,通常用于当应用处于后台时,发送,本文主要来介绍在Harmony OS中的三种消息通知。
基础通知
总体流程有三步:
- 导入notification模块
- 配置通知参数之后通过publish发布通知
- 取消通知
1、导入notification
import notificationManager from '@ohos.notificationManager';
2、发布通知
let request: notificationManager.NotificationRequest = {
      id: 0,
      content: {
        contentType: notificationManager.ContentType.NOTIFICATION_CONTENT_BASIC_TEXT
      }
    }

    notificationManager.publish(request).then(() => {
      console.log('发送通知成功')
    }).catch(err => {
      console.log('发送通知失败')
    })
这里的id就是通知的唯一标识,后续可以通过id然后调用cancel函数来取消通知。
其中conentType有四个枚举:
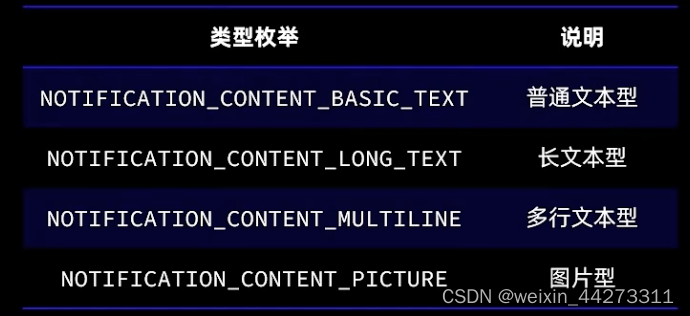
当contentType为图片型的时候,需要传入一个PixelMap的图片数据,这个可以通过提供这样的方式来获取:
// 获取资源管理器
    const resourcemanage = getContext(this).resourceManager;
    // 获取图片资源
    const imgFile = await resourcemanage.getMediaContent($r('xxxx'));
    // 创建PixelMap数据
    // image需要从@ohos.multimedia.image导入
    image.createImageSource(imgFile.buffer).createPixelMap()
      .then(val => this.piexlMap = val)
      .catch(err => console.log(err))
3、取消通知
Harmony O提供了两种方式来取消通知,第一种就是上方提到的根据id取消,第二种则是调用cancelAll来取消所有的通知信息。
notificationManager.cancel(id)
notificationManager.cancelAll()
详细的request请求参数api查看官网:NotificationRequest
进度条通知
进度条通知会展示一个动态的进度条,主要用于文件下载、长任务处理的实时进度显示
主要也是三步:
- 判断系统是否支持进度条模版
- 配置进度条模版参数
- 根据参数发送模版通知
1、通过isSupportTemplate是否支持,异步返回Promose回调
const isSupport = await notificationManager.isSupportTemplate('process');
if(!isSupport) return;
2、配置进度条模版参数
const templateParams = {
    name: 'process',
    data: {
      progressValue: this.progressValue, // 当前进度值
      ProgressMaxValue: 100 // 进度条最大值
    }
  }

  const request: notificationManager.NotificationRequest = {
    id: 0,
    template: templateParams, // 较基础通知新增进度模版配置
    content: {} // 配置和基础通知一致
  }
3、根据参数发送模版通知
notificationManager.publish(request).then(() => {
  console.log('发送通知成功')
}).catch(err => {
  console.log('发送通知失败')
})
行为意图通知
我们可以给通知或者通知中的按钮设置行为意图,从而实现拉起应用组件或发布公共事件等能力。说白了,就是我们可以通过点击消息栏中的通知重新回到指定应用或者做一些事情。
主要是三个步骤:
- 创建wantInfo,行为意图配置
- 创建WantAgentInfo实例
- 发送携带意图的通知
1、 创建行为意图配置
const wantInfo: wantAgent.WantAgentInfo = {
  wants: [
     {
       deviceId: '', // 默认本机
       bundleName: 'com.example.myapplication', // 拉起的应用
       abilityName: 'EntryAbility', // 拉起当前应用的那个ability
     }
   ],
   requestCode: 0,
   operationType: wantAgent.OperationType.START_ABILITY, // 拉起一个ability
   wantAgentFlags: [wantAgent.WantAgentFlags.CONSTANT_FLAG]
 }
这里只是简单列了一些,具体请查看官网:WantAgentInfo
2、创建WantAgentInfo实例
// 创建wantAgent实例
const wantAgentInstance = await wantAgent.getWantAgent(wantInfo);
3、发送携带意图的通知
和发送进度条通知一样,在基础通知中添加一个配置wantAgent即可,
const request: notificationManager.NotificationRequest = {
   id: 0,
   template: templateParams,
   wantAgent: this.wantAgentInstance,
   content: {} // 配置和基础通知一致
 }
 // 发布行为意图通知
 notificationManager.publish(request).then(() => {
  console.log('发送通知成功')
}).catch(err => {
  console.log('发送通知失败')
})