1、Spark的数据存储
Spark计算速度远胜于Hadoop的原因之一就在于中间结果是缓存在内存而不是直接写入到disk,本文尝试分析Spark中存储子系统的构成,并以数据写入和数据读取为例,讲述清楚存储子系统中各部件的交互关系。
1.1存储子系统概览
Storage模块主要分为两层:
1)通信层:storage模块采用的是master-slave结构来实现通信层,master和slave之间传输控制信息、状态信息,这些都是通过通信层来实现的。
2)存储层:storage模块需要把数据存储到disk或是memory上面,有可能还需replicate到远端,这都是由存储层来实现和提供相应接口。
而其他模块若要和storage模块进行交互,storage模块提供了统一的操作类BlockManager,外部类与storage模块打交道都需要通过调用BlockManager相应接口来实现。
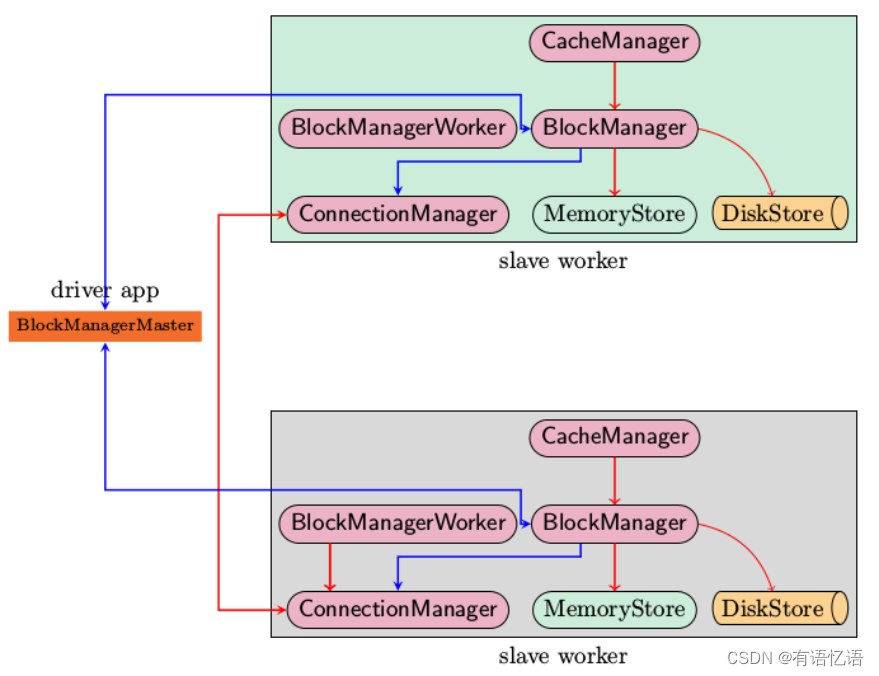
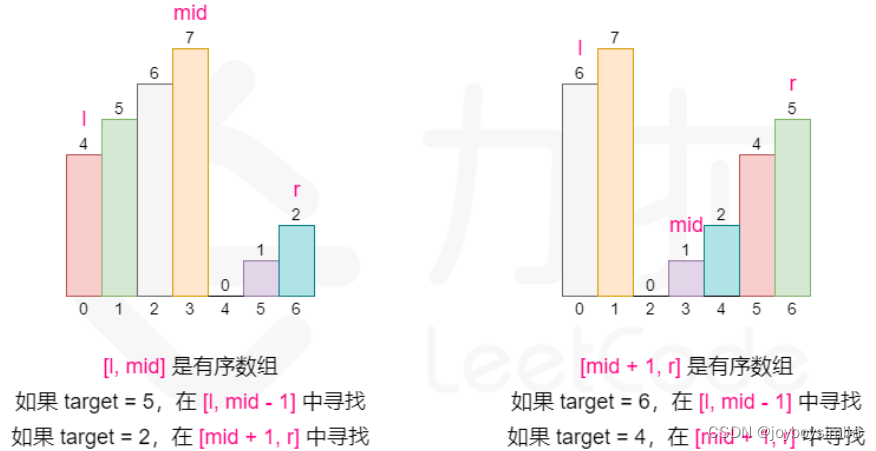
上图是Spark存储子系统中几个主要模块的关系示意图,现简要说明如下
1)CacheManager RDD在进行计算的时候,通过CacheManager来获取数据,并通过CacheManager来存储计算结果
2)BlockManager CacheManager在进行数据读取和存取的时候主要是依赖BlockManager接口来操作,BlockManager决定数据是从内存(MemoryStore)还是从磁盘(DiskStore)中获取
3)MemoryStore 负责将数据保存在内存或从内存读取
4)DiskStore 负责将数据写入磁盘或从磁盘读入
5)BlockManagerWorker 数据写入本地的MemoryStore或DiskStore是一个同步操作,为了容错还需要将数据复制到别的计算结点,以防止数据丢失的时候还能够恢复,数据复制的操作是异步完成,由BlockManagerWorker来处理这一部分事情
6)ConnectionManager 负责与其它计算结点建立连接,并负责数据的发送和接收
7)BlockManagerMaster 注意该模块只运行在Driver Application所在的Executor,功能是负责记录下所有BlockIds存储在哪个SlaveWorker上,比如RDD Task运行在机器A,所需要的BlockId为3,但在机器A上没有BlockId为3的数值,这个时候Slave worker需要通过BlockManager向BlockManagerMaster询问数据存储的位置,然后再通过ConnectionManager去获取。
1.2启动过程分析
上述的各个模块由SparkEnv来创建,创建过程在SparkEnv.create中完成
val blockManagerMaster = new BlockManagerMaster(registerOrLookup(
        "BlockManagerMaster",
        new BlockManagerMasterActor(isLocal, conf)), conf)
val blockManager = new BlockManager(executorId, actorSystem, blockManagerMaster, serializer, conf)

val connectionManager = blockManager.connectionManager
val broadcastManager = new BroadcastManager(isDriver, conf)
val cacheManager = new CacheManager(blockManager)
这段代码容易让人疑惑,看起来像是在所有的cluster node上都创建了BlockManagerMasterActor,其实不然,仔细看registerOrLookup函数的实现。如果当前节点是driver则创建这个actor,否则建立到driver的连接。
def registerOrLookup(name: String, newActor: => Actor): ActorRef = {
    if (isDriver) {
        logInfo("Registering " + name)
        actorSystem.actorOf(Props(newActor), name = name)
    } else {
        val driverHost: String = conf.get("spark.driver.host", "localhost")
        val driverPort: Int = conf.getInt("spark.driver.port", 7077)
        Utils.checkHost(driverHost, "Expected hostname")
        val url = s"akka.tcp://spark@$driverHost:$driverPort/user/$name"
        val timeout = AkkaUtils.lookupTimeout(conf)
        logInfo(s"Connecting to $name: $url")
        Await.result(actorSystem.actorSelection(url).resolveOne(timeout), timeout)
    }
}
初始化过程中一个主要的动作就是BlockManager需要向BlockManagerMaster发起注册
1.3通信层
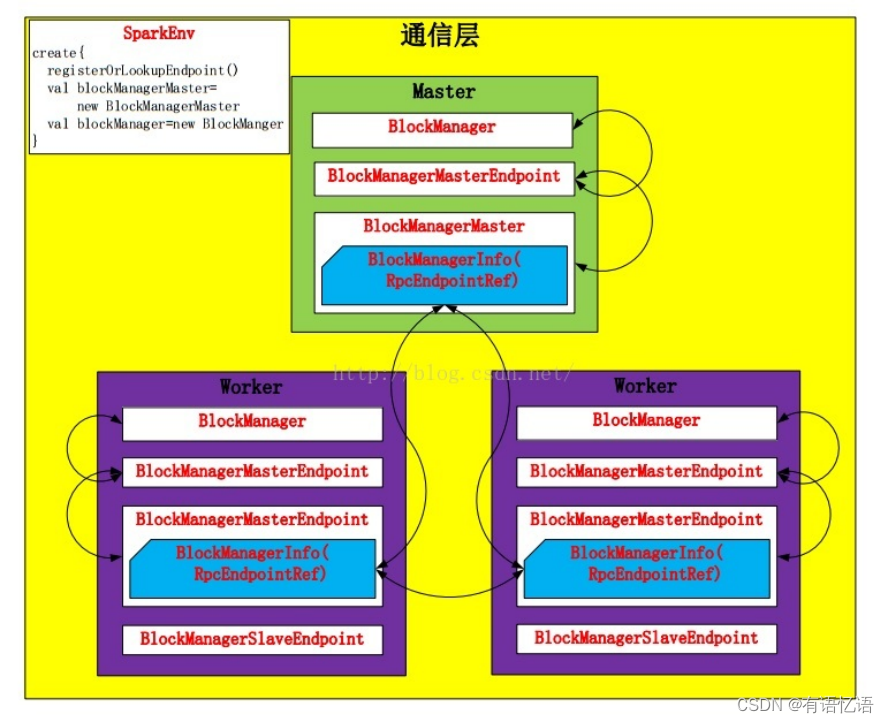
BlockManager包装了BlockManagerMaster,发送信息包装成BlockManagerInfo。Spark在Driver和Worker端都创建各自的BlockManager,并通过BlockManagerMaster进行通信,通过BlockManager对Storage模块进行操作。
BlockManager对象在SparkEnv.create函数中进行创建:
def registerOrLookupEndpoint(
        name: String, endpointCreator: => RpcEndpoint):
RpcEndpointRef = {
    if (isDriver) {
        logInfo("Registering " + name)
        rpcEnv.setupEndpoint(name, endpointCreator)
    } else {
        RpcUtils.makeDriverRef(name, conf, rpcEnv)
    }
}
…………
val blockManagerMaster = new BlockManagerMaster(registerOrLookupEndpoint(
        BlockManagerMaster.DRIVER_ENDPOINT_NAME,
        new BlockManagerMasterEndpoint(rpcEnv, isLocal, conf, listenerBus)),
        conf, isDriver)

// NB: blockManager is not valid until initialize() is called later.
val blockManager = new BlockManager(executorId, rpcEnv, blockManagerMaster,
        serializer, conf, mapOutputTracker, shuffleManager, blockTransferService,     securityManager,numUsableCores)
并且在创建之前对当前节点是否是Driver进行了判断。如果是,则创建这个Endpoint;否则,创建Driver的连接。
在创建BlockManager之后,BlockManager会调用initialize方法初始化自己。并且初始化的时候,会调用BlockManagerMaster向Driver注册自己,同时,在注册时也启动了Slave Endpoint。另外,向本地shuffle服务器注册Executor配置,如果存在的话。
def initialize(appId: String): Unit = {
…………
    master.registerBlockManager(blockManagerId, maxMemory, slaveEndpoint)

    // Register Executors' configuration with the local shuffle service, if one should exist.
    if (externalShuffleServiceEnabled && !blockManagerId.isDriver) {
        registerWithExternalShuffleServer()
    }
}
而BlockManagerMaster将注册请求包装成RegisterBlockManager注册到Driver。Driver的BlockManagerMasterEndpoint会调用register方法,通过对消息BlockManagerInfo检查,向Driver注册。
private def register(id: BlockManagerId, maxMemSize: Long, slaveEndpoint: RpcEndpointRef) {
    val time = System.currentTimeMillis()
    if (!blockManagerInfo.contains(id)) {
        blockManagerIdByExecutor.get(id.executorId) match {
            case Some(oldId) =>
                // A block manager of the same executor already exists, so remove it (assumed dead)
                logError("Got two different block manager registrations on same executor - "
                        + s" will replace old one $oldId with new one $id")
                removeExecutor(id.executorId)
            case None =>
        }
        logInfo("Registering block manager %s with %s RAM, %s".format(
                id.hostPort, Utils.bytesToString(maxMemSize), id))

        blockManagerIdByExecutor(id.executorId) = id

        blockManagerInfo(id) = new BlockManagerInfo(
                id, System.currentTimeMillis(), maxMemSize, slaveEndpoint)
    }
    listenerBus.post(SparkListenerBlockManagerAdded(time, id, maxMemSize))
}
不难发现BlockManagerInfo对象被保存到Map映射中。
在通信层中BlockManagerMaster控制着消息的流向,这里采用了模式匹配,所有的消息模式都在BlockManagerMessage中。
1.4存储层
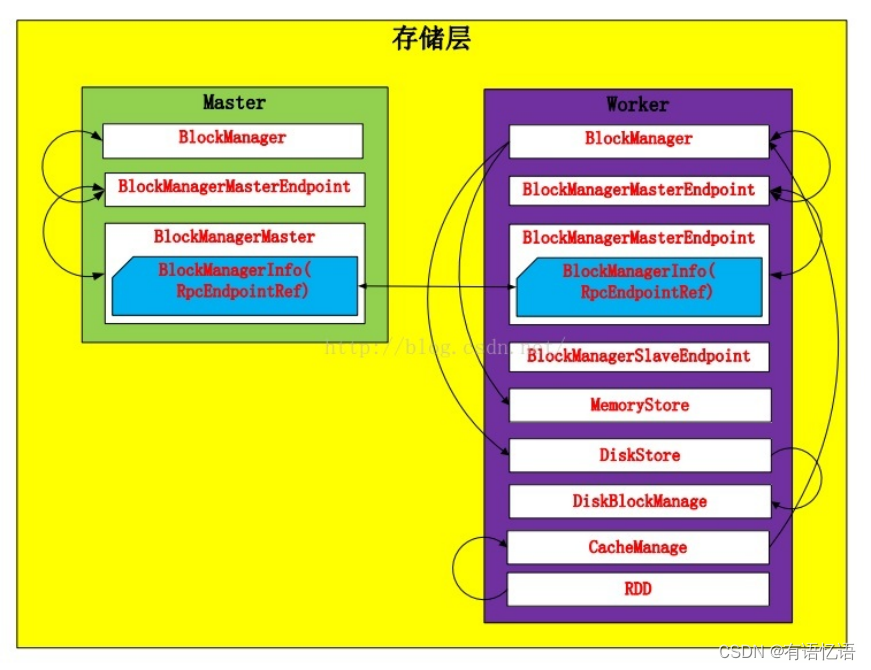
Spark Storage的最小存储单位是block,所有的操作都是以block为单位进行的。
在BlockManager被创建的时候MemoryStore和DiskStore对象就被创建出来了
val diskBlockManager = new DiskBlockManager(this, conf)
private[spark] val memoryStore = new MemoryStore(this, maxMemory)
private[spark] val diskStore = new DiskStore(this, diskBlockManager)
1.4.1Disk Store
由于当前的Spark版本对Disk Store进行了更细粒度的分工,把对文件的操作提取出来放到了DiskBlockManager中,DiskStore仅仅负责数据的存储和读取。
Disk Store会配置多个文件目录,Spark会在不同的文件目录下创建文件夹,其中文件夹的命名方式是:spark-UUID(随机UUID码)。Disk Store在存储的时候创建文件夹。并且根据“高内聚,低耦合”原则,这种服务型的工具代码就放到了Utils中(调用路径:DiskStore.putBytes—>DiskBlockManager.createLocalDirs—>Utils.createDirectory):
def createDirectory(root: String, namePrefix: String = "spark"): File = {
    var attempts = 0
    val maxAttempts = MAX_DIR_CREATION_ATTEMPTS
    var dir: File = null
    while (dir == null) {
        attempts += 1
        if (attempts > maxAttempts) {
            throw new IOException("Failed to create a temp directory (under " + root + ") after " +
                    maxAttempts + " attempts!")
        }
        try {
            dir = new File(root, namePrefix + "-" + UUID.randomUUID.toString)
            if (dir.exists() || !dir.mkdirs()) {
                dir = null
            }
        } catch { case e: SecurityException => dir = null; }
    }

    dir.getCanonicalFile
}
在DiskBlockManager里,每个block都被存储为一个file,通过计算blockId的hash值,将block映射到文件中。
def getFile(filename: String): File = {
    // Figure out which local directory it hashes to, and which subdirectory in that
    val hash = Utils.nonNegativeHash(filename)
    val dirId = hash % localDirs.length
    val subDirId = (hash / localDirs.length) % subDirsPerLocalDir

    // Create the subdirectory if it doesn't already exist
    val subDir = subDirs(dirId).synchronized {
        val old = subDirs(dirId)(subDirId)
        if (old != null) {
            old
        } else {
            val newDir = new File(localDirs(dirId), "%02x".format(subDirId))
            if (!newDir.exists() && !newDir.mkdir()) {
                throw new IOException(s"Failed to create local dir in $newDir.")
            }
            subDirs(dirId)(subDirId) = newDir
            newDir
        }
    }

    new File(subDir, filename)
}

def getFile(blockId: BlockId): File = getFile(blockId.name)
通过hash值的取模运算,求出dirId和subDirId。然后,在从subDirs中找到subDir,如果subDir不存在,则创建一个新subDir。最后,以subDir为路径,blockId的name属性为文件名,新建该文件。
文件创建完之后,那么Spark就会在DiskStore中向文件写与之映射的block:
override def putBytes(blockId: BlockId, _bytes: ByteBuffer, level: StorageLevel): PutResult = {
    val bytes = _bytes.duplicate()
    logDebug(s"Attempting to put block $blockId")
    val startTime = System.currentTimeMillis
    val file = diskManager.getFile(blockId)
    val channel = new FileOutputStream(file).getChannel
    Utils.tryWithSafeFinally {
        while (bytes.remaining > 0) {
            channel.write(bytes)
        }
    } {
        channel.close()
    }
    val finishTime = System.currentTimeMillis
    logDebug("Block %s stored as %s file on disk in %d ms".format(
            file.getName, Utils.bytesToString(bytes.limit), finishTime - startTime))
    PutResult(bytes.limit(), Right(bytes.duplicate()))
}
读取过程就简单了,DiskStore根据blockId读取与之映射的file内容,当然,这中间需要从DiskBlockManager中得到文件信息。
private def getBytes(file: File, offset: Long, length: Long): Option[ByteBuffer] = {
    val channel = new RandomAccessFile(file, "r").getChannel
    Utils.tryWithSafeFinally {
        // For small files, directly read rather than memory map
        if (length < minMemoryMapBytes) {
            val buf = ByteBuffer.allocate(length.toInt)
            channel.position(offset)
            while (buf.remaining() != 0) {
                if (channel.read(buf) == -1) {
                    throw new IOException("Reached EOF before filling buffer\n" +
                            s"offset=$offset\nfile=${file.getAbsolutePath}\nbuf.remaining=${buf.remaining}")
                }
            }
            buf.flip()
            Some(buf)
        } else {
            Some(channel.map(MapMode.READ_ONLY, offset, length))
        }
    } {
        channel.close()
    }
}

override def getBytes(blockId: BlockId): Option[ByteBuffer] = {
    val file = diskManager.getFile(blockId.name)
    getBytes(file, 0, file.length)
}
1.4.2Memory Store
相对Disk Store,Memory Store就显得容易很多。Memory Store用一个LinkedHashMap来管理,其中Key是blockId,Value是MemoryEntry样例类,MemoryEntry存储着数据信息。
private case class MemoryEntry(value: Any, size: Long, deserialized: Boolean)
private val entries = new LinkedHashMap[BlockId, MemoryEntry](32, 0.75f, true)
在MemoryStore中存储block的前提是当前内存有足够的空间存放。通过对tryToPut函数的调用对内存空间进行判断。
def putBytes(blockId: BlockId, size: Long, _bytes: () => ByteBuffer): PutResult = {
    // Work on a duplicate - since the original input might be used elsewhere.
    lazy val bytes = _bytes().duplicate().rewind().asInstanceOf[ByteBuffer]
    val putAttempt = tryToPut(blockId, () => bytes, size, deserialized = false)
    val data =
    if (putAttempt.success) {
        assert(bytes.limit == size)
        Right(bytes.duplicate())
    } else {
        null
    }
    PutResult(size, data, putAttempt.droppedBlocks)
}
在tryToPut函数中,通过调用enoughFreeSpace函数判断内存空间。如果内存空间足够,那么就把block放到LinkedHashMap中;如果内存不足,那么就告诉BlockManager内存不足,如果允许Disk Store,那么就把该block放到disk上。
private def tryToPut(blockId: BlockId, value: () => Any, size: Long, deserialized: Boolean): ResultWithDroppedBlocks = {
    var putSuccess = false
    val droppedBlocks = new ArrayBuffer[(BlockId, BlockStatus)]

    accountingLock.synchronized {
        val freeSpaceResult = ensureFreeSpace(blockId, size)
        val enoughFreeSpace = freeSpaceResult.success
        droppedBlocks ++= freeSpaceResult.droppedBlocks

        if (enoughFreeSpace) {
            val entry = new MemoryEntry(value(), size, deserialized)
            entries.synchronized {
                entries.put(blockId, entry)
                currentMemory += size
            }
            val valuesOrBytes = if (deserialized) "values" else "bytes"
            logInfo("Block %s stored as %s in memory (estimated size %s, free %s)".format(
                    blockId, valuesOrBytes, Utils.bytesToString(size), Utils.bytesToString(freeMemory)))
            putSuccess = true
        } else {
            lazy val data = if (deserialized) {
                Left(value().asInstanceOf[Array[Any]])
            } else {
                Right(value().asInstanceOf[ByteBuffer].duplicate())
            }
            val droppedBlockStatus = blockManager.dropFromMemory(blockId, () => data)
            droppedBlockStatus.foreach { status => droppedBlocks += ((blockId, status)) }
        }
        releasePendingUnrollMemoryForThisTask()
    }
    ResultWithDroppedBlocks(putSuccess, droppedBlocks)
}
Memory Store读取block也很简单,只需要从LinkedHashMap中取出blockId的Value即可。
override def getValues(blockId: BlockId): Option[Iterator[Any]] = {
    val entry = entries.synchronized {
        entries.get(blockId)
    }
    if (entry == null) {
        None
    } else if (entry.deserialized) {
        Some(entry.value.asInstanceOf[Array[Any]].iterator)
    } else {
        val buffer = entry.value.asInstanceOf[ByteBuffer].duplicate() // Doesn't actually copy data
        Some(blockManager.dataDeserialize(blockId, buffer))
    }
}
1.5数据写入过程分析
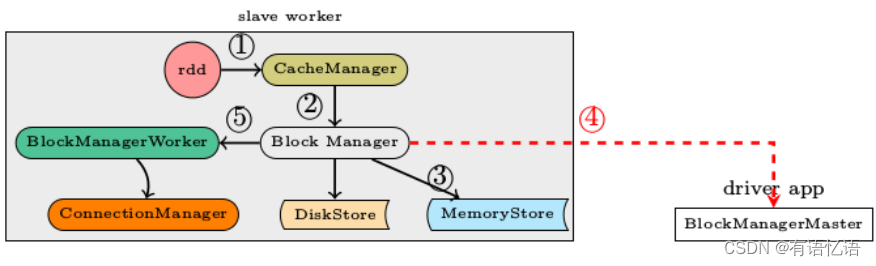
数据写入的简要流程
1)RDD.iterator是与storage子系统交互的入口
2)CacheManager.getOrCompute调用BlockManager的put接口来写入数据
3)数据优先写入到MemoryStore即内存,如果MemoryStore中的数据已满则将最近使用次数不频繁的数据写入到磁盘
4)通知BlockManagerMaster有新的数据写入,在BlockManagerMaster中保存元数据
5)将写入的数据与其它slave worker进行同步,一般来说在本机写入的数据,都会另先一台机器来进行数据的备份,即replicanumber=1
其实,我们在put和get block的时候并没有那么复杂,前面的细节BlockManager都包装好了,我们只需要调用BlockManager中的put和get函数即可。
def putBytes(
           blockId: BlockId,
           bytes: ByteBuffer,
           level: StorageLevel,
           tellMaster: Boolean = true,
           effectiveStorageLevel: Option[StorageLevel] = None): Seq[(BlockId, BlockStatus)] = {
       require(bytes != null, "Bytes is null")
       doPut(blockId, ByteBufferValues(bytes), level, tellMaster, effectiveStorageLevel)
   }
   private def doPut(
           blockId: BlockId,
           data: BlockValues,
           level: StorageLevel,
           tellMaster: Boolean = true,
           effectiveStorageLevel: Option[StorageLevel] = None)
: Seq[(BlockId, BlockStatus)] = {

       require(blockId != null, "BlockId is null")
       require(level != null && level.isValid, "StorageLevel is null or invalid")
       effectiveStorageLevel.foreach { level =>
           require(level != null && level.isValid, "Effective StorageLevel is null or invalid")
       }

       val updatedBlocks = new ArrayBuffer[(BlockId, BlockStatus)]

       val putBlockInfo = {
               val tinfo = new BlockInfo(level, tellMaster)
               val oldBlockOpt = blockInfo.putIfAbsent(blockId, tinfo)
       if (oldBlockOpt.isDefined) {
           if (oldBlockOpt.get.waitForReady()) {
               logWarning(s"Block $blockId already exists on this machine; not re-adding it")
               return updatedBlocks
           }
           oldBlockOpt.get
       } else {
           tinfo
       }
}

       val startTimeMs = System.currentTimeMillis

       var valuesAfterPut: Iterator[Any] = null

       var bytesAfterPut: ByteBuffer = null

       var size = 0L

       val putLevel = effectiveStorageLevel.getOrElse(level)

       val replicationFuture = data match {
           case b: ByteBufferValues if putLevel.replication > 1 =>
               // Duplicate doesn't copy the bytes, but just creates a wrapper
               val bufferView = b.buffer.duplicate()
               Future {
               replicate(blockId, bufferView, putLevel)
           }(futureExecutionContext)
           case _ => null
       }

       putBlockInfo.synchronized {
           logTrace("Put for block %s took %s to get into synchronized block"
                   .format(blockId, Utils.getUsedTimeMs(startTimeMs)))

           var marked = false
           try {
               val (returnValues, blockStore: BlockStore) = {
                   if (putLevel.useMemory) {
                       (true, memoryStore)
                   } else if (putLevel.useOffHeap) {
                       (false, externalBlockStore)
                   } else if (putLevel.useDisk) {
                       (putLevel.replication > 1, diskStore)
                   } else {
                       assert(putLevel == StorageLevel.NONE)
                       throw new BlockException(
                               blockId, s"Attempted to put block $blockId without specifying storage level!")
                   }
               }

               val result = data match {
                   case IteratorValues(iterator) =>
                       blockStore.putIterator(blockId, iterator, putLevel, returnValues)
                   case ArrayValues(array) =>
                       blockStore.putArray(blockId, array, putLevel, returnValues)
                   case ByteBufferValues(bytes) =>
                       bytes.rewind()
                       blockStore.putBytes(blockId, bytes, putLevel)
               }
               size = result.size
               result.data match {
                   case Left (newIterator) if putLevel.useMemory => valuesAfterPut = newIterator
                   case Right (newBytes) => bytesAfterPut = newBytes
                   case _ =>
               }

               if (putLevel.useMemory) {
                   result.droppedBlocks.foreach { updatedBlocks += _ }
               }

               val putBlockStatus = getCurrentBlockStatus(blockId, putBlockInfo)
               if (putBlockStatus.storageLevel != StorageLevel.NONE) {
                   marked = true
                   putBlockInfo.markReady(size)
                   if (tellMaster) {
                       reportBlockStatus(blockId, putBlockInfo, putBlockStatus)
                   }
                   updatedBlocks += ((blockId, putBlockStatus))
               }
           } finally {
               if (!marked) {
                   blockInfo.remove(blockId)
                   putBlockInfo.markFailure()
                   logWarning(s"Putting block $blockId failed")
               }
           }
       }
       logDebug("Put block %s locally took %s".format(blockId, Utils.getUsedTimeMs(startTimeMs)))

       if (putLevel.replication > 1) {
           data match {
               case ByteBufferValues(bytes) =>
                   if (replicationFuture != null) {
                       Await.ready(replicationFuture, Duration.Inf)
                   }
               case _ =>
                   val remoteStartTime = System.currentTimeMillis
                   if (bytesAfterPut == null) {
                       if (valuesAfterPut == null) {
                           throw new SparkException(
                                   "Underlying put returned neither an Iterator nor bytes! This shouldn't happen.")
                       }
                       bytesAfterPut = dataSerialize(blockId, valuesAfterPut)
                   }
                   replicate(blockId, bytesAfterPut, putLevel)
                   logDebug("Put block %s remotely took %s"
                           .format(blockId, Utils.getUsedTimeMs(remoteStartTime)))
           }
       }

       BlockManager.dispose(bytesAfterPut)

       if (putLevel.replication > 1) {
           logDebug("Putting block %s with replication took %s"
                   .format(blockId, Utils.getUsedTimeMs(startTimeMs)))
       } else {
           logDebug("Putting block %s without replication took %s"
                   .format(blockId, Utils.getUsedTimeMs(startTimeMs)))
       }

       updatedBlocks
   }
对于doPut函数,主要做了以下几个操作
创建BlockInfo对象存储block信息;
将BlockInfo加锁,然后根据Storage Level判断存储到Memory还是Disk。同时,对于已经准备好读的BlockInfo要进行解锁。
根据block的副本数量决定是否向远程发送副本。
1.5.1序列化与否
写入的具体内容可以是序列化之后的bytes也可以是没有序列化的value. 此处有一个对scala的语法中Either, Left, Right关键字的理解。
1.6数据读取过程分析
def get(blockId: BlockId): Option[Iterator[Any]] = {
    val local = getLocal(blockId)
    if (local.isDefined) {
        logInfo("Found block %s locally".format(blockId))
        return local
    }
    val remote = getRemote(blockId)
    if (remote.isDefined) {
        logInfo("Found block %s remotely".format(blockId))
        return remote
    }
    None
}
1.6.1本地读取
首先在查询本机的MemoryStore和DiskStore中是否有所需要的block数据存在,如果没有则发起远程数据获取。
1.6.2远程读取
远程获取调用路径, getRemote->doGetRemote, 在doGetRemote中最主要的就是调用BlockManagerWorker.syncGetBlock来从远程获得数据
def syncGetBlock(msg: GetBlock, toConnManagerId: ConnectionManagerId): ByteBuffer = {
    val blockManager = blockManagerWorker.blockManager
    val connectionManager = blockManager.connectionManager
    val blockMessage = BlockMessage.fromGetBlock(msg)
    val blockMessageArray = new BlockMessageArray(blockMessage)
    val responseMessage = connectionManager.sendMessageReliablySync(
            toConnManagerId, blockMessageArray.toBufferMessage)
    responseMessage match {
        case Some(message) => {
            val bufferMessage = message.asInstanceOf[BufferMessage]
            logDebug("Response message received " + bufferMessage)
            BlockMessageArray.fromBufferMessage(bufferMessage).foreach(blockMessage => {
                    logDebug("Found " + blockMessage)
            return blockMessage.getData
      })
        }
        case None => logDebug("No response message received")
    }
    null
}
上述这段代码中最有意思的莫过于sendMessageReliablySync,远程数据读取毫无疑问是一个异步i/o操作,这里的代码怎么写起来就像是在进行同步的操作一样呢。也就是说如何知道对方发送回来响应的呢?
别急,继续去看看sendMessageReliablySync的定义
def sendMessageReliably(connectionManagerId: ConnectionManagerId, message: Message)
  : Future[Option[Message]] = {
    val promise = Promise[Option[Message]]
    val status = new MessageStatus(
            message, connectionManagerId, s => promise.success(s.ackMessage))
    messageStatuses.synchronized {
        messageStatuses += ((message.id, status))
    }
    sendMessage(connectionManagerId, message)
    promise.future
}
要是我说秘密在这里,你肯定会说我在扯淡,但确实在此处。注意到关键字Promise和Future没。
如果这个future执行完毕,返回s.ackMessage。我们再看看这个ackMessage是在什么地方被写入的呢。看一看ConnectionManager.handleMessage中的代码片段
case bufferMessage: BufferMessage =>

{
    if (authEnabled) {
        val res = handleAuthentication(connection, bufferMessage)
        if (res == true) {
            // message was security negotiation so skip the rest
            logDebug("After handleAuth result was true, returning")
            return
        }
    }
    if (bufferMessage.hasAckId) {
        val sentMessageStatus = messageStatuses. synchronized {
            messageStatuses.get(bufferMessage.ackId) match {
                case Some(status) =>{
                    messageStatuses -= bufferMessage.ackId
                    status
                }
                case None =>{
                    throw new Exception("Could not find reference for received ack message " +
                            message.id)
                    null
                }
            }
        }
        sentMessageStatus. synchronized {
            sentMessageStatus.ackMessage = Some(message)
            sentMessageStatus.attempted = true
            sentMessageStatus.acked = true
            sentMessageStaus.markDone()
        }
    }
}
注意,此处的所调用的sentMessageStatus.markDone就会调用在sendMessageReliablySync中定义的promise.Success. 不妨看看MessageStatus的定义。
class MessageStatus(
val message: Message,
val connectionManagerId: ConnectionManagerId,
completionHandler: MessageStatus => Unit) {

    var ackMessage: Option[Message] = None
    var attempted = false
    var acked = false

    def markDone() { completionHandler(this) }
}
1.7Partition如何转化为Block
在storage模块里面所有的操作都是和block相关的,但是在RDD里面所有的运算都是基于partition的,那么partition是如何与block对应上的呢?
RDD计算的核心函数是iterator()函数:
final def iterator(split: Partition, context: TaskContext): Iterator[T] = {
    if (storageLevel != StorageLevel.NONE) {
        SparkEnv.get.cacheManager.getOrCompute(this, split, context, storageLevel)
    } else {
        computeOrReadCheckpoint(split, context)
    }
}
如果当前RDD的storage level不是NONE的话,表示该RDD在BlockManager中有存储,那么调用CacheManager中的getOrCompute()函数计算RDD,在这个函数中partition和block发生了关系:
首先根据RDD id和partition index构造出block id (rdd_xx_xx),接着从BlockManager中取出相应的block。
如果该block存在,表示此RDD在之前已经被计算过和存储在BlockManager中,因此取出即可,无需再重新计算。
如果该block不存在则需要调用RDD的computeOrReadCheckpoint()函数计算出新的block,并将其存储到BlockManager中。
需要注意的是block的计算和存储是阻塞的,若另一线程也需要用到此block则需等到该线程block的loading结束。
def getOrCompute[T](rdd:RDD[T],split:Partition,context:TaskContext,storageLevel:StorageLevel):Iterator[T]=
{
    val key = "rdd_%d_%d".format(rdd.id, split.index)
    logDebug("Looking for partition " + key)
    blockManager.get(key) match {
    case Some(values) =>
        // Partition is already materialized, so just return its values
        return values.asInstanceOf[Iterator[T]]

    case None =>
        // Mark the split as loading (unless someone else marks it first)
        loading. synchronized {
        if (loading.contains(key)) {
            logInfo("Another thread is loading %s, waiting for it to finish...".format(key))
            while (loading.contains(key)) {
                try {
                    loading.wait()
                } catch {
                    case _:
                        Throwable =>}
            }
            logInfo("Finished waiting for %s".format(key))
            // See whether someone else has successfully loaded it. The main way this would fail
            // is for the RDD-level cache eviction policy if someone else has loaded the same RDD
            // partition but we didn't want to make space for it. However, that case is unlikely
            // because it's unlikely that two threads would work on the same RDD partition. One
            // downside of the current code is that threads wait serially if this does happen.
            blockManager.get(key) match {
                case Some(values) =>
                    return values.asInstanceOf[Iterator[T]]
                case None =>
                    logInfo("Whoever was loading %s failed; we'll try it ourselves".format(key))
                    loading.add(key)
            }
        } else {
            loading.add(key)
        }
    }
    try {
        // If we got here, we have to load the split
        logInfo("Partition %s not found, computing it".format(key))
        val computedValues = rdd.computeOrReadCheckpoint(split, context)
        // Persist the result, so long as the task is not running locally
        if (context.runningLocally) {
            return computedValues
        }
        val elements = new ArrayBuffer[Any]
        elements++ = computedValues
        blockManager.put(key, elements, storageLevel, true)
        return elements.iterator.asInstanceOf[Iterator[T]]
    } finally {
        loading. synchronized {
            loading.remove(key)
            loading.notifyAll()
        }
    }
}
这样RDD的transformation、action就和block数据建立了联系,虽然抽象上我们的操作是在partition层面上进行的,但是partition最终还是被映射成为block,因此实际上我们的所有操作都是对block的处理和存取。
1.8partition和block的对应关系
在RDD中,核心的函数是iterator:
final def iterator(split: Partition, context: TaskContext): Iterator[T] = {
    if (storageLevel != StorageLevel.NONE) {
        SparkEnv.get.cacheManager.getOrCompute(this, split, context, storageLevel)
    } else {
        computeOrReadCheckpoint(split, context)
    }
}
如果当前RDD的storage level不是NONE的话,表示该RDD在BlockManager中有存储,那么调用CacheManager中的getOrCompute函数计算RDD,在这个函数中partition和block就对应起来了:
getOrCompute函数会先构造RDDBlockId,其中RDDBlockId就把block和partition联系起来了,RDDBlockId产生的name就是BlockId的name属性,形式是:rdd_rdd.id_partition.index。
def getOrCompute[T](
rdd: RDD[T],
partition: Partition,
context: TaskContext,
storageLevel: StorageLevel): Iterator[T] = {

    val key = RDDBlockId(rdd.id, partition.index)
    logDebug(s"Looking for partition $key")
    blockManager.get(key) match {
        case Some(blockResult) =>
            val existingMetrics = context.taskMetrics
                    .getInputMetricsForReadMethod(blockResult.readMethod)
            existingMetrics.incBytesRead(blockResult.bytes)

            val iter = blockResult.data.asInstanceOf[Iterator[T]]
            new InterruptibleIterator[T](context, iter) {
            override def next(): T = {
                    existingMetrics.incRecordsRead(1)
                    delegate.next()
            }
        }
        case None =>
            val storedValues = acquireLockForPartition[T](key)
            if (storedValues.isDefined) {
                return new InterruptibleIterator[T](context, storedValues.get)
            }

            try {
                logInfo(s"Partition $key not found, computing it")
                val computedValues = rdd.computeOrReadCheckpoint(partition, context)

                if (context.isRunningLocally) {
                    return computedValues
                }

                val updatedBlocks = new ArrayBuffer[(BlockId, BlockStatus)]
                val cachedValues = putInBlockManager(key, computedValues, storageLevel, updatedBlocks)
                val metrics = context.taskMetrics
                val lastUpdatedBlocks = metrics.updatedBlocks.getOrElse(Seq[(BlockId, BlockStatus)]())
                metrics.updatedBlocks = Some(lastUpdatedBlocks ++ updatedBlocks.toSeq)
                new InterruptibleIterator(context, cachedValues)

            } finally {
                loading.synchronized {
                    loading.remove(key)
                    loading.notifyAll()
                }
            }
    }
}
同时getOrCompute函数会对block进行判断:
如果该block存在,表示此RDD在之前已经被计算过和存储在BlockManager中,因此取出即可,无需再重新计算。
如果该block不存在则需要调用RDD的computeOrReadCheckpoint()函数计算出新的block,并将其存储到BlockManager中。
需要注意的是block的计算和存储是阻塞的,若另一线程也需要用到此block则需等到该线程block的loading结束。