一、本文介绍
本文给大家带来是用最新的RT-DETR模型的检测头去替换YOLOv8中的检测头。RT-DETR号称是打败YOLO的检测模型,其作为一种基于Transformer的检测方法,相较于传统的基于卷积的检测方法,提供了更为全面和深入的特征理解,将RT-DETR检测头融入YOLOv8,我们可以结合YOLO的实时检测能力和RT-DETR的深度特征理解能力,打造出一个更加强大的目标检测模型。亲测这一整合不仅提高了模型在复杂场景下的表现,还显著提升了对小目标和遮挡目标的检测能力。此外,模型在多种标准数据集上的表现也有了明显提升,特别是在处理高动态范围和复杂背景的图像时,其表现尤为出色。
适用检测目标:需要注意的是本文的改进并不一定适合所有的数据集可能只有在部分的数据集有效(听人反馈部分的数据集可能掉点)。
推荐指数:⭐⭐⭐
专栏回顾:YOLOv8改进系列专栏——本专栏持续复习各种顶会内容——科研必备
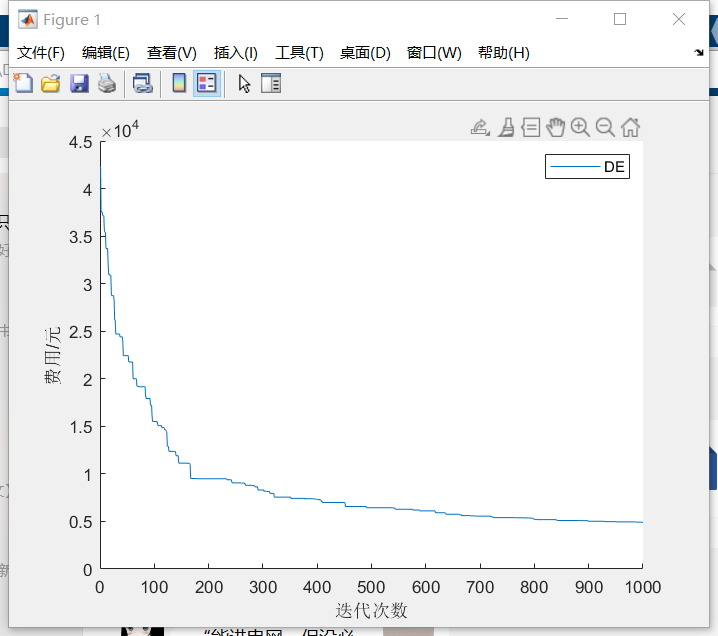
训练结果对比图->
因为资源有限我发的文章都要做对比实验所以本次实验我只用了一百张图片检测的是火灾训练了二百个epoch,该结果只能展示出该机制有效,但是并不能产生决定性结果,因为具体的效果还要看你的数据集和实验环境所影响
可以看出部分的检测有提点但是有的有降点所以具体的效果还要看你自己的数据集来看。

目录
一、本文介绍
二、RT-DETR检测头框架原理
2.1 RT-DETR的基本原理
三、RT-DETR检测头的代码
四、手把手教你添加RT-DETR检测头
4.1 RT-DETR的添加教程
4.2 的yaml文件和训练截图
4.2.1 RT-DETR检测头的yaml文件
4.3 训练方法
4.3.1 RT-DETR的训练过程截图
六、本文总结
二、RT-DETR检测头框架原理

论文地址:RT-DETR论文地址
代码地址:RT-DETR官方下载地址

2.1 RT-DETR的基本原理
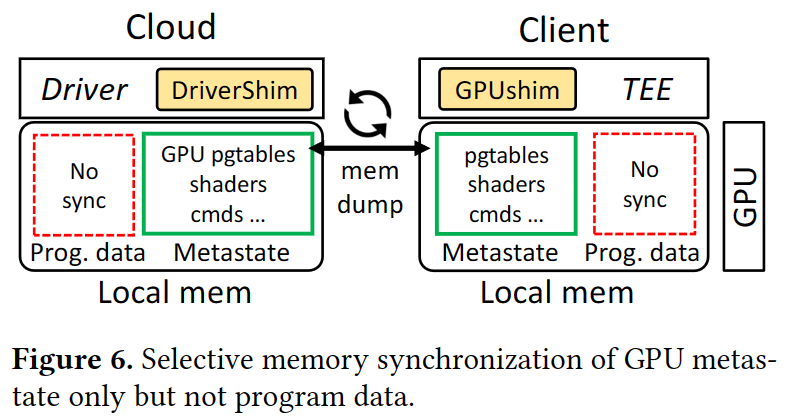
RT-DETR系统中的检测头变换器解码器(transformer decoder)部分,包括辅助预测头,是该系统的核心组成之一。变换器解码器在RT-DETR中扮演了重要角色,主要负责处理经过混合编码器加工后的特征,并对这些特征进行目标检测。这一部分的设计是基于Transformer架构的,该架构已在自然语言处理领域取得了巨大成功,并在最近几年逐渐被应用于计算机视觉任务中。
在RT-DETR中,变换器解码器利用Transformer的强大能力来捕捉和理解图像中的复杂模式。它通过自注意力机制来分析和加权输入特征,从而能够更准确地定位和识别图像中的不同对象。这种方法使RT-DETR能够在保持高速度的同时,提供比传统方法更精准的检测结果。
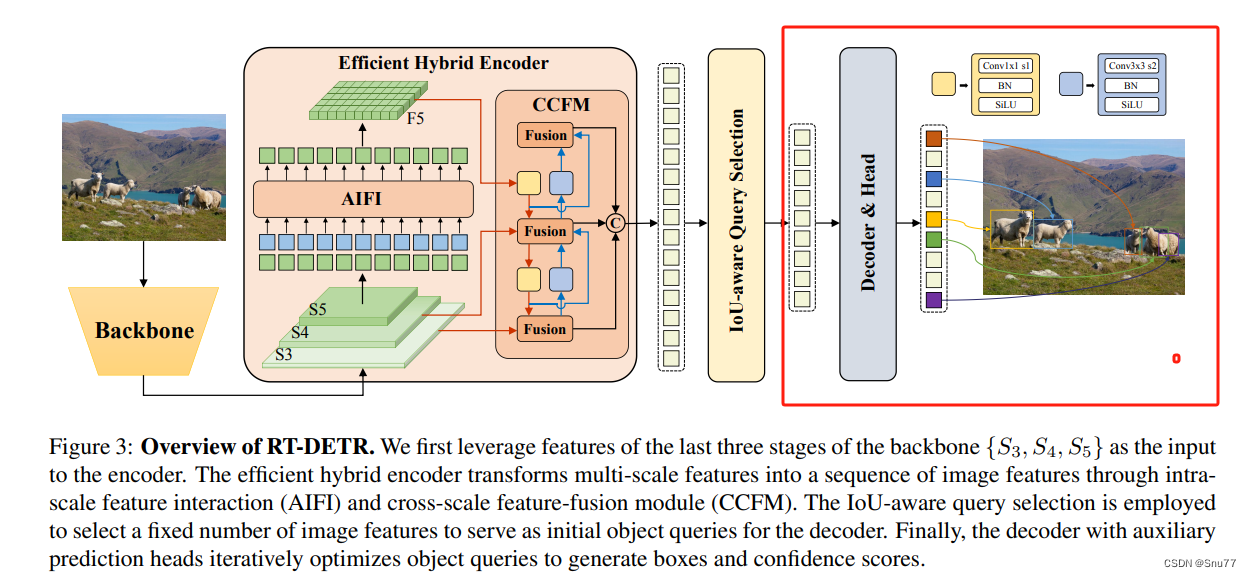
辅助预测头则是变换器解码器的一个关键组件,它被用来进一步提升模型的检测性能。这些预测头直接作用于解码器的输出,负责生成最终的检测结果,包括对象的类别、位置和大小等信息。通过这种设计,RT-DETR能够在端到端的框架内完成整个目标检测流程,无需依赖于传统的基于锚点的方法或复杂的后处理步骤,这大大简化了检测流程并提高了效率。
RT-DETR网络详解:详解RT-DETR网络结构/数据集获取/环境搭建/训练/推理/验证/导出/部署
三、RT-DETR检测头的代码
以下的代码时RT-DETR检测头的代码,如果你的YOLO仓库已经是新版本的了(好像是9月份的时候更新的)就已经集成这个代码了无需做任何修改即可使用该检测头,但是该检测头有一些使用注意事项后面第四章我会提到。
class RTDETRDecoder(nn.Module):
    """
    Real-Time Deformable Transformer Decoder (RTDETRDecoder) module for object detection.

    This decoder module utilizes Transformer architecture along with deformable convolutions to predict bounding boxes
    and class labels for objects in an image. It integrates features from multiple layers and runs through a series of
    Transformer decoder layers to output the final predictions.
    """
    export = False  # export mode

    def __init__(
            self,
            nc=80,
            ch=(512, 1024, 2048),
            hd=256,  # hidden dim
            nq=300,  # num queries
            ndp=4,  # num decoder points
            nh=8,  # num head
            ndl=6,  # num decoder layers
            d_ffn=1024,  # dim of feedforward
            dropout=0.,
            act=nn.ReLU(),
            eval_idx=-1,
            # Training args
            nd=100,  # num denoising
            label_noise_ratio=0.5,
            box_noise_scale=1.0,
            learnt_init_query=False):
        """
        Initializes the RTDETRDecoder module with the given parameters.

        Args:
            nc (int): Number of classes. Default is 80.
            ch (tuple): Channels in the backbone feature maps. Default is (512, 1024, 2048).
            hd (int): Dimension of hidden layers. Default is 256.
            nq (int): Number of query points. Default is 300.
            ndp (int): Number of decoder points. Default is 4.
            nh (int): Number of heads in multi-head attention. Default is 8.
            ndl (int): Number of decoder layers. Default is 6.
            d_ffn (int): Dimension of the feed-forward networks. Default is 1024.
            dropout (float): Dropout rate. Default is 0.
            act (nn.Module): Activation function. Default is nn.ReLU.
            eval_idx (int): Evaluation index. Default is -1.
            nd (int): Number of denoising. Default is 100.
            label_noise_ratio (float): Label noise ratio. Default is 0.5.
            box_noise_scale (float): Box noise scale. Default is 1.0.
            learnt_init_query (bool): Whether to learn initial query embeddings. Default is False.
        """
        super().__init__()
        self.hidden_dim = hd
        self.nhead = nh
        self.nl = len(ch)  # num level
        self.nc = nc
        self.num_queries = nq
        self.num_decoder_layers = ndl

        # Backbone feature projection
        self.input_proj = nn.ModuleList(nn.Sequential(nn.Conv2d(x, hd, 1, bias=False), nn.BatchNorm2d(hd)) for x in ch)
        # NOTE: simplified version but it's not consistent with .pt weights.
        # self.input_proj = nn.ModuleList(Conv(x, hd, act=False) for x in ch)

        # Transformer module
        decoder_layer = DeformableTransformerDecoderLayer(hd, nh, d_ffn, dropout, act, self.nl, ndp)
        self.decoder = DeformableTransformerDecoder(hd, decoder_layer, ndl, eval_idx)

        # Denoising part
        self.denoising_class_embed = nn.Embedding(nc, hd)
        self.num_denoising = nd
        self.label_noise_ratio = label_noise_ratio
        self.box_noise_scale = box_noise_scale

        # Decoder embedding
        self.learnt_init_query = learnt_init_query
        if learnt_init_query:
            self.tgt_embed = nn.Embedding(nq, hd)
        self.query_pos_head = MLP(4, 2 * hd, hd, num_layers=2)

        # Encoder head
        self.enc_output = nn.Sequential(nn.Linear(hd, hd), nn.LayerNorm(hd))
        self.enc_score_head = nn.Linear(hd, nc)
        self.enc_bbox_head = MLP(hd, hd, 4, num_layers=3)

        # Decoder head
        self.dec_score_head = nn.ModuleList([nn.Linear(hd, nc) for _ in range(ndl)])
        self.dec_bbox_head = nn.ModuleList([MLP(hd, hd, 4, num_layers=3) for _ in range(ndl)])

        self._reset_parameters()

    def forward(self, x, batch=None):
        """Runs the forward pass of the module, returning bounding box and classification scores for the input."""
        from ultralytics.models.utils.ops import get_cdn_group

        # Input projection and embedding
        feats, shapes = self._get_encoder_input(x)

        # Prepare denoising training
        dn_embed, dn_bbox, attn_mask, dn_meta = \
            get_cdn_group(batch,
                          self.nc,
                          self.num_queries,
                          self.denoising_class_embed.weight,
                          self.num_denoising,
                          self.label_noise_ratio,
                          self.box_noise_scale,
                          self.training)

        embed, refer_bbox, enc_bboxes, enc_scores = \
            self._get_decoder_input(feats, shapes, dn_embed, dn_bbox)

        # Decoder
        dec_bboxes, dec_scores = self.decoder(embed,
                                              refer_bbox,
                                              feats,
                                              shapes,
                                              self.dec_bbox_head,
                                              self.dec_score_head,
                                              self.query_pos_head,
                                              attn_mask=attn_mask)
        x = dec_bboxes, dec_scores, enc_bboxes, enc_scores, dn_meta
        if self.training:
            return x
        # (bs, 300, 4+nc)
        y = torch.cat((dec_bboxes.squeeze(0), dec_scores.squeeze(0).sigmoid()), -1)
        return y if self.export else (y, x)

    def _generate_anchors(self, shapes, grid_size=0.05, dtype=torch.float32, device='cpu', eps=1e-2):
        """Generates anchor bounding boxes for given shapes with specific grid size and validates them."""
        anchors = []
        for i, (h, w) in enumerate(shapes):
            sy = torch.arange(end=h, dtype=dtype, device=device)
            sx = torch.arange(end=w, dtype=dtype, device=device)
            grid_y, grid_x = torch.meshgrid(sy, sx, indexing='ij') if TORCH_1_10 else torch.meshgrid(sy, sx)
            grid_xy = torch.stack([grid_x, grid_y], -1)  # (h, w, 2)

            valid_WH = torch.tensor([h, w], dtype=dtype, device=device)
            grid_xy = (grid_xy.unsqueeze(0) + 0.5) / valid_WH  # (1, h, w, 2)
            wh = torch.ones_like(grid_xy, dtype=dtype, device=device) * grid_size * (2.0 ** i)
            anchors.append(torch.cat([grid_xy, wh], -1).view(-1, h * w, 4))  # (1, h*w, 4)

        anchors = torch.cat(anchors, 1)  # (1, h*w*nl, 4)
        valid_mask = ((anchors > eps) * (anchors < 1 - eps)).all(-1, keepdim=True)  # 1, h*w*nl, 1
        anchors = torch.log(anchors / (1 - anchors))
        anchors = anchors.masked_fill(~valid_mask, float('inf'))
        return anchors, valid_mask

    def _get_encoder_input(self, x):
        """Processes and returns encoder inputs by getting projection features from input and concatenating them."""
        # Get projection features
        x = [self.input_proj[i](feat) for i, feat in enumerate(x)]
        # Get encoder inputs
        feats = []
        shapes = []
        for feat in x:
            h, w = feat.shape[2:]
            # [b, c, h, w] -> [b, h*w, c]
            feats.append(feat.flatten(2).permute(0, 2, 1))
            # [nl, 2]
            shapes.append([h, w])

        # [b, h*w, c]
        feats = torch.cat(feats, 1)
        return feats, shapes

    def _get_decoder_input(self, feats, shapes, dn_embed=None, dn_bbox=None):
        """Generates and prepares the input required for the decoder from the provided features and shapes."""
        bs = len(feats)
        # Prepare input for decoder
        anchors, valid_mask = self._generate_anchors(shapes, dtype=feats.dtype, device=feats.device)
        features = self.enc_output(valid_mask * feats)  # bs, h*w, 256

        enc_outputs_scores = self.enc_score_head(features)  # (bs, h*w, nc)

        # Query selection
        # (bs, num_queries)
        topk_ind = torch.topk(enc_outputs_scores.max(-1).values, self.num_queries, dim=1).indices.view(-1)
        # (bs, num_queries)
        batch_ind = torch.arange(end=bs, dtype=topk_ind.dtype).unsqueeze(-1).repeat(1, self.num_queries).view(-1)

        # (bs, num_queries, 256)
        top_k_features = features[batch_ind, topk_ind].view(bs, self.num_queries, -1)
        # (bs, num_queries, 4)
        top_k_anchors = anchors[:, topk_ind].view(bs, self.num_queries, -1)

        # Dynamic anchors + static content
        refer_bbox = self.enc_bbox_head(top_k_features) + top_k_anchors

        enc_bboxes = refer_bbox.sigmoid()
        if dn_bbox is not None:
            refer_bbox = torch.cat([dn_bbox, refer_bbox], 1)
        enc_scores = enc_outputs_scores[batch_ind, topk_ind].view(bs, self.num_queries, -1)

        embeddings = self.tgt_embed.weight.unsqueeze(0).repeat(bs, 1, 1) if self.learnt_init_query else top_k_features
        if self.training:
            refer_bbox = refer_bbox.detach()
            if not self.learnt_init_query:
                embeddings = embeddings.detach()
        if dn_embed is not None:
            embeddings = torch.cat([dn_embed, embeddings], 1)

        return embeddings, refer_bbox, enc_bboxes, enc_scores

    # TODO
    def _reset_parameters(self):
        """Initializes or resets the parameters of the model's various components with predefined weights and biases."""
        # Class and bbox head init
        bias_cls = bias_init_with_prob(0.01) / 80 * self.nc
        # NOTE: the weight initialization in `linear_init_` would cause NaN when training with custom datasets.
        # linear_init_(self.enc_score_head)
        constant_(self.enc_score_head.bias, bias_cls)
        constant_(self.enc_bbox_head.layers[-1].weight, 0.)
        constant_(self.enc_bbox_head.layers[-1].bias, 0.)
        for cls_, reg_ in zip(self.dec_score_head, self.dec_bbox_head):
            # linear_init_(cls_)
            constant_(cls_.bias, bias_cls)
            constant_(reg_.layers[-1].weight, 0.)
            constant_(reg_.layers[-1].bias, 0.)

        linear_init_(self.enc_output[0])
        xavier_uniform_(self.enc_output[0].weight)
        if self.learnt_init_query:
            xavier_uniform_(self.tgt_embed.weight)
        xavier_uniform_(self.query_pos_head.layers[0].weight)
        xavier_uniform_(self.query_pos_head.layers[1].weight)
        for layer in self.input_proj:
            xavier_uniform_(layer[0].weight)
四、手把手教你添加RT-DETR检测头
4.1 RT-DETR的添加教程
这个检测头如果你已经是最新版本的YOLO了那么已经集成在你的代码里了,而且更换了该检测头需要用RT-DETR的训练方法(用YOLO版本的训练方法会报错)。同时如果你使用了该检测头需要增大训练epochs,比如你原先150能够收敛模型那么改完之后可能需要200-250才能够收敛。
具体的训练方法需要修改完下一小节的配置文件后看4.3章节。
4.2 的yaml文件和训练截图
4.2.1 RT-DETR检测头的yaml文件
需要把YOLO的检测头更换为RT-DETR的检测头修改如下->
# Ultralytics YOLO 🚀, AGPL-3.0 license
# YOLOv8 object detection model with P3-P5 outputs. For Usage examples see https://docs.ultralytics.com/tasks/detect

# Parameters
nc: 80  # number of classes
scales: # model compound scaling constants, i.e. 'model=yolov8n.yaml' will call yolov8.yaml with scale 'n'
  # [depth, width, max_channels]
  n: [0.33, 0.25, 1024]  # YOLOv8n summary: 225 layers,  3157200 parameters,  3157184 gradients,   8.9 GFLOPs
  s: [0.33, 0.50, 1024]  # YOLOv8s summary: 225 layers, 11166560 parameters, 11166544 gradients,  28.8 GFLOPs
  m: [0.67, 0.75, 768]   # YOLOv8m summary: 295 layers, 25902640 parameters, 25902624 gradients,  79.3 GFLOPs
  l: [1.00, 1.00, 512]   # YOLOv8l summary: 365 layers, 43691520 parameters, 43691504 gradients, 165.7 GFLOPs
  x: [1.00, 1.25, 512]   # YOLOv8x summary: 365 layers, 68229648 parameters, 68229632 gradients, 258.5 GFLOPs

# YOLOv8.0n backbone
backbone:
  # [from, repeats, module, args]
  - [-1, 1, Conv, [64, 3, 2]]  # 0-P1/2
  - [-1, 1, Conv, [128, 3, 2]]  # 1-P2/4
  - [-1, 3, C2f, [128, True]]
  - [-1, 1, Conv, [256, 3, 2]]  # 3-P3/8
  - [-1, 6, C2f, [256, True]]
  - [-1, 1, Conv, [512, 3, 2]]  # 5-P4/16
  - [-1, 6, C2f, [512, True]]
  - [-1, 1, Conv, [1024, 3, 2]]  # 7-P5/32
  - [-1, 3, C2f, [1024, True]]
  - [-1, 1, SPPF, [1024, 5]]  # 9


# YOLOv8.0n head
head:
  - [-1, 1, nn.Upsample, [None, 2, 'nearest']]
  - [[-1, 6], 1, Concat, [1]]  # cat backbone P4
  - [-1, 3, C2f, [512]]  # 12

  - [-1, 1, nn.Upsample, [None, 2, 'nearest']]
  - [[-1, 4], 1, Concat, [1]]  # cat backbone P3
  - [-1, 3, C2f, [256]]  # 15 (P3/8-small)

  - [-1, 1, Conv, [256, 3, 2]]
  - [[-1, 12], 1, Concat, [1]]  # cat head P4
  - [-1, 3, C2f, [512]]  # 18 (P4/16-medium)

  - [-1, 1, Conv, [512, 3, 2]]
  - [[-1, 9], 1, Concat, [1]]  # cat head P5
  - [-1, 3, C2f, [1024]]  # 21 (P5/32-large)

  - [[15, 18, 21], 1, RTDETRDecoder, [nc]]  # Detect(P3, P4, P5)
4.3 训练方法
前面提到了修改完之后进行训练和YOLO变得不在一样需要按照RT-DETR的训练方式(否则会报错)我使用的新建文件进行训练,可以新建一个run.py文件然后把以下代码复制把你的数据集更新进去即可进行训练。
import warnings
warnings.filterwarnings('ignore')
from ultralytics import RTDETR

if __name__ == '__main__':
    model = RTDETR('你替换了RT-DETR检测头的yaml文件地址')
    model.train(data='替换你数据集的yaml文件地址',
                imgsz=640,
                epochs=200,
                batch=16,
                workers=0,
                device=0,
                optimizer='SGD', # 这里可以使用两个优化器SGD 和AdamW其它的可能会导致模型无法收敛
                )
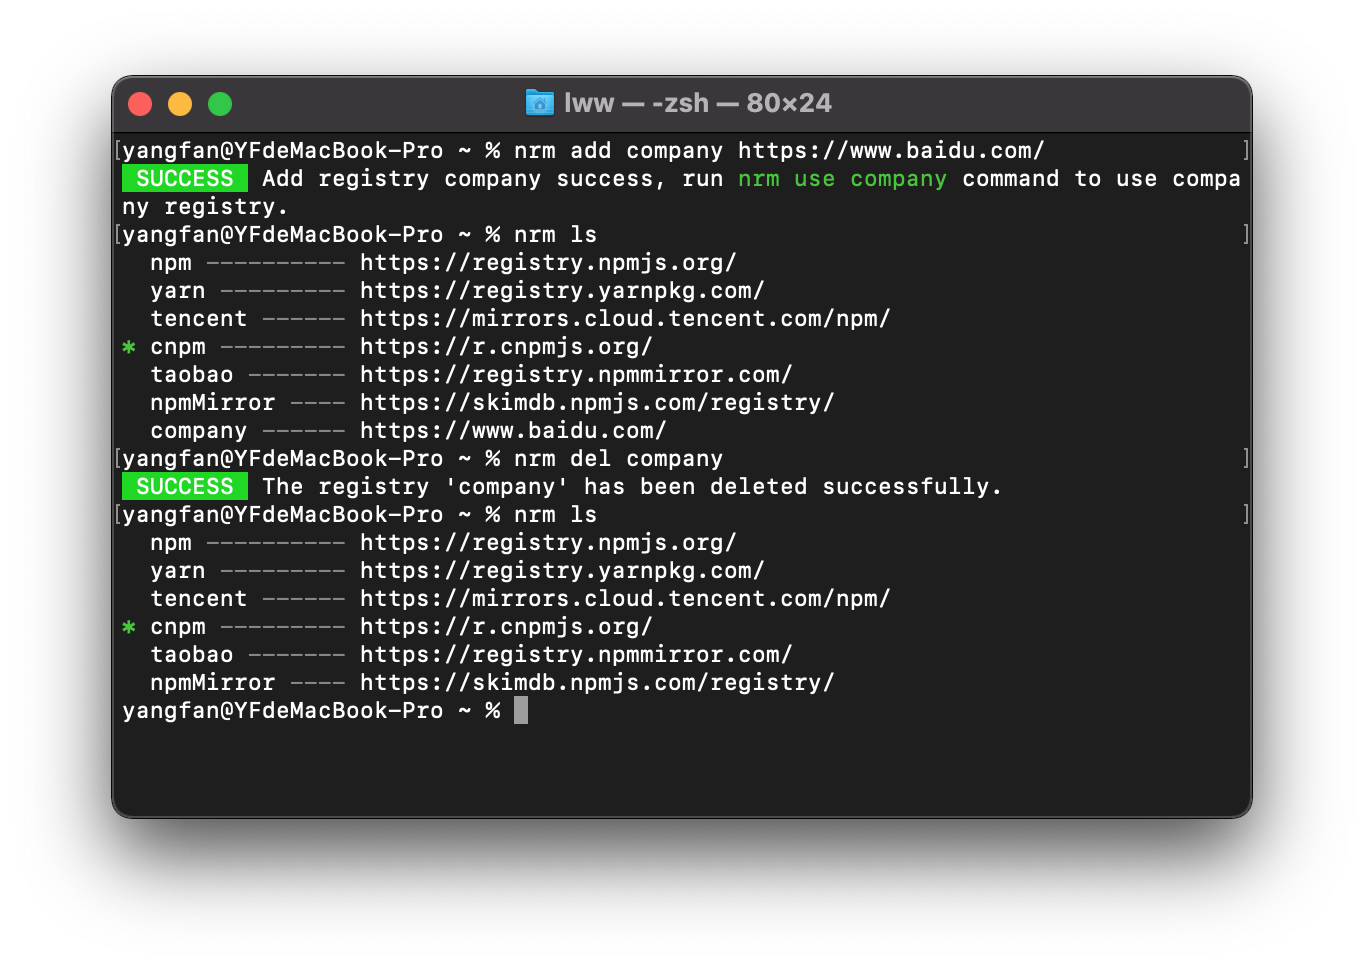
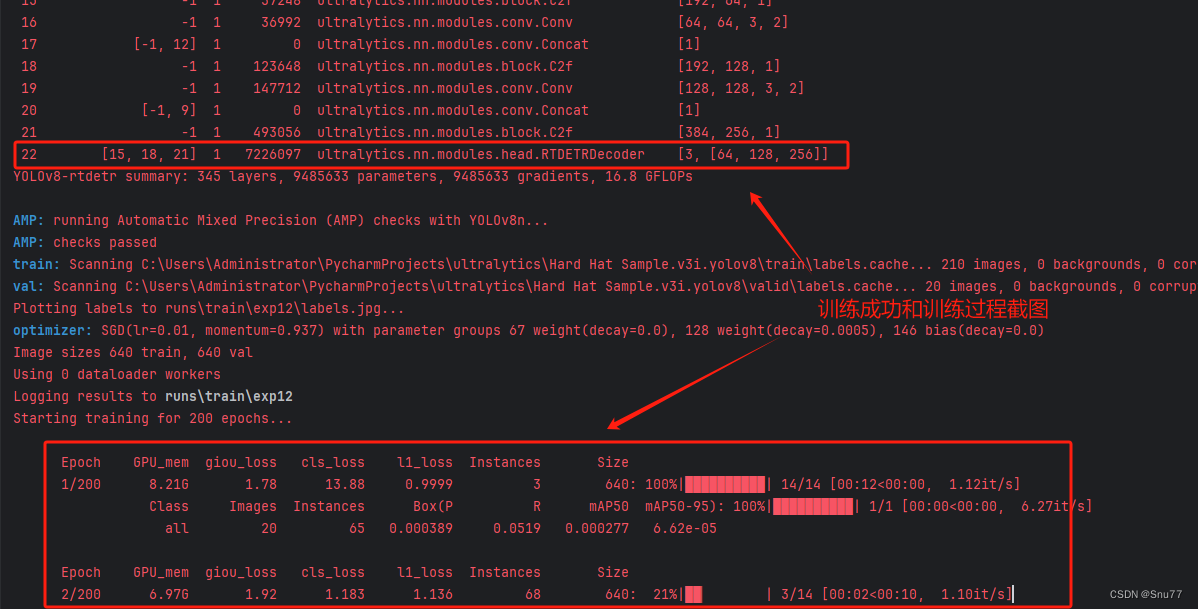
4.3.1 RT-DETR的训练过程截图
下面是添加了RT-DETR的训练截图。
(最近有人说我改的代码是没有发全的,我不知道这群人是怎么说出这种话的,希望大家如果用我的代码成功的可以在评论区支持一下,我也好发更多的改进毕竟免费给大家看。同时有问题皆可在评论区留言我看到都会回复)
六、本文总结
到此本文的正式分享内容就结束了,在这里给大家推荐我的YOLOv8改进有效涨点专栏,本专栏目前为新开的平均质量分98分,后期我会根据各种最新的前沿顶会进行论文复现,也会对一些老的改进机制进行补充,目前本专栏免费阅读(暂时,大家尽早关注不迷路~),如果大家觉得本文帮助到你了,订阅本专栏,关注后续更多的更新~
专栏回顾:YOLOv8改进系列专栏——本专栏持续复习各种顶会内容——科研必备