#企业级Nginx使用-day1
学习目标和内容
1、能够了解Nginx的信号参数
2、能够进行平滑升级Nginx
3、能够配置server虚拟机
4、能够部署上线项目到LNMP架构中
5、能够了解Nginx的常用官方模块
6、能够了解日志相关使用
一、重装和升级
在实际业务场景中,需要使用软件新版本的功能、特性。就需要对原有软件进行升级或者重装操作。
旧statble 稳定版 1.14
stable 稳定版 1.16
mainline 主线版本 最新的 1.17
1、信号参数
Kill 命令 传输信号给进程 Nginx的主进程
TERM, INT(快速退出,当前的请求不执行完成就退出) -s stop
QUIT (优雅退出,执行完当前的请求后退出) -s quit
HUP (重新加载配置文件,用新的配置文件启动新worker进程,并优雅的关闭旧的worker进程) -s reload
USR1 (重新打开日志文件) -s reopen
USR2 (平滑的升级nginx二进制文件 拉起一个新的主进程 旧主进程不停止)
WINCH (优雅的关闭worker进程)
以上几个信息命令都是发送给master主进程的
语法:
Kill 选项参数  pid
##关闭nginx
##快速关闭
kill -INT pid
##优雅关闭
kill -QUIT pid
2、重新安装
①停止掉服务,删除编译的安装的软件包和源码包
②重新解压编译安装即可
注意:如果有需要,请备份配置文件和网站目录里的资源文件
3、平滑升级
升级软件版本之后,需要启动新的版本,启动不了,端口已经被占用
如果直接把旧版本的服务停止掉,会影响线上业务的使用
最佳解决办法:
①旧的不先停掉
②新的又可以起来
③旧的和新的同时提供服务,旧的请求完成之后,就停掉旧进程
-USR2 平滑启动一个进程(平滑升级)
-WINCH 优雅的关闭子进程
-QUIT 优雅关闭主进程
①编译安装新版本
shell > tar xvf nginx-1.16.0.tar.gz
shell > cd nginx-1.16.0
shell > ./configure  --prefix=/usr/local/nginx --user=www --group=www --with-http_ssl_module --with-http_stub_status_module --with-http_realip_module
shell > make && make install
升级新版本,需要把软件的安装路径,指定到旧版本上。
以上操作完成之后,会把原来的旧版本备份为nginx.old
②新旧版本同时运行
shell > kill -USR2 主进程号
③停止掉旧进程
查看旧的主进程号,并使用kill -WINCH 优雅的关闭的子进程,再关闭旧的主进程
shell > kill -WINCH 旧的主进程号
shell > kill -QUIT 旧的主进程号
在nginx中,默认提供了平滑升级的操作,只需要执行以下命令
#注意先configure  在nginx源码包执行
shell > make install && make upgrade
4、配置文件介绍
查看nignx目录下的配置文件
/usr/local/nginx/nginx.conf
#nginx子进程启动用户
#user nobody;
#子进程数量 一般调整为cpu核数或者倍数
worker_processes 1;
#错误日志定义
#error_log logs/error.log;
#error_log logs/error.log notice;
#error_log logs/error.log info;
#进程pid 存储文件
#pid logs/nginx.pid;
#事件
events {
#每个子进程的连接数 nginx当前并发量 worker_processes * worker_connections
worker_connections 1024;
}
#http协议段
http {
#引入 文件扩展名和与文件类型映射表
include mime.types;
#默认文件类型
default_type application/octet-stream;
#访问日志access.log的格式
#log_format main '$remote_addr - $remote_user [$time_local] "$request" '
# '$status $body_bytes_sent "$http_referer" '
# '"$http_user_agent" "$http_x_forwarded_for"';
#访问日志存储路径
#access_log logs/access.log main;
#linux内核 提供文件读写的机制
sendfile on;
#tcp_nopush on;
#keepalive_timeout 0;
#长连接超时时间 单位为s
keepalive_timeout 65;
#gzip压缩
#gzip on;
#server虚拟主机的配置
server {
#监听端口
listen 80;
#域名 可以有多个 用空格分隔
server_name localhost;
#默认编码
#charset koi8-r;
#access_log logs/host.access.log main;
#location 用来匹配url
location / {
#默认访问的网站路径
root html;
#默认访问页面 从前往后的顺序查找
index index.html index.htm;
}
#error_page 404 /404.html;
# redirect server error pages to the static page /50x.html
#
error_page 500 502 503 504 /50x.html;
location = /50x.html {
root html;
}
# proxy the PHP scripts to Apache listening on 127.0.0.1:80
#
#location ~ \.php$ {
# proxy_pass http://127.0.0.1;
#}
# pass the PHP scripts to FastCGI server listening on 127.0.0.1:9000
#
#location ~ \.php$ {
# root html;
# fastcgi_pass 127.0.0.1:9000;
# fastcgi_index index.php;
# fastcgi_param SCRIPT_FILENAME /scripts$fastcgi_script_name;
# include fastcgi_params;
#}
# deny access to .htaccess files, if Apache's document root
# concurs with nginx's one
#
#location ~ /\.ht {
# deny all;
#}
}
# another virtual host using mix of IP-, name-, and port-based configuration
#
#server {
# listen 8000;
# listen somename:8080;
# server_name somename alias another.alias;
# location / {
# root html;
# index index.html index.htm;
# }
#}
# HTTPS server
#
#server {
# listen 443 ssl;
# server_name localhost;
# ssl_certificate cert.pem;
# ssl_certificate_key cert.key;
# ssl_session_cache shared:SSL:1m;
# ssl_session_timeout 5m;
# ssl_ciphers HIGH:!aNULL:!MD5;
# ssl_prefer_server_ciphers on;
# location / {
# root html;
# index index.html index.htm;
# }
#}
}
主要注意:
http=>==server===>location 递进关系
二、企业中常见使用方式
##1、server配置
###1.1、server虚拟主机配置
在实际生产业务环境中,一台web服务器,需要使用多个网站部署。搭建vhost虚拟机主机实现不同域名,解析绑定到不同的目录。
核心语法
#基于http的web服务
server{
    #监听端口
    listen 80
    #配置虚拟机
    server_name shop.lnmp.com
    root html/tp5shop;
    location / {
        index index.php index.html index.htm
    }
    location ~ \.php$ {
        fastcgi_pass   127.0.0.1:9000;
        fastcgi_index  index.php;
        fastcgi_param  SCRIPT_FILENAME  $document_root$fastcgi_script_name;
        include        fastcgi_params;
    }
}
一般server虚拟主机配置有三类:
①基于域名,将域名配置到server_name上
②基于IP,将IP配置到server_name上
③基于端口,将端口配置到listen
==案例一:基于域名的虚拟机配置==
①建立网站访问目录
shell > cd /usr/local/nginx/html
shell > mkdir tp5shop
shell > cd tp5shop
#创建测试文件
shell > echo "shop.lnmp.com" >> index.html
shell > echo "shop site by php" >> index.php
②解析域名并绑定
当前客户端是通过windows的浏览器,需要在win下的hosts文件(C:\Windows\System32\drivers\etc\hosts)进行解析域名
nginx配置文件绑定域名
server {
      #监听端口
      listen 80;
      #绑定域名
      server_name shop.lnmp.com;
      #网站目录
      root html/tp5shop;
      #默认访问页面
      index index.html;
      #这段一定不要忘了配置,需要解析php使用到
      location ~ \.php$ {
        fastcgi_pass   127.0.0.1:9000;
        fastcgi_index  index.php;
        fastcgi_param  SCRIPT_FILENAME  $document_root$fastcgi_script_name;
        include        fastcgi_params;
    }
 }
③浏览器访问查看效果
==案例二:配置基于端口的虚拟主机==
还是使用上面创建好的tp5shop目录
修改listen配置进行测试
==案例三:配置基于IP的虚拟主机==
①添加IP
#临时绑定IP
shell > ifconfig eth0:1 192.168.17.220
#查看IP是否绑定成功
shell > ip a
②nginx配置文件添加
server {
    listen 80;
    server_name 192.168.17.220;
    root html/ip;
}
③建立一个IP测试目录
shell > cd /usr/local/nginx/html
shell > mkdir ip
shell > echo "ip site" >> index.html
##2、案例:上线商城项目
①上传项目文件到服务器
shell > cd /usr/local/nginx/html
#把项目压缩包解压
shell > unzip tp5shop.zip
②配置server虚拟机,客户端配置host解析
#编辑配置文件
shell > vim /usr/local/nginx/conf/nginx.conf
#在配置文件中配置server虚拟主机段
 server {
        listen 80;
        server_name shop.lnmp.com;
        #tp5shop商城项目基于thinkphp5框架开发,需要绑定默认网站目录为public
        root html/tp5shop/public;
        index index.php index.html;
        location ~ \.php$ {
        #    root           html;
            fastcgi_pass   127.0.0.1:9000;
            fastcgi_index  index.php;
            fastcgi_param  SCRIPT_FILENAME  $document_root$fastcgi_script_name;
            include        fastcgi_params;
        }
}
解析域名进行访问,如果是在windows下,就在c:\Windows\System32\drivers\etc\hosts解析
③创建数据库,导入数据迁移文件
遇到问题:数据没有导入,没有配置项目连接数据库

#创建数据库
mysql > create database tp5shop;
#使用数据库
mysql > use tp5shop;
#通过sql文件导入恢复数据
mysql > source /usr/local/nginx/html/tpshop.sql
④配置项目连接数据库
修改项目的连接数据库配置文件
shell > vim /usr/local/nginx/html/tp5shop/application/database.php
需要修改的内容说明
//注意主要连接地址、数据库名称、用户名称、用户密码、连接端口号等参数
//hostname,database,username,password,hostport等参数,根据实际请求修改即可
return [
    // 数据库类型
    'type'            => 'mysql',
    // 服务器地址
    'hostname'        => '127.0.0.1',
    // 数据库名
    'database'        => 'tp5shop',
    // 用户名
    'username'        => 'root',
    // 密码
    'password'        => '123456',
    // 端口
    'hostport'        => '3306',
⑤测试访问
遇到问题:项目需要在runtime文件夹中写入缓存信息(需要写权限)
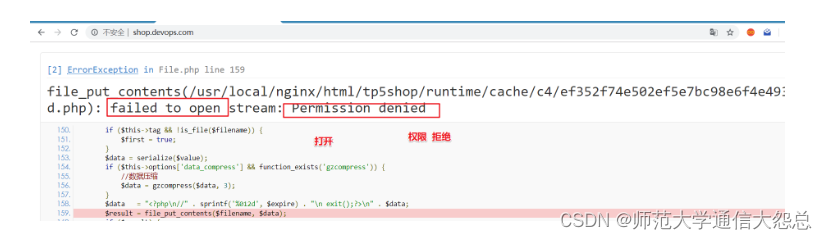
分析:
①nginx 读取静态文件 用户www
②php-fpm 读取、写入、解析php文件 用户www
应该把runtime目录的所属关系赋予www
shell > cd /usr/local/nginx/html/tp5shop
shell > chown -R www:www ./runtime
##3、默认官方模块
###3.1、Gzip压缩
压缩文件,使文件变小,传输更快了。目前市场上大部分浏览器是支持GZIP的。IE6以下支持不好,会出现乱码情况。
官方文档:Module ngx_http_gzip_module
示例语法:
#配置到http段里,使整个http服务都启用gzip压缩
#开启gzip压缩
gzip on;
#http协议版本
gzip_http_version 1.0;
#IE浏览器不开启gzip  IE6以下会乱码
gzip_disable 'MSIE [1-6].';
#开启gzip 文件的格式
gzip_types image/jpeg image/jpg image/png text/plain text/css;
验证文件是否开启gzip

3.2、客户端缓存
B/S架构里 browser浏览器 就是客户端
告知浏览器获取的信息是在某个区间时间段是有效的。
官方文档:Module ngx_http_headers_module
示例语法:
location ~ \.(js|css)$ {
#单位参数 d day 天|H hour 小时 M 分
expires 1h;
}
#在整个http中生效 配置到http段里
expires 1h
###3.3、基于IP的访问控制
基于ngx_http_access_module模块,默认可使用
官方文档:Module ngx_http_access_module
语法:
==deny ip== 禁止ip访问
allow ip 允许访问
3.4、基于用户的访问控制
基于ngx_http_auth_basic_module模块,默认可用
官方文档:Module ngx_http_auth_basic_module
语法:
auth_basic "提示信息"
auth_basic_user_file /etc/nginx/htpasswd;
配置实现: ①创建用户名和密码存储文件
shell > cd /usr/local/nginx/conf
#htpasswd 如果不存在就通过  yum -y install httpd-tools安装
#生成用户名称和密码
shell > htpasswd -c ./passwd.db lnmp
#输入密码并再次确认密码
#查看passwd.db文件是否创建成功
②在配置文件中进行配置
shell > vim /usr/local/nginx/conf/nginx.conf
配置文件内容
#根据业务需求,配置到server段里
#登录框显示的标题提示
auth_basic "test login"
#加载用户名称和密码校验文件
auth_basic_user_file  /usr/local/nginx/conf/passwd.db;
③测试查看
3.5、目录列表显示
显示文件列表,或者需要做一个下载列表
官方文档:Module ngx_http_autoindex_module
示例语法:
#开启目录列表显示
autoindex on;
#index  当index默认找不到时,才会使用目录列表
index index;
注意:如果目录中没有配置的默认index访问项,而autoindex又没有开启,不能够查看访问目录列表,就会报出403错误。
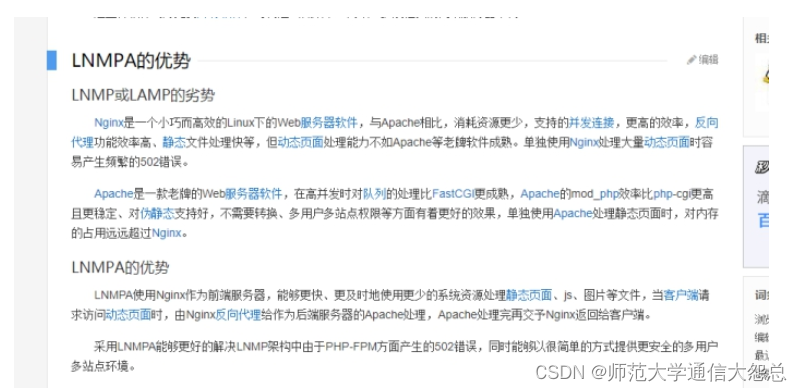
3.6、反向代理
正向代理

特点:知道自己使用了代理,需要填写代理服务器的IP等相关连接信息
==常见于代理客户端上网等操作。==
反向代理

特点:用户是无感知的,不知道使用了代理服务器。反向代理服务器是和真实访问的服务器是在一起的,有关联的。
作用:可以根据实际业务需求,分发代理页面到不同的解释器
可以隐藏真实服务器的路径
==常见于代理后端服务器==
官方文档:Module ngx_http_proxy_module
①配置反向代理
LNMPA
==验证例子:==
①安装httpd 需改端口8080
#安装apache
shell > yum install -y httpd
#配置apache的配置文件
shell > vim /etc/httpd/conf/httpd.conf
修改配置项
listen 8080
②配置nginx的server并进行转发
location / {
    proxy_pass http://127.0.0.1:8080;
}
三、日志管理
日志类型:
①access.log 访问日志 查看统计用户的访问信息 流量
②error.log 错误日志 错误信息 重写信息
1、访问日志
官方文档:Module ngx_http_log_module
①查看access.log
shell > cd /usr/local/nginx/logs
shell > cat access.log
access.log日志文件内容示例
127.0.0.1 - - [06/Oct/2017:11:46:16 +0800] "GET /phpinfo.php HTTP/1.1" 200 25206 "-" "Mozilla/5.0 (Windows NT 10.0; Win64; x64) AppleWebKit/537.36 (KHTML, like Gecko) Chrome/62.0.3202.9 Safari/537.36"
②查看配置解析参数说明
shell > vim nginx.conf
查看访问日志相关参数
#定义日志格式  格式命名    详细格式参数
#log_format  main  '$remote_addr - $remote_user [$time_local] "$request" '
    #                  '$status $body_bytes_sent "$http_referer" '
    #                  '"$http_user_agent" "$http_x_forwarded_for"';
#访问日志的存储路径配置               调用的日志格式
    #access_log  logs/access.log  main;
| 参数 | 意义 |
|---|---|
| $remote_addr | 客户端的ip地址(代理服务器,显示代理服务ip) |
| $remote_user | 用于记录远程客户端的用户名称(一般为“-”) |
| $time_local | 用于记录访问时间和时区 |
| $request | 用于记录请求的url以及请求方法 |
| $status | 响应状态码,例如:200成功、404页面找不到等。 |
| $body_bytes_sent | 给客户端发送的文件主体内容字节数 |
| $http_user_agent | 用户所使用的代理(一般为浏览器) |
| $http_x_forwarded_for | 可以记录客户端IP,通过代理服务器来记录客户端的ip地址 |
| $http_referer | 可以记录用户是从哪个链接访问过来的 |
访问日志,可以统计分析用户的流量的相关情况。客情分析
2、错误日志
记录一些启动和运行过程中的错误信息
# 定义开启错误日志    日志位置    日志级别
#error_log  logs/error.log;
#error_log  logs/error.log  notice;
#error_log  logs/error.log  info;
官方文档:Core functionality
shell > cat /usr/local/nginx/logs/error.log
格式示例:
2019/06/06 11:42:43 [error] 25356#0: *38 open() "/usr/local/nginx/html/favicon.ico" failed (2: No such file or directory), client: 192.168.17.1, server: localhost, request: "GET /favicon.ico HTTP/1.1", host: "192.168.17.220", referrer: "http://192.168.17.220/index.php"
3、基于域名日志分割
①开启日志的定义规则
#定义日志格式  定义http里
log_format  mylogs  '$remote_addr - $remote_user [$time_local] "$request" '
                      '$status $body_bytes_sent "$http_referer" '
                      '"$http_user_agent" "$http_x_forwarded_for"';
②重启nginx测试查看
#访问日志的存储路径配置        调用的日志格式
#在server段里面配置  也就是在当前server里的访问日志,会被写入定义的这里
access_log  logs/shop.lnmp.com_access.log  mylogs;
日志切割的方式有很多种:
①基于域名分开存储
②日志轮转 时间段
③自定义脚本 定时检测大小 根据文件大小进行切割