目录
一.label管理
1.label的作用和特点
2.标签的查询和筛选
(1)等式型
(2)集合型
3.命令行打标签用法示例
(1)为资源对象添加多个标签
(2)更该原有标签
(3)删除标签
4.配置文件打标签用法示例
二.deployment控制器
1.pod控制器简介
2.deployment控制器
三.service管理
1.kubernetes内部可访问的service
2.kubernetes外部可访问的service
3.删除service
四.ipvs管理(做一次就行)
1.加载内核模块(通常在部署kubernetes环境时就已经做了)
2.edit修改kube-proxy配置
3.删除kube-proxy空间下的所有pod以重新添加生效
一.label管理
1.label的作用和特点
(1)label用来在资源上添加标识,来对资源进行区分选择
(2)label一般会以类似于键值对的形式打到资源上,如node、pod、service等对象,一个资源对象可以有多个标签,多个资源对象也可以打同一个标签
2.标签的查询和筛选
使用-l参数,需要指定资源类型(但不需要指定该资源的对象具体名称)、筛选条件,命名空间
(1)等式型
[root@k8s-master ~]# kubectl get pod -l port=80 --show-labels -n myns #筛选并输出myns下标签为port=80的pod
NAME READY STATUS RESTARTS AGE LABELS
nginx 1/1 Running 0 8m10s port=80,run=nginx,user=nginx
[root@k8s-master ~]# kubectl get pod -l port!=80 --show-labels -n myns #筛选并输出myns下标签不为port=80的pod
No resources found in myns namespace.(2)集合型
[root@k8s-master ~]# kubectl get pod -l 'user in (nginx,sulibao)' --show-labels -n myns
#筛选并输出myns下标签的user字段的值是nginx或sulibao的pod
NAME    READY   STATUS    RESTARTS   AGE   LABELS
nginx   1/1     Running   0          32m   port=80,run=nginx,user=nginx
[root@k8s-master ~]# kubectl get pod -l 'user notin (sulibao)' --show-labels -n myns
#筛选并输出myns下标签的user字段的值不是sulibao的pod
NAME    READY   STATUS    RESTARTS   AGE   LABELS
nginx   1/1     Running   0          38m   port=80,run=nginx,user=nginx
3.命令行打标签用法示例
(1)为资源对象添加多个标签
[root@k8s-master ~]# kubectl get pod nginx -n myns --show-labels
NAME READY STATUS RESTARTS AGE LABELS
nginx 1/1 Running 0 85s run=nginx
[root@k8s-master ~]# kubectl label pod nginx port=80 -n myns
pod/nginx labeled
[root@k8s-master ~]# kubectl label pod nginx user=nginx -n myns
pod/nginx labeled
[root@k8s-master ~]# kubectl get pod nginx -n myns --show-labels
NAME READY STATUS RESTARTS AGE LABELS
nginx 1/1 Running 0 2m10s port=80,run=nginx,user=nginx(2)更该原有标签
[root@k8s-master ~]# kubectl label pod nginx user=sulibao -n myns --overwrite
pod/nginx labeled
[root@k8s-master ~]# kubectl get pod -n myns --show-labels
NAME    READY   STATUS    RESTARTS   AGE   LABELS
nginx   1/1     Running   0          49m   port=80,run=nginx,user=sulibao
(3)删除标签
指定以“标签名-”格式来删除
[root@k8s-master ~]# kubectl label pod nginx port- -n myns
pod/nginx unlabeled
[root@k8s-master ~]# kubectl get pod -n myns --show-labels
NAME    READY   STATUS    RESTARTS   AGE   LABELS
nginx   1/1     Running   0          51m   run=nginx,user=sulibao
4.配置文件打标签用法示例
(1)定义创建namespace和pod和label文件
[root@k8s-master ~]# cat nginxpod.yaml
apiVersion: v1
kind: Namespace
metadata:
name: myns
---
apiVersion: v1
kind: Pod
metadata:
name: nginxpod
namespace: myns
labels: #指定标签选项
version: "2.0" #标签内容
spec:
containers:
- name: nginx-containers
image: nginx(2)创建并验证
[root@k8s-master ~]# kubectl create -f nginxpod.yaml
namespace/myns created
pod/nginxpod created
[root@k8s-master ~]# kubectl get pods -n myns --show-labels
NAME READY STATUS RESTARTS AGE LABELS
nginxpod 1/1 Running 0 19s version=2.0二.deployment控制器
1.pod控制器简介
以往文章提到,kubernetes里pod是最小的控制单元,大部分情况下是通过pod控制器来操作pod的,pod控制器主要是在当pod故障时,进行重启或重新添加pod资源
2.deployment控制器
(1)命令行常用参数
| 参数 | 功能 |
|---|---|
| --image | 指定镜像 |
| --port | 指定端口 |
| --namespace | 指定命名空间 |
| --replicas | 指定pod的期望数量,指定后再某个pod出现故障退出控制后会自动添加pod数量至该参数指定的数量,在1.18版本后--replicas用于kubectl create命令而不存在于kubectl run的使用范围 |
(2)deployment控制器管理pod资源示例
#命令行管理
[root@k8s-master ~]# kubectl create deployment nginx --image=nginx --port=80 --replicas=3 -n myns
deployment.apps/nginx created
[root@k8s-master ~]# kubectl get pods -n myns
NAME READY STATUS RESTARTS AGE
nginx-7c5ddbdf54-h65ch 1/1 Running 0 15s
nginx-7c5ddbdf54-ktmj9 1/1 Running 0 15s
nginx-7c5ddbdf54-vpm8n 1/1 Running 0 15s
[root@k8s-master ~]# kubectl get deploy -n myns #查看deployment信息
NAME READY UP-TO-DATE AVAILABLE AGE
nginx 3/3 3 3 29s
#UP-TO-DATE表示成功成绩的副本数,AVAILABLE表示可用的副本数
[root@k8s-master ~]# kubectl delete pod nginx-7c5ddbdf54-h65ch -n myns #删除一个pod资源
pod "nginx-7c5ddbdf54-h65ch" deleted
[root@k8s-master ~]# kubectl get pods -n myns
#由于我们指定了replicas=3,所以即使我们删除了一个pod,也会自动新增一个新的pod以达到我们的指定的期望pod数量
NAME READY STATUS RESTARTS AGE
nginx-7c5ddbdf54-9zf2k 1/1 Running 0 8s
nginx-7c5ddbdf54-ktmj9 1/1 Running 0 104s
nginx-7c5ddbdf54-vpm8n 1/1 Running 0 104s
[root@k8s-master ~]# kubectl get pods -n myns -o wide
#新增的pod的name和IP都会发生改变,这个IP也是虚拟IP,外部无法直接访问
NAME READY STATUS RESTARTS AGE IP NODE NOMINATED NODE READINESS GATES
nginx-7c5ddbdf54-c9dtt 1/1 Running 0 2m2s 10.244.169.133 k8s-node2 <none> <none>
nginx-7c5ddbdf54-q2rtf 1/1 Running 0 2m2s 10.244.169.132 k8s-node2 <none> <none>
nginx-7c5ddbdf54-rfsvf 1/1 Running 0 2m2s 10.244.36.68 k8s-node1 <none> <none>
[root@k8s-master ~]# kubectl delete deploy nginx -n myns #删除整个资源
deployment.apps "nginx" deleted
#文件形式
[root@k8s-master ~]# kubectl create deployment nginx --image=nginx --port=80 --replicas=3 -n myns -o yaml
apiVersion: apps/v1
kind: Deployment
metadata:
creationTimestamp: "2023-10-30T11:27:49Z"
generation: 1
labels:
app: nginx
name: nginx
namespace: myns
resourceVersion: "4986"
uid: 1872c4fe-d168-4fb1-9721-f6edff5beab6
spec:
progressDeadlineSeconds: 600
replicas: 3
revisionHistoryLimit: 10
selector:
matchLabels:
app: nginx
strategy:
rollingUpdate:
maxSurge: 25%
maxUnavailable: 25%
type: RollingUpdate
template:
metadata:
creationTimestamp: null
labels:
app: nginx
spec:
containers:
- image: nginx
imagePullPolicy: Always
name: nginx
ports:
- containerPort: 80
protocol: TCP
resources: {}
terminationMessagePath: /dev/termination-log
terminationMessagePolicy: File
dnsPolicy: ClusterFirst
restartPolicy: Always
schedulerName: default-scheduler
securityContext: {}
terminationGracePeriodSeconds: 30
status: {}
[root@k8s-master ~]# kubectl get pods -n myns
NAME READY STATUS RESTARTS AGE
nginx-7c5ddbdf54-c9dtt 1/1 Running 0 15s
nginx-7c5ddbdf54-q2rtf 1/1 Running 0 15s
nginx-7c5ddbdf54-rfsvf 1/1 Running 0 15s三.service管理
此处主要简单介绍解决访问pod上nginx服务的问题,service也可以理解为pod们被访问的接口,也可以通过service实现负载均衡
1.kubernetes内部可访问的service
(1)简单示例
[root@k8s-master ~]# kubectl expose deployment nginx --name=service-nginx --type=ClusterIP --port=80 --target-port=80 -n myns
#指定暴露nginx,service名称为service-nginx,类型为ClusterIP(只有集群内部能通信的类型),暴露端口,名称空间
service/service-nginx exposed
[root@k8s-master ~]# kubectl get service service-nginx -n myns -o wide
NAME            TYPE        CLUSTER-IP       EXTERNAL-IP   PORT(S)   AGE   SELECTOR
service-nginx   ClusterIP   10.109.112.194   <none>        80/TCP    36s   app=nginx
[root@k8s-master ~]# curl 10.109.112.194    #访问的是clusterip,这个ip在service工作期间通常是不会变的
<!DOCTYPE html>
<html>
<head>
<title>Welcome to nginx!</title>
<style>
html { color-scheme: light dark; }
body { width: 35em; margin: 0 auto;
font-family: Tahoma, Verdana, Arial, sans-serif; }
</style>
</head>
<body>
<h1>Welcome to nginx!</h1>
<p>If you see this page, the nginx web server is successfully installed and
working. Further configuration is required.</p>

<p>For online documentation and support please refer to
<a href="http://nginx.org/">nginx.org</a>.<br/>
Commercial support is available at
<a href="http://nginx.com/">nginx.com</a>.</p>

<p><em>Thank you for using nginx.</em></p>
</body>
</html>
(2)简单负载均衡实现
[root@k8s-master ~]# kubectl get pods -n myns -o wide
NAME                     READY   STATUS    RESTARTS   AGE   IP               NODE        NOMINATED NODE   READINESS GATES
nginx-7c5ddbdf54-c9dtt   1/1     Running   0          22m   10.244.169.133   k8s-node2   <none>           <none>
nginx-7c5ddbdf54-q2rtf   1/1     Running   0          22m   10.244.169.132   k8s-node2   <none>           <none>
nginx-7c5ddbdf54-rfsvf   1/1     Running   0          22m   10.244.36.68     k8s-node1   <none>           <none>

[root@k8s-master ~]# kubectl exec nginx-7c5ddbdf54-c9dtt -it -n myns -- /bin/bash  #对于pod的进一步操作后几篇文章作介绍和演示
root@nginx-7c5ddbdf54-c9dtt:/# echo `hostname` > /usr/share/nginx/html/index.html
root@nginx-7c5ddbdf54-c9dtt:/# exit
exit
[root@k8s-master ~]# kubectl exec nginx-7c5ddbdf54-q2rtf -it -n myns -- /bin/bash
root@nginx-7c5ddbdf54-q2rtf:/# echo `hostname` > /usr/share/nginx/html/index.html
root@nginx-7c5ddbdf54-q2rtf:/# exit
exit
[root@k8s-master ~]# kubectl exec nginx-7c5ddbdf54-rfsvf -it -n myns -- /bin/bash
root@nginx-7c5ddbdf54-rfsvf:/# echo `hostname` > /usr/share/nginx/html/index.html
root@nginx-7c5ddbdf54-rfsvf:/# exit
exit
[root@k8s-master ~]# curl 10.109.112.194
nginx-7c5ddbdf54-c9dtt
[root@k8s-master ~]# curl 10.109.112.194
nginx-7c5ddbdf54-q2rtf
[root@k8s-master ~]# curl 10.109.112.194
nginx-7c5ddbdf54-q2rtf
[root@k8s-master ~]# curl 10.109.112.194
nginx-7c5ddbdf54-q2rtf
[root@k8s-master ~]# curl 10.109.112.194
nginx-7c5ddbdf54-rfsvf
[root@k8s-master ~]# curl 10.109.112.194
nginx-7c5ddbdf54-rfsvf
2.kubernetes外部可访问的service
(1)按照上面的步骤就只需要将type改为NodePort即可
[root@k8s-master ~]# kubectl expose deployment nginx --name=service-nginx1 --type=NodePort --port=80 --target-port=80 -n myns
service/service-nginx1 exposed
[root@k8s-master ~]# kubectl get service service-nginx1 -n myns -o wide
NAME             TYPE       CLUSTER-IP       EXTERNAL-IP   PORT(S)        AGE   SELECTOR
service-nginx1   NodePort   10.110.248.180   <none>        80:30331/TCP   19s   app=nginx
(2)在主机和浏览器都可以访问,同样可以实现负载均衡
注意:是使用主机(虚拟机地址)+service暴露的端口(示例暴露的是30331端口)进行访问
[root@k8s-master ~]# curl 192.168.2.150:30331
nginx-7c5ddbdf54-q2rtf
[root@k8s-master ~]# curl 192.168.2.150:30331
nginx-7c5ddbdf54-c9dtt
[root@k8s-master ~]# curl 192.168.2.150:30331
nginx-7c5ddbdf54-rfsvf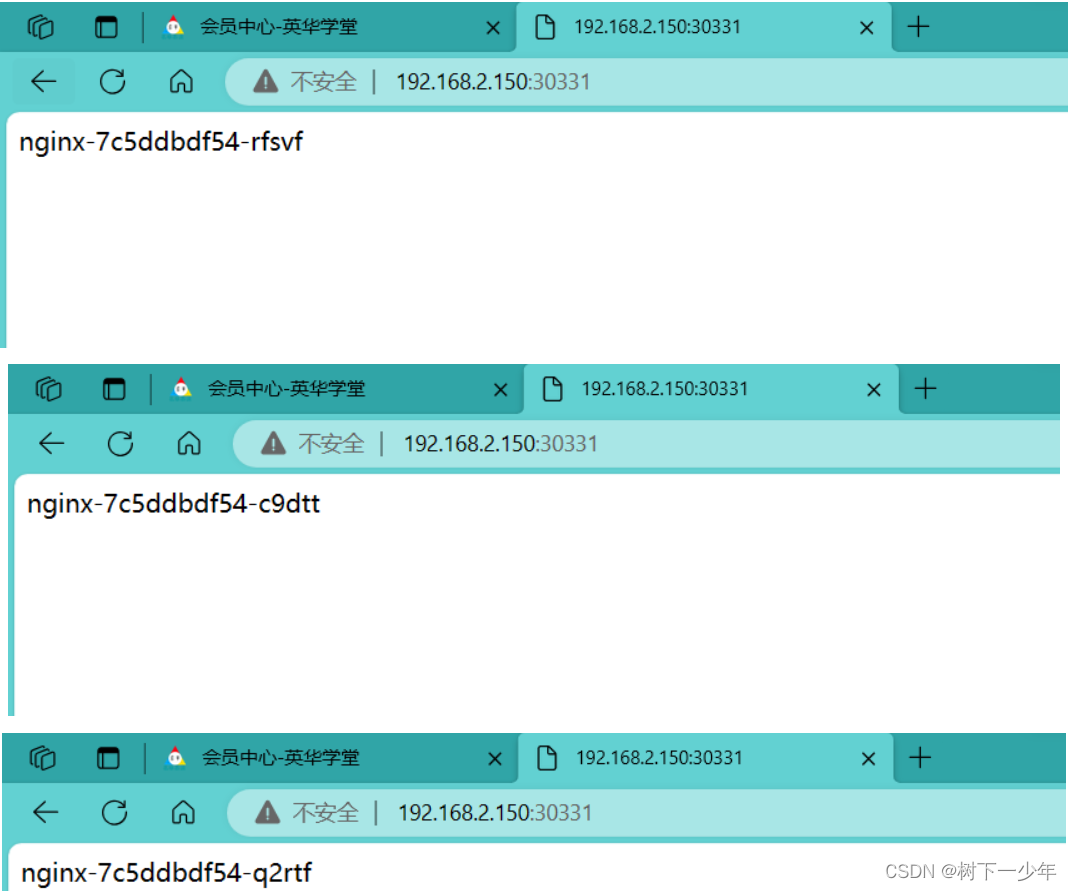
3.删除service
[root@k8s-master ~]# kubectl delete service service-nginx -n myns四.ipvs管理(做一次就行)
使用ipvs去替换iptables以支持更复杂的调度算法、健康检查等,提高管理运行效率
1.加载内核模块(通常在部署kubernetes环境时就已经做了)
[root@k8s-master ~]# lsmod | grep ip_vs
ip_vs_sh               12688  0
ip_vs_wrr              12697  0
ip_vs_rr               12600  0
ip_vs                 145458  6 ip_vs_rr,ip_vs_sh,ip_vs_wrr
nf_conntrack          139264  10 ip_vs,nf_nat,nf_nat_ipv4,nf_nat_ipv6,xt_conntrack,nf_nat_masquerade_ipv4,nf_nat_masquerade_ipv6,nf_conntrack_netlink,nf_conntrack_ipv4,nf_conntrack_ipv6
libcrc32c              12644  4 xfs,ip_vs,nf_nat,nf_conntrack
2.edit修改kube-proxy配置
[root@k8s-master ~]# kubectl edit configmap kube-proxy -n kube-system
configmap/kube-proxy edited
#将mode改为ipvs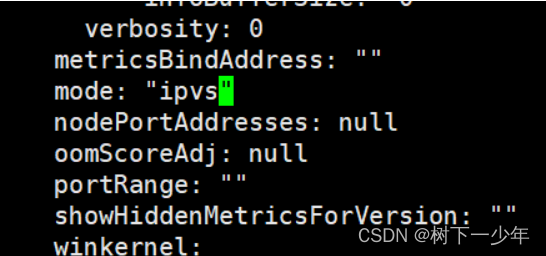
3.删除kube-proxy空间下的所有pod以重新添加生效
(1)删除
[root@k8s-master ~]# kubectl get pods -n kube-system | grep kube-proxy
kube-proxy-tk2m4                           1/1     Running   0          99m
kube-proxy-w4nbw                           1/1     Running   0          98m
kube-proxy-x7z2w                           1/1     Running   0          98m
[root@k8s-master ~]# kubectl delete pod kube-proxy-tk2m4 kube-proxy-w4nbw kube-proxy-x7z2w -n kube-system
pod "kube-proxy-tk2m4" deleted
pod "kube-proxy-w4nbw" deleted
pod "kube-proxy-x7z2w" deleted
(2)验证
#名称已发生变化,新pod已添加成功
[root@k8s-master ~]# kubectl get pods -n kube-system | grep kube-proxy
kube-proxy-6xlff                           1/1     Running   0          16s
kube-proxy-k5fm7                           1/1     Running   0          16s
kube-proxy-sqzxf                           1/1     Running   0          16s
#查看日志时已经使用ipvs进行代理
[root@k8s-master ~]# kubectl logs kube-proxy-6xlff -n kube-system | grep ipvsI1030 12:24:48.489664       1 server_others.go:218] "Using ipvs Proxier"
#已生效
[root@k8s-master ~]# ipvsadm -Ln
IP Virtual Server version 1.2.1 (size=4096)
Prot LocalAddress:Port Scheduler Flags
  -> RemoteAddress:Port           Forward Weight ActiveConn InActConn
TCP  192.168.2.150:30331 rr
  -> 10.244.36.68:80              Masq    1      0          0
  -> 10.244.169.132:80            Masq    1      0          0
  -> 10.244.169.133:80            Masq    1      0          0
TCP  10.96.0.1:443 rr
  -> 192.168.2.150:6443           Masq    1      1          0
TCP  10.96.0.10:53 rr
  -> 10.244.235.193:53            Masq    1      0          0
  -> 10.244.235.195:53            Masq    1      0          0
TCP  10.96.0.10:9153 rr
  -> 10.244.235.193:9153          Masq    1      0          0
  -> 10.244.235.195:9153          Masq    1      0          0
TCP  10.109.112.194:80 rr
  -> 10.244.36.68:80              Masq    1      0          0
  -> 10.244.169.132:80            Masq    1      0          0
  -> 10.244.169.133:80            Masq    1      0          0
TCP  10.110.248.180:80 rr
  -> 10.244.36.68:80              Masq    1      0          0
  -> 10.244.169.132:80            Masq    1      0          0
  -> 10.244.169.133:80            Masq    1      0          0
TCP  10.244.235.192:30331 rr
  -> 10.244.36.68:80              Masq    1      0          0
  -> 10.244.169.132:80            Masq    1      0          0
  -> 10.244.169.133:80            Masq    1      0          0
UDP  10.96.0.10:53 rr
  -> 10.244.235.193:53            Masq    1      0          0
  -> 10.244.235.195:53            Masq    1      0          0