前言
前面几篇我们简单的复习了一下自定义 View 的测量与绘制,并且回顾了常见的一些事件的处理方式。
那么如果我们想自定义 ViewGroup 的话,它和自定义View又有什么区别呢?其实我们把 ViewGroup 当做 View 来用的话也不是不可以。但是既然我们用到了容器 ViewGroup 当时是想用它的一些特殊的特性了。
比如 ViewGroup 的测量,ViewGroup的布局,ViewGroup的绘制。
- ViewGroup的测量:与 View 的测量不同,ViewGroup 的测量会遍历子 View ,获取子 View 的大小,从而决定自己的大小。当然我们也可以通过指定的模式来指定自身的大小。
- ViewGroup的布局:这个是 ViewGroup 核心与常用的功能。找到对于的子View 布局到指定的位置。
- ViewGroup的绘制:一般我们不会重写这个方法,因为一般来说它本身不需要绘制,并且当我们没有设置ViewGroup的背景的时候,onDraw()方法都不会被调用,一般来说 ViewGroup 只是会使用 dispatchDraw()方法来绘制其子View,其过程同样是通过遍历所有子View,并调用子View的绘制方法来完成绘制工作。
下面我们一起复习一下ViewGroup的测量布局方式。我们以入门级的 FlowLayout 为例,看看流式布局是如何测量与布局的。
话不多说,Let’s go
一、基本的测量与布局
我们先回顾一下ViewGroup的
一个经典的ViewGroup测量是怎样实现?一般来说,最简单的测量如下:
    @Override
    protected void onMeasure(int widthMeasureSpec, int heightMeasureSpec) {
        super.onMeasure(widthMeasureSpec, heightMeasureSpec);
        for(int i = 0; i < getChildCount(); i++){
          View childView = getChildAt(i);
          measureChild(childView,widthMeasureSpec,heightMeasureSpec);
        }

    }
或者我们直接使用封装之后的默认方法
measureChildren(widthMeasureSpec,heightMeasureSpec);
其内部也是遍历子View来实现的。当然如果有自定义的一些宽高测量规则,就不能使用这个方法,就需要自己遍历找到View自定义实现了。
需要注意的是,这里我们测量子布局传递的 widthMeasureSpec 和 heightMeasureSpec 是父布局的测量模式。
当父布局设置为固定宽度的时候,子View是不能超过这个宽度的,比如父控件设置为match_parent,自定义View无论是match_parent 还是 wrap_content 都是一样的,充满整个父控件。
相当于父布局调用子控件的onMeasure方法的时候告诉子控件,我就这么大,你看着办,不能超过它。
而父布局传递的是自适应AT_MOST模式,那么就是由子View来决定父布局的宽高。
相当于父布局调用子控件的onMeasure方法的时候问子控件,我也不知道我多大,你需要多大的位置?我又需要多大的地方才能容纳你?
其实也很好理解。那么一个经典的ViewGroup布局又是怎样实现?重写 onLayout 并且遍历拿到每一个View,进行Layout操作。
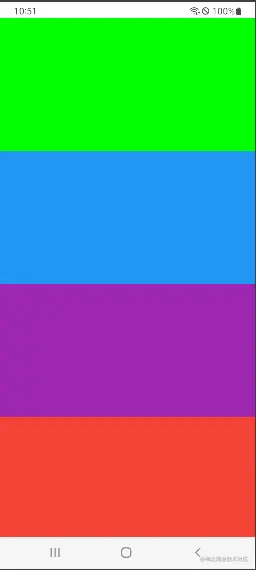
比如如下的代码,我们每一个View的高度设置为固定高度,并且垂直排列,类似一个ListView 的布局:
    @Override
    protected void onLayout(boolean changed, int l, int t, int r, int b) {

        int childCount = getChildCount();
        //设置子View的高度
        MarginLayoutParams params = (MarginLayoutParams) getLayoutParams();
        params.height = mFixedHeight * childCount;
        setLayoutParams(params);

        for (int i = 0; i < childCount; i++) {
            View child = getChildAt(i);

            if (child.getVisibility() != View.GONE) {
                child.layout(l, i * mFixedHeight, r, (i + 1) * mFixedHeight);
            }

        }

    }
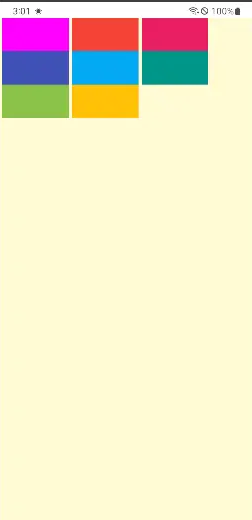
注意我们 onLayout() 的参数
展示的效果就是这样:
二、流式的布局的layout
首先我们先不管测量,我们先指定ViewGroup的宽高为固定宽高,指定为match_parent。我们先做布局的操作:
我们自定义 ViewGroup 中重写测量与布局的方法:
    @Override
    protected void onMeasure(int widthMeasureSpec, int heightMeasureSpec) {

        measureChildren(widthMeasureSpec,heightMeasureSpec);

        super.onMeasure(widthMeasureSpec, heightMeasureSpec);
    }

    /**
     * @param changed 当前ViewGroup的尺寸或者位置是否发生了改变
     * @param l,t,r,b 当前ViewGroup相对于父控件的坐标位置,
     */
    @Override
    protected void onLayout(boolean changed, int l, int t, int r, int b) {

        int mViewGroupWidth = getMeasuredWidth(); //当前ViewGroup的总宽度

        int layoutChildViewCurX = l; //当前绘制View的X坐标
        int layoutChildViewCurY = t; //当前绘制View的Y坐标

        int childCount = getChildCount(); //子控件的数量

        //遍历所有子控件,并在其位置上绘制子控件
        for (int i = 0; i < childCount; i++) {
            View childView = getChildAt(i);
            //子控件的宽和高
            int width = childView.getMeasuredWidth();
            int height = childView.getMeasuredHeight();

            //如果剩余控件不够,则移到下一行开始位置
            if (layoutChildViewCurX + width > mViewGroupWidth) {
                layoutChildViewCurX = l;
                //如果换行,则需要修改当前绘制的高度位置
                layoutChildViewCurY += height;
            }

            //执行childView的布局与绘制(右和下的位置加上自身的宽高即可)
            childView.layout(layoutChildViewCurX, layoutChildViewCurY, layoutChildViewCurX + width, layoutChildViewCurY + height);

            //布局完成之后,下一次绘制的X坐标需要加上宽度
            layoutChildViewCurX += width;
        }

    }
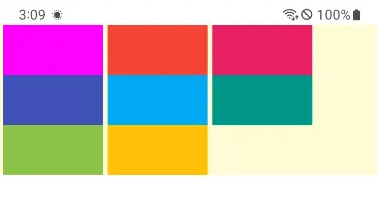
最后我们就能得到对应的换行效果,如下:
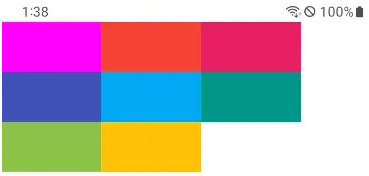
通过上面我们的基础学习,我们应该能理解这样的布局方式,跟上面的基础布局方式相比,就是多了一个 layoutChildViewCurX 和 layoutChildViewCurY 。关于其它的逻辑这里已经注释的非常清楚了。
但是这样的效果好丑,我们加上间距 margin 试试?
并没有效果,其实是内部 View 的 LayoutParams 就不支持 margin,我们需要定义一个内部类继承 ViewGroup.MarginLayoutParams,并重写generateLayoutParams() 方法。
    //要使子控件的margin属性有效必须继承此LayoutParams,内部还可以定制一些别的属性
    public static class LayoutParams extends MarginLayoutParams {

        public LayoutParams(Context c, AttributeSet attrs) {
            super(c, attrs);
        }

        public LayoutParams(int width, int height) {
            super(width, height);
        }

        public LayoutParams(ViewGroup.LayoutParams layoutParams) {
            super(layoutParams);
        }
    }

    @Override
    public ViewGroup.LayoutParams generateLayoutParams(AttributeSet attrs) {
        return new ViewGroup2.LayoutParams(getContext(), attrs);
    }

    @Override
    protected LayoutParams generateLayoutParams(ViewGroup.LayoutParams p) {
        return new LayoutParams(p);
    }
然后修改一下代码,在 layout 子布局的时候我们手动的把 margin 加上。
    @Override
    protected void onLayout(boolean changed, int l, int t, int r, int b) {

        int mViewGroupWidth = getMeasuredWidth(); //当前ViewGroup的总宽度

        int layoutChildViewCurX = l; //当前绘制View的X坐标
        int layoutChildViewCurY = t; //当前绘制View的Y坐标

        int childCount = getChildCount(); //子控件的数量

        //遍历所有子控件,并在其位置上绘制子控件
        for (int i = 0; i < childCount; i++) {
            View childView = getChildAt(i);
            //子控件的宽和高
            int width = childView.getMeasuredWidth();
            int height = childView.getMeasuredHeight();
            final LayoutParams lp = (LayoutParams) childView.getLayoutParams();

            //如果剩余控件不够,则移到下一行开始位置
            if (layoutChildViewCurX + width + lp.leftMargin + lp.rightMargin > mViewGroupWidth) {
                layoutChildViewCurX = l;
                //如果换行,则需要修改当前绘制的高度位置
                layoutChildViewCurY += height + lp.topMargin + lp.bottomMargin;
            }

            //执行childView的布局与绘制(右和下的位置加上自身的宽高即可)
            childView.layout(
                    layoutChildViewCurX + lp.leftMargin,
                    layoutChildViewCurY + lp.topMargin,
                    layoutChildViewCurX + width + lp.leftMargin + lp.rightMargin,
                    layoutChildViewCurY + height + lp.topMargin + lp.bottomMargin);

            //布局完成之后,下一次绘制的X坐标需要加上宽度
            layoutChildViewCurX += width + lp.leftMargin + lp.rightMargin;
        }

    }
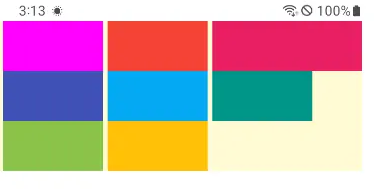
此时的效果就能生效了:

三、流式的布局的Measure
前面的设置我们都是使用的宽高 match_parent。那我们修改 ViewGroup 的高度为 wrap_content ,能实现高度自适应吗?
这…并不是我们想要的效果。并没有自适应高度。因为我们没有写测量的逻辑。
我们想一下,如果我们的宽度是固定的,想要高度自适应,那么我们就需要测量每一个子View的高度,计算出对应的高度,当换行之后我们再加上行的高度。
 @Override
    protected void onMeasure(int widthMeasureSpec, int heightMeasureSpec) {

        final int sizeWidth = MeasureSpec.getSize(widthMeasureSpec) - this.getPaddingRight() - this.getPaddingLeft();
        final int modeWidth = MeasureSpec.getMode(widthMeasureSpec);

        final int sizeHeight = MeasureSpec.getSize(heightMeasureSpec) - this.getPaddingTop() - this.getPaddingBottom();
        final int modeHeight = MeasureSpec.getMode(heightMeasureSpec);

        if (modeWidth == MeasureSpec.EXACTLY && modeHeight == MeasureSpec.EXACTLY) {

            measureChildren(widthMeasureSpec, heightMeasureSpec);

            super.onMeasure(widthMeasureSpec, heightMeasureSpec);

        } else if (modeWidth == MeasureSpec.EXACTLY && modeHeight == MeasureSpec.AT_MOST) {

            int layoutChildViewCurX = this.getPaddingLeft();

            int totalControlHeight = 0;

            for (int i = 0; i < getChildCount(); i++) {
                final View childView = this.getChildAt(i);
                if (childView.getVisibility() == GONE) {
                    continue;
                }

                final LayoutParams lp = (LayoutParams) childView.getLayoutParams();
                childView.measure(
                        getChildMeasureSpec(widthMeasureSpec, this.getPaddingLeft() + this.getPaddingRight(), lp.width),
                        getChildMeasureSpec(heightMeasureSpec, this.getPaddingTop() + this.getPaddingBottom(), lp.height)
                );

                int width = childView.getMeasuredWidth();
                int height = childView.getMeasuredHeight();

                if (totalControlHeight == 0) {
                    totalControlHeight = height + lp.topMargin + lp.bottomMargin;
                }

                //如果剩余控件不够,则移到下一行开始位置
                if (layoutChildViewCurX + width + lp.leftMargin + lp.rightMargin > sizeWidth) {
                    layoutChildViewCurX = this.getPaddingLeft();
                    totalControlHeight += height + lp.topMargin + lp.bottomMargin;
                }
                layoutChildViewCurX += width + lp.leftMargin + lp.rightMargin;

            }

            //最后确定整个布局的高度和宽度
            int cachedTotalWith = resolveSize(sizeWidth, widthMeasureSpec);
            int cachedTotalHeight = resolveSize(totalControlHeight, heightMeasureSpec);

            this.setMeasuredDimension(cachedTotalWith, cachedTotalHeight);

        }
宽度固定和高度自适应的情况下,我们是这么处理的。计算出子View的总高度,然后设置 setMeasuredDimension 为ViewGroup的测量宽度和子View的总高度。即为最终 ViewGroup 的宽高。
这样我们就能实现高度的自适应了。那么宽度能不能自适应呢?
当然可以,我们只需要记录每一行的宽度,然后最终 setMeasuredDimension 的时候传入所有行中的最大宽度,就是 ViewGroup 的最终宽度,而高度的计算是和上面的方式一样的。
    @Override
    protected void onMeasure(int widthMeasureSpec, int heightMeasureSpec) {

        ...

       else if (modeWidth == MeasureSpec.AT_MOST && modeHeight == MeasureSpec.AT_MOST) {

            //如果宽高都是Wrap-Content
            int layoutChildViewCurX = this.getPaddingLeft();
            //总宽度和总高度
            int totalControlWidth = 0;
            int totalControlHeight = 0;
            //由于宽度是非固定的,所以用一个List接收每一行的最大宽度
            List<Integer> lineLenghts = new ArrayList<>();

            for (int i = 0; i < getChildCount(); i++) {
                final View childView = this.getChildAt(i);
                if (childView.getVisibility() == GONE) {
                    continue;
                }

                final LayoutParams lp = (LayoutParams) childView.getLayoutParams();
                childView.measure(
                        getChildMeasureSpec(widthMeasureSpec, this.getPaddingLeft() + this.getPaddingRight(), lp.width),
                        getChildMeasureSpec(heightMeasureSpec, this.getPaddingTop() + this.getPaddingBottom(), lp.height)
                );

                int width = childView.getMeasuredWidth();
                int height = childView.getMeasuredHeight();

                if (totalControlHeight == 0) {
                    totalControlHeight = height + lp.topMargin + lp.bottomMargin;
                }

                //如果剩余控件不够,则移到下一行开始位置
                if (layoutChildViewCurX + width + lp.leftMargin + lp.rightMargin > sizeWidth) {
                    lineLenghts.add(layoutChildViewCurX);
                    layoutChildViewCurX = this.getPaddingLeft();
                    totalControlHeight += height + lp.topMargin + lp.bottomMargin;
                }
                layoutChildViewCurX += width + lp.leftMargin + lp.rightMargin;

            }

            //计算每一行的宽度,选出最大值
            YYLogUtils.w("每一行的宽度 :" + lineLenghts.toString());
            totalControlWidth = Collections.max(lineLenghts);
            YYLogUtils.w("选出最大宽度 :" + totalControlWidth);

            //最后确定整个布局的高度和宽度
            int cachedTotalWith = resolveSize(totalControlWidth, widthMeasureSpec);
            int cachedTotalHeight = resolveSize(totalControlHeight, heightMeasureSpec);

            this.setMeasuredDimension(cachedTotalWith, cachedTotalHeight);

        }

    }
为了效果,我们把第一行的最后一个View宽度多一点,方便查看效果。
这样就可以得到ViewGroup自适应的宽度和高度了。并不复杂对不对!
后记
这样是不是就能实现一个简单的流式布局了呢?当然这些只是为方便学习和理解,真正的实战中并不推荐直接这样使用,因为内部还有一些兼容的逻辑没处理,一些逻辑没有封装,属性没有抽取。甚至连每一个View的高度,和每一行的最大高度也没有处理,其实这样健壮性并不好。
Android 知识点归整
Android 性能调优系列:https://0a.fit/dNHYY
Android 车载学习指南:https://0a.fit/jdVoy
Android Framework核心知识点笔记:https://0a.fit/acnLL
Android 音视频学习笔记:https://0a.fit/BzPVh
Jetpack全家桶(含Compose):https://0a.fit/GQJSl
Kotlin 入门到精进:https://0a.fit/kdfWR
Flutter 基础到进阶实战:https://0a.fit/xvcHV
Android 八大知识体系:https://0a.fit/mieWJ
Android 中高级面试题锦:https://0a.fit/YXwVq
后续如有新知识点,将会持续更新,尽请期待……