定义
和loader的区别
- loader:文件加载器,能够加载资源,并对这些文件进行一些处理,诸如编译、压缩等,最终一起打包到指定的文件中。
- plugin:赋予了webpack各种灵活的功能,例如打包优化、资源管理、环境变量注入等,目的是解决loader无法实现的其它事。

loader运行在打包文件之前,plugin在整个编译周期都起作用
在webpack运行的生命周期中会广播出许多事件,plugin可以监听这些事件,在合适的时机通过webpack提供的api改变输出结果。
对于loader,实际上是一个转换器,将A文件进行编译形成B文件,操作的是文件,比如将A.scss或A.less转化为B.css,单纯的文件转换过程。
特性
本质是一个具有apply方法的js对象
apply方法会被webpack compiler调用,并且在整个编译生命周期都可以访问compiler对象
compiler hook 的 tap方法的第一个参数,应是驼峰式命名的插件名称
const pluginName = 'ConsoleLogOnBuildWebpackPlugin';

class ConsoleLogOnBuildWebpackPlugin {
  apply(compiler) {
    compiler.hooks.run.tap(pluginName, (compilation) => {
      console.log('webpack 构建过程开始!');
    });
  }
}

module.exports = ConsoleLogOnBuildWebpackPlugin;
生命周期:
- entry-option :初始化 option
- run
- compile: 真正开始的编译,在创建 compilation 对象之前
- compilation :生成好了 compilation 对象
- make 从 entry 开始递归分析依赖,准备对每个模块进行 build
- after-compile: 编译 build 过程结束
- emit :在将内存中 assets 内容写到磁盘文件夹之前
- after-emit :在将内存中 assets 内容写到磁盘文件夹之后
- done: 完成所有的编译过程
- failed: 编译失败的时候
常见Plugin
clean-webpack-plugin
构建时,清除dist包
npm install --save-dev clean-webpack-plugin

const { CleanWebpackPlugin } = require('clean-webpack-plugin')
module.exports = {
plugins: [
        new CleanWebpackPlugin()
    ]
}
测试,在dist中添加一个test.txt文件,重新运行打包命令,test.txt消失
html-webpack-plugin
构建时,帮助我们自动创建一个index.html文件,并把打包生成的js 模块引⼊到该 html 中
 npm i html-webpack-plugin -D

 const HtmlWebpackPlugin = require('html-webpack-plugin')
 module.exports = {
plugins: [
        new HtmlWebpackPlugin({
         title: "My App", //修改页面的title
       filename: "app.html", //
       template: "./public/index.html" //指定index文件位置,以我提供的html模板为基准生成index.html文件
        })
    ]
}


<!--./public/index.html-->
<!DOCTYPE html>
<html lang="en">
<head>
    <meta charset="UTF-8">
    <meta name="viewport" content="width=device-width, initial-scale=1.0">
    <meta http-equiv="X-UA-Compatible" content="ie=edge">
    <title><%=htmlWebpackPlugin.options.title%></title>
</head>
<body>
    <h1>html-webpack-plugin</h1>
</body>
</html>
测试,创建public/index.html文件,添加一些内容,打包后在dist中生成index.html文件会包含public/index.html文件中的内容
DefinePlugin
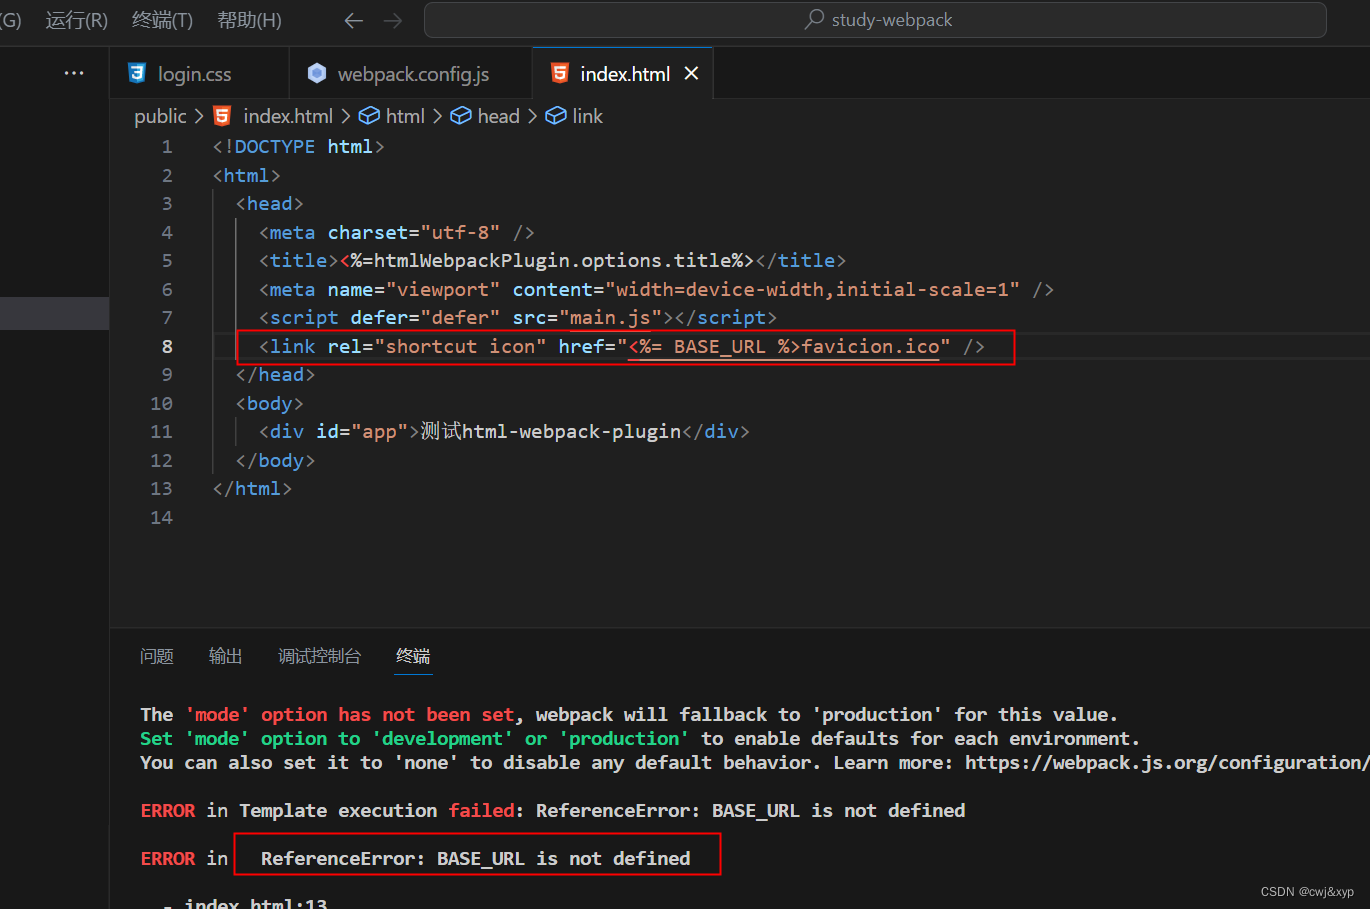
给我们自定义模板中填充数据,定义常亮填充数据
使用内置插件DefinePlugin
new DefinePlugin({
            BASE_URL: '"./"'//希望是同级进行查找,相当于把值原封不动的拿出去 是./ 所以需要再包一层
        })
babel-loader
babel原理
为什么需要babel:开发时写了ts、jsx、es6+等,需要转换为浏览器可以识别的
安装核心:npm i @babel/core (为了能在命令行使用npm i @babel/cli -D)
命令行转化npx babel src --out-dir build,项目中多了build/js/index.js文件,但是没有对箭头函数和const关键字进行转换
继续安装npm i @babel/plugin-transform-arrow-functions -D,命令行npx babel src --out-dir build --plugins=@babel/plugin-transform-arrow-functions,发现箭头函数完成了转换
const title='前端'
const foo = () =>{
    console.log(title)
}
foo()

const title = '前端';
const foo = function () {
  console.log(title);
};
foo();
继续完成const到var的转化,npm i @babel/plugin-transform-block-scoping -D
var title = '前端';
var foo = function () {
  console.log(title);
};
foo();
babel会结合插件对js代码进行转换
我们实际开发提供了一个预设npm i @babel/preset-env -D,防止我们所需要什么转换还需要自己去安装,这是一个集合包含了大部分的babel插件
npx babel src --out-dir build --presets=@babel/preset-env
添加了严格模式
"use strict";

var title = '前端';
var foo = function foo() {
  console.log(title);
};
foo();
babel-loader处理
npm i babel-loader
会根据我们.browserslistrc文件中的配置去进行兼容处理,如果我们同时配置了target,则会根据target为主进行打包
module.exports = {
...
module: {
        rules: [
        ...,
         {
            test: /.\.js$/,
                use: [{
                    loader:'babel-loader',
                    options:{
                        [presets:['@babel/preset-env',{targets:'chrome 91'}]]
                    }
                }]
            }
]
}
}
babel-loader相关的配置文件
babel.config.js(json)目前是多包管理的方式,推荐使用这种方式babelrc.json(js)在babel7之前使用
项目中新建babel.config.js文件
module.exports = {
    presets: ['@babel/preset-env']
}
// webpack.config.js
{
                test: /.\.js$/,
                use: ['babel-loader']
            }