推荐阅读列表:
扩散模型实战(一):基本原理介绍
扩散模型实战(二):扩散模型的发展
扩散模型实战(三):扩散模型的应用
扩散模型实战(四):从零构建扩散模型
扩散模型实战(五):采样过程
扩散模型实战(六):Diffusers DDPM初探
扩散模型实战(七):Diffusers蝴蝶图像生成实战
微调在LLM中并不是新鲜的概念,从头开始训练一个扩散模型需要很长的时间,特别是使用高分辨率图像训练。那么其实我们可以在已经训练好的”去噪“扩散模型基础上使用微调数据集进行二次微调训练。
本文将介绍基于蝴蝶数据集上微调人脸生成的扩散模型:
一、环境准备
1.1 安装相关库
!pip install -qq diffusers datasets accelerate wandb open-clip-torch1.2 登录Huggingface Hub
如果需要开源微调好的模型到Huggingface Hub上,那么需要使用如下代码登录,否则可忽略此步骤:
from huggingface_hub import notebook_loginnotebook_login()
1.3 导入相关库
import numpy as npimport torchimport torch.nn.functional as Fimport torchvisionfrom datasets import load_datasetfrom diffusers import DDIMScheduler, DDPMPipelinefrom matplotlib import pyplot as pltfrom PIL import Imagefrom torchvision import transformsfrom tqdm.auto import tqdmdevice = ("mps"if torch.backends.mps.is_available()else "cuda"if torch.cuda.is_available()else "cpu")
二、导入预训练的扩散模型
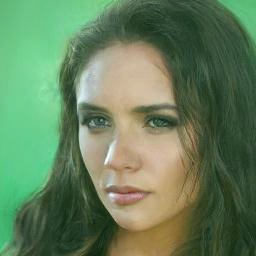
下面我们导入人脸生成的扩散模型,观察一下生成的效果,代码如下:
image_pipe = DDPMPipeline.from_pretrained("google/ddpm-celebahq-256")image_pipe.to(device);
查看生成的图像,代码如下:
images = image_pipe().imagesimages[0]
生成的效果虽然不错,但是速度稍微有点慢,其实有更快的采样器可以加速这一过程,比如下面介绍的DDIM
三、DDIM-更快的采样器
在生成图像的每一步中,模型都会接收一个带有噪声的输入,并且需要预测这个噪声,以此来估计没有噪声的完整图像是什么。这个过程被称为采样过程,在Diffusers库中,采样通过调度器控制的,之前的文章中介绍过DDPMScheduler调度器,本文介绍的DDIMScheduler可以通过更少的迭代周期来产生很好的采样样本(1000多步采样不是必须的)。
# 创建一个新的调度器并设置推理迭代次数scheduler = DDIMScheduler.from_pretrained("google/ddpm-celebahq-256")scheduler.set_timesteps(num_inference_steps=40)
scheduler.timesteps# 输出tensor([975, 950, 925, 900, 875, 850, 825, 800, 775, 750, 725,700, 675, 650, 625, 600, 575, 550, 525, 500, 475, 450, 425,400, 375, 350, 325, 300, 275, 250, 225, 200, 175, 150,125, 100, 75, 50, 25, 0])
下面使用4幅随机噪声图像进行循环采样,并观察每一步的输入与输出的”去噪“图像,代码如下:
# 从随机噪声开始x = torch.randn(4, 3, 256, 256).to(device)# batch size为4,三通道,长、宽均为256像素的一组图像# 循环一整套时间步for i, t in tqdm(enumerate(scheduler.timesteps)):# 准备模型输入:给“带躁”图像加上时间步信息model_input = scheduler.scale_model_input(x, t)# 预测噪声with torch.no_grad():noise_pred = image_pipe.unet(model_input, t)["sample"]# 使用调度器计算更新后的样本应该是什么样子scheduler_output = scheduler.step(noise_pred, t, x)# 更新输入图像x = scheduler_output.prev_sample# 时不时看一下输入图像和预测的“去噪”图像if i % 10 == 0 or i == len(scheduler.timesteps) - 1:fig, axs = plt.subplots(1, 2, figsize=(12, 5))grid = torchvision.utils.make_grid(x, nrow=4).permute(1, 2, 0)axs[0].imshow(grid.cpu().clip(-1, 1) * 0.5 + 0.5)axs[0].set_title(f"Current x (step {i})")pred_x0 = (scheduler_output.pred_original_sample)grid = torchvision.utils.make_grid(pred_x0, nrow=4).permute(1, 2, 0)axs[1].imshow(grid.cpu().clip(-1, 1) * 0.5 + 0.5)axs[1].set_title(f"Predicted denoised images (step {i})")plt.show()


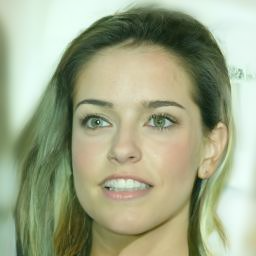
第二步生成图像的采样器是DDPMScheduler,我们可以使用新的DDIMScheduler来代替DDPMScheduler看看image_pipe生成的效果是否有提升,代码如下:
image_pipe.scheduler = schedulerimages = image_pipe(num_inference_steps=40).imagesimages[0]
上述介绍了生成人脸的扩散模型以及生成的效果,也介绍了更快的采样器DDIMScheduler,下面我们使用蝴蝶数据集来微调人脸生成扩散模型:
四、微调人脸生成扩散模型
4.1 加载蝴蝶数据集
dataset_name = "huggan/smithsonian_butterflies_subset"dataset = load_dataset(dataset_name, split="train")image_size = 256batch_size = 4preprocess = transforms.Compose([transforms.Resize((image_size, image_size)),transforms.RandomHorizontalFlip(),transforms.ToTensor(),transforms.Normalize([0.5], [0.5]),])def transform(examples):images = [preprocess(image.convert("RGB")) for image inexamples["image"]]return {"images": images}dataset.set_transform(transform)train_dataloader = torch.utils.data.DataLoader(dataset, batch_size=batch_size, shuffle=True)
输出4幅蝴蝶图像,便于观察
print("Previewing batch:")batch = next(iter(train_dataloader))grid = torchvision.utils.make_grid(batch["images"], nrow=4)plt.imshow(grid.permute(1, 2, 0).cpu().clip(-1, 1) * 0.5 + 0.5)

4.2 微调人脸生成扩散模型
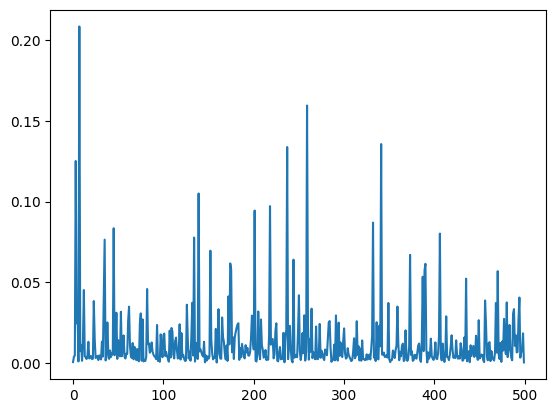
num_epochs = 2lr = 1e-5grad_accumulation_steps = 2optimizer = torch.optim.AdamW(image_pipe.unet.parameters(), lr=lr)losses = []for epoch in range(num_epochs):for step, batch in tqdm(enumerate(train_dataloader),total=len(train_dataloader)):clean_images = batch["images"].to(device)# 随机生成一个噪声,稍后加到图像上noise = torch.randn(clean_images.shape).to(clean_images.device)bs = clean_images.shape[0]# 随机选取一个时间步timesteps = torch.randint(0,image_pipe.scheduler.num_train_timesteps,(bs,),device=clean_images.device,).long()# 根据选中的时间步和确定的幅值,在干净图像上添加噪声# 此处为前向扩散过程noisy_images = image_pipe.scheduler.add_noise(clean_images,noise, timesteps)# 使用“带噪”图像进行网络预测noise_pred = image_pipe.unet(noisy_images, timesteps,return_dict=False)[0]# 对真正的噪声和预测的结果进行比较,注意这里是预测噪声loss = F.mse_loss(noise_pred, noise)# 保存损失值losses.append(loss.item())# 根据损失值更新梯度loss.backward()# 进行梯度累积,在累积到一定步数后更新模型参数if (step + 1) % grad_accumulation_steps == 0:optimizer.step()optimizer.zero_grad()print(f"Epoch {epoch} average loss: {sum(losses[-len(train_dataloader):])/len(train_dataloader)}")# 画出损失曲线,效果如图所示plt.plot(losses)
4.3 使用微调好的模型生成图像
x = torch.randn(8, 3, 256, 256).to(device)for i, t in tqdm(enumerate(scheduler.timesteps)):model_input = scheduler.scale_model_input(x, t)with torch.no_grad():noise_pred = image_pipe.unet(model_input, t)["sample"]x = scheduler.step(noise_pred, t, x).prev_samplegrid = torchvision.utils.make_grid(x, nrow=4)plt.imshow(grid.permute(1, 2, 0).cpu().clip(-1, 1) * 0.5 + 0.5)
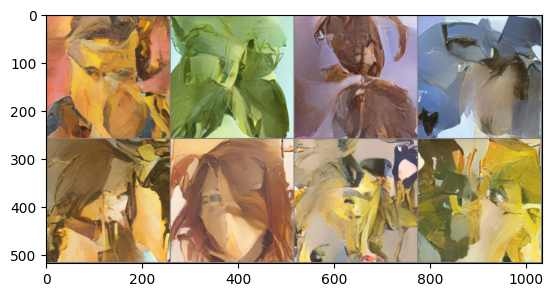
从图中可以看出生成的图像有蝴蝶数据的风格。
4.4 保持微调好的扩散模型,并且上传到Huggingface Hub中
image_pipe.save_pretrained("my-finetuned-model")from huggingface_hub import HfApi, ModelCard, create_repo, get_full_repo_name# 配置Hugging Face Hub,上传文件model_name = "ddpm-celebahq-finetuned-butterflies-2epochs"# 使用@param 脚本程序对上传到# Hugging Face Hub的文件进行命名local_folder_name = "my-finetuned-model" # @param脚本程序生成的名字,# 你也可以通过 image_pipe.save_pretrained('savename')自行指定description = "Describe your model here" # @paramhub_model_id = get_full_repo_name(model_name)create_repo(hub_model_id)api = HfApi()api.upload_folder(folder_path=f"{local_folder_name}/scheduler",path_in_repo="",repo_id=hub_model_id )api.upload_folder(folder_path=f"{local_folder_name}/unet", path_in_repo="",repo_id=hub_model_id )api.upload_file(path_or_fileobj=f"{local_folder_name}/model_index.json",path_in_repo="model_index.json",repo_id=hub_model_id,)# 添加一个模型卡片,这一步虽然不是必需的,但可以给他人提供一些模型描述信息content = f"""---license: mittags:- pytorch- diffusers- unconditional-image-generation- diffusion-models-class---# 用法from diffusers import DDPMPipelinepipeline = DDPMPipeline.from_pretrained(' {hub_model_id}')image = pipeline().images[0]image'''"""card = ModelCard(content)card.push_to_hub(hub_model_id)
微调Trick:
- 设置合适的batch_size,batch_size要在不超过GPU显存的前提下,尽量大一些,这样可以提高GPU计算效果;如果特别小,可以采用梯度累积的方式来更新模型参数,达到和大batch_size类似的效果,也就是多运行几次loss.backward(),再调用optimizer.step()和optimizer.zero_grad();
- 训练过程中,要时不时生成一些图像样本来观察模型性能;
- 训练过程中,可以把损失值、生成的图像样本等信息记录在日志中,可以使用Weights and Biases、TensorBoard等工具;