一、继承Thread类
1.1方法
| 方法名 | 说明 |
|---|---|
| void run() | 在线程开启后,此方法将被调用执行 |
| void start() | 使此线程开始执行,Java虚拟机会调用run方法() |
run()方法和start()方法的区别:
- run():封装线程执行的代码,直接调用,相当于普通方法的调用
- start():启动线程;然后由JVM调用此线程的run()方法
1.2实现步骤
-
定义一个类MyThread继承Thread类
-
在MyThread类中重写run()方法
-
创建MyThread类的对象
-
启动线程
1.3代码实例
实现一个MyThread类继承Thread,然后重写里面的run()方法。至于说为什么需要重写run()方法是因为run()是用来封装被线程执行的代码
public class MyThread extends Thread{
    @Override
    public void run(){
        for(int i = 0; i <= 100 ; i++){
            System.out.println(i);
        }
    }
}


public class ThreadTest {
    public static void main(String[] args) {
        MyThread myThread1 = new MyThread();
        MyThread myThread2 = new MyThread();

        myThread1.run();
        myThread2.start();
    }


}
二、实现Runnable接口
2.1方法
| 方法名 | 说明 |
|---|---|
| Thread(Runnable target) | 分配一个新的Thread对象 |
| Thread(Runnable target, String name) | 分配一个新的Thread对象 |
2.2实现步骤
-
定义一个类MyRunnable实现Runnable接口
-
在MyRunnable类中重写run()方法
-
创建MyRunnable类的对象
-
创建Thread类的对象,把MyRunnable对象作为构造方法的参数
-
启动线程
2.3代码实例
public class MyRunnable implements Runnable{
@Override
public void run() {
for(int i=0; i<100; i++) {
System.out.println(Thread.currentThread().getName()+":"+i);
}
}
}
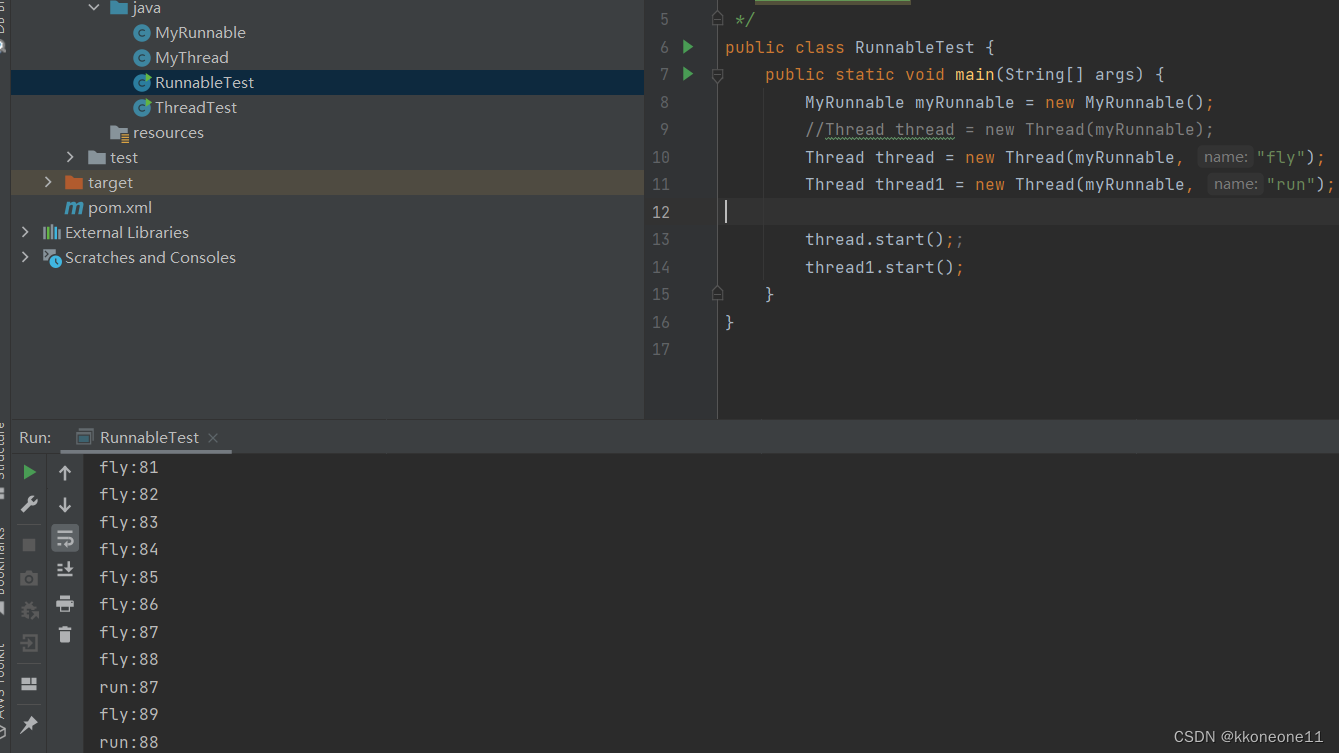
public class RunnableTest {
public static void main(String[] args) {
MyRunnable myRunnable = new MyRunnable();
//Thread thread = new Thread(myRunnable);
Thread thread = new Thread(myRunnable, "fly");
Thread thread1 = new Thread(myRunnable, "run");
thread.start();;
thread1.start();
}
}
三、实现Callable接口
3.1方法
| 方法名 | 说明 |
|---|---|
| V call() | 计算结果,如果无法计算结果,则抛出一个异常 |
| FutureTask(Callable<V> callable) | 创建一个 FutureTask,一旦运行就执行给定的 Callable |
| V get() | 如有必要,等待计算完成,然后获取其结果 |
3.2实现步骤
-
定义一个类MyCallable实现Callable接口
-
在MyCallable类中重写call()方法
-
创建MyCallable类的对象
-
创建Future的实现类FutureTask对象,把MyCallable对象作为构造方法的参数
-
创建Thread类的对象,把FutureTask对象作为构造方法的参数
-
启动线程
-
再调用get方法,就可以获取线程结束之后的结果。
3.3代码实例
public class MyCallable implements Callable<String> {
    @Override
    public String call() throws Exception {
        for (int i = 0; i < 100; i++) {
            System.out.println(i);
        }
        //返回值就表示线程运行完毕之后的结果
        return "完成";
    }
}

public class CallableTest {
    public static void main(String[] args) throws ExecutionException, InterruptedException {
        MyCallable myCallable = new MyCallable();

//        Thread thread = new Thread(myCallable);

        FutureTask<String> stringFutureTask = new FutureTask<String>(myCallable);

        Thread thread = new Thread(stringFutureTask);

        String s = stringFutureTask.get();

        thread.start();

        System.out.println(s);
    }
}
三种线程的各自优缺点
-
实现Runnable、Callable接口
-
好处: 扩展性强,实现该接口的同时还可以继承其他的类
-
缺点: 编程相对复杂,不能直接使用Thread类中的方法
-
-
继承Thread类
-
好处: 编程比较简单,可以直接使用Thread类中的方法
-
缺点: 可以扩展性较差,不能再继承其他的类
-
-
Runnable接口和Callable接口区别
-
Callable的call()方法允许用try catch语句块内部处理也可以允许异常向上抛出,而Runnable方法的run()方法异常只能在内部处理。
-
Callable可以有返回结果而Runnable没有。
-

应用:
1.设置和获取线程名称
1.1方法
| 方法名 | 说明 |
|---|---|
| void setName(String name) | 将此线程的名称更改为等于参数name |
| String getName() | 返回此线程的名称 |
| Thread currentThread() | 返回对当前正在执行的线程对象的引用 |
1.2代码示例
public class MyThread extends Thread{

    public MyThread(){}

    public MyThread(String name){
        super(name);
    }

    @Override
    public void run(){
        for(int i = 0; i <= 100 ; i++){
            System.out.println(getName() + ":" + i);
        }
    }
}


public class ThreadTest {
    public static void main(String[] args) {
        MyThread myThread1 = new MyThread();
        MyThread myThread2 = new MyThread();

        myThread1.setName("thread1");
        myThread2.setName("thread2");

        MyThread myThread3 = new MyThread("thread3");
        MyThread myThread4 = new MyThread("thread4");

        myThread1.start();
        myThread2.start();
        myThread3.start();
        myThread4.start();
        System.out.println(Thread.currentThread().getName());
    }
}
2.线程休眠
2.1方法
| 方法名 | 说明 |
|---|---|
| static void sleep(long millis) | 使当前正在执行的线程停留(暂停执行)指定的毫秒数 |
2.2代码示例
public class MyRunnable implements Runnable{
    @Override
    public void run() {
        for(int i=0; i<100; i++) {
            try{
                Thread.sleep(100);
            }catch (Exception e){
                e.printStackTrace();
            }
            System.out.println(Thread.currentThread().getName()+":"+i);
        }
    }
}

public class RunnableTest {
    public static void main(String[] args) {
        MyRunnable myRunnable = new MyRunnable();
        Thread thread1 = new Thread(myRunnable);
        Thread thread2 = new Thread(myRunnable);


        thread1.start();;
        thread2.start();
    }
}
3.线程优先级
3.1方法
| 方法名 | 说明 |
|---|---|
| final int getPriority() | 返回此线程的优先级 |
| final void setPriority(int newPriority) | 更改此线程的优先级线程默认优先级是5;线程优先级的范围是:1-10 |
3.2线程调度
-
分时调度模型:所有线程轮流使用 CPU 的使用权,平均分配每个线程占用 CPU 的时间片
-
抢占式调度模型:优先让优先级高的线程使用 CPU,如果线程的优先级相同,那么会随机选择一个,优先级高的线程获取的 CPU 时间片相对多一些
3.3代码示例
public class MyCallable implements Callable<String> {
    @Override
    public String call() throws Exception {
        for (int i = 0; i < 100; i++) {
            System.out.println(Thread.currentThread().getName() + "---" + i);
        }
        //返回值就表示线程运行完毕之后的结果
        return "完成";
    }
}


public class CallableTest {
    public static void main(String[] args) throws ExecutionException, InterruptedException {
        MyCallable myCallable = new MyCallable();
//        Thread thread = new Thread(myCallable);
        FutureTask<String> stringFutureTask = new FutureTask<String>(myCallable);
        Thread thread1 = new Thread(stringFutureTask);
        thread1.setName("thread1");
        thread1.setPriority(10);
        thread1.start();

        MyCallable myCallable2 = new MyCallable();
//        Thread thread = new Thread(myCallable);
        FutureTask<String> stringFutureTask2 = new FutureTask<String>(myCallable);
        Thread thread2 = new Thread(stringFutureTask2);
        thread2.setName("thread2");
        thread2.setPriority(1);
        thread2.start();
    }
}
4.守护线程
4.1方法
| 方法名 | 说明 |
|---|---|
| void setDaemon(boolean on) | 将此线程标记为守护线程,当运行的线程都是守护线程时,Java虚拟机将退出 |
4.2代码示例
public class MyThread1 extends Thread {
    @Override
    public void run() {
        for (int i = 0; i < 10; i++) {
            System.out.println(getName() + "---" + i);
        }
    }
}
public class MyThread2 extends Thread {
    @Override
    public void run() {
        for (int i = 0; i < 100; i++) {
            System.out.println(getName() + "---" + i);
        }
    }
}
public class Demo {
    public static void main(String[] args) {
        MyThread1 t1 = new MyThread1();
        MyThread2 t2 = new MyThread2();

        t1.setName("女神");
        t2.setName("舔狗");

        //把第二个线程设置为守护线程
        //当普通线程执行完之后,那么守护线程也没有继续运行下去的必要了.
        t2.setDaemon(true);

        t1.start();
        t2.start();
    }
}