1.1 vuex概述

1.2 构建 vuex [多组件数据共享] 环境
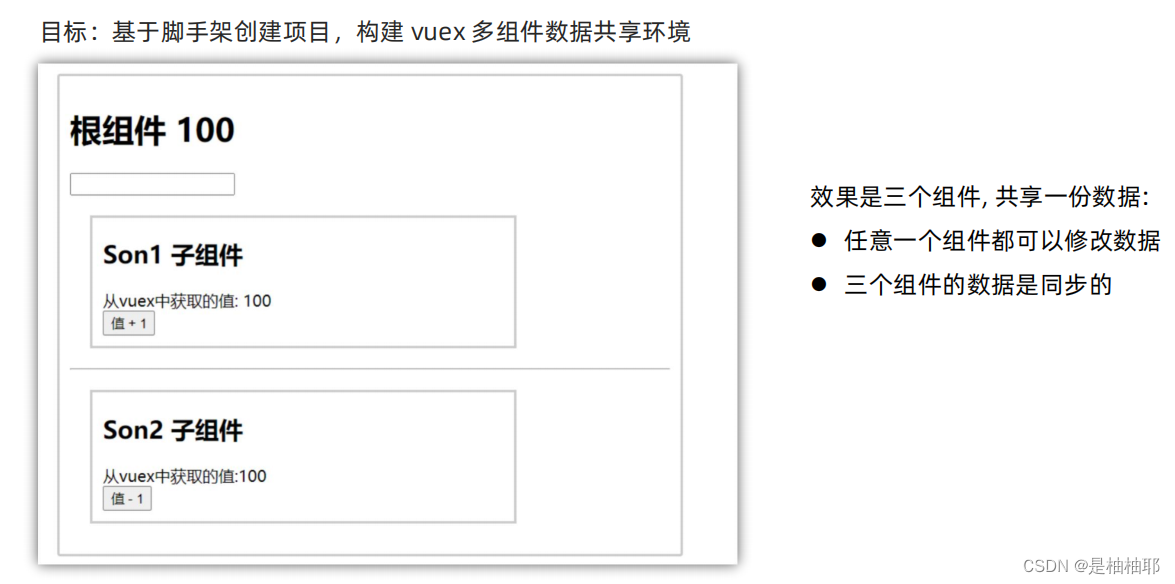
1.创建项目
vue create vuex-demo
2.创建三个组件, 目录如下
|-components
|--Son1.vue
|--Son2.vue
|-App.vue
3.源代码如下
App.vue在入口组件中引入 Son1 和 Son2 这两个子组件
<template>
  <div id="app">
    <h1>根组件</h1>
    <input type="text">
    <Son1></Son1>
    <hr>
    <Son2></Son2>
  </div>
</template>

<script>
import Son1 from './components/Son1.vue'
import Son2 from './components/Son2.vue'

export default {
  name: 'app',
  data: function () {
    return {

    }
  },
  components: {
    Son1,
    Son2
  }
}
</script>

<style>
#app {
  width: 600px;
  margin: 20px auto;
  border: 3px solid #ccc;
  border-radius: 3px;
  padding: 10px;
}
</style>
main.js
import Vue from 'vue'
import App from './App.vue'

Vue.config.productionTip = false

new Vue({
  render: h => h(App)
}).$mount('#app')
Son1.vue
<template>
  <div class="box">
    <h2>Son1 子组件</h2>
    从vuex中获取的值: <label></label>
    <br>
    <button>值 + 1</button>
  </div>
</template>

<script>
export default {
  name: 'Son1Com'
}
</script>

<style lang="css" scoped>
.box{
  border: 3px solid #ccc;
  width: 400px;
  padding: 10px;
  margin: 20px;
}
h2 {
  margin-top: 10px;
}
</style>
Son2.vue
<template>
  <div class="box">
    <h2>Son2 子组件</h2>
    从vuex中获取的值:<label></label>
    <br />
    <button>值 - 1</button>
  </div>
</template>

<script>
export default {
  name: 'Son2Com'
}
</script>

<style lang="css" scoped>
.box {
  border: 3px solid #ccc;
  width: 400px;
  padding: 10px;
  margin: 20px;
}
h2 {
  margin-top: 10px;
}
</style>
1.3 创建一个空仓库
PS:
vue2对应router3、vuex3
vue3对应router4、vuex4
因为创建vue时没有勾选vuex,所以要装包,勾选就不需要装包了
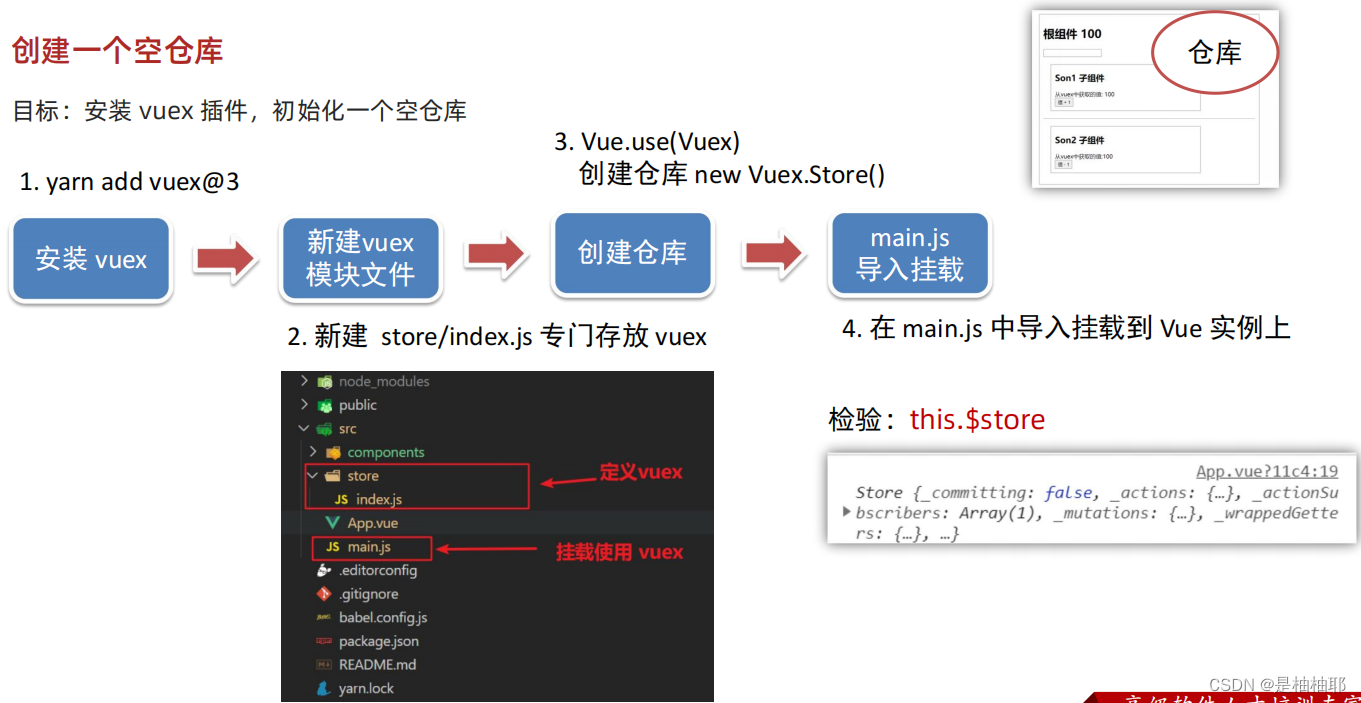
src → store → index.js
// 在这里存放的就是 Vuex 相关的核心代码
import Vue from 'vue'
import Vuex from 'vuex'

// 插件安装
Vue.use(Vuex)

// 创建仓库
const store = new Vuex.Store()

// 导出给main.js使用
export default store
main.js
import Vue from 'vue'
import App from './App.vue'
import store from '@/store/index'

Vue.config.productionTip = false

new Vue({
  render: h => h(App),
  store
}).$mount('#app')
1.4 核心概念 - state 状态
目标:明确如何给仓库 提供 数据,如何 使用 仓库的数据

1. 提供数据:
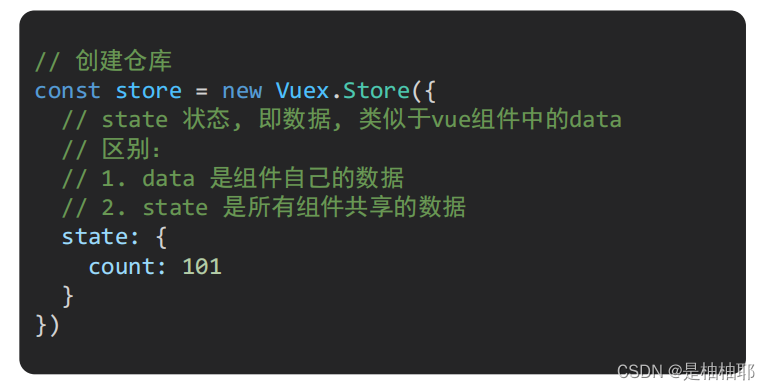
State 提供唯一的公共数据源,所有共享的数据都要统一放到 Store 中的 State 中存储。
在 state 对象中可以添加我们要共享的数据。
src - store - index.js
// 在这里存放的就是 Vuex 相关的核心代码
import Vue from 'vue'
import Vuex from 'vuex'

// 插件安装
Vue.use(Vuex)

// 创建仓库
const store = new Vuex.Store({
  // 通过state可以提供数据(所有组件共享的数据)
  state: {
    title: '大标题',
    count: 100
  }
}
)

// 导出给main.js使用
export default store
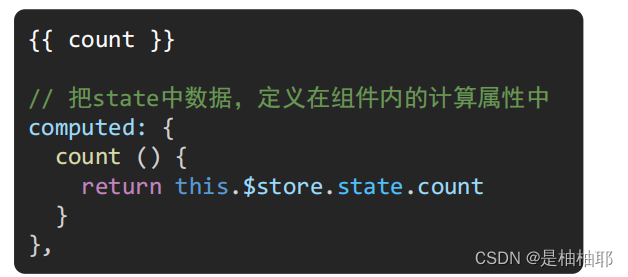
2. 使用数据:
① 通过 store 直接访问

App.vue
<template>
  <div id="app">
    <h1>根组件 - {{ $store.state.title }}</h1>
    <input type="text">
    <Son1></Son1>
    <hr>
    <Son2></Son2>
  </div>
</template>

<script>
import Son1 from './components/Son1.vue'
import Son2 from './components/Son2.vue'

export default {
  name: 'app',
  created () {
    console.log(this.$store.state.title)
  },
  data: function () {
    return {

    }
  },
  components: {
    Son1,
    Son2
  }
}
</script>

<style>
#app {
  width: 600px;
  margin: 20px auto;
  border: 3px solid #ccc;
  border-radius: 3px;
  padding: 10px;
}
</style>
main.js
import Vue from 'vue'
import App from './App.vue'
import store from '@/store/index'
console.log(store.state.count)

Vue.config.productionTip = false

new Vue({
  render: h => h(App),
  store
}).$mount('#app')
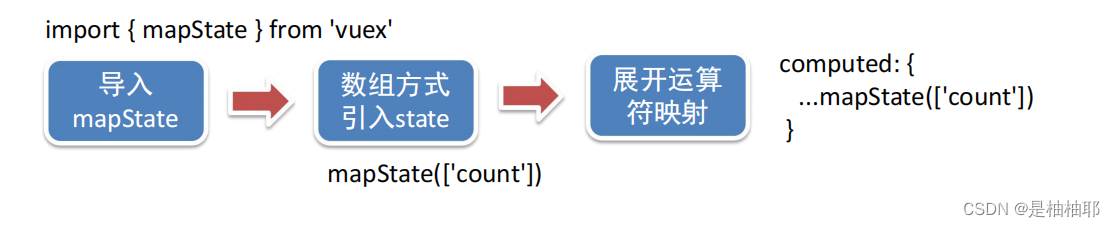
② 通过辅助函数 (简化)
mapState是辅助函数,帮助我们把 store中的数据 自动 映射到 组件的计算属性中
App.vue
<template>
  <div id="app">
    <h1>根组件 - {{ title }}</h1>
    <input type="text">
    <Son1></Son1>
    <hr>
    <Son2></Son2>
  </div>
</template>

<script>
import Son1 from './components/Son1.vue'
import Son2 from './components/Son2.vue'
import { mapState } from 'vuex'
console.log(mapState(['count', 'title']))

export default {
  name: 'app',
  created () {
    console.log(this.$store.state.title)
  },
  computed: {
    ...mapState(['count', 'title'])
  },
  data: function () {
    return {

    }
  },
  components: {
    Son1,
    Son2
  }
}
</script>

<style>
#app {
  width: 600px;
  margin: 20px auto;
  border: 3px solid #ccc;
  border-radius: 3px;
  padding: 10px;
}
</style>
1.5 核心概念 - mutations

son.vue(不开严格模式可以用)
methods: {
    handleAdd () {
      // 错误代码(vue默认不会监测,检测需要成本)
    //   this.$store.state.count++
    //   console.log(this.$store.state.count)

    // 应该通过 mutation 核心概念,进行修改数据
    }
  }
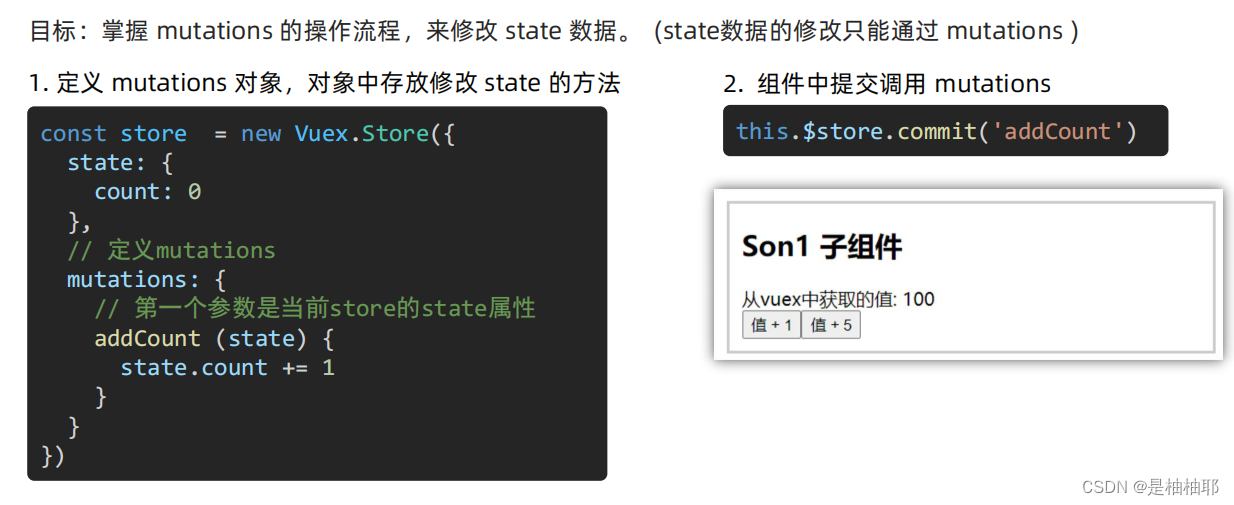
str - store - index.js
 mutations: {
    // 所有mutation函数,第一个参数,都是state
    addCount (state) {
      // 修改数据
      state.count += 1
    },
    addFive (state) {
      state.count += 5
    }
  }
Son1.vue
methods: {
  handleAdd () {
    // 错误代码(vue默认不会监测,检测需要成本)
  //   this.$store.state.count++
  //   console.log(this.$store.state.count)

    // 应该通过 mutation 核心概念,进行修改数据
    this.$store.commit('addCount')
  },
  addFive () {
    this.$store.commit('addFive')
  }
}
}

str - store - index.js
mutations: {
    // 所有mutation函数,第一个参数,都是state
    addCount (state, n) {
      // 修改数据
      state.count += n
    },
    changeTitle (state, newTitle) {
      state.title = newTitle
    }
  }
Son1.vue
methods: {
  handleAdd (n) {
    // 错误代码(vue默认不会监测,检测需要成本)
  //   this.$store.state.count++
  //   console.log(this.$store.state.count)

    // 应该通过 mutation 核心概念,进行修改数据
    //   this.$store.commit('addCount')

    // 调用带参数的mutation函数
    this.$store.commit('addCount', n)
  },
  changeFn () {
    this.$store.commit('changeTitle', '黑马程序员')
  }
}
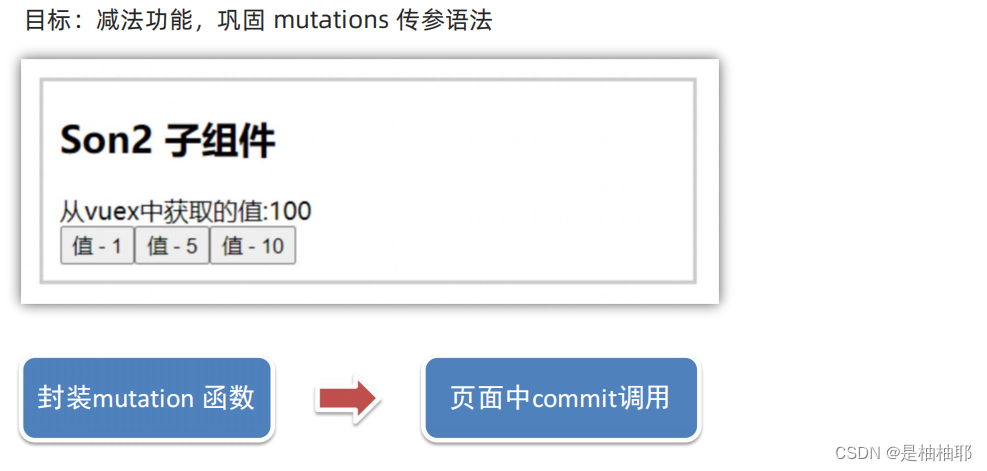
1.5.1 核心概念 - mutations - 练习1
str - store - index.js
 //   2.通过mutations可以提供修改数据的方法
  mutations: {
    // 所有mutation函数,第一个参数,都是state
    addCount (state, n) {
      // 修改数据
      state.count += n
    },
    subCount (state, n) {
      state.count -= n
    },
    changeTitle (state, newTitle) {
      state.title = newTitle
    }
  }
Son2.vue
 methods: {
    handleSub (n) {
      this.$store.commit('subCount', n)
    }
  }
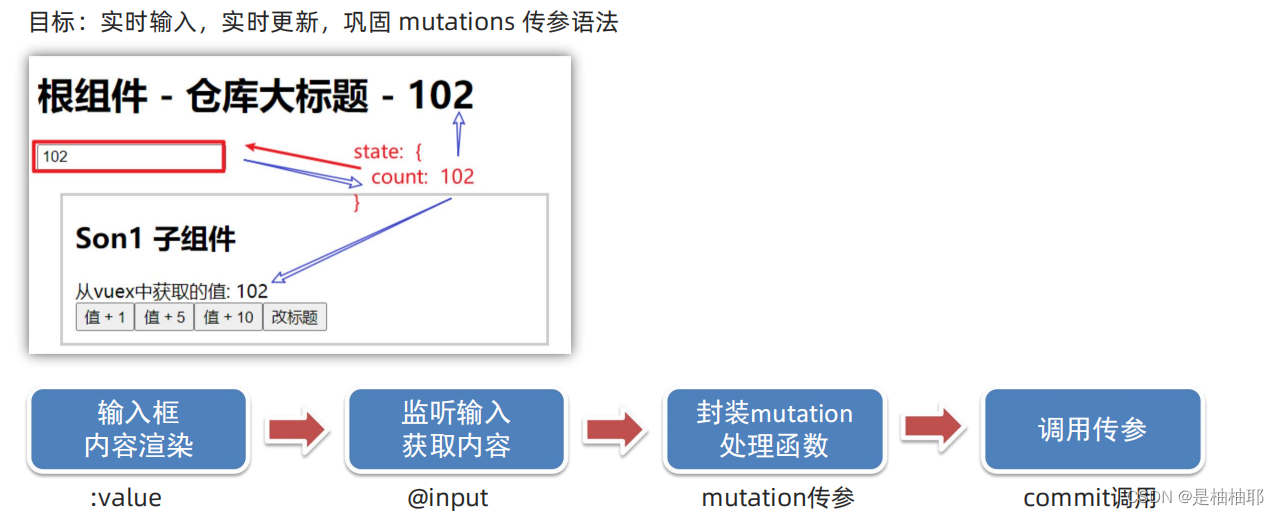
1.5.2 核心概念 - mutations - 练习2
src - store - index.js
// 在这里存放的就是 Vuex 相关的核心代码
import Vue from 'vue'
import Vuex from 'vuex'

// 插件安装
Vue.use(Vuex)

// 创建仓库
const store = new Vuex.Store({
  // 严格模式(有利于初学者,检测不规范的代码 => 上线时需要关闭)
  strict: true,
  // 通过state可以提供数据(所有组件共享的数据)
  state: {
    title: '仓库大标题',
    count: 100
  },
  //   2.通过mutations可以提供修改数据的方法
  mutations: {
    // 所有mutation函数,第一个参数,都是state
    addCount (state, n) {
      // 修改数据
      state.count += n
    },
    subCount (state, n) {
      state.count -= n
    },
    changeTitle (state, newTitle) {
      state.title = newTitle
    },
    changeCount (state, newCount) {
      state.count = newCount
    }
  }
}
)

// 导出给main.js使用
export default store
Son2.vue
<template>
  <div id="app">
    <h1>根组件 - {{ title }}</h1>
    <input :value="count" @input="handleInput" type="text">
    <Son1></Son1>
    <hr>
    <Son2></Son2>
  </div>
</template>

<script>
import Son1 from './components/Son1.vue'
import Son2 from './components/Son2.vue'
import { mapState } from 'vuex'
// console.log(mapState(['count', 'title']))

export default {
  name: 'app',
  created () {
    console.log(this.$store.state.title)
  },
  computed: {
    ...mapState(['count', 'title'])
  },
  data: function () {
    return {

    }
  },
  components: {
    Son1,
    Son2
  },
  methods: {
    handleInput (e) {
      // console.log(+e.target.value)
      const num = +e.target.value
      this.$store.commit('changeCount', num)
    }

  }
}
</script>

<style>
#app {
  width: 600px;
  margin: 20px auto;
  border: 3px solid #ccc;
  border-radius: 3px;
  padding: 10px;
}
</style>
1.6 辅助函数 - mapMutations
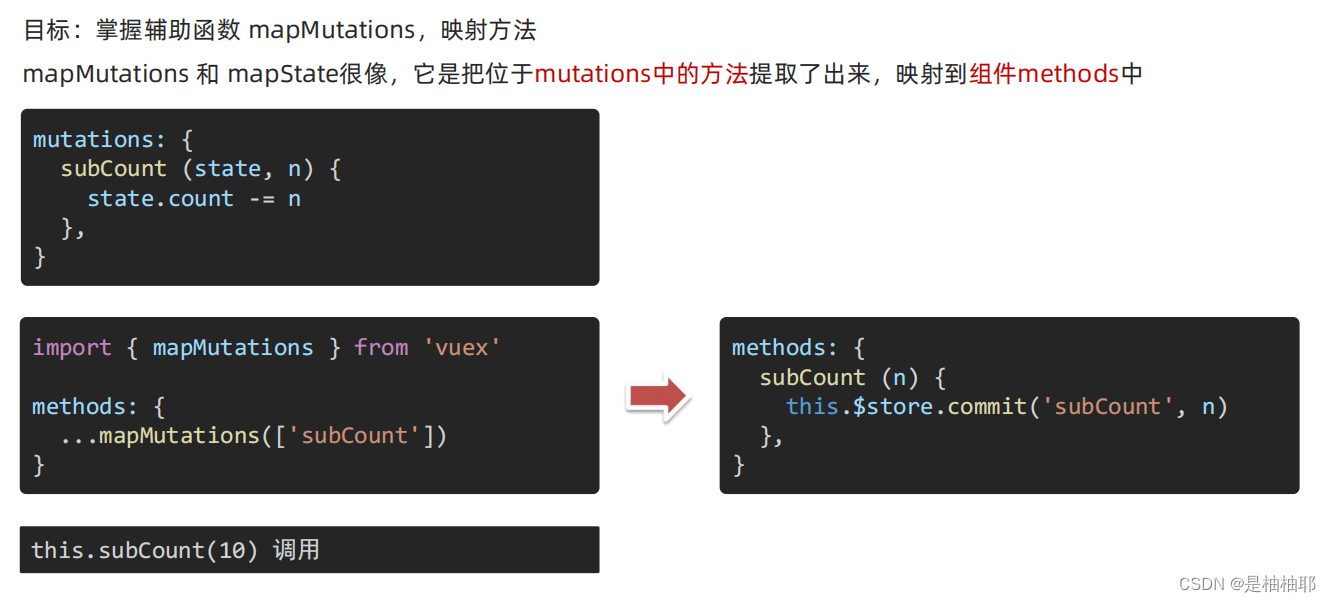
PS:就是在仓库里面写好方法,通过辅助函数mapMutation把仓库中的方法提取出来了,可以直接使用
Son2.vue
<template>
    <div class="box">
      <h2>Son2 子组件</h2>
      从vuex中获取的值:<label>{{ count }}</label>
      <br />
      <button @click="subCount(1)">值 - 1</button>
      <button @click="subCount(5)">值 - 5</button>
      <button @click="subCount(10)">值 - 10</button>
    </div>
  </template>

<script>
import { mapState, mapMutations } from 'vuex'
export default {
  name: 'Son2Com',
  computed: {
    ...mapState(['count', 'title'])
  },
  methods: {
    ...mapMutations(['subCount', 'changeCount'])
    // handleSub (n) {
    //   // this.$store.commit('subCount', n)
    //   this.subCount(n)
    // }
  }

}
</script>

  <style lang="css" scoped>
  .box {
    border: 3px solid #ccc;
    width: 400px;
    padding: 10px;
    margin: 20px;
  }
  h2 {
    margin-top: 10px;
  }
  </style>
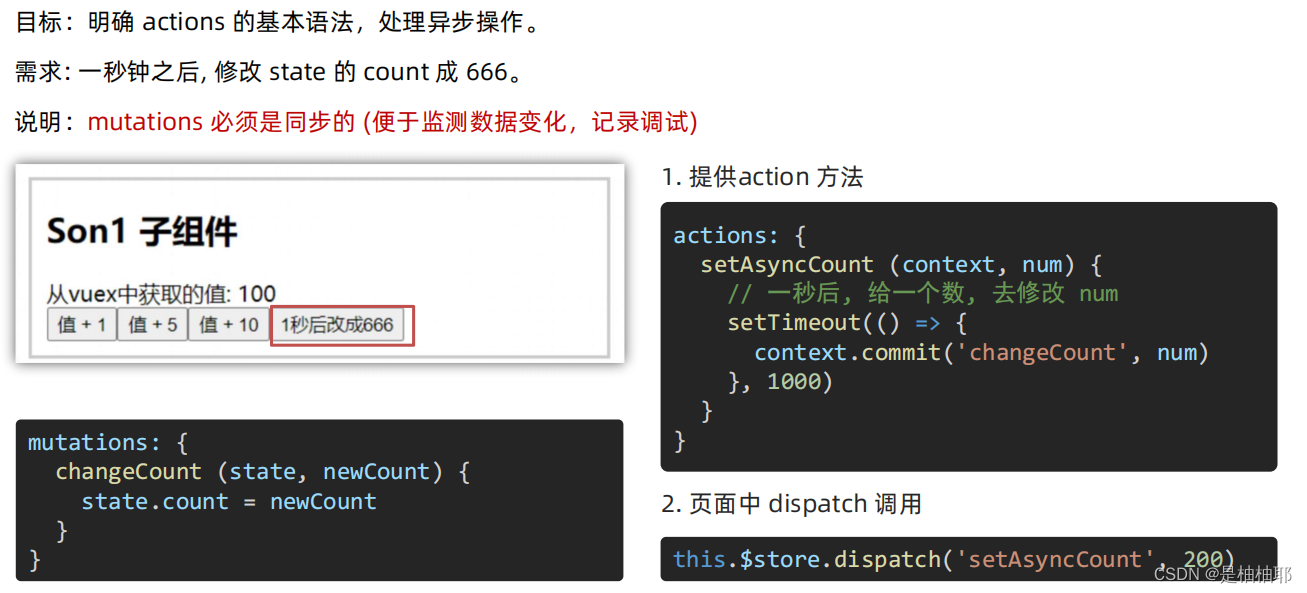
1.7 核心概念 - actions
str - store - index.js
// 在这里存放的就是 Vuex 相关的核心代码
import Vue from 'vue'
import Vuex from 'vuex'

// 插件安装
Vue.use(Vuex)

// 创建仓库
const store = new Vuex.Store({
  // 严格模式(有利于初学者,检测不规范的代码 => 上线时需要关闭)
  strict: true,
  // 通过state可以提供数据(所有组件共享的数据)
  state: {
    title: '仓库大标题',
    count: 100
  },
  //   2.通过mutations可以提供修改数据的方法
  mutations: {
    // 所有mutation函数,第一个参数,都是state
    addCount (state, n) {
      // 修改数据
      state.count += n
    },
    subCount (state, n) {
      state.count -= n
    },
    changeTitle (state, newTitle) {
      state.title = newTitle
    },
    changeCount (state, newCount) {
      state.count = newCount
    }
  },
  //   3.actions 处理异步
  // 注意: 不能直接操作 state, 操作 state, 还是需要 commit mutation
  actions: {
    // context 上下文(此处未分模块,可以当成store仓库)
    // context.commit('mutation名字',额外参数)
    changeCountAction (context, num) {
      // 这里是setTimeout模拟异步,以后大部分场景是发请求
      setTimeout(() => {
        context.commit('changeCount', num)
      }, 1000)
    }
  }

}
)

// 导出给main.js使用
export default store
Son1.vue
<template>
    <div class="box">
      <h2>Son1 子组件</h2>
      从vuex中获取的值: <label>{{ $store.state.count }}</label>
      <br>
      <button @click="handleAdd(1)">值 + 1</button>
      <button @click="handleAdd(5)">值 + 5</button>
      <button @click="handleAdd(10)">值 + 10</button>
      <button @click="changeFn">改标题</button>
      <button @click="handleChange">一秒之后修改成666</button>
    </div>
  </template>

<script>
export default {
  name: 'Son1Com',
  methods: {
    handleAdd (n) {
      // 错误代码(vue默认不会监测,检测需要成本)
    //   this.$store.state.count++
    //   console.log(this.$store.state.count)

      // 应该通过 mutation 核心概念,进行修改数据
      //   this.$store.commit('addCount')

      // 调用带参数的mutation函数
      this.$store.commit('addCount', n)
    },
    changeFn () {
      this.$store.commit('changeTitle', '黑马程序员')
    },
    handleChange () {
      // 调用action
      // this.$store.dispatch('action名字', 额外参数)
      this.$store.dispatch('changeCountAction', 666)
    }
  }
}
</script>

  <style lang="css" scoped>
  .box{
    border: 3px solid #ccc;
    width: 400px;
    padding: 10px;
    margin: 20px;
  }
  h2 {
    margin-top: 10px;
  }
  </style>
1.8 辅助函数 - mapActions

Son2.vue
<template>
    <div class="box">
      <h2>Son2 子组件</h2>
      从vuex中获取的值:<label>{{ count }}</label>
      <br />
      <button @click="subCount(1)">值 - 1</button>
      <button @click="subCount(5)">值 - 5</button>
      <button @click="subCount(10)">值 - 10</button>
      <button @click="changeCountAction(888)">一秒之后修改成888</button>
    </div>
  </template>

<script>
import { mapState, mapMutations, mapActions } from 'vuex'
export default {
  name: 'Son2Com',
  computed: {
    ...mapState(['count', 'title'])
  },
  methods: {
    ...mapMutations(['subCount', 'changeCount']),
    ...mapActions(['changeCountAction'])
    // handleSub (n) {
    //   // this.$store.commit('subCount', n)
    //   this.subCount(n)
    // }
  }

}
</script>

  <style lang="css" scoped>
  .box {
    border: 3px solid #ccc;
    width: 400px;
    padding: 10px;
    margin: 20px;
  }
  h2 {
    margin-top: 10px;
  }
  </style>
1.9 核心概念 - getters

src - store - index.js
// 在这里存放的就是 Vuex 相关的核心代码
import Vue from 'vue'
import Vuex from 'vuex'

// 插件安装
Vue.use(Vuex)

// 创建仓库
const store = new Vuex.Store({
  // 严格模式(有利于初学者,检测不规范的代码 => 上线时需要关闭)
  strict: true,
  // 通过state可以提供数据(所有组件共享的数据)
  state: {
    title: '仓库大标题',
    count: 100,
    list: [1, 2, 3, 4, 5, 6, 7, 8, 9, 10]
  },
  //   2.通过mutations可以提供修改数据的方法
  mutations: {
    // 所有mutation函数,第一个参数,都是state
    addCount (state, n) {
      // 修改数据
      state.count += n
    },
    subCount (state, n) {
      state.count -= n
    },
    changeTitle (state, newTitle) {
      state.title = newTitle
    },
    changeCount (state, newCount) {
      state.count = newCount
    }
  },
  //   3.actions 处理异步
  // 注意: 不能直接操作 state, 操作 state, 还是需要 commit mutation
  actions: {
    // context 上下文(此处未分模块,可以当成store仓库)
    // context.commit('mutation名字',额外参数)
    changeCountAction (content, num) {
      // 这里是setTimeout模拟异步,以后大部分场景是发请求
      setTimeout(() => {
        content.commit('changeCount', num)
      }, 1000)
    }
  },
  //   4.getters 类似于计算属性
  getters: {
    // 注意点:
    // 1.形参第一个参数,就是state
    // 2.必须有返回值,返回值就是getters的值
    filterList (state) {
      return state.list.filter(item => item > 5)
    }

  }

}
)

// 导出给main.js使用
export default store
方法一:通过 store 访问 getters
Son1.vue
<div>{{ $store.state.list }}</div>
<div>{{ $store.getters.filterList }}</div>
方法二:通过辅助函数 mapGetters 映射
Son2.vue
<template>
    <div class="box">
      <h2>Son2 子组件</h2>
      从vuex中获取的值:<label>{{ count }}</label>
      <br />
      <button @click="subCount(1)">值 - 1</button>
      <button @click="subCount(5)">值 - 5</button>
      <button @click="subCount(10)">值 - 10</button>
      <button @click="changeCountAction(888)">一秒之后修改成888</button>
      <hr>
    <div>{{ filterList }}</div>
    </div>
  </template>

<script>
import { mapState, mapMutations, mapActions, mapGetters } from 'vuex'
export default {
  name: 'Son2Com',
  computed: {
    // mapStore 和 mapGetters 都是映射属性
    ...mapState(['count', 'title']),
    ...mapGetters(['filterList'])
  },
  methods: {
    // mapMutation 和 mapActions 都是映射方法
    ...mapMutations(['subCount', 'changeCount']),
    ...mapActions(['changeCountAction'])
    // handleSub (n) {
    //   // this.$store.commit('subCount', n)
    //   this.subCount(n)
    // }
  }

}
</script>

  <style lang="css" scoped>
  .box {
    border: 3px solid #ccc;
    width: 400px;
    padding: 10px;
    margin: 20px;
  }
  h2 {
    margin-top: 10px;
  }
  </style>
1.10 核心概念 - 模块 module (进阶语法)
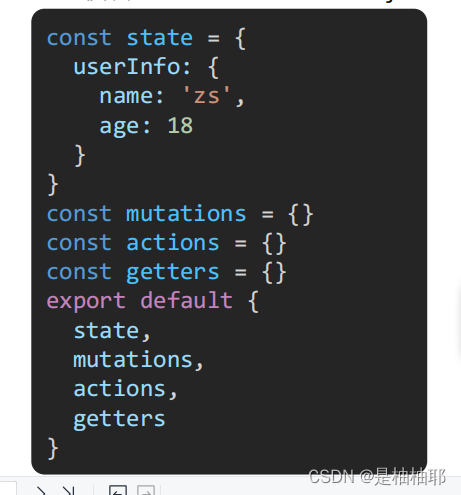
1.10.1module 模块的创建

模块拆分:
user模块: store/modules/user.js
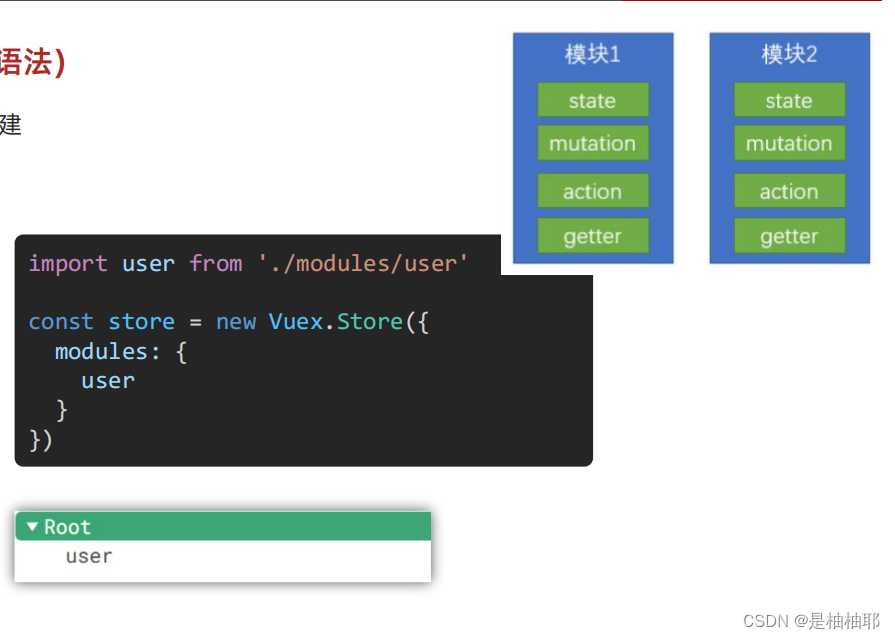
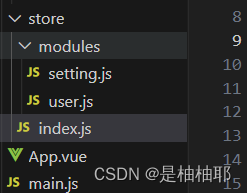
index.js
// 在这里存放的就是 Vuex 相关的核心代码
import Vue from 'vue'
import Vuex from 'vuex'
import user from './modules/user'
import setting from './modules/setting'

// 插件安装
Vue.use(Vuex)

// 创建仓库
const store = new Vuex.Store({
  // 严格模式(有利于初学者,检测不规范的代码 => 上线时需要关闭)
  strict: true,
  // 通过state可以提供数据(所有组件共享的数据)
  state: {
    title: '仓库大标题',
    count: 100,
    list: [1, 2, 3, 4, 5, 6, 7, 8, 9, 10]
  },
  //   2.通过mutations可以提供修改数据的方法
  mutations: {
    // 所有mutation函数,第一个参数,都是state
    addCount (state, n) {
      // 修改数据
      state.count += n
    },
    subCount (state, n) {
      state.count -= n
    },
    changeTitle (state, newTitle) {
      state.title = newTitle
    },
    changeCount (state, newCount) {
      state.count = newCount
    }
  },
  //   3.actions 处理异步
  // 注意: 不能直接操作 state, 操作 state, 还是需要 commit mutation
  actions: {
    // context 上下文(此处未分模块,可以当成store仓库)
    // context.commit('mutation名字',额外参数)
    changeCountAction (content, num) {
      // 这里是setTimeout模拟异步,以后大部分场景是发请求
      setTimeout(() => {
        content.commit('changeCount', num)
      }, 1000)
    }
  },
  //   4.getters 类似于计算属性
  getters: {
    // 注意点:
    // 1.形参第一个参数,就是state
    // 2.必须有返回值,返回值就是getters的值
    filterList (state) {
      return state.list.filter(item => item > 5)
    }
  },
  //   5.modules模块
  modules: {
    user,
    setting
  }
})

// 导出给main.js使用
export default store
modules - setting.js
// setting模块
const state = {
  theme: 'light', // 主题色
  desc: '测试demo'
}
const mutations = {}
const actions = {}
const getters = {}
export default {
  state,
  mutations,
  actions,
  getters
}
1.10.2 state 的访问语法
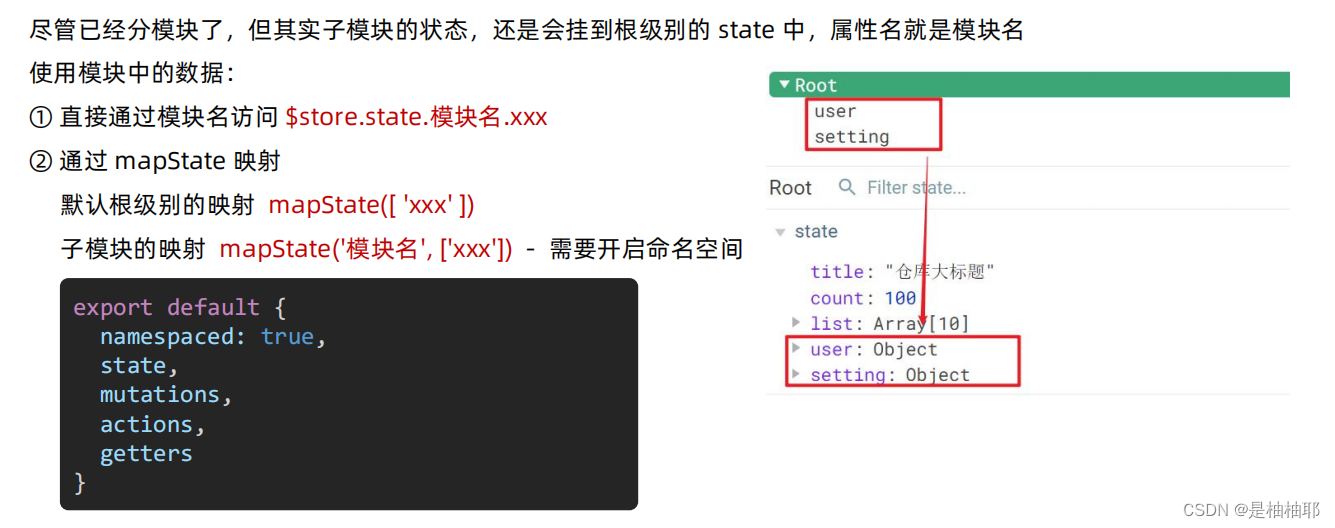
方法一:直接通过模块名访问 $store.state.模块名.xxx
Son2.vue
<!-- 测试访问模块中的state - 原生 -->
      <div>{{ $store.state.user.userInfo.name }}</div>
      <div>{{ $store.state.setting.theme }}</div>
方法二:通过 mapState 映射
Son2.vue
<template>
    <div class="box">
      <h2>Son2 子组件</h2>
      从vuex中获取的值:<label>{{ count }}</label>
      <br />
      <button @click="subCount(1)">值 - 1</button>
      <button @click="subCount(5)">值 - 5</button>
      <button @click="subCount(10)">值 - 10</button>
      <button @click="changeCountAction(888)">一秒之后修改成888</button>
      <hr>
    <div>{{ filterList }}</div>
    <hr>
    <!-- 访问模块中的state -->
    <div>{{ user.userInfo.name }}</div>
    <div>{{ setting.theme }}</div>
    <div>user模块的数据{{ userInfo }}</div>
    <div>setting模块的数据{{ theme }}</div>
    </div>
  </template>

<script>
import { mapState, mapMutations, mapActions, mapGetters } from 'vuex'
export default {
  name: 'Son2Com',
  computed: {
    // mapStore 和 mapGetters 都是映射属性
    ...mapState(['count', 'title', 'user', 'setting']),
    ...mapState('user', ['userInfo']),
    ...mapState('setting', ['theme', 'desc']),
    ...mapGetters(['filterList'])
  },
  methods: {
    // mapMutation 和 mapActions 都是映射方法
    ...mapMutations(['subCount', 'changeCount']),
    ...mapActions(['changeCountAction'])
    // handleSub (n) {
    //   // this.$store.commit('subCount', n)
    //   this.subCount(n)
    // }
  }

}
</script>

  <style lang="css" scoped>
  .box {
    border: 3px solid #ccc;
    width: 400px;
    padding: 10px;
    margin: 20px;
  }
  h2 {
    margin-top: 10px;
  }
  </style>
setting.js
// setting模块
const state = {
theme: 'light', // 主题色
desc: '测试demo'
}
const mutations = {}
const actions = {}
const getters = {}
export default {
namespaced: true,
state,
mutations,
actions,
getters
}
1.10.3 getters 的访问语法
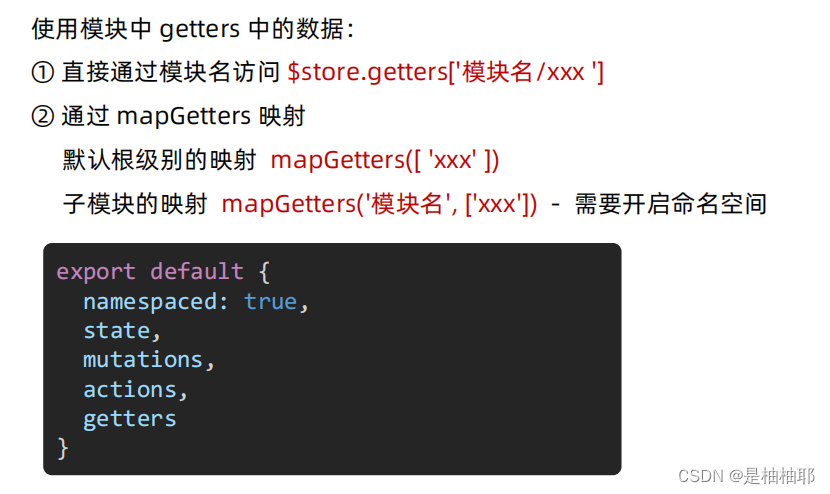
方法一:直接通过模块名访问 $store.getters['模块名/xxx ']
user.js
// user模块
const state = {
  userInfo: {
    name: 'zs',
    age: 18
  },
  score: 80
}
const mutations = {}
const actions = {}
const getters = {
  // 分模块后,state指代子模块的state
  UpperCaseName (state) {
    return state.userInfo.name.toUpperCase()
  }
}
export default {
  namespaced: true,
  state,
  mutations,
  actions,
  getters
}
Son1.vue
<!-- 测试访问模块中的getters - 原生 - -->
      <div>{{ $store.getters['user/UpperCaseName'] }}</div>
方法二:通过 mapGetters 映射
Son2.vue
<template>
    <div class="box">
      <h2>Son2 子组件</h2>
      从vuex中获取的值:<label>{{ count }}</label>
      <br />
      <button @click="subCount(1)">值 - 1</button>
      <button @click="subCount(5)">值 - 5</button>
      <button @click="subCount(10)">值 - 10</button>
      <button @click="changeCountAction(888)">一秒之后修改成888</button>
      <hr>
    <div>{{ filterList }}</div>
    <hr>
    <!-- 访问模块中的state -->
    <div>{{ user.userInfo.name }}</div>
    <div>{{ setting.theme }}</div>
    <div>user模块的数据{{ userInfo }}</div>
    <div>setting模块的数据{{ theme }}</div>
    <hr>
    <!-- 访问模块中的getters -->
    <div>{{ UpperCaseName }}</div>
    </div>
  </template>

<script>
import { mapState, mapMutations, mapActions, mapGetters } from 'vuex'
export default {
  name: 'Son2Com',
  computed: {
    // mapStore 和 mapGetters 都是映射属性
    ...mapState(['count', 'title', 'user', 'setting']),
    ...mapState('user', ['userInfo']),
    ...mapState('setting', ['theme', 'desc']),
    ...mapGetters(['filterList']),
    ...mapGetters('user', ['UpperCaseName'])
  },
  methods: {
    // mapMutation 和 mapActions 都是映射方法
    ...mapMutations(['subCount', 'changeCount']),
    ...mapActions(['changeCountAction'])
    // handleSub (n) {
    //   // this.$store.commit('subCount', n)
    //   this.subCount(n)
    // }
  }

}
</script>

  <style lang="css" scoped>
  .box {
    border: 3px solid #ccc;
    width: 400px;
    padding: 10px;
    margin: 20px;
  }
  h2 {
    margin-top: 10px;
  }
  </style>
1.10.4 mutation 的调用语法
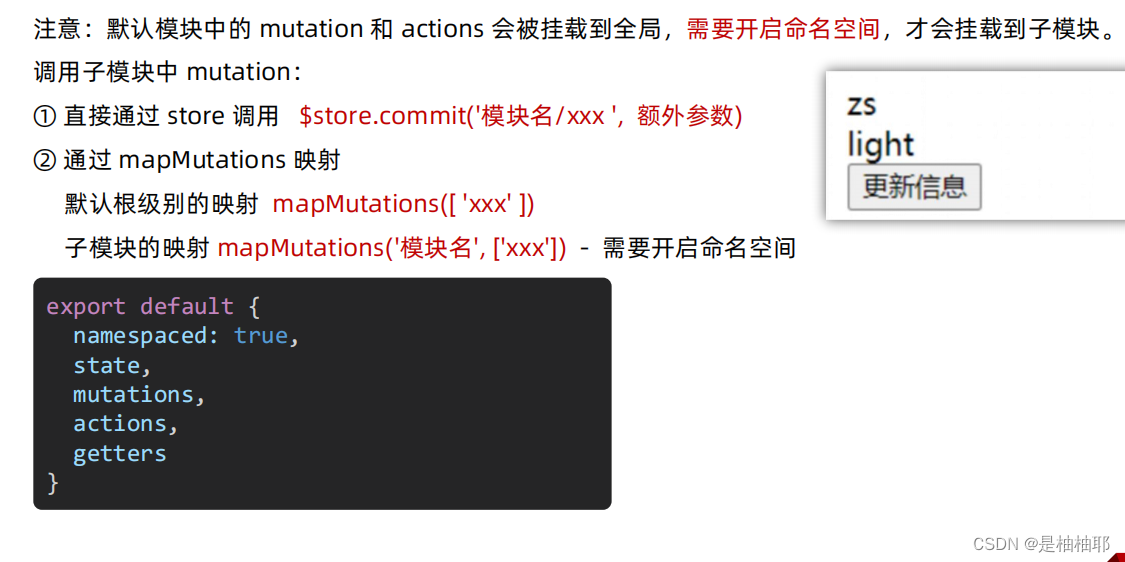
方法一:直接通过 store 调用
user.js
// user模块
const state = {
  userInfo: {
    name: 'zs',
    age: 18
  },
  score: 80
}
const mutations = {
  setUser (state, newUserinfo) {
    state.userInfo = newUserinfo
  }
}
const actions = {}
const getters = {
  // 分模块后,state指代子模块的state
  UpperCaseName (state) {
    return state.userInfo.name.toUpperCase()
  }
}
export default {
  namespaced: true,
  state,
  mutations,
  actions,
  getters
}
Son1.vue
<template>
    <div class="box">
      <h2>Son1 子组件</h2>
      从vuex中获取的值: <label>{{ $store.state.count }}</label>
      <br>
      <button @click="handleAdd(1)">值 + 1</button>
      <button @click="handleAdd(5)">值 + 5</button>
      <button @click="handleAdd(10)">值 + 10</button>
      <button @click="changeFn">改标题</button>
      <button @click="handleChange">一秒之后修改成666</button>
      <hr>
      <div>{{ $store.state.list }}</div>
      <div>{{ $store.getters.filterList }}</div>

      <hr>
      <!-- 测试访问模块中的state - 原生 -->
      <div>{{ $store.state.user.userInfo.name }}</div>
      <button @click="updateUser">更改个人信息</button>
      <div>{{ $store.state.setting.theme }}</div>
      <button @click="updateTheme">更改主题色</button>
      <hr>
      <!-- 测试访问模块中的getters - 原生 - -->
      <div>{{ $store.getters['user/UpperCaseName'] }}</div>
    </div>
  </template>

<script>
export default {
  name: 'Son1Com',
  methods: {
    handleAdd (n) {
      // 错误代码(vue默认不会监测,检测需要成本)
    //   this.$store.state.count++
    //   console.log(this.$store.state.count)

      // 应该通过 mutation 核心概念,进行修改数据
      //   this.$store.commit('addCount')

      // 调用带参数的mutation函数
      this.$store.commit('addCount', n)
    },
    changeFn () {
      this.$store.commit('changeTitle', '黑马程序员')
    },
    handleChange () {
      // 调用action
      // this.$store.dispatch('action名字', 额外参数)
      this.$store.dispatch('changeCountAction', 666)
    },
    updateUser () {
      // this.$store.commit('模块名/mutation名', 额外参数)
      this.$store.commit('user/setUser', {
        name: 'xiaowang',
        age: 25
      })
    }
  }
}
</script>

  <style lang="css" scoped>
  .box{
    border: 3px solid #ccc;
    width: 400px;
    padding: 10px;
    margin: 20px;
  }
  h2 {
    margin-top: 10px;
  }
  </style>
方法二:通过 mapMutations 映射
Son2.vue
<template>
    <div class="box">
      <h2>Son2 子组件</h2>
      从vuex中获取的值:<label>{{ count }}</label>
      <br />
      <button @click="subCount(1)">值 - 1</button>
      <button @click="subCount(5)">值 - 5</button>
      <button @click="subCount(10)">值 - 10</button>
      <button @click="changeCountAction(888)">一秒之后修改成888</button>
      <hr>
    <div>{{ filterList }}</div>
    <hr>
    <!-- 访问模块中的state -->
    <div>{{ user.userInfo.name }}</div>
    <div>{{ setting.theme }}</div>
    <div>user模块的数据{{ userInfo }}</div>
    <button @click="setUser({name: 'xiaoli', age: 80})">更新个人信息</button>
    <div>setting模块的数据{{ theme }}</div>
    <button @click="setTheme('skyblue')">更新主题</button>
    <hr>
    <!-- 访问模块中的getters -->
    <div>{{ UpperCaseName }}</div>
    </div>
  </template>

<script>
import { mapState, mapMutations, mapActions, mapGetters } from 'vuex'
export default {
  name: 'Son2Com',
  computed: {
    // mapStore 和 mapGetters 都是映射属性
    ...mapState(['count', 'title', 'user', 'setting']),
    ...mapState('user', ['userInfo']),
    ...mapState('setting', ['theme', 'desc']),
    ...mapGetters(['filterList']),
    ...mapGetters('user', ['UpperCaseName'])
  },
  methods: {
    // mapMutation 和 mapActions 都是映射方法
    // 全局级别的映射
    ...mapMutations(['subCount', 'changeCount']),
    ...mapActions(['changeCountAction']),
    // handleSub (n) {
    //   // this.$store.commit('subCount', n)
    //   this.subCount(n)
    // }
    // 分模块的映射
    ...mapMutations('setting', ['setTheme']),
    ...mapMutations('user', ['setUser'])
  }

}
</script>

  <style lang="css" scoped>
  .box {
    border: 3px solid #ccc;
    width: 400px;
    padding: 10px;
    margin: 20px;
  }
  h2 {
    margin-top: 10px;
  }
  </style>
1.10.5 action 的调用语法 (同理 - 直接类比 mutation 即可)
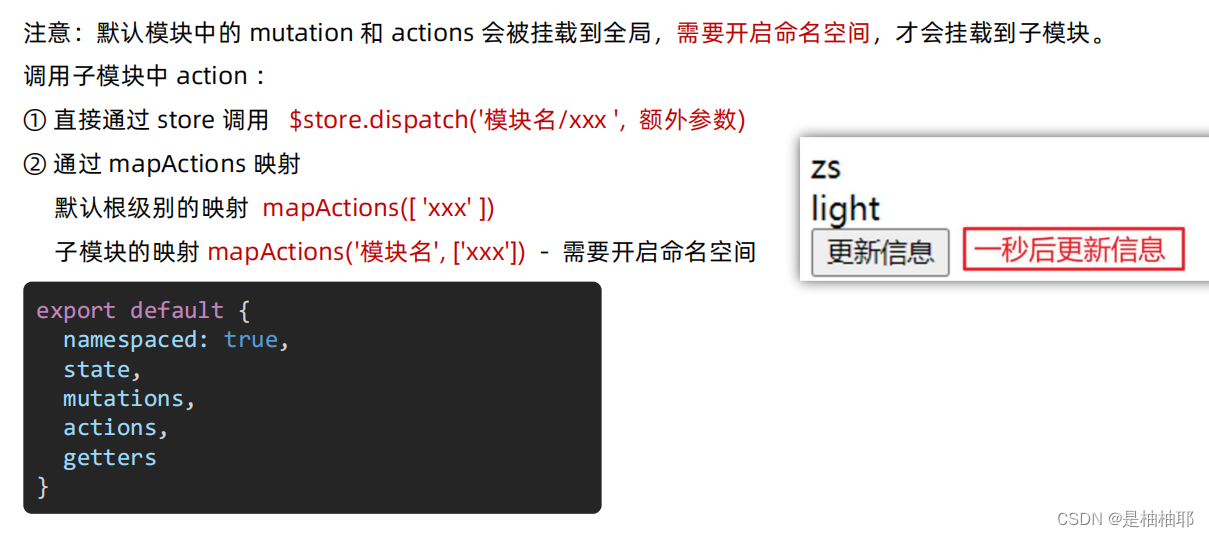
方法一:直接通过 store 调用
user.js
const actions = {
  setUserSecond (context, newUserinfo) {
    // 将异步在action中进行封装
    setTimeout(() => {
      // 调用mutation  context上下文,默认提交的就是自己模块的action和mutation
      context.commit('setUser', newUserinfo)
    }, 1000)
  }
}
Son1.vue
updaterUser2 () {
      // 调用action dispatch
      this.$store.dispatch('user/setUserSecond', {
        name: 'xiaohong',
        age: 28
      })
    },
方法二:通过 mapMutations 映射
Son2.vue
...mapActions('user', ['setUserSecond'])
<button @click="setUserSecond({name: 'xiaoli', age: 80})">一秒后更新个人信息</button>
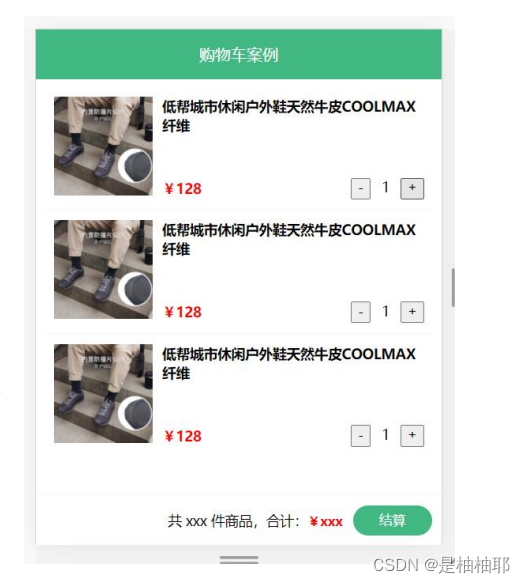
1.11 综合案例 - 购物车
1.目标:功能分析,创建项目,构建分析基本结构
- 功能模块分析
① 请求动态渲染购物车,数据存 vuex
② 数字框控件 修改数据
③ 动态计算 总价和总数量 - 脚手架新建项目 (注意:勾选vuex)
vue create vue-cart-demo - 将原本src内容清空,替换成素材的《vuex-cart-准备代码》并分析
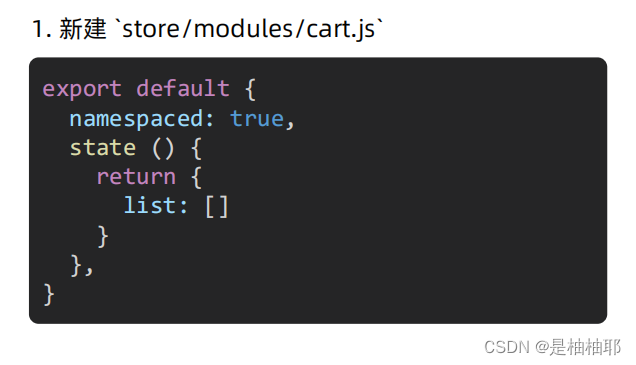
2.目标:构建 cart 购物车模块
说明:既然明确数据要存 vuex,建议分模块存,购物车数据存 cart 模块,将来还会有 user 模块,article 模块…
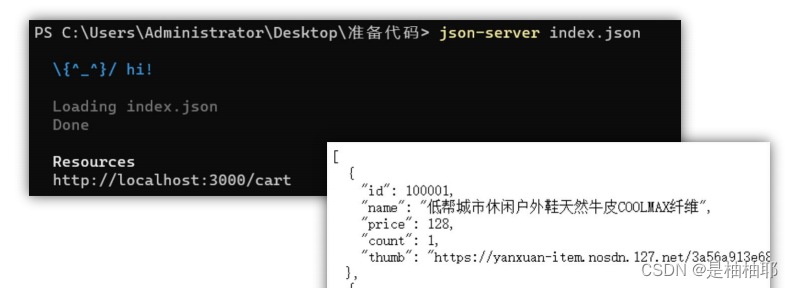
3.目标:基于 json-server 工具,准备后端接口服务环境
- 安装全局工具 json-server (全局工具仅需要安装一次)官网
yarn global add json-server 或 npm i json-server -g - 代码根目录新建一个 db 目录
- 将资料 index.json 移入 db 目录
- 进入 db 目录,执行命令,启动后端接口服务
json-server index.json - 访问接口测试 http://localhost:3000/cart
推荐: json-server --watch index.json (可以实时监听 json 文件的修改)
4.目标:请求获取数据存入 vuex, 映射渲染

npm install axios --save --legacy-peer-deps
- 1.安装axios
npm i axios
安装过程中出现如下报错: code ERESOLVE ERESOLVE could not resolve
出现问题的原因:由于npm不同版本库之间命令不兼容。
解决方法:
终端输入命令:npm install axios -save --legacy-peer-deps
5.目标:修改数量功能完成

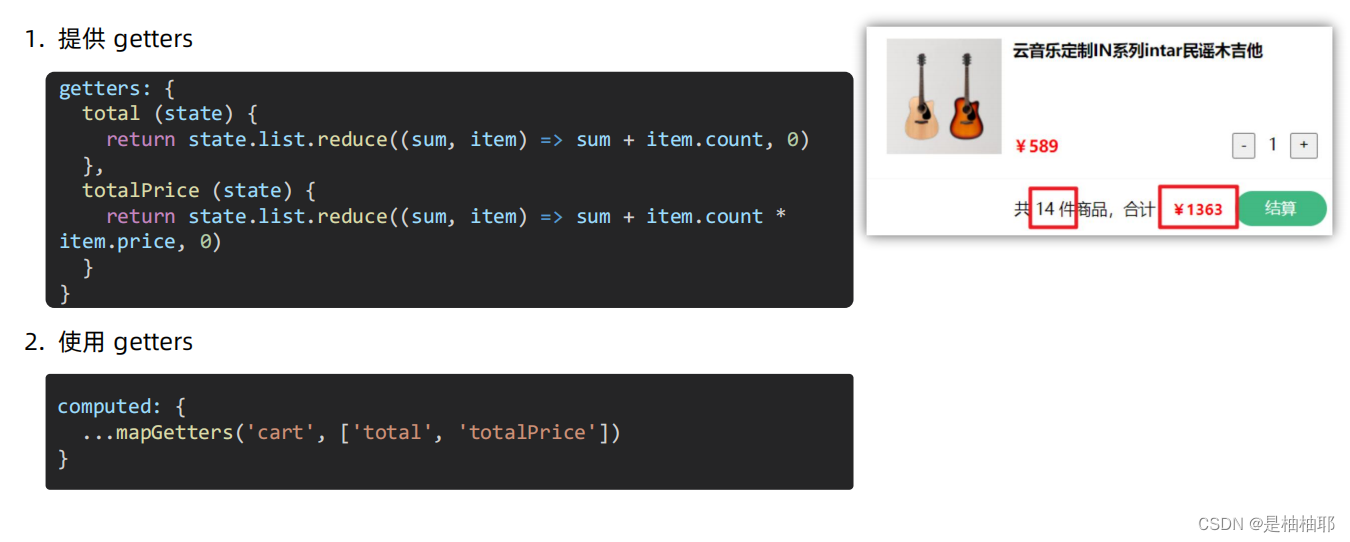
6.目标:底部 getters 统计
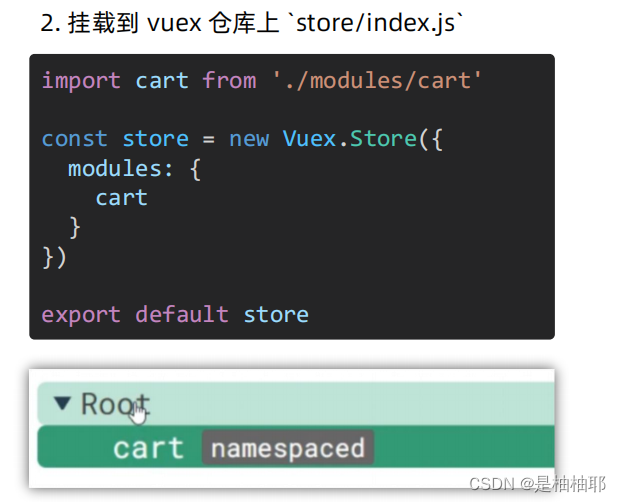
index.js
import Vue from 'vue'
import Vuex from 'vuex'
import cart from './modules/cart'

Vue.use(Vuex)

export default new Vuex.Store({
  modules: {
    cart
  }
})
modules - cart.js
import axios from 'axios'
export default {
  namespaced: true,
  state () {
    return {
      // 购物车数据[{}, {}]
      list: []
    }
  },
  mutations: {
    updateList (state, newList) {
      state.list = newList
    },
    updateCount (state, obj) {
      // console.log(obj)
      const goods = state.list.find(item => item.id === obj.id)
      goods.count = obj.newCount
    }
  },
  actions: {
    // 请求方式: get
    // 请求地址:  http://localhost:3000
    async getList (context) {
      const res = await axios.get('http://localhost:3000/cart')
      // console.log(res.data)
      context.commit('updateList', res.data)
    },
    // 请求方式:patch
    // 请求地址:http://localhost:3000/cart/:id值 表示修改的是哪个对象
    // {
    //   name: '新值', 【可选】
    //   price: '新值', 【可选】
    //   count: '新值', 【可选】
    //   thumb: '新值', 【可选】
    // }
    async updateCountAsync (context, obj) {
      // console.log(obj)
      // 将修改更新同步到后台服务器
      await axios.patch(`http://localhost:3000/cart/${obj.id}`, {
        count: obj.newCount
      })
      // console.log(res)
      // 将修改更新同步到vuex
      context.commit('updateCount', {
        id: obj.id,
        newCount: obj.newCount
      })
    }
  },
  getters: {
    // 商品总数量 累加count * price
    total (state) {
      return state.list.reduce((sum, item) => sum + item.count, 0)
    },
    // 商品总价格 累加count * price
    totalPrice (state) {
      return state.list.reduce((sum, item) => sum + item.count * item.price, 0)
    }
  }
}
App.vue
<template>
  <div class="app-container">
    <!-- Header 区域 -->
    <cart-header></cart-header>

    <!-- 商品 Item 项组件 -->
    <cart-item v-for="item in list" :key="item.id" :item="item"></cart-item>

    <!-- Foote 区域 -->
    <cart-footer></cart-footer>
  </div>
</template>

<script>
import CartHeader from '@/components/cart-header.vue'
import CartFooter from '@/components/cart-footer.vue'
import CartItem from '@/components/cart-item.vue'

import { mapState } from 'vuex'

export default {
  name: 'App',
  created () {
    this.$store.dispatch('cart/getList')
  },
  computed: {
    ...mapState('cart', ['list'])
  },
  components: {
    CartHeader,
    CartFooter,
    CartItem
  }
}
</script>

<style lang="less" scoped>
.app-container {
  padding: 50px 0;
  font-size: 14px;
}
</style>
components - cart-item.vue
<template>
  <div class="goods-container">
    <!-- 左侧图片区域 -->
    <div class="left">
      <img :src="item.thumb" class="avatar" alt="">
    </div>
    <!-- 右侧商品区域 -->
    <div class="right">
      <!-- 标题 -->
      <div class="title">{{ item.name }}</div>
      <div class="info">
        <!-- 单价 -->
        <span class="price">¥{{ item.price }}</span>
        <div class="btns">
          <!-- 按钮区域 -->
          <button class="btn btn-light" @click="btnClick(-1)">-</button>
          <span class="count">{{ item.count }}</span>
          <button class="btn btn-light" @click="btnClick(1)">+</button>
        </div>
      </div>
    </div>
  </div>
</template>

<script>
export default {
  name: 'CartItem',
  methods: {
    btnClick (step) {
      // console.log(step)
      const newCount = this.item.count + step
      const id = this.item.id
      // console.log(id, newCount)
      if (newCount < 1) return
      this.$store.dispatch('cart/updateCountAsync', {
        id,
        newCount
      })
    }

  },
  props: {
    item: {
      type: Object,
      required: true
    }
  }
}
</script>

<style lang="less" scoped>
.goods-container {
  display: flex;
  padding: 10px;
  + .goods-container {
    border-top: 1px solid #f8f8f8;
  }
  .left {
    .avatar {
      width: 100px;
      height: 100px;
    }
    margin-right: 10px;
  }
  .right {
    display: flex;
    flex-direction: column;
    justify-content: space-between;
    flex: 1;
    .title {
      font-weight: bold;
    }
    .info {
      display: flex;
      justify-content: space-between;
      align-items: center;
      .price {
        color: red;
        font-weight: bold;
      }
      .btns {
        .count {
          display: inline-block;
          width: 30px;
          text-align: center;
        }
      }
    }
  }
}

.custom-control-label::before,
.custom-control-label::after {
  top: 3.6rem;
}
</style>
cart-footer.vue
<template>
  <div class="footer-container">
    <!-- 中间的合计 -->
    <div>
      <span>共 {{total}} 件商品,合计:</span>
      <span class="price">¥{{ totalPrice }}</span>
    </div>
    <!-- 右侧结算按钮 -->
    <button class="btn btn-success btn-settle">结算</button>
  </div>
</template>

<script>
import { mapGetters } from 'vuex'
export default {
  name: 'CartFooter',
  computed: {
    ...mapGetters('cart', ['total', 'totalPrice'])
  }
}
</script>

<style lang="less" scoped>
.footer-container {
  background-color: white;
  height: 50px;
  border-top: 1px solid #f8f8f8;
  display: flex;
  justify-content: flex-end;
  align-items: center;
  padding: 0 10px;
  position: fixed;
  bottom: 0;
  left: 0;
  width: 100%;
  z-index: 999;
}

.price {
  color: red;
  font-size: 13px;
  font-weight: bold;
  margin-right: 10px;
}

.btn-settle {
  height: 30px;
  min-width: 80px;
  margin-right: 20px;
  border-radius: 20px;
  background: #42b983;
  border: none;
  color: white;
}
</style>