前言
此前,笔者梳理了语音相关的两篇文章:
- 如何打造车载语音交互:Google Voice Interaction 给你答案:介绍的是 3rd Party App 如何通过
Voice InteractionAPI 快速调用系统的语音交互服务快速完成确认、选择的基础语音对话 - 直面原理:5 张图彻底了解 Android TextToSpeech 机制:侧重于阐述 TTS Engine App 如何提供
Text-to-Speech文字转语音服务,以及 3rd Party App 又如何便捷地调用这些服务。
还缺最后一块即如何向系统提供语音识别的 SpeechRecognizer 服务、3rd Party App 如何使用他们,以及系统和联系这两者?
本篇文章将为你补齐这块知识点。
如何实现识别服务?
首先我们得提供识别服务的实现,简单来说继承 RecognitionService 实现最重要的几个抽象方法即可:
- 首先可以定义抽象的识别 Engine 的接口
IRecognitionEngine - 在 RecognitionService 启动的时候获取识别 engine 提供商的实现实例
- 在
onStartListening()里解析识别请求 Intent 中的参数,比如语言、最大结果数等信息封装成 json 字符串传递给 engine 的开始识别。那么 Engine 也需要依据参数进行识别实现方面的调整,并将识别过程中相应的状态、结果返回,比如开始说话 beginningOfSpeech() 、结束说话 endOfSpeech() 、中间结果 partialResults() 等 onStopListening()里调用 engine 的停止识别,一样的需要 engine 回传结果,比如最终识别结果 results()onCancel()里执行 engine 提供的 release() 进行识别 engine 的解绑、资源释放
interface IRecognitionEngine {
    fun init()

    fun startASR(parameter: String, callback: Callback?)

    fun stopASR(callback: Callback?)

    fun release(callback: Callback?)
}

class CommonRecognitionService : RecognitionService() {
    private val recognitionEngine: IRecognitionEngine by lazy {
        RecognitionProvider.provideRecognition()
    }

    override fun onCreate() {
        super.onCreate()
        recognitionEngine.init()
    }

    override fun onStartListening(intent: Intent?, callback: Callback?) {
        val params: String = "" // Todo parse parameter from intent

        recognitionEngine.startASR(params, callback)
    }

    override fun onStopListening(callback: Callback?) {
        recognitionEngine.stopASR(callback)
    }

    override fun onCancel(callback: Callback?) {
        recognitionEngine.release(callback)
    }
}
当然不要忘记在 Manifest 中声明:
<service
    android:name=".recognition.service.CommonRecognitionService"
    android:exported="true">
    <intent-filter>
        <action android:name="android.speech.RecognitionService"/>
    </intent-filter>
</service>
如何请求识别?
首先得声明 capture audio 的 Runtime 权限,还需补充运行时权限的代码逻辑。
<manifest ... >
    <uses-configuration android:name="android.permission.RECORD_AUDIO"/>
</manifest>
另外,Android 11 以上的话,需要额外添加对识别服务的包名 query 声明。
<manifest ... >
    ...
    <queries>
        <intent>
            <action
                android:name="android.speech.RecognitionService" />
        </intent>
    </queries>
</manifest>
权限满足之后,最好先检查整个系统里是否有 Recognition 服务可用,NO 的话,直接结束即可。
class RecognitionHelper(val context: Context) {
    fun prepareRecognition(): Boolean {
        if (!SpeechRecognizer.isRecognitionAvailable(context)) {
            Log.e("RecognitionHelper", "System has no recognition service yet.")
            return false
        }
        ...
    }
}
有可用服务的话,通过 SpeechRecognizer 提供的静态方法创建调用识别的入口实例,该方法必须在主线程调用。
class RecognitionHelper(val context: Context) : RecognitionListener{
    private lateinit var recognizer: SpeechRecognizer

    fun prepareRecognition(): Boolean {
        ...
        recognizer = SpeechRecognizer.createSpeechRecognizer(context)
        ...
    }
}
当然如果系统搭载的服务不止一个,并且已知了其包名,可指定识别的实现方:
public static SpeechRecognizer createSpeechRecognizer (Context context,
                ComponentName serviceComponent)
接下来就是设置 Recognition 的监听器,对应着识别过程中各种状态,比如:
- onPartialResults() 返回的中间识别结果,通过 SpeechRecognizer#RESULTS_RECOGNITION key 去 Bundle 中获取识别字符串 getStringArrayList(String)
- onResults() 将返回最终识别的结果,解析办法同上
- onBeginningOfSpeech():检测到说话开始
- onEndOfSpeech():检测到说话结束
- onError() 将返回各种错误,和 SpeechRecognizer#ERROR_XXX 中各数值相对应,例如没有麦克风权限的话,会返回
ERROR_INSUFFICIENT_PERMISSIONS - 等等
class RecognitionHelper(val context: Context) : RecognitionListener{
    ...
    fun prepareRecognition(): Boolean {
        ...
        recognizer.setRecognitionListener(this)
        return true
    }

    override fun onReadyForSpeech(p0: Bundle?) {
        TODO("Not yet implemented")
    }

    override fun onBeginningOfSpeech() {
        TODO("Not yet implemented")
    }

    override fun onRmsChanged(p0: Float) {
        TODO("Not yet implemented")
    }

    override fun onBufferReceived(p0: ByteArray?) {
        TODO("Not yet implemented")
    }

    override fun onEndOfSpeech() {
        TODO("Not yet implemented")
    }

    override fun onError(p0: Int) {
        TODO("Not yet implemented")
    }

    override fun onResults(p0: Bundle?) {
        TODO("Not yet implemented")
    }

    override fun onPartialResults(p0: Bundle?) {
        TODO("Not yet implemented")
    }

    override fun onEvent(p0: Int, p1: Bundle?) {
        TODO("Not yet implemented")
    }
}
之后创建识别的必要 Intent 信息并启动,信息包括:
EXTRA_LANGUAGE_MODEL:必选,期望识别的偏好模型,比如代码里设置的自由形式的 LANGUAGE_MODEL_FREE_FORM 模型,还有依赖网络搜索的 LANGUAGE_MODEL_WEB_SEARCH 模型等EXTRA_PARTIAL_RESULTS:可选,是否要求识别服务回传识别途中的结果,默认 falseEXTRA_MAX_RESULTS:可选,设置允许服务返回的最多结果数值,int 类型EXTRA_LANGUAGE:可选,设置识别语言,默认情况下是 Locale.getDefault() 的地区语言(笔者使用的是 Google Assistant 提供的识别服务,暂不支持中文,所以此处配置的 Locale 为 ENGLISH)- 等
另外,需要留意两点:1. 此方法必须在上述监听器设置之后进行,2. 该方法得在主线程发起:
class RecognitionHelper(val context: Context) : RecognitionListener{
    ...
    fun startRecognition() {
        val intent = createRecognitionIntent()
        recognizer.startListening(intent)
    }
    ...
}

fun createRecognitionIntent() = Intent(RecognizerIntent.ACTION_RECOGNIZE_SPEECH).apply {
    putExtra(RecognizerIntent.EXTRA_LANGUAGE_MODEL, RecognizerIntent.LANGUAGE_MODEL_FREE_FORM)
    putExtra(RecognizerIntent.EXTRA_PARTIAL_RESULTS, true)
    putExtra(RecognizerIntent.EXTRA_MAX_RESULTS, 3)
    putExtra(RecognizerIntent.EXTRA_LANGUAGE, Locale.ENGLISH)
}
下面我们添加一个布局调用上述的 RecognitionHelper 进行识别的初始化和启动,并将结果进行展示。

同时添加和 UI 交互的中间识别结果和最终识别结果的 interface,将 RecognitionListener 的数据带回。
interface ASRResultListener {
    fun onPartialResult(result: String)

    fun onFinalResult(result: String)
}

class RecognitionHelper(private val context: Context) : RecognitionListener {
    ...
    private lateinit var mResultListener: ASRResultListener

    fun prepareRecognition(resultListener: ASRResultListener): Boolean {
        ...
        mResultListener = resultListener
        ...
    }

    ...

    override fun onPartialResults(bundle: Bundle?) {
        bundle?.getStringArrayList(SpeechRecognizer.RESULTS_RECOGNITION)?.let {
            Log.d(
                "RecognitionHelper", "onPartialResults() with:$bundle" +
                        " results:$it"
            )

            mResultListener.onPartialResult(it[0])
        }
    }

    override fun onResults(bundle: Bundle?) {
        bundle?.getStringArrayList(SpeechRecognizer.RESULTS_RECOGNITION)?.let {
            Log.d(
                "RecognitionHelper", "onResults() with:$bundle" +
                        " results:$it"
            )

            mResultListener.onFinalResult(it[0])
        }
    }
}
接着,Activity 实现该借口,将数据展示到 TextView,为了能够让肉眼能够分辨中间结果的识别过程,在更新 TextView 前进行 300ms 的等待。
class RecognitionActivity : AppCompatActivity(), ASRResultListener {
    private lateinit var binding: RecognitionLayoutBinding
    private val recognitionHelper: RecognitionHelper by lazy {
        RecognitionHelper(this)
    }

    private var updatingTextTimeDelayed = 0L
    private val mainHandler = Handler(Looper.getMainLooper())

    override fun onCreate(savedInstanceState: Bundle?) {
        ...

        if (!recognitionHelper.prepareRecognition(this)) {
            Toast.makeText(this, "Recognition not available", Toast.LENGTH_SHORT).show()

            return
        }

        binding.start.setOnClickListener {
            Log.d("RecognitionHelper", "startRecognition()")

            recognitionHelper.startRecognition()
        }

        binding.stop.setOnClickListener {
            Log.d("RecognitionHelper", "stopRecognition()")

            recognitionHelper.stopRecognition()
        }
    }

    override fun onStop() {
        super.onStop()
        Log.d("RecognitionHelper", "onStop()")

        recognitionHelper.releaseRecognition()
    }

    override fun onPartialResult(result: String) {
        Log.d("RecognitionHelper", "onPartialResult() with result:$result")

        updatingTextTimeDelayed += 300L
        mainHandler.postDelayed(
            {
                Log.d("RecognitionHelper", "onPartialResult() updating")
                binding.recoAsr.text = result
            }, updatingTextTimeDelayed
        )
    }

    override fun onFinalResult(result: String) {
        Log.d("RecognitionHelper", "onFinalResult() with result:$result")

        updatingTextTimeDelayed += 300L
        mainHandler.postDelayed(
            {
                Log.d("RecognitionHelper", "onFinalResult() updating")
                binding.recoAsr.text = result
            }, updatingTextTimeDelayed
        )
    }
}
我们点击“START RECOGNITION” button,然后可以看到手机右上角显示了 mic 录音中,当我们说出“Can you introduce yourself” 后,TextView 能够逐步上屏,呈现打字机的效果。

下面是过程中的 log,也反映了识别过程:
// 初始化
08-15 22:43:13.963  6879  6879 D RecognitionHelper: onCreate()
08-15 22:43:14.037  6879  6879 E RecognitionHelper: audio recording permission granted
08-15 22:43:14.050  6879  6879 D RecognitionHelper: onStart()

// 开始识别
08-15 22:43:41.491  6879  6879 D RecognitionHelper: startRecognition()
08-15 22:43:41.577  6879  6879 D RecognitionHelper: onReadyForSpeech()
08-15 22:43:41.776  6879  6879 D RecognitionHelper: onRmsChanged() with:-2.0
...
08-15 22:43:46.532  6879  6879 D RecognitionHelper: onRmsChanged() with:-0.31999993

// 检测到开始说话
08-15 22:43:46.540  6879  6879 D RecognitionHelper: onBeginningOfSpeech()

// 第 1 个识别结果:Can
08-15 22:43:46.541  6879  6879 D RecognitionHelper: onPartialResults() with:Bundle[{results_recognition=[Can], android.speech.extra.UNSTABLE_TEXT=[]}] results:[Can]
08-15 22:43:46.541  6879  6879 D RecognitionHelper: onPartialResult() with result:Can

// 第 2 个识别结果:Can you
08-15 22:43:46.542  6879  6879 D RecognitionHelper: onPartialResults() with:Bundle[{results_recognition=[Can you], android.speech.extra.UNSTABLE_TEXT=[]}] results:[Can you]
08-15 22:43:46.542  6879  6879 D RecognitionHelper: onPartialResult() with result:Can you

// 第 3 个识别结果:Can you in
08-15 22:43:46.542  6879  6879 D RecognitionHelper: onPartialResults() with:Bundle[{results_recognition=[Can you in], android.speech.extra.UNSTABLE_TEXT=[]}] results:[Can you in]
08-15 22:43:46.542  6879  6879 D RecognitionHelper: onPartialResult() with result:Can you in

// 第 4 个识别结果:Can you intro
08-15 22:43:46.542  6879  6879 D RecognitionHelper: onPartialResults() with:Bundle[{results_recognition=[Can you intro], android.speech.extra.UNSTABLE_TEXT=[]}] results:[Can you intro]
08-15 22:43:46.542  6879  6879 D RecognitionHelper: onPartialResult() with result:Can you intro

// 第 n 个识别结果:Can you introduce yourself
08-15 22:43:46.542  6879  6879 D RecognitionHelper: onPartialResults() with:Bundle[{results_recognition=[Can you introduce yourself], android.speech.extra.UNSTABLE_TEXT=[]}] results:[Can you introduce yourself]
08-15 22:43:46.542  6879  6879 D RecognitionHelper: onPartialResult() with result:Can you introduce yourself

// 检测到停止说话
08-15 22:43:46.543  6879  6879 D RecognitionHelper: onEndOfSpeech()
08-15 22:43:46.543  6879  6879 D RecognitionHelper: onEndOfSpeech()
08-15 22:43:46.545  6879  6879 D RecognitionHelper: onResults() with:Bundle[{results_recognition=[Can you introduce yourself], confidence_scores=[0.0]}] results:[Can you introduce yourself]

// 识别到最终结果:Can you introduce yourself
08-15 22:43:46.545  6879  6879 D RecognitionHelper: onFinalResult() with result:Can you introduce yourself
系统如何调度?
SpeechRecognizer 没有像 Text-to-speech 一样在设置中提供独立的设置入口,其默认 App 由 VoiceInteraction 联动设置。
但如下命令可以 dump 出系统默认的识别服务。
adb shell settings get secure voice_recognition_service
当在模拟器中 dump 的话,可以看到默认搭载的是 Google 的识别服务。
com.google.android.tts/com.google.android.apps.speech.tts.googletts.service.GoogleTTSRecognitionService
在三星设备中 dump 的话,则是 Samsung 提供的识别服务。
com.samsung.android.bixby.agent/.mainui.voiceinteraction.RecognitionServiceTrampoline
我们从请求识别中提及的几个 API 入手探究一下识别服务的实现原理。
检测识别服务
检查服务是否可用的实现很简单,即是用 Recognition 专用的 Action(“android.speech.RecognitionService”) 去 PackageManager 中检索,能够启动的 App 存在 1 个的话,即认为系统有识别服务可用。
    public static boolean isRecognitionAvailable(final Context context) {
        final List<ResolveInfo> list = context.getPackageManager().queryIntentServices(
                new Intent(RecognitionService.SERVICE_INTERFACE), 0);
        return list != null && list.size() != 0;
    }
初始化识别服务
正如【如何请求识别?】章节中讲述的,调用静态方法 createSpeechRecognizer() 完成初始化,内部将检查 Context 是否存在、依据是否指定识别服务的包名决定是否记录目标的服务名称。
    public static SpeechRecognizer createSpeechRecognizer(final Context context) {
        return createSpeechRecognizer(context, null);
    }

    public static SpeechRecognizer createSpeechRecognizer(final Context context,
            final ComponentName serviceComponent) {
        if (context == null) {
            throw new IllegalArgumentException("Context cannot be null");
        }
        checkIsCalledFromMainThread();
        return new SpeechRecognizer(context, serviceComponent);
    }

    private SpeechRecognizer(final Context context, final ComponentName serviceComponent) {
        mContext = context;
        mServiceComponent = serviceComponent;
        mOnDevice = false;
    }
得到 SpeechRecognizer 之后调用 setRecognitionListener() 则稍微复杂些:
- 检查调用源头是否属于主线程
- 创建专用 Message MSG_CHANGE_LISTENER
- 如果系统处理 Recognition 请求的服务 SpeechRecognitionManagerService 尚未建立连接,先将该 Message 排入 Pending Queue,等后续发起识别的时候创建连接后会将 Message 发往 Handler
- 反之直接放入 Handler 等待调度
    public void setRecognitionListener(RecognitionListener listener) {
        checkIsCalledFromMainThread();
        putMessage(Message.obtain(mHandler, MSG_CHANGE_LISTENER, listener));
    }

    private void putMessage(Message msg) {
        if (mService == null) {
            mPendingTasks.offer(msg);
        } else {
            mHandler.sendMessage(msg);
        }
    }
而 Handler 通过 handleChangeListener() 将 Listener 实例更新。
    private Handler mHandler = new Handler(Looper.getMainLooper()) {
        @Override
        public void handleMessage(Message msg) {
            switch (msg.what) {
                ...
                case MSG_CHANGE_LISTENER:
                    handleChangeListener((RecognitionListener) msg.obj);
                    break;
                ...
            }
        }
    };

    private void handleChangeListener(RecognitionListener listener) {
        if (DBG) Log.d(TAG, "handleChangeListener, listener=" + listener);
        mListener.mInternalListener = listener;
    }
开始识别
startListening() 首先将确保识别请求的 Intent 不为空,否则弹出 “intent must not be null” 的提示,接着检查调用线程是否是主线程,反之抛出 “SpeechRecognizer should be used only from the application’s main thread” 的 Exception。
然后就是确保服务是准备妥当的,不然的话调用 connectToSystemService() 建立识别服务的连接。
    public void startListening(final Intent recognizerIntent) {
        if (recognizerIntent == null) {
            throw new IllegalArgumentException("intent must not be null");
        }
        checkIsCalledFromMainThread();

        if (mService == null) {
            // First time connection: first establish a connection, then dispatch #startListening.
            connectToSystemService();
        }
        putMessage(Message.obtain(mHandler, MSG_START, recognizerIntent));
    }
connectToSystemService() 的第一步是调用 getSpeechRecognizerComponentName() 获取识别服务的组件名称,一种是来自于请求 App 的指定,一种是来自 SettingsProvider 中存放的当前识别服务的包名 VOICE_RECOGNITION_SERVICE,其实就是和 VoiceInteraction 的 App 一致。如果包名不存在的话结束。
包名确实存在的话,通过 IRecognitionServiceManager.aidl 向 SystemServer 中管理语音识别的 SpeechRecognitionManagerService 系统服务发送创建 Session 的请求。
    /** Establishes a connection to system server proxy and initializes the session. */
    private void connectToSystemService() {
        if (!maybeInitializeManagerService()) {
            return;
        }

        ComponentName componentName = getSpeechRecognizerComponentName();

        if (!mOnDevice && componentName == null) {
            mListener.onError(ERROR_CLIENT);
            return;
        }

        try {
            mManagerService.createSession(
                    componentName,
                    mClientToken,
                    mOnDevice,
                    new IRecognitionServiceManagerCallback.Stub(){
                        @Override
                        public void onSuccess(IRecognitionService service) throws RemoteException {
                            mService = service;
                            while (!mPendingTasks.isEmpty()) {
                                mHandler.sendMessage(mPendingTasks.poll());
                            }
                        }

                        @Override
                        public void onError(int errorCode) throws RemoteException {
                            mListener.onError(errorCode);
                        }
                    });
        } catch (RemoteException e) {
            e.rethrowFromSystemServer();
        }
    }
SpeechRecognitionManagerService 的处理是调用 SpeechRecognitionManagerServiceImpl 实现。
// SpeechRecognitionManagerService.java
    final class SpeechRecognitionManagerServiceStub extends IRecognitionServiceManager.Stub {
        @Override
        public void createSession(
                ComponentName componentName,
                IBinder clientToken,
                boolean onDevice,
                IRecognitionServiceManagerCallback callback) {
            int userId = UserHandle.getCallingUserId();
            synchronized (mLock) {
                SpeechRecognitionManagerServiceImpl service = getServiceForUserLocked(userId);
                service.createSessionLocked(componentName, clientToken, onDevice, callback);
            }
        }
        ...
    }
SpeechRecognitionManagerServiceImpl 则是交给 RemoteSpeechRecognitionService 类完成和 App 识别服务的绑定,可以看到 RemoteSpeechRecognitionService 将负责和识别服务的通信。
// SpeechRecognitionManagerServiceImpl.java
    void createSessionLocked( ... ) {
        ...
        RemoteSpeechRecognitionService service = createService(creatorCallingUid, serviceComponent);
        ...
        service.connect().thenAccept(binderService -> {
            if (binderService != null) {
                try {
                    callback.onSuccess(new IRecognitionService.Stub() {
                        @Override
                        public void startListening( ... )
                                        throws RemoteException {
                            ...
                            service.startListening(recognizerIntent, listener, attributionSource);
                        }
                        ...
                    });
                } catch (RemoteException e) {
                    tryRespondWithError(callback, SpeechRecognizer.ERROR_CLIENT);
                }
            } else {
                tryRespondWithError(callback, SpeechRecognizer.ERROR_CLIENT);
            }
        });
    }
当和识别服务 App 的连接建立成功或者已经存在的话,发送 MSG_START 的 Message,Main Handler 则是调用 handleStartListening() 继续。其首先会再度检查 mService 是否存在,避免引发 NPE。
接着,向该 AIDL 接口代理对象发送开始聆听的请求。
    private Handler mHandler = new Handler(Looper.getMainLooper()) {
        @Override
        public void handleMessage(Message msg) {
            switch (msg.what) {
                case MSG_START:
                    handleStartListening((Intent) msg.obj);
                    break;
                ...
            }
        }
    };

    private void handleStartListening(Intent recognizerIntent) {
        if (!checkOpenConnection()) {
            return;
        }
        try {
            mService.startListening(recognizerIntent, mListener, mContext.getAttributionSource());
        }
        ...
    }
该 AIDL 的定义在如下文件中:
// android/speech/IRecognitionService.aidl
oneway interface IRecognitionService {
    void startListening(in Intent recognizerIntent, in IRecognitionListener listener,
            in AttributionSource attributionSource);

    void stopListening(in IRecognitionListener listener);

    void cancel(in IRecognitionListener listener, boolean isShutdown);
    ...
}
该 AIDL 的实现在系统的识别管理类 SpeechRecognitionManagerServiceImpl 中:
// com/android/server/speech/SpeechRecognitionManagerServiceImpl.java
    void createSessionLocked( ... ) {
        ...
        service.connect().thenAccept(binderService -> {
            if (binderService != null) {
                try {
                    callback.onSuccess(new IRecognitionService.Stub() {
                        @Override
                        public void startListening( ...) {
                            attributionSource.enforceCallingUid();
                            if (!attributionSource.isTrusted(mMaster.getContext())) {
                                attributionSource = mMaster.getContext()
                                        .getSystemService(PermissionManager.class)
                                        .registerAttributionSource(attributionSource);
                            }
                            service.startListening(recognizerIntent, listener, attributionSource);
                        }
                        ...
                    });
                } ...
            } else {
                tryRespondWithError(callback, SpeechRecognizer.ERROR_CLIENT);
            }
        });
    }
此后还要经过一层 RemoteSpeechRecognitionService 的中转:
// com/android/server/speech/RemoteSpeechRecognitionService.java
void startListening(Intent recognizerIntent, IRecognitionListener listener,
            @NonNull AttributionSource attributionSource) {
        ...
        synchronized (mLock) {
            if (mSessionInProgress) {
                tryRespondWithError(listener, SpeechRecognizer.ERROR_RECOGNIZER_BUSY);
                return;
            }

            mSessionInProgress = true;
            mRecordingInProgress = true;

            mListener = listener;
            mDelegatingListener = new DelegatingListener(listener, () -> {
                synchronized (mLock) {
                    resetStateLocked();
                }
            });

            final DelegatingListener listenerToStart = this.mDelegatingListener;
            run(service ->
                    service.startListening(
                            recognizerIntent,
                            listenerToStart,
                            attributionSource));
        }
    }
最后调用具体服务的实现,自然位于 RecognitionService 中,该 Binder 线程向主线程发送 MSG_START_LISTENING Message:
/** Binder of the recognition service */
    private static final class RecognitionServiceBinder extends IRecognitionService.Stub {
        ...
        @Override
        public void startListening(Intent recognizerIntent, IRecognitionListener listener,
                @NonNull AttributionSource attributionSource) {
            final RecognitionService service = mServiceRef.get();
            if (service != null) {
                service.mHandler.sendMessage(Message.obtain(service.mHandler,
                        MSG_START_LISTENING, service.new StartListeningArgs(
                                recognizerIntent, listener, attributionSource)));
            }
        }
        ...
    }

    private final Handler mHandler = new Handler() {
        @Override
        public void handleMessage(Message msg) {
            switch (msg.what) {
                case MSG_START_LISTENING:
                    StartListeningArgs args = (StartListeningArgs) msg.obj;
                    dispatchStartListening(args.mIntent, args.mListener, args.mAttributionSource);
                    break;
                ...
            }
        }
    };
Handler 接受一样将具体事情交由 dispatchStartListening() 继续,最重要的内容是检查发起识别的 Intent 中是否提供了 EXTRA_AUDIO_SOURCE 活跃音频来源,或者请求的 App 是否具备 RECORD_AUDIO 的 permission。
private void dispatchStartListening(Intent intent, final IRecognitionListener listener,
            @NonNull AttributionSource attributionSource) {
        try {
            if (mCurrentCallback == null) {
                boolean preflightPermissionCheckPassed =
                        intent.hasExtra(RecognizerIntent.EXTRA_AUDIO_SOURCE)
                        || checkPermissionForPreflightNotHardDenied(attributionSource);
                if (preflightPermissionCheckPassed) {
                    mCurrentCallback = new Callback(listener, attributionSource);
                    RecognitionService.this.onStartListening(intent, mCurrentCallback);
                }

                if (!preflightPermissionCheckPassed || !checkPermissionAndStartDataDelivery()) {
                    listener.onError(SpeechRecognizer.ERROR_INSUFFICIENT_PERMISSIONS);
                    if (preflightPermissionCheckPassed) {
                        // If we attempted to start listening, cancel the callback
                        RecognitionService.this.onCancel(mCurrentCallback);
                        dispatchClearCallback();
                    }
                }
                ...
            }
        } catch (RemoteException e) {
            Log.d(TAG, "onError call from startListening failed");
        }
    }
任一条件满足的话,调用服务实现的 onStartListening 方法发起识别,具体逻辑由各自的服务决定,其最终将调用 Callback 返回识别状态和结果,对应着【如何请求识别?】章节里对应的 RecognitionListener 回调。
protected abstract void onStartListening(Intent recognizerIntent, Callback listener);
停止识别 & 取消服务
后续的停止识别 stopListening()、取消服务 cancel() 的实现链路和开始识别基本一致,最终分别抵达 RecognitionService 的 onStopListening() 以及 onCancel() 回调。
唯一区别的地方在于 stop 只是暂时停止识别,识别 App 的连接还在,而 cancel 则是断开了连接、并重置了相关数据。
void cancel(IRecognitionListener listener, boolean isShutdown) {
        ...
        synchronized (mLock) {
            ...
            mRecordingInProgress = false;
            mSessionInProgress = false;

            mDelegatingListener = null;
            mListener = null;

            // Schedule to unbind after cancel is delivered.
            if (isShutdown) {
                run(service -> unbind());
            }
        }
    }
结语
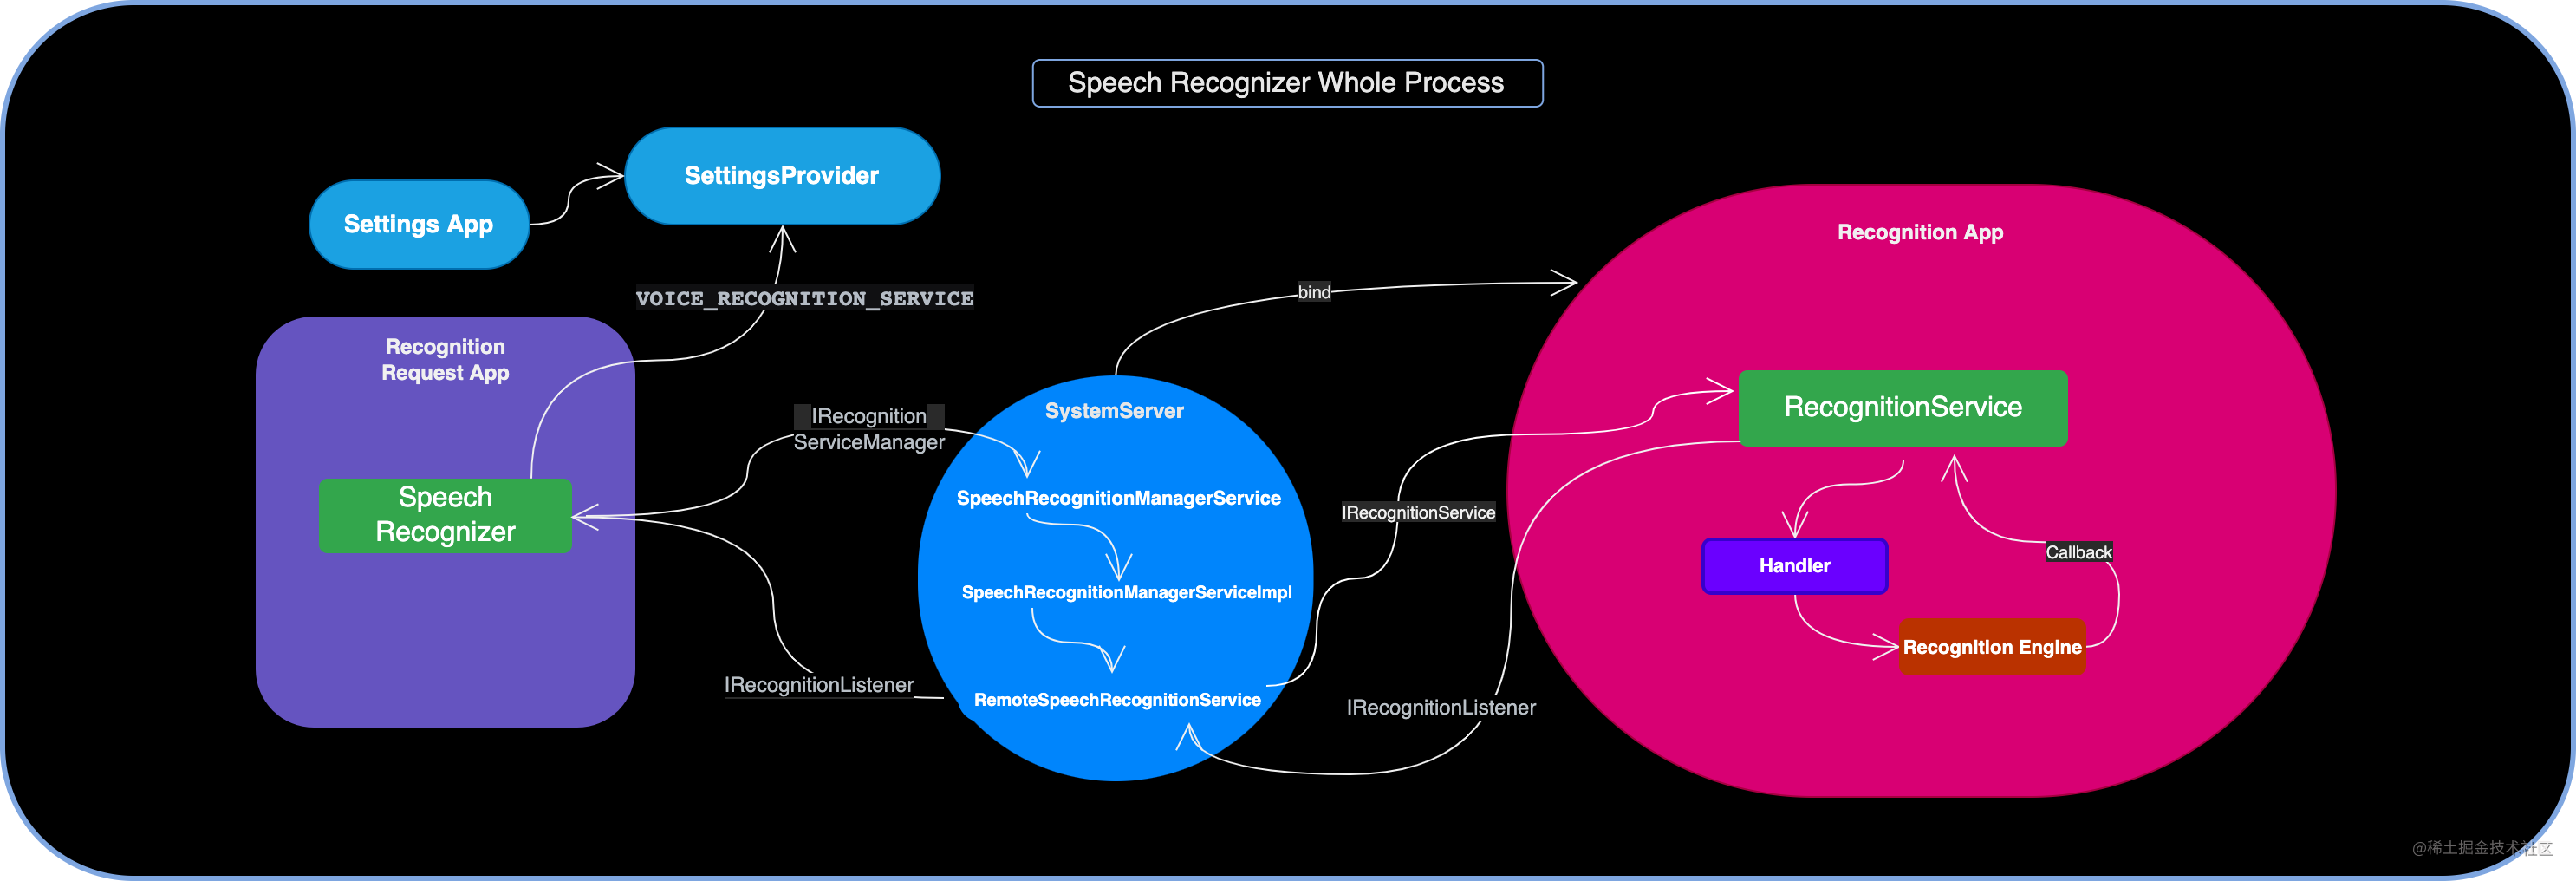
最后我们结合一张图整体了解一下 SpeechRecognizer 机制的链路:
- 需要语音识别的 App 通过 SpeechRecognizer 发送 Request
- SpeechRecognizer 在发起识别的时候通过 IRecognitionServiceManager.aidl 告知 SystemServer 的
SpeechRecognitionManagerService系统服务,去SettingsProvider中获取默认的 Recognition 服务包名 - SpeechRecognitionManagerService 并不直接负责绑定,而是交由
SpeechRecognitionManagerServiceImpl调度 - SpeechRecognitionManagerServiceImpl 则是交给
RemoteSpeechRecognitionService专门绑定和管理 - RemoteSpeechRecognitionService 通过 IRecognitionService.aidl 和具体的识别服务 RecognitionService 进行交互
- RecognitionService 则会通过
Handler切换到主线程,调用识别 engine 开始处理识别请求,并通过Callback内部类完成识别状态、结果的返回 - 后续则是 RecognitionService 通过 IRecognitionListener.aidl 将结果传递至 SystemServer,以及进一步抵达发出请求的 App 源头
推荐阅读
- 如何打造车载语音交互:Google Voice Interaction 给你答案
- 直面原理:5 张图彻底了解 Android TextToSpeech 机制
参考资料
- SpeechRecognizer
- RecognitionService
- 系统 Sample Project