文章目录
- 前言
- 一、@RequestMapping介绍
- 二、详解(末尾附源码,自行测试)
- 1.@RequestMapping注解的位置
- 2.@RequestMapping注解的value属性
- 3.@RequestMapping注解的method属性
- 4.@RequestMapping注解的params属性(了解)
- 5.@RequestMapping注解的headers属性(了解)
- 6.SpringMVC支持ant风格的路径
- 7.SpringMVC支持路径中的占位符(重点)
- 三、源码
- 总结
前言
@RequestMapping注解
一、@RequestMapping介绍
(1)@RequestMapping注解的作用就是将请求和处理请求的控制器方法关联起来,建立映射关系。
(2)SpringMVC 接收到指定的请求,就会来找到在映射关系中对应的控制器方法来处理这个请求。
(3)在SpringMVC中如何被使用:浏览器发送请求,若请求地址符合前端控制器的url-pattern,该请求就会被前端控制器DispatcherServlet处理。前端控制器会读取SpringMVC的核心配置文件,通过扫描组件找到控制器,将请求地址和控制器中@RequestMapping注解的value属性值进行匹配,若匹配成功,该注解所标识的控制器方法就是处理请求的方法。处理请求的方法需要返回一个字符串类型的视图名称,该视图名称会被视图解析器解析,加上前缀和后缀组成视图的路径,通过Thymeleaf对视图进行渲染,最终转发到视图所对应页面。
二、详解(末尾附源码,自行测试)
1.@RequestMapping注解的位置
@RequestMapping标识一个类:设置映射请求的请求路径的初始信息
@RequestMapping标识一个方法:设置映射请求请求路径的具体信息
@Controller
@RequestMapping("/test")
public class RequestMappingController {
//此时请求映射所映射的请求的请求路径为:/test/testRequestMapping
@RequestMapping("/testRequestMapping")
public String testRequestMapping(){
return "success";
}
}
2.@RequestMapping注解的value属性
@RequestMapping注解的value属性通过请求的请求地址匹配请求映射
@RequestMapping注解的value属性是一个字符串类型的数组,表示该请求映射能够匹配多个请求地址所对应的请求
@RequestMapping注解的value属性必须设置,至少通过请求地址匹配请求映射
<a th:href="@{/testRequestMapping}">测试@RequestMapping的value属性--
>/testRequestMapping</a><br>
<a th:href="@{/test}">测试@RequestMapping的value属性-->/test</a><br>
@RequestMapping(
value = {"/testRequestMapping", "/test"}
)
public String testRequestMapping(){
return "success";
}
这两个请求映射路径都能访问到success页面。
3.@RequestMapping注解的method属性
@RequestMapping注解的method属性通过请求的请求方式(get或post)匹配请求映射。
@RequestMapping注解的method属性是一个RequestMethod类型的数组,表示该请求映射能够匹配多种请求方式的请求。
若当前请求的请求地址满足请求映射的value属性,但是请求方式不满足method属性,则浏览器报错405:Request method ‘POST’ not supported。
<a th:href="@{/test}">测试@RequestMapping的value属性-->/test</a><br>
<form th:action="@{/test}" method="post">
<input type="submit">
</form>
@RequestMapping(
value = {"/testRequestMapping", "/test"},
method = {RequestMethod.GET, RequestMethod.POST}
)
public String testRequestMapping(){
return "success";
}
@GetMapping("/testGetMapping")
public String testGetMapping(){
return "success";
 }
注:对于处理指定请求方式的控制器方法,SpringMVC中提供了@RequestMapping的派生注解:
1.处理get请求的映射–>@GetMapping
2.处理post请求的映射–>@PostMapping
3.处理put请求的映射–>@PutMapping
4.处理delete请求的映射–>@DeleteMapping
5.常用的请求方式有get,post,put,delete。
但是目前浏览器只支持get和post,若在form表单提交时,为method设置了其他请求方式的字符串(put或delete),则按照默认的请求方式get处理。若要发送put和delete请求,则需要通过spring提供的过滤器HiddenHttpMethodFilter,在RESTFUL部分会讲到。
4.@RequestMapping注解的params属性(了解)
@RequestMapping注解的params属性通过请求的请求参数匹配请求映射。
@RequestMapping注解的params属性是一个字符串类型的数组,可以通过四种表达式设置请求参数和请求映射的匹配关系:
“param”:要求请求映射所匹配的请求必须携带param请求参数
“!param”:要求请求映射所匹配的请求必须不能携带param请求参数
“param=value”:要求请求映射所匹配的请求必须携带param请求参数且param=value
“param!=value”:要求请求映射所匹配的请求必须携带param请求参数但是param!=value
<a th:href="@{/test(username='admin',password=123456)">测试@RequestMapping的
params属性-->/test</a><br>
@RequestMapping(
value = {"/testRequestMapping", "/test"}
,method = {RequestMethod.GET, RequestMethod.POST}
,params = {"username","password!=123456"}
)
public String testRequestMapping(){
return "success";
}
注:
若当前请求满足@RequestMapping注解的value和method属性,但是不满足params属性,此时
页面会报错400:Parameter conditions “username, password!=123456” not met for actual
request parameters: username={admin}, password={123456}
5.@RequestMapping注解的headers属性(了解)
@RequestMapping注解的headers属性通过请求的请求头信息匹配请求映射。
@RequestMapping注解的headers属性是一个字符串类型的数组,可以通过四种表达式设置请求头信息和请求映射的匹配关系:
“header”:要求请求映射所匹配的请求必须携带header请求头信息。
“!header”:要求请求映射所匹配的请求必须不能携带header请求头信息。
“header=value”:要求请求映射所匹配的请求必须携带header请求头信息且header=value。
“header!=value”:要求请求映射所匹配的请求必须携带header请求头信息且header!=value。
若当前请求满足@RequestMapping注解的value和method属性,但是不满足headers属性,此时页面显示404错误,即资源未找到。
<a th:href="@{/hello/testHeaders}">目标testHeaders</a><br>
    @RequestMapping(
            value = {"/testHeaders"},
            headers = {"localhost=8081"}
    )
    public String testHeaders(){
        return "success";
    }
tomcat默认端口是8080,这里8081访问不到,报错。
6.SpringMVC支持ant风格的路径
?:表示任意的单个字符
*:表示任意的0个或多个字符
** :表示任意的一层或多层目录
注意 :在使用 ** 时,只能使用/**/xxx的方式
<a th:href="@{/hello/a1a/testAnt}">目标testAnt</a><br>
    @RequestMapping(
            value = {"/a*a/testAnt"}// /**/testAnt
    )
    public String testAnt(){
        return "success";
    }
7.SpringMVC支持路径中的占位符(重点)
原始方式:/deleteUser?id=1
rest方式:/deleteUser/1
SpringMVC路径中的占位符常用于RESTful风格中,当请求路径中将某些数据通过路径的方式传输到服务器中,就可以在相应的@RequestMapping注解的value属性中通过占位符{xxx}表示传输的数据,在通过@PathVariable注解,将占位符所表示的数据赋值给控制器方法的形参。
<a th:href="@{/testRest/1/admin}">测试路径中的占位符-->/testRest</a><br>
@RequestMapping("/testRest/{id}/{username}")
public String testRest(@PathVariable("id") String id, @PathVariable("username")
String username){
System.out.println("id:"+id+",username:"+username);
return "success";
}
//最终输出的内容为-->id:1,username:admin
三、源码
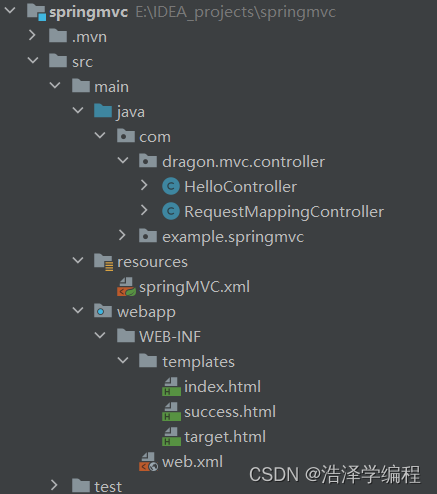
工程目录:
maven依赖:
    <dependencies>
        <dependency>
            <groupId>javax.servlet</groupId>
            <artifactId>javax.servlet-api</artifactId>
            <version>4.0.1</version>
            <scope>provided</scope>
        </dependency>
        <dependency>
            <groupId>org.junit.jupiter</groupId>
            <artifactId>junit-jupiter-api</artifactId>
            <version>${junit.version}</version>
            <scope>test</scope>
        </dependency>
        <dependency>
            <groupId>org.junit.jupiter</groupId>
            <artifactId>junit-jupiter-engine</artifactId>
            <version>${junit.version}</version>
            <scope>test</scope>
        </dependency>
        <!-- SpringMVC -->
        <dependency>
            <groupId>org.springframework</groupId>
            <artifactId>spring-webmvc</artifactId>
            <version>5.3.1</version>
        </dependency>

        <!-- 日志 -->
        <dependency>
            <groupId>ch.qos.logback</groupId>
            <artifactId>logback-classic</artifactId>
            <version>1.2.3</version>
        </dependency>

        <!-- ServletAPI -->
        <dependency>
            <groupId>javax.servlet</groupId>
            <artifactId>javax.servlet-api</artifactId>
            <version>3.1.0</version>
            <scope>provided</scope>
        </dependency>

        <!-- Spring5和Thymeleaf整合包 -->
        <dependency>
            <groupId>org.thymeleaf</groupId>
            <artifactId>thymeleaf-spring5</artifactId>
            <version>3.0.12.RELEASE</version>
        </dependency>
    </dependencies>
index.html:
<!DOCTYPE html>
<html lang="en" xmlns:th="http://www.thymeleaf.org">
<head>
    <meta charset="UTF-8">
    <title>首页</title>
</head>
<body>
<h1>首页</h1>
<a th:href="@{/target}">目标target</a><br>
<a th:href="@{/hello/testRequestMapping}">目标testRequestMapping</a><br>
<a th:href="@{/hello/test}">目标test</a><br>
<a th:href="@{/hello/test}">目标test-->get方法</a><br>
<a th:href="@{/hello/testGetMapping}">目标testGetMapping-->get方法</a><br>
<form th:action="@{/hello/test}" method="post">
    <input type="submit" value="post">
</form>
<form th:action="@{/hello/testPut}" method="put">
    <input type="submit" value="put">
</form>
<a th:href="@{/hello/testParams(username='admin',password=123)}">目标testParams</a><br>
<a th:href="@{/hello/testHeaders}">目标testHeaders</a><br>
<a th:href="@{/hello/a1a/testAnt}">目标testAnt</a><br>
<a th:href="@{/hello/testPath/1/admin}">目标testPath</a><br>
</body>
</html>
target.html:
<!DOCTYPE html>
<html lang="en" xmlns:th="http://www.thymeleaf.org">
<head>
    <meta charset="UTF-8">
    <title>Title</title>
</head>
<body>
hello,我是target
</body>
</html>
success.html:
<!DOCTYPE html>
<html lang="en" xmlns:th="http://www.thymeleaf.org">
<head>
    <meta charset="UTF-8">
    <title>success</title>
</head>
<body>
我是success
</body>
</html>
RequestMappingController类:
package com.dragon.mvc.controller;

import org.springframework.stereotype.Controller;
import org.springframework.web.bind.annotation.GetMapping;
import org.springframework.web.bind.annotation.PathVariable;
import org.springframework.web.bind.annotation.RequestMapping;
import org.springframework.web.bind.annotation.RequestMethod;

@RequestMapping("/hello")
@Controller
public class RequestMappingController {
    @RequestMapping(
            value = {"/testRequestMapping","/test"},
            method = {RequestMethod.GET}
    )
    public String success(){
        return "success";
    }
    @GetMapping("/testGetMapping")
    public String testGetMapping(){
        return "success";
    }
    @RequestMapping(
            value = {"/testPut"},
            method = {RequestMethod.PUT}
    )
    public String testPut(){
        return "success";
    }
    @RequestMapping(
            value = {"/testParams"},
            params = {"username","password!=123456"}
    )
    public String testParams(){
        return "success";
    }
    @RequestMapping(
            value = {"/testHeaders"},
            headers = {"localhost=8081"}
    )
    public String testHeaders(){
        return "success";
    }
    @RequestMapping(
            value = {"/a*a/testAnt"}// /**/testAnt
    )
    public String testAnt(){
        return "success";
    }
    @RequestMapping("/testPath/{id}/{username}")
    public String testPath(@PathVariable("id")Integer id,@PathVariable("username")String username){
        System.out.println("id:"+id);
        System.out.println("username:"+username);
        return "success";
    }
}
HelloController类:
package com.dragon.mvc.controller;

import org.springframework.stereotype.Controller;
import org.springframework.web.bind.annotation.RequestMapping;
@Controller
public class HelloController {
    @RequestMapping("/")
    public String index(){
        return "index";
    }
    @RequestMapping("/target")
    public String toTarget(){
        return "target";
    }
}
如果不会搭建框架,或者需要看springMVC.xml等文件,可以看我springmvc专栏里的搭建框架的文章。
总结
以上就是SpringMVC的讲解。







![[推荐] MyBatis框架初学笔记-为之后拾遗](https://img-blog.csdnimg.cn/cfe0eadf206348e290d4a8e74c5a8a45.png)
