目录
- 一、为什么需要组件
- 1.1 传统方式编写应用
- 1.2 使用组件方式编写应用
- 1.3 Vue的组件管理
- 二、Vue中的组件
- 1.1 基本概念
- 1.1.1 组件分类
- 1.1.2 Vue中使用组件的三大步骤:
- 1.1.3 如何定义一个组件
- 1.1.4 如何注册组件
- 1.1.5 如何使用组件
- 1.2 注意点
- 1.2.1 关于组件名
- 1.2.2 关于组件标签
- 1.2.3 一个简写方式
- 三、非单文件组件
- 四、组件的嵌套
- 4.1 案例一
- 4.2 案例二
- 五、VueComponent()构造函数
- 5.1 案例分析
- 5.2 为什么每次调用Vue.extend,返回的是一个全新的VueComponent?
- 5.3 vm管理vc
- 5.4 vm和vc
- 六、一个重要的内置关系
- 6.1 显示/隐式原型属性、原型对象
- 6.2 内置关系
- 6.3 关系分析图
- 七、单文件组件
- 7.1 安装Vetur插件
- 7.2 案例
- 7.2.1 School.vue
- 7.2.2 Student.vue
- 7.2.3 App.vue
- 7.2.4 main.js
- 7.2.5 index.html
一、为什么需要组件
组件(Component):用来实现局部(特定)功能效果的代码和资源的集合。
- 代码:
html/css/js - 资源:
mp3/mp4/tff/zip...
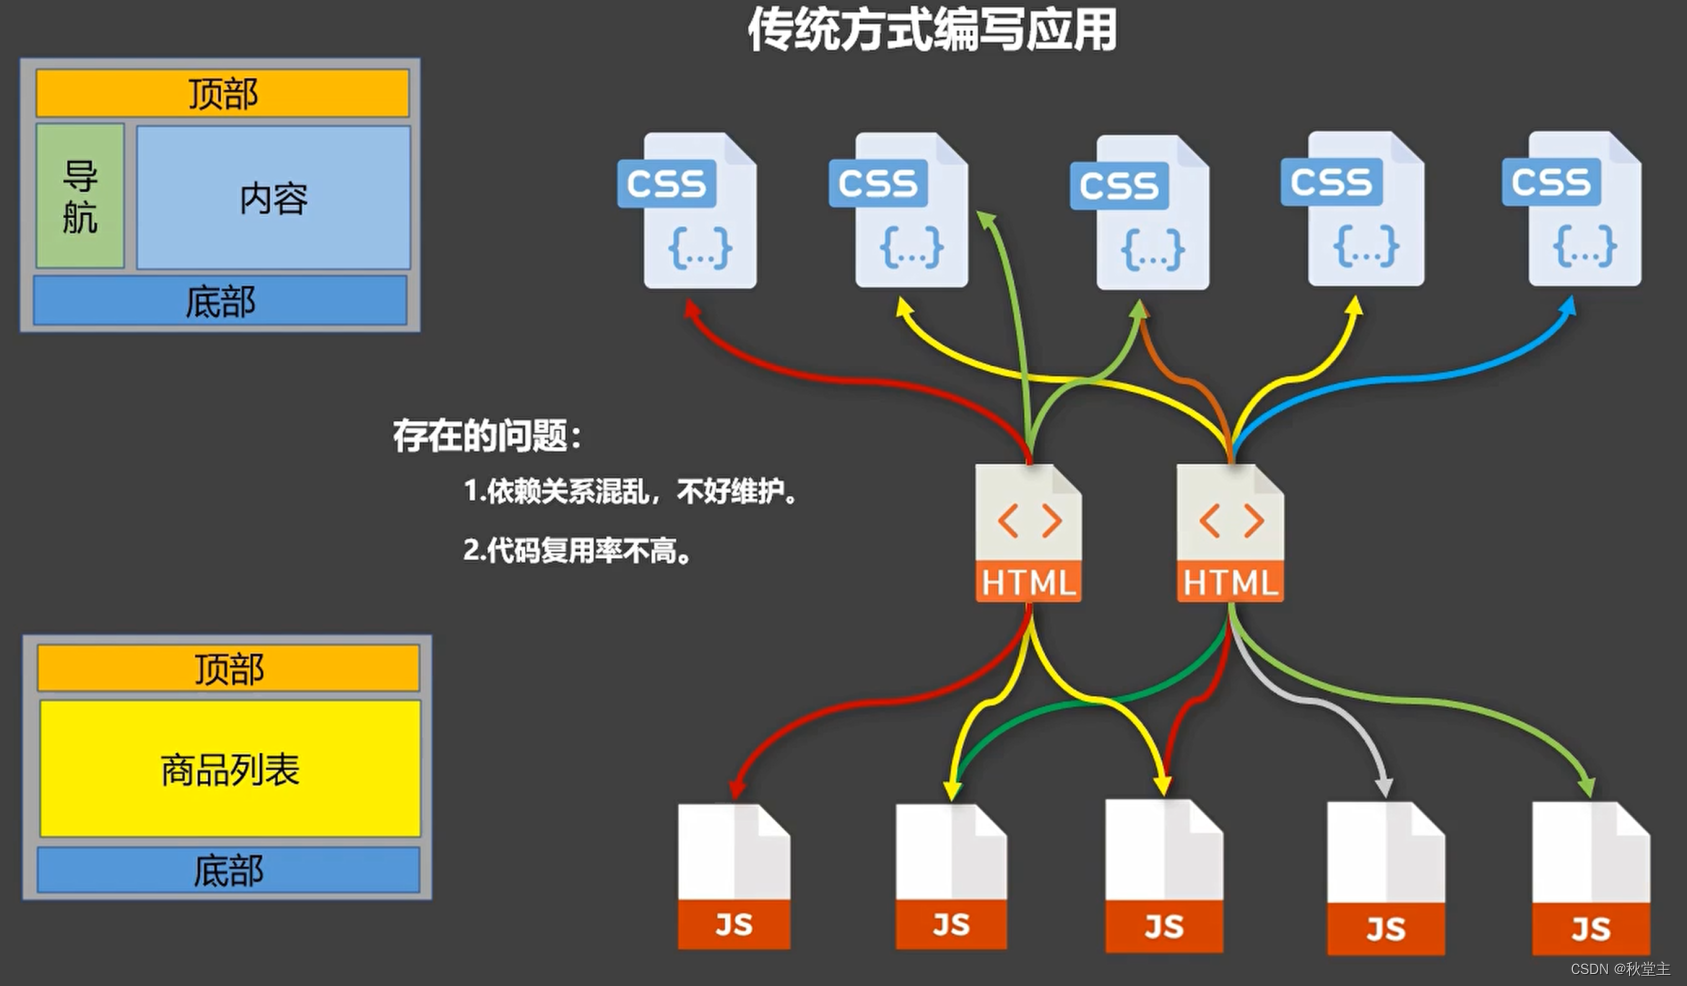
1.1 传统方式编写应用
传统方式编写应用存在的问题:
- 依赖关系混乱,引入的先后顺序,不好维护
- 代码复用率不高。
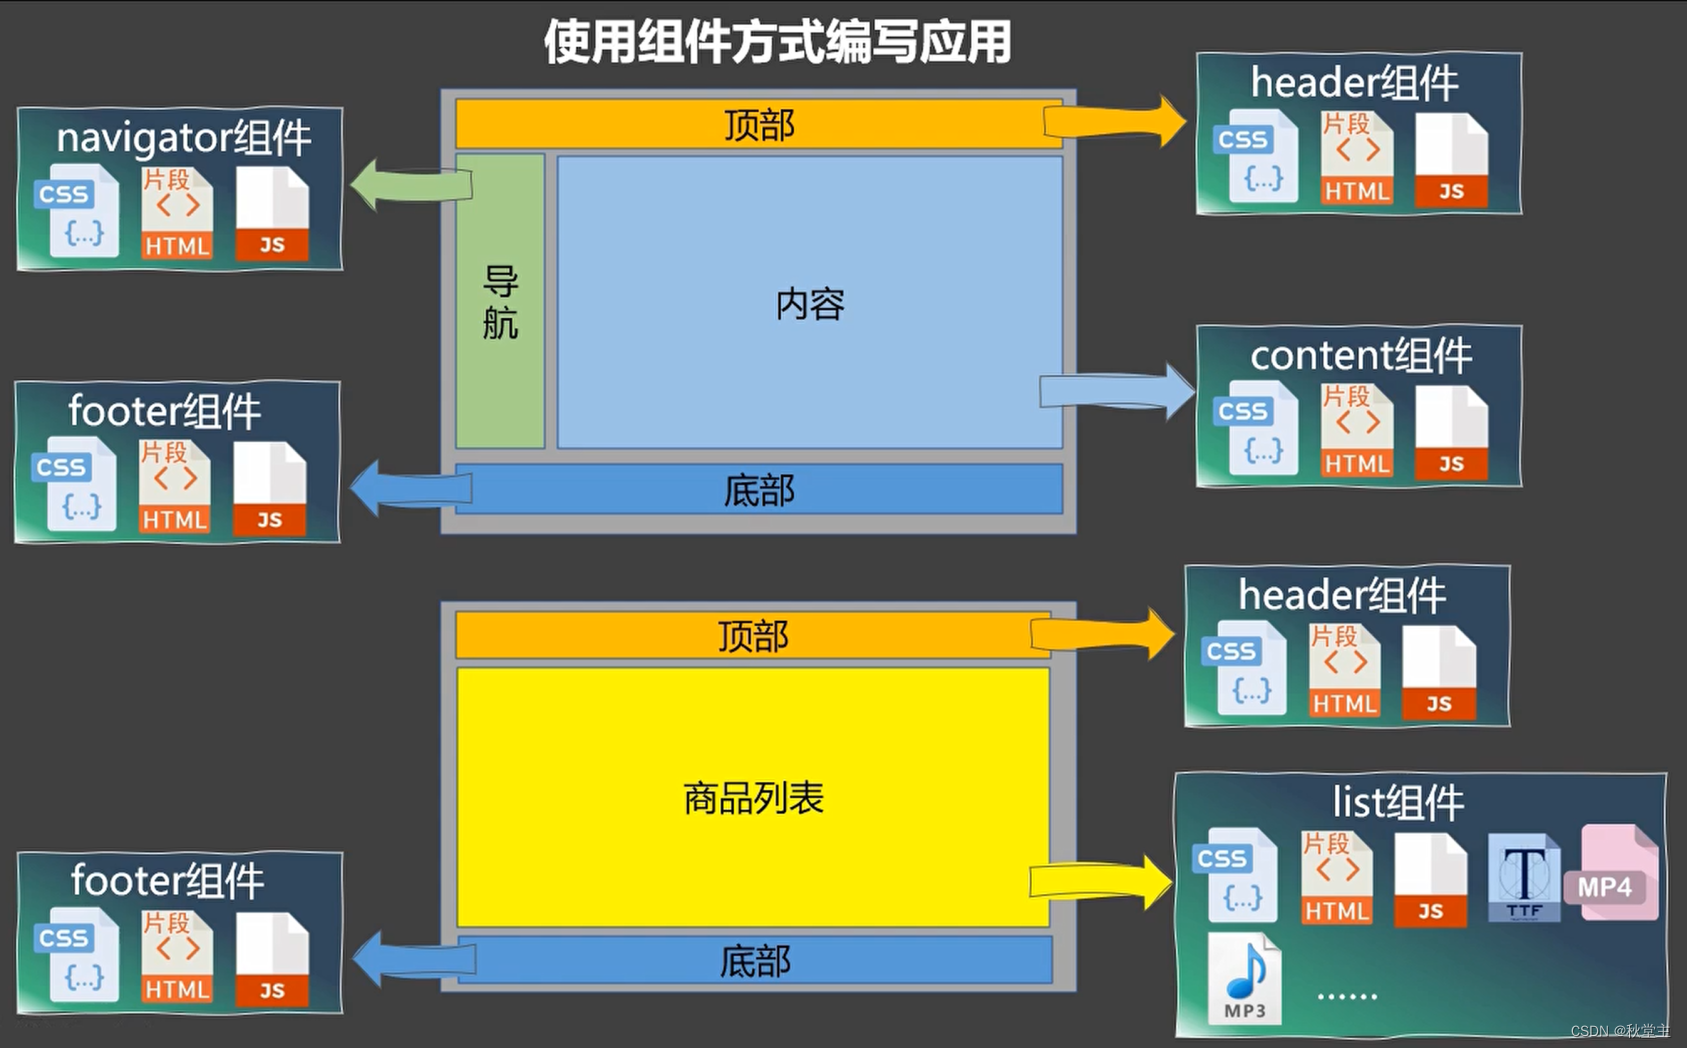
1.2 使用组件方式编写应用
使用组件方式编写应用,可以很好解决传统方式编写应用存在的问题。
1.3 Vue的组件管理
组件(Component)是 Vue.js 最强大的功能之一。组件可以扩展 HTML 元素,封装可重用的代码。
组件系统让我们可以用独立可复用的小组件来构建大型应用,几乎任意类型的应用的界面都可以抽象为一个组件树。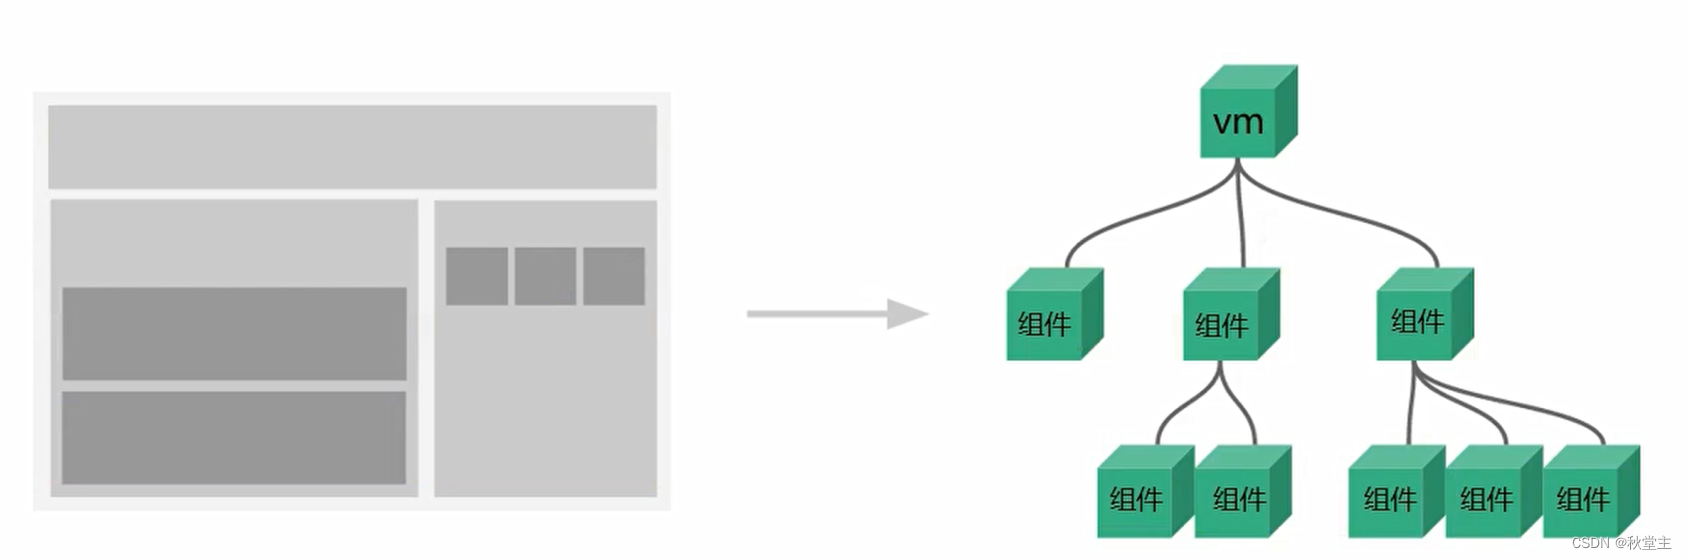
二、Vue中的组件
组件是可复用的 Vue 实例,因为组件是可复用的 Vue 实例,所以它们与 new Vue 接收相同的选项,例如 data、computed、watch、methods 以及生命周期钩子等。仅有的例外是像 el 这样根实例特有的选项。
1.1 基本概念
1.1.1 组件分类
Vue中组件分为:非单文件组件、单文件组件
- 非单文件组件:一个文件中包含有
n个组件。a.html - 单文件组件:一个文件中只包含有
1个组件。a.vue
1.1.2 Vue中使用组件的三大步骤:
- 定义组件(创建组件)
- 注册组件
- 使用组件(写组件标签)
1.1.3 如何定义一个组件
使用Vue.extend(options)创建,其中options和new Vue(options)时传入的那个options几乎一样但也有点区别。区别如下:
el不要写,为什么?—最终所有的组件都要经过一个vm的管理,由vm中的el决定服务哪个容器。data必须写成函数,为什么?——避兔组件被复用时,数据存在引用关系(因为如果直接写一个对象,组件复用的时候共用一个对象,容易引起问题)。
备注:使用template可以配置组件结构。
1.1.4 如何注册组件
- 局部注册:靠
new Vue的时候传入components选项 - 局注册:靠
Vue.component('组件名',组件)
1.1.5 如何使用组件
编写组件标签,例如:<school></school>
1.2 注意点
1.2.1 关于组件名
一个单词组成:
- 第一种写法(首字母小写):
school - 第二种写法(首字母大写):
School
多个单词组成:
- 第一种写法(
kebab-case命名):my-school - 第二种写法(
CamelCase大驼峰命名):MySchool(需要Vue脚手架支持)
备注:
- 组件名尽可能回避
HTML中已有的元素名称,例如:h2、H2都不行。 - 可以使用
name配置项指定组件在开发者工具中呈现的名字。
推荐使用的命令:School和MySchool
1.2.2 关于组件标签
- 第一种写法:
<school>< /school> - 第二种写法:
<school/>
备注:不用使用脚手架时,写第一个<school/>渲染不会有问题,写超过一个<school/>的时候,会导致后续的<school/>组件不能渲染。
1.2.3 一个简写方式
const school = Vue.extend(options)可简写为:const school = options。
简写的形式,其底层还是会自动调用Vue.extend()函数 。
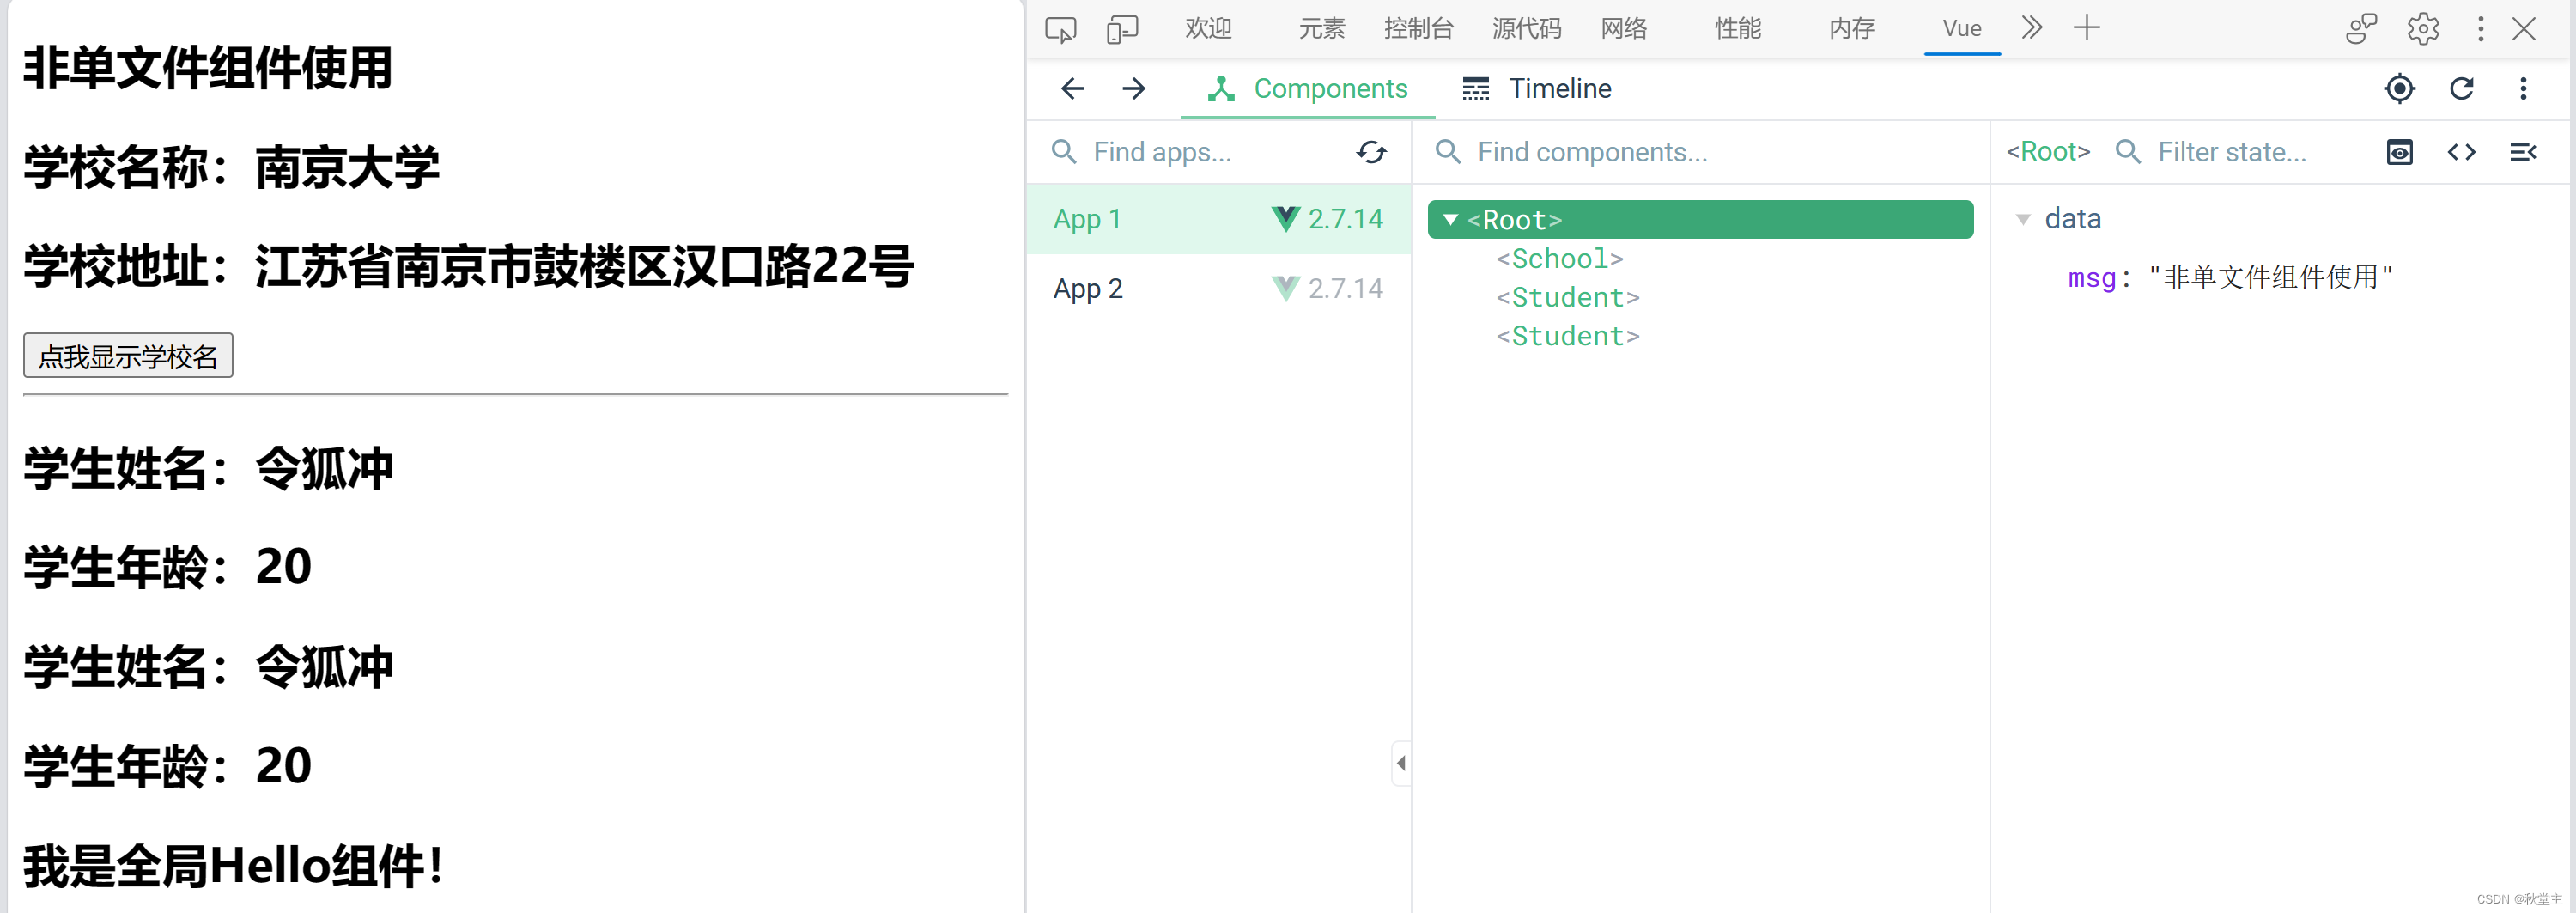
三、非单文件组件
下面案例中,定义了三个组件:hello、school、student ,其中hello为全局组件,而school、student为局部组件。
在定义组件的时候注意点:
- 不能使用
el配置项 data必须使用函数式,不能使用对象式
<div id="root">
    <h2>{{msg}}</h2>
    <!-- 编写组件标签 -->
    <school></school>
    <hr>
    <student></student>
    <student></student>

</div>
<div id="root2">
    <hello></hello>
</div>
<script>
    // 创建全局hello组件
    const hello = Vue.extend({
        template:`
            <div>
                <h2>我是全局{{name}}组件!</h2>
            </div>
        `,
        data() {
            return {
                name:'Hello'
            }
        },
    })
    // 全局注册组件
    Vue.component('hello',hello)

    // 创建School组件
    const school = Vue.extend({
        // el:'root', //不能写el配置项
        template:`
            <div>
                <h2>学校名称:{{schoolName}}</h2>
                <h2>学校地址:{{address}}</h2>
                <button @click="showName">点我显示学校名</button>
            </div>
        `,
        data() {
            return {
                schoolName: '南京大学',
                address: '江苏省南京市鼓楼区汉口路22号',
            }
        },
        methods: {
            showName(){
                alert(this.schoolName)
            }
        },
    })
    // 创建Student组件
    const student = Vue.extend({
        template:`
            <div>
                <h2>学生姓名:{{studentName}}</h2>
                <h2>学生年龄:{{age}}</h2>
            </div>
        `,
        data() {
            return {
                studentName: '令狐冲',
                age: 20
            }
        },
    })

    new Vue({
        data:{
            msg:'非单文件组件使用'
        },
        el: '#root',
        components: {
            school, //相当于school: school
            student
        }


    })

    new Vue({
        el:'#root2'
    })
</script>
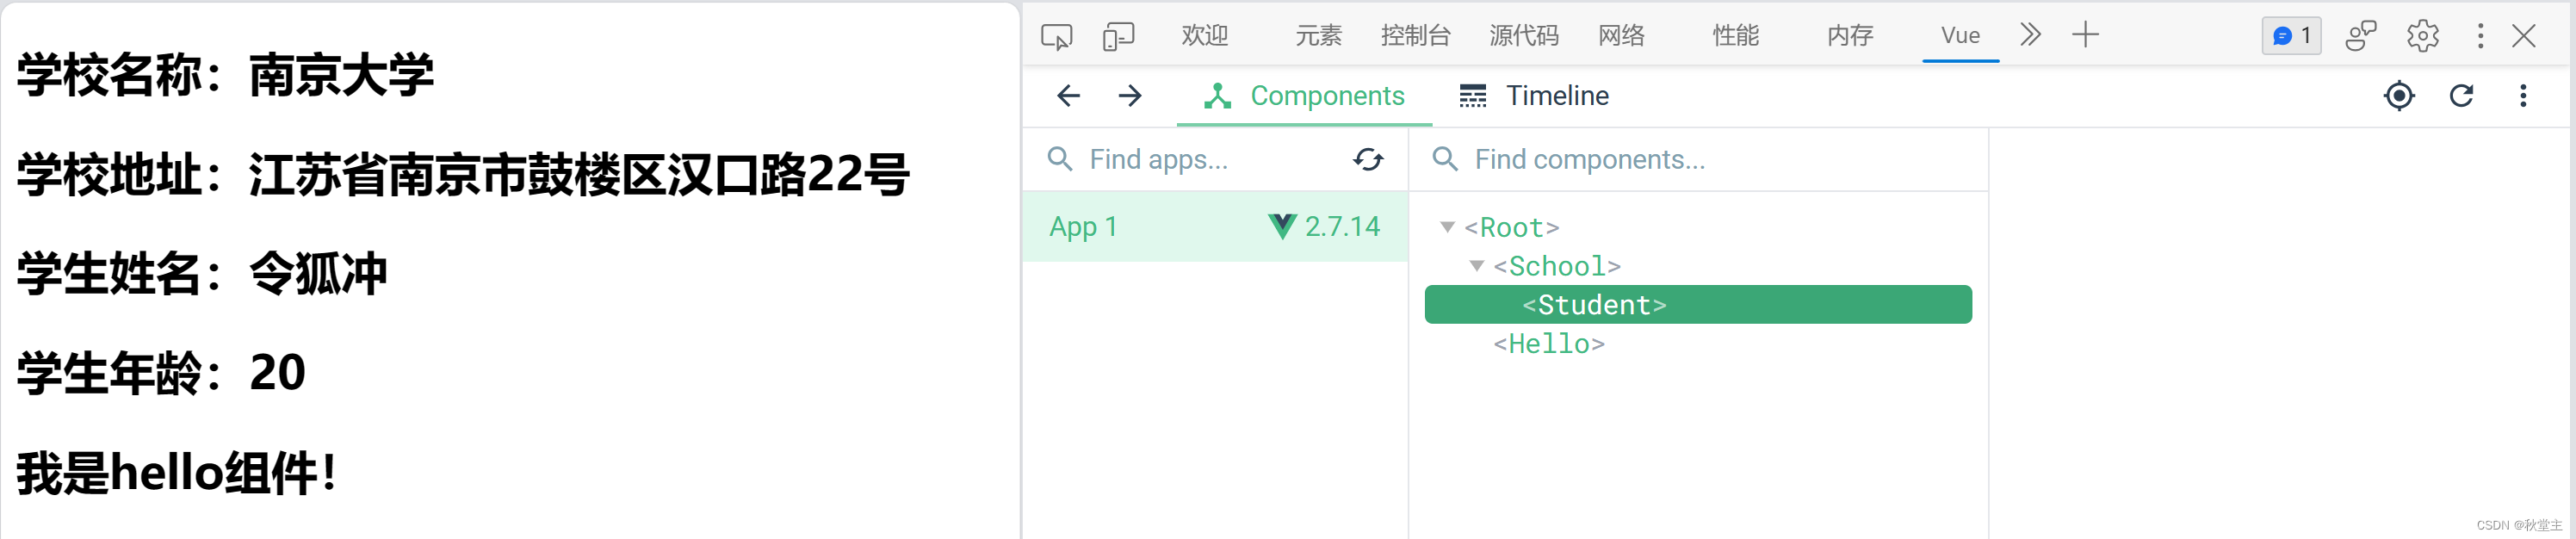
四、组件的嵌套
4.1 案例一
<div id="root">
    <!-- 编写组件标签 -->
    <school></school>
    <hello></hello>
</div>

<script>

    // 创建Student组件
    const student = Vue.extend({
        template:`
            <div>
                <h2>学生姓名:{{studentName}}</h2>
                <h2>学生年龄:{{age}}</h2>
            </div>
        `,
        data() {
            return {
                studentName: '令狐冲',
                age: 20
            }
        },
    })

    // 创建School组件
    const school = Vue.extend({
        template:`
            <div>
                <h2>学校名称:{{schoolName}}</h2>
                <h2>学校地址:{{address}}</h2>
                <student></student>
            </div>
        `,
        data() {
            return {
                schoolName: '南京大学',
                address: '江苏省南京市鼓楼区汉口路22号',
            }
        },
        components:{
            student
        }
    })

    // 创建hello组件
    const hello = Vue.extend({
        template:`
            <div>
                <h2>我是{{name}}组件!</h2>
            </div>
        `,
        data() {
            return {
                name:'hello'
            }
        },
    })

    // 创建vm
    new Vue({
        el: '#root',
        // 局部注册组件
        components: {
            school,
            hello
        }


    })

</script>
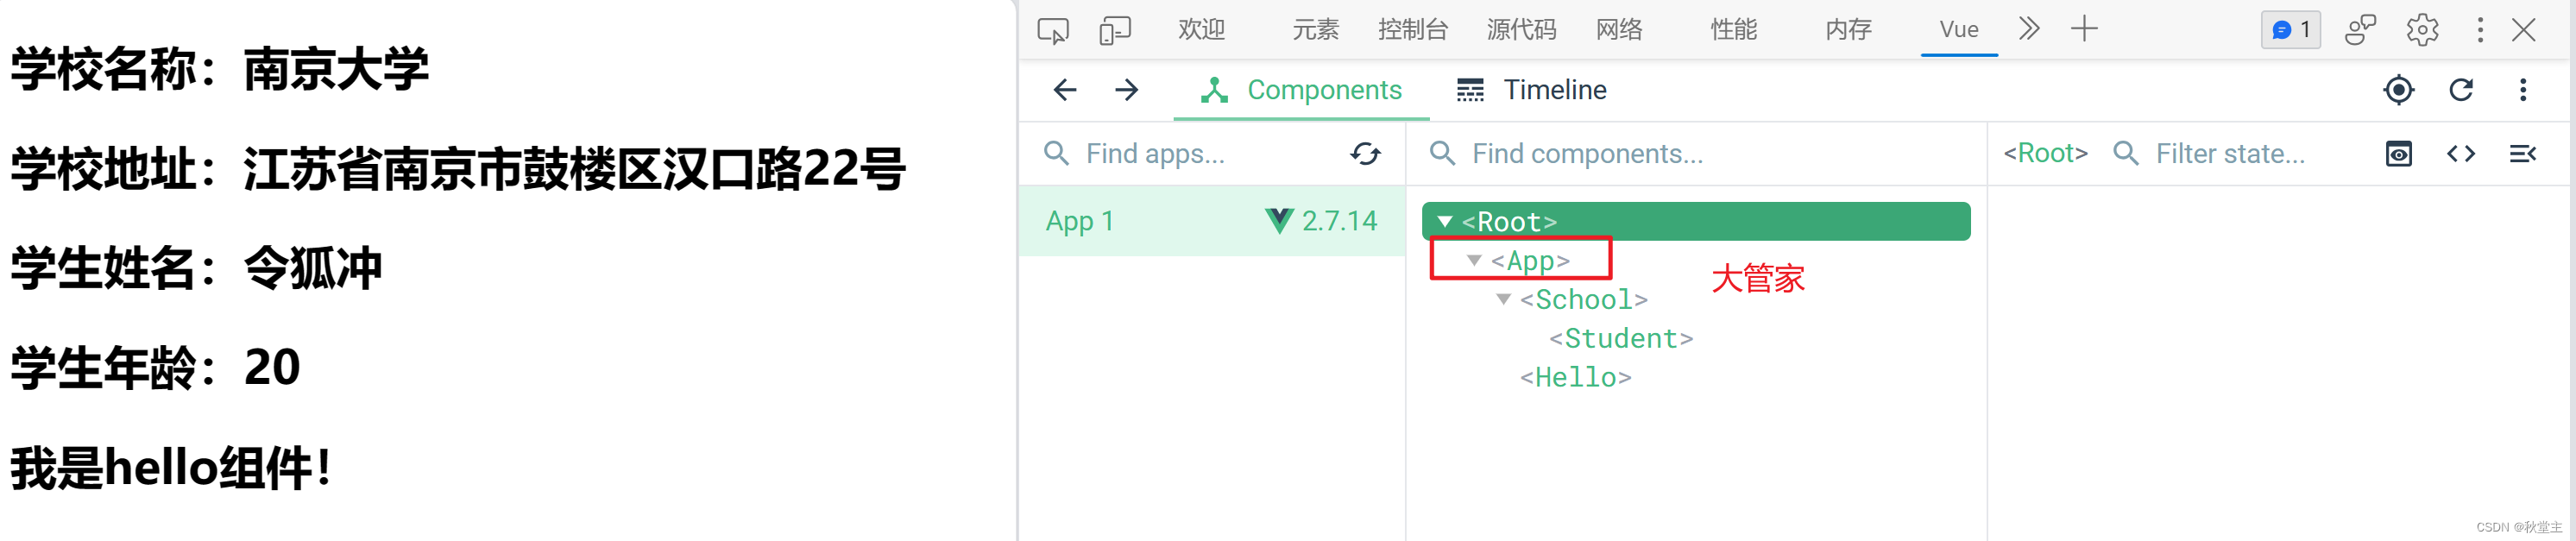
4.2 案例二
<div id="root">
    <!-- <app></app> -->
</div>

<script>

    // 创建Student组件
    const student = Vue.extend({
        template:`
            <div>
                <h2>学生姓名:{{studentName}}</h2>
                <h2>学生年龄:{{age}}</h2>
            </div>
        `,
        data() {
            return {
                studentName: '令狐冲',
                age: 20
            }
        },
    })

    // 创建School组件
    const school = Vue.extend({
        template:`
            <div>
                <h2>学校名称:{{schoolName}}</h2>
                <h2>学校地址:{{address}}</h2>
                <student></student>
            </div>
        `,
        data() {
            return {
                schoolName: '南京大学',
                address: '江苏省南京市鼓楼区汉口路22号',
            }
        },
        components:{
            student
        }
    })

    // 创建hello组件
    const hello = Vue.extend({
        template:`
            <div>
                <h2>我是{{name}}组件!</h2>
            </div>
        `,
        data() {
            return {
                name:'hello'
            }
        },
    })

    // 创建app组件
    const app = Vue.extend({
        template:`
            <div>
                <school></school>
                <hello></hello>
            </div>
        `,
        components:{
            school,
            hello
        }
    })

    // 创建vm
    new Vue({
        template:`<app></app>`,
        el: '#root',
        // 局部注册组件
        components: {
            app
        }


    })

</script>
五、VueComponent()构造函数
5.1 案例分析
下面案例中打印了school 组件。
-
school组件本质是一个名VueComponent的构造函数,且不是程序员定义的,是Vue.extend生成的。 -
我们只需要写
<school/>或<school></school>,Vue解析时会帮我们创建school组件的实例对象,即Vue帮我们执行的:new VueComponent(options)。 -
特别注意:每次调用
Vue.extend,返回的都是一个全新的VueComponent -
关于this指向:
- 组件配置中:
data函数、methods中的函数、watch中的函数、computed中的函数它们的this均是【VueComponent实例对象】 new Vue()配置中:data函数、methods中的函数、watch中的函数、computed中的函数它们的this均是【Vue实例对象】。
- 组件配置中:
-
VueComponent的实例对象,以后简称vc(也可称之为:组件实例对象)
vue的实例对象,以后简称vm。
// 创建School组件
const school = Vue.extend({
   template:`
       <div>
           <h2>学校名称:{{schoolName}}</h2>
           <h2>学校地址:{{address}}</h2>
       </div>
   `,
   data() {
       return {
           schoolName: '南京大学',
           address: '江苏省南京市鼓楼区汉口路22号',
       }
   },
})
console.log(school)

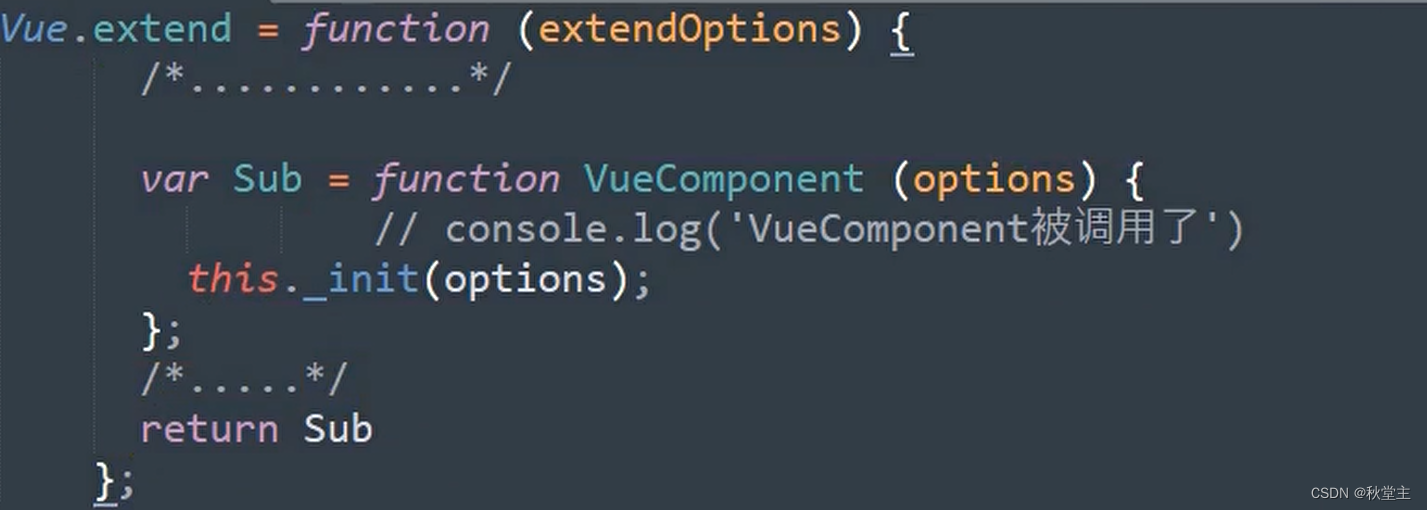
5.2 为什么每次调用Vue.extend,返回的是一个全新的VueComponent?
打开源码,查看Vue.extend()函数定义,可以发现其最终返回的sub ,由此可见每次调用返回的都是一个全新的VueComponent() 函数
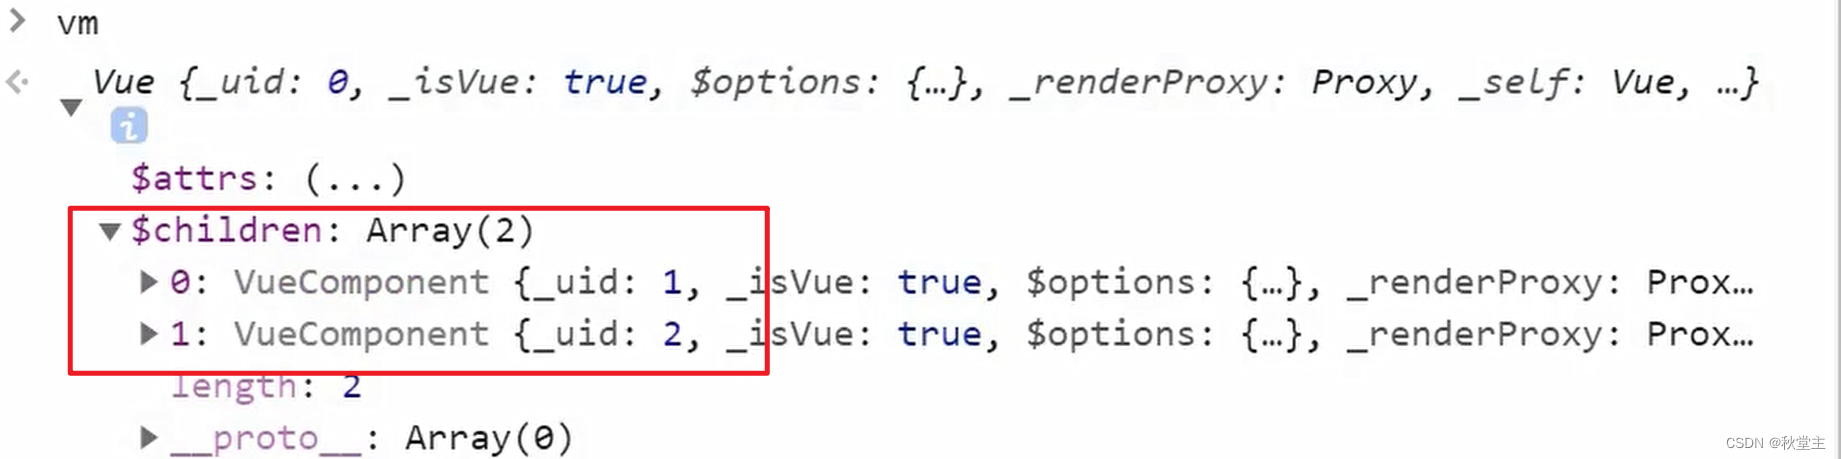
5.3 vm管理vc
打开控制台,输出vm,可以发现在vc存储在$children属性上。
5.4 vm和vc
vm和vc不一样.
- 创建
vc的时候,不能写el,vm可以 vc的data必须写成函数式,vm可以是对象式
六、一个重要的内置关系
6.1 显示/隐式原型属性、原型对象
显示原型属性、隐式原型属性指向同一个对象:原型对象
function Person(name) {
    this.name = name
}
const person = new Person('张三');

// 显示原型属性
console.log(Person.prototype);

// 隐式原型属性
console.log(person.__proto__);

// 显示原型属性、隐式原型属性指向同一个对象:原型对象
console.log(Person.prototype === person.__proto__); //true

Person.prototype.age = 25;
console.log(person.age); //25
6.2 内置关系
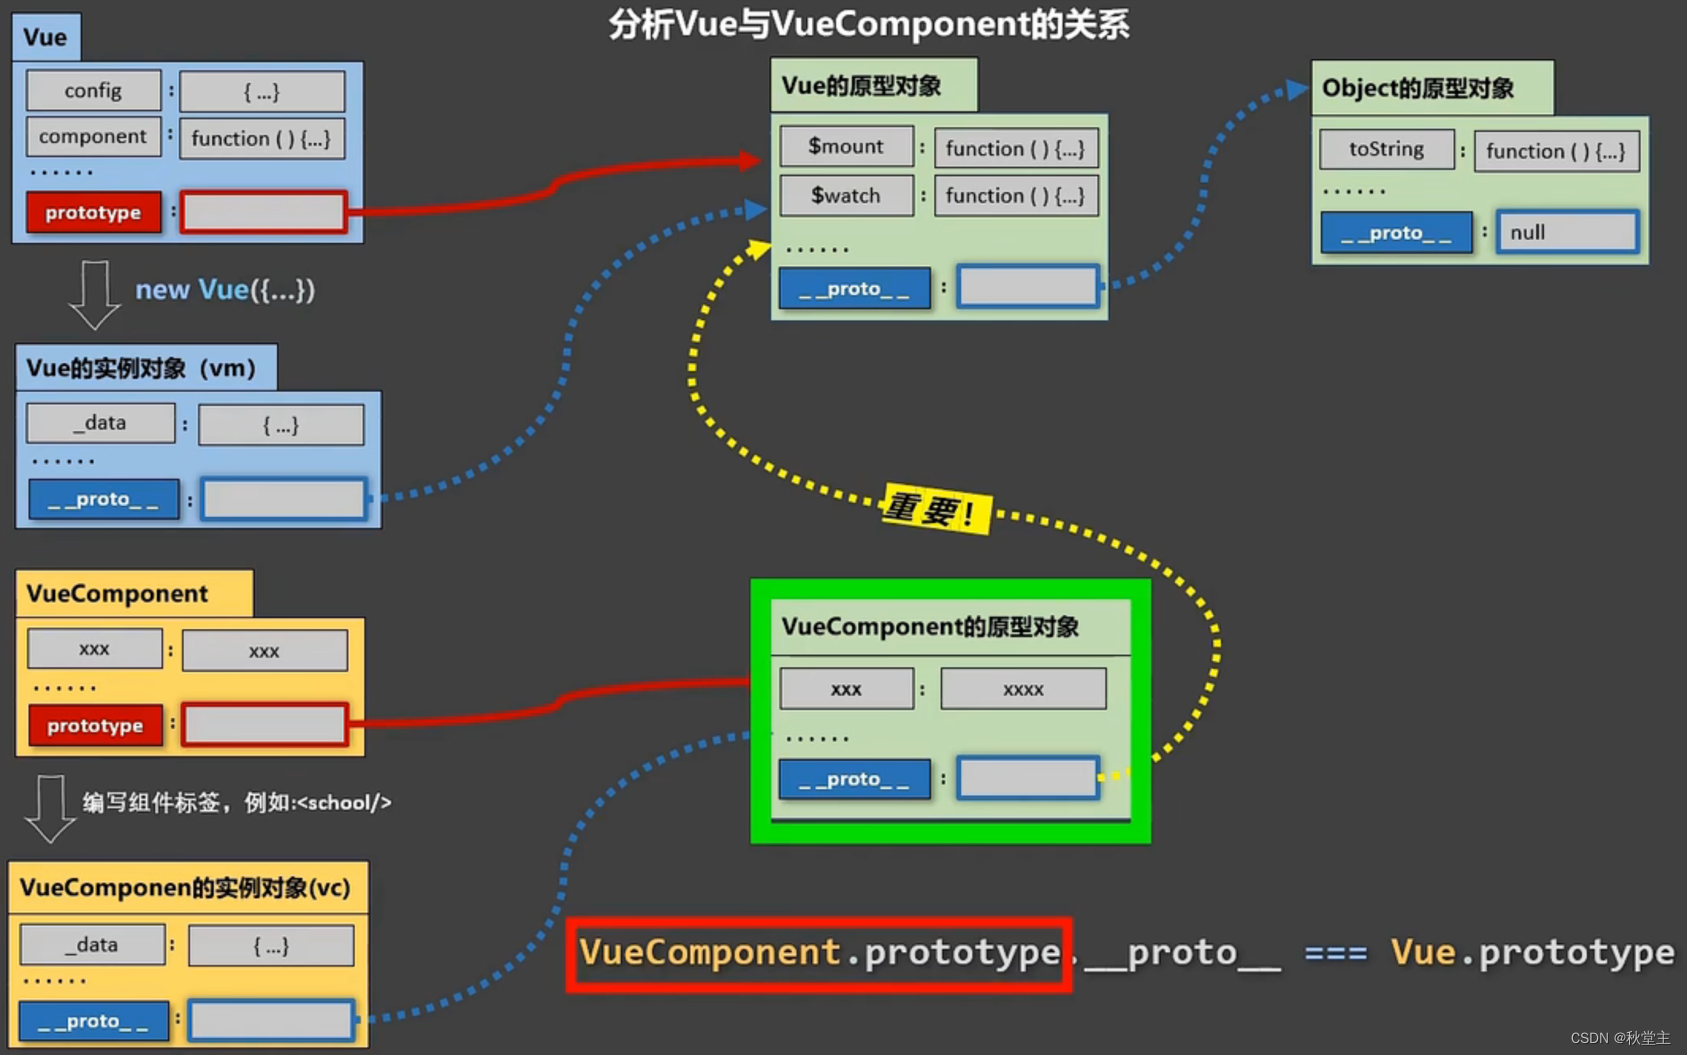
一个重要的内置关系:VueComponent.prototype._proto_=== Vue.prototype
为什么要有这个关系?是为了让组件实例对象(vc)可以访问到Vue原型上的属性、方法。
下面案例中,证明了这个重要的内置关系。即:school.prototype.__proto__ == Vue.prototype
<div id="root">
    <!-- 编写组件标签 -->
    <school></school>
</div>

<script>
    // 创建School组件
    const school = Vue.extend({
        template:`
            <div>
                <h2>学校名称:{{schoolName}}</h2>
                <h2>学校地址:{{address}}</h2>
            </div>
        `,
        data() {
            return {
                schoolName: '南京大学',
                address: '江苏省南京市鼓楼区汉口路22号',
            }
        },
    })
    // true
    console.log(school.prototype.__proto__  == Vue.prototype)
    // 创建vm
    new Vue({
        el: '#root',
        // 局部注册组件
        components: {
            school,
        }


    })

</script>
6.3 关系分析图
Vue和VueComponent的关系分析图如下:
七、单文件组件
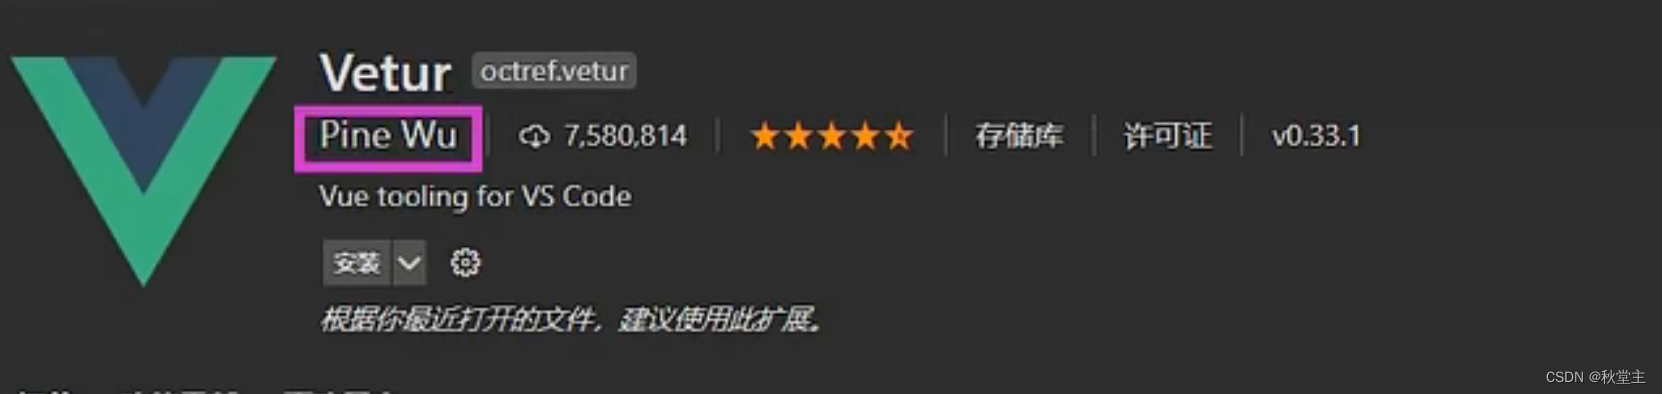
7.1 安装Vetur插件
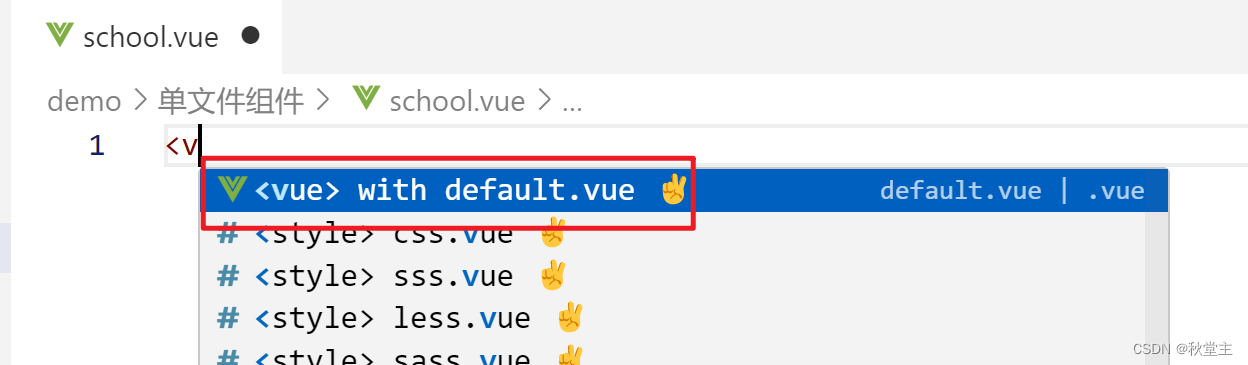
在VSCode中安装Vetur插件.
安装完成后,输入<v 回车就会自动生成相关代码
7.2 案例
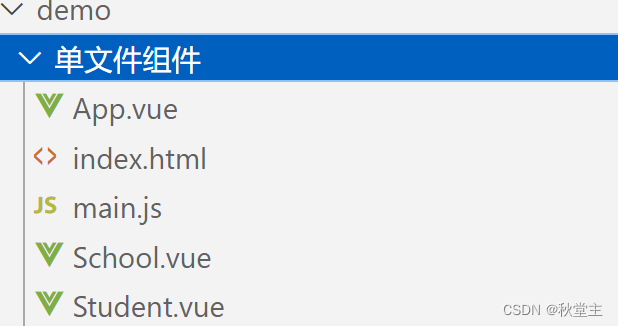
下面案例最终的目录结构如下:
7.2.1 School.vue
<template>
    <div class="demo">
        <h2>学校名称:{{ schoolName }}</h2>
        <h2>学校地址:{{ address }}</h2>
        <button @click="showName">点我显示学校名</button>
    </div>
</template>

<script>
export default {
    name: 'School',
    data() {
        return {
            schoolName: "南京大学",
            address: "江苏省南京市鼓楼区汉口路22号",
        };
    },
    methods: {
        showName() {
            alert(this.schoolName);
        },
    },
};
</script>

<style>
.demo {
    background-color: orange;
}
</style>
7.2.2 Student.vue
<template>
    <div>
        <h2>学生姓名:{{name}}</h2>
        <h2>学生年龄:{{age}}</h2>
    </div>
</template>

<script>
export default {
    name: 'Student',
    data() {
        return {
            name: "令狐冲",
            age: 20,
        };
    }

};
</script>
7.2.3 App.vue
<template>
   <div>
        <School></School>
        <Student></Student>
   </div>
</template>

<script>
// 引入组件
import School from './School'
import Student from './Student'


export default {
    name: 'App',
    components:{
        School,
        Student
    }
};
</script>
7.2.4 main.js
import App from './App'

new Vue({
    el:'#root',
    template:`<App></App>`,
    comments:{
        App
    }
})
7.2.5 index.html
<!DOCTYPE html>
<html lang="en">
<head>
    <meta charset="UTF-8">
    <meta name="viewport" content="width=device-width, initial-scale=1.0">
    <title>Document</title>
</head>
<body>
    <div id="root">
        <!-- <App></App> -->
    </div>
    <script src="../../lib/vue.js"></script>
    <script src="./main.js"></script>
</body>
</html>