😀前言
本篇博文是关于Thymeleaf 的综合案例, 使用SpringBoot + Thymeleaf 完成简单的用户登录-列表功能,希望你能够喜欢😊
🏠个人主页:晨犀主页
🧑个人简介:大家好,我是晨犀,希望我的文章可以帮助到大家,您的满意是我的动力😉😉
💕欢迎大家:这里是CSDN,我总结知识的地方,欢迎来到我的博客,感谢大家的观看🥰
如果文章有什么需要改进的地方还请大佬不吝赐教 先在此感谢啦😊
文章目录
- Thymeleaf
- 官方文档
- Thymeleaf 综合案例
- 需求说明
- 分析图
- 代码实现
- 完成测试
- 😄总结
Thymeleaf
官方文档
在线文档: https://www.thymeleaf.org/doc/tutorials/3.0/usingthymeleaf.html
离线文档: usingthymeleaf.pdf
Thymeleaf 综合案例
如果对Thymeleaf感兴趣可以看看小编的Thymeleaf快速入门及其注意事项,希望你能够喜欢😊。
需求说明
说明: 使用SpringBoot + Thymeleaf 完成简单的用户登录-列表功能


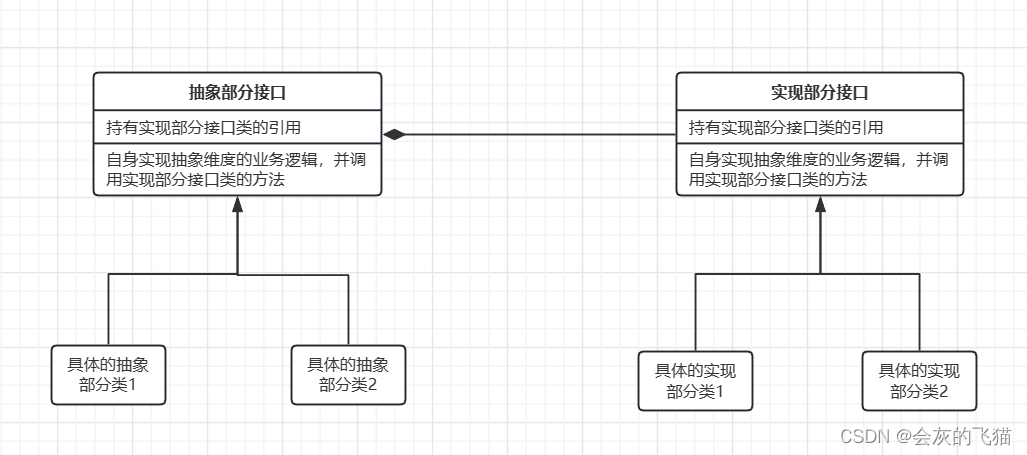
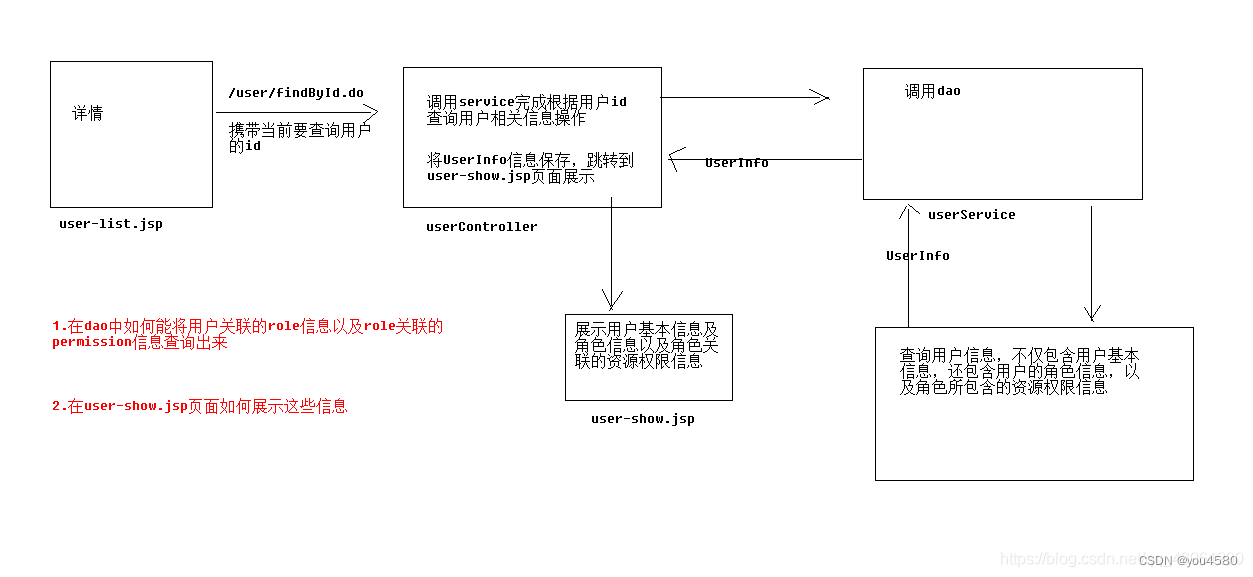
分析图

代码实现
-
创建项目。
-
要使项目支持Thymeleaf, 需要在pom.xml 加入thymeleaf-starter,配置。

- 引入starter-Thymeleaf , 项目会自动完成配置, 程序员按照规则开发即可


- 创建Login.html和manage.html 和静态图片到指定目录,从准备好的拷贝即可, 注意如果将html 文件放到templates/ 目录下, 该目录不能直接访问

创建Login.html
<!DOCTYPE html>
<html lang="en" xmlns:th="http://www.thymeleaf.org">
<head>
    <meta charset="UTF-8">
    <title>login</title>
</head>
<body bgcolor="#CED3FE">
<img src="images/1.GIF"/>
<hr/>
<div style="text-align: center">
    <h1>用户登陆</h1>
    <form action="#"  method="post">
        <label style="color: red" th:text="${msg}"></label><br/>
        用户名:<input type="text" style="width:150px" name="name"/><br/><br/>
        密 码:<input type="password" style="width:150px" name="password"/><br/><br/>
        <input type="submit" value="登录"/>
        <input type="reset" value="重新填写"/>
    </form>
</div>
<hr/>
<img src="images/logo.png"/>
</body>
</html>
创建manage.html
<!DOCTYPE html>
<html lang="en" xmlns:th="http://www.thymeleaf.org">
<head>
    <meta charset="UTF-8">
    <title>管理后台</title>
</head>
<body bgcolor="#CED3FE">
<img src="images/1.GIF"/>
<a href='#'>返回管理界面</a>  <a href='#'>安全退出</a>   欢迎您:xxx
<hr/>
<div style="text-align: center">
    <h1>管理雇员~</h1>
    <table border="1px" cellspacing="0" bordercolor="green" style="width:800px;margin: auto">
        <tr bgcolor="pink">
            <td>id</td>
            <td>name</td>
            <td>pwd</td>
            <td>email</td>
            <td>age</td>
        </tr>
        <tr bgcolor="#ffc0cb" >
            <td>a</td>
            <td>b</td>
            <td>c</td>
            <td>d</td>
            <td>e</td>
        </tr>
    </table>
    <br/>
</div>
<hr/>
<img src="images/logo.png"/>
</body>
</html>
- 创建com/nlc/usersys/bean/Admin.java
@Data
public class Admin {
    private String name;
    private String password;
}
- 创建com/nlc/usersys/bean/User.java
@Data
@AllArgsConstructor
@NoArgsConstructor
public class User {
    private Integer id;
    private String name;
    private String password;
    private Integer age;
    private String email;
}
- 创建com/nlc/usersys/controller/IndexController.java 默认进入登录页面
@Controller
public class IndexController {

    //编写方法,转发到登录页面
    @GetMapping(value = {"/", "/login"})
    public String login() {
        /**
         * 解读
         * 1. 因为我们引入了starter-thymeleaf
         * 2. 这里就会直接使用视图解析到 thymeleaf下的模板文件adminLogin.html
         */
        return "adminLogin";
    }
}
- 创建com/nlc/usersys/controller/AdminController.java 处理登录请求完成测试
@Controller
public class AdminController {

    //响应用户的登录请求
    @PostMapping("/login")
    public String login(Admin admin, HttpSession session, Model model) {

        //验证用户是否合法
        if (StringUtils.hasText(admin.getName()) && "666".equals(admin.getPassword())) {

            //将登录用户保存到session
            session.setAttribute("loginAdmin", admin);

            //合法, 重定向到manage.html
            //不使用请求转发?为了防止刷新页面会重复提交
            //这里为什么是写的 manage.html, 因为这样可以更加明确的表示到哪个页面
            //manage.html表示要去找 方法的映射路径为 manage.html
            return "redirect:/manage.html";
        } else {
            //不合法,就重新登录, 请求转发
            model.addAttribute("msg", "账号/用户错误");
            return "adminLogin";
        }
    }


    //处理用户的请求到 manage.html
    @GetMapping("/manage.html")
    public String mainPage(Model model, HttpSession session) {
		//是否登录。拦截器,过滤器
		Object loginAdmin = session.getAttribute("loginAdmin");

        if(loginAdmin != null){
        	return "manage";
        }else {
            //回到登录页面
            model.addAttribute("msg","请重新登录");
            return "login";
        }
    }
}
浏览器输入: http://localhost:8080/login


- 修改AdminController.java 模拟返回用户列表
//处理用户的请求到 manage.html
@GetMapping("/manage.html")
public String mainPage(Model model, HttpSession session) {
	Object loginAdmin = session.getAttribute("loginAdmin");
        if(null != loginAdmin) {//说明成功登录过
            //可以这里集合-模拟用户数据, 放入到request域中,并显示
            ArrayList<User> users = new ArrayList<>();
            users.add(new User(1, "关羽~", "666666", 20, "gy@sohu.com"));
            users.add(new User(2, "张飞", "666666", 30, "zf@sohu.com"));
            users.add(new User(3, "赵云", "666666", 22, "zy@sohu.com"));
            users.add(new User(4, "马超", "666666", 28, "mc@sohu.com"));
            users.add(new User(5, "黄忠", "666666", 50, "hz@sohu.com"));

            //将数据放入到request域
            model.addAttribute("users", users);

            return "manage"; //这里才是我们的视图解析到 /templates/manage.html
        } else {
            //这里就返回登录页,并给出提示
            model.addAttribute("msg","你没有登录/请登录");
            return "Login";
        }
}
- 修改manage.html , 显示用户列表
<!DOCTYPE html>
<html lang="en" xmlns:th="http://www.thymeleaf.org">
<head>
    <meta charset="UTF-8">
    <title>管理后台</title>
</head>
<body bgcolor="#CED3FE">
<img src="images/1.GIF"/>
<a href='#'>返回管理界面</a>  <a href='#' th:href="@{/}">安全退出</a>   欢迎您:[[${session.loginAdmin.name}]]
<hr/>
<div style="text-align: center">
    <h1>管理雇员~</h1>
    <table border="1px" cellspacing="0" bordercolor="green" style="width:800px;margin: auto">
        <tr bgcolor="pink">
            <td>id</td>
            <td>name</td>
            <td>pwd</td>
            <td>email</td>
            <td>age</td>
        </tr>
        <tr bgcolor="#ffc0cb" th:each="user:${users}">
            <td th:text="${user.id}">a</td>
            <td th:text="${user.name}">b</td>
            <td th:text="${user.password}">c</td>
            <td th:text="${user.email}">d</td>
            <td th:text="${user.age}">e</td>
        </tr>
    </table>
    <br/>
</div>
<hr/>
<img src="images/logo.png"/>
</body>
</html>
- 修改login.html , 显示登录错误信息和提交action
<!DOCTYPE html>
<html lang="en" xmlns:th="http://www.thymeleaf.org">
<head>
    <meta charset="UTF-8">
    <title>login</title>
</head>
<body bgcolor="#CED3FE">
<img src="images/1.GIF"/>
<hr/>
<div style="text-align: center">
    <h1>用户登陆</h1>
    <form action="#" th:action="@{/login}"  method="post">
        <label style="color: red" th:text="${msg}"></label><br/>
        用户名:<input type="text" style="width:150px" name="name"/><br/><br/>
        密 码:<input type="password" style="width:150px" name="password"/><br/><br/>
        <input type="submit" value="登录"/>
        <input type="reset" value="重新填写"/>
    </form>
</div>
<hr/>
<img src="images/logo.png"/>
</body>
</html>
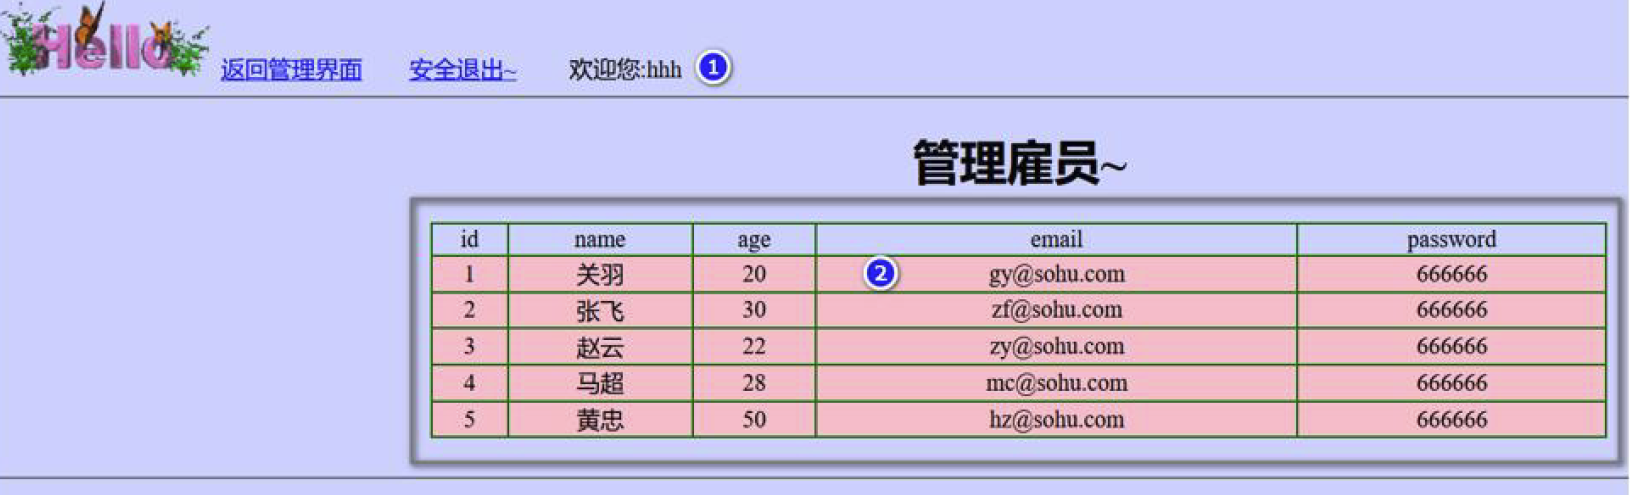
完成测试
Thymeleaf 显示数据页面效果,浏览器: http://localhost:8080/login.html

😄总结
1、若要使用Thymeleaf 语法,首先要声明名称空间: xmlns:th=“http://www.thymeleaf.org”
2、设置文本内容th:text,设置input 的值th:value,循环输出th:each,条件判断th:if,插入代码块th:insert,定义代码块th:fragment,声明变量th:object
3、th:each 的用法需要格外注意,打个比方:如果你要循环一个div 中的p 标签,则th:each属性必须放在p 标签上。若你将th:each 属性放在div 上,则循环的是将整个div。
4、变量表达式中提供了很多的内置方法,该内置方法是用#开头,请不要与#{}消息表达式弄混。
😁热门文章推荐
Thymeleaf快速入门及其注意事项
Spring Initailizr–快速入门–SpringBoot的选择
带你了解SpringBoot支持的复杂参数–自定义对象参数-自动封装
Rest 优雅的url请求处理风格及注意事项
文章到这里就结束了,如果有什么疑问的地方请指出,诸大佬们一起来评论区一起讨论😁
希望能和诸大佬们一起努力,今后我们一起观看感谢您的阅读🍻
如果帮助到您不妨3连支持一下,创造不易您们的支持是我的动力🤞


![linux学习(自写shell)[11]](https://img-blog.csdnimg.cn/b3b1e0e5472a42cb96ae1ac63d4d3d2a.png)