一、场景
vue写uniapp打包安卓包,实现原生地图截屏(andirod同事做的)-画板编辑功能
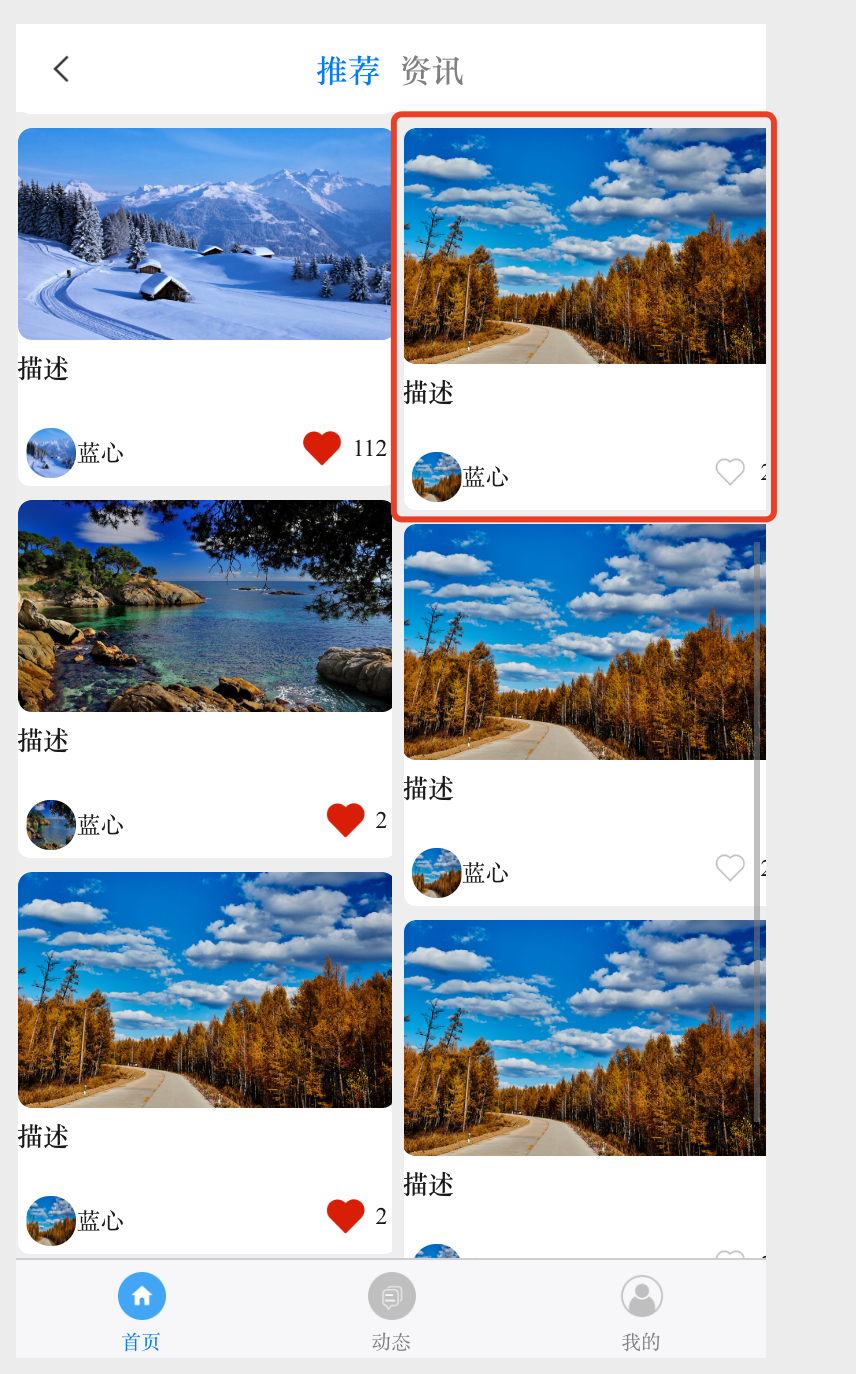
实现效果: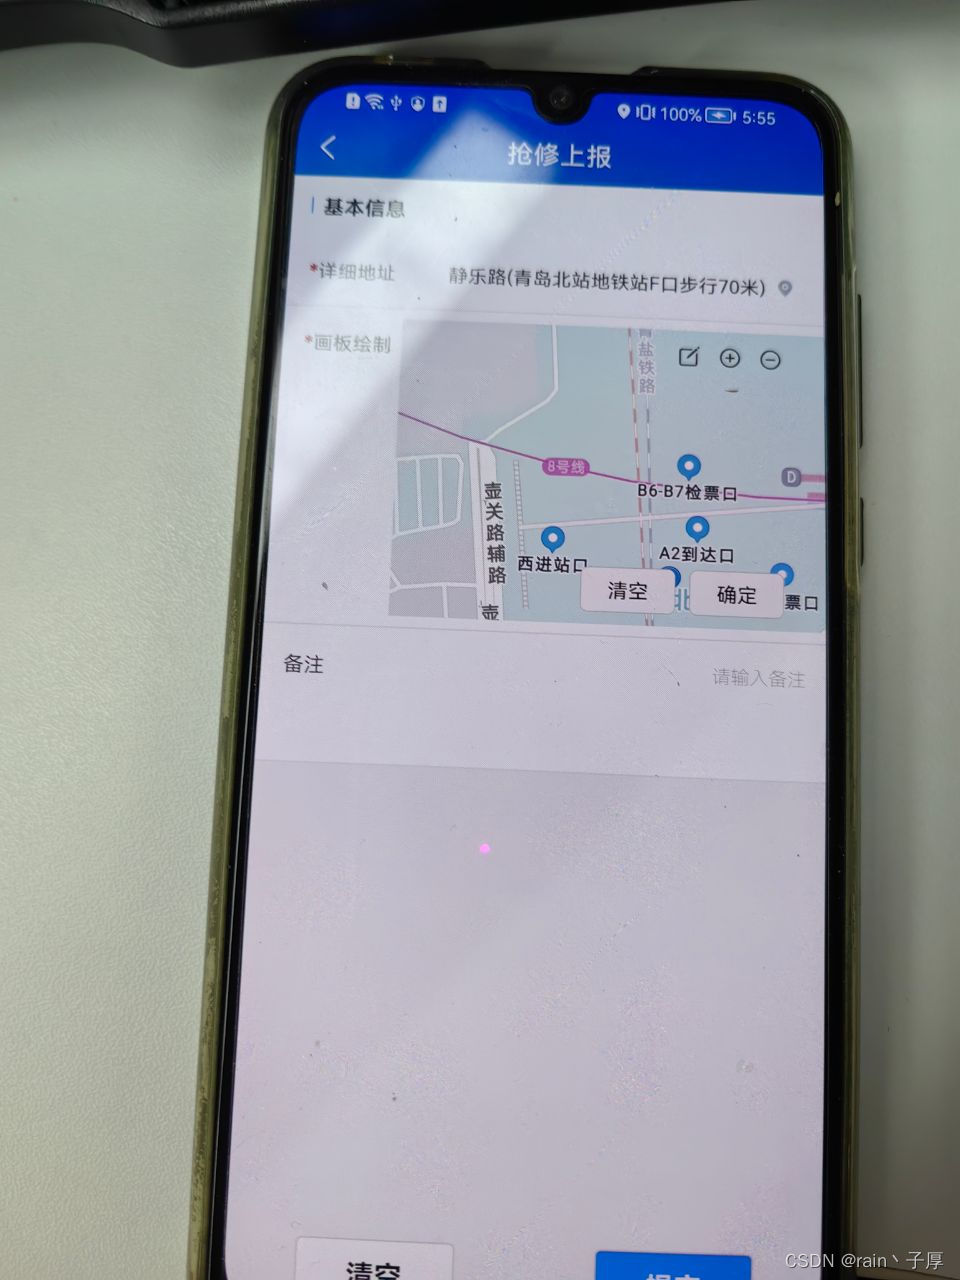
二、逻辑步骤简略
1. 由 原生地图nvue部分,回调返回 地图截屏生成的base64 数据,
2. 通过 uni插件市场 image-tools 插件 base64ToPath方法,将base64数据 转成文件路径
3. 通过 uni -API- uni.createCanvasContext() 、ctx.createPattern() 方法,将 图片数据 创建绘图对象
4. 通过 uni - movable-area+movable-view 控制画布缩放
5. 通过 canvas @touchmove="touchmove" @touchend="touchend" @touchstart="touchstart" 等方法实现在画布上绘制画笔
6. 生成图片及清空画布
三、具体实现
1. 由 原生地图nvue部分,回调返回 原生地图截屏生成的base64 数据(andirod同事做的)
2. image-tools 插件 base64ToPath
image-tools - DCloud 插件市场
import { pathToBase64, base64ToPath } from '@/js_sdk/mmmm-image-tools/index.js'3.通过 uni -API- uni.createCanvasContext() 、ctx.createPattern() 方法
uni-app官网 API- createPattern()
initC() {
      const that = this
      // 创建绘图对象
      this.ctx = uni.createCanvasContext('mycanvas', this);
      // 在canvas设置背景 - 入参 仅支持包内路径和临时路径
      const pattern = this.ctx.createPattern(this.imageUrl, 'repeat-x')
      this.ctx.fillStyle = pattern
      this.ctx.setStrokeStyle('red')
      this.ctx.fillRect(0, 0, this.dWidth, this.dHeight)
      this.ctx.draw()
      // 方法二  在画布上插入图片
      // this.img = new Image();
      // this.img.src = this.imageUrl;
      // this.img.onload = () => {
      //   console.log('this.img', that.img.width)
      //   that.ctx.drawImage(that.img, 0, 0, this.dWidth, this.dHeight)
      //   // that.ctx.draw()
      // }
    },
4. 通过 uni - movable-area+movable-view 控制画布缩放
<movable-area :scale-area="true" :style="{'width':windowWidth+'px','height':windowHeight+'px','backgroundColor':'#ddd','overflow':'hidden'}">
      <movable-view
        direction="all"
        :inertia="false"
        :out-of-bounds="false"
        :scale-min="0.001"
        :scale-max="4"
        :scale="true"
        :disabled="movableDisabled"
        :scale-value="scaleValue"
        class="pr"
        :style="{'width':widths+'px','height':heights+'px'}"
        @scale="scaleChange">
          <canvas
            id="mycanvas"
            canvas-id="mycanvas"
            :style="{'width':widths+'px','height':heights+'px'}"
            @touchmove="touchmove"
            @touchend="touchend"
            @touchstart="touchstart">
          </canvas>
      </movable-view>
    </movable-area>
5.通过 canvas @touchmove="touchmove" 等方法实现在画布上绘制画笔
touchstart(e) {
      let startX = e.changedTouches[0].x
      let startY = e.changedTouches[0].y
      if (this.scaleValue > 1) {
        startX = e.changedTouches[0].x / this.scaleValue;
        startY = e.changedTouches[0].y / this.scaleValue;
      } else {
        startX = e.changedTouches[0].x * this.scaleValue;
        startY = e.changedTouches[0].y * this.scaleValue;
      }
      console.log('touchstart()-x', e.changedTouches[0].x, 'scaleValue', this.scaleValue, 'startX', startX)
      let startPoint = { X: startX, Y: startY };
      this.points.push(startPoint);
      // 每次触摸开始,开启新的路径
      this.ctx.beginPath();
	  },
    touchmove(e) {
      if (this.isEdit) {
        let moveX = e.changedTouches[0].x
        let moveY = e.changedTouches[0].y
        if (this.scaleValue > 1) {
          moveX = e.changedTouches[0].x / this.scaleValue;
          moveY = e.changedTouches[0].y / this.scaleValue;
        } else {
          moveX = e.changedTouches[0].x * this.scaleValue;
          moveY = e.changedTouches[0].y * this.scaleValue;
        }
        console.log('touchmove()-x', e.changedTouches[0].x, 'scaleValue', this.scaleValue, 'moveX', moveX)
        let movePoint = { X: moveX, Y: moveY };
        this.points.push(movePoint); // 存点
        let len = this.points.length;
        if (len >= 2) {
          this.draw(); // 绘制路径
        }
      }
	  },
    touchend() {
      this.points = [];
	  },
    draw() {
      let point1 = this.points[0];
      let point2 = this.points[1];
      this.points.shift();
      this.ctx.moveTo(point1.X, point1.Y);
      this.ctx.lineTo(point2.X, point2.Y);
      this.ctx.stroke();
      this.ctx.draw(true);
    },
6.生成图片及清空画布
clear() {
      let that = this;
      this.scaleValue = 1
      this.isEdit = false
      this.movableDisabled = false
      uni.getSystemInfo({
        success: function(res) {
          let canvasw = res.windowWidth;
          let canvash = res.windowHeight;
          that.ctx.clearRect(0, 0, canvasw, canvash);
          const pattern = that.ctx.createPattern(that.imageUrl, 'repeat-x')
          that.ctx.fillStyle = pattern
          that.dWidth = 285
          that.dHeight = 200
          that.ctx.setStrokeStyle('red')
          that.ctx.fillRect(0, 0, that.dWidth, that.dHeight)
          that.ctx.draw()
          // that.ctx.draw(true);
        }
      });
    },
    finish() {
      let that = this;
      uni.canvasToTempFilePath({
          canvasId: 'mycanvas',
          success: function(res) {
            // 这里的res.tempFilePath就是生成的签字图片
            // console.log('tempFilePath', res.tempFilePath);
            that.tempFilePath = res.tempFilePath
            that.$emit('onImgUrl', that.tempFilePath) // 向父级组件传值
          }
      });
    },
utils:
// 是否是 base64数据
export function isBase64Two(str) {
	try {
		return btoa(atob(str)) === str;
	} catch (err) {
		return false;
	}
}
export function isBase64(str) {
	// 正则表达式匹配B4-64编码格式
	const regex = /^[a-zA-Z0-9+\/]+={0,2}$/;
	return regex.test(str);
}
// 校验内容是否包含base64格式的图片
export function isBase64Three(str){
  let imgReg = RegExp(/data:image\/.*;base64,/)
  const res = imgReg.test(str)
  return res
}
四、总结
以下完整代码 DrawingBoard.vue:
<template>
  <view class="canvas-frame">
    <view class="icon-frame">
      <uni-icons
        :class="{ 'is-edit': isEdit }"
        type="compose"
        size="18" class="icon-item mr10"
        @click="createCanvas">编辑
      </uni-icons>
      <uni-icons
        type="plus"
        size="18" class="icon-item mr10"
        title="放大"
        @click="plusImageScalex">
      </uni-icons>
      <uni-icons
        type="minus"
        size="18" class="icon-item"
        title="缩小"
        @click="minusImageScalex">
      </uni-icons>
    </view>
    <view class="button-frame">
      <button size="mini" class="mr10" @click="clear">清空</button>
      <button size="mini" @click="finish">确定</button>
    </view>
    <!-- style="border: 1rpx solid #ccc;width: 570rpx; height: 400rpx;" -->
    <!-- <canvas
      id="mycanvas"
      canvas-id="mycanvas"
      :style="{'width':widths+'px','height':heights+'px'}"
      @touchmove="touchmove"
      @touchend="touchend"
      @touchstart="touchstart">
    </canvas> -->
    <movable-area :scale-area="true" :style="{'width':windowWidth+'px','height':windowHeight+'px','backgroundColor':'#ddd','overflow':'hidden'}">
      <movable-view
        direction="all"
        :inertia="false"
        :out-of-bounds="false"
        :scale-min="0.001"
        :scale-max="4"
        :scale="true"
        :disabled="movableDisabled"
        :scale-value="scaleValue"
        class="pr"
        :style="{'width':widths+'px','height':heights+'px'}"
        @scale="scaleChange">
          <canvas
            id="mycanvas"
            canvas-id="mycanvas"
            :style="{'width':widths+'px','height':heights+'px'}"
            @touchmove="touchmove"
            @touchend="touchend"
            @touchstart="touchstart">
          </canvas>
      </movable-view>
    </movable-area>
  </view>
</template>

<script>
// import { fabric } from 'fabric';
// import { fabric } from '@/utils/fabric.min.js';
// import { Database64ToFile } from '@/utils/index';
import { pathToBase64, base64ToPath } from '@/js_sdk/mmmm-image-tools/index.js'
import { isBase64 } from '@/utils/index.js';
// isBase64 方法判断 原生端返回到的数据格式是否正确
export default {
  props: {
    // 更新 原始地图画布
    mapImageUrl: {
      type: String,
      default: '',
    }
  },
  data() {
    return {
      canvasEle: null,
      isEdit: false,
      imageContainer: null,
      scaleValue: 1,
      ctx: '', // 绘图图像
      points: [], // 路径点集合
      tempFilePath: '', // 签名图片
      imageUrl: require('@/static/res/imgs/all/fushanhou-area.jpg'), // 本地图片画布资源
      img: null,
      dWidth: 285,
      dHeight: 200,
      widths: 285,
      heights: 200,
      windowWidth: 285,
      windowHeight: 200,
      movableDisabled: false,
    };
  },
  mounted() {
    this.initC()
  },
  watch: {
    mapImageUrl(newV, oldV) {
      const that = this
      console.log('watch()-mapImageUrl-newV,监听数据变化-newV', newV? '有值': '无值')
			if (!['',undefined,null].includes(newV)) {
        console.log('watch()-mapImageUrl-isBase64(newV)', isBase64(newV))
        // const base64Image = 'data:image/png;base64,/9j/4AAQSkZJRgA...';
        // that.base64ToTempFilePath(newV ,(tempFilePath) => {
        //   console.log('转换成功,临时地址为:', tempFilePath)
        //   that.imageUrl = tempFilePath
        //   // 会在canvas中调用
        //   that.initC()
        // },
        // () =>{
        //   console.log('fail转换失败')
        // });
        const base64 = 'data:image/png;base64,' + newV;
        base64ToPath(base64).then((tempFilePath) => {
          console.log('转换成功,临时地址为:', tempFilePath)
          that.imageUrl = tempFilePath
          that.initC()
        })
			}
		},
  },
  methods: {

    initC() {
      const that = this
      // 创建绘图对象
      this.ctx = uni.createCanvasContext('mycanvas', this);
      // 在canvas设置背景 - 入参 仅支持包内路径和临时路径
      const pattern = this.ctx.createPattern(this.imageUrl, 'repeat-x')
      this.ctx.fillStyle = pattern
      this.ctx.setStrokeStyle('red')
      this.ctx.fillRect(0, 0, this.dWidth, this.dHeight)
      this.ctx.draw()
      // 方法二  在画布上插入图片
      // this.img = new Image();
      // this.img.src = this.imageUrl;
      // this.img.onload = () => {
      //   console.log('this.img', that.img.width)
      //   that.ctx.drawImage(that.img, 0, 0, this.dWidth, this.dHeight)
      //   // that.ctx.draw()
      // }
    },
    createCanvas() {
      this.isEdit = !this.isEdit
      if (this.isEdit) {
        this.movableDisabled = true
        // 设置画笔样式
        this.ctx.lineWidth = 2;
        this.ctx.lineCap = 'round';
        this.ctx.lineJoin = 'round';
      } else {
        this.movableDisabled = false
      }
    },
    touchstart(e) {
      let startX = e.changedTouches[0].x
      let startY = e.changedTouches[0].y
      if (this.scaleValue > 1) {
        startX = e.changedTouches[0].x / this.scaleValue;
        startY = e.changedTouches[0].y / this.scaleValue;
      } else {
        startX = e.changedTouches[0].x * this.scaleValue;
        startY = e.changedTouches[0].y * this.scaleValue;
      }
      console.log('touchstart()-x', e.changedTouches[0].x, 'scaleValue', this.scaleValue, 'startX', startX)
      let startPoint = { X: startX, Y: startY };
      this.points.push(startPoint);
      // 每次触摸开始,开启新的路径
      this.ctx.beginPath();
	  },
    touchmove(e) {
      if (this.isEdit) {
        let moveX = e.changedTouches[0].x
        let moveY = e.changedTouches[0].y
        if (this.scaleValue > 1) {
          moveX = e.changedTouches[0].x / this.scaleValue;
          moveY = e.changedTouches[0].y / this.scaleValue;
        } else {
          moveX = e.changedTouches[0].x * this.scaleValue;
          moveY = e.changedTouches[0].y * this.scaleValue;
        }
        console.log('touchmove()-x', e.changedTouches[0].x, 'scaleValue', this.scaleValue, 'moveX', moveX)
        let movePoint = { X: moveX, Y: moveY };
        this.points.push(movePoint); // 存点
        let len = this.points.length;
        if (len >= 2) {
          this.draw(); // 绘制路径
        }
      }
	  },
    touchend() {
      this.points = [];
	  },
    draw() {
      let point1 = this.points[0];
      let point2 = this.points[1];
      this.points.shift();
      this.ctx.moveTo(point1.X, point1.Y);
      this.ctx.lineTo(point2.X, point2.Y);
      this.ctx.stroke();
      this.ctx.draw(true);
    },
    clear() {
      let that = this;
      this.scaleValue = 1
      this.isEdit = false
      this.movableDisabled = false
      uni.getSystemInfo({
        success: function(res) {
          let canvasw = res.windowWidth;
          let canvash = res.windowHeight;
          that.ctx.clearRect(0, 0, canvasw, canvash);
          const pattern = that.ctx.createPattern(that.imageUrl, 'repeat-x')
          that.ctx.fillStyle = pattern
          that.dWidth = 285
          that.dHeight = 200
          that.ctx.setStrokeStyle('red')
          that.ctx.fillRect(0, 0, that.dWidth, that.dHeight)
          that.ctx.draw()
          // that.ctx.draw(true);
        }
      });
    },
    finish() {
      let that = this;
      uni.canvasToTempFilePath({
          canvasId: 'mycanvas',
          success: function(res) {
            // 这里的res.tempFilePath就是生成的签字图片
            // console.log('tempFilePath', res.tempFilePath);
            that.tempFilePath = res.tempFilePath
            that.$emit('onImgUrl', that.tempFilePath)
          }
      });
    },
    plusImageScalex() {
      const num = this.scaleValue + 0.4
      this.scaleValue = Math.floor(num * 100) / 100;
      // this.setImageScale(this.scaleValue);
    },
    minusImageScalex() {
      const num = this.scaleValue + 0.4
      this.scaleValue = - (Math.floor(num * 100) / 100);
      // this.setImageScale(-this.scaleValue);
    },
    // 设置图片缩放
    setImageScale(scale) {
      const that = this
      console.log('this.ctx.', this.ctx.dWidth, scale)
      // const value = this.imageContainer.scaleX + scale;
      // const zoom = Number(value.toFixed(2));
      // // 设置图片的缩放比例和位置
      // this.imageContainer.set({
      //   scaleX: zoom,
      //   scaleY: zoom,
      // });
      // this.canvasEle.renderAll();
      // that.ctx.fillRect(0, 0, 285, 200)
      // that.ctx.draw()
      const pattern = that.ctx.createPattern(that.imageUrl, 'repeat-x')
      that.ctx.fillStyle = pattern
      const w = that.dWidth * scale
      const h = that.dHeight * scale
      console.log('this.ctx.',w, h)
      that.ctx.fillRect(0, 0, w, h)
      that.ctx.draw()
    },
    //点击事件 判断缩放比例
    touchstart(e) {
      let x = e.touches[0].x
      let y = e.touches[0].y
      // this.node.forEach(item => {
      //   if (x > item.x * this.scale && x < (item.x + item.w) * this.scale
      //       && y > item.y * this.scale && y < (item.y + item.h) * this.scale) {
      //       //在范围内,根据标记定义节点类型
      //       // this.lookDetial(item)
      //   }
      // })
    },
    //s缩放比例
    scaleChange(e) {
      this.scaleValue = e.detail.scale
    },
    // 将base64图片转换为临时地址
    base64ToTempFilePath(base64Data, success, fail) {
      const fs = uni.getFileSystemManager()
      const fileName = 'temp_image_' + Date.now() + '.png'
      // 自定义文件名,可根据需要修改
      const USER_DATA_PATH = 'ttfile://user' // uni.env.USER_DATA_PATH
      const filePath = USER_DATA_PATH + '/' + fileName
      const buffer = uni.base64ToArrayBuffer(base64Data)
      fs.writeFile({
        filePath,
        data: buffer,
        encoding: 'binary',
        success() {
          success && success(filePath)
        },
        fail() { fail && fail()}
      });
    },
    // base64转化成本地文件路径
    parseBlob(base64, success) {
      const arr = base64.split(',');
      console.log('parseBlob()-arr:', arr)
      const mime = arr[0].match(/:(.*?);/)[1];
      const bstr = atob(arr[1]);
      const n = bstr.length;
      const u8arr = new Uint8Array(n);
      for(let i = 0; i < n; i++) {
        u8arr[i] = bstr.charCodeAt(i);
      }
      // const url = URL || webkitURL;
      let a = new Blob([u8arr], {type: mime});
      const file = new File([a], 'test.png', {type: 'image/png'});
      console.log('parseBlob()-file', file);
      success && success(file)
    },
  }
};
</script>

<style lang="scss" scoped>
.pr{
  position: relative;
}
.canvas-frame {
  position: relative;
  width: 570rpx;
  // overflow: hidden;
  .icon-frame {
    position: absolute;
    top: 20rpx;
    right: 40rpx;
    z-index: 2;
  }
  .blockS{
    background: transparent;width: 570rpx; height: 400rpx;
    position: absolute;
    top: 0;
    left: 0;
    z-index: 1;
  }
  .icon-item {
    // font-size: 36rpx;
    // padding: 12rpx;
    // border-radius: 8rpx;
    // margin-right: 16rpx;
    // border: 1rpx solid #ccc;
    // background-color: #fff;

    &:hover {
      // background-color: #f1f1f1;
    }

    &:active {
      opacity: 0.8;
    }
  }
  .is-edit {
    color: #007EF3 !important;
  }
  .button-frame {
    position: absolute;
    bottom: 10rpx;
    right: 40rpx;
    z-index: 2;
  }

  #canvasElement {
    cursor: pointer;
  }
}
</style>
由于hbuildex-真机调试-打印很费劲,需要来回构建打包,从而找问题找了好久,其中因为 原生地图截屏返回的是纯base64的数据,未带 data:image\/.*;base64,然后找了半天的问题,需要一步步的推导和确认有没有错,错在那,花费了很多时间和精力;