目录
- 一、阿里云 oss
- 1. 开通 对象存储 OSS 服务
- 2. 使用 SDK 文档
- 3. 文件服务实现
- 搭建 service-oss 模块
- 测试SDK
- 封装 service 接口
- 封装 controller 接口
- 二、用户认证
- 1. 需求分析
- 2. api 接口
- 3. 前端
- 4. 预约挂号页面调整
- 三、就诊人管理
- 1. 需求分析
- 2. api 接口
- 3. 前端
- 四、平台用户管理
- 1. 用户列表
- 2. 锁定
- 3. 详情
- 4. 用户认证列表
- 5. 用户认证审批
一、阿里云 oss
用户认证需要上传证件图片、首页轮播也需要上传图片,因此我们要做文件服务,阿里云 oss 是一个很好的分布式文件服务系统,所以我们只需要集成阿里云 oss 即可。
1. 开通 对象存储 OSS 服务
- 申请阿里云账号
- 实名认证
- 开通“对象存储OSS”服务
- 进入管理控制台
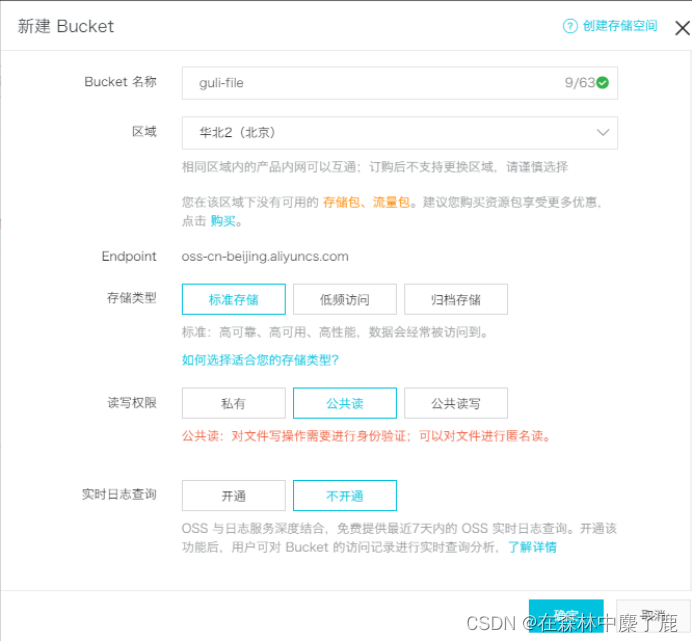
A、创建 Bucket
选择:标准存储、公共读、不开通
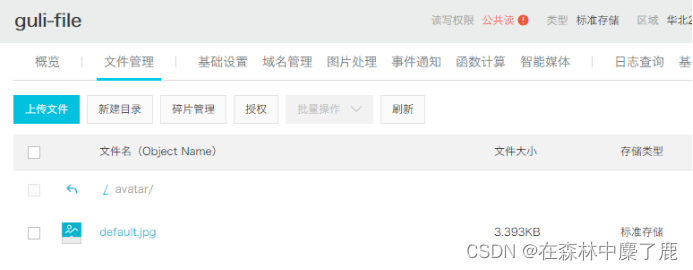
B、上传默认头像
创建文件夹 avatar,上传默认的用户头像
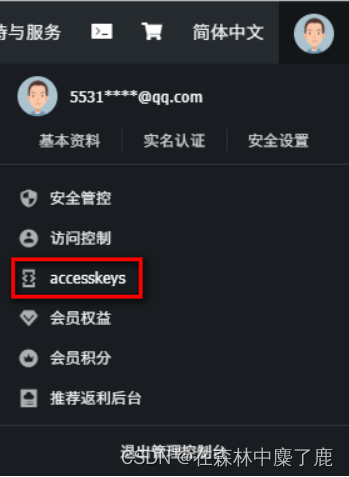
C、获取用户 acesskeys
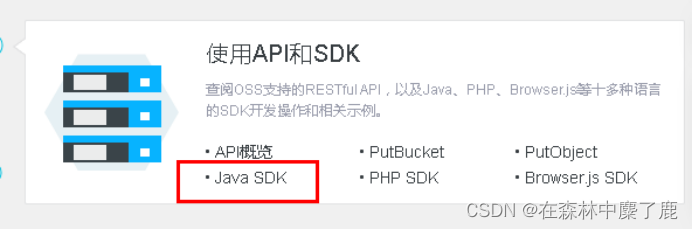
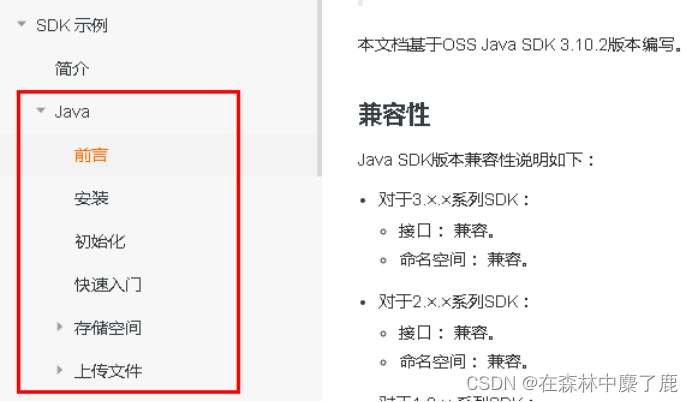
2. 使用 SDK 文档
3. 文件服务实现
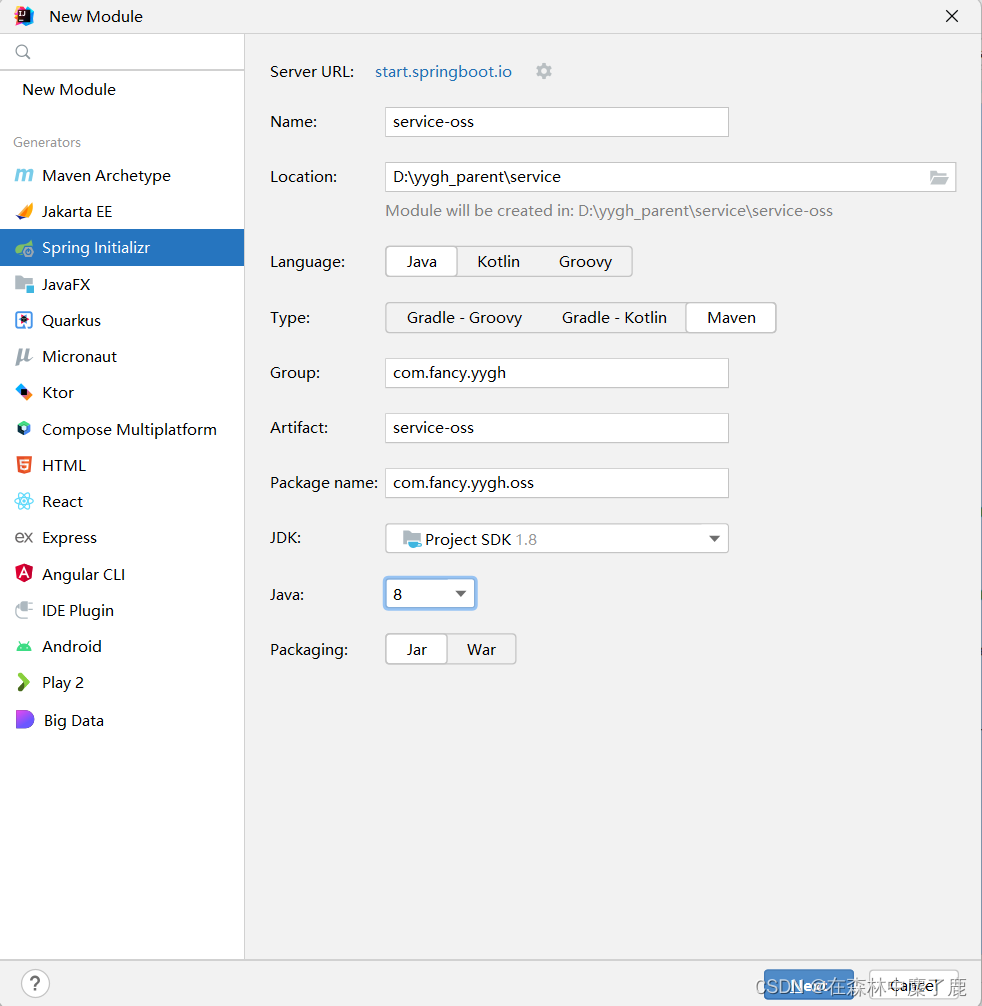
搭建 service-oss 模块
① 搭建 service-oss 模块
搭建过程参考 service-user 模块

② 修改配置
修改 pom.xml,引入阿里云 oss 依赖
<dependencies>
    <!-- 阿里云oss依赖 -->
    <dependency>
        <groupId>com.aliyun.oss</groupId>
        <artifactId>aliyun-sdk-oss</artifactId>
    </dependency>

    <!-- 日期工具栏依赖 -->
    <dependency>
        <groupId>joda-time</groupId>
        <artifactId>joda-time</artifactId>
    </dependency>
</dependencies>
添加配置文件 application.properties
# 服务端口
server.port=8205
# 服务名
spring.application.name=service-oss

#返回json的全局时间格式
spring.jackson.date-format=yyyy-MM-dd HH:mm:ss
spring.jackson.time-zone=GMT+8

# nacos服务地址
spring.cloud.nacos.discovery.server-addr=127.0.0.1:8848

aliyun.oss.endpoint=oss-cn-beijing.aliyuncs.com
aliyun.oss.accessKeyId=LTAI4G4SV6WtST7UYH776b64
aliyun.oss.secret=X9KHNYgztNr9MI5Zp8JffQPZO4uJo5
aliyun.oss.bucket=yygh-atguigu
③ 启动类
//取消数据源自动配置
@SpringBootApplication(exclude = DataSourceAutoConfiguration.class)
@EnableDiscoveryClient
public class ServiceOssApplication {
    public static void main(String[] args) {
        SpringApplication.run(ServiceOssApplication.class, args);
    }
}
④ 配置网关
#设置路由id
spring.cloud.gateway.routes[5].id=service-oss
#设置路由的uri
spring.cloud.gateway.routes[5].uri=lb://service-oss
#设置路由断言,代理servicerId为auth-service的/auth/路径
spring.cloud.gateway.routes[5].predicates= Path=/*/oss/**
测试SDK

封装 service 接口
public interface FileService {
    //上传文件到阿里云oss
    String upload(MultipartFile file);
}
创建 com.fancy.yygh.oss.utils.ConstantOssPropertiesUtils 配置类
@Component
public class ConstantOssPropertiesUtils implements InitializingBean {

    @Value("${aliyun.oss.endpoint}")
    private String endpoint;

    @Value("${aliyun.oss.accessKeyId}")
    private String accessKeyId;

    @Value("${aliyun.oss.secret}")
    private String secret;

    @Value("${aliyun.oss.bucket}")
    private String bucket;

    public static String EDNPOINT;
    public static String ACCESS_KEY_ID;
    public static String SECRECT;
    public static String BUCKET;

    @Override
    public void afterPropertiesSet() throws Exception {
        EDNPOINT=endpoint;
        ACCESS_KEY_ID=accessKeyId;
        SECRECT=secret;
        BUCKET=bucket;
    }
}
创建接口类实现类
@Service
public class FileServiceImpl implements FileService {
    @Override
    public String upload(MultipartFile file) {
        // Endpoint以杭州为例,其它Region请按实际情况填写。
        String endpoint = ConstantOssPropertiesUtils.EDNPOINT;
        String accessKeyId = ConstantOssPropertiesUtils.ACCESS_KEY_ID;
        String accessKeySecret = ConstantOssPropertiesUtils.SECRECT;
        String bucketName = ConstantOssPropertiesUtils.BUCKET;
        try {
            // 创建OSSClient实例。
            OSS ossClient = new OSSClientBuilder().build(endpoint, accessKeyId, accessKeySecret);
            // 上传文件流。
            InputStream inputStream = file.getInputStream();
            String fileName = file.getOriginalFilename();
            //生成随机唯一值,使用uuid,添加到文件名称里面
            String uuid = UUID.randomUUID().toString().replaceAll("-","");
            fileName = uuid+fileName;
            //按照当前日期,创建文件夹,上传到创建文件夹里面
            //  2021/02/02/01.jpg
            String timeUrl = new DateTime().toString("yyyy/MM/dd");
            fileName = timeUrl+"/"+fileName;
            //调用方法实现上传
            ossClient.putObject(bucketName, fileName, inputStream);
            // 关闭OSSClient。
            ossClient.shutdown();
            //上传之后文件路径
           // https://yygh-project.oss-cn-beijing.aliyuncs.com/01.jpg
            String url = "https://"+bucketName+"."+endpoint+"/"+fileName;
            //返回
            return url;
        } catch (IOException e) {
            e.printStackTrace();
            return null;
        }
    }
}
封装 controller 接口
@RestController
@RequestMapping("/api/oss/file")
public class FileApiController {
    @Autowired
    private FileService fileService;

    //上传文件到阿里云oss
    @PostMapping("fileUpload")
    public Result fileUpload(MultipartFile file) {
        //获取上传文件
        String url = fileService.upload(file);
        return Result.ok(url);
    }
}
二、用户认证
1. 需求分析
用户登录成功后都要进行身份认证,认证通过后才可以预约挂号。
认证过程:用户填写信息(姓名、证件类型、证件号码和证件照片) ==> 平台审批
用户认证设计接口:
- 提交认证
- 上传证件图片
- 获取提交认证信息
2. api 接口
操作模块:service-user
A、添加 service 接口及实现
在 UserInfoService 类添加接口
//用户认证
void userAuth(Long userId, UserAuthVo userAuthVo);
在 UserInfoServiceImpl 类添加实现
//用户认证
@Override
public void userAuth(Long userId, UserAuthVo userAuthVo) {
    //根据用户id查询用户信息
    UserInfo userInfo = baseMapper.selectById(userId);
    //设置认证信息
    //认证人姓名
    userInfo.setName(userAuthVo.getName());
    //其他认证信息
    userInfo.setCertificatesType(userAuthVo.getCertificatesType());
    userInfo.setCertificatesNo(userAuthVo.getCertificatesNo());
    userInfo.setCertificatesUrl(userAuthVo.getCertificatesUrl());
    userInfo.setAuthStatus(AuthStatusEnum.AUTH_RUN.getStatus());
    //进行信息更新
    baseMapper.updateById(userInfo);
}
B、获取当前用户工具类
在 common-util 模块添加工具类
//获取当前用户信息工具类
public class AuthContextHolder {
    //获取当前用户id
    public static Long getUserId(HttpServletRequest request) {
        //从header获取token
        String token = request.getHeader("token");
        //jwt从token获取userid
        Long userId = JwtHelper.getUserId(token);
        return userId;
    }
    //获取当前用户名称
    public static String getUserName(HttpServletRequest request) {
        //从header获取token
        String token = request.getHeader("token");
        //jwt从token获取userid
        String userName = JwtHelper.getUserName(token);
        return userName;
    }
}
C、添加 controller 方法
在 UserInfoApiController 类添加方法
//用户认证接口
@PostMapping("auth/userAuth")
public Result userAuth(@RequestBody UserAuthVo userAuthVo, HttpServletRequest request) {
    //传递两个参数,第一个参数用户id,第二个参数认证数据vo对象
    userInfoService.userAuth(AuthContextHolder.getUserId(request),userAuthVo);
    return Result.ok();
}

//获取用户id信息接口
@GetMapping("auth/getUserInfo")
public Result getUserInfo(HttpServletRequest request) {
    Long userId = AuthContextHolder.getUserId(request);
    UserInfo userInfo = userInfoService.getById(userId);
    return Result.ok(userInfo);
}
3. 前端
A、封装 api 请求
在 /api/userInfo.js 添加方法
getUserInfo() {
	return request({
	  url: `${api_name}/auth/getUserInfo`,
	  method: `get`
	})
},

saveUserAuah(userAuah) {
  return request({
    url: `${api_name}/auth/userAuah`,
    method: 'post',
    data: userAuah
  })
}
B、页面展示
创建 /pages/user/index.vue 组件
<template>
<!-- header -->
<div class="nav-container page-component">
<!--左侧导航 #start -->
<div class="nav left-nav">
<div class="nav-item selected">
<span class="v-link selected dark" onclick="javascript:window.location='/user'">实名认证 </span>
</div>
<div class="nav-item">
<span class="v-link selected dark" onclick="javascript:window.location='/order'"> 挂号订单 </span>
</div>
<div class="nav-item ">
<span class="v-link clickable dark" onclick="javascript:window.location='/patient'"> 就诊人管理 </span>
</div>
<div class="nav-item ">
<span class="v-link clickable dark"> 修改账号信息 </span>
</div>
<div class="nav-item ">
<span class="v-link clickable dark"> 意见反馈 </span>
</div>
</div>
<!-- 左侧导航 #end -->
<!-- 右侧内容 #start -->
<div class="page-container">
<div>
<div class="title"> 实名认证</div>
<div class="status-bar">
<div class="status-wrapper"><span class="iconfont"></span>{{ userInfo.param.authStatusString }}</div>
</div>
<div class="tips"><span class="iconfont"></span>
完成实名认证后才能添加就诊人,正常进行挂号,为了不影响后续步骤,建议提前实名认证。
</div>
<div class="form-wrapper" v-if="userInfo.authStatus == 0">
<div>
<el-form :model="userAuah" label-width="110px" label-position="left">
<el-form-item prop="name" label="姓名:" class="form-normal">
<div class="name-input">
<el-input v-model="userAuah.name" placeholder="请输入联系人姓名全称" class="input v-input"/>
</div>
</el-form-item>
<el-form-item prop="certificatesType" label="证件类型:">
<el-select v-model="userAuah.certificatesType" placeholder="请选择证件类型" class="v-select patient-select">
<el-option
v-for="item in certificatesTypeList"
:key="item.value"
:label="item.name"
:value="item.name">
</el-option>
</el-select>
</el-form-item>
<el-form-item prop="certificatesNo" label="证件号码:">
<el-input v-model="userAuah.certificatesNo" placeholder="请输入联系人证件号码" class="input v-input"/>
</el-form-item>
<el-form-item prop="name" label="上传证件:">
<div class="upload-wrapper">
<div class="avatar-uploader">
<el-upload
class="avatar-uploader"
:action="fileUrl"
:show-file-list="false"
:on-success="onUploadSuccess">
<div class="upload-inner-wrapper">
<img v-if="userAuah.certificatesUrl" :src="userAuah.certificatesUrl" class="avatar">
<i v-else class="el-icon-plus avatar-uploader-icon"></i>
<div v-if="!userAuah.certificatesUrl" class="text"> 上传证件合照</div>
</div>
</el-upload>
</div>
<img src="//img.114yygh.com/static/web/auth_example.png" class="example">
</div>
</el-form-item>
</el-form>
<div class="bottom-wrapper">
<div class="button-wrapper">
<div class="v-button" @click="saveUserAuah()">{{ submitBnt }}</div>
</div>
</div>
</div>
</div>
<div class="context-container" v-if="userInfo.authStatus != 0">
<div>
<el-form :model="formData" label-width="110px" label-position="right">
<el-form-item prop="name" label="姓名:" class="form-normal">
<div class="name-input">
{{ userInfo.name }}
</div>
</el-form-item>
<el-form-item prop="name" label="证件类型:">
{{ userInfo.certificatesType }}
</el-form-item>
<el-form-item prop="name" label="证件号码:">
{{ userInfo.certificatesNo }}
</el-form-item>
</el-form>
</div>
</div>
</div>
</div><!-- 右侧内容 #end -->
<!-- 登录弹出框 -->
</div>
<!-- footer -->
</template>
<script>
import '~/assets/css/hospital_personal.css'
import '~/assets/css/hospital.css'
import '~/assets/css/personal.css'
import dictApi from '@/api/dict'
import userInfoApi from '@/api/userInfo'
const defaultForm = {
name: '',
certificatesType: '',
certificatesNo: '',
certificatesUrl: ''
}
export default {
data() {
return {
userAuah: defaultForm,
certificatesTypeList: [],
fileUrl:'http://localhost/api/oss/file/fileUpload',
userInfo: {
param: {}
},
submitBnt: '提交'
}
},
created() {
this.init()
},
methods: {
init() {
this.getUserInfo()
this.getDict()
},
getUserInfo() {
userInfoApi.getUserInfo().then(response => {
this.userInfo = response.data
})
},
saveUserAuah() {
if(this.submitBnt == '正在提交...') {
this.$message.info('重复提交')
return
}
this.submitBnt = '正在提交...'
userInfoApi.saveUserAuth(this.userAuah).then(response => {
this.$message.success("提交成功")
window.location.reload()
}).catch(e => {
this.submitBnt = '提交'
})
},
getDict() {
dictApi.findByDictCode("CertificatesType").then(response => {
this.certificatesTypeList = response.data
})
},
onUploadSuccess(response, file) {
if(response.code !== 200) {
this.$message.error("上传失败")
return
}
// 填充上传文件列表
this.userAuah.certificatesUrl = file.response.data
}
}
}
</script>
<style>
.header-wrapper .title {
font-size: 16px;
margin-top: 0;
}
.content-wrapper {
margin-left: 0;
}
.patient-card .el-card__header .detail {
font-size: 14px;
}
.page-container .title {
letter-spacing: 1px;
font-weight: 700;
color: #333;
font-size: 16px;
margin-top: 0;
margin-bottom: 20px;
}
.page-container .tips {
width: 100%;
padding-left: 0;
}
.page-container .form-wrapper {
padding-left: 92px;
width: 580px;
}
.form-normal {
height: 40px;
}
.bottom-wrapper{
width: 100%;
padding: 0;
margin-top: 0;
}
</style>
4. 预约挂号页面调整
如果要预约挂号,我们必须要认证通过后才可以,所以我们在预约挂号前要做认证判断,如果没有认证通过,则跳转到认证页面修改 /pages/hospital/_hoscode.vue 组件
import userInfoApi from '@/api/userInfo'
schedule(depcode) {
  // 登录判断
  let token = cookie.get('token')
  if (!token) {
    loginEvent.$emit('loginDialogEvent')
    return
  }

  //判断认证
  userInfoApi.getUserInfo().then(response => {
    let authStatus = response.data.authStatus
    // 状态为2认证通过
    if (!authStatus || authStatus != 2) {
      window.location.href = '/user'
      return
    }
  })
  window.location.href = '/hospital/schedule?hoscode=' + this.hospital.hoscode + "&depcode="+ depcode
},
三、就诊人管理
1. 需求分析
预约下单需要选择就诊人,因此我们要实现就诊人管理,前端就诊人管理其实就是要实现一个完整的增删改查
2. api 接口
A、引入依赖
<dependencies>
    <dependency>
        <groupId>com.atguigu</groupId>
        <artifactId>service_cmn_client</artifactId>
        <version>0.0.1-SNAPSHOT</version>
    </dependency>
</dependencies>
B、添加 Mapper
添加 com.fancy.yygh.user.mapper.PatientMapper
public interface PatientMapper extends BaseMapper<Patient> {
}
C、添加 service 接口及实现类
添加 com.fancy.yygh.user.service.PatientService 接口
public interface PatientService extends IService<Patient> {
    //获取就诊人列表
    List<Patient> findAllUserId(Long userId);
    //根据id获取就诊人信息
    Patient getPatientId(Long id);
}
添加 com.fancy.yygh.user.service.impl.PatientServiceImpl 接口实现
@Service
public class PatientServiceImpl extends ServiceImpl<PatientMapper, Patient> implements PatientService {
    @Autowired
    private DictFeignClient dictFeignClient;

    //获取就诊人列表
    @Override
    public List<Patient> findAllUserId(Long userId) {
        //根据userid查询所有就诊人信息列表
        QueryWrapper<Patient> wrapper = new QueryWrapper<>();
        wrapper.eq("user_id",userId);
        List<Patient> patientList = baseMapper.selectList(wrapper);
        //通过远程调用,得到编码对应具体内容,查询数据字典表内容
        patientList.stream().forEach(item -> {
            //其他参数封装
            this.packPatient(item);
        });
        return patientList;
    }

    @Override
    public Patient getPatientId(Long id) {
        return this.packPatient(baseMapper.selectById(id));
    }
    //Patient对象里面其他参数封装
    private Patient packPatient(Patient patient) {
        //根据证件类型编码,获取证件类型具体指
        String certificatesTypeString = dictFeignClient.getName(DictEnum.CERTIFICATES_TYPE.getDictCode(), patient.getCertificatesType());//联系人证件
        //联系人证件类型
        String contactsCertificatesTypeString = dictFeignClient.getName(DictEnum.CERTIFICATES_TYPE.getDictCode(),patient.getContactsCertificatesType());
        //省
        String provinceString = dictFeignClient.getName(patient.getProvinceCode());
        //市
        String cityString = dictFeignClient.getName(patient.getCityCode());
        //区
        String districtString = dictFeignClient.getName(patient.getDistrictCode());
        patient.getParam().put("certificatesTypeString", certificatesTypeString);
        patient.getParam().put("contactsCertificatesTypeString", contactsCertificatesTypeString);
        patient.getParam().put("provinceString", provinceString);
        patient.getParam().put("cityString", cityString);
        patient.getParam().put("districtString", districtString);
        patient.getParam().put("fullAddress", provinceString + cityString + districtString + patient.getAddress());
        return patient;
    }
}
D、添加 controller
添加 com.fancy.yygh.user.api.PatientApiController
//就诊人管理接口
@RestController
@RequestMapping("/api/user/patient")
public class PatientApiController {
    @Autowired
    private PatientService patientService;
    //获取就诊人列表
    @GetMapping("auth/findAll")
    public Result findAll(HttpServletRequest request) {
        //获取当前登录用户id
        Long userId = AuthContextHolder.getUserId(request);
        List<Patient> list = patientService.findAllUserId(userId);
        return Result.ok(list);
    }
    //添加就诊人
    @PostMapping("auth/save")
    public Result savePatient(@RequestBody Patient patient,HttpServletRequest request) {
        //获取当前登录用户id
        Long userId = AuthContextHolder.getUserId(request);
        patient.setUserId(userId);
        patientService.save(patient);
        return Result.ok();
    }
    //根据id获取就诊人信息
    @GetMapping("auth/get/{id}")
    public Result getPatient(@PathVariable Long id) {
        Patient patient = patientService.getPatientId(id);
        return Result.ok(patient);
    }
    //修改就诊人
    @PostMapping("auth/update")
    public Result updatePatient(@RequestBody Patient patient) {
        patientService.updateById(patient);
        return Result.ok();
    }
    //删除就诊人
    @DeleteMapping("auth/remove/{id}")
    public Result removePatient(@PathVariable Long id) {
        patientService.removeById(id);
        return Result.ok();
    }
}
3. 前端
A、封装 api 请求
创建 /api/patient.js 文件
import request from '@/utils/request'
const api_name = `/api/user/patient`
export default {
    //就诊人列表
    findList() {
        return request({
            url: `${api_name}/auth/findAll`,
            method: `get`
        })
    },
    //根据id查询就诊人信息
    getById(id) {
        return request({
            url: `${api_name}/auth/get/${id}`,
            method: 'get'
        })
	},
    //添加就诊人信息
    save(patient) {
        return request({
            url: `${api_name}/auth/save`,
            method: 'post',
            data: patient
        })
    },
    //修改就诊人信息
    updateById(patient) {
        return request({
            url: `${api_name}/auth/update`,
            method: 'post',
            data: patient
        })
    },
    //删除就诊人信息
    removeById(id) {
        return request({
            url: `${api_name}/auth/remove/${id}`,
            method: 'delete'
        })
    }
}
B、列表
添加 /pages/patient/index.vue 组件
<template>
<!-- header -->
<div class="nav-container page-component">
<!--左侧导航 #start -->
<div class="nav left-nav">
<div class="nav-item ">
<span class="v-link clickable dark" onclick="javascript:window.location='/user'">实名认证 </span>
</div>
<div class="nav-item ">
<span class="v-link clickable dark" onclick="javascript:window.location='/order'"> 挂号订单 </span>
</div>
<div class="nav-item selected">
<span class="v-link selected dark" onclick="javascript:window.location='/patient'"> 就诊人管理 </span>
</div>
<div class="nav-item ">
<span class="v-link clickable dark"> 修改账号信息 </span>
</div>
<div class="nav-item ">
<span class="v-link clickable dark"> 意见反馈 </span>
</div>
</div>
<!-- 左侧导航 #end -->
<!-- 右侧内容 #start -->
<div class="page-container">
<div class="personal-patient">
<div class="header-wrapper">
<div class="title"> 就诊人管理</div>
</div>
<div class="content-wrapper">
<el-card class="patient-card" shadow="always" v-for="item in patientList" :key="item.id">
<div slot="header" class="clearfix">
<div>
<span class="name">{{ item.name }}</span>
<span>{{ item.certificatesNo }} {{ item.param.certificatesTypeString }}</span>
<div class="detail" @click="show(item.id)"> 查看详情 <span class="iconfont"></span></div>
</div>
</div>
<div class="card SELF_PAY_CARD">
<div class="info">
<span class="type">{{ item.isInsure == 0 ? '自费' : '医保'}}</span>
<span class="card-no">{{ item.certificatesNo }}</span>
<span class="card-view">{{ item.param.certificatesTypeString }}</span>
</div>
<span class="operate"></span>
</div>
<div class="card">
<div class="text bind-card"></div>
</div>
</el-card>
<div class="item-add-wrapper v-card clickable" @click="add()">
<div class="">
<div>+ 添加就诊人</div>
</div>
</div>
</div>
</div>
</div>
<!-- 右侧内容 #end -->
</div>
<!-- footer -->
</template>
<script>
import '~/assets/css/hospital_personal.css'
import '~/assets/css/hospital.css'
import '~/assets/css/personal.css'
import patientApi from '@/api/patient'
export default {
data() {
return {
patientList: []
}
},
created() {
this.findPatientList()
},
methods: {
findPatientList() {
patientApi.findList().then(response => {
this.patientList = response.data
})
},
add() {
window.location.href = '/patient/add'
},
show(id) {
window.location.href = '/patient/show?id=' + id
}
}
}
</script>
<style>
.header-wrapper .title {
font-size: 16px;
margin-top: 0;
}
.content-wrapper {
margin-left: 0;
}
.patient-card .el-card__header .detail{
font-size: 14px;
}
</style>
C、添加与修改
添加 /pages/patient/add.vue 组件
<template>
    <!-- header -->
    <div class="nav-container page-component">
        <!--左侧导航 #start -->
        <div class="nav left-nav">
            <div class="nav-item ">
                <span class="v-link clickable dark" onclick="javascript:window.location='/user'">实名认证 </span>
            </div>
            <div class="nav-item ">
                <span class="v-link clickable dark" onclick="javascript:window.location='/order'"> 挂号订单 </span>
            </div>
            <div class="nav-item selected">
                <span class="v-link selected dark" onclick="javascript:window.location='/patient'"> 就诊人管理 </span>
            </div>
            <div class="nav-item ">
                <span class="v-link clickable dark"> 修改账号信息 </span>
            </div>
            <div class="nav-item ">
                <span class="v-link clickable dark"> 意见反馈 </span>
            </div>
        </div>
        <!-- 左侧导航 #end -->
        <!-- 右侧内容 #start -->
        <div class="page-container">
        <div class="personal-patient">
            <div class="header-wrapper">
                <div class="title"> 添加就诊人</div>
            </div>
        <div>
        <div class="sub-title">
        <div class="block"></div>
                    就诊人信息
        </div>
        <div class="content-wrapper">
            <el-form :model="patient" label-width="110px" label-position="left" ref="patient" :rules="validateRules">
            <el-form-item prop="name" label="姓名:">
                <el-input v-model="patient.name" placeholder="请输入真实姓名全称" class="input v-input"/>
            </el-form-item>
            <el-form-item prop="certificatesType" label="证件类型:">
                <el-select v-model="patient.certificatesType" placeholder="请选择证件类型" class="v-select patient-select">
                    <el-option
                        v-for="item in certificatesTypeList"
                        :key="item.value"
                        :label="item.name"
                        :value="item.value">
                    </el-option>
                </el-select>
            </el-form-item>
            <el-form-item prop="certificatesNo" label="证件号码:">
                <el-input v-model="patient.certificatesNo" placeholder="请输入证件号码" class="input v-input"/>
            </el-form-item>
            <el-form-item prop="sex" label="性别:">
                <el-radio-group v-model="patient.sex">
                <el-radio :label="1">男</el-radio>
                <el-radio :label="0">女</el-radio>
                </el-radio-group>
            </el-form-item>
            <el-form-item prop="birthdate" label="出生日期:">
                <el-date-picker
                    v-model="patient.birthdate"
                    class="v-date-picker"
                    type="date"
                    placeholder="选择日期">
                </el-date-picker>
            </el-form-item>
            <el-form-item prop="phone" label="手机号码:">
                <el-input v-model="patient.phone" placeholder="请输入手机号码" maxlength="11" class="input v-input"/>
            </el-form-item>
            </el-form>
        </div>
        <div class="sub-title">
            <div class="block"></div>
                建档信息(完善后部分医院首次就诊不排队建档)
        </div>
        <div class="content-wrapper">
            <el-form :model="patient" label-width="110px" label-position="left" ref="patient" :rules="validateRules">
                <el-form-item prop="isMarry" label="婚姻状况:">
                    <el-radio-group v-model="patient.isMarry">
                        <el-radio :label="0">未婚</el-radio>
                        <el-radio :label="1">已婚</el-radio>
                    </el-radio-group>
                </el-form-item>
            <el-form-item prop="isInsure" label="自费/医保:">
                <el-radio-group v-model="patient.isInsure">
                    <el-radio :label="0">自费</el-radio>
                    <el-radio :label="1">医保</el-radio>
                </el-radio-group>
            </el-form-item>
            <el-form-item prop="addressSelected" label="当前住址:">
                <el-cascader
                    ref="selectedShow"
                    v-model="patient.addressSelected"
                    class="v-address"
                    :props="props"></el-cascader>
            </el-form-item>
            <el-form-item prop="address" label="详细地址:">
                <el-input v-model="patient.address" placeholder="应公安机关要求,请填写现真实住址" class="input v-input"/>
            </el-form-item>
            </el-form>
        </div>
        <div class="sub-title">
            <div class="block"></div>
                    联系人信息(选填)
        </div>
        <div class="content-wrapper">
            <el-form :model="patient" label-width="110px" label-position="left">
                <el-form-item prop="contactsName" label="姓名:">
                    <el-input v-model="patient.contactsName" placeholder="请输入联系人姓名全称" class="input v-input"/>
                </el-form-item>
                <el-form-item prop="contactsCertificatesType" label="证件类型:">
                    <el-select v-model="patient.contactsCertificatesType" placeholder="请选择证件类型" class="v-select patient-select">
                        <el-option
                            v-for="item in certificatesTypeList"
                            :key="item.value"
                            :label="item.name"
                            :value="item.value">
                        </el-option>
                    </el-select>
                </el-form-item>
                <el-form-item prop="contactsCertificatesNo" label="证件号码:">
                    <el-input v-model="patient.contactsCertificatesNo" placeholder="请输入联系人证件号码" class="input v-input"/>
                </el-form-item>
                <el-form-item prop="contactsPhone" label="手机号码:">
                    <el-input v-model="patient.contactsPhone" placeholder="请输入联系人手机号码" class="input v-input"/>
                </el-form-item>
            </el-form>
        </div>
        </div>
        <div  class="bottom-wrapper">
            <div  class="button-wrapper">
                <div class="v-button" @click="saveOrUpdate()">{{ submitBnt }}</div>
            </div>
        </div>
        </div>
        </div>
        <!-- 右侧内容 #end -->
    </div>
    <!-- footer -->
</template>
<script>
import '~/assets/css/hospital_personal.css'
import '~/assets/css/hospital.css'
import '~/assets/css/personal.css'
import dictApi from '@/api/dict'
import patientApi from '@/api/patient'
const defaultForm = {
    name: '',
    certificatesType: '',
    certificatesNo: '',
    sex: 1,
    birthdate: '',
    phone: '',
    isMarry: 0,
    isInsure: 0,
    provinceCode: '',
    cityCode: '',
    districtCode: '',
    addressSelected: null,
    address: '',
    contactsName: '',
    contactsCertificatesType: '',
    contactsCertificatesNo: '',
    contactsPhone: '',
    param: {}
}
export default {
    data() {
        return {
            patient: defaultForm,
            certificatesTypeList: [],
            props: {
                lazy: true,
                async lazyLoad (node, resolve) {
                const { level } = node
                //异步获取省市区
                dictApi.findByParentId(level ? node.value : '86').then(response => {
                    let list= response.data
                    let provinceList = list.map((item, i) => {
                        return {
                            value: item.id,
                            label: item.name,
                            leaf: node.level == 2 ? true : false,//可控制显示几级
                        }
                    })
                        resolve && resolve(provinceList)
                    })
                }
            },
            submitBnt: '保存',
            validateRules: {
                name: [{ required: true, trigger: 'blur', message: '必须输入' }],
                certificatesType: [{ required: true, trigger: 'blur', message: '必须输入' }],
                certificatesNo: [{ required: true, trigger: 'blur', message: '必须输入' }],
                birthdate: [{ required: true, trigger: 'blur', message: '必须输入' }],
                phone: [{ required: true, trigger: 'blur', message: '必须输入' }],
                addressSelected: [{ required: true, trigger: 'blur', message: '必须输入' }],
                address: [{ required: true, trigger: 'blur', message: '必须输入' }]
            }
        }
    },
    created() {
        this.init();
    },
    mounted() {
        if (this.$route.query.id) {
            setTimeout(()=>{
                this.$refs.selectedShow.presentText = this.patient.param.provinceString + '/' + this.patient.param.cityString + '/' +this.patient.param.districtString //"北京市/市辖区/西城区";// 首次手动复制
                // this.$refs.selectedShow.value = '110000/110100/110102';
            },1000)
        }
    },
    methods: {
        init() {
            if (this.$route.query.id) {
                const id = this.$route.query.id
                    this.fetchDataById(id)
            } else {
                // 对象拓展运算符:拷贝对象,而不是赋值对象的引用
                this.patient = { ...defaultForm }
            }
            this.getDict()
        },

        fetchDataById(id) {
            patientApi.getById(id).then(response => {
                this.patient = response.data
                //添加默认值
                this.patient.addressSelected = [this.patient.provinceCode, this.patient.cityCode, this.patient.districtCode]
            })
        },
        getDict() {
            dictApi.findByDictCode("CertificatesType").then(response => {
                this.certificatesTypeList = response.data
            })
        },

        saveOrUpdate() {
            this.$refs.patient.validate(valid => {
                if (valid) {
                    //地址处理
                    if(this.patient.addressSelected.length == 3) {
                        this.patient.provinceCode = this.patient.addressSelected[0]
                        this.patient.cityCode = this.patient.addressSelected[1]
                        this.patient.districtCode = this.patient.addressSelected[2]
                    }
                    if (!this.patient.id) {
                        this.saveData()
                    } else {
                        this.updateData()
                    }
                }
            })
        },
        // 新增
        saveData() {
            if(this.submitBnt == '正在提交...') {
                this.$message.info('重复提交')
                return
            }
            this.submitBnt = '正在提交...'
                patientApi.save(this.patient).then(response => {
                    this.$message.success("提交成功")
                    window.location.href = '/patient'
                }).catch(e => {
                    this.submitBnt = '保存'
                })
        },
        // 根据id更新记录
        updateData() {
            if(this.submitBnt == '正在提交...') {
                this.$message.info('重复提交')
                return
            }
            this.submitBnt = '正在提交...'
            patientApi.updateById(this.patient).then(response => {
                this.$message.success("提交成功")
                window.location.href = '/patient'
            }).catch(e => {
                this.submitBnt = '保存'
            })
        }
    }
}
</script>
<style>
  .header-wrapper .title {
    font-size: 16px;
    margin-top: 0;
  }
  .sub-title {
    margin-top: 0;
  }
  .bottom-wrapper{
    padding: 0;
    margin: 0;
  }
  .bottom-wrapper .button-wrapper{
    margin-top: 0;
  }
</style>
D、详情与删除
添加 /pages/patient/show.vue 组件
<template>
  <!-- header -->
  <div class="nav-container page-component">
    <!--左侧导航 #start -->
    <div class="nav left-nav">
      <div class="nav-item ">
        <span class="v-link clickable dark" onclick="javascript:window.location='/user'">实名认证 </span>
      </div>
      <div class="nav-item ">
        <span class="v-link clickable dark" onclick="javascript:window.location='/order'"> 挂号订单 </span>
      </div>
      <div class="nav-item selected">
        <span class="v-link selected dark" onclick="javascript:window.location='/patient'"> 就诊人管理 </span>
      </div>
      <div class="nav-item ">
        <span class="v-link clickable dark"> 修改账号信息 </span>
      </div>
      <div class="nav-item ">
        <span class="v-link clickable dark"> 意见反馈 </span>
      </div>
    </div><!-- 左侧导航 #end -->
    <!-- 右侧内容 #start -->
    <div class="page-container">
      <div class="personal-patient">
          <div class="title" style="margin-top: 0px;font-size: 16px;"> 就诊人详情</div>
        <div>
          <div class="sub-title">
            <div class="block"></div>
            就诊人信息
          </div>
          <div class="content-wrapper">
            <el-form :model="patient" label-width="110px" label-position="left">
              <el-form-item label="姓名:">
                <div class=""><span>{{ patient.name }}</span></div>
              </el-form-item>
              <el-form-item label="证件类型:">
                <div class=""><span>{{ patient.param.certificatesTypeString }}</span></div>
              </el-form-item>
              <el-form-item label="证件号码:">
                <div class=""><span>{{ patient.certificatesNo }} </span></div>
              </el-form-item>
              <el-form-item label="性别:">
                <div class=""><span>{{ patient.sex == 1 ? '男' : '女' }} </span></div>
              </el-form-item>
              <el-form-item label="出生日期:">
                <div class=""><span>{{ patient.birthdate }} </span></div>
              </el-form-item>
              <el-form-item label="手机号码:">
                <div class=""><span>{{ patient.phone }} </span></div>
              </el-form-item>
              <el-form-item label="婚姻状况:">
                <div class=""><span>{{ patient.isMarry == 1 ? '已婚' : '未婚' }} </span></div>
              </el-form-item>
              <el-form-item label="当前住址:">
              <div class=""><span>{{ patient.param.provinceString }}/{{ patient.param.cityString }}/{{ patient.param.districtString }} </span></div>
            </el-form-item>
              <el-form-item label="详细地址:">
                <div class=""><span>{{ patient.address }} </span></div>
              </el-form-item>
              <br/>
              <el-form-item>
                <el-button class="v-button" type="primary" @click="remove()">删除就诊人</el-button>
                <el-button class="v-button" type="primary white" @click="edit()">修改就诊人</el-button>
              </el-form-item>
            </el-form>
          </div>
        </div>
      </div>
    </div><!-- 右侧内容 #end -->
  </div><!-- footer -->
</template>
<script>
import '~/assets/css/hospital_personal.css'
import '~/assets/css/hospital.css'
import '~/assets/css/personal.css'
import patientApi from '@/api/patient'
export default {
  data() {
    return {
      patient: {
        param: {}
      }
    }
  },
  created() {
    this.fetchDataById();
  },
  methods: {
    fetchDataById() {
      patientApi.getById(this.$route.query.id).then(response => {
        this.patient = response.data
      })
    },
    remove() {
      patientApi.removeById(this.patient.id).then(response => {
        this.$message.success('删除成功')
        window.location.href = '/patient'
      })
    },
    edit() {
      window.location.href = '/patient/add?id=' + this.patient.id
    }
  }
}
</script>
<style>
  .info-wrapper {
    padding-left: 0;
    padding-top: 0;
  }
  .content-wrapper {
    color: #333;
    font-size: 14px;
    padding-bottom: 0;
  }
  .el-form-item {
    margin-bottom: 5px;
  }
  .bottom-wrapper {
    width: 100%;
  }
  .button-wrapper {
    margin: 0;
  }
  .bottom-wrapper .button-wrapper {
    margin-top: 0;
  }
</style>
四、平台用户管理
前面我们做了用户登录、用户认证与就诊人,现在我们需要把这些信息在我们的平台管理系统做一个统一管理。
操作模块:service-user
1. 用户列表
A、api 接口
① 添加 service 接口与实现
在 UserInfoService 类添加接口
//用户列表(条件查询带分页)
IPage<UserInfo> selectPage(Page<UserInfo> pageParam, UserInfoQueryVo userInfoQueryVo);
在 UserInfoServiceImpl 类添加实现
//用户列表(条件查询带分页)
@Override
public IPage<UserInfo> selectPage(Page<UserInfo> pageParam, UserInfoQueryVo userInfoQueryVo) {
    //UserInfoQueryVo获取条件值
    String name = userInfoQueryVo.getKeyword(); //用户名称
    Integer status = userInfoQueryVo.getStatus();//用户状态
    Integer authStatus = userInfoQueryVo.getAuthStatus(); //认证状态
    String createTimeBegin = userInfoQueryVo.getCreateTimeBegin(); //开始时间
    String createTimeEnd = userInfoQueryVo.getCreateTimeEnd(); //结束时间
    //对条件值进行非空判断
    QueryWrapper<UserInfo> wrapper = new QueryWrapper<>();
    if(!StringUtils.isEmpty(name)) {
        wrapper.like("name",name);
    }
    if(!StringUtils.isEmpty(status)) {
        wrapper.eq("status",status);
    }
    if(!StringUtils.isEmpty(authStatus)) {
        wrapper.eq("auth_status",authStatus);
    }
    if(!StringUtils.isEmpty(createTimeBegin)) {
        wrapper.ge("create_time",createTimeBegin);
    }
    if(!StringUtils.isEmpty(createTimeEnd)) {
        wrapper.le("create_time",createTimeEnd);
    }
    //调用mapper的方法
    IPage<UserInfo> pages = baseMapper.selectPage(pageParam, wrapper);
    //编号变成对应值封装
    pages.getRecords().stream().forEach(item -> {
        this.packageUserInfo(item);
    });
    return pages;
}

//编号变成对应值封装
private UserInfo packageUserInfo(UserInfo userInfo) {
    //处理认证状态编码
    userInfo.getParam().put("authStatusString",AuthStatusEnum.getStatusNameByStatus(userInfo.getAuthStatus()));
    //处理用户状态 0  1
    String statusString = userInfo.getStatus().intValue()==0 ?"锁定" : "正常";
    userInfo.getParam().put("statusString",statusString);
    return userInfo;
}
② 添加 controller 方法
添加 com.fancy.yygh.user.controller.UserController 类
@RestController
@RequestMapping("/admin/user")
public class UserController {

    @Autowired
    private UserInfoService userInfoService;

    //用户列表(条件查询带分页)
    @GetMapping("{page}/{limit}")
    public Result list(@PathVariable Long page,
                       @PathVariable Long limit,
                       UserInfoQueryVo userInfoQueryVo) {
        Page<UserInfo> pageParam = new Page<>(page,limit);
        IPage<UserInfo> pageModel =
                userInfoService.selectPage(pageParam,userInfoQueryVo);
        return Result.ok(pageModel);
    }
}
B、前端
① 添加路由
在 src/router/index.js 文件添加路由
{
  path: '/user',
  component: Layout,
  redirect: '/user/userInfo/list',
  name: 'userInfo',
  meta: { title: '用户管理', icon: 'table' },
  alwaysShow: true,
  children: [
    {
      path: 'userInfo/list',
      name: '用户列表',
      component: () =>import('@/views/user/userInfo/list'),
      meta: { title: '用户列表', icon: 'table' }
    }
  ]
},
② 封装 api 请求
创建 /api/user/userInfo.js
import request from '@/utils/request'

const api_name = '/admin/user'

export default {
	getPageList(page, limit, searchObj) {
		return request({
			url: `${api_name}/${page}/${limit}`,
			method: 'get',
			params: searchObj
		})
	}
}
C、添加组件
创建 /views/user/userInfo/list.vue 组件
<template>
    <div class="app-container">
        <!--查询表单-->
        <el-form  :inline="true" class="demo-form-inline">
            <el-form-item>
                <el-input v-model="searchObj.keyword" placeholder="姓名/手机"/>
            </el-form-item>

            <el-form-item  label="创建时间">
                <el-date-picker
                v-model="searchObj.createTimeBegin"
                type="datetime"
                placeholder="选择开始时间"
                value-format="yyyy-MM-dd HH:mm:ss"
                default-time="00:00:00"
                />
            </el-form-item>
            至
            <el-form-item>
                <el-date-picker
                v-model="searchObj.createTimeEnd"
                type="datetime"
                placeholder="选择截止时间"
                value-format="yyyy-MM-dd HH:mm:ss"
                default-time="00:00:00"
                />
            </el-form-item>

            <el-button type="primary" icon="el-icon-search" @click="fetchData()">查询</el-button>
            <el-button type="default" @click="resetData()">清空</el-button>
        </el-form>

        <!-- 列表 -->
        <el-table
        v-loading="listLoading"
        :data="list"
        stripe
            style="width: 100%">

            <el-table-column
            label="序号"
            width="70"
            align="center">
                <template slot-scope="scope">
                        {{ (page - 1) * limit + scope.$index + 1 }}
                </template>
            </el-table-column>

            <el-table-column prop="phone" label="手机号"/>
            <el-table-column prop="nickName" label="昵称"/>
            <el-table-column prop="name" label="姓名"/>
            <el-table-column label="状态" prop="param.statusString"/>
            <el-table-column label="认证状态" prop="param.authStatusString"/>
            <el-table-column prop="createTime" label="创建时间"/>

            <el-table-column label="操作" width="200" align="center">
            </el-table-column>
        </el-table>

        <!-- 分页组件 -->
        <el-pagination
        :current-page="page"
        :total="total"
        :page-size="limit"
        :page-sizes="[5, 10, 20, 30, 40, 50, 100]"
        style="padding: 30px 0; text-align: center;"
        layout="sizes, prev, pager, next, jumper, ->, total, slot"
        @current-change="fetchData"
        @size-change="changeSize"
        />
    </div>
</template>
<script>
import userInfoApi from '@/api/userInfo'
export default {
    // 定义数据
    data() {
        return {
            listLoading: true, // 数据是否正在加载
            list: null, // banner列表
            total: 0, // 数据库中的总记录数
            page: 1, // 默认页码
            limit: 10, // 每页记录数
            searchObj: {} // 查询表单对象
        }
    },
    // 当页面加载时获取数据
    created() {
        this.fetchData()
    },
    methods: {
    // 调用api层获取数据库中的数据
    fetchData(page = 1) {
        console.log('翻页。。。' + page)
        // 异步获取远程数据(ajax)
        this.page = page
            userInfoApi.getPageList(this.page, this.limit, this.searchObj).then(
                response => {
                this.list = response.data.records
                this.total = response.data.total
                // 数据加载并绑定成功
                this.listLoading = false
            }
        )
    },
    // 当页码发生改变的时候
    changeSize(size) {
        console.log(size)
        this.limit = size
        this.fetchData(1)
    },
    // 重置查询表单
    resetData() {
        console.log('重置查询表单')
        this.searchObj = {}
        this.fetchData()
    }
  }
}
</script>
2. 锁定
A、api 接口
① 添加 service 接口与实现
在 UserInfoService 类添加接口
/**
 * 用户锁定
 * @param userId
* @param status 0:锁定 1:正常
 */
void lock(Long userId, Integer status);
在 UserInfoServiceImpl 类添加实现
@Override
public void lock(Long userId, Integer status) {
    if(status.intValue() == 0 || status.intValue() == 1) {
        UserInfo userInfo = this.getById(userId);
        userInfo.setStatus(status);
        this.updateById(userInfo);
    }
}
② 添加 controller 方法
在UserController类添加方法
@ApiOperation(value = "锁定")
@GetMapping("lock/{userId}/{status}")
public Result lock(
        @PathVariable("userId") Long userId,
        @PathVariable("status") Integer status){
    userInfoService.lock(userId, status);
    return Result.ok();
}
B、前端
① 封装 api 请求
在 /api/user/userInfo.js 文件添加方法
lock(id, status) {
  return request({
    url: `${api_name}/lock/${id}/${status}`,
    method: 'get'
  })
}
② 添加组件
修改 /views/user/userInfo/list.vue 组件
<el-table-column label="操作" width="200" align="center">
    <template slot-scope="scope">
        <el-button v-if="scope.row.status == 1" type="primary" size="mini" @click="lock(scope.row.id, 0)">锁定</el-button>
        <el-button v-if="scope.row.status == 0" type="danger" size="mini" @click="lock(scope.row.id, 1)">取消锁定</el-button>
    </template>
</el-table-column>
添加方法
// 锁定
lock(id, status) {
    this.$confirm('确定该操作吗?', '提示', {
        confirmButtonText: '确定',
        cancelButtonText: '取消',
        type: 'warning'
        }).then(() => { // promise
            // 点击确定,远程调用ajax
            return userInfoApi.lock(id, status)
        }).then((response) => {
            this.fetchData(this.page)
            if (response.code) {
                this.$message({
                type: 'success',
                message: '操作成功!'
            })
        }
    })
}
3. 详情
详情展示用户信息、用户就诊人信息和登录日志信息
A、api 接口
① 添加 service 接口与实现
在 UserInfoService 类添加接口
/**
 * 详情
 * @param userId
* @return
*/
Map<String, Object> show(Long userId);
在 UserInfoServiceImpl 类添加实现
@Autowired
private PatientService patientService;
//用户详情
@Override
public Map<String, Object> show(Long userId) {
    Map<String,Object> map = new HashMap<>();
    //根据userid查询用户信息
    UserInfo userInfo = this.packageUserInfo(baseMapper.selectById(userId));
    map.put("userInfo",userInfo);
    //根据userid查询就诊人信息
    List<Patient> patientList = patientService.findAllUserId(userId);
    map.put("patientList",patientList);
    return map;
}
② 添加 controller 方法
在 UserController 类添加方法
//用户详情
@GetMapping("show/{userId}")
public Result show(@PathVariable Long userId) {
    Map<String,Object> map = userInfoService.show(userId);
    return Result.ok(map);
}
B、前端
① 添加路由
{
  path: '/user',
  component: Layout,
  redirect: '/user/userInfo/list',
  name: 'userInfo',
  meta: { title: '用户管理', icon: 'table' },
  alwaysShow: true,
  children: [
    {
      path: 'userInfo/list',
      name: '用户列表',
      component: () =>import('@/views/user/userInfo/list'),
      meta: { title: '用户列表', icon: 'table' }
    },
    {
      path: 'userInfo/show/:id',
      name: '用户查看',
            component: () =>import('@/views/user/userInfo/show'),
      meta: { title: '用户查看' },
      hidden: true
    }
  ]
},
② 封装 api 请求
在 /api/user/userInfo.js 文件添加方法
//用户详情
show(id) {
  return request({
    url: `${api_name}/show/${id}`,
    method: 'get'
  })
}
③ 修改列表组件
<el-table-column label="操作" width="200" align="center">
    <template slot-scope="scope">
        <router-link :to="'/user/userInfo/show/'+scope.row.id">
            <el-button type="primary" size="mini">查看</el-button>
        </router-link>
        <el-button v-if="scope.row.status == 1" type="primary" size="mini" @click="lock(scope.row.id, 0)">锁定</el-button>
        <el-button v-if="scope.row.status == 0" type="danger" size="mini" @click="lock(scope.row.id, 1)">取消锁定</el-button>
    </template>
</el-table-column>
④ 添加组件
添加 /views/user/userInfo/show.vue 组件
<template>
    <div class="app-container">
        <h4>用户信息</h4>
        <table class="table table-striped table-condenseda table-bordered" width="100%">
        <tbody>
            <tr>
                <th width="15%">手机号</th>
                <td width="35%"><b>{{ userInfo.phone }}</b></td>
                <th width="15%">用户姓名</th>
                <td width="35%">{{ userInfo.name }}</td>
            </tr>
        <tr>
            <th>状态</th>
            <td>{{ userInfo.status == 0 ? '锁定' : '正常' }}</td>
            <th>注册时间</th>
            <td>{{ userInfo.createTime }}</td>
        </tr>
        </tbody>
        </table>
        <h4>认证信息</h4>
        <table class="table table-striped table-condenseda table-bordered" width="100%">
            <tbody>
            <tr>
                <th width="15%">姓名</th>
                <td width="35%"><b>{{ userInfo.name }}</b></td>
                <th width="15%">证件类型</th>
                <td width="35%">{{ userInfo.certificatesType }}</td>
            </tr>
            <tr>
                <th>证件号</th>
                <td>{{ userInfo.certificatesNo }}</td>
                <th>证件图片</th>
                <td><img :src="userInfo.certificatesUrl" width="80px"></td>
            </tr>
            </tbody>
        </table>
    <h4>就诊人信息</h4>
    <el-table
        v-loading="listLoading"
        :data="patientList"
        stripe
            style="width: 100%">
        <el-table-column
        label="序号"
        width="70"
        align="center">
        <template slot-scope="scope">
                {{ scope.$index + 1 }}
        </template>
        </el-table-column>

        <el-table-column prop="name" label="姓名"/>
        <el-table-column prop="param.certificatesTypeString" label="证件类型"/>
        <el-table-column prop="certificatesNo" label="证件编号"/>
        <el-table-column label="性别">
        <template slot-scope="scope">
                {{ scope.row.sex == 1 ? '男' : '女' }}
        </template>
        </el-table-column>
        <el-table-column prop="birthdate" label="出生年月"/>
        <el-table-column prop="phone" label="手机"/>
        <el-table-column label="是否结婚">
        <template slot-scope="scope">
                {{ scope.row.isMarry == 1 ? '时' : '否' }}
        </template>
    </el-table-column>
    <el-table-column prop="fullAddress" label="地址"/>
    <el-table-column prop="createTime" label="注册时间"/>
    </el-table>
    <br>
    <el-row>
    <el-button  @click="back">返回</el-button>
    </el-row>
    </div>
</template>
<script>
import userInfoApi from '@/api/userInfo'
export default {
    // 定义数据
    data() {
        return {
            id: this.$route.params.id,
            userInfo: {}, // 会员信息
            patientList: [] // 就诊人列表
        }
    },
    // 当页面加载时获取数据
    created() {
        this.fetchDataById()
    },
    methods: {
        // 根据id查询会员记录
        fetchDataById() {
            userInfoApi.show(this.id).then(response => {
                this.userInfo = response.data.userInfo
                this.patientList = response.data.patientList
            })
        },
        back() {
            window.history.back(-1)
        }
    }
}
</script>
4. 用户认证列表
api 接口与用户列表一致,只是默认加了一个认证状态搜索条件:authStatus
A、添加路由
{
  path: 'userInfo/authList',
  name: '认证审批列表',
  component: () => import('@/views/user/userInfo/authList'),
  meta: { title: '认证审批列表', icon: 'table' }
}
B、添加组件
添加 /views/user/userInfo/authList.vue 组件
<template>
    <div class="app-container">
        <!--查询表单-->
        <el-form :inline="true" class="demo-form-inline">
            <el-form-item>
                <el-input v-model="searchObj.keyword" placeholder="姓名/手机"/>
            </el-form-item>

            <el-form-item label="创建时间">
                <el-date-picker
                    v-model="searchObj.createTimeBegin"
                    type="datetime"
                    placeholder="选择开始时间"
                    value-format="yyyy-MM-dd HH:mm:ss"
                    default-time="00:00:00"
                    />
            </el-form-item>
            至
            <el-form-item>
                <el-date-picker
                    v-model="searchObj.createTimeEnd"
                    type="datetime"
                    placeholder="选择截止时间"
                    value-format="yyyy-MM-dd HH:mm:ss"
                    default-time="00:00:00"
                    />
            </el-form-item>

            <el-button type="primary" icon="el-icon-search" @click="fetchData()">查询</el-button>
            <el-button type="default" @click="resetData()">清空</el-button>
        </el-form>

        <!-- 列表 -->
        <el-table
        v-loading="listLoading"
        :data="list"
        stripe
            style="width: 100%">

            <el-table-column
            label="序号"
            width="70"
            align="center">
                <template slot-scope="scope">
                        {{ (page - 1) * limit + scope.$index + 1 }}
                </template>
            </el-table-column>

            <el-table-column prop="name" label="姓名"/>
            <el-table-column prop="certificatesType" label="证件类型"/>
            <el-table-column prop="certificatesNo" label="证件号"/>
            <el-table-column prop="createTime" label="创建时间"/>

            <el-table-column label="操作" width="250" align="center">
                <template slot-scope="scope">
                    <router-link :to="'/user/userInfo/show/'+scope.row.id">
                        <el-button type="primary" size="mini">查看</el-button>
                    </router-link>
                </template>
            </el-table-column>
        </el-table>

        <!-- 分页组件 -->
        <el-pagination
            :current-page="page"
            :total="total"
            :page-size="limit"
            :page-sizes="[5, 10, 20, 30, 40, 50, 100]"
            style="padding: 30px 0; text-align: center;"
            layout="sizes, prev, pager, next, jumper, ->, total, slot"
            @current-change="fetchData"
            @size-change="changeSize"
            />
    </div>
</template>
<script>
import userInfoApi from '@/api/userInfo'

export default {

// 定义数据
data() {
    return {
        listLoading: true, // 数据是否正在加载
        list: null, // banner列表
        total: 0, // 数据库中的总记录数
        page: 1, // 默认页码
        limit: 10, // 每页记录数
        searchObj: {
            authStatus: 1
        } // 查询表单对象
    }
},

// 当页面加载时获取数据
created() {
    this.fetchData()
},

methods: {
    // 调用api层获取数据库中的数据
    fetchData(page = 1) {
        console.log('翻页。。。' + page)
        // 异步获取远程数据(ajax)
        this.page = page
        userInfoApi.getPageList(this.page, this.limit, this.searchObj).then(
                response => {
            this.list = response.data.records
            this.total = response.data.total
            // 数据加载并绑定成功
            this.listLoading = false
        }
      )
    },

    // 当页码发生改变的时候
    changeSize(size) {
        console.log(size)
        this.limit = size
        this.fetchData(1)
    },

    // 重置查询表单
    resetData() {
        console.log('重置查询表单')
        this.searchObj = {}
        this.fetchData()
    }
  }
}
</script>
5. 用户认证审批
A、api 接口
① 添加 service 接口与实现
在 UserInfoService 类添加接口
/**
 * 认证审批
 * @param userId
* @param authStatus 2:通过 -1:不通过
 */
void approval(Long userId, Integer authStatus);
在 UserInfoServiceImpl 类添加实现
//认证审批  2通过  -1不通过
@Override
public void approval(Long userId, Integer authStatus) {
    if(authStatus.intValue()==2 || authStatus.intValue()==-1) {
        UserInfo userInfo = baseMapper.selectById(userId);
        userInfo.setAuthStatus(authStatus);
        baseMapper.updateById(userInfo);
    }
}
② 添加 controller 方法
在 UserController 类添加方法
//认证审批
@GetMapping("approval/{userId}/{authStatus}")
public Result approval(@PathVariable Long userId,@PathVariable Integer authStatus) {
    userInfoService.approval(userId,authStatus);
    return Result.ok();
}
B、前端
① 封装 api 请求
在 /api/userInfo.js 文件添加方法
//认证审批
approval(id, authStatus) {
  return request({
    url: `${api_name}/approval/${id}/${authStatus}`,
    method: 'get'
  })
}
② 添加组件
修改 /views/user/userInfo/authList.vue 组件
<el-table-column label="操作" width="250" align="center">
    <template slot-scope="scope">
        <router-link :to="'/user/userInfo/show/'+scope.row.id">
            <el-button type="primary" size="mini">查看</el-button>
        </router-link>
        <el-button type="primary" size="mini" @click="approval(scope.row.id, 2)">通过</el-button>
        <el-button type="danger" size="mini" @click="approval(scope.row.id, -1)">不通过</el-button>
    </template>
</el-table-column>
添加方法
// 审批
approval(id, authStatus) {
    // debugger
    this.$confirm('确定该操作吗?', '提示', {
        confirmButtonText: '确定',
        cancelButtonText: '取消',
        type: 'warning'
    }).then(() => { // promise
            // 点击确定,远程调用ajax
        return userInfoApi.approval(id, authStatus)
    }).then((response) => {
        this.fetchData(this.page)
        if (response.code) {
            this.$message({
                type: 'success',
                message: '操作成功!'
            })
        }
    })
}


![[附源码]JAVA毕业设计-英杰学堂网上教学平台-(系统+LW)](https://img-blog.csdnimg.cn/7fc76ce6e9e2482ca9fb0610b2bc95d3.png)