全局事件总线
作用:可以在全局层面上,在任意组件之间相互传递数据。不再局限于父子组件传值,或多层嵌套传值等方式。
使用方式:完全与父子组件传值一致,使用 $on 监听事件,使用 $emit 触发事件,使用 $off 解绑事件。
理解
1、事件总线相当于是独立于所有组件之外的旁观者,不参与组件内的任何逻辑,只负责调用 Vue 实例对象上的方法,且所有组件都能访问到它
2、既然所有组件都能使用事件总线,那我们可以将其定义在两个地方
window:直接挂载到 window 全局对象上( 但是会导致污染window 全局对象,可能造成属性混乱 ),且通过 window.x 不能访问到 Vue 实例对象上的 $on 等方法。直接排除
window.x = {a:1,b:2}Vue 原型对象:挂载到 Vue.prototype 上,组件实例对象 和 Vue实例对象都能访问到该属性。
Vue.prototype.x = { a: 1, b: 2 };3、在 Vue 原型对象,以及 组件实例对象上都是不存在这个东西的,但是我们又需要使用 Vue 实例对象上的 $on、$emit、$off 等方法,所以这玩意应该继承了 Vue 原型对象,或者 组件实例对象
4、继承 组件实例对象 ,或 Vue 原型对象 ( 在 main.js 中挂载 )
继承 VueComponent组件实例对象
// 通过 Vue.extend({}) 返回 VueComponent 构造函数
const Demo = Vue.extend({})

// 通过 new Demo() 得到 VueComponent 构造函数 的实例对象
const d = new Demo()

// 将 VueComponent 构造函数 的实例对象 挂载到 Vue.prototype 实例对象上
Vue.prototype.x = d;
继承 Vue 实例对象:
// 如果这样写,那肯定是错误的,因为 new Vue() 已经完成,且挂载了,这个时候再去向 Vue.prototype 添加属性会报错
const vm = new Vue({
  render: (h) => h(App),
}).$mount("#app");

Vue.prototype.x = vm;
使用 beforeCreate 生命周期钩子函数,在 Vue 实例创建之前,向 Vue.prototype 中添加属性。
new Vue({
  render: (h) => h(App),
  beforeCreate() {
    // 当前 this 就是 new Vue() 实例,这是 Vue 底层设计,在生命周期钩子函数中,this都是指向当前 Vue实例对象 或 组件实例对象
    Vue.prototype.x = this
  }
}).$mount("#app");
继承 组件实例对象 ,或 Vue 原型对象 都可以使的 事件总线对象访问到 $on、$emit 等Vue 底层的方法。但是看写法来说,肯定是使用 beforeCreate 生命周期钩子函数好啊
用法
因为 上面已经 通过 beforeCreate 生命周期钩子函数 使得 事件总线对象 继承了 底层方法,所以下面可以直接使用
定义 School 子组件。在 mounted 钩子函数中,注册了 hello 事件,且进行监听
<template>
  <div class="demo">
    <p>School子组件</p>
  </div>
</template>

<script>
export default {
  mounted() {
    this.x.$on('hello', (data) => {
      console.log('我接受到了数据',data)
    })
  },
};
</script>
定义 Student 子组件。点击 test 之后 触发 hello 事件,传递数据给 School 子组件
<template>
  <div class="demo">
    <p @click="test">Student子组件</p>
  </div>
</template>

<script>
export default {
  methods: {
    test() {
      this.x.$emit('hello','123')
    },
  },
};
</script>
定义App 组件,
<template>
<div id="app">
<School/>
<Student />
</div>
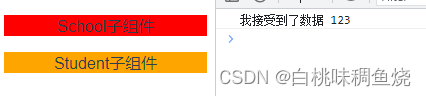
</template>两个兄弟组件之间没有任何关联,但是现在需要 School 子组件 获取到 Student 子组件 传递的数据,这个时候,我们的事件总线就起到作用了。
点击 test 事件,触发 hello 事件,且传递数据。此时控制台上打印出了 Student 传递出的数据。
这个 this.x 只是我随便定义的一个属性,不是固定名称,建议使用 $bus ,类似于 Vue 底层的 $on、$emit 等方法。
第二种方法:需要新建文件,且使用时每次需要引入文件,较麻烦。只不过一个是在原型上增加属性,一个是直接使用全新的 Vue 实例对象
新建 js 文件:直接暴露 Vue 实例对象
//bus.js
import Vue from 'vue';
export default new Vue();
引入文件:相当于引入了一个 全新的 Vue 实例对象
import Bus from '@/module/util/bus';使用:和父子组件传值一样,$on 监听事件 $emit 触发事件
// 监听事件
Bus.$on('getLevelList', data => {
    this.levelList = data;
});

// 触发事件
Bus.$emit('getLevelList', res.data);
建议
如果组件被销毁,建议解绑该组件上的事件,因为事件总线上 监听的事件不会随着组件的销毁而自动解绑,这样可能会造成 事件总线上绑定了过多的 不用监听的事件
beforeDestroy() {
  this.$bus.$off('hello')
},
总结
全局事件总线:
一种组件间的通信方式,适用于任意组件通信( 父子组件,兄弟组件,深层嵌套组件 )
挂载全局事件总线:建议使用该方法,不会增加额外代码,且使用方便
new Vue({
  render: (h) => h(App),
  beforeCreate() {
    Vue.prototype.x = this
  }
}).$mount("#app");
使用全局事件总线
// 监听事件
this.$bus.$on('hello', (data) => {
  console.log('我接受到了数据',data)
})


// 触发事件,传递数据
test() {
  this.x.$emit('hello','我传递了数据')
},
组件销毁之前解绑事件,避免事件总线上绑定过多无用的事件
beforeDestroy() {
  this.$bus.$off('hello')
},