一、使用场景:
1.大文件上传
2.网络环境环境不好,存在需要重传风险的场景
二、名词解释:
切片上传:也叫分片上传,就是将所要上传的文件,按照一定的大小,将整个文件分隔成多个数据块来进行分别上传,上传完之后再由服务端对所有上传的文件进行汇总整合成原始的文件。
断点续传:是在下载或上传时,将下载或上传任务(一个文件或一个压缩包)人为的划分为几个部分,每一个部分采用一个线程进行上传或下载,如果碰到网络故障,可以从已经上传或下载的部分开始继续上传或者下载未完成的部分,而没有必要从头开始上传或者下载。
三、实现流程步骤:
我们先来个简单的文件上传案例:
<!DOCTYPE html>
<html lang="en">
  <head>
    <meta charset="UTF-8" />
    <meta name="viewport" content="width=device-width, initial-scale=1.0" />
    <title>文件上传</title>
    <style>
      html,
      body {
        display: flex;
        align-items: center;
        justify-content: center;
        height: 100%;
      }
    </style>
  </head>

  <body>
    <script src="https://cdn.bootcdn.net/ajax/libs/axios/1.2.0/axios.js"></script>
    <input type="file" name="file" id="ipt" />
    <input type="button" οnclick="getData()" value="get请求数据"/>
    <button οnclick="upload()" type="button"> 上传</button>
    <script>
      function getData(){
        axios.get("http://localhost:9528/uname?name=abc").then((res) => {
          console.log(res.data);
        });
      }
      function upload() {
        const file = ipt.files[0];
        const formData = new FormData();
        formData.append("formData", file, file.name);
        console.log(formData);
        axios.post("http://localhost:9528/upload", formData).then((res) => {
          console.log(formData, res);
        });
      }
    </script>
  </body>
</html>
node服务端
const multiparty = require("multiparty");
const bodyParser = require("body-parser");
const path = require("path");
const express = require("express");
const app = express();
const cors = require('cors')
const fs = require("fs");
function resolvePath(dir) {
  return path.join(__dirname, dir);
}

app.use(cors())
app.use(express.static(resolvePath("/public")));
app.use(bodyParser.json({ limit: "50mb" }));
app.use(bodyParser.urlencoded({ extended: true }));

app.post("/upload", function (req, res) {
  const form = new multiparty.Form({ uploadDir: "public" });
  form.parse(req);
  form.on("file", function (name, file) {
    console.log(name, file);
    const { path, originalFilename } = file;
    fs.renameSync(path, `public/${originalFilename}`);
    res.json({
      url: `http://localhost:9528/${originalFilename}`,
      message: "发送成功",
    });
  });
});
app.get('/uname',function(req,res){
  console.log(req.query,req.params);
  // res.json({a:1,b:2})
   res.send({ name: "yang", age: 18 });
})

app.use(function (err, req, res, next) {
  console.log('server错误',err);
  res.send({
    err:err,
    message: "server错误"
  })
})

const port = 9528;
app.listen(port, function () {
  console.log(`listen port ${port}`);
});
测试上传:


可以看到这里已经上传成功,payload是一个二进制文件。服务端指定目录下就多了一个文件
一个简单的文件上传就完成了,现在开始切片上传功能开发,切片上传就是把一个文件切分成很多小文件,本来上传一个大文件,现在改成上传很多小文件。
分片上传:
我们知道使用 <input type="file" name="file" /> 元素选择一个文件之后,会得到 File 对象,而 File 对象 又继承 Blob,正好 Blob 对象有个方法叫 slice。这个方法和数组的 slice 方法使用基本相同,它可以获取待上传文件的某一部分,经过 slice 方法处理之后得到的结果也是一个 Blob。
思路:
1、将需要上传的文件按照一定的分割规则,分割成相同大小的数据块;
2、初始化一个分片上传任务,返回本次分片上传唯一标识;
3、按照一定的策略(串行或并行)发送各个分片数据块;
4、发送完成后,服务端根据判断数据上传是否完整,如果完整,则进行数据块合成得到原始文件。
前端代码:
<!DOCTYPE html>
<html lang="en">
  <head>
    <meta charset="UTF-8" />
    <meta name="viewport" content="width=device-width, initial-scale=1.0" />
    <title>分片上传</title>
    <style>
      html,
      body {
        display: flex;
        align-items: center;
        justify-content: center;
        height: 100%;
      }
    </style>
  </head>

  <body>
    <script src="https://cdn.bootcdn.net/ajax/libs/axios/1.2.0/axios.js"></script>
    <script src="https://xiaojinhe-cdn.iyoudui.cn/upload/common/2022129/spark-md5.min.js"></script>
    <input type="file" name="file" id="ipt" />
    <button οnclick="upload(0)">上传</button>
    <script>
      const chunkSize = 1024 * 1024; // 默认分片大小为1兆。1kb = 1024byte, 1m = 1024 kb

      function upload(index) {
        const file = ipt.files[0];
        if (!file) return alert("请您先选择要上传的文件~~");
        const { name, type, size } = file;

        // 生成文件hash
        const spark = new SparkMD5.ArrayBuffer();
        spark.append(file);
        const hexHash = spark.end();
        // 生成文件后缀
        const extName = name.substring(name.lastIndexOf("."));
        const startIndex = chunkSize * index;

        // 文件上传完,终止递归同时合并文件
        if (startIndex > size) {
          axios
            .post("http://localhost:9528/merge", {
              fileName: name,
              hexHash,
              extName,
            })
            .then((res) => {
              console.log(res);
            });
          return;
        }
        const endIndex =
          startIndex + chunkSize > size ? size : startIndex + chunkSize;
        const blobPart = file.slice(startIndex, endIndex, type);
        // FormData 直接上传切片后的文件,文件名默认为 blob( filename="blob")
        // 这里通过 File 给个文件名
        const blobFile = new File([blobPart], `${hexHash}-${index}${extName}`, {
          type,
        });
        // 创建虚拟表单进行文件上传
        const vform = new FormData();
        vform.append("vform", blobFile);
        axios.post("http://localhost:9528/upload", vform,{
          onUploadProgress(e) {
              console.log('进度', e.loaded / e.total);
            }
        }).then((res) => {
          // 分片 => 通过递归实现
          upload(++index);
        });
      }
    </script>
  </body>
</html>
server新增路由:
app.post("/merge", function (req, res) {
  const { fileName, hexHash, extName } = req.body;
  const readDir = fs.readdirSync(resolvePath("./temp"));
  readDir.sort((a, b) => a - b).map(chunkPath => {
      fs.appendFileSync(
          resolvePath(`public/${fileName}`),
          fs.readFileSync(resolvePath(`temp/${chunkPath}`))
      );
      fs.rmSync(resolvePath(`temp/${chunkPath}`));
  });
  // fs.rmdirSync(resolvePath("./temp"));
  res.json({
      url: `http://localhost:9528/${fileName}`,
      message: "merge发送成功"
  });
});
测试切片上传:

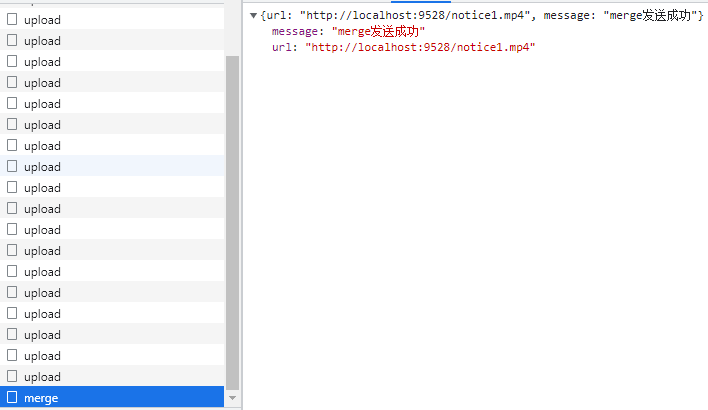
分片上传完成,服务端就有了这个上传完成视频。
断点续传:
前面在分片上传的时候,每片chunks都有文件唯一性md5code的文件片段${hexHash}-${index}${extName},如果用户选择了重新上传,后端需要根据此文件的 MD5 检索出来文件已经上传的部分,前端续传。
四、补充:
代码都是简易实现的业务逻辑,真正项目上都不用自己手写,GitHub和各大云都有完善的组件库,功能更完善,逻辑更严谨。附地址:
阿里云:如何在OSS中实现分片上传_对象存储 OSS-阿里云帮助中心
腾讯云:对象存储 上传对象-SDK 文档-文档中心-腾讯云
七牛云:JavaScript SDK历史文档1.x_SDK 下载_对象存储 - 七牛开发者中心
百度上传组件:Web Uploader