前言:
资源链接:GitHub - jakespringer/angr_ctf(题库仓库,里面有个讲解angr的PPT,里面有官方的题解很详细) GitHub - Hustcw/Angr_Tutorial_For_CTF: angr tutorial for ctf
安装:
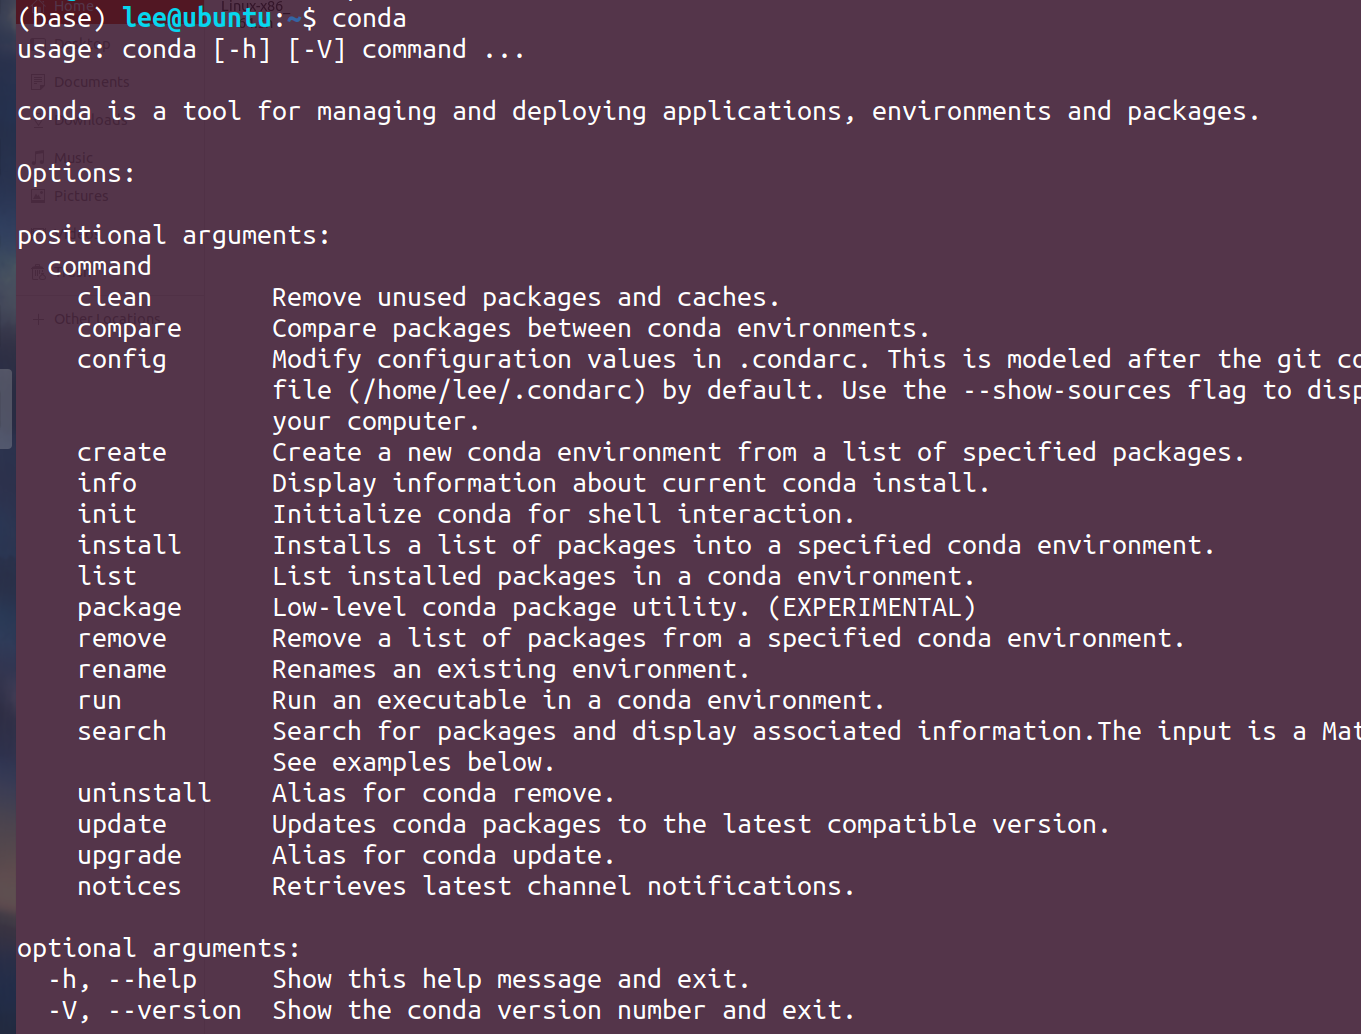
关于angr的安装:官方提供了很多安装教程方式 这里用的是Anaconda来安装python然后安装angr https://mirrors.bfsu.edu.cn/anaconda/archive/Anaconda3-2022.10-Linux-x86_64.sh 去这里下载安装文件,不建议用wget下载,很慢很慢。 然后:
bash Anaconda3-2022.10-Linux-x86_64.sh
回车后查看许可证,按 q 退出许可证,然后输入 yes 表示同意
确认安装的路径,一般直接回车安装在默认的 /home/你的名字/anaconda
很快就安装完毕。输入 yes 来确认使用 conda init 来启动
source ~/.bashrc   //修改环境变量
然后就可以命令行输入conda直接来使用了
conda的常用命令:
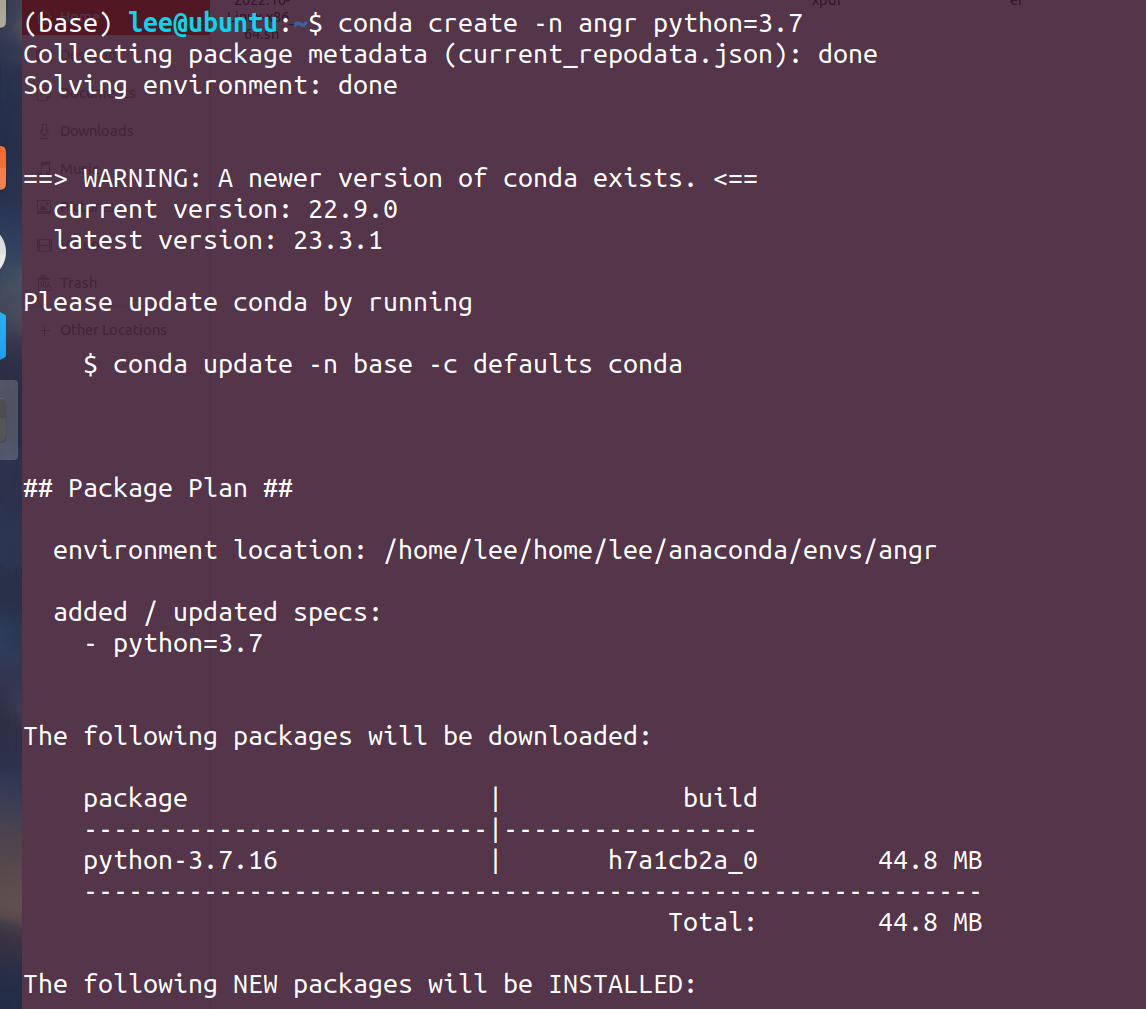
conda create -n  name  python=版本号 //name 为要创建的环境名
conda activate name   //进入环境
conda deactivate    //退出环境
conda info
conda info -e   //查看已经创建的环境
然后创建环境:
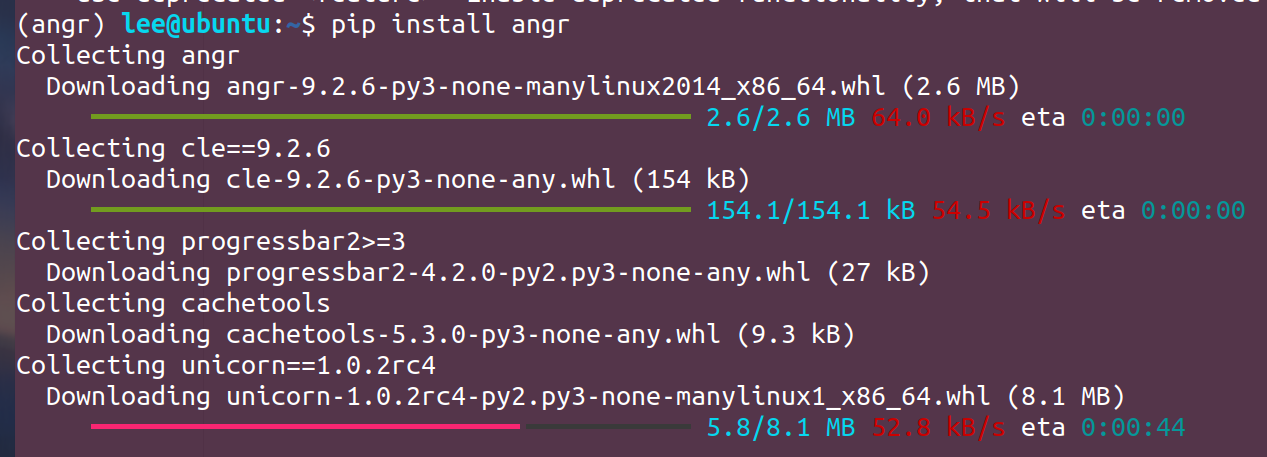
进入环境安装angr:
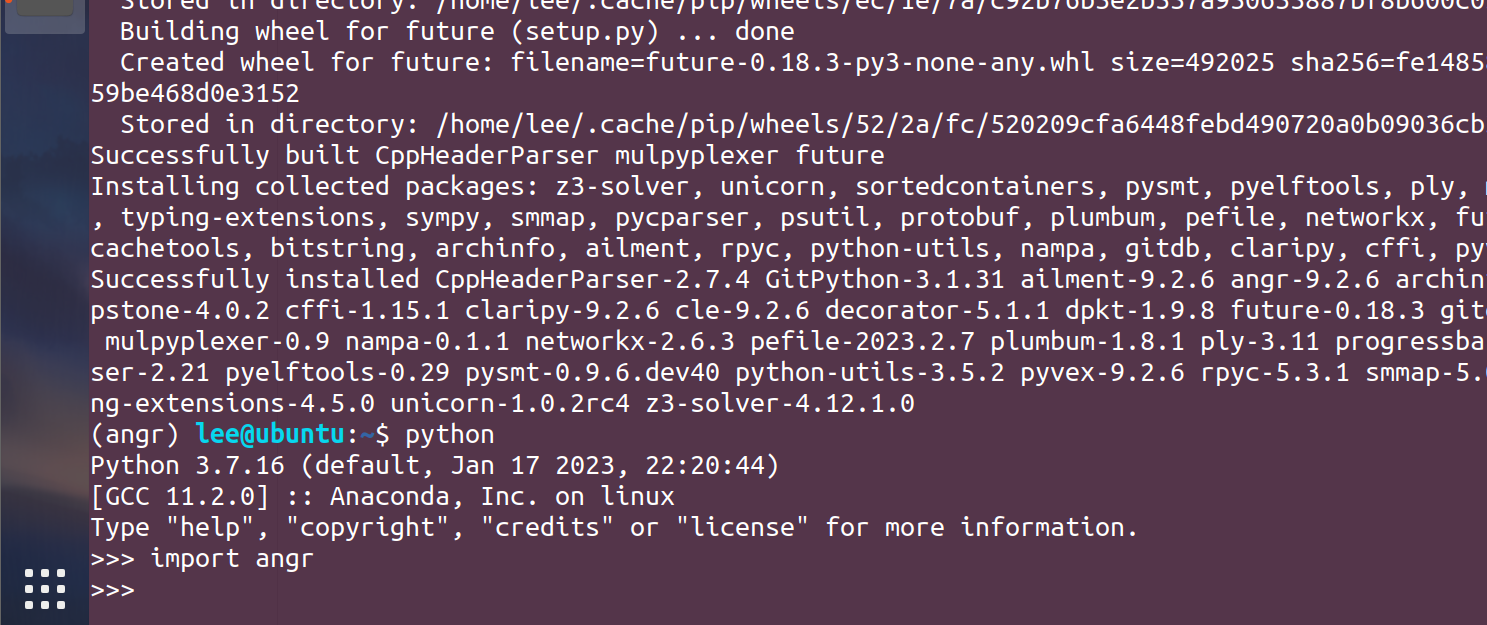
安装成功测试:
正文:
官方文档:Core Concepts - angr documentation 翻译版本:angr学习(2):基本命令 · 语雀 SymbolicExecution.pptx 常用命令:
import angr
import claripy
proj = angr.Project('./file_name') //load the binary file
proj.arch //arch of the binary file
proj.entry // the entry of the binary file
state = proj.factory.entry_state() //to create the state
start_addr = 0xdeadbeef
state = proj.factory.blank_state(addr=start_addr)
// to create a blank stateand we set the regs
parameter_1 = claripy.BVS("p1",32)
state.regs.eax = parameter_1
simgr = proj.factory.simulation_manger(state) //to create the simulation
simgr.explore(find=???,avoid=???)
solution = simgr.found[0]
print(solution.posix.dumps(0)) // '0' represents standard output
solution = state.solver.eval(parameter_1)
print("Solution:",hex(solution))
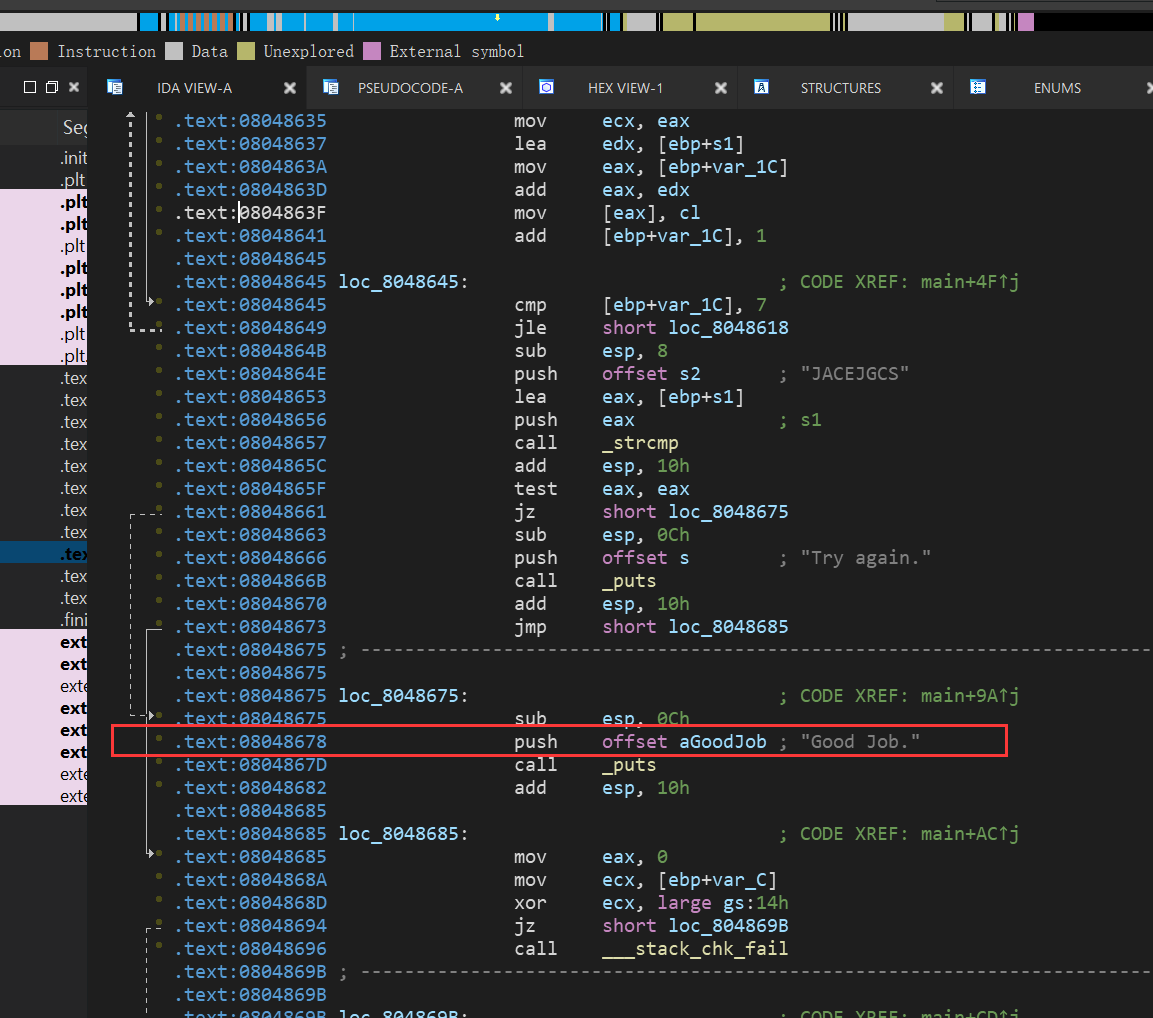
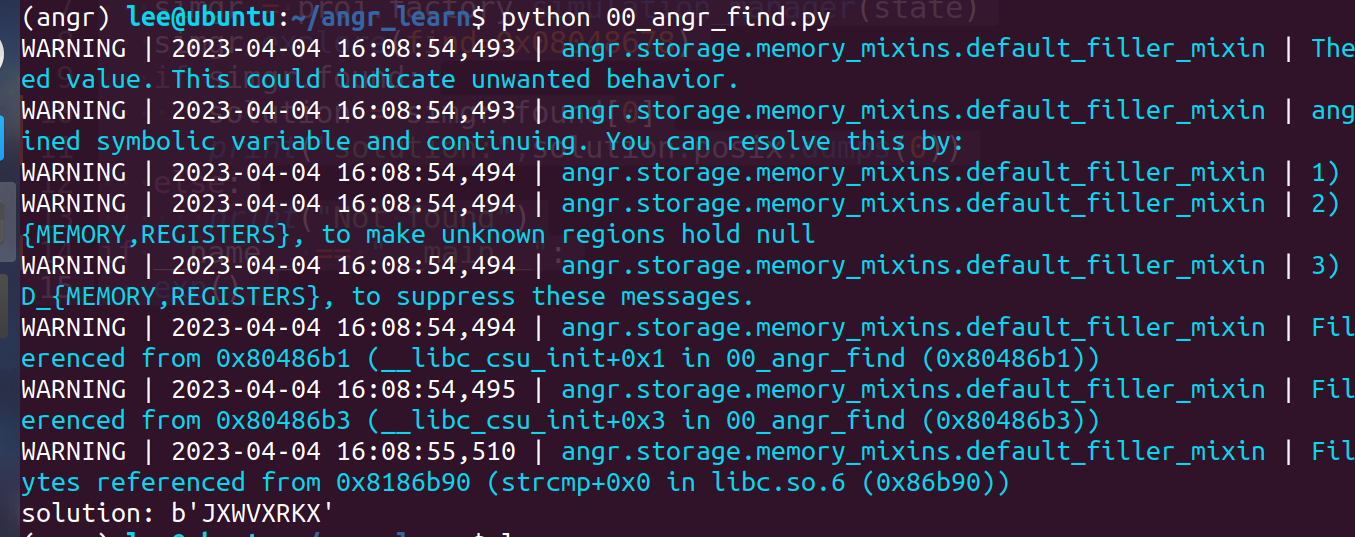
00_angr_find
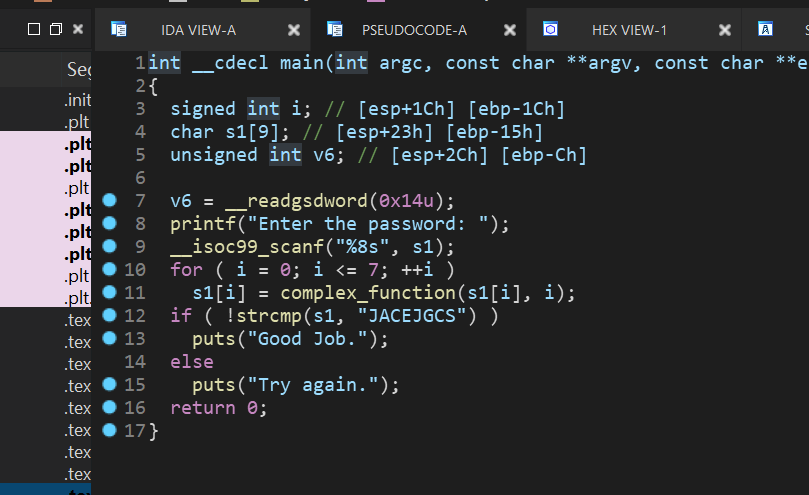
import angr
def exp():
proj = angr.Project('./00_angr_find')
state = proj.factory.entry_state()
simgr = proj.factory.simulation_manager(state)
simgr.explore(find=0x08048678)
if simgr.found:
solution = simgr.found[0]
print("solution:",solution.posix.dumps(0))
else:
print("Not found")
if __name__ == "__main__":
exp()

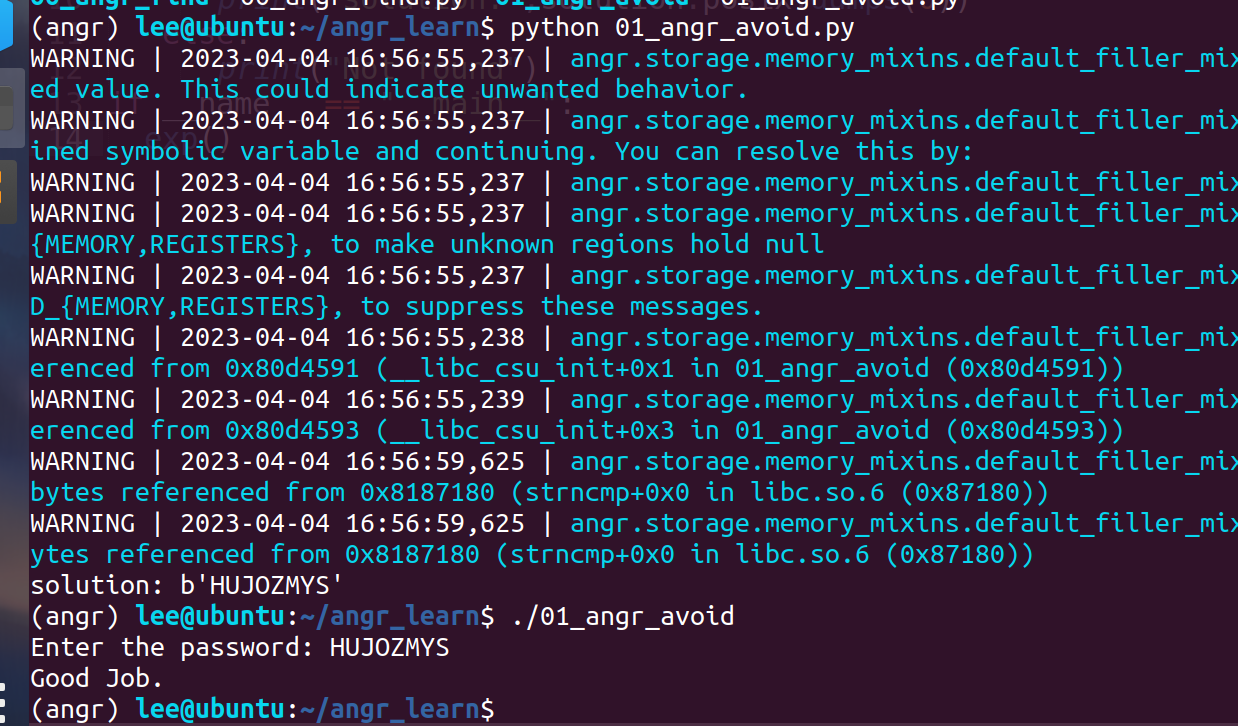
01_angr_avoid
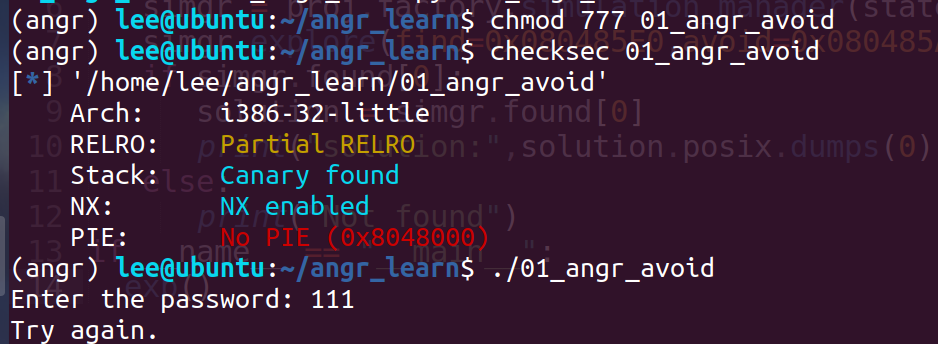
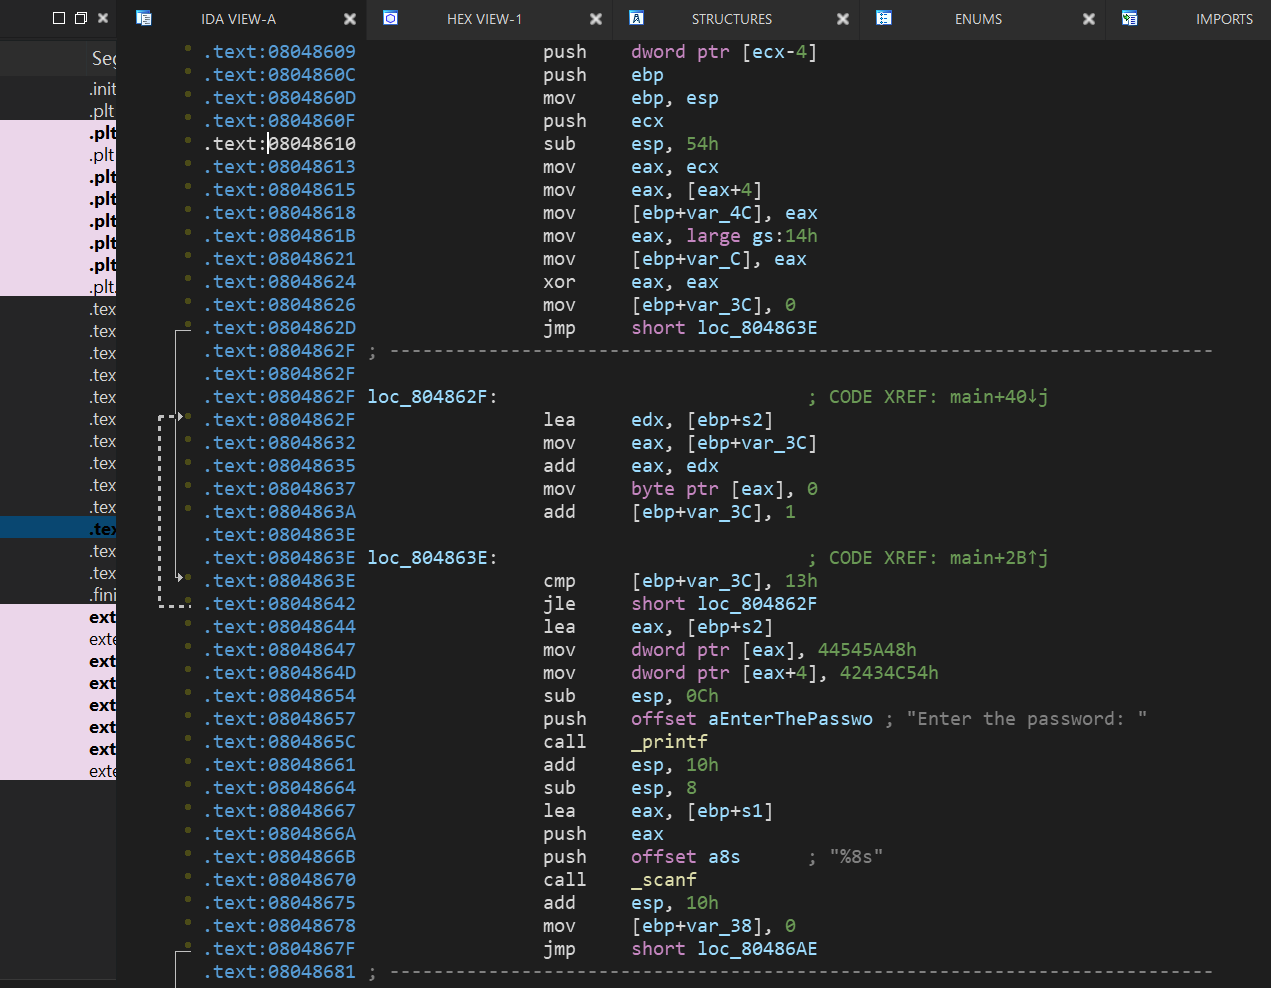
由于一些原因F5反编译main函数有点麻烦,修改IDA设置可以解决,但是本题影响不大
整个函数逻辑流程和00_angr_find一样,只不过加入了个分支avoid_me,倘若angr的explore中不加avoid参数,应该也能跑出来,只不过加了后直接会跳过那个avoid_me的分支,加快速度。

import angr
def exp():
proj = angr.Project('./01_angr_avoid')
state = proj.factory.entry_state()
simgr = proj.factory.simulation_manager(state)
simgr.explore(find=0x080485E0,avoid=0x080485A8)
if simgr.found[0]:
solution = simgr.found[0]
print("solution:",solution.posix.dumps(0))
else:
print("Not found")
if __name__ == "__main__":
exp()
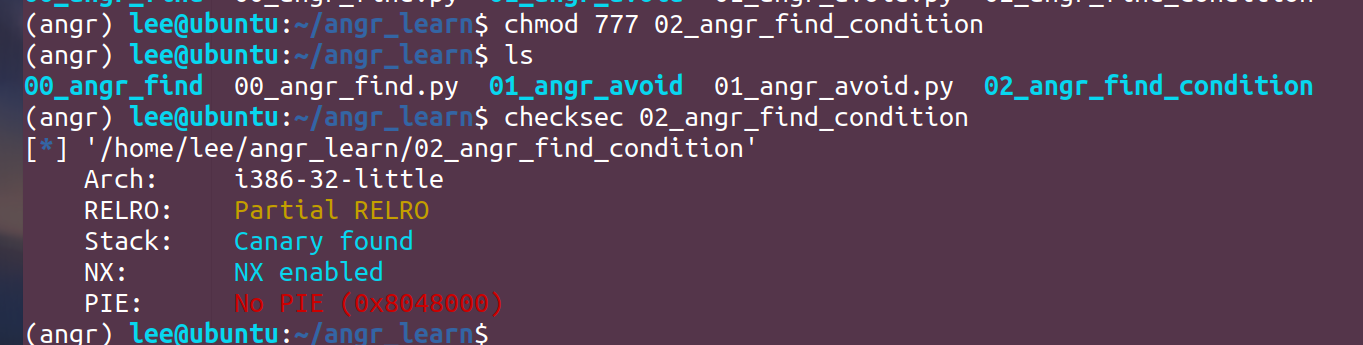
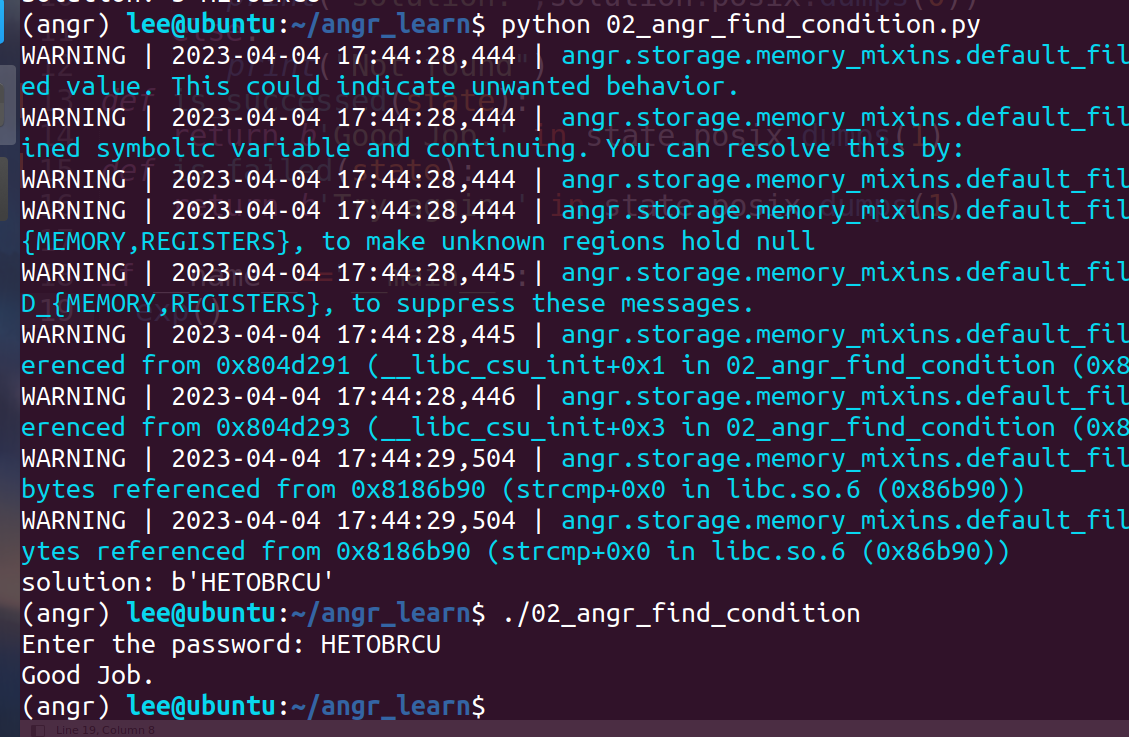
02_angr_find_condition
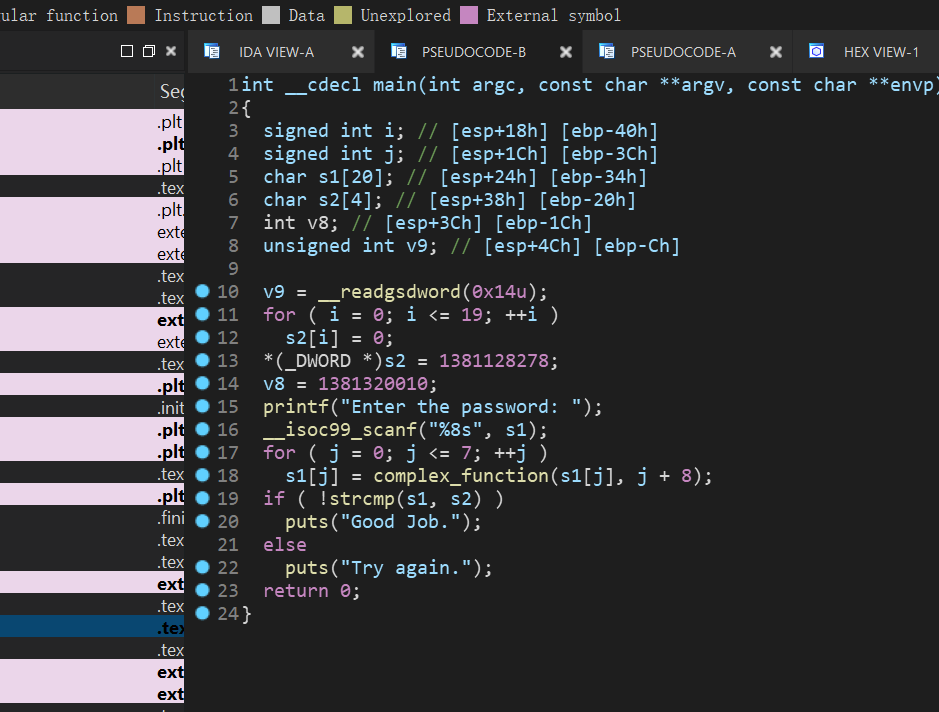
看这里没啥区别,但是:
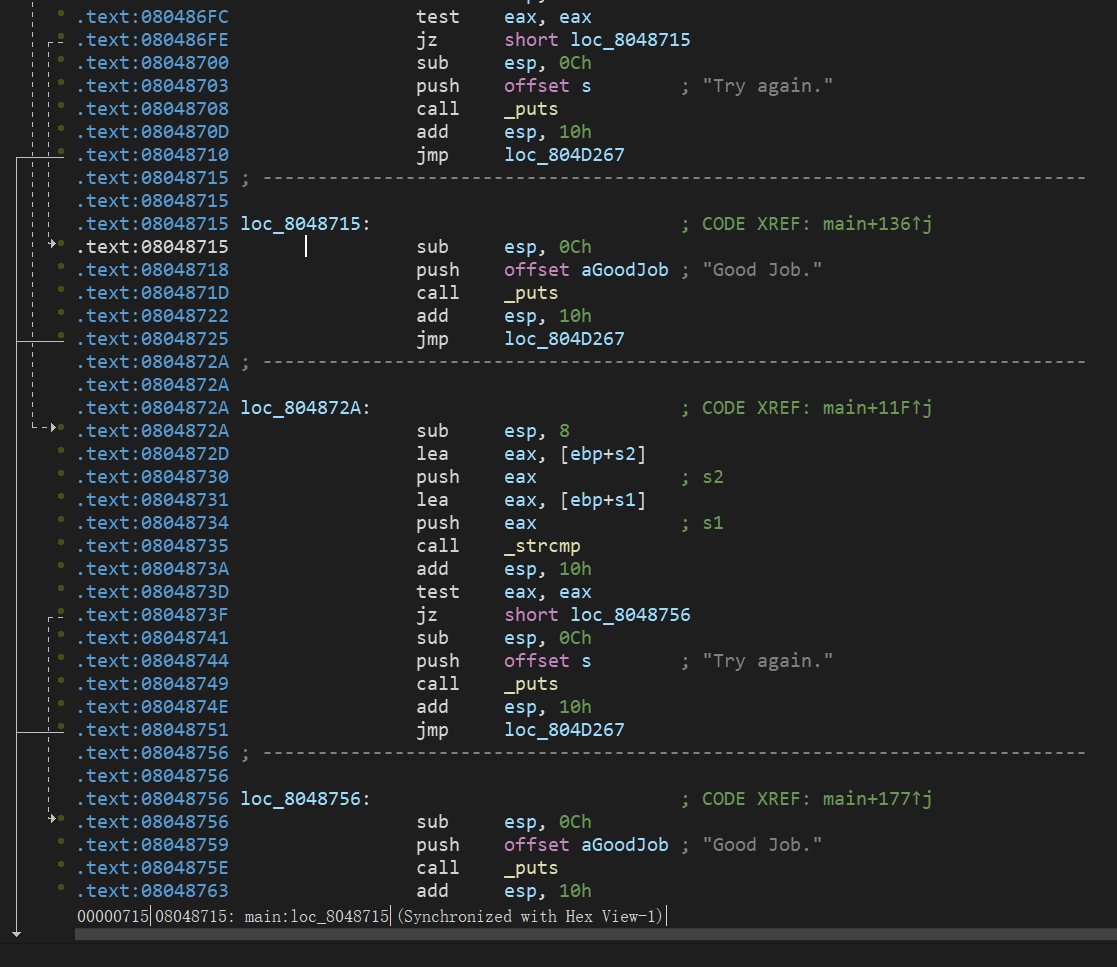
这里就需要对explore中的find和avoid进行设置条件来让它们识别了
import angr
def exp():
proj = angr.Project('./02_angr_find_condition')
state = proj.factory.entry_state()
simgr = proj.factory.simulation_manager(state)
simgr.explore(find=is_success,avoid=is_fail)
if simgr.found:
solution = simgr.found[0]
print("solution:",solution.posix.dumps(0))
else:
print("Not found")
def is_success(state):
return b'Good Job.' in state.posix.dumps(1)
def is_fail(state):
return b'Try again.' in state.posix.dumps(1)
if __name__=="__main__":
exp()
这里添加了两个函数is_successed()和is_failed(),函数内的内容就是如果出现符合的条件输入,posix.dumps(1)中的参数为1时为输入。
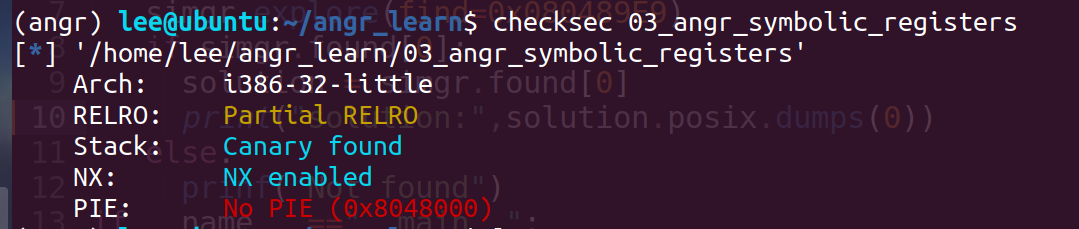
03_angr_symbolic_registers
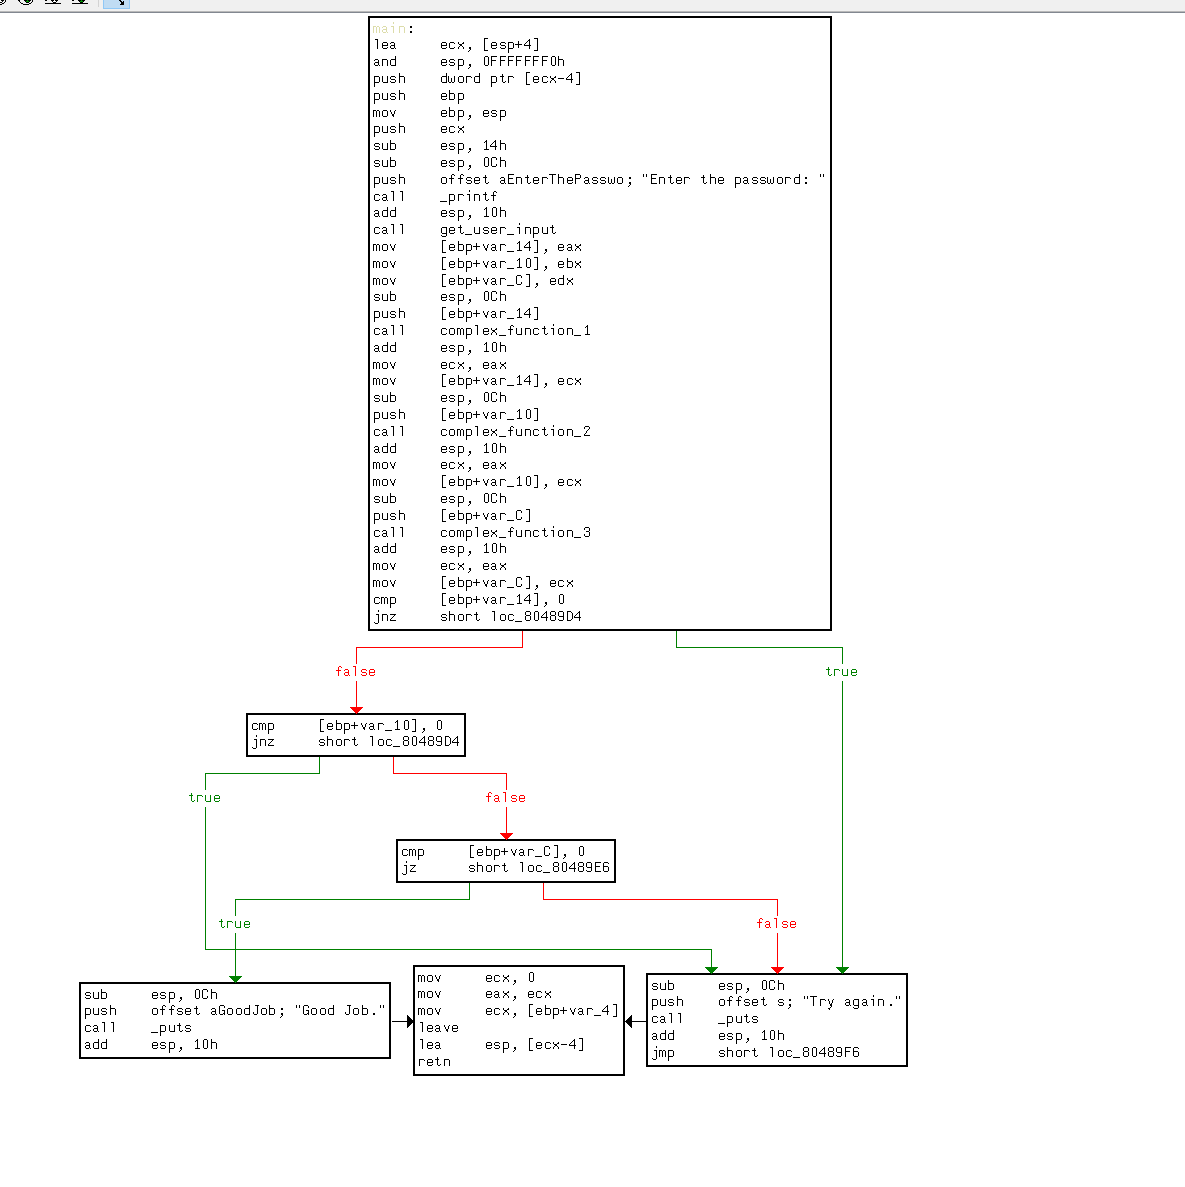
这次看起来不是太复杂
输入看得出不是一个参数了,而是三个参数
这里先按最简单的方法试试,即只设置一个find参数,结果很快也跑了出来,但是题目肯定不是考核的这个
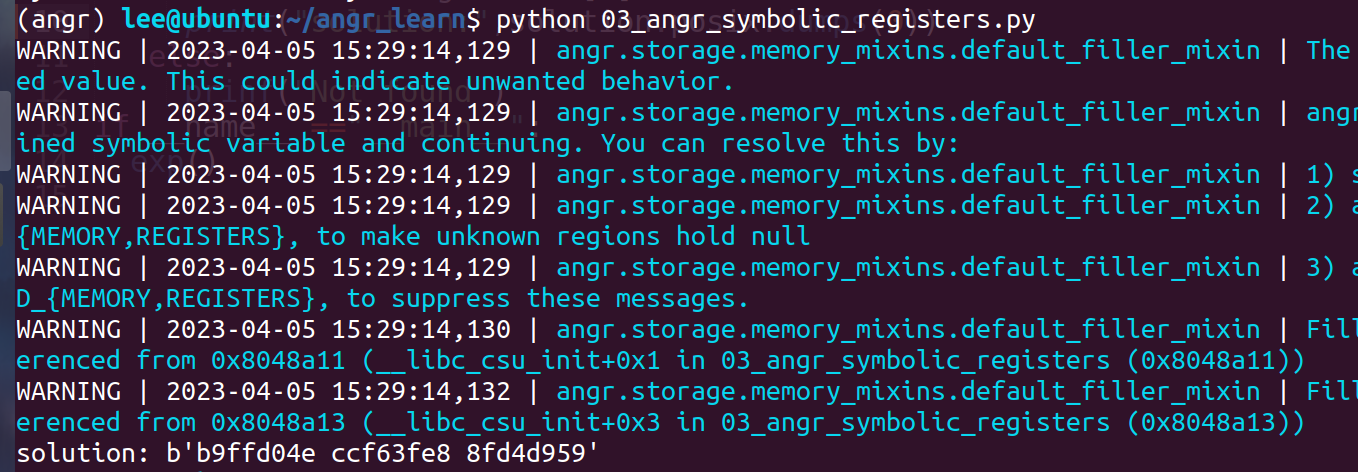

实际做法:
Why we use the symbolic_registers:

import angr
import claripy
def exp():
proj = angr.Project('./03_angr_symbolic_registers')
start_addr = 0x08048980
state = proj.factory.blank_state(addr=start_addr)
rem_1 = claripy.BVS('rem_1',32)
rem_2 = claripy.BVS('rem_2',32)
rem_3 = claripy.BVS('rem_3',32)
state.regs.eax=rem_1
state.regs.ebx=rem_2
state.regs.edx=rem_3
simgr = proj.factory.simulation_manager(state)
simgr.explore(find=is_find,avoid=not_find)
if simgr.found[0]:
solution = simgr.found[0]
solution_1 = solution.solver.eval(rem_1)
solution_2 = solution.solver.eval(rem_2)
solution_3 = solution.solver.eval(rem_3)
print("Solution:{} {} {}".format(hex(solution_1),hex(solution_2),hex(solution_3)))
else:
prinf("Not found")
def is_find(state):
return b'Good Job.' in state.posix.dumps(1)
def not_find(state):
return b'Try again.' in state.posix.dumps(1)
if __name__ =="__main__":
exp()
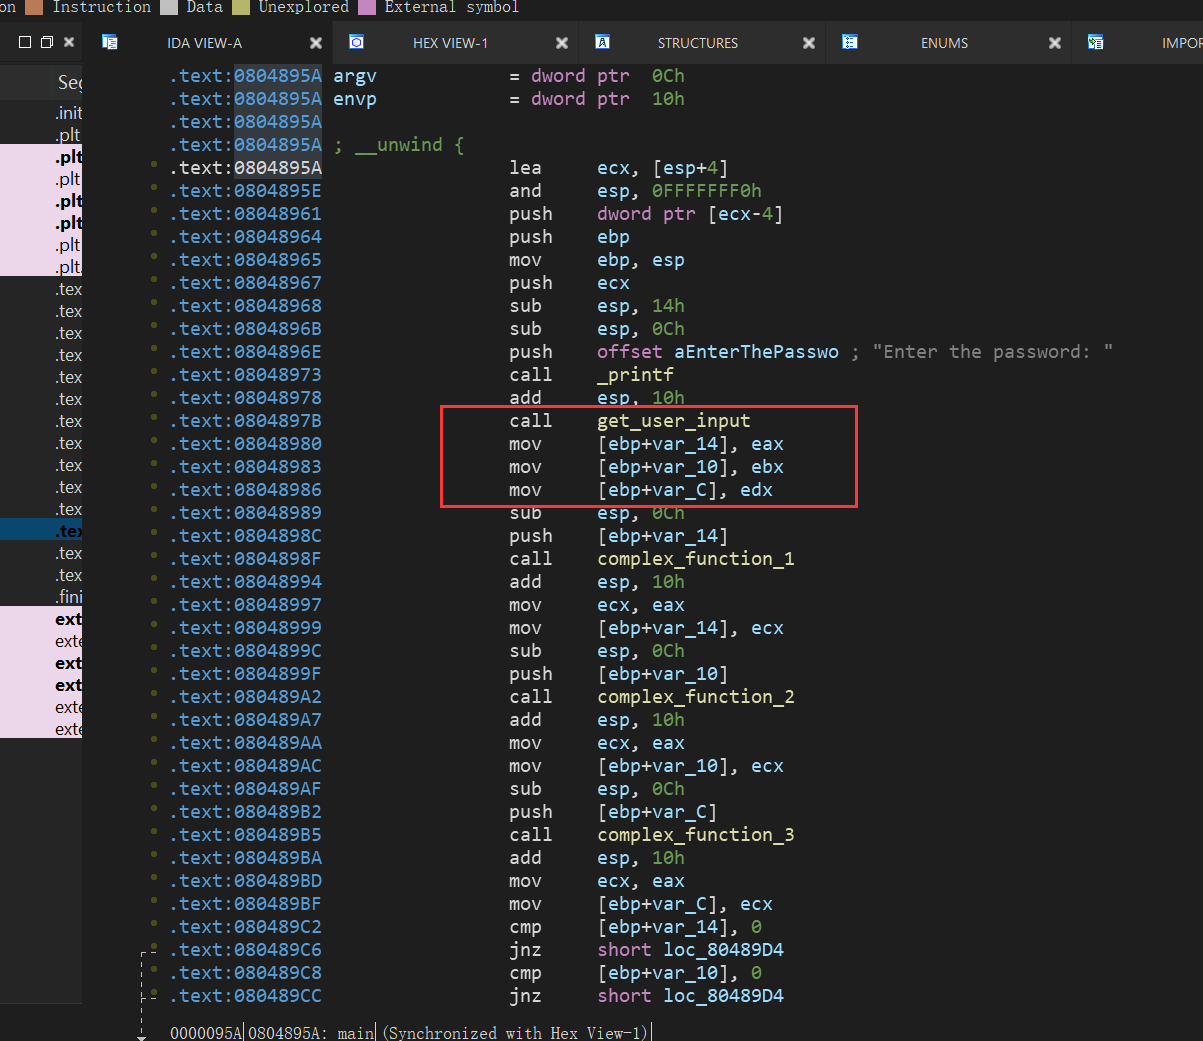
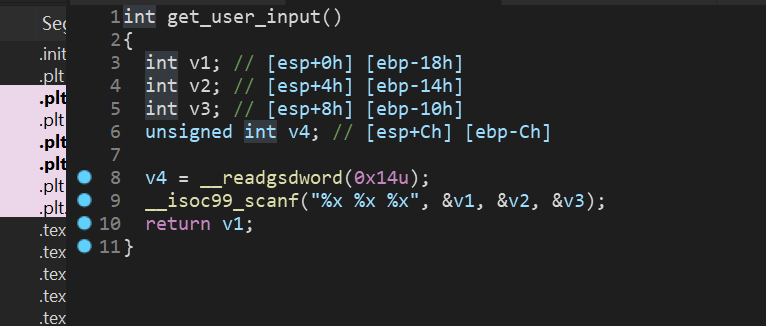
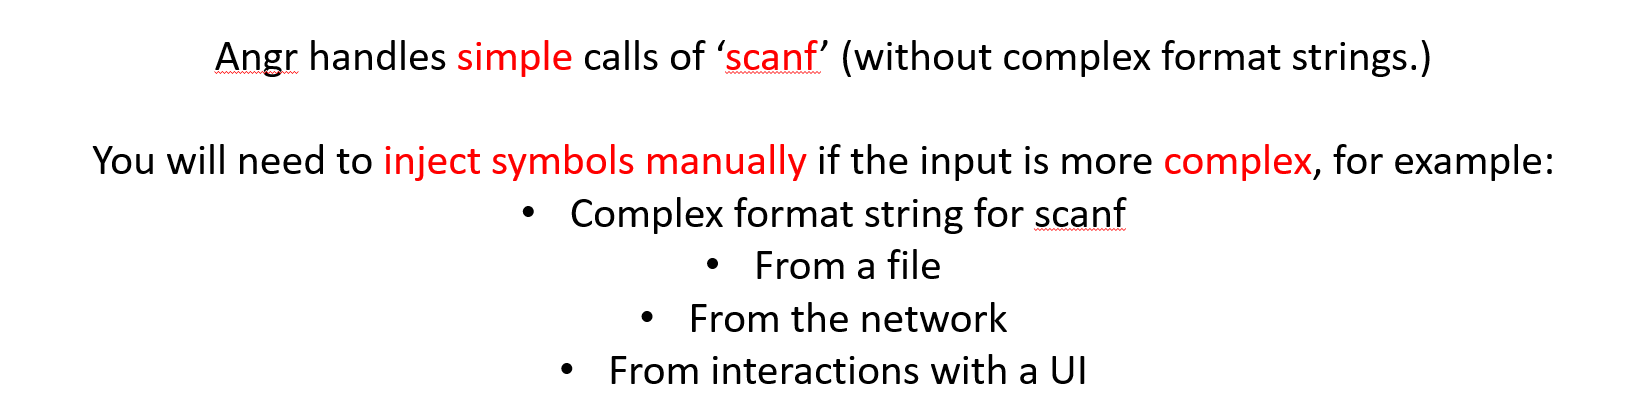
这里解释下脚本: 首先这里引入了factory.blank_state,这是创建一个空的状态,因为本题是scanf来读取值,然后需要跳过这个scanf函数的读入,所以看代码:
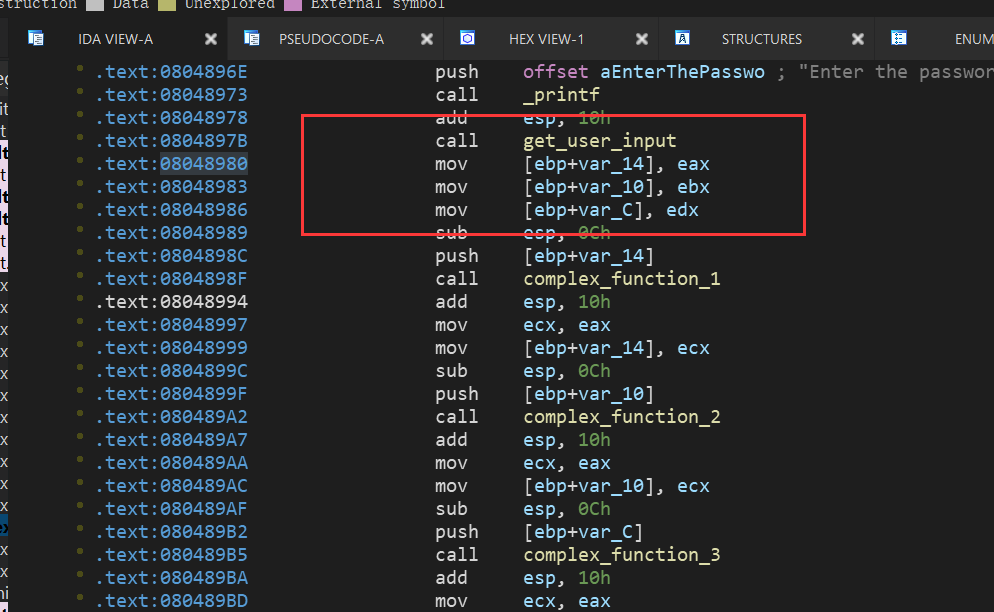
从这里可以看出,读入的三个值最终会分别存入eax和ebx和edx中,angr可以随意指定一个地址来往下进行运行,所以我们可以指定开始地址为:0x08048980

然后把地址传给我们创建的空状态中 再然后我们需要进行三个寄存器进行设置值,引入了claripy
import claripy
parameter_1 = claripy.BVS("p1",32) //to create a Bitvector Symbol size:32
state.regs.eax = parameter_1
最后找到结果值后,我们需要把parameter_1的 值打印出来,即:
solution_1 = solution.solver.eval(parameter_1)
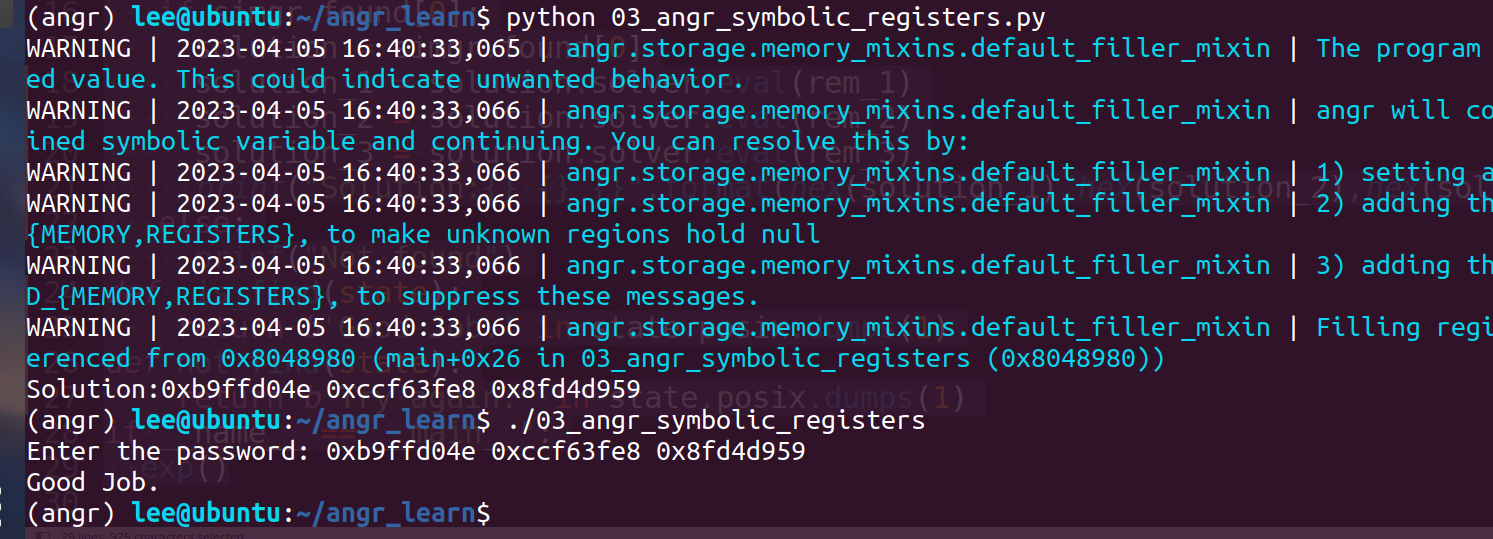
结果和开始的一样。
04_angr_symbolic_stack
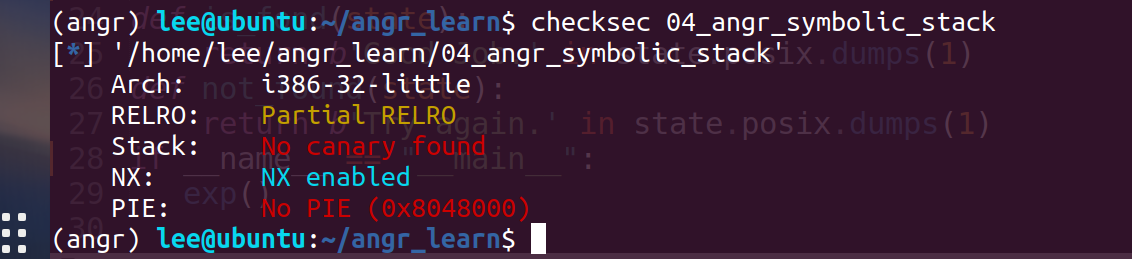
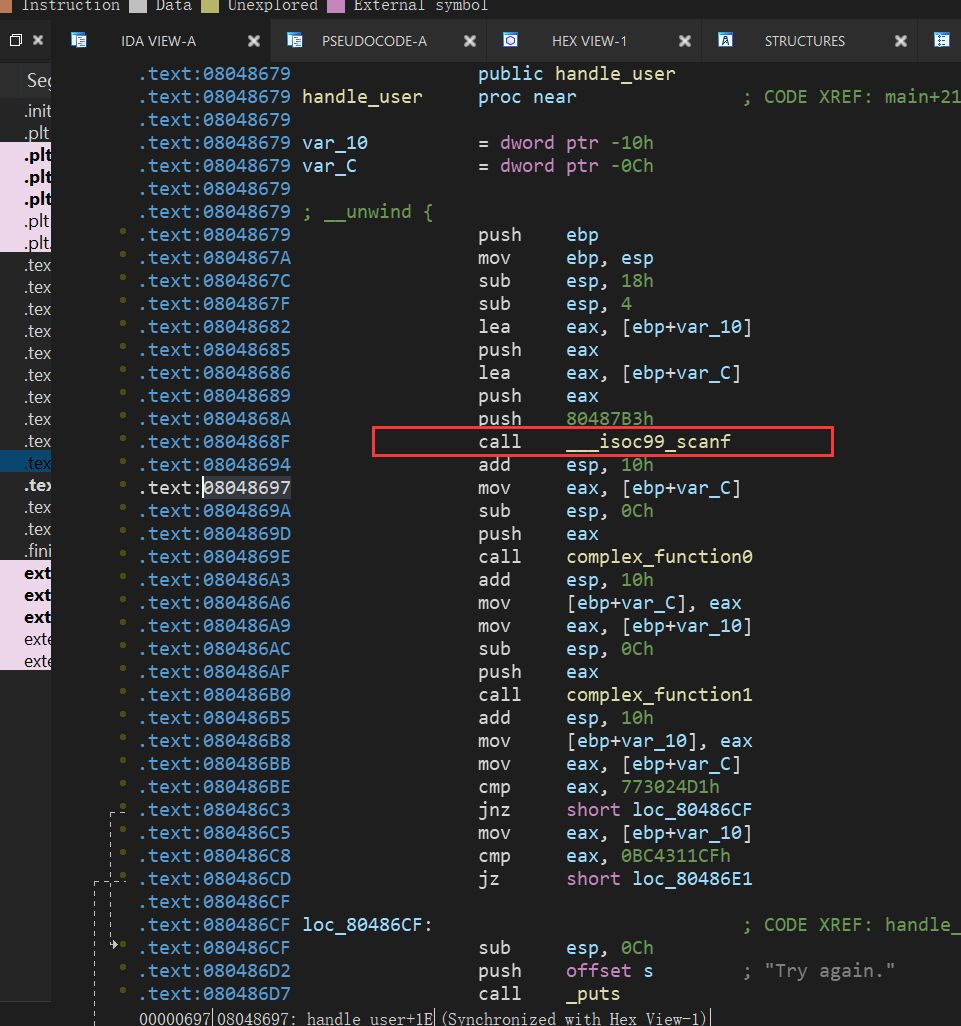
这里也是scanf读入数据,但是这次是储存在栈中,而不是寄存器
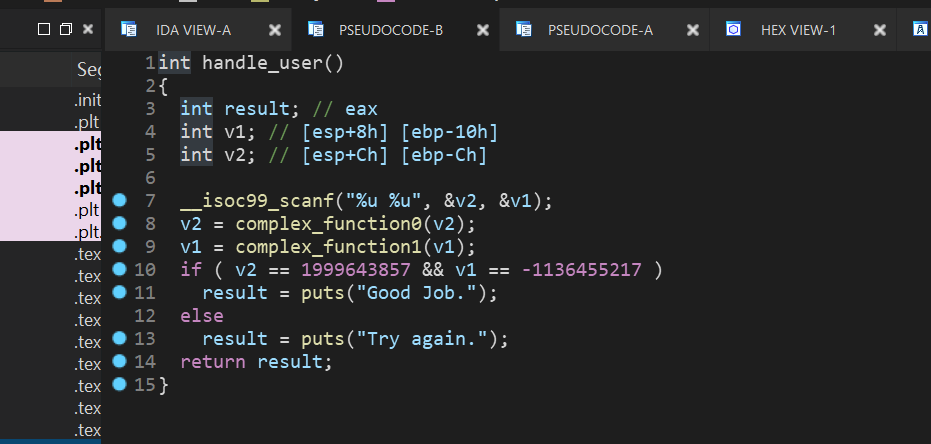
所以我们需要运行到angr中的对栈中的数据进行复制,这就要涉及到ebp和esp,然后还有距离,这里可以在gdb中调试来直观的计算距离:
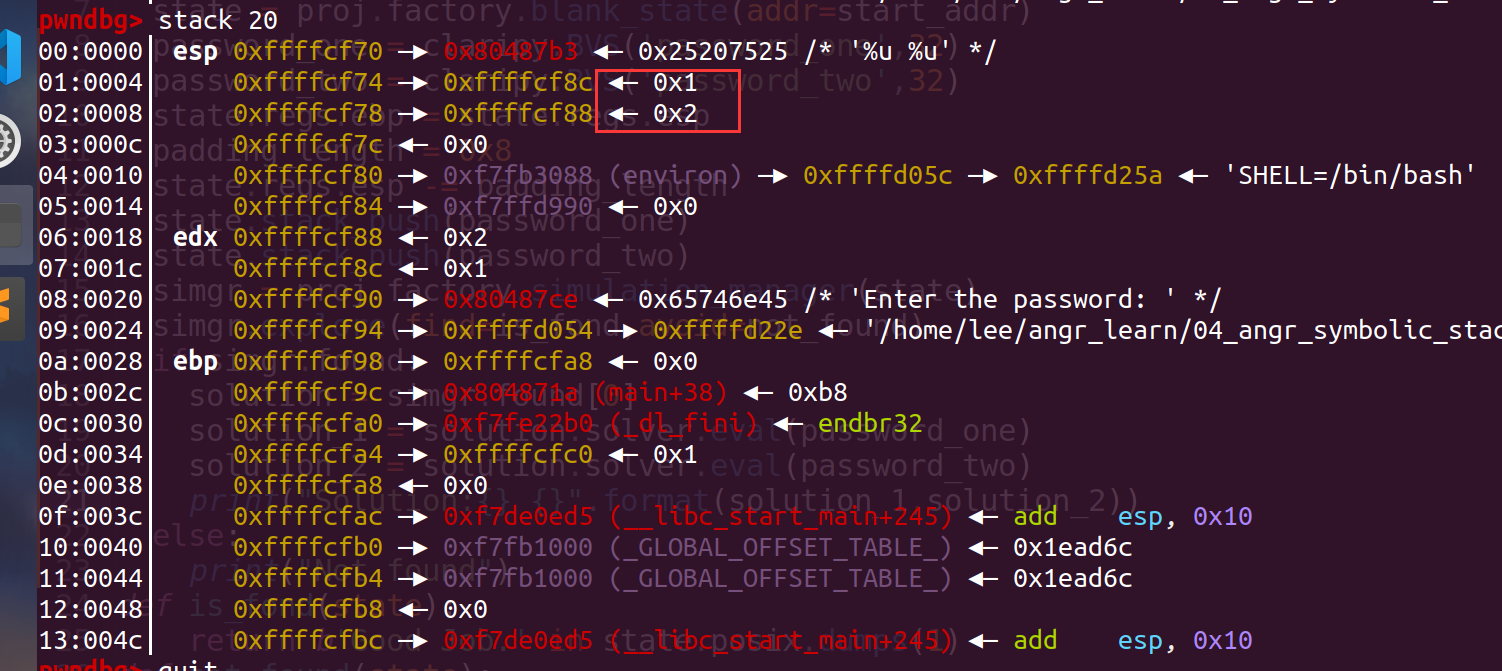
我们输入的两个值为1和2,可以看出存入时esp应该指向位置为esp-8(此处的esp为当前值) exp:
import angr
import claripy

def exp():
  start_addr = 0x08048697
  proj = angr.Project('./04_angr_symbolic_stack')
  state = proj.factory.blank_state(addr=start_addr)
  password_one = claripy.BVS('password_one',32)
  password_two = claripy.BVS('password_two',32)
  state.regs.ebp = state.regs.esp
  padding_length = 0x8
  state.regs.esp -= padding_length
  state.stack_push(password_one)
  state.stack_push(password_two)
  simgr = proj.factory.simulation_manager(state)
  simgr.explore(find=is_fond,avoid=not_found)
  if simgr.found:
  	solution = simgr.found[0]
  	solution_1 = solution.solver.eval(password_one)
  	solution_2 = solution.solver.eval(password_two)
  	print("Solution:{} {}".format(solution_1,solution_2))
  else:
  	print("Not found")
def is_fond(state):
    return b'Good Job.' in state.posix.dumps(1)
def not_found(state):
    return b'Try again.' in state.posix.dumps(1)
if __name__ == "__main__":
   exp()
需要解释的是这个:
start_addr = 0x08048697
首先我们后面创造的是自己的一个栈空间,所以需要在同一个栈中的操作:

这里调用完scanf后回收栈空间然后开始又开辟新的栈空间 然后就是设置:
state.regs.ebp = state.regs.esp


05_angr_symbolic_memory
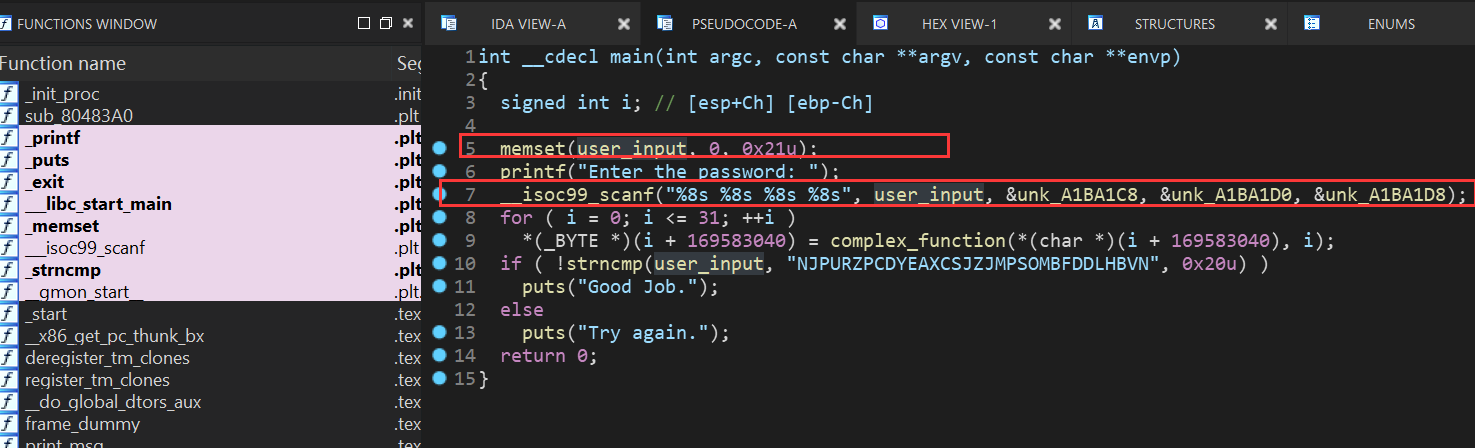
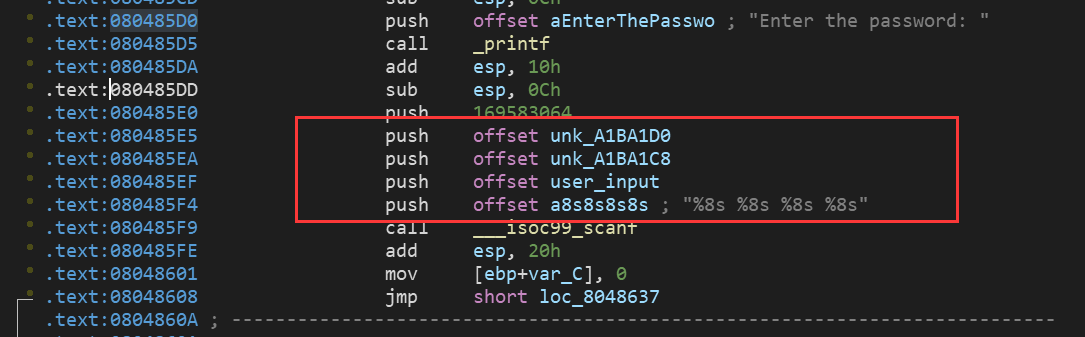
这次存储的地方和上次又不一样了,直接存入一个地址中 gdb下断点调试发现读入的值的存储地址:
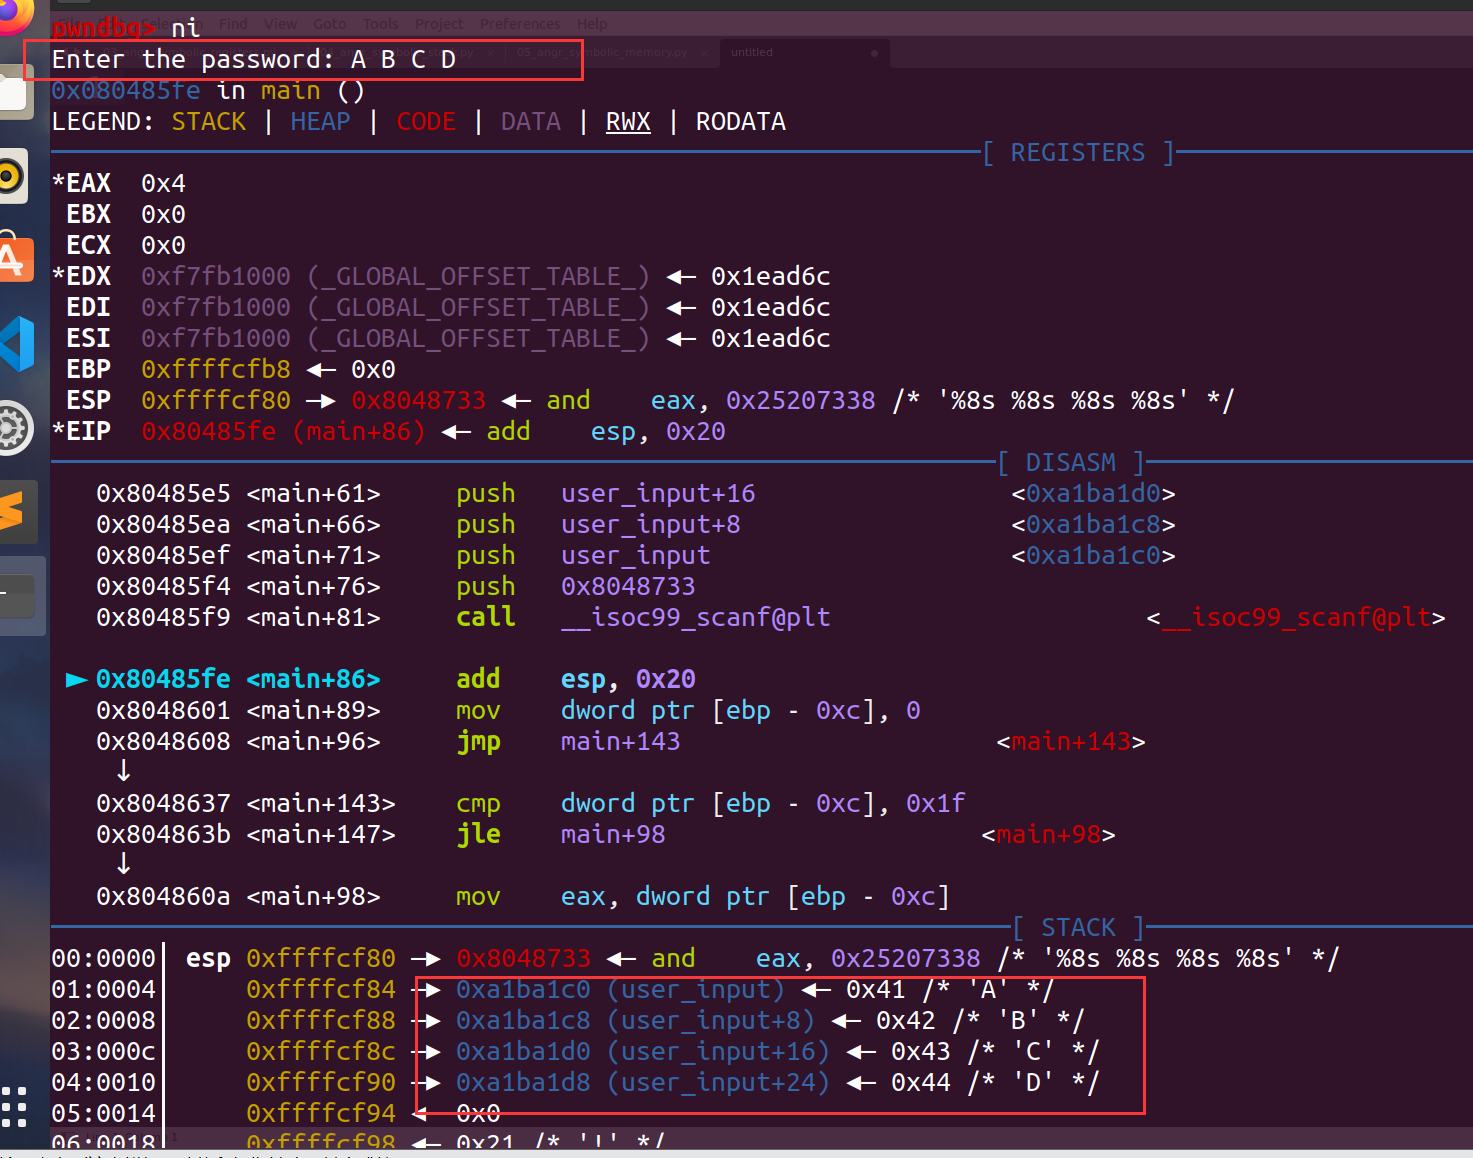
然后就是利用claripy生成4个符号向量,注意这里scanf中的每个值为%8s,8个字符,C语言中char类型占1个字节,即8bit,所以BVS中大小得设置成8*8
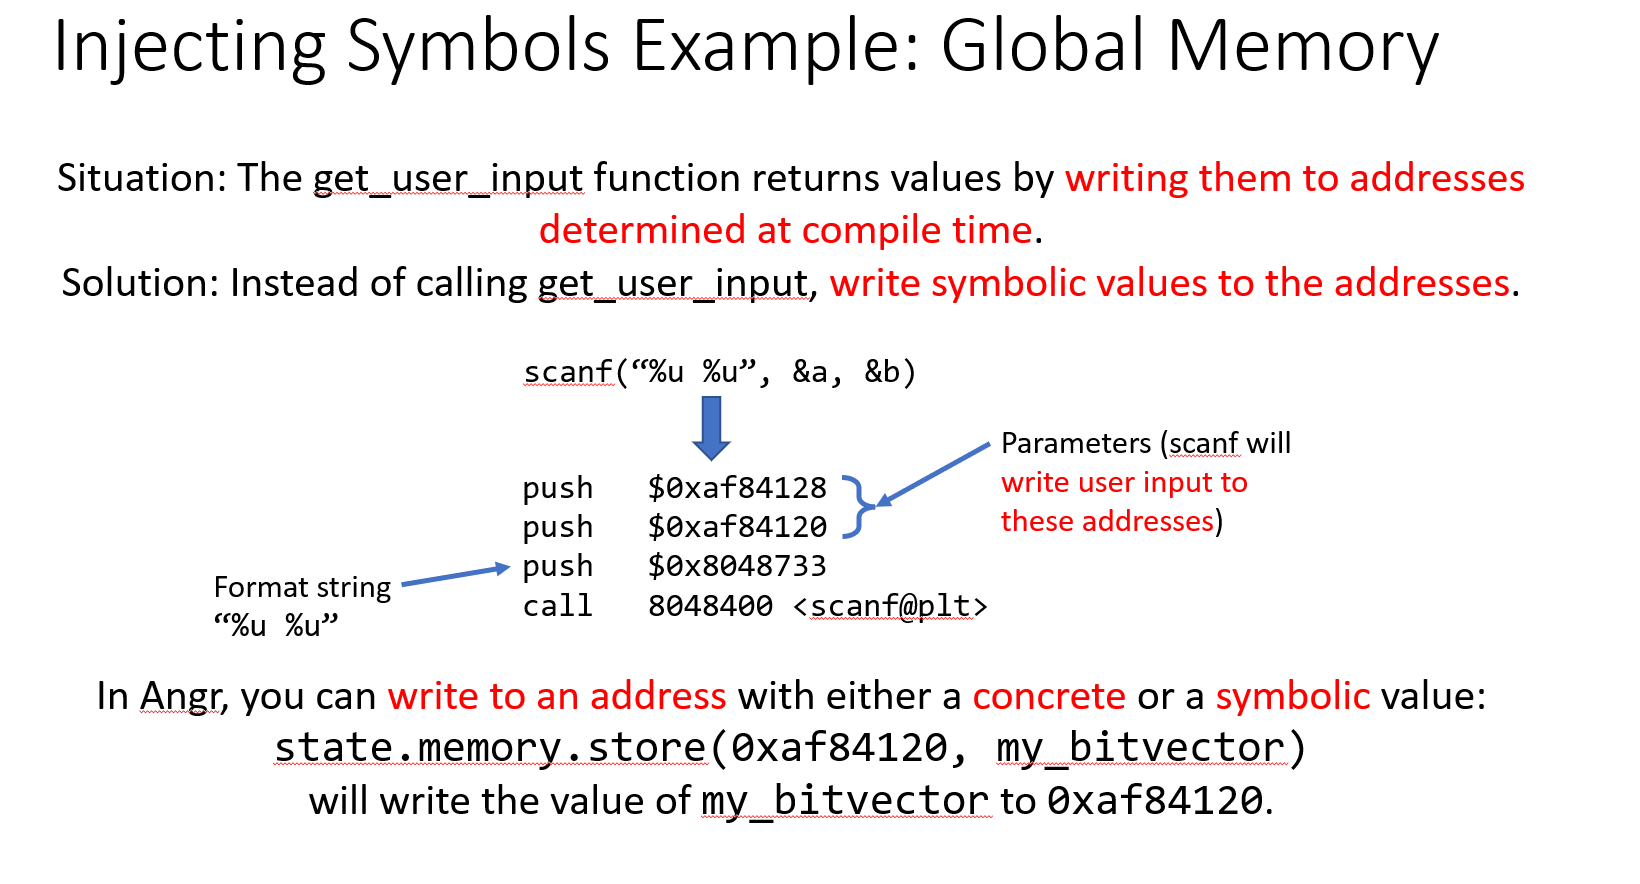
(官方提供的PPT中讲解,不过每个知识点就一笔带过) exp:
import angr
import claripy

def exp():
   start_addr =  0x080485FE
   proj = angr.Project('./05_angr_symbolic_memory')
   state = proj.factory.blank_state(addr=start_addr)
   password_1 = claripy.BVS('p1',8*8)
   password_2 = claripy.BVS('p2',8*8)
   password_3 = claripy.BVS('p3',8*8)
   password_4 = claripy.BVS('p4',8*8)
   state.memory.store(0xa1ba1c0,password_1)
   state.memory.store(0xa1ba1c8,password_2)
   state.memory.store(0xa1ba1d0,password_3)
   state.memory.store(0xa1ba1d8,password_4)
   simgr = proj.factory.simulation_manager(state)
   simgr.explore(find=is_found,avoid=not_found)
   if simgr.found:
   	solution = simgr.found[0]
   	solution_1 = solution.solver.eval(password_1,cast_to=bytes).decode()
   	solution_2 = solution.solver.eval(password_2,cast_to=bytes).decode()
   	solution_3 = solution.solver.eval(password_3,cast_to=bytes).decode()
   	solution_4 = solution.solver.eval(password_4,cast_to=bytes).decode()
   	print("Solution:{} {} {} {}".format(solution_1,solution_2,solution_3,solution_4))
   else:
   	print("Not found")

def is_found(state):
    return b'Good Job.' in state.posix.dumps(1)
def not_found(state):
    return b'Try again.' in state.posix.dumps(1)
if __name__ == "__main__":
    exp()
这里的开始地址设置为(如果设置错地址会出现失败或者找到缺失的解的情况)
然后最后的时候因为程序读入的是字符串,而我们直接eval出来的是bytes类型的,所以进行个类型转换:
    solution_1 = solution.solver.eval(password_1,cast_to=bytes).decode()
   	solution_2 = solution.solver.eval(password_2,cast_to=bytes).decode()
   	solution_3 = solution.solver.eval(password_3,cast_to=bytes).decode()
   	solution_4 = solution.solver.eval(password_4,cast_to=bytes).decode()

06_angr_symbolic_dynamic_memory
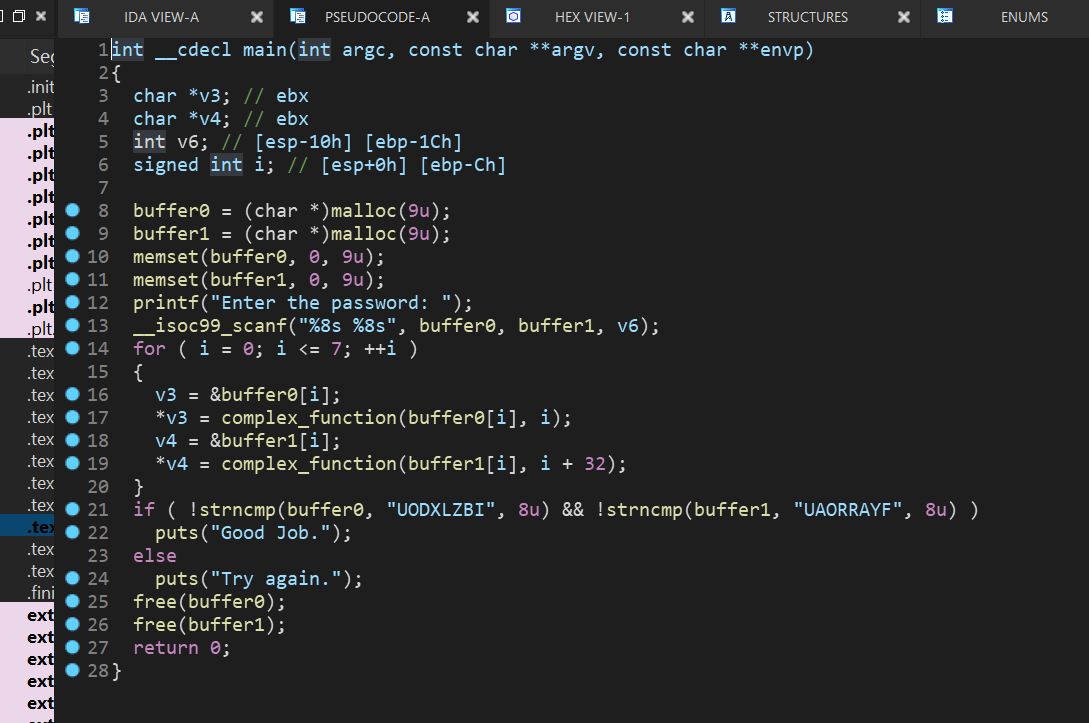
这次程序中引入了malloc,动态分配内存,然后再把读入的数据存放在分配的内存中
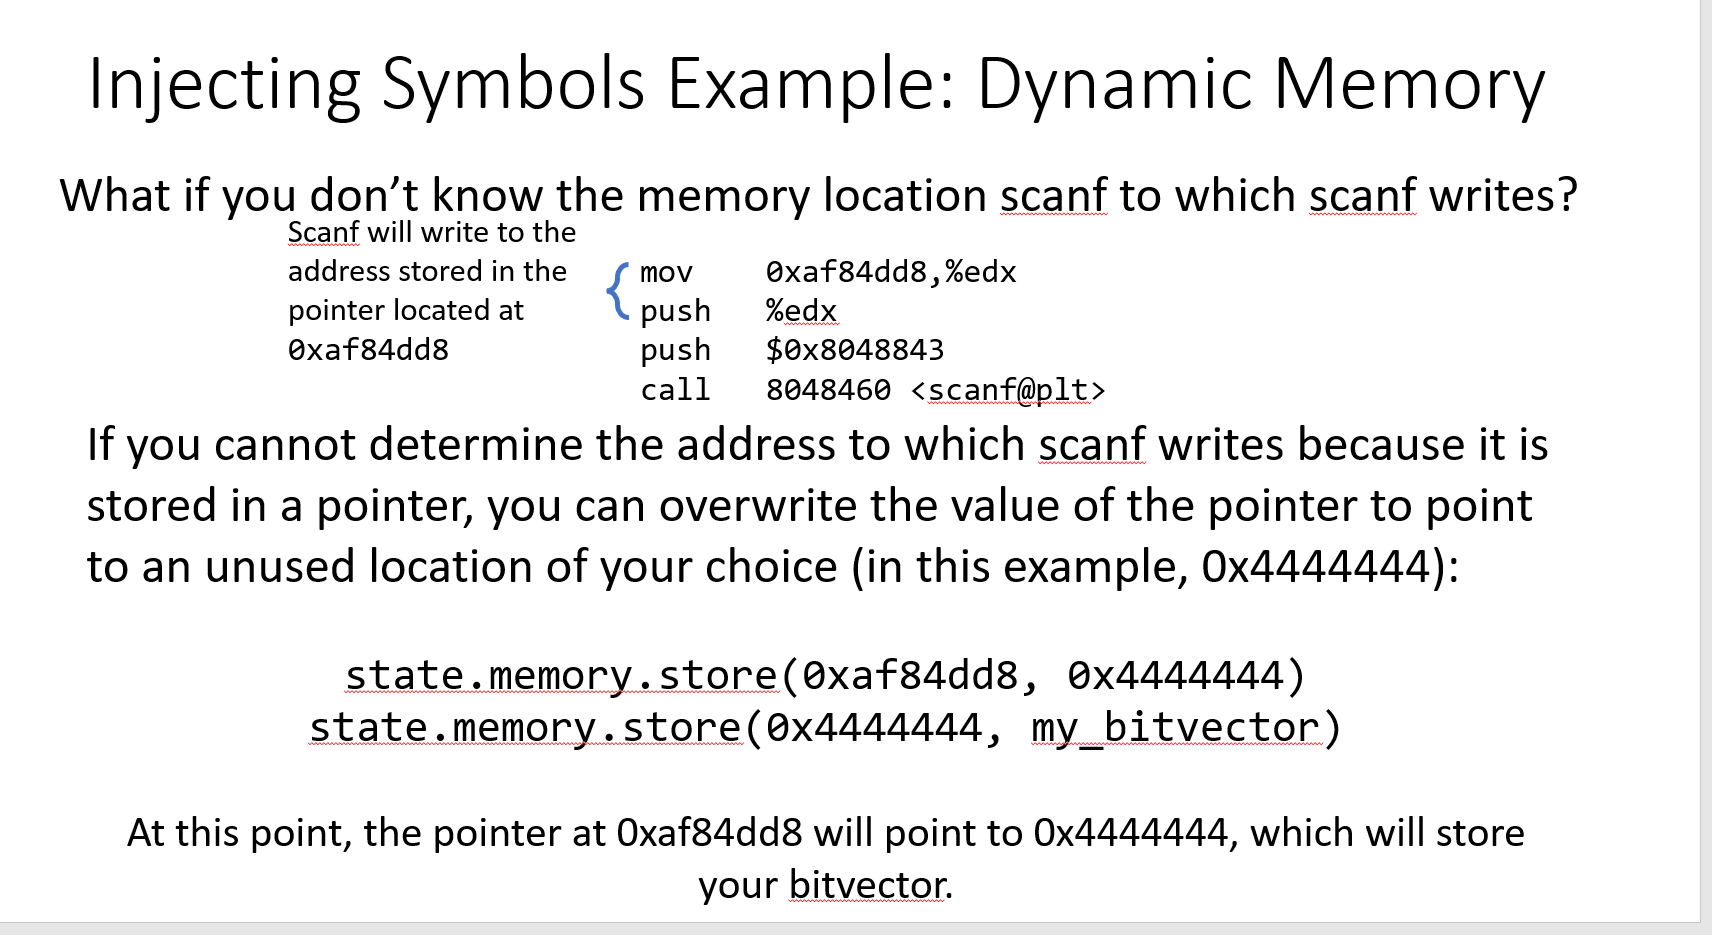
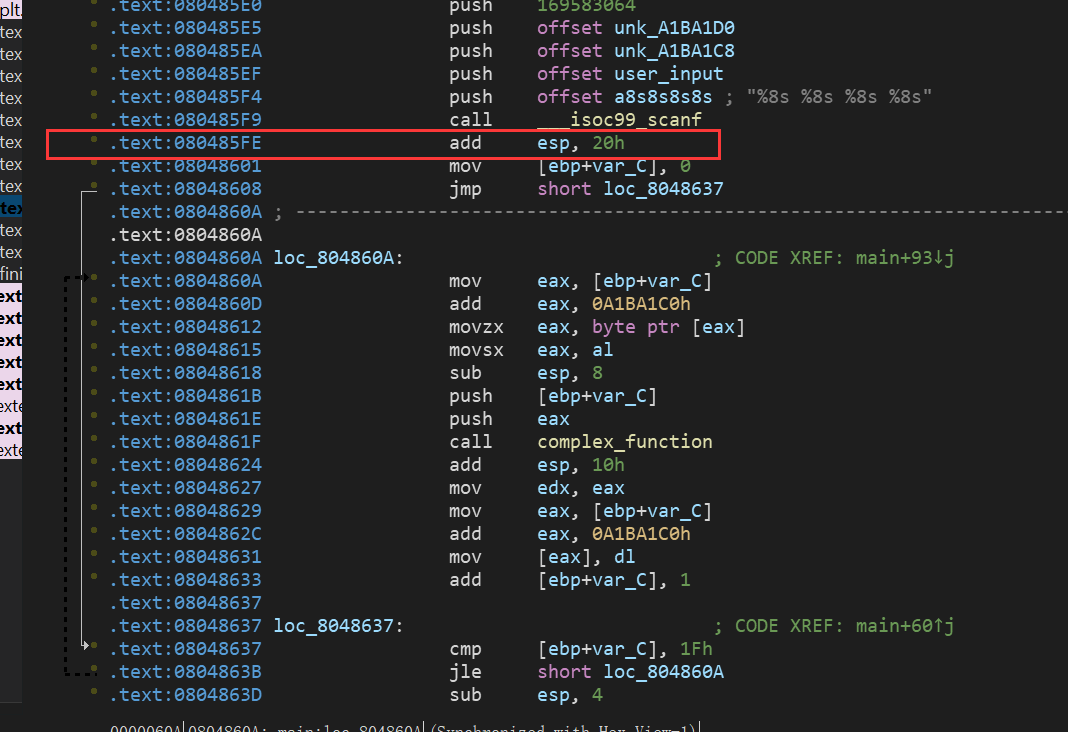
我们来看PPT中的汇编代码的作用:
mov    0xaf84dd8,%edx
push   %edx
push   $0x8048843
call   8048460 <scanf@plt>

将0xaf84dd8的值移动到寄存器edx中。
将edx的值压入堆栈中。
将立即数0x8048843压入堆栈中。
调用标记为scanf@plt的过程,该过程是一个链接到程序的C库函数,用于从标准输入读取格式化输入,并将其存储到提供的参数中。
简而言之,这段代码的作用是读取标准输入并将其格式化存储在edx寄存器指向的内存地址中。
题目的汇编代码:

区别在于PPT中的是直接给出的地址,而题目中的buffer0和buffer1是动态分配的,这里的buffer0和buffer1都是指针的形式:

这里还是用到gdb来调试看看,首先我们大概了解了程序到底干了点啥,所以就是看看malloc后如何将指向分配的内存地址的指针存放在buffer0和buffer1这里
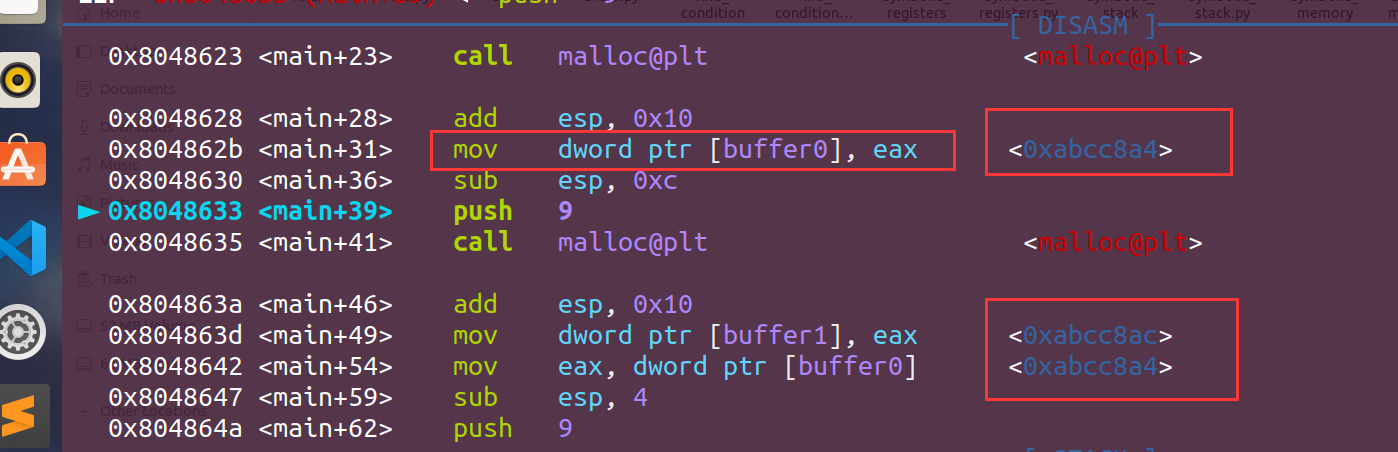
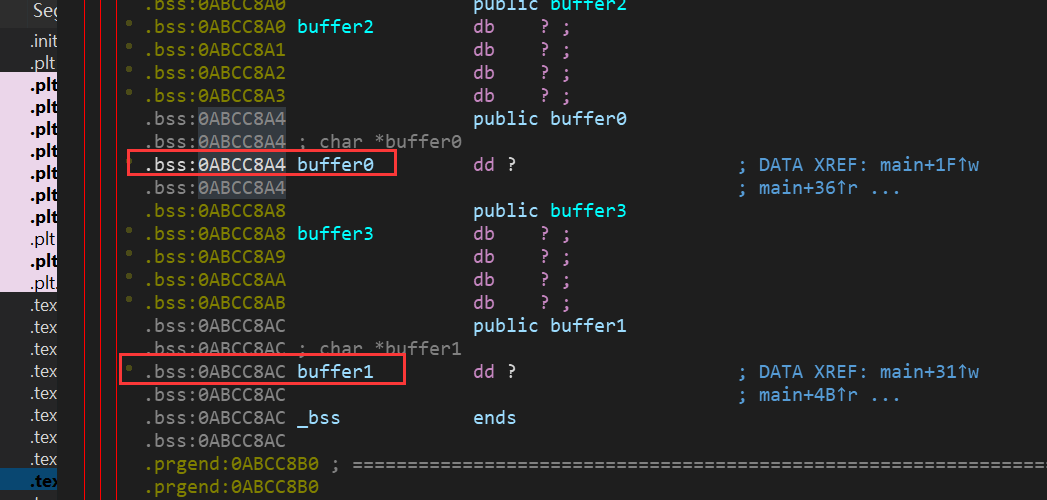
我们可以看到buffer0和buffer1的地址:
buffer0:0xabcc8a4
buffer1:0xabcc8ac
然后我们可以看看里面到底放了点啥(这里需要用十六进制的形式展现,所以用到的是x而不是p):
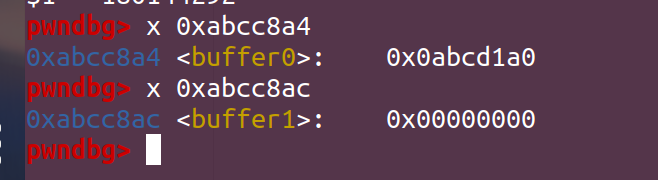
可以看出buffer0中已经放入了东西,而buffer1由于mallo还没完成,所以里面存的为空,我们可以继续单步执行,来看看malloc完后是否被赋值:
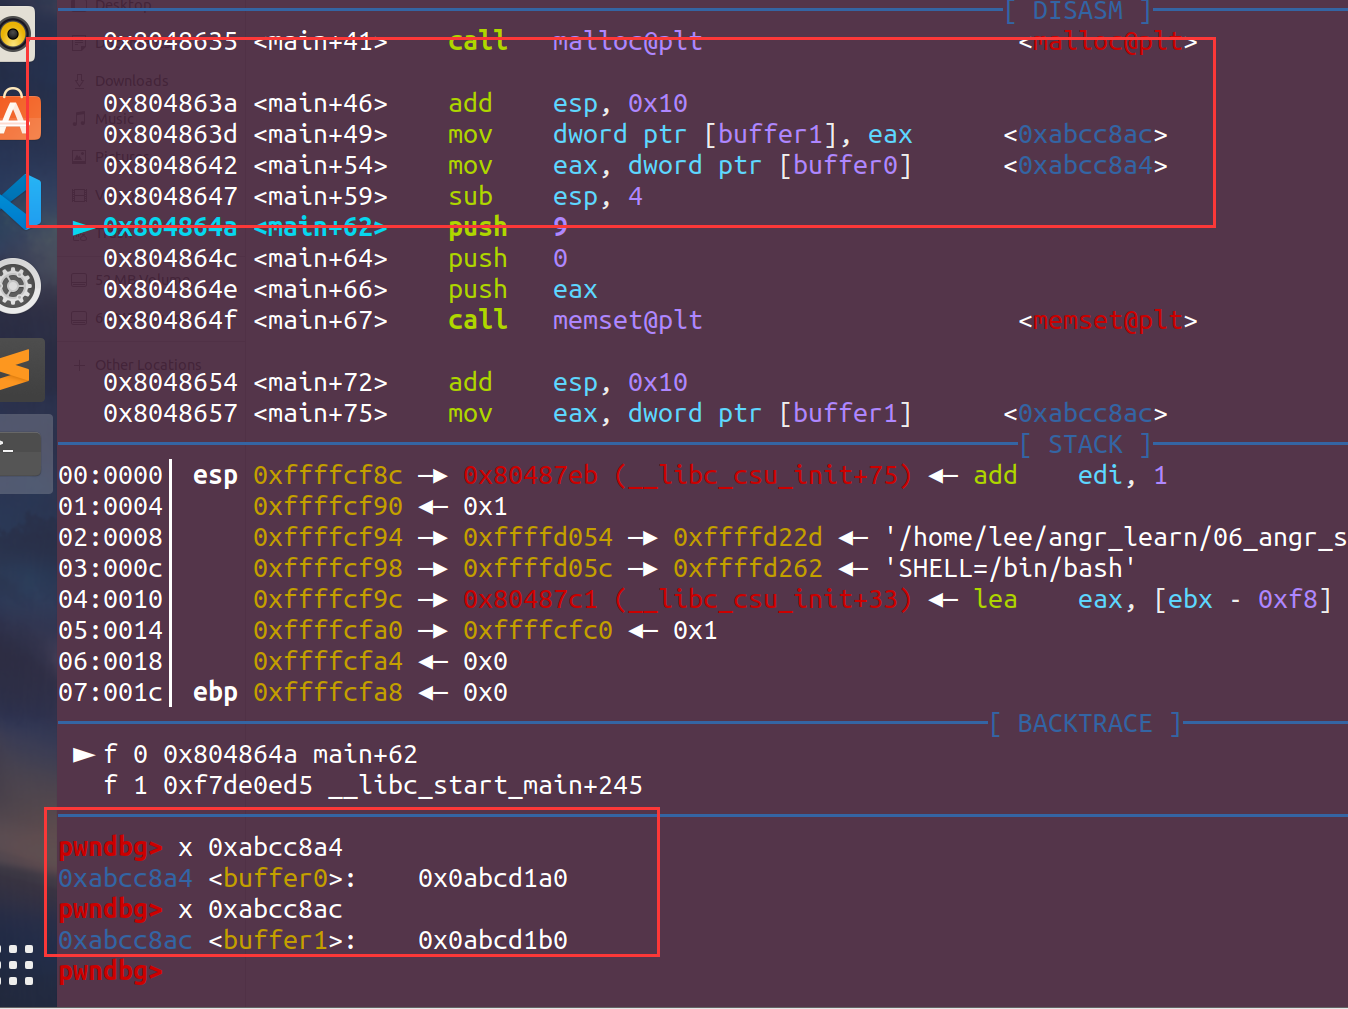
然后我们就可以确定本题的思路,把buffer0和buffer1中的东西改成我们的设置好的一个地址。 PS:buffer0和buffer1的地址也可直接从IDA中得到:
仿照PPT的思路写出个初始的:
import angr
import claripy

def exp():
    start_addr = 0x08048696
    proj = angr.Project("./06_angr_symbolic_dynamic_memory")
    state = proj.factory.blank_state(addr=start_addr)
    simgr = proj.factory.simulation_manager(state)
    buffer_0 = claripy.BVS('b0',8*8)
    buffer_1 = claripy.BVS('b1',8*8)
    fake_addr_0 = 0x11111111
    fake_addr_1 = 0x22222222
    state.memory.store(0xabcc8a4,fake_addr_0)
    state.memory.store(0xabcc8ac,fake_addr_1)
    state.memory.store(fake_addr_0,buffer_0)
    state.memory.store(fake_addr_1,buffer_1)
    #这里是模拟的malloc过程
    simgr.explore(find=success,avoid=fail)
    if simgr.found:
        solution = simgr.found[0]
        solution_1 = solution.solver.eval(buffer_0,cast_to=bytes).decode()
        solution_2 = solution.solver.eval(buffer_1,cast_to=bytes).decode()
        print("Solution:{} {}".format(solution_1,solution_2))
    else:
        print("Not found")

def success(state):
    return b"Good Job." in state.posix.dumps(1)
def fail(state):
    return b'Try again.' in state.posix.dumps(1)
if __name__ == "__main__":
    exp()
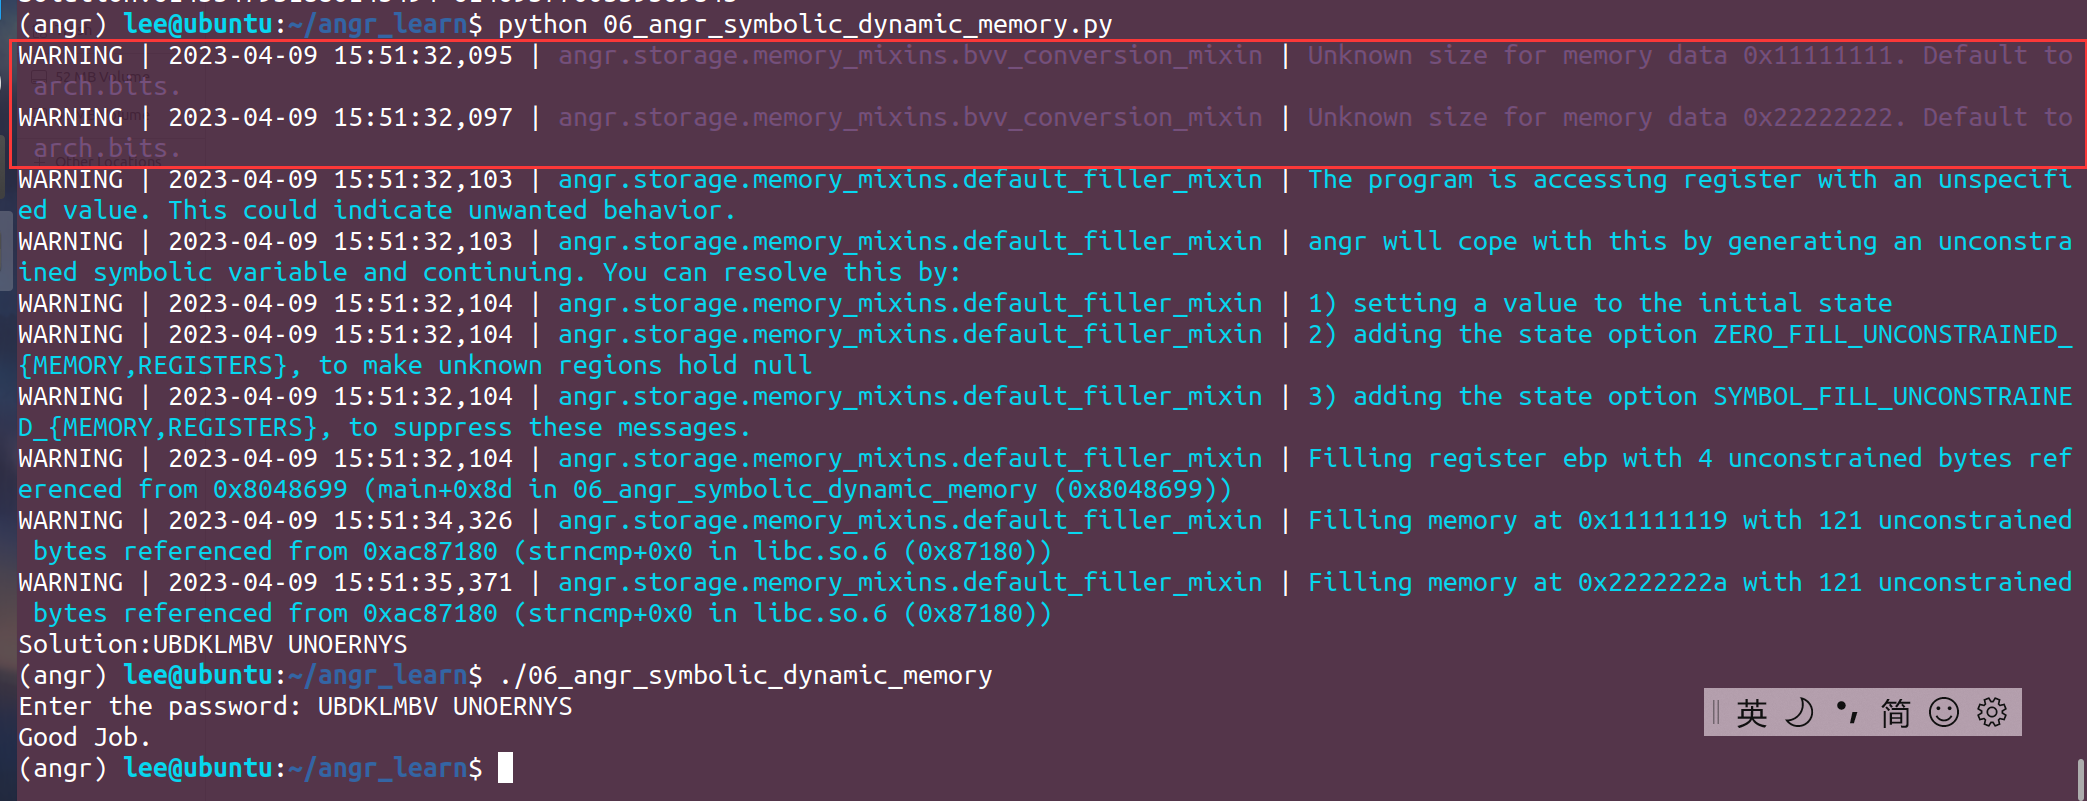
仔细看上面的打印结果,虽然能正确跑出结果,但是有两段warning:
WARNING | 2023-04-09 15:51:32,095 | angr.storage.memory_mixins.bvv_conversion_mixin | Unknown size for memory data 0x11111111. Default to arch.bits.
WARNING | 2023-04-09 15:51:32,097 | angr.storage.memory_mixins.bvv_conversion_mixin | Unknown size for memory data 0x22222222. Default to arch.bits.
解决办法:
state.memory.store(0xabcc8a4,fake_addr_0, endness=proj.arch.memory_endness,size=4)
state.memory.store(0xabcc8ac,fake_addr_1, endness=proj.arch.memory_endness,size=4)
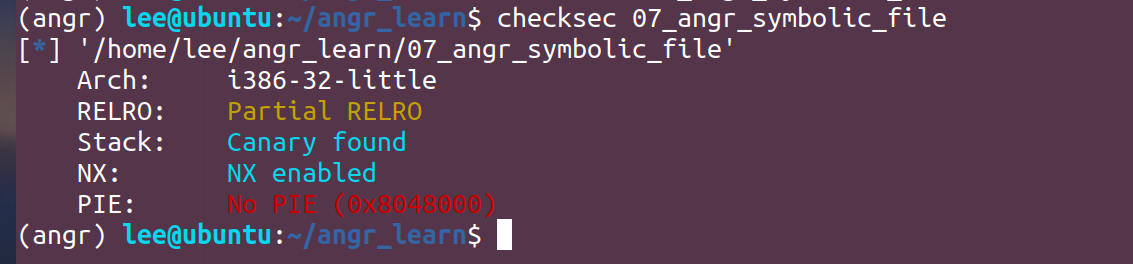
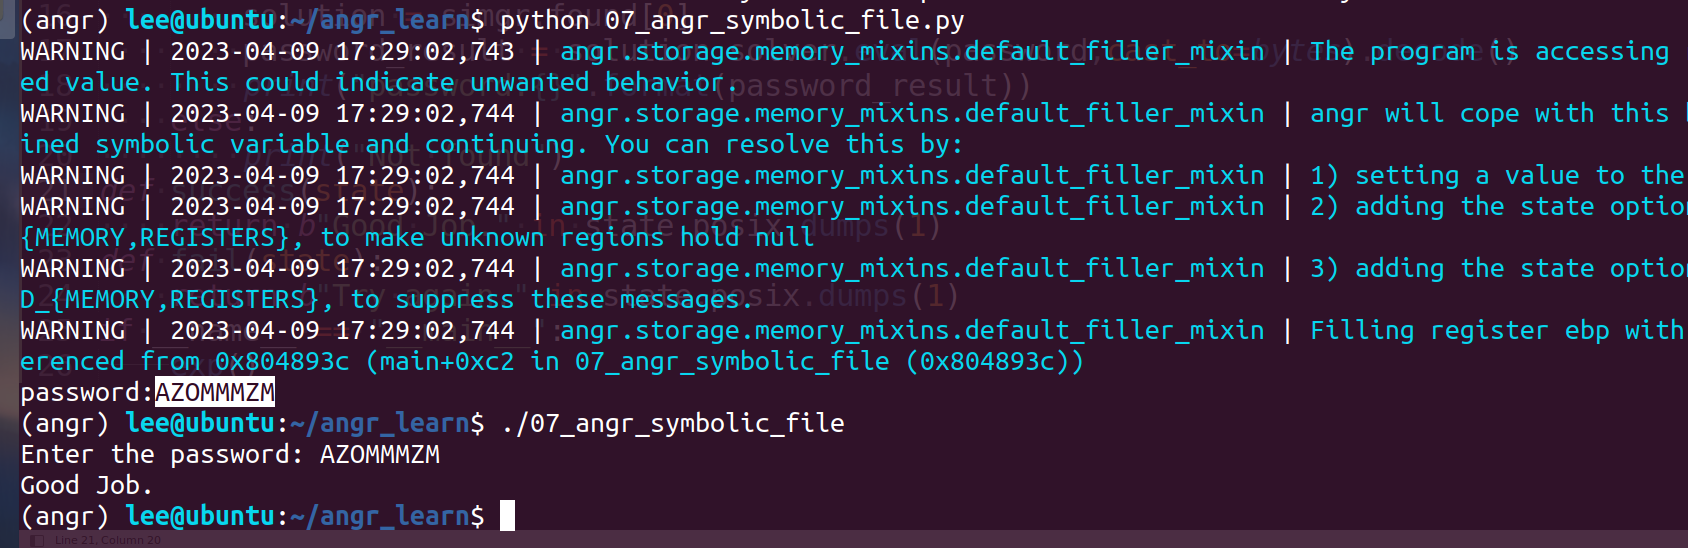
07_angr_symbolic_file

直接贴EXP:
import angr
import claripy

def exp():
    start_addr = 0x080488E7
    # Get an address just before opening the file with th simbolic content
    # Or at least when the file is not going to suffer more changes before being read
    proj = angr.Project("./07_angr_symbolic_file")
    state = proj.factory.blank_state(addr=start_addr)
    file_name = "OJKSQYDP.txt"
    size_file = 64
    password = claripy.BVS('password',size_file*8)
    file_sym = angr.storage.SimFile(file_name,content=password)
    state.fs.insert(file_name,file_sym)
    simgr = proj.factory.simulation_manager(state)
    simgr.explore(find=success,avoid=fail)
    if simgr.found:
        solution = simgr.found[0]
        password_result = solution.solver.eval(password,cast_to=bytes).decode()
        print("password:{}".format(password_result))
    else:
        print("Not found")
def success(state):
    return b"Good Job." in state.posix.dumps(1)
def fail(state):
    return b"Try again." in state.posix.dumps(1)
if __name__ == "__main__":
	exp()
解释:这里引进了新的东西,首先我们要将整个文件进行符号化,然后再设置符号化文件中的内容
file_name = "OJKSQYDP.txt"
size_file = 64
password = claripy.BVS('password',size_file*8)

file_sym = angr.storage.SimFile(file_name,content=password)
state.fs.insert(file_name,file_sym)
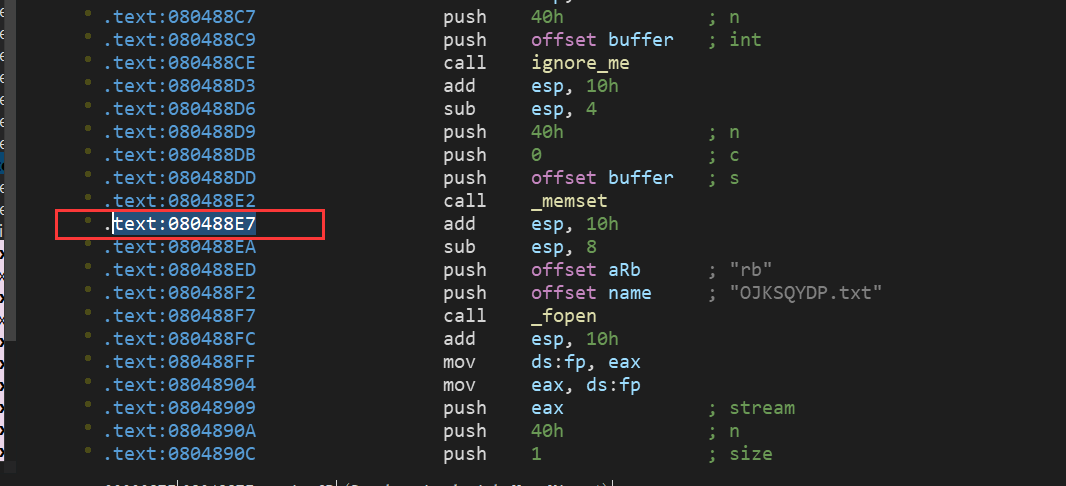
开始地址可能找不对,仔细分析代码就可以找到
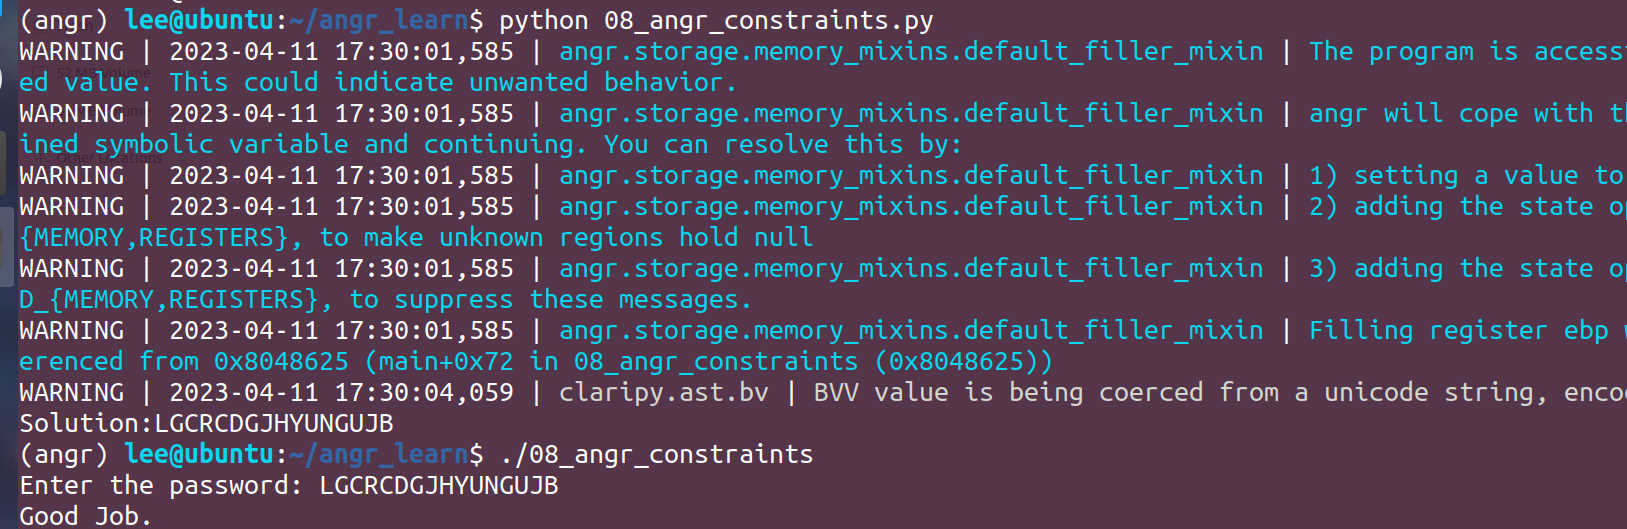
08_angr_constraints
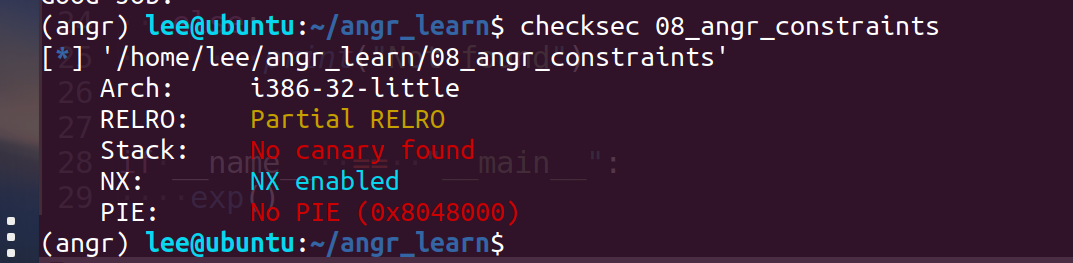
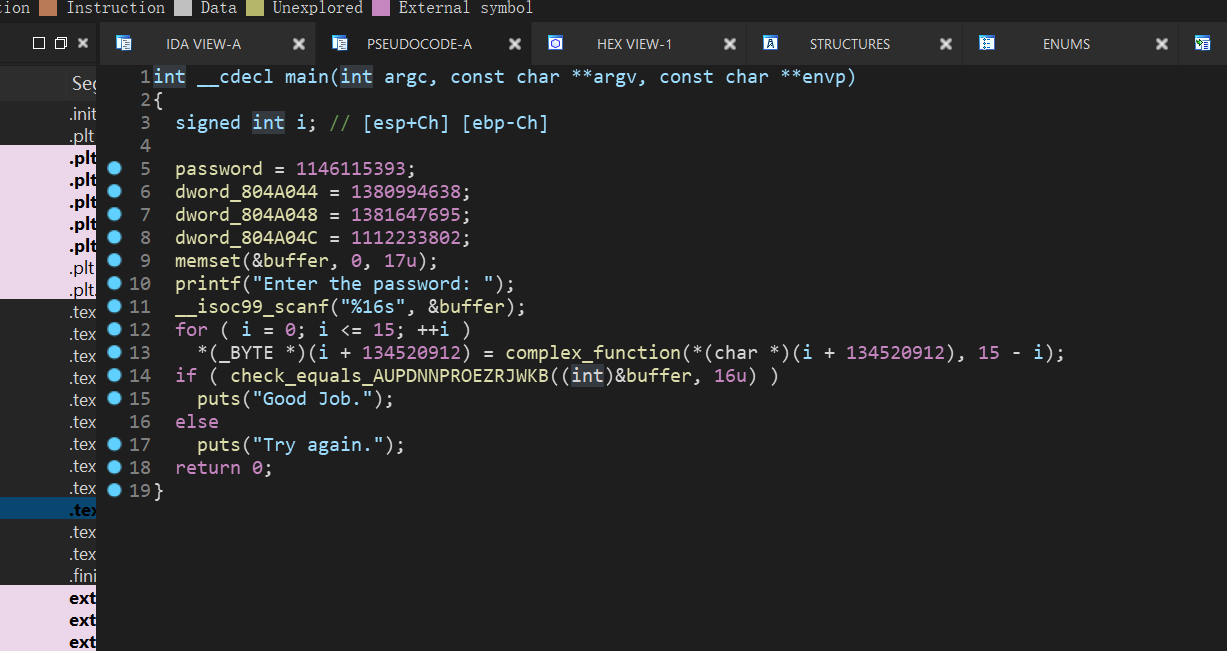
这题以为可以简单解出来,但是忽视了题目考点,点进去check函数,这里的比较是一位一位的比较,所以就会造成有很多可能,一个很大的数量级,angr在遍历过程中会状态爆炸

但是通过反汇编出来的代码我们可以大概知道比较的流程是如何,因为函数名也给出了提示信息,所以我们需要人为的添加一些限制条件,使遍历不那么盲目
import angr
import claripy

def exp():
   start_addr = 0x08048622
   proj = angr.Project('./08_angr_constraints')
   init_state = proj.factory.blank_state(addr=start_addr)
   password = claripy.BVS('p1',8*16)
   password_address =  0x804a050
   init_state.memory.store(password_address,password)
   simgr = proj.factory.simulation_manager(init_state)
   check_addr=0x08048673
   simgr.explore(find=check_addr)
   if simgr.found:
      solution_state = simgr.found[0]
      constrain_parameter_address = password_address
      byte_size = 16
      load_symbols = solution_state.memory.load(constrain_parameter_address,byte_size)
      desire_string = "AUPDNNPROEZRJWKB"
      solution_state.add_constraints(load_symbols == desire_string)
      solution = solution_state.solver.eval(password,cast_to=bytes).decode()
      print("Solution:{}".format(solution))

   else:
        print("Not found")


if __name__  ==  "__main__":
    exp()
挨个解释下里面和以往不同的地方,以往都是在explore中设置成功和失败条件,但是这次我们需要人为添加判断的条件,所以我们explore中需要指定find为check函数的入口点,所以设置:
simgr.explore(find=check_addr)
然后我们需要指定程序读入后存储的位置,这个是为了后续添加限制条件时对比,这里的password_address在上面也定义了,在创建符号向量时
constrain_parameter_address = password_address
然后我们需要取出我们创建的符号向量:
byte_size = 16
load_symbols = solution_state.memory.load(constrain_parameter_address,byte_size)
然后手动添加限制,指定成功的条件,也就是当符号向量等于字符串"AUPDNNPROEZRJWKB"时
desire_string = "AUPDNNPROEZRJWKB"
solution_state.add_constraints(load_symbols == desire_string)
小结:关于这个状态爆炸问题,angr中也有很多缓解机制,以及添加算法来缓解,后面的题有专门的知识点,这里就不深入探究,后面遇到再深入剖析下。
09_angr_hooks
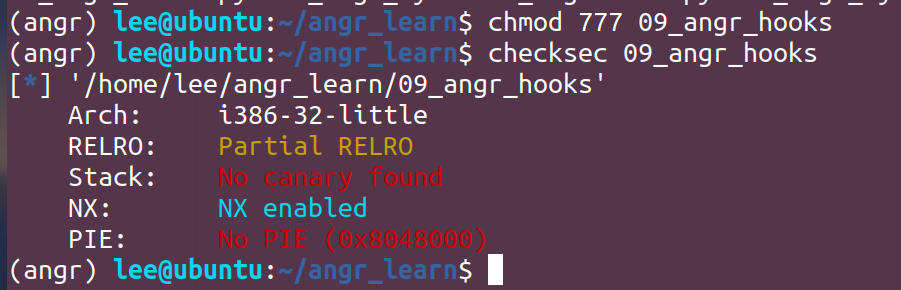
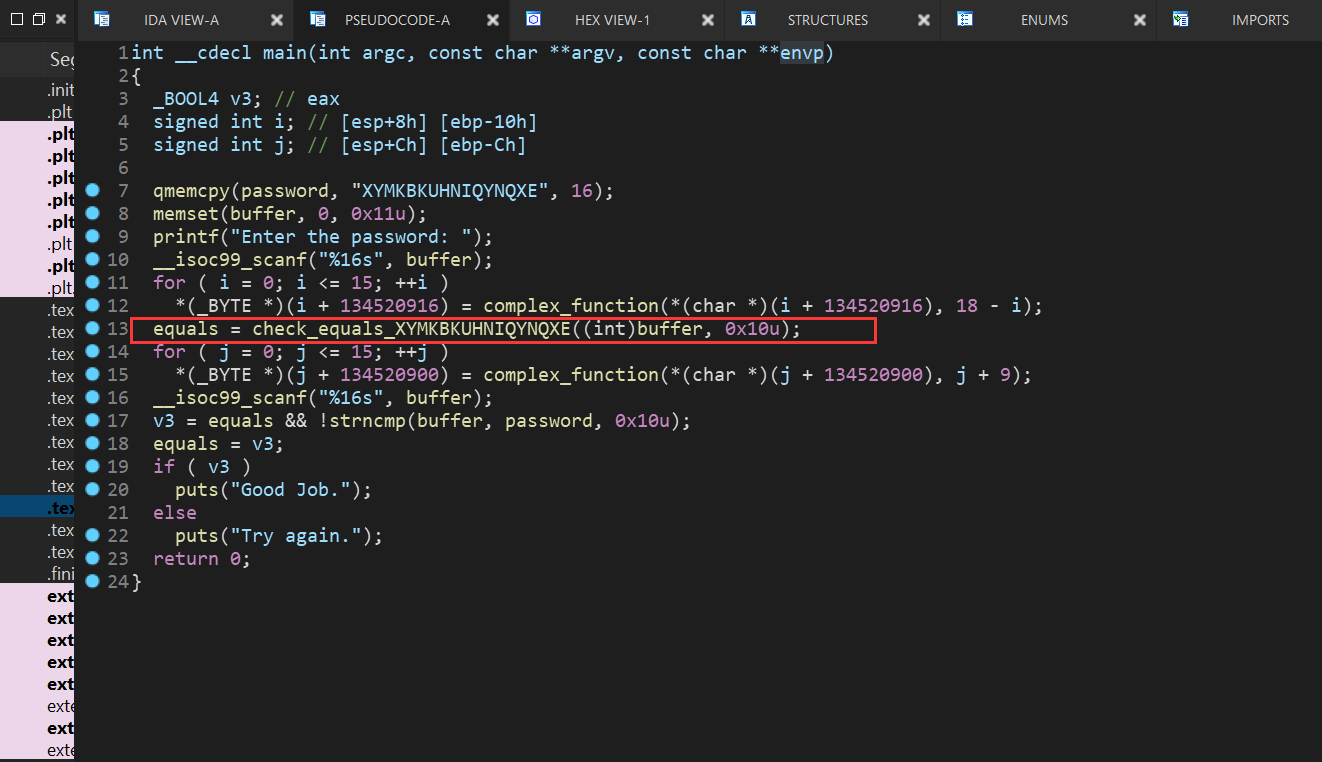
点进这个函数后发现还是存在状态爆炸问题,这里引入一个新的技术:hook
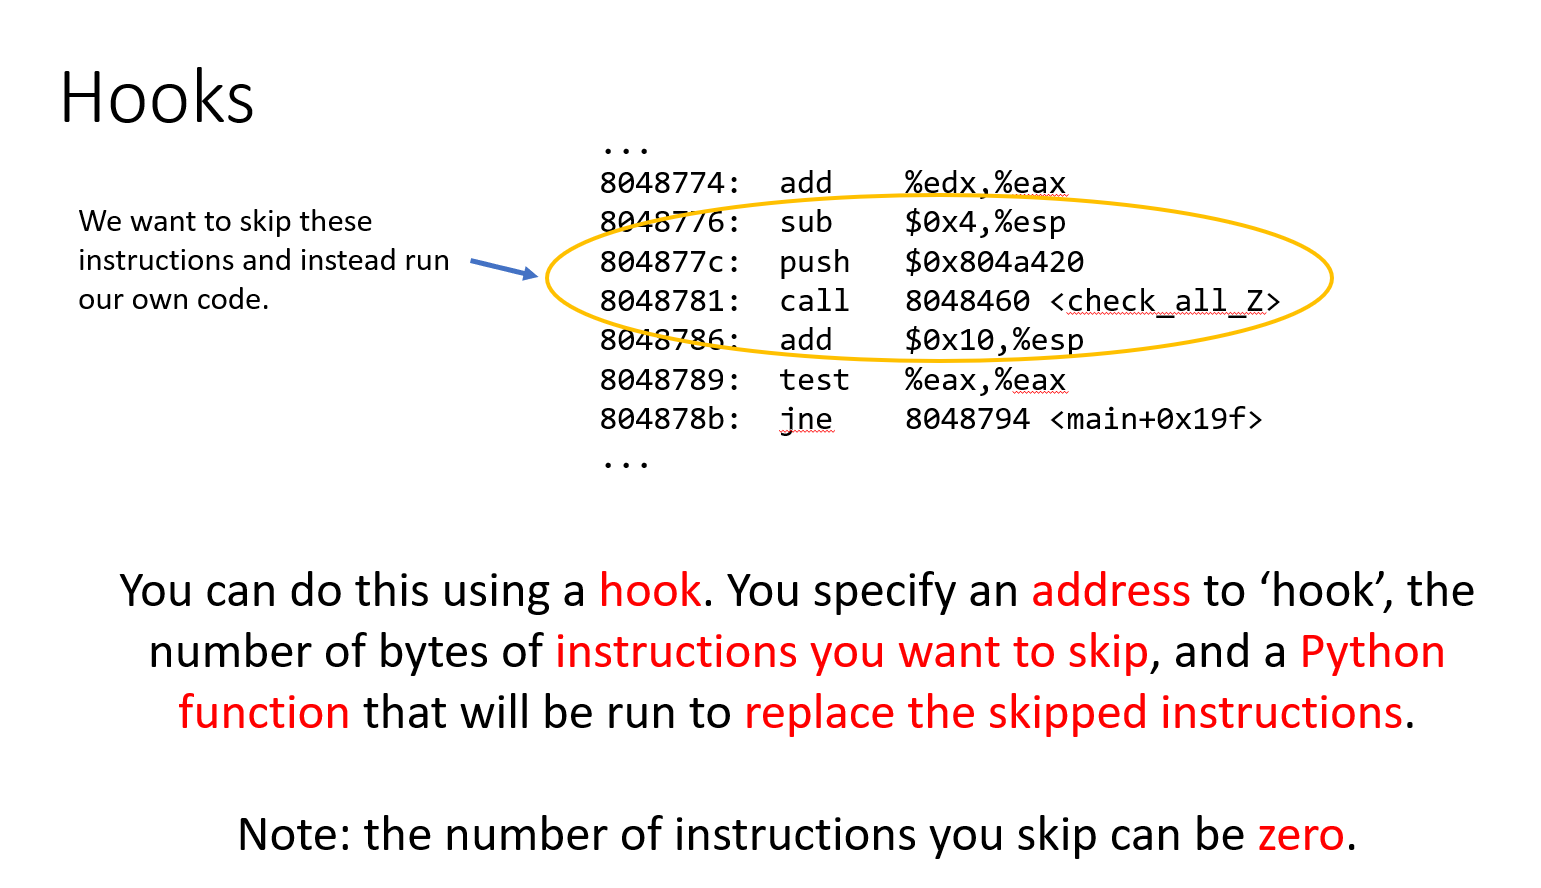
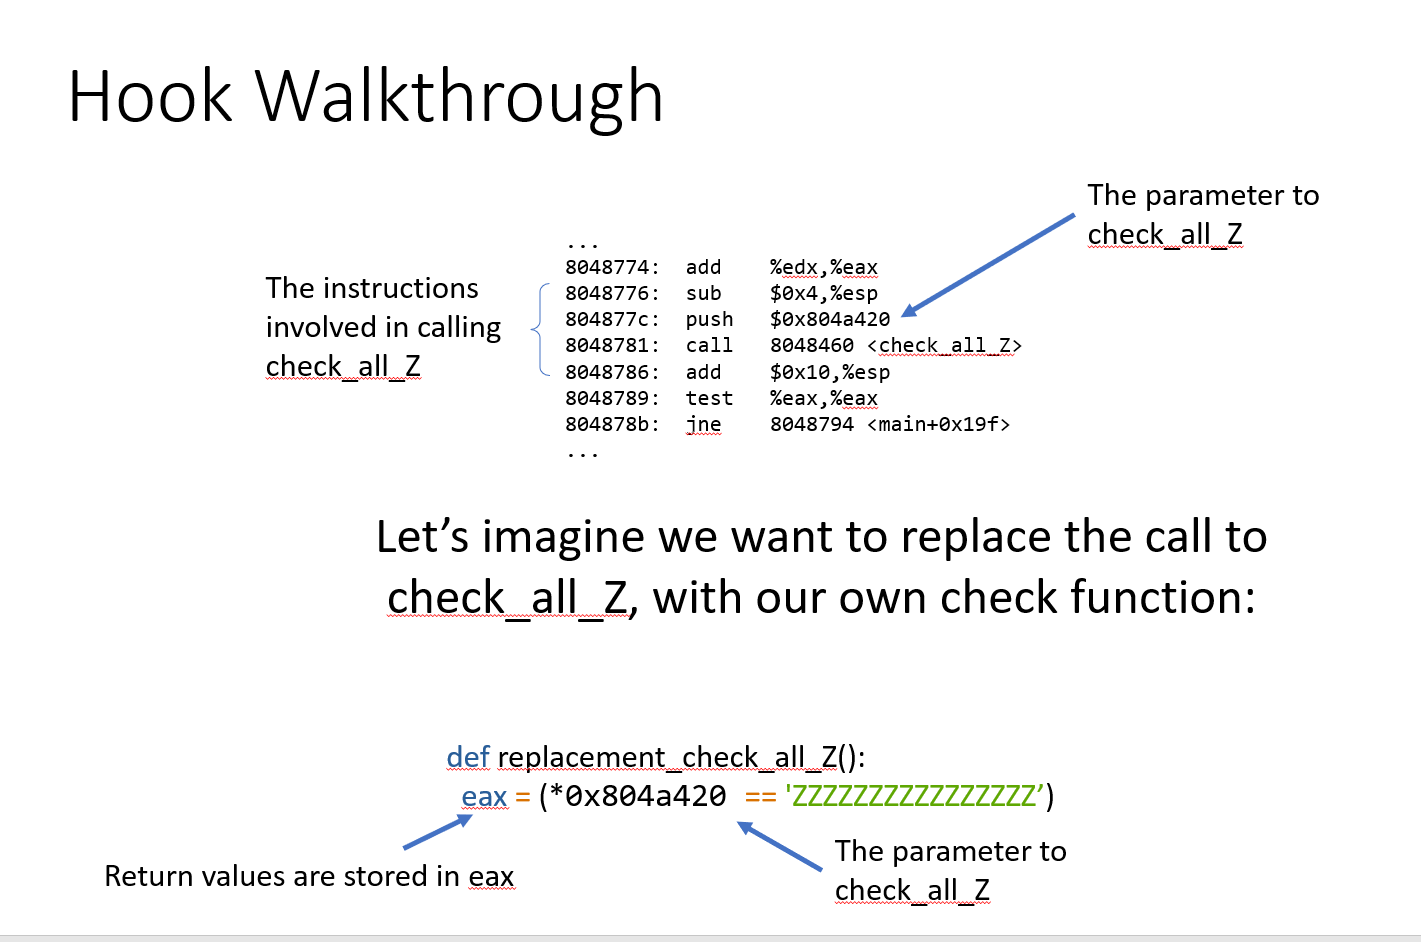
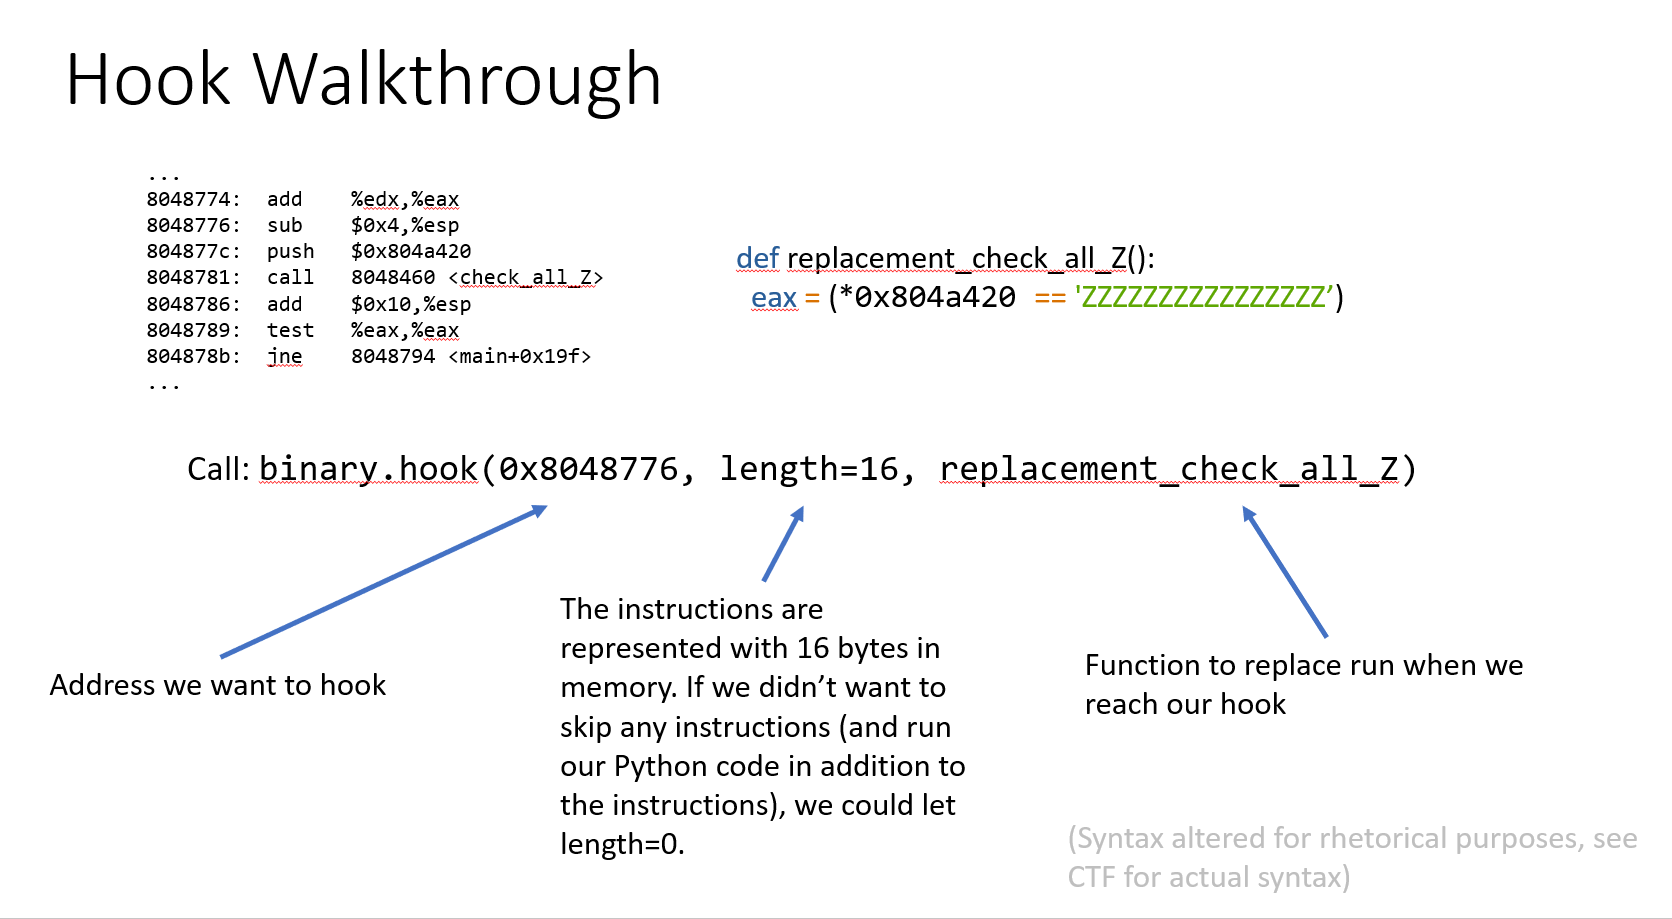
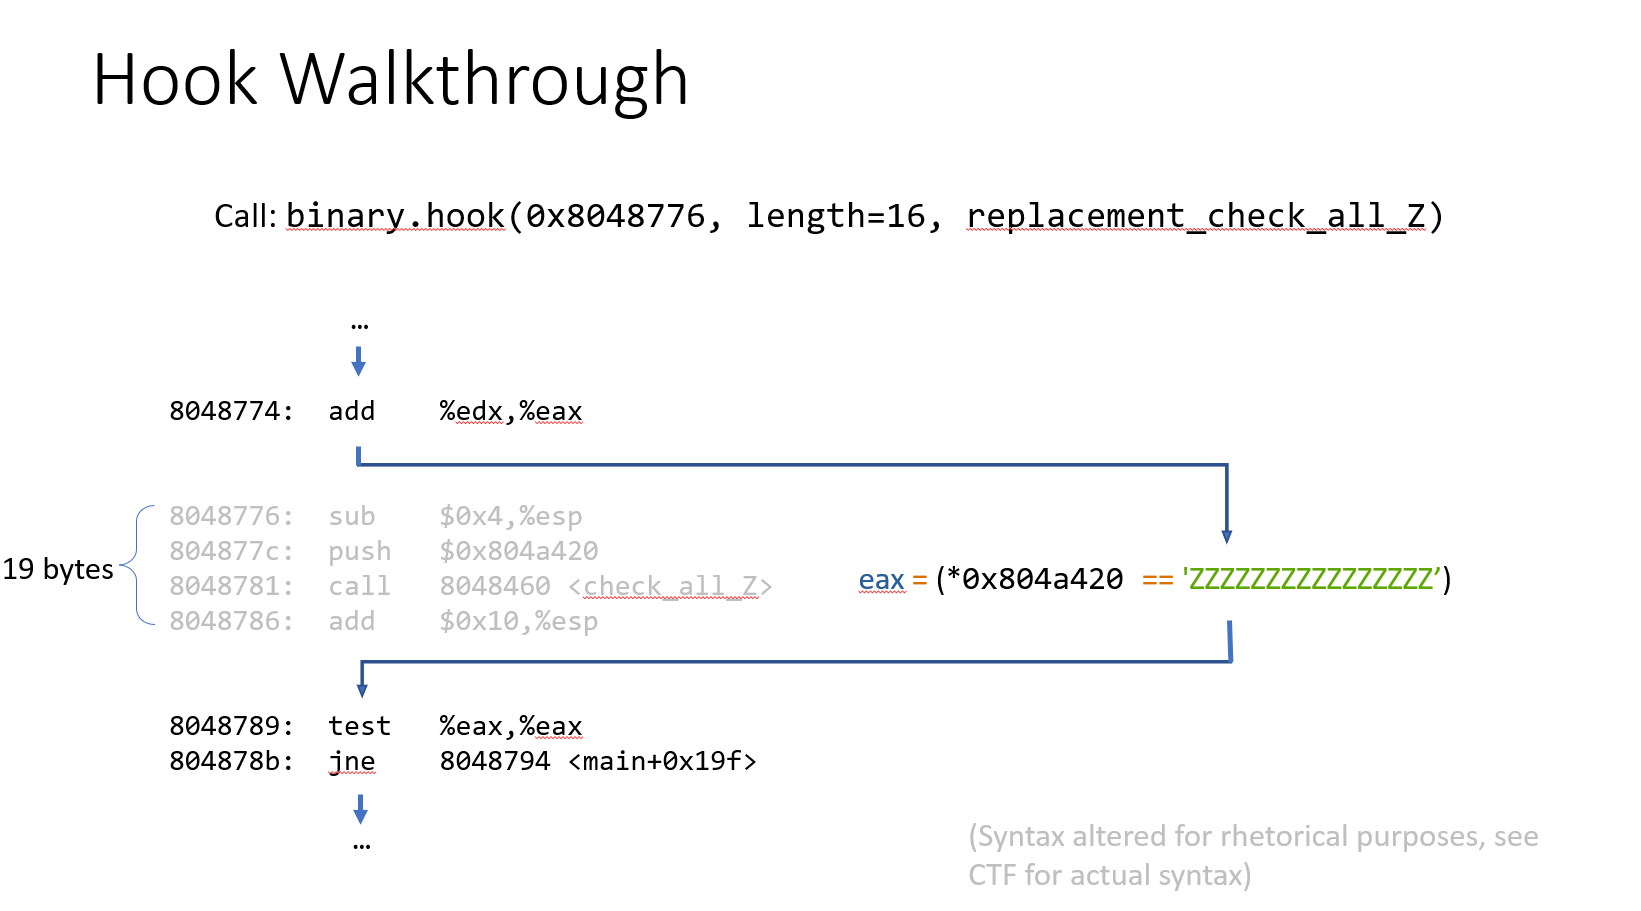
这里的PPT和实际题中的还是有些偏差,还是结合实际EXP来看看:
import angr
import claripy

def exp():
     proj = angr.Project("./09_angr_hooks")
     init_state = proj.factory.entry_state()
     check_addr = 0x080486B3
     skip_len = 5
     @proj.hook(check_addr,length=skip_len)
     def check_equal(init_state):
        buffer_addr = 0x0804A054
        load_buffer_symbol = init_state.memory.load(buffer_addr,16)
        check_str = 'XYMKBKUHNIQYNQXE'
        init_state.regs.eax = claripy.If(
          load_buffer_symbol==check_str,
          claripy.BVV(1,32),
          claripy.BVV(0,32)
     )
     simgr = proj.factory.simulation_manager(init_state)
     simgr.explore(find=is_success,avoid=is_fail)
     if simgr.found:
          solution = simgr.found[0]
          reuslt = solution.posix.dumps(0)
          print("Solution:{}".format(reuslt))
def is_success(init_state):
     return b'Good Job.' in init_state.posix.dumps(1)
def is_fail(init_state):
     return b'Try again.' in init_state.posix.dumps(1)
if __name__=="__main__":
     exp()
解释:
@proj.hook(check_addr,length=skip_len)
def check_equal(init_state):
#主体
我们想把check函数替换成我们自己设置的函数,所以需要从check函数前跳过

可以看出check函数占用的长度为5,所以skip_len=5
def check_equal(init_state):
        buffer_addr = 0x0804A054
        load_buffer_symbol = init_state.memory.load(buffer_addr,16)
        check_str = 'XYMKBKUHNIQYNQXE'
        init_state.regs.eax = claripy.If(
          load_buffer_symbol==check_str,
          claripy.BVV(1,32),
          claripy.BVV(0,32)
        )
#然后就是读出内存中数据,对比,最后根据对比结果对eax的值进行设置,1为相同,0为不同,32位
10_angr_simprocedures
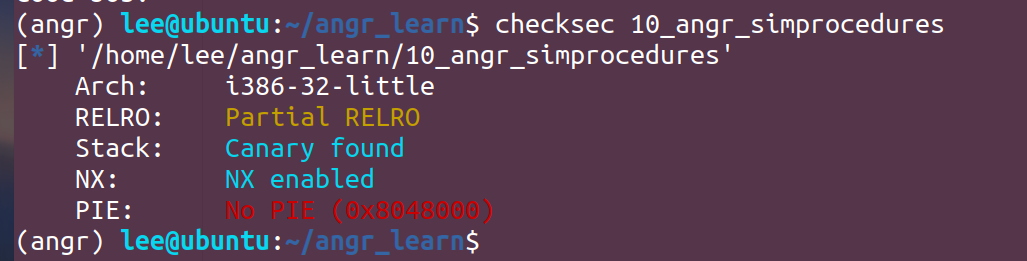
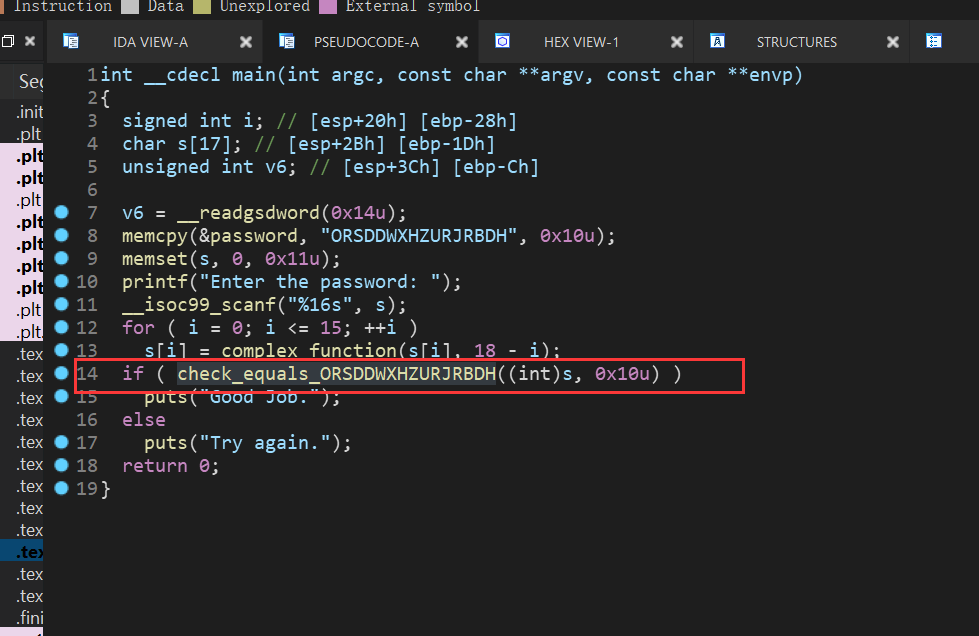
和上一个题差不多,但是由于我们要hook的函数多次被调用,hook时地址就不好设置,所以引进了新的技术
This challenge is similar to the previous one. It operates under the same
premise that you will have to replace the check_equals_ function. In this
case, however, check_equals_ is called so many times that it wouldn't make
sense to hook where each one was called. Instead, use a SimProcedure to write
your own check_equals_ implementation and then hook the check_equals_ symbol
to replace all calls to scanf with a call to your SimProcedure.
You may be thinking:
Why can't I just use hooks? The function is called many times, but if I hook
the address of the function itself (rather than the addresses where it is
called), I can replace its behavior everywhere. Furthermore, I can get the
parameters by reading them off the stack (with memory.load(regs.esp + xx)),
and return a value by simply setting eax! Since I know the length of the
function in bytes, I can return from the hook just before the 'ret'
instruction is called, which will allow the program to jump back to where it
was before it called my hook.
If you thought that, then congratulations! You have just invented the idea of
SimProcedures! Instead of doing all of that by hand, you can let the already-
implemented SimProcedures do the boring work for you so that you can focus on
writing a replacement function in a Pythonic way.
As a bonus, SimProcedures allow you to specify custom calling conventions, but
unfortunately it is not covered in this CTF.
import angr
import claripy
def exp():
proj = angr.Project("./10_angr_simprocedures")
init_state = proj.factory.entry_state()
class My_replace(angr.SimProcedure):
def run(self,to_check,length):
to_check_addr = to_check
check_len = length
user_input_string = self.state.memory.load(
to_check_addr,length
)
check_string = 'ORSDDWXHZURJRBDH'
return claripy.If(
user_input_string == check_string,
claripy.BVV(1,32),
claripy.BVV(0,32)
)
check_symbol = 'check_equals_ORSDDWXHZURJRBDH'
proj.hook_symbol(check_symbol,My_replace())
simgr = proj.factory.simgr(init_state)
simgr.explore(find=is_found,avoid=is_fail)
if simgr.found:
solution = simgr.found[0]
print("Solution{}".format(solution.posix.dumps(0)))
else:
print("Not found")
def is_found(init_state):
return b'Good Job.' in init_state.posix.dumps(1)
def is_fail(init_state):
return b'Try again.' in init_state.posix.dumps(1)
if __name__ == "__main__":
exp()
加下方wx,拉你一起进群学习