因项目使用 Guice + Jersey + Jetty 框架,所有进行了学习,下面是学习笔记。
目录
一、Guice
1. 依赖注入方式: @Inject
2. 依赖绑定(依赖注册): bind()
3. 作用域
4. 基本使用
二、Jersey
使用内置容器为例(使用Jetty发布Jersey服务)
三、Jetty
四、Guice + Jersey + Jetty Demo
一、Guice
Guice 是谷歌推出的一个轻量级 依赖注入 框架。官网地址:GitHub - google/guice: Guice (pronounced 'juice') is a lightweight dependency injection framework for Java 8 and above, brought to you by Google.
1. 依赖注入方式: @Inject
① 构造注入
public class OrderServiceImpl implements OrderService {
    private ItemService itemService;
    private PriceService priceService;

    @Inject
    public OrderServiceImpl(ItemService itemService, PriceService priceService) {
        this.itemService = itemService;
        this.priceService = priceService;
    }
}
② 一般注入
public class OrderServiceImpl implements OrderService {
    private ItemService itemService;
    private PriceService priceService;

    @Inject
    public void init(ItemService itemService, PriceService priceService) {
        this.itemService = itemService;
        this.priceService = priceService;
    }
}
public class OrderServiceImpl implements OrderService {
private ItemService itemService;
private PriceService priceService;
@Inject
public void setItemService(ItemService itemService) {
this.itemService = itemService;
}
@Inject
public void setPriceService(PriceService priceService) {
this.priceService = priceService;
}
}2. 依赖绑定(依赖注册): bind()
Guice 提供依赖配置类:继承 AbstractModule,实现 configure 或者使用 @Provides 方法,完成依赖绑定。
Binder 语义:
基本配置:binder.bind(serviceClass).to(implClass).in(Scopes.[SINGLETON | NO_SCOPE]);
无base类、接口配置:binder.bind(implClass).in(Scopes.[SINGLETON | NO_SCOPE]);
service实例配置:binder.bind(serviceClass).toInstance(servieInstance).in(Scopes.[SINGLETON | NO_SCOPE]);
多个实例按名注入:binder.bind(serviceClass).annotatedWith(Names.named(“name”)).to(implClass).in(Scopes.[SINGLETON | NO_SCOPE]);
① 基本绑定
public class BillingModule extends AbstractModule {
  @Override
  protected void configure() {
    bind(TransactionLog.class).to(DatabaseTransactionLog.class);
  }
}
② @Named 注解绑定(多实现绑定同一个接口)
// 1.注入的地方添加 @Named 注解
@Inject
public RealBillingService(@Named("Checkout") CreditCardProcessor processorg, TransactionLog transactionLog) {
    // ......
}

// 2.在绑定中添加 annotatedWith 方法指定 @Named 中指定的名称
bind(TransactionLog.class).to(TransactionLogImpl.class);
bind(CreditCardProcessor.class)
    .annotatedWith(Names.named("Checkout"))
    .to(CheckoutCreditCardProcessor.class);
// 1.注入
@Inject
public List<NamedService> getAllItemServices(@Named("impl1") NamedService nameService1,
@Named("impl2") NamedService nameService2) {
}
// 2.绑定
bind(NamedService.class).annotatedWith(Names.named("impl1")).to(NamedServiceImpl1.class);
bind(NamedService.class).annotatedWith(Names.named("impl2")).to(NamedServiceImpl2.class);③ toInstance 实例绑定
bind(String.class)
    .annotatedWith(Names.named("JDBC URL"))
    .toInstance("jdbc:mysql://localhost/pizza");
④ @Provides 方法
public class BillingModule extends AbstractModule {
  @Override
  protected void configure() {
    ...
  }

  @Provides
  TransactionLog provideTransactionLog() {
    DatabaseTransactionLog transactionLog = new DatabaseTransactionLog();
    transactionLog.setJdbcUrl("jdbc:mysql://localhost/pizza");
    transactionLog.setThreadPoolSize(30);
    return transactionLog;
  }
}
3. 作用域
Guice 提供了很多作用域,有单例 Singleton,Session 作用域 SessionScoped,Request 请求作用域 RequestScoped 等等。
默认情况下 Guice 会在每次注入的时候创建一个新对象,用以下方式设置作用域:
① 实现类上添加 @Singleton 注解
@Singleton
public class InMemoryTransactionLog implements TransactionLog {
  /* everything here should be threadsafe! */
}
② 在配置类中指定
bind(TranLog.class).to(TranLogImpl.class).in(Singleton.class);③ 在 @Provides 方法中也中指定单例
@Provides @Singleton
TransactionLog provideTransactionLog() {
    ...
}
4. 基本使用
① 引入依赖
<dependency>
    <groupId>com.google.inject</groupId>
    <artifactId>guice</artifactId>
    <version>4.1.0</version>
</dependency>
② 业务接口 和 接口实现
public interface UserService {
    void process();
}

public class UserServiceImpl implements UserService {
    @Override
    public void process() {
        System.out.println("我需要做一些业务逻辑");
    }
}
③ 注入
public interface Application {
    void work();
}

public class MyApp implements Application {
    private UserService userService;

    @Inject
    public MyApp(UserService userService) {
        this.userService = userService;
    }

    @Override
    public void work() {
        userService.process();
    }
}
④ 依赖绑定
public class MyAppModule extends AbstractModule {
    @Override
    protected void configure() {
        bind(UserService.class).to(UserServiceImpl.class);
        bind(Application.class).to(MyApp.class);
    }
}
⑤ 创建注入器 Guice.createInjector
public class MyAppTest {
    private static Injector injector;

    @BeforeClass
    public static void init() {
        injector = Guice.createInjector(new MyAppModule());
    }

    @Test
    public void testMyApp() {
        Application myApp = injector.getInstance(Application.class);
        myApp.work();
    }
}
参考1:JAVA轻量级IOC框架Guice - Leejk - 博客园
参考2:Guice 快速入门 - 腾讯云开发者社区-腾讯云
guice 官网地址:GitHub - google/guice: Guice (pronounced 'juice') is a lightweight dependency injection framework for Java 8 and above, brought to you by Google.
二、Jersey
Jersey 是一个 REST 框架,官网地址:Eclipse Jersey
基于 Jersey 的 REST 应用,可以运行在 Servlet 环境下(例如 Tomcat),也可以脱离 Servlet 环境,使用内置容器(例如 Jetty)。
注意:
jersey 1.X 使用的是 sun 的 com.sun.jersey
jersey 2.X 使用的是 glassfish 的 org.glassfish.jersey
使用内置容器为例(使用Jetty发布Jersey服务)
jersey 1.X
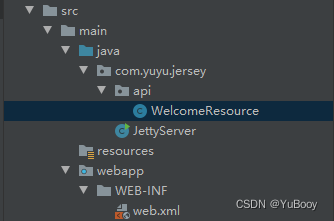
项目结构:
① 添加 maven 依赖
<dependency>
  <groupId>org.eclipse.jetty</groupId>
  <artifactId>jetty-server</artifactId>
  <version>9.3.8.v20160314</version>
</dependency>

<dependency>
  <groupId>org.eclipse.jetty</groupId>
  <artifactId>jetty-servlet</artifactId>
  <version>9.3.8.v20160314</version>
</dependency>

<dependency>
  <groupId>com.sun.jersey</groupId>
  <artifactId>jersey-server</artifactId>
  <version>1.19.1</version>
</dependency>

<dependency>
  <groupId>com.sun.jersey</groupId>
  <artifactId>jersey-servlet</artifactId>
  <version>1.19.1</version>
</dependency>
② 创建一个 JettyServer 类,用于配置 Jetty 环境:
package com.yuyu.jersey;

public class JettyServer {

    private void start() throws Exception {
        Server server = new Server(8080);
        ServletContextHandler context =
                new ServletContextHandler(ServletContextHandler.SESSIONS);
        context.setContextPath("/");
        server.setHandler(context);

        ServletHolder sh = new ServletHolder(ServletContainer.class);
        sh.setInitParameter(
                "com.sun.jersey.config.property.resourceConfigClass",
                "com.sun.jersey.api.core.PackagesResourceConfig");
        sh.setInitParameter(
                "com.sun.jersey.config.property.packages",
                "com.yuyu.jersey.api");
        context.addServlet(sh, "/*");
        server.start();
    }

    public void stop() throws Exception {

    }

    public static void main(String[] args) throws Exception {
        JettyServer server = new JettyServer();
        server.start();
    }
}
③ REST 服务的类(也称资源类,路径要和上面配置的保持一致)
package com.yuyu.jersey.api;

@Path("/welcome")
public class WelcomeResource {

    @GET
    @Produces(MediaType.TEXT_PLAIN)
    public String sayHello() {
        return "Welcome to Jersey world";
    }
}
执行 main 方法,请求 http://localhost:8080/welcome,得到响应:

jersey 2.X
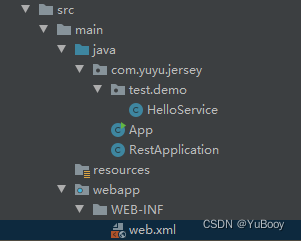
项目结构:
① 添加 maven 依赖
<dependency>
    <groupId>org.glassfish.jersey.containers</groupId>
    <artifactId>jersey-container-jetty-http</artifactId>
    <version>2.21</version>
</dependency>
② 创建一个 Application 类,用于设置发布环境:
package com.yuyu.jersey;

public class RestApplication extends ResourceConfig {
    public RestApplication(){
        this.packages("com.yuyu.jersey");
    }
}
· ResourceConfig 类继承了 Application 类,此类是 Jersey 中的基础类,用于定义一个 JAX-RS 应用的基础组件。
· 在 RestApplication 类的构造方法中,我们调用了 packages 方法注册了扫描资源类的基础包。
③ REST 服务的类(也称资源类)
package com.yuyu.jersey.test.demo;

@Path("hello")
public class HelloService {

    @GET
    @Produces(MediaType.TEXT_PLAIN)
    public String hi(){
        return "hello jersey";
    }
}
1. 在类上面添加了 @Path("hello"),代表资源根路径为 hello;
2. @GET 代表该方法接受 GET类型请求;
3. @Produces 代表该方法的响应类型为 text/plain;
4. 该方法返回 String,这个 String 值 Jersey 会自动按照 text/plain 格式输出。
④ 发布应用
package com.yuyu.jersey;
public class App {
public static void main(String[] args) {
JettyHttpContainerFactory.createServer(URI.create("http://localhost:8082/"), new RestApplication());
}
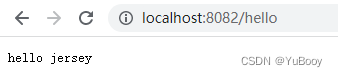
}执行 main 方法,请求 localhost:8082/hello,得到响应:
参考1:Jersey 开发RESTful(七)Jersey快速入门 - 简书
参考2:Jersey 开发RESTful(八)Jersey参数绑定 - 简书
参考3:Jetty + Jersey简单RESTful例子_飞飞好奇的博客-CSDN博客
jersey 官网:Eclipse Jersey
三、Jetty
Jetty 是一个开源的 servlet 容器,可以为JSP和Servlet提供运行时环境。
jetty 与 tomcat 区别:
(1) Jetty 比 Tomcat 架构更加简单。 jetty的所有组件都是基于 Handler 来实现,它的主要功能扩展都可以用 Handler 来实现。
(2) jetty 比较容易扩展第三方框架,所以也跟容易定制
(3) jetty更加轻量可以节省内存;
(4) tomcat 更加稳定、更加成熟。
参考:jetty、jetty原理、jetty与tomcat区别 - 知乎
四、Guice + Jersey + Jetty Demo
项目结构:

① 添加 maven 依赖
<dependency>
    <groupId>org.eclipse.jetty</groupId>
    <artifactId>jetty-server</artifactId>
    <version>9.3.24.v20180605</version>
</dependency>
<dependency>
    <groupId>org.eclipse.jetty</groupId>
    <artifactId>jetty-servlet</artifactId>
    <version>9.3.24.v20180605</version>
</dependency>

<dependency>
    <groupId>com.google.inject.extensions</groupId>
    <artifactId>guice-servlet</artifactId>
    <version>4.2.3</version>
</dependency>
<dependency>
    <groupId>com.google.inject</groupId>
    <artifactId>guice</artifactId>
    <version>4.2.3</version>
</dependency>

<dependency>
    <groupId>com.sun.jersey</groupId>
    <artifactId>jersey-server</artifactId>
    <version>1.19</version>
</dependency>
<dependency>
    <groupId>com.sun.jersey.contribs</groupId>
    <artifactId>jersey-guice</artifactId>
    <version>1.19</version>
</dependency>
② 创建一个资源 api 服务
@Path("/myTest")
public class ResourceTest {

    @GET
    @Path("/test")
    @Produces(MediaType.TEXT_PLAIN)
    public String testApi(){
        return "this is a test";
    }
}
③ 创建 WebServer 配置 servlet
public class WebServer {
    private final Server jetty;
    private final Connector connector;

    @Inject
    public WebServer(Server jetty, Connector connector) {
        this.jetty = jetty;
        this.connector = connector;
    }

    public void start() throws Exception {
        this.jetty.addConnector(connector);

        ServletHolder apiServletHolder = new ServletHolder(new GuiceContainer(Start.getInjector()));
        apiServletHolder.setInitParameter("com.sun.jersey.config.property.resourceConfigClass", "com.sun.jersey.api.core.PackagesResourceConfig");
        apiServletHolder.setInitParameter("com.sun.jersey.config.property.packages", "com.yuyu.demo.api");

        ServletContextHandler context = new ServletContextHandler();
        context.setContextPath("/");
        context.addServlet(apiServletHolder, "/*");

        this.jetty.setHandler(context);
        this.jetty.start();
    }

    public void stop() throws Exception {
        this.jetty.stop();
    }
}
④ 实现 ConnectorProvider 为 jetty 提供 http 连接
public class HttpConnectorProvider implements Provider<Connector> {
    private Server jetty;

    @Inject
    public HttpConnectorProvider(Server jetty) {
        this.jetty = jetty;
    }

    @Override
    public Connector get() {
        ServerConnector ret = new ServerConnector(this.jetty);
        ret.setName("test");
        ret.setHost("0.0.0.0");
        ret.setPort(8089);
        return ret;
    }
}
⑤ 创建 WebServerModule 绑定依赖
public class WebServerModule extends AbstractModule {
    private Server jetty;

    public WebServerModule() throws Exception {
        this.jetty = new Server();
    }

    @Override
    protected void configure() {
        bind(Server.class).in(Scopes.SINGLETON);
        bind(WebServer.class).in(Scopes.SINGLETON);
        bind(Connector.class).toProvider(HttpConnectorProvider.class);
    }
}
⑥ 创建 main 方法执行服务
public class Start {

    private static Injector injector;

    public static void main(String[] args) throws Exception {

        injector = Guice.createInjector(new WebServerModule());
        WebServer webServer = injector.getInstance(WebServer.class);
        webServer.start();
    }

    public static Injector getInjector() {
        return injector;
    }
}
执行结果:

参考:GitHub - sunnygleason/j4-minimal: Minimal web application example using Embedded Jetty, Jersey, Guice, and Jackson
![[附源码]Python计算机毕业设计单位库房管理系统Django(程序+LW)](https://img-blog.csdnimg.cn/73a8e59a5ca64bba85ca8d0c1aae9fc3.png)