水善利万物而不争,处众人之所恶,故几于道💦
目录
1. 从Java的集合中读取数据
2. 从本地文件中读取数据
3. 从HDFS中读取数据
4. 从Socket中读取数据
5. 从Kafka中读取数据
6. 自定义Source
官方文档 - Flink1.13

1. 从Java的集合中读取数据
fromCollection(waterSensors)
public static void main(String[] args) {
    Configuration conf = new Configuration();
    conf.setInteger("rest.port",1000);
    StreamExecutionEnvironment env = StreamExecutionEnvironment.getExecutionEnvironment(conf);
    env.setParallelism(1);

    List<WaterSensor> waterSensors = Arrays.asList(
            new WaterSensor("ws_001", 1577844001L, 45),
            new WaterSensor("ws_002", 1577844015L, 43),
            new WaterSensor("ws_003", 1577844020L, 42));

    env
            .fromCollection(waterSensors)
            .print();

    try {
        env.execute();
    } catch (Exception e) {
        e.printStackTrace();
    }
}
运行结果:

2. 从本地文件中读取数据
readTextFile(“input/words.txt”),支持相对路径和绝对路径
public static void main(String[] args) {
    Configuration conf = new Configuration();
    conf.setInteger("rest.port",1000);
    StreamExecutionEnvironment env = StreamExecutionEnvironment.getExecutionEnvironment(conf);
    env.setParallelism(1);

    env.readTextFile("input/words.txt").print();

    try {
        env.execute();
    } catch (Exception e) {
        e.printStackTrace();
    }

}
运行结果:

3. 从HDFS中读取数据
readTextFile(“hdfs://hadoop101:8020/flink/data/words.txt”)
要先在pom文件中添加hadoop-client依赖:
<dependency>
    <groupId>org.apache.hadoop</groupId>
    <artifactId>hadoop-client</artifactId>
    <version>3.1.3</version>
</dependency>
public static void main(String[] args) {
    Configuration conf = new Configuration();
    conf.setInteger("rest.port",1000);
    StreamExecutionEnvironment env = StreamExecutionEnvironment.getExecutionEnvironment(conf);
    env.setParallelism(1);

    env.readTextFile("hdfs://hadoop101:8020/flink/data/words.txt").print();

    try {
        env.execute();
    } catch (Exception e) {
        e.printStackTrace();
    }
}
运行结果:

4. 从Socket中读取数据
socketTextStream(“hadoop101”,9999),这个输入源不支持多个并行度。
public static void main(String[] args) {
    Configuration conf = new Configuration();
    conf.setInteger("rest.port",1000);
    StreamExecutionEnvironment env = StreamExecutionEnvironment.getExecutionEnvironment(conf);
    env.setParallelism(1);

    //从端口中读数据,  windows中 nc -lp 9999     Linux nc -lk 9999
    env.socketTextStream("hadoop101",9999).print();

    try {
        env.execute();
    } catch (Exception e) {
        e.printStackTrace();
    }
}
运行结果:

5. 从Kafka中读取数据
addSource(new FlinkKafkaConsumer<>(“flink_source_kafka”,new SimpleStringSchema(),properties))
第一个参数是topic,
第二个参数是序列化器,序列化器就是在Kafka和flink之间转换数据 - 官方注释:The de-/serializer used to convert between Kafka’s byte messages and Flink’s objects.(反-序列化程序用于在Kafka的字节消息和Flink的对象之间进行转换。)
第三个参数是Kafka的配置。
public static void main(String[] args) {
    Configuration conf = new Configuration();
    conf.setInteger("rest.port",1000);
    StreamExecutionEnvironment env = StreamExecutionEnvironment.getExecutionEnvironment(conf);
    env.setParallelism(1);

    Properties properties = new Properties();
    // 设置集群地址
    properties.setProperty("bootstrap.servers", "hadoop101:9092,hadoop102:9092,hadoop103:9092");
    // 设置所属消费者组
    properties.setProperty("group.id", "flink_consumer_group");
    env.addSource(new FlinkKafkaConsumer<>("flink_source_kafka",new SimpleStringSchema(),properties)).print();

    try {
        env.execute();
    } catch (Exception e) {
        e.printStackTrace();
    }
}
运行结果:

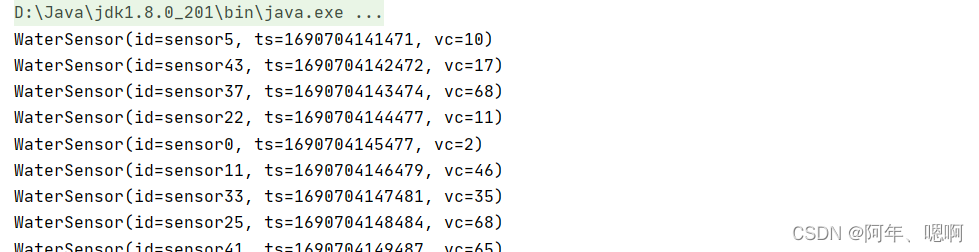
6. 自定义Source
addSource(new XXXX())
大多数情况下,前面的数据源已经能够满足需要,但是难免会存在特殊情况的场合,所以flink也提供了能自定义数据源的方式.
public class Flink06_myDefDataSource {
    public static void main(String[] args) {
        Configuration conf = new Configuration();
        conf.setInteger("rest.port",1000);
        StreamExecutionEnvironment env = StreamExecutionEnvironment.getExecutionEnvironment(conf);
        env.setParallelism(1);

        env.addSource(new RandomWatersensor()).print();

        try {
            env.execute();
        } catch (Exception e) {
            e.printStackTrace();
        }
    }
}
自定义数据源需要定义一个类,然后实现SourceFunction接口,然后实现其中的两个方法,run和cancel,run方法包含具体读数据的逻辑,当调用cancel方法的时候应该可以让run方法中的读数据逻辑停止
public class RandomWatersensor implements SourceFunction<WaterSensor> {
    private Boolean running = true;

    @Override
    public void run(SourceContext<WaterSensor> sourceContext) throws Exception {
        Random random = new Random();
        while (running){
            sourceContext.collect(new WaterSensor(
                    "sensor" + random.nextInt(50),
                    Calendar.getInstance().getTimeInMillis(),
                    random.nextInt(100)
            ));
            Thread.sleep(1000);
        }
    }

    /**
     * 大多数的source在run方法内部都会有一个while循环,
     * 当调用这个方法的时候, 应该可以让run方法中的while循环结束
     */
    @Override
    public void cancel() {
        running = false;
    }

}
运行结果:
demo2 - 自定义从socket中读取数据
public class Flink04_Source_Custom {
    public static void main(String[] args) throws Exception {


        // 1. 创建执行环境
        StreamExecutionEnvironment env = StreamExecutionEnvironment.getExecutionEnvironment();
        env
          .addSource(new MySource("hadoop102", 9999))
          .print();

        env.execute();
    }

    public static class MySource implements SourceFunction<WaterSensor> {
        private String host;
        private int port;
        private volatile boolean isRunning = true;
        private Socket socket;

        public MySource(String host, int port) {
            this.host = host;
            this.port = port;
        }


        @Override
        public void run(SourceContext<WaterSensor> ctx) throws Exception {
            // 实现一个从socket读取数据的source
            socket = new Socket(host, port);
            BufferedReader reader = new BufferedReader(new InputStreamReader(socket.getInputStream(), StandardCharsets.UTF_8));
            String line = null;
            while (isRunning && (line = reader.readLine()) != null) {
                String[] split = line.split(",");
                ctx.collect(new WaterSensor(split[0], Long.valueOf(split[1]), Integer.valueOf(split[2])));
            }
        }

        /**
         * 大多数的source在run方法内部都会有一个while循环,
         * 当调用这个方法的时候, 应该可以让run方法中的while循环结束
         */

        @Override
        public void cancel() {
            isRunning = false;
            try {
                socket.close();
            } catch (IOException e) {
                e.printStackTrace();
            }
        }
    }
}
/*
sensor_1,1607527992000,20
sensor_1,1607527993000,40
sensor_1,1607527994000,50
 */