首先,SpringBoot是基于的Spring,所以我们要依赖Spring,然后我希望我们模拟出来的SpringBoot也支持Spring MVC的那一套功能,所以也要依赖Spring MVC,包括Tomcat等,所以在SpringBoot模块中要添加以下依赖:
<dependency>
            <groupId>org.springframework</groupId>
            <artifactId>spring-context</artifactId>
            <version>5.3.18</version>
        </dependency>
        <dependency>
            <groupId>org.springframework</groupId>
            <artifactId>spring-web</artifactId>
            <version>5.3.18</version>
        </dependency>
        <dependency>
            <groupId>org.springframework</groupId>
            <artifactId>spring-webmvc</artifactId>
            <version>5.3.18</version>
        </dependency>
        <dependency>
            <groupId>javax.servlet</groupId>
            <artifactId>javax.servlet-api</artifactId>
            <version>4.0.1</version>
        </dependency>
        <dependency>
            <groupId>org.apache.tomcat.embed</groupId>
            <artifactId>tomcat-embed-core</artifactId>
            <version>9.0.60</version>
        </dependency>
在User模块下我们进行正常的开发就行了,比如先添加SpringBoot依赖:
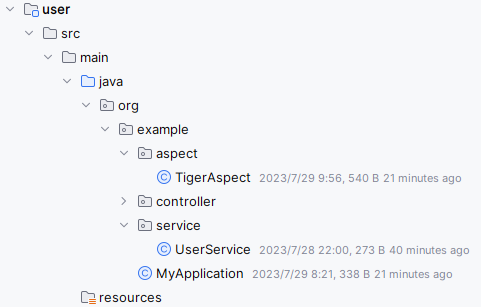
在业务层,定义常用的controller、Service之类的包:
当我们真正使用SpringBoot时,核心主要是@SpringBootApplication和SpringApplication:前面的是用来让Spring扫描,后面是Spring容器相关。我们接下来自行研究一下这两个核心内容。
一般开始的时候,SpringBoot项目是下面的样子:
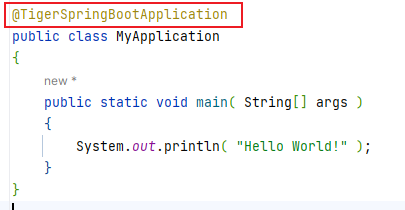
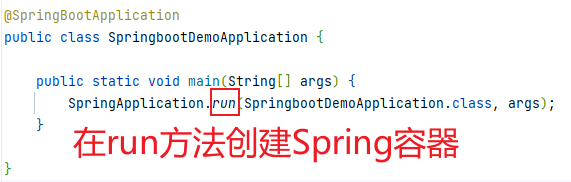
我们模拟一下注解:@SpringBootApplication以及SpringApplication.run(SpringbootDemoApplication.class, args);
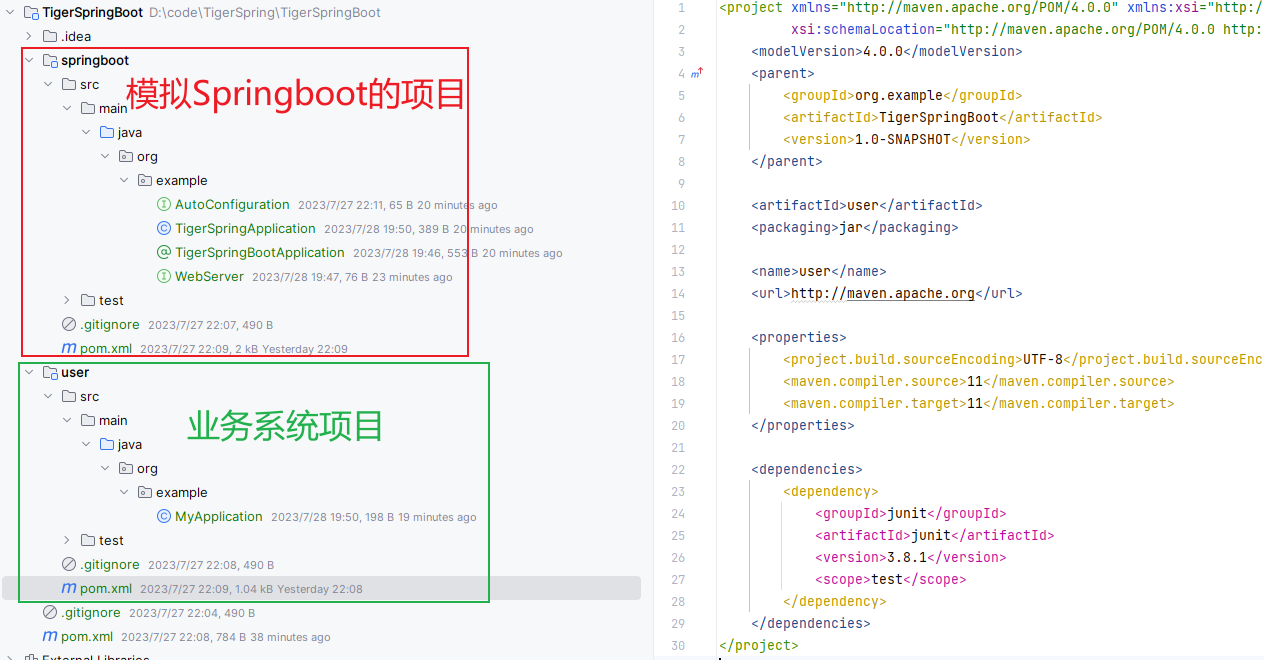
项目整体结构
项目结构如下:
需要添加SpringBoot项目依赖,才可以在启动类中添加注解:@TigerSpringBootApplication

由于SpringBoot用的容器也是Spring的,所以我们首先得在run方法创建一个Spring容器。
一般情况下,run方法执行完了,我们就能在浏览器中访问到controller里面的方法,那么在run方法中,肯定会启动tomcat,然后才能接收web请求。
tomcat里需要配置一个DispatcherServlet,然后这个DispatcherServlet需要和Spring容器绑定,这样DispatcherServlet在接收到请求后,才能根据请求路径去匹配Spring容器中的controller的mapping路径。
所以,在run方法中,我们要实现如下逻辑:
-
创建一个Spring容器
-
创建Tomcat对象
-
生成DispatcherServlet对象,并且和前面创建出来的Spring容器进行绑定
-
将DispatcherServlet添加到Tomcat中
-
启动Tomcat
接下来对每一步进行详细说明。
创建Spring容器
容器创建语句:
AnnotationConfigApplicationContext applicationContext = new AnnotationConfigApplicationContext();
applicationContext.register(clazz);
把配置类注册进去。
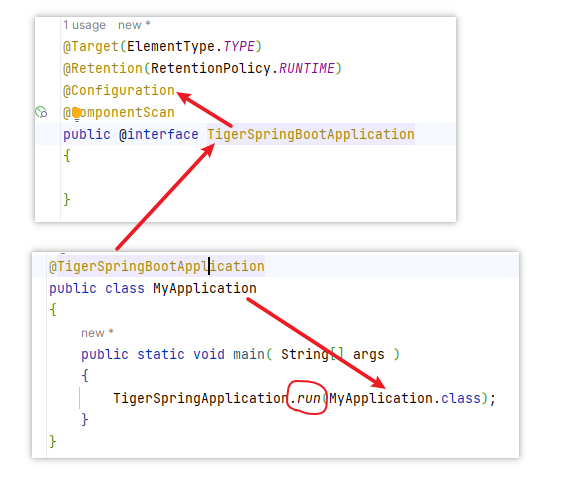
如图所示,在调用run方法时候,传入了MyApplication.class这个类,由于他上面有@TigerSpringBootApplication注解,而这个又是一个组合注解,里面包括了@Configuration,所以最终,我们上面的applicationContext.register(clazz);就拿到了配置类,然后调用applicationContext.register();这样容器就启动了。容器启动了之后,就去解析传进来的配置类。由于配置类上面有@TigerSpringBootApplication,他是一个组合注解,包含了@ComponentScan,这样Spring就知道了扫描路径。
总结: 经过上面的步骤,我们就把Spring容器创建好了。
我们创建的是一个AnnotationConfigWebApplicationContext容器,并且把run方法传入进来的class作为容器的配置类,比如在MyApplication的run方法中,我们就是把MyApplication.class传入到了run方法中,最终MyApplication就是所创建出来的Spring容器的配置类,并且由于MyApplication类上有@TigerSpringBootApplication注解,而@TigerSpringBootApplication注解上又存在@ComponentScan注解,所以AnnotationConfigWebApplicationContext容器在执行refresh时,就会解析MyApplication这个配置类,从而发现定义了@ComponentScan注解,也就知道了要进行扫描,只不过扫描路径为空,而AnnotationConfigWebApplicationContext容器会处理这种情况,如果扫描路径会空,则会将MyApplication所在的包路径做为扫描路径,从而就会扫描到UserService和UserController。
所以Spring容器创建完之后,容器内部就拥有了UserService和UserController这两个Bean。
启动Tomcat服务器
run方法执行完之后,我们就可以通过浏览器访问controller接口了。为了能够接收web请求,我们需要启动一个web容器。
接下来启动tomcat容器。启动Tomcat时,需要配置DispatcherServlet。之前单独用Spring MVC的时候,我们要在web.xml单独配置一个DispatcherServlet,就相当于往tomcat里面配置了DispatcherServlet。
   tomcat.addServlet(contextPath, "dispatcher", new DispatcherServlet(applicationContext));
   context.addServletMappingDecoded("/*", "dispatcher");
通过上面的形式,就可以把DispatcherServlet配置到我们Tomcat当中。context.addServletMappingDecoded(“/*”, “dispatcher”);表示,当Tomcat启动时,所有的请求都会交给DispatcherServlet处理。

当我们在浏览器中请求:http://localhost:8081/test的时候,端口8081定位 到了Tomcat容器,然后请求交给了DispatcherServlet,它会根据/test去我们的controller进行匹配。然后controller是我们后端Spring 的一个bean,为了能关联起来,我们需要在初始化DispatcherServlet的时候,在构造函数中接收一个Spring容器。

在构造DispatcherServlet对象时,传入了一个ApplicationContext对象,也就是一个Spring容器,就是我们前文说的,DispatcherServlet对象和一个Spring容器进行绑定。
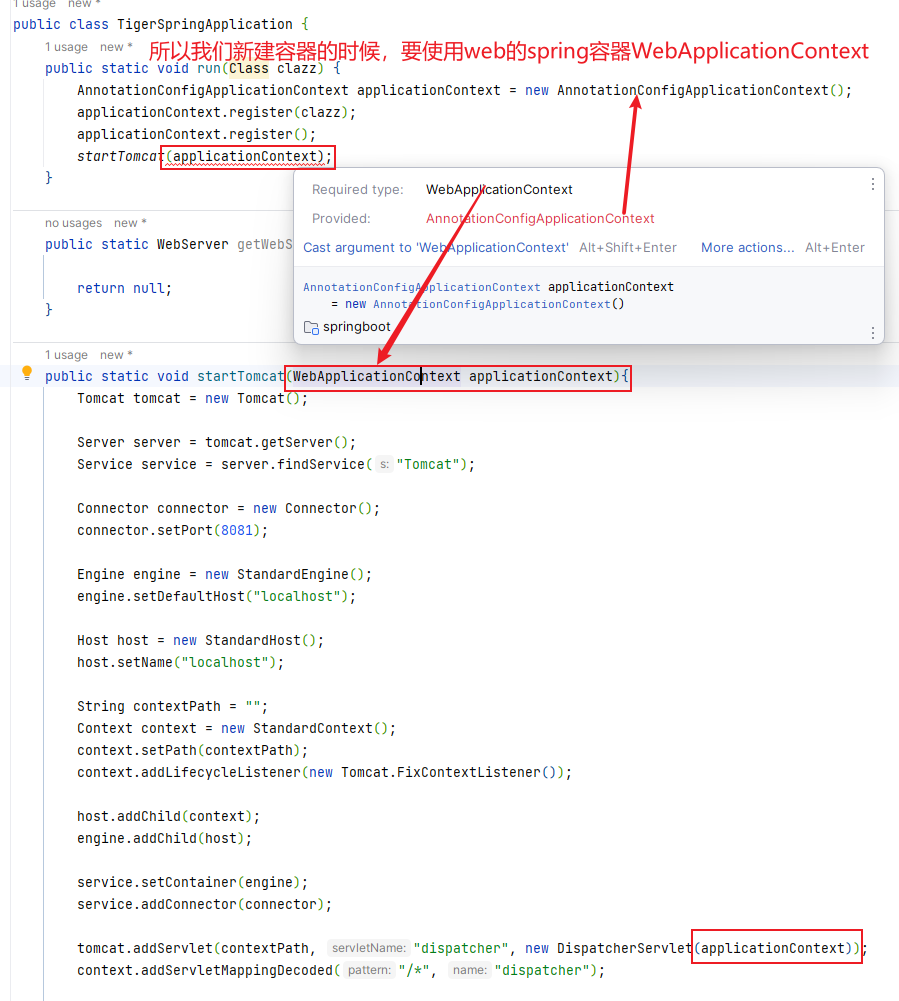
修改后,使用的是web的Spring容器AnnotationConfigWebApplicationContext:
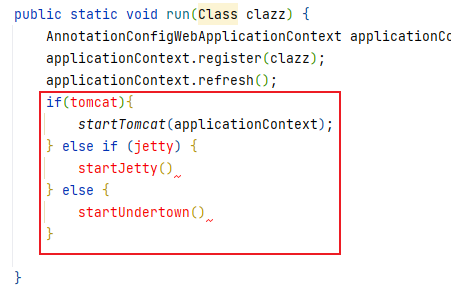
    public static void run(Class clazz) {
        AnnotationConfigWebApplicationContext applicationContext = new AnnotationConfigWebApplicationContext();
        applicationContext.register(clazz);
        applicationContext.register();
        startTomcat(applicationContext);
    }
启动成功:
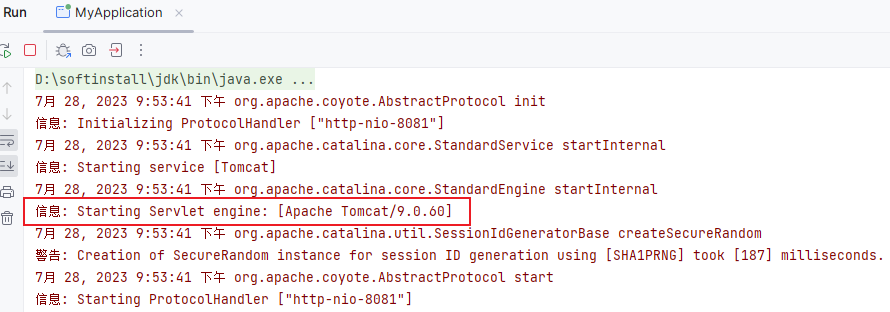
至此,一个简单的Springboot demo就写好了。
总结一下一个完整的请求流程:在浏览器发起http请求:http://localhost:8081/test,由于Tomcat监听的是8081,所以被Tomcat接收到,然后Tomcat再把请求交给DispatcherServlet,DispatcherServlet拿到请求后,就用路径/test去Spring容器中匹配controller的bean,然后再遍历bean里面的方法,发现刚好匹配下面的方法:
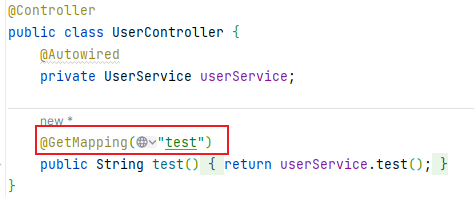
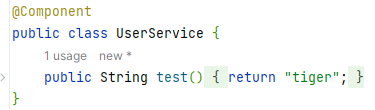
然后执行方法test().
最终把结果返回前端:
[外链图片转存失败,源站可能有防盗链机制,建议将图片保存下来直接上传(img-gxEU885s-1690601777922)(https://typora-chenhui-2021-08-03.oss-cn-shenzhen.aliyuncs.com/img/启动Tomcat.gif)]
自定义的注解@TigerSpringBootApplication有两个重要的组合注解@Configuration、@ComponentScan。
Configuration表示当前的类是配置类,ComponentScan表示需要spring扫描,默认当前类的子包路径都要扫描。执行run方法的时候,创建好了spring容器(web型容器),然后还通过编程的方式,启动了一个tomcat服务器。
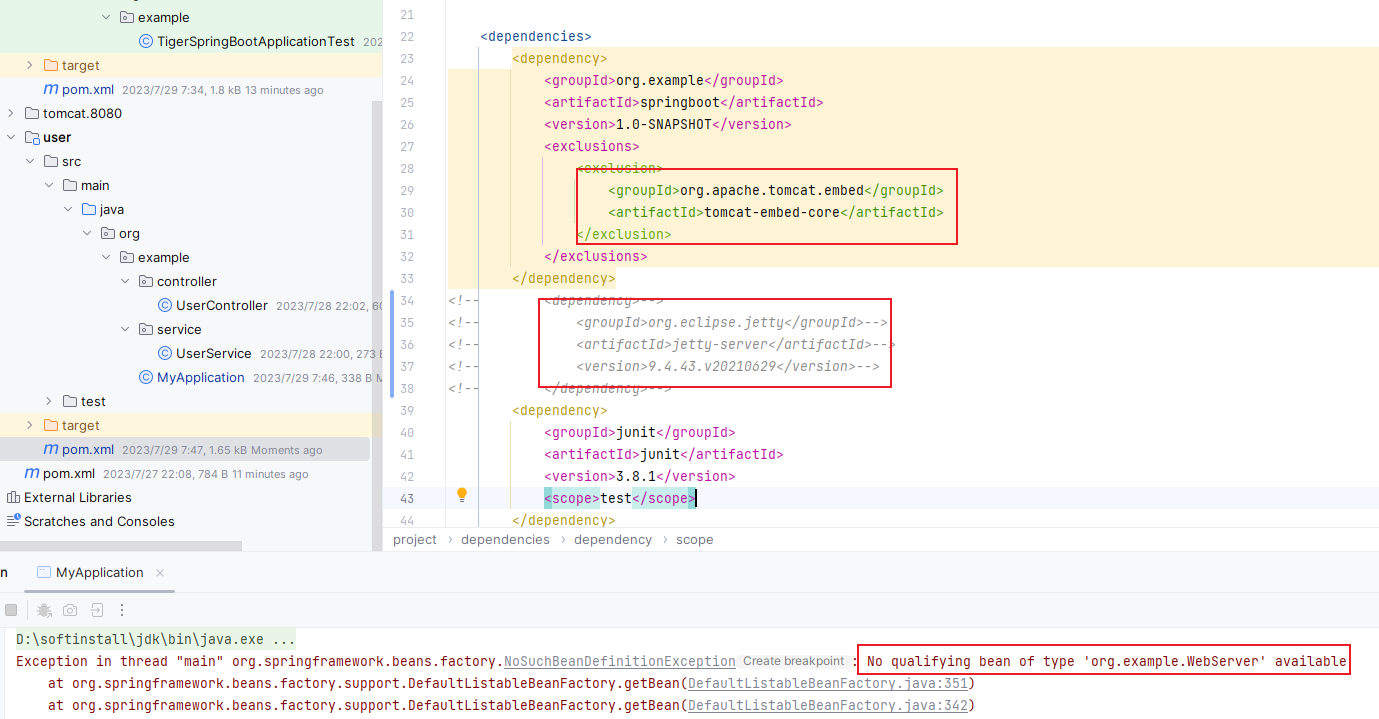
当我们想把tomcat换成jetty或者undertown的时候,只需要再pom依赖中修改一下即可,如下:
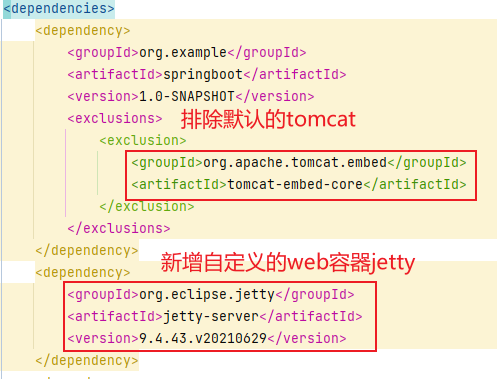
如果我想继续按下面的要求修改:
- 如果项目中有Tomcat的依赖,那就启动Tomcat
- 如果项目中有Jetty的依赖就启动Jetty
- 如果两者都没有则报错
- 如果两者都有也报错
我们希望SpringBoot自动帮我们把上面的逻辑实现,对于我们程序员而言,只要在Pom文件中添加相关依赖就可以了,想用Tomcat就加Tomcat依赖,想用Jetty就加Jetty依赖。
那这个底层原理是怎么实现的?
实现tomcat和Jetty切换
我们需要判断依赖里面有什么,如果有Tomcat,就启动Tomcat,有Jetty就启动Jetty,有Undertow就启动Undertow。
如果是在run方法里面写if else,不仅代码太难看,而且也不好扩展。
像tomcat、jetty、undertown都是属于servlet容器,有共性,我们就要用抽象的思维,把这三个都容器抽象为WebServer,然后提供一个启动的方法:
public interface WebServer {
    void start();
}
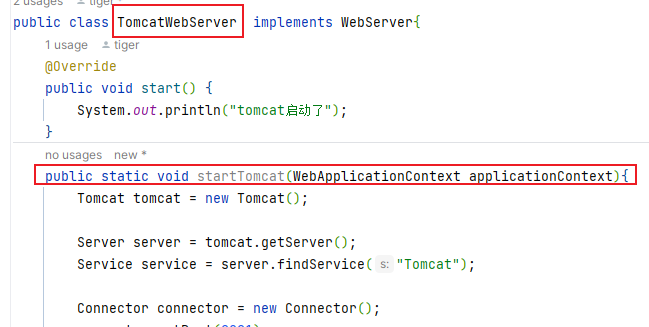
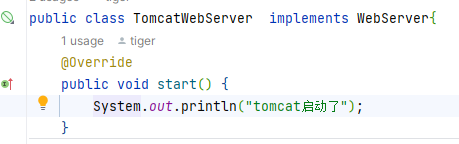
然后写一个Tomcat类,实现WebServer接口:
public class TomcatWebServer  implements WebServer{
    @Override
    public void start() {
        System.out.println("tomcat启动了");
    }
}
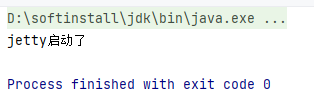
public class JettyWebServer implements WebServer{
    @Override
    public void start() {
        System.out.println("jetty启动了");
    }
}
回到run方法那里,我们要改变一下思路,不能直接启动tomcat容器,而是先获取webserver,然后再使用webserver的start方法:
    public static void run(Class clazz) {
        AnnotationConfigWebApplicationContext applicationContext = new AnnotationConfigWebApplicationContext();
        applicationContext.register(clazz);
        applicationContext.refresh();

        // startTomcat(applicationContext);
        WebServer webServer = getWebServer(applicationContext);
        webServer.start();
    }

    public static WebServer getWebServer(WebApplicationContext applicationContext) {
        //在这里判断,tomcat、jetty、undertown到底返回那个webserver
        return null;
    }
注意:getWebServer方法的参数WebApplicationContext,这是一个Spring容器,我们可以直接从容器里面获取web类型容器的bean:applicationContext.getBean(WebServer.class)
然后直接返回:
    public static WebServer getWebServer(WebApplicationContext applicationContext) {
        //在这里判断,tomcat、jetty、undertown到底返回那个webserver
        return applicationContext.getBean(WebServer.class);
    }
我们得判断项目中的依赖是什么,是Tomcat?还是Jetty?这个时候就得引入条件注解。
引入条件注解
我们新建一个自动配置类:WebServerAutoConfiguration,然后我们定义 Tomcat、Jetty的bean
@Configuration
public class WebServerAutoConfiguration implements AutoConfiguration{
    @Bean
    public TomcatWebServer tomcatWebServer(){
        return new TomcatWebServer();
    }

    @Bean
    public JettyWebServer jettyWebServer(){
        return new JettyWebServer();
    }
}
虽然定义了两个bean,但是我们可以让bean在某种条件下生效,这就是条件注解。
新增一个条件注解类:TigerCondition,实现Spring的Condition,条件注解返回false,表示不符合逻辑,返回true,表示符合逻辑。
public class TigerCondition implements Condition {
    @Override
    public boolean matches(ConditionContext context, AnnotatedTypeMetadata metadata) {
        return false;
    }
}
我们在上面两个bean上加条件注解 @Conditional(TigerCondition.class):
@Configuration
public class WebServerAutoConfiguration implements AutoConfiguration{
    @Bean
    @Conditional(TigerCondition.class)
    public TomcatWebServer tomcatWebServer(){
        return new TomcatWebServer();
    }

    @Bean
    @Conditional(TigerCondition.class)
    public JettyWebServer jettyWebServer(){
        return new JettyWebServer();
    }
}
虽然定义了两个bean,但是只有条件注解返回true的时候,对应的bean才能生效,容器中才会存在对应bean。
但是在一个条件注解里面同时判断Tomcat和Jetty,不方便,我们看下spring boot原始的判断方法。SpringBoot会写一个注解:ConditionalOnClass
@Target({ ElementType.TYPE, ElementType.METHOD })
@Retention(RetentionPolicy.RUNTIME)
@Conditional(TigerCondition.class)
public @interface ConditionalOnClass {
    String value();
}
然后我们把指定条件的代码,@Conditional 换成@ConditionalOnClass。ConditionalOnClass是SpringBoot的注解,它封装了Spring的Conditional注解。
@Configuration
public class WebServerAutoConfiguration implements AutoConfiguration{
    @Bean
    @Conditional(TigerCondition.class)
    @ConditionalOnClass("org.apache.catalina.startup.Tomcat")
    public TomcatWebServer tomcatWebServer(){
        return new TomcatWebServer();
    }

    @Bean
    @Conditional(TigerCondition.class)
    @ConditionalOnClass("org.eclipse.jetty.server.Server")
    public JettyWebServer jettyWebServer(){
        return new JettyWebServer();
    }
}
如果当前项目中,有org.apache.catalina.startup.Tomcat这个类,那么这个bean就生效,同理,如果有org.eclipse.jetty.server.Server这个类,那么Jetty的bean就生效。
那这个判断怎么实现呢?得回到TigerCondition这个注解的方法这里。
我们需要拿到"org.eclipse.jetty.server.Server"、"org.apache.catalina.startup.Tomcat"这两个字符串。Spring去解析注解的时候,可以获取到value的值,这样就拿到了这两个字符串,由因为注解ConditionalOnClass包含了@Conditional(TigerCondition.class),那么Spring就去执行指定类TigerCondition下的判断逻辑,即match方法里的逻辑。
    @Override
    public boolean matches(ConditionContext context, AnnotatedTypeMetadata metadata) {
        Map<String, Object> annotationAttributes = metadata.getAnnotationAttributes(ConditionalOnClass.class.getName());
        String className = (String) annotationAttributes.get("value");// org.eclipse.jetty.server.Server 或 Tomcat

        try {
            context.getClassLoader().loadClass(className);
            return true;
        } catch (ClassNotFoundException e) {
            return false;
        }
    }
通过className,从容器中加载这个类,如果能加载到,返回true,表示项目中有这个类,否则,抛异常ClassNotFoundException,类加载失败,返回false。
启动项目:
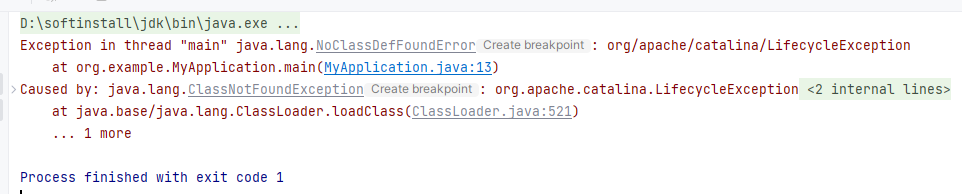
找不到类。
因为我们写的配置类WebServerAutoConfiguration是定义在SpringBoot中的,那我们得让Spring知道这个配置类的存在,让他扫描到。所以加一个注解:@Import(WebServerAutoConfiguration.class)。当我们执行run方法时,传入了一个类:MyApplication.class,spring接收到这个类之后,就会去解析这个类,找到这个类之后,就会去解析上面的注解@TigerSpringBootApplication,发现需要去扫描(因为组合注解包含了@ComponentScan),然后Spring就把Service层,Controller层都扫描一遍,并把bean放入容器中。
@TigerSpringBootApplication
@Import(WebServerAutoConfiguration.class)
public class MyApplication
{
    public static void main( String[] args )
    {
        TigerSpringApplication.run(MyApplication.class);
    }
}
当@TigerSpringBootApplication解析完之后,再解析@Import(WebServerAutoConfiguration.class),Spring发现要导入一个类WebServerAutoConfiguration,然后发现上面有@Configuration,再解析这个注解,发现里面与bean的定义。
重新启动项目还是报错,再仔细看代码,发现问题:
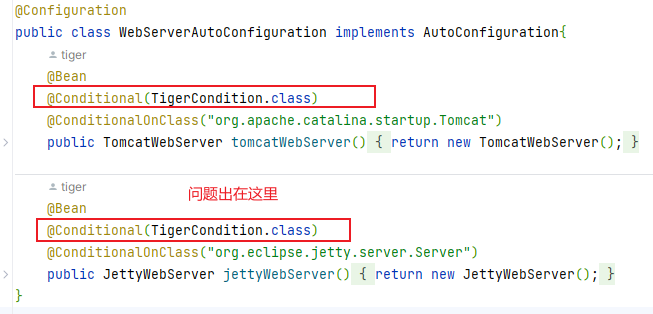
删除@Conditional(TigerCondition.class)后,重新启动代码,还是报错,最终发现报错原因如下:
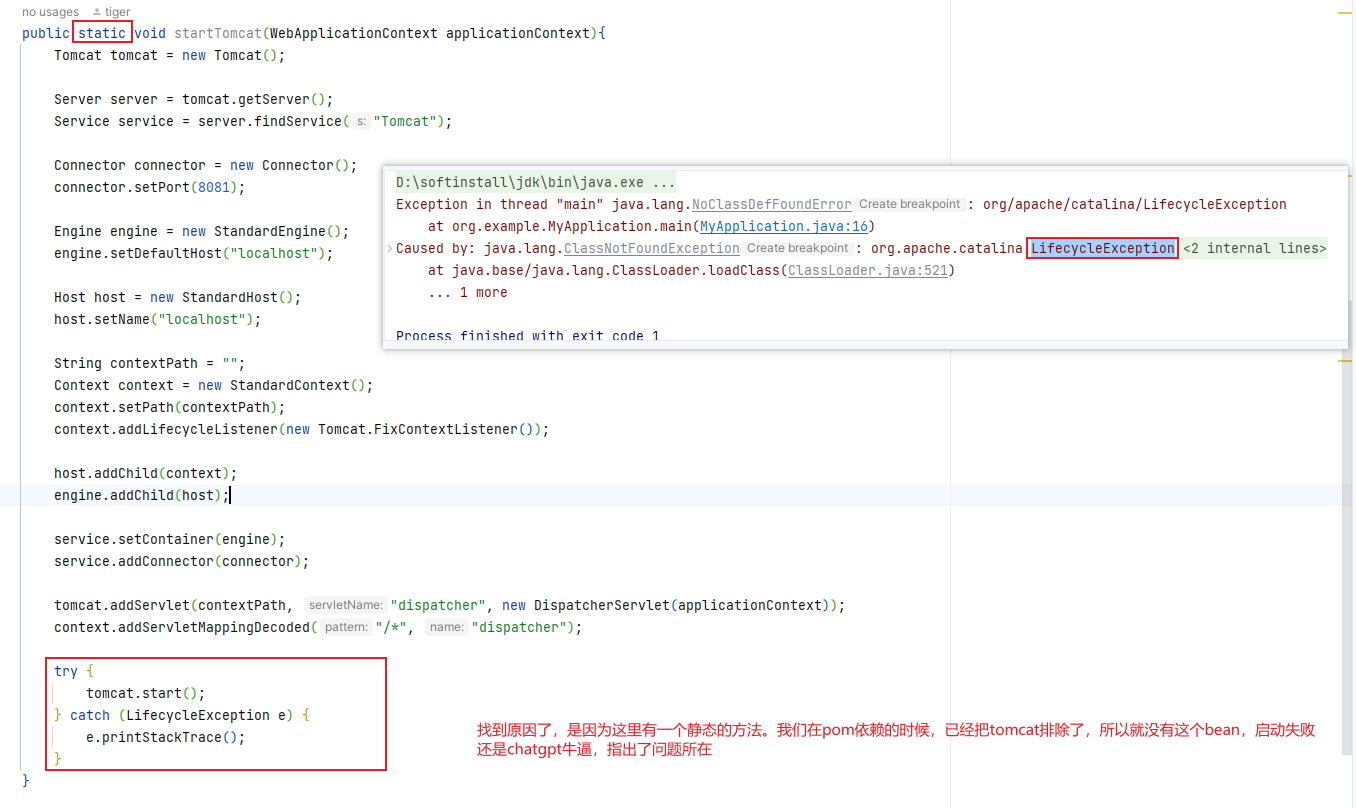


把代码移动到tomcat模块中:
重新启动项目:启动成功,这样就实现了,根据pom依赖自动选择web服务器的功能!
如果依赖中移除依赖,会报错,找不到对应bean。如果两个bean都有,那么也会报错,因为Spring不知道要去使用哪个bean。
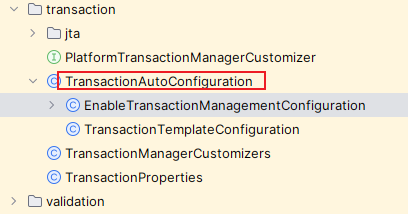
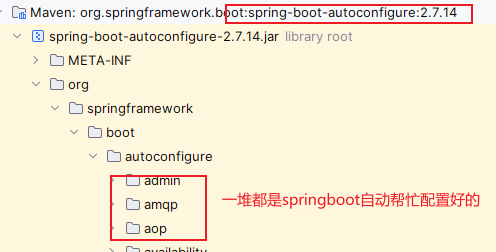
类似web服务器,还有消息队列,看你是用rabbitmq,还是用rocketmq,还是kafka,或者spring事务,或者datasource等。这些如果在Spring项目中,都是要程序员自己手动配置这些bean的。
但是到了SprinBboot,就不用我们手动去配置,SpringBoot默认帮我们配置好,如下:
我们刚开始,是在启动类中import了我们需要的自动配置@Import(WebServerAutoConfiguration.class):
@TigerSpringBootApplication
@Import(WebServerAutoConfiguration.class)
public class MyApplication
{
    public static void main( String[] args )
    {
        TigerSpringApplication.run(MyApplication.class);
    }
}
那如我想导入更多的自动配置,全部都直接在上面添加@Import(xxxx)注解,那这个类就得膨胀了:
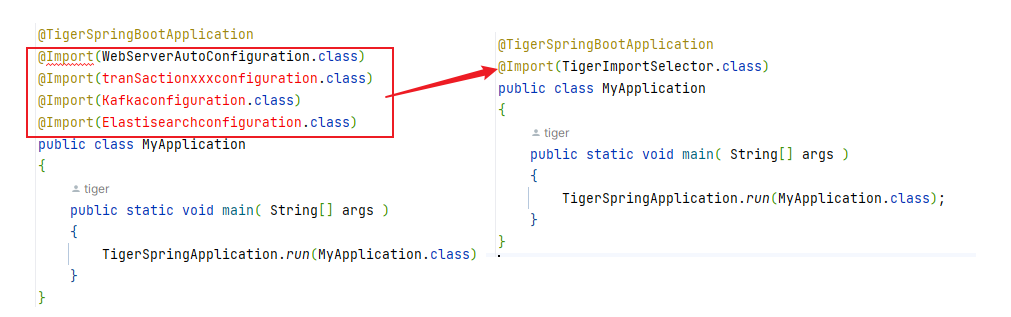
所以引入一个自定义类:TigerImportSelector.class
public class TigerImportSelector implements DeferredImportSelector {
    @Override
    public String[] selectImports(AnnotationMetadata importingClassMetadata) {
        ServiceLoader<AutoConfiguration> loader = ServiceLoader.load(AutoConfiguration.class);

        List<String> list = new ArrayList<>();

        for (AutoConfiguration configuration : loader) {
            list.add(configuration.getClass().getName());
        }
        return list.toArray(new String[0]);
    }
}
selectImports方法返回的是一个数组 String[],我们可以把上面多个自动配置类的类名直接通过方法selectImports返回,这样启动类就不用import很多的配置类了。
发现自动配置类
虽然启动类是少了注解,这种做法也是不太优雅的,我们看看springboot是怎么实现的。这个时候就用到了spi机制。
创建一个接口:AutoConfiguration,里面什么 都不用实现
public interface AutoConfiguration {
}
然后我们的自动配置类,都要实现这个接口:
public class WebServerAutoConfiguration implements AutoConfiguration
然后我们在resource目录下新建文件夹META-INF、services以及文件org.example.AutoConfiguration:
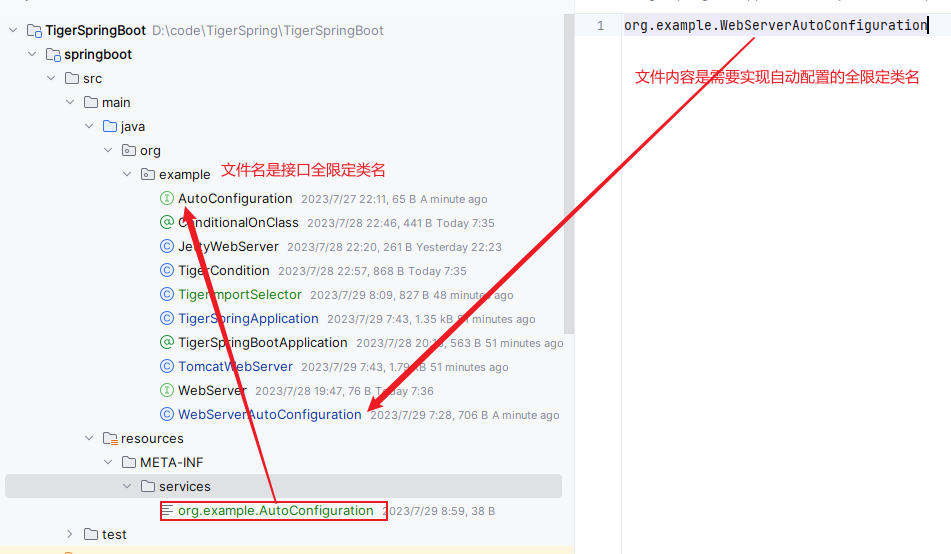
文件是接口的名字:org.example.AutoConfiguration,文件的内容是需要自动生效的配置类全限定类名。
配置好之后,我们就可以从代码中去到上面的这些配置信息(通过SPI机制)。在下面的类中,
public class TigerImportSelector implements DeferredImportSelector {
    @Override
    public String[] selectImports(AnnotationMetadata importingClassMetadata) {
        ServiceLoader<AutoConfiguration> loader = ServiceLoader.load(AutoConfiguration.class);
        List<String> list = new ArrayList<>();
        for (AutoConfiguration configuration : loader) {
            list.add(configuration.getClass().getName());
        }
        return list.toArray(new String[0]);
    }
}
通过Java的SPI可以load 我们自定义的接口AutoConfiguration,底层会去目录META-INF/services/读org.example.AutoConfiguration文件,把文件内容读取出来,然后通过反射的方式,把这些全限定类名获取到的类,返回给loader这个变量接收。如果后面还想实现如aop的自动配置,那我们新建一个类,实现接口AutoConfiguration,然后 在META-INF下面的文件增加对应的全限定类名即可。
这种spi的机制,主要是为了方便扩展。
比如像mybatis,spring官方就没提供自动配置的starter,就需要通过这种spi机制进行扩展。
配置类就是为了定义bean,然后把bean纳入容器中管理。配置类就像之前的xml配置文件一样,用来定义外部bean的。
SpringBoot 自动配置AOP
下面再写一个aop的自动配置例子。
案例目的:要在user模块中使用aop功能,只要在pom中添加依赖即可,无需配置。如果不想使用aop,则把依赖删除即可。
首先新增一个配置类:AopAutoConfiguration,我们主要是在这个配置类中开启aop配置
@Configuration
public class AopAutoConfiguration implements AutoConfiguration{
    @Configuration
    @EnableAspectJAutoProxy
    @ConditionalOnClass("org.aspectj.weaver.Advice")
    class AspectJConfiguration{

    }
}
@ConditionalOnClass(“org.aspectj.weaver.Advice”):表示pom中有这个依赖,项目中有这个bean,当前的类才生效
@EnableAspectJAutoProxy :表示开启aop的功能
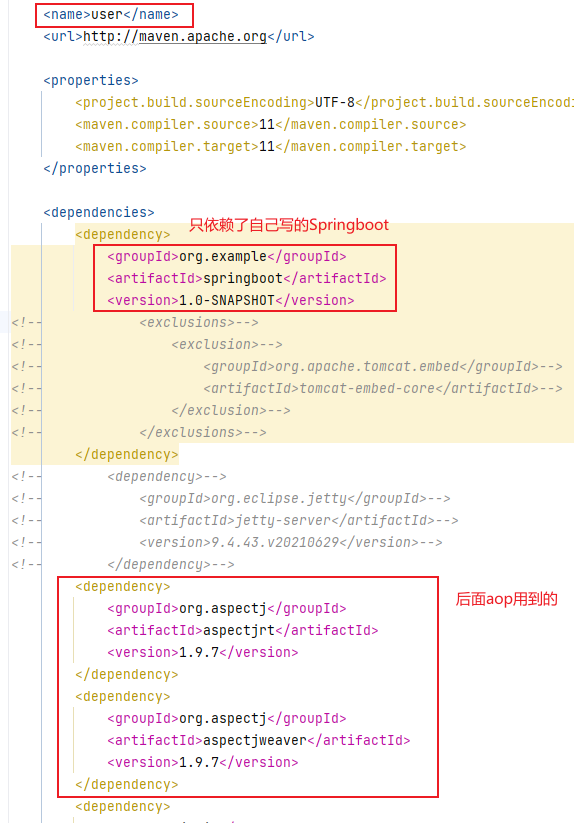
在User模块中使用AspectJ的时候,需要把它的jar包引入进来,这是程序员必须要做的:
        <dependency>
            <groupId>org.aspectj</groupId>
            <artifactId>aspectjrt</artifactId>
            <version>1.9.7</version>
        </dependency>
        <dependency>
            <groupId>org.aspectj</groupId>
            <artifactId>aspectjweaver</artifactId>
            <version>1.9.7</version>
        </dependency>
引入上面的依赖之后,才能使用注解:@Aspect
然后在User模块配置一个切面:
@Component
@Aspect
public class TigerAspect {
    @Before("execution((public * org.example.service.UserService.test()))")
    public void tigerBefore(JoinPoint joinPoint){
        System.out.println("进入aop拦截的方法了");
    }
}
因为我们是为了验证http请求进来的时候,切面是否生效,而tomcat容器中,我们只简单的打印,所以需要修改一下:
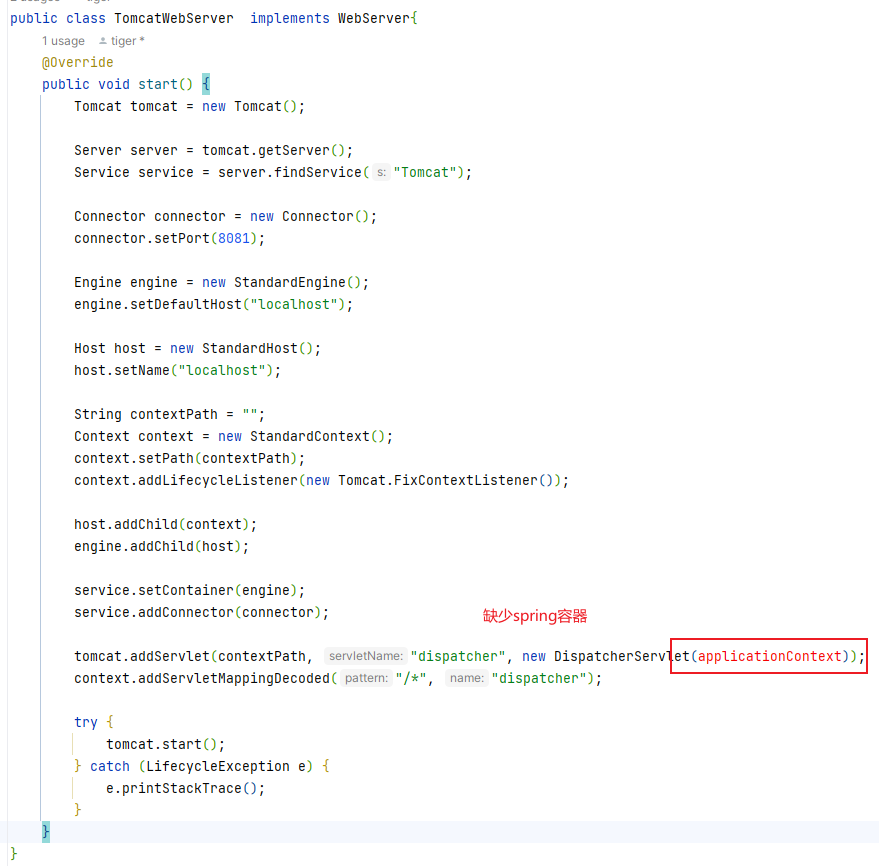
把方法挪上去之后,发现缺少spring容器。
如何获取Spring容器?
只要让TomcatWebServer实现接口ApplicationContextAware,这样就能拿到spring容器
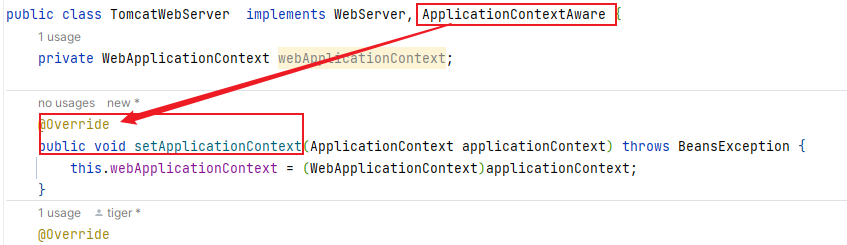
定义变量:
private WebApplicationContext webApplicationContext;
然后实现接口ApplicationContextAware,并重写方法setApplicationContext,这样在方法里面就可以给成员变量:WebApplicationContext赋值了。
实现效果如下:
[外链图片转存失败,源站可能有防盗链机制,建议将图片保存下来直接上传(img-I8iPnhPZ-1690601777928)(https://typora-chenhui-2021-08-03.oss-cn-shenzhen.aliyuncs.com/img/aop拦截.gif)]
在userService中,我们只添加了pom依赖,并没有在启动类增加开启aop的注解,就能在项目中使用aop功能。这是我们写的配置类:AopAutoConfiguration自动生效了。