罗布乐思
文章目录
- 罗布乐思
- 基本操作
- CFrame
- GUI
- Module script
- 呼吸灯
- 商店
- imageChange
- tag标签
- 知识答题
- show
- Tips
基本操作
缩放按shift 等比例缩放
ctrl 双向缩放
复制对象 ctrl+D (如果选择多个对象,按住ctrl)
F 聚焦
Workspace
Terrain 地形
SpawnLocation 重生点(角色重生的地方)
组合,左键框住,将同种属性的进行组合方便管理
组合功能只能用于基础部件(部件下不能有任何子项,如脚本或表面GUI等)
镂空功能
类似于实现门,窗之类的
先选择一块部件,选择镂空,然后移动到里面,然后组合即可
撤回的话,要选中,然后按分离
贴图(类似于喷漆吧)
贴图导入,就是图片导入到素材管理器,然后把图片贴上去,face是调整图片所在的位置
还有一种方法,选择部件,加号,选择Decal,然后单机贴图的区域,
找到属性Texture
Assembly
线速度
改变x的值的话就可以实现传送带的功能,但是注意要进行锚固(试了一下没锚固实现不了传送带的功能)
改变y的值可以实现蹦床
角速度
改变y的值实现大转盘
铰链会以黄色的轴为转轴,棕色的为旋转起始点,制作开门,黄色的指向上方,棕色的指向门的地方
那如果是设置会自动关闭的门的话,设置成motor,第一个参数角速度设置成-5,第三个参数马达转矩设置成2000
手电筒的制作,要有一个handle,拿在手上的东西,然后要把两个放在tool中
spotlight 灯光
beam实现图片的滚动
trial 拖尾效果
粒子发射器
图形用户界面
通常放入StarterGui中
用local script
实现点赞
但是如果放到part里面去的话,就要用script,用local script不行
实现到part里面,在part中加入SurfaceGui或者billbordGui(随摄像头移动而移动),然后把图片移进去即可(如果修改Adornee属性,就是把这个属性改成要装饰的那个东西)
游戏存档,重生点
首先建立重生点,然后把netural的勾去掉,把下面的allow啥的勾上,然后改变team color的颜色
再在teams里面创建team,改变team color的颜色,注意颜色要与上面的相对应,颜色的顺序也是有讲究的
制作爆炸赛道,随机爆炸
组队创作实现---------电子科技大学第9课70分钟左右那里有
startGui里面的东西是存在服务器里面,每当有玩家加入的时候,他会先把startGui里面的子对象拷贝一份到player下面的playerGui里面,所以之后如果修改startGui里面的东西是没有用的,他只是服务器的存档,
反重力实现悬浮
local part =script.Parent
local yForce=part.Mass*workspace.Gravity
local antiGravity = Instance.new("BodyForce",part)
antiGravity.Force = Vector3.new(0,yForce-0.5,0)
CFrame
model是没有CFrame的,要用setPrimaryPartCFrame
Cframe实现跟着人物转动
wait(5)
local part =script.Parent
local players = game.Players:GetPlayers()
local player = players[1]
local head = player.Character.Head

while wait () do
	part.CFrame = CFrame.new(part.Position,head.Position)--第二个参数是目标位置
end
没有wait会报错,attempt to index nil with character
意思是人物还没有加载好
CFrame实现物品的旋转
local rotate =workspace.rotate
while wait() do
rotate.CFrame*=CFrame.Angles(0,math.rad(10),0)--弧度转为角度
end
我用while true 就不行不知道为什么
CFrame旋转是以自己的轴为旋转轴的,而不是以世界全局的xyz为旋转轴
CFrame中的Lerp(线性插值)
local Lerp1 = game.Workspace.Lerp1
local Lerp2 = game.Workspace.Lerp2

local lerp3=game.Workspace.Lerp3

local d=1
local alpha = 0.1


while wait() do
	lerp3.CFrame=Lerp1.CFrame:Lerp(Lerp2.CFrame,alpha)--alpha为0的话就是和lerp1重合,1的话和lerp2重合
	alpha+=d*0.01
	if alpha>=0.9 or alpha <= 0.1 then
		d= -d
	end
end
WeldConstraint约束实现拾取钥匙,不用tool,且只能拾取一个
WeldConstraints(接合约束)用于将两个 parts(部件)连接在一起。该约束确保部件彼此保持相同的相对位置和方向,这意味着如果一个部件移动,另一个部件也会移动相同的量。即使两个部件彼此没有接触,也可以使用接合约束将它们接合在一起。
通过各个部件组合成钥匙后改颜色时发现颜色改不了,此时要去属性下面把UsePartColor勾上
local key =script.Parent
key.ProximityPrompt.Triggered:Connect(function(player)
	key.ProximityPrompt.Enabled=false --防止钥匙拿到手后还会出现交互界面
	local character = player.Character or player.CharacterAdded:Wait()
	local rightHand = character:FindFirstChild("RightHand")
	key.CFrame = rightHand.CFrame*CFrame.Angles(0,math.rad(90),math.rad(180))--就是调整位置吧
	local weld = Instance.new("WeldConstraint",key)
	weld.Part0=rightHand
	weld.Part1=key
end)

--上面代码有个问题就是我拾取另一把钥匙之后,我先前的钥匙就没了,上面的代码就是把所有钥匙都捡起来了


local key =script.Parent

key.ProximityPrompt.Triggered:Connect(function(player)
	key.ProximityPrompt.Enabled=false --防止钥匙拿到手后还会出现交互界面
	local character = player.Character or player.CharacterAdded:Wait()
	local rightHand = character:FindFirstChild("RightHand")
	--假如手上已经有钥匙了再去pick up的话,就把原来的weld取消掉,原来的钥匙放回地面上去,交互功能重新变回true
	if(character:FindFirstChild("key1")) then
		local oldkey=character.key1
		oldkey.WeldConstraint:Destroy()
		oldkey.Parent = workspace
		oldkey.ProximityPrompt.Enabled=true
	end

	key.Parent=character
	key.CFrame = rightHand.CFrame*CFrame.Angles(0,math.rad(90),math.rad(180))--就是调整位置吧
	local weld = Instance.new("WeldConstraint",key)
	weld.Part0=rightHand
	weld.Part1=key
end)
Proximity Prompt 和 ClickDetector
实现物品互动

cliablePrmpt 能否通过鼠标来实现
HoldDuration 如果不是0的话,就是长按E多少秒才会触发
script.Parent.Triggered:Connect(function(palyer)
	print(palyer.Name .."和".. script.Parent.Name .."发生了交互" )
	if script.Parent.Parent.BrickColor~=BrickColor.Black() then
		script.Parent.Parent.BrickColor=BrickColor.Black()
	else script.Parent.Parent.BrickColor=BrickColor.Yellow()
	end
end)


script.Parent.MouseClick:Connect(function(player)
	print(player.Name .."和" .. script.Parent.Name .. "发生了交互")
	script.Parent.Parent.BrickColor = BrickColor.Green()
end)


--这里实现的是通过交互来改变Part的颜色的功能
点赞功能的实现
local button = script.Parent:WaitForChild("ImageButton")--这个方法就是找孩子的意思,因为此时脚本和这两个对象是平级的关系,如果直接.对象的话,可能脚本比两个对象先加载完,那么此时就会报错,用WaitForChild这个就可以一直等到对象创建好再返回
local label = script.Parent:WaitForChild("TextLabel")
local clickCount = 0

button.MouseButton1Click:Connect(function()
	clickCount = clickCount + 1
	label.Text = tostring(clickCount)
end)
碰撞某个东西,玩家就挂了
local trapPart = script.Parent

local function onPartTouch(otherPart)
	local partParent = otherPart.Parent
	local humanoid = partParent:FindFirstChildWhichIsA("Humanoid")
	if humanoid then
		-- 将玩家的生命值设为 0
		humanoid.Health = 0
	end
end
trapPart.Touched:Connect(onPartTouch)


local trapPart = script.Parent
--local function onPartTouch(otherPart)
--	local partParent = otherPart.Parent
--	local humanoid = partParent:FindFirstChildWhichIsA("Humanoid")
--	if humanoid then
--		-- 将玩家的生命值设为 0
--		humanoid.Health = 0
--	end
--end
--trapPart.Touched:Connect(onPartTouch)

local function onTouch(other)
	if other.Parent:FindFirstChild("Humanoid") then
		local character=other.Parent
		local humanoid=character.Humanoid
		humanoid.Health=0
	end
end

trapPart.Touched:Connect(onTouch)--很奇怪,这个onTouch后面加括号就实现不了,但是这是括号是编译器自己加的


--某个东西被碰到了,然后就变红色,parent是被碰到的东西,part是去碰东西的东西
local parent = script.Parent
parent.Touched:Connect(function(part))
    parent.BrickColor=BrickColor.Red()
end
touch加上Debounce(就差不多是设定一个无敌时间)

随机爆炸,然后爆炸前会有红色显示出来,如果变红色了,说明马上就要爆炸了
local children = game.Workspace:GetChildren()--获取所有的子集
while true do
	for _, child in ipairs(children) do
		if child.Name=="ExplosionPart" then
			if child.BrickColor == BrickColor.Red() then
				local explosion = Instance.new("Explosion")
				explosion.Position=child.Position
				explosion.Parent=game.Workspace
				child.BrickColor=BrickColor.Black()
			else
				local number=math.random(1,3)
				if number==1 then
					child.BrickColor=BrickColor.Red()
				end
			end
		end
	end
	wait(2)
end
小方块本来是在另一个方块上面,Cancollide是可以碰撞的意思,如果是true的话,小方块就不会掉落下来
Transparency是透明度的意思,设置为1就是透明的
wait (10)
script.Parent.CanCollide=false
GUI
怎么实现按下一个按钮,让一扇门打开,按下一个按钮,出现一个交互式的屏幕GUI
怎么实现玩家进行了某种操作后,然后出现某一个交互式屏幕GUI
实现的是按下某一个按钮(× ×)让screenGui关闭,不知道为什么从game里面找StsrtGui再往下找到ScreenGui就不能实现该功能
local button = script.Parent
local screenGui = script.Parent.Parent.Parent
--local screenGui = game.StarterGui:WaitForChild("ScreenGui")

button.MouseButton1Click:Connect(function()
	screenGui.Enabled=false
end)
场景内的传送
script.Parent.Touched:Connect(function(other)
    local humanoid=other.Parent:FindFirstChild("Humanoid")
        if(humanoid) then
            other.Parent:WaitForChild("HumanoidRootPart").CFrame = CFrame.new(game.Workspace.Checkpoint1.PrimaryPart.Position+Vector3.new(0,0,10))
            --为什么参数是HumanoidRootPart,应该是去humanoid里找他的PrimaryPart,然后还要再加个距离,使出来的地方离传送点有点距离,并不是加在z轴,看情况的,这句话的意思就是改变人物的位置,等号右边是传送点的位置
    end
    end)
script.Parent.Touched:Connect(function(other)
    local humanoid=other.Parent:FindFirstChild("Humanoid")
        if(humanoid) then
            other.Parent:WaitForChild("HumanoidRootPart").CFrame = CFrame.new(game.Workspace.part1.Position+Vector3.new(0,10,0))
    end
    end)
跨场景的传送
与NPC的对话
在NPC的head下面添加dialog,然后再dialog中添加dialogchoice,注意如果要多次对话的话,就继续再dialogChoice下添加dialogchoice,是子集,不是同级
NPC的移动
下面是两点之间的移动
local humanoid =human.Humanoid
local pointA = script.Parent
local pointB = game.Workspace.Greenflag2
local next = pointA

while wait(delay) do
	humanoid:MoveTo(next.Position)
	humanoid.MoveToFinished:Wait()
	if next==pointA then
		next=pointB
		else next=pointA
	end
end
跳跃的高度失效,可以把jump power改成JumpHeight即可
实现碰到某个部件出现烟雾的效果并且掉血 Instance

克隆函数实现克隆,然后Rock下面的Script里的函数是destoryed,实现过几秒后部件消失
rock的属性是怎么样的,下面克隆出来的东西的属性也会是怎样的,所以下面克隆后要对一些属性进行修改

坐椅子 在workspace上加seat就行
在桥上实现多个fire,要加上attachment,然后在attachment下面加上fire
Module script
就是很多地方要用到重复的函数,这时就可以把函数放到Module script里面,
在ServerStorge里面添加moduleScript
而且到时候修改代码时,只需要修改Mudule script 里面的代码,其他引用该函数的代码都会变(类似于C语言里面函数的功能吧)
[外链图片转存失败,源站可能有防盗链机制,建议将图片保存下来直接上传(img-cnbTmqGF-1690429026144)(D:\Typroa\photo\image-20220701140814635.png)]
上方是Mudule里面的函数,下方是调用该函数,mudule.startRotating(Part)就实现调用了
还有一个定义函数的方式:function module:StartRotating(part)
那么此时调用函数时就要写成module:startRotating(part)
呼吸灯
Enum 枚举的使用
local light =script.Parent

while(true) do
    i=math.random(0,255)
    j=math.random(0,255)
    k=math.random(0,255)
    light.Color = Color.fromRGB(i,j,k)
    wait(0.3)
    end
UserInputService
首先调用这个服务
然后这里实现的是一个霓虹的开关的效果,这个霓虹有PointLight的效果
如果键盘输入的J的话,就会实现开关

现在的问题是,当我的灯关了的时候,如果切换到服务器,此时灯就是开着的,即服务器并不知道我做了这个操作,此时就用到了远程事件
1.在ReplicatedStorage下面加一个RemoteEvent,重命名LightEvent
2.在StartGui下面的localScript中加入
local LightEvent = game:GetService("ReplicatedStorage"):WaitFOrChild("LightEvent")

添加LightEven:FireServer()这个方法,是客户端通知服务器来响应一些事情
4.在ServiceScriptService下面有个script
添加如下代码
这里就是OnserverEvent

可以看到FireServer()里面是没有参数的,但是接收的时候有个player参数,是因为默认第一个参数就是玩家的名称,fireServer里面如果有参数的话,都是排在player之后的
fire就是发送的意思、
发送到客户端,首先要申明一个players

这是localScript中的


商店
1.在ReplicatedStorage里面添加moduleScript用于存放商品的信息,并增加RemoteFunction重命名为PurchaseRequest
local module = {
	["hamster"]={
		name="hamster",
	    value = 10,
		Image='rbxassetid://' .. 10141042653,
	},
	["Dog1"]={
		name="Dog1",
		value=20,
		Image='rbxassetid://' .. 10141042857,
	},
	["Dog2"]={
		name="Dog2",
		value=30,
		Image='rbxassetid://' .. 10141043147,
	},
	["Dog3"]={
		name="Dog3",
		value=40,
		Image='rbxassetid://' .. 10141043319,
	},
	["Cat"]={
		name="Cat",
		value=50,
		Image='rbxassetid://' .. 10141043445,
	}
}
return module
2.在StartGui中添加ScreenGui,下面添加localScript
这里商店的页面不是手动添加的,要先在ReplicatedStorage下添加一个ItemTemlate(差不多就是一个模板吧),然后通过克隆实现
然后其实本来是可以手动添加的,而且商品信息也不需要放在moduleScript里面,直接添加就行,但是这是在数据量小的情况下可行,但是数据量大的话,还是得那样做,而且放在moduleScript里面便于维护与修改
local RelicatedStorage = game:GetService("ReplicatedStorage")
local module =require(RelicatedStorage:WaitForChild("ModuleScript"))--返回值是table类型


local shop = script.Parent
local ShopFrame = shop.Frame
local ItemContainer = ShopFrame.ItemContainer

local ItemTemplate = RelicatedStorage:WaitForChild("ItemTemplate")

local PurchaseRequest = RelicatedStorage:WaitForChild("PurchaseRequest")--RelicatedStorage下面定义一个remoteFunction命名为PurchaseRequest

for intemName, itemData in pairs(module) do
	local ItemFrame = ItemTemplate:Clone()
	ItemFrame.name.Text=itemData.name
	ItemFrame.value.Text=itemData.value
	ItemFrame.ImageLabel.Image=itemData.Image
	ItemFrame.TextButton.Text="购买"
	ItemFrame.name.TextScaled=true
	ItemFrame.value.TextScaled=true
	ItemFrame.TextButton.TextScaled=true


    --鼠标单击购买
	ItemFrame.TextButton.MouseButton1Click:Connect(function()
		local result = PurchaseRequest:InvokeServer(intemName)--!!!!!!!!!!
		if result then
			ItemFrame.TextButton.Text="成功"
			task.wait(2)
			ItemFrame.TextButton.Text="购买"
		else
			ItemFrame.TextButton.Text="失败"
			task.wait(2)
			ItemFrame.TextButton.Text="购买"
		end
	end)

	ItemFrame.Parent = ItemContainer --克隆的时候还要申明他的位置,一般这句话最好写在最后面
end
3.这是写在ServerScriptService中的script
local RelicatedStorage = game:GetService("ReplicatedStorage")
local PurchaseRequest = RelicatedStorage:WaitForChild("PurchaseRequest")----RelicatedStorage下面定义一个remoteFunction命名为PurchaseRequest
local module =require(RelicatedStorage:WaitForChild("ModuleScript"))

PurchaseRequest.OnServerInvoke = function(play,itemName) --用function的时候,第一个参数是玩家,好像是编译器默认生成的
	local result =false
	local itemData = module[itemName]
	if itemData == nil then --检查传过来的name是否存在
		return result
	end
	local coin =15 --自己定义一个钱
	if coin>=itemData.value then
		result=true
	end
	return result
end
RemoteEven是单向传递
而RemoteFunction是双向的,即会得到回复的,(function函数有个return的值)
上面那个就是最简单的版本,只能返回购买是否成功,后来想实现记录自己的金币,并且通过按金币后面的加号实现coin+10
1.一开始在客户端假设钱是15,然后点+号,发现在客户端显示钱是变成25了,但是在按购买的时候发现,此时的钱还是15,按加号并不会影响实际钱的数量,此时发现25只是在客户端,并未在服务器
2.于是用remoteEvent来传递到服务器,此时钱增加的功能可以实现了,购买的功能也可以实现,但是左上角钱的数量是并不变的(而实际的钱是在变的),我不管按加号还是购买左上角的都不会变
3.想到了remoteFunction,于是现在可以实现单击➕让钱变多且显示的功能,但是点击购买不能实时显示钱的多少,只有回来点+的时候才会显示
4.最后,通过改变RemoteFuction返回的值实现该功能,刚开始RemoteFunction返回的是true或是false,即钱够不够购买该商品。最后改成返回剩余的钱
然后想实现商店外面放着旋转的金币,捡到金币后金币数增加10(同样,金币用tag标签来实现,但是旋转的功能直接放在coin下面)
防止一次触碰增加很多的值要用到Debounce的思想
local collectionService = game:GetService("CollectionService")
local coins = collectionService:GetTagged("coin")


local isTrue={false}
for i,coin in pairs(coins) do
	coin.Touched:Connect(function(other)
		local humanoid = other.Parent:FindFirstChild("Humanoid")
		if humanoid then
			if not isTrue[i] then
				local Count = script.Parent.Text--这句话放第8行金币就不会变,放for循环外面的话就不会更新购买后的金币
				coin.Transparency=1
				Count+=10
				print(Count)
				isTrue[i]=true
				script.Parent.Text=Count
			end
		end
	end)
end
1.首先这个touch如果写部件下面的话,就不能在客户端显示,要在StartGui中用localScript来写
2.刚开始想到了用moduleScript,但是实现不了,于是想到用tags标签。
3.然后怎么实现让金币碰撞不会再次再次碰撞,而且怎么防止一次碰撞仅仅增加10元。因为人身体有很多个部件的。仅仅改透明度是不够的
4.有一种情况,就是当我先捡完金币后,去购买物品,再回来捡金币,此时左上角的钱还是之前总的钱加上10(并不会因为购买物品而减少钱),关键就是上方注释的那句话的位置,作用域
最后,想实现捡到金币后金币数随机增加,点击加号以及捡到金币后的一个动画效果(图片和文本都用Tween动画),于是就想到了用Tween动画
最后想实现一个背包的功能
local collectionService = game:GetService("CollectionService")
local coins = collectionService:GetTagged("coin")
local image =game.StarterGui.Shop.ImageLabel
--math.randomseed(tostring(os:time()):reverse():sub(1,7))
local Text_coin =script.Parent
local isTrue={false}
for i,coin in pairs(coins) do
coin.Touched:Connect(function(other)
local humanoid = other.Parent:FindFirstChild("Humanoid")
if humanoid then
if not isTrue[i] then
local Count = script.Parent.Text--这句话放第8行金币就不会变,放for循环外面的话就不会更新购买后的金币
coin.Transparency=1
isTrue[i]=true
local cloneImage = image:Clone()
cloneImage.Parent=script.Parent
cloneImage.Size=UDim2.new(0.8,0,0.8,0)
cloneImage.Position=UDim2.new(0.5+math.random(3,7)/10.0,0.5+math.random(3,7)/10.0)
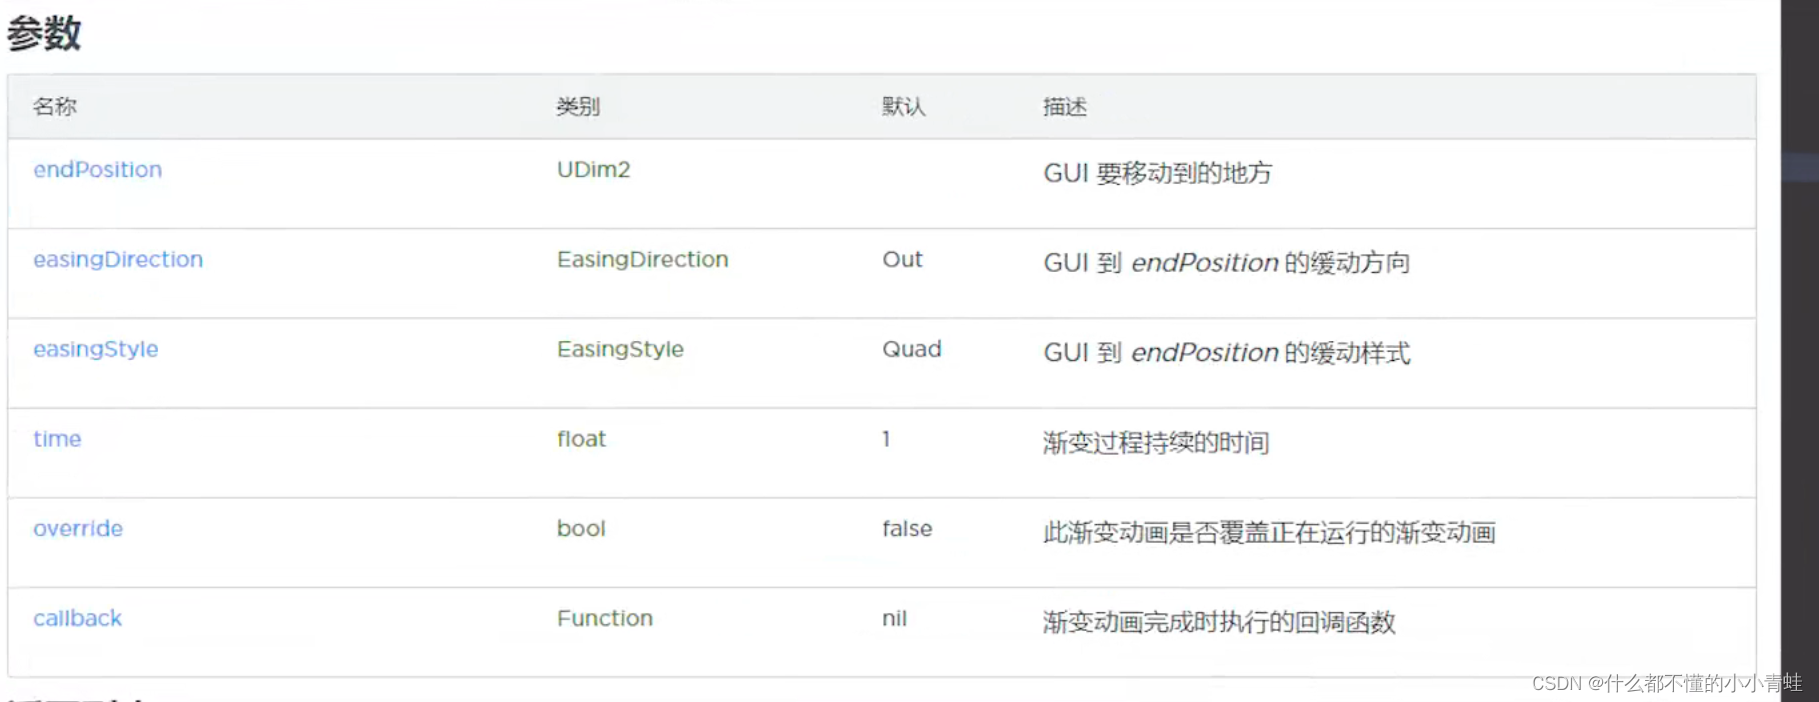
cloneImage:TweenSizeAndPosition(
UDim2.new(0,0,0,0),--设置目标尺寸
UDim2.new(0,0,0,0),--设置目标位置
Enum.EasingDirection.In,--缓动方向,默认是out
Enum.EasingStyle.Sine,--缓动样式,默认是Quad
2,--时间,默认是1
true,--此渐变应该覆盖正在运行的渐变动画吗,默认是false
function()
cloneImage:Destroy()
local add = math.random(1,20)
local temparyadd = add
while true do
if add <=10 then
for i=1,add,1 do
Count+=1
Text_coin.Text=Count
wait(0.01)
end
break
else
local randomNumber = math.random(4,9)
add-=randomNumber
Count+=randomNumber
Text_coin.Text=Count
wait(0.01)
end
end
local cloneText = Text_coin:Clone()
cloneText.Parent=script.Parent
cloneText.Text= "+" .. temparyadd
cloneText.Position = cloneText.Position+UDim2.new(math.random(4,9)/10.0,0,math.random(4,9)/10.0,0)
cloneText.Size=UDim2.new(0.6,0,0.6,0)
local MoveUdim2 = Text_coin.Position
--print(cloneText.Position)
--print(MoveUdim2)
cloneText:TweenPosition(
MoveUdim2,
Enum.EasingDirection.In,
Enum.EasingStyle.Sine,
1,
true,
function()
cloneText:Destroy()
end
)
end
)
--Count+=10
--print(Count)
--script.Parent.Text=Count
end
end
end)
end
在part中添加surfaceGui,再添加了一个textlable,在size中输入1,0,1,0就能实现textLable 覆盖整个part
然后把textScared勾上,就能实现文字的自动放大
imageChange
1.如何实现用户在使用的时候那个交互按钮消失,用户关闭的时候那个交互界面出现
2.如何达到part上的图片与Gui上的目前图片实现同步
3.Frame的使用以及ScrollingFrame(即旁边的滚轮,可以向下拖动),以及UIGridLayOut的作用,对齐方式选center
4.在实现ID输入的时候,获取ID必须在函数里面获取,在函数外面获取Text中的Text就不行,应该时因为点了那个Enter那个按钮再获取text值能确保text中有内容,一开始就获取可能就是没输入之前就获取了
tag标签
tag标签和CollectionService来控制相同的Object(下载了个插件Tag Editor)
这里我每个钥匙下面都有这个script的代码,于是我就用贴标签的方式,下面这段代码写在ServeScriptService下面
local CollectionService = game:GetService("CollectionService")

local keys = CollectionService:GetTagged("key")--预先把每个钥匙的标签贴好为“key”

for _,key in pairs(keys) do
	key.ProximityPrompt.Triggered:Connect(function(player)
		key.ProximityPrompt.Enabled=false --防止钥匙拿到手后还会出现交互界面
		local character = player.Character or player.CharacterAdded:Wait()
		local rightHand = character:FindFirstChild("RightHand")
		--假如手上已经有钥匙了再去pick up的话,就把原来的weld取消掉,原来的钥匙放回地面上去,交互功能重新变回true
		if(character:FindFirstChild("key1")) then
			local oldkey=character.key1
			oldkey.WeldConstraint:Destroy()
			oldkey.Parent = workspace
			oldkey.ProximityPrompt.Enabled=true
		end

		key.Parent=character
		key.CFrame = rightHand.CFrame*CFrame.Angles(0,math.rad(90),math.rad(180))--就是调整位置

		local weld = Instance.new("WeldConstraint",key)
		weld.Part0=rightHand
		weld.Part1=key
	end)
end
Scale是比例尺,而Offset是偏移量,如果用鼠标拖的话,移动的是Offset,这样的话,如果是手机来玩的话,这个界面就可能会超出边框了,所以必须要用比例尺,但是如果用比例尺,就要自己一个一个打上去然后调试很麻烦,这时候,就用到了AutoScale Lite插件
知识答题
1.和商店差不多,先把题目答案这些的事先存储在moduleScript中,而且把Gui的那些格式也先放在ReplicatedStorage下面。关键就是遍历的时候怎么实现按下一题才进行下一步循环。如果没有这个操作的话,所有题目都会合并到同一个页面中,Lua里面的for each很奇怪,不好直接控制,而且没有continue的功能
2.为什么确认提交时让她出现新的页面也要到players里面找,
startGui里面的东西是存在服务器里面,每当有玩家加入的时候,他会先把startGui里面的子对象拷贝一份到player下面的playerGui里面,所以之后如果修改startGui里面的东西是没有用的,他只是服务器的存档,
这是在StartGui下面的localScript
local ReplicatedStorage = game:GetService("ReplicatedStorage")
local Frame = ReplicatedStorage:WaitForChild("Frame")
local module = require(ReplicatedStorage:WaitForChild("Question"))

local QuestionTemplate = script.Parent.QuestionTemplate--不知道为什么从game这样一层一层下来就实现不了
local next=script.Parent.QuestionTemplate.next

--for num,data in pairs(module) do
--	local QusetionFrame= Frame:Clone()
--	QusetionFrame.A.Text=data.A
--	QusetionFrame.B.Text=data.B
--	QusetionFrame.C.Text=data.C
--	QusetionFrame.question.Text=data.question
--	QusetionFrame.cnt.Text=num
--	QusetionFrame.Parent=QuestionTemplate
--	--print(data.A)
--	--print(data.B)
--	--print(data.C)
--	local flag=0
--	next.MouseButton1Click:Connect(function()
--		num=num+1
--		flag=1
--		QusetionFrame:Destroy()
--	end)
--	break
--end
local num=1
local QusetionFrame= Frame:Clone()
QusetionFrame.A.Text=module[1].A
QusetionFrame.B.Text=module[1].B
QusetionFrame.C.Text=module[1].C
QusetionFrame.question.Text=module[1].question
QusetionFrame.cnt.Text=num .. "/5"
QusetionFrame.Parent=QuestionTemplate
local flagA=true
local flagB=true
local flagC=true

local YourAnswer ={}
local score = 0

next.MouseButton1Click:Connect(function()
	if YourAnswer[num]==module[num].answer then
		score = score + 1
	end
	num=num+1
	if num==5 then
		next.Text="确定提交"
	end
	if num==6 then
		local answer = game.Players.Robloxianc6m6s5o7r.PlayerGui.Answer
		answer.Enabled=false
		local result = game.Players.Robloxianc6m6s5o7r.PlayerGui.Result
		result.Enabled=true
		result.QuestionTemplate.TextLabel.Text="很遗憾"  .. "答错"  .. 5-score .. "题"
	else
	QusetionFrame.A.Text=module[num].A
	QusetionFrame.B.Text=module[num].B
	QusetionFrame.C.Text=module[num].C
	QusetionFrame.question.Text=module[num].question
	QusetionFrame.cnt.Text=num .. "/5"
	QusetionFrame.A.BorderColor3=Color3.fromRGB(170, 170, 127)
	QusetionFrame.B.BorderColor3=Color3.fromRGB(170, 170, 127)
	QusetionFrame.C.BorderColor3=Color3.fromRGB(170, 170, 127)
	flagA=true
	flagB=true
	flagC=true
	end
end)

local A=QusetionFrame.A
local B=QusetionFrame.B
local C=QusetionFrame.C

A.MouseButton1Click:Connect(function()
	if flagA==true then
		A.BorderColor3=Color3.fromRGB(5,255,13)
		YourAnswer[num]="A"
		flagA=false
	else
		A.BorderColor3=Color3.fromRGB(170, 170, 127)
		flagA=true
	end
end)

B.MouseButton1Click:Connect(function()
	if flagB==true then
		YourAnswer[num]="B"
		B.BorderColor3=Color3.fromRGB(5,255,13)
		flagB=false
	else
		B.BorderColor3=Color3.fromRGB(170, 170, 127)
		flagB=true
	end
end)

C.MouseButton1Click:Connect(function()
	if flagC==true then
		YourAnswer[num]="C"
		C.BorderColor3=Color3.fromRGB(5,255,13)
		flagC=false
	else
		C.BorderColor3=Color3.fromRGB(170, 170, 127)
		flagC=true
	end
end)
实现自动门的功能
Tween动画还有TouchEnded
local TweenService = game:GetService("TweenService")
local door = script.Parent
local door1 = door.d1
local door2 = door.d2
local touch = door.touch

local isOpen = false

local CFrameD1 = door1.CFrame
local CframeD2 = door2.CFrame

touch.Touched:Connect(function(other)
	local humanoid = other.Parent:FindFirstChild("Humanoid")
	if humanoid then
		local tweenInfo_open = TweenInfo.new(1.5,Enum.EasingStyle.Linear,Enum.EasingDirection.In)
		local open_d1 = {CFrame=CFrameD1+Vector3.new(0,0,-10)}
		local open_d2 = {CFrame=CframeD2+Vector3.new(0,0,10)}
		if not isOpen then
			isOpen=true
			local tween_d1 = TweenService:Create(door1,tweenInfo_open,open_d1)
			local tween_d2 = TweenService:Create(door2,tweenInfo_open,open_d2)
			tween_d1:Play()
			tween_d2:Play()
		end
	end
end)


touch.TouchEnded:Connect(function(other)
	local humanoid = other.Parent:FindFirstChild("Humanoid")
	if humanoid then
		local tweenInfo_open = TweenInfo.new(1.5,Enum.EasingStyle.Linear,Enum.EasingDirection.In)
		local close_d1 = {CFrame=CFrameD1}
		local close_d2 = {CFrame=CframeD2}
		if isOpen then
			isOpen=false
			local tween_d1 = TweenService:Create(door1,tweenInfo_open,close_d1)
			local tween_d2 = TweenService:Create(door2,tweenInfo_open,close_d2)
			tween_d1:Play()
			tween_d2:Play()
		end
	end
end)
Gui的Tween动画
show
UIGradient 渲染颜色颜色梯度(开始的Start用到了这个东东)
然后是一个传送门,主要是CFrame
local door=script.Parent
door.Touched:Connect(function(other)
	local humanoid=other.Parent:FindFirstChild("Humanoid")
	if humanoid then	other.Parent:WaitForChild("HumanoidRootPart").CFrame=CFrame.new(game.Workspace.red.Position+Vector3.new(0,0,10))
	end
end)
克隆
local fangkuai = script.Parent

function clon()
	local newFangkuai=Instance.new('Part',workspace)
	newFangkuai.Position=Vector3.new(90, 17.5, 132)
	--local newFangkuai = fangkuai:Clone()
	--newFangkuai.Parent=script.Parent
	--newFangkuai.Anchored=false
	wait(5)
	newFangkuai:Destroy()
end
while true do
	clon()
end
Lerp线性插值
local Lerp1 = game.Workspace.Lerp1
local Lerp2 = game.Workspace.Lerp2

local lerp3=game.Workspace.Lerp3

local d=1
local alpha = 0.1


while wait() do
	lerp3.CFrame=Lerp1.CFrame:Lerp(Lerp2.CFrame,alpha)
	alpha+=d*0.01
	if alpha>=0.9 or alpha <= 0.1 then
		d= -d
	end
end
Tween动画
local TweenService = game:GetService("TweenService")

local part = script.Parent
local position = part.CFrame

local tweenInfo = TweenInfo.new(
	2,--Time
	Enum.EasingStyle.Quad,--EasingStyle
	Enum.EasingDirection.In,--EasingDirection
	-1,--RepeatCount(-1代表无限循环)
	true,--Reverses(tween完成目标后会反转)
	0--DelayTime
)
local Cframe ={CFrame=position+Vector3.new(15,0,0)}

local tween = TweenService:Create(part,tweenInfo,Cframe)

tween:Play()
wait(100)
tween:Cancel()
CFrame
实现旋转
local rotate =script.Parent
while wait() do
	rotate.CFrame*=CFrame.Angles(0,math.rad(10),0)
end
实现某始终跟着我人物的,类似于监控会实时转动
wait(15)
local part =script.Parent
local players = game.Players:GetPlayers()
local player = players[1]
local head = player.Character.Head

while wait () do
	part.CFrame = CFrame.new(part.Position,head.Position)--第二个参数是目标位置
end
反重力BodyForce
local part =script.Parent
local yForce=part.Mass*workspace.Gravity
local antiGravity = Instance.new("BodyForce",part)
antiGravity.Force = Vector3.new(0,yForce-1,0)
然后一个部件是只能实现一个效果的,那怎么实现多个效果呢,就用到了Attachment,
key
1.tags标签 ,CollectionService
2.代码写在ServeScriptService中
3.WeldConstraint
local CollectionService = game:GetService("CollectionService")

local keys = CollectionService:GetTagged("key")

for _,key in pairs(keys) do
	key.ProximityPrompt.Triggered:Connect(function(player)
		key.ProximityPrompt.Enabled=false --防止钥匙拿到手后还会出现交互界面
		local character = player.Character or player.CharacterAdded:Wait()
		local rightHand = character:FindFirstChild("RightHand")
		--假如手上已经有钥匙了再去pick up的话,就把原来的weld取消掉,原来的钥匙放回地面上去,交互功能重新变回true
		if(character:FindFirstChild("key1")) then
			local oldkey=character.key1
			oldkey.WeldConstraint:Destroy()
			oldkey.Parent = workspace
			oldkey.ProximityPrompt.Enabled=true
		end
		key.Parent=character
		key.CFrame = rightHand.CFrame*CFrame.Angles(0,math.rad(90),math.rad(180))--就是调整位置吧

		local weld = Instance.new("WeldConstraint",key)
		weld.Part0=rightHand
		weld.Part1=key
	end)
end
自动感应门
1.用到了TweenService
2.touched的使用
3.Tween动画的使用
local TweenService = game:GetService("TweenService")
local door = script.Parent
local door1 = door.d1
local door2 = door.d2
local touch = door.touch

local isOpen = false

local CFrameD1 = door1.CFrame
local CframeD2 = door2.CFrame

touch.Touched:Connect(function(other)
	local humanoid = other.Parent:FindFirstChild("Humanoid")
	if humanoid then
		local tweenInfo_open = TweenInfo.new(1.5,Enum.EasingStyle.Linear,Enum.EasingDirection.In)
		local open_d1 = {CFrame=CFrameD1+Vector3.new(0,0,-10)}
		local open_d2 = {CFrame=CframeD2+Vector3.new(0,0,10)}
		if not isOpen then
			isOpen=true
			local tween_d1 = TweenService:Create(door1,tweenInfo_open,open_d1)
			local tween_d2 = TweenService:Create(door2,tweenInfo_open,open_d2)
			tween_d1:Play()
			tween_d2:Play()
		end
	end
end)


touch.TouchEnded:Connect(function(other)
	local humanoid = other.Parent:FindFirstChild("Humanoid")
	if humanoid then
		local tweenInfo_open = TweenInfo.new(1.5,Enum.EasingStyle.Linear,Enum.EasingDirection.In)
		local close_d1 = {CFrame=CFrameD1}
		local close_d2 = {CFrame=CframeD2}
		if isOpen then
			isOpen=false
			local tween_d1 = TweenService:Create(door1,tweenInfo_open,close_d1)
			local tween_d2 = TweenService:Create(door2,tweenInfo_open,close_d2)
			tween_d1:Play()
			tween_d2:Play()
		end
	end
end)
Tips
- model是没有CFrame的,要用setPrimaryPartCFrame
- attempt to index nil with character人物还没有加载好。类似的可能就是某个部件的脚本先加载完成(脚本和这两个对象是平级的关系,如果直接.对象的话,可能脚本比两个对象先加载完,那么此时就会报错),如果是while true 的话改成while wait(),如果是找某个部件的话,可以改成WaitForChild,还有可以在开头加上wait(10)这种


![[SSM]Spring面向切面编程AOP](https://img-blog.csdnimg.cn/766135b9ed94492a93433ea4409b06b6.png)