WebGPU(八):三角形渲染
三角形的渲染其实很简单,只是需要设置很详细的render pipeline以及shader。
// Select which render pipeline to use
wgpuRenderPassEncoderSetPipeline(renderPass, pipeline);
// Draw 1 instance of a 3-vertices shape
wgpuRenderPassEncoderDraw(renderPass, 3, 1, 0, 0);
渲染管线(Render Pipeline)
为了实现高性能的实时 3D 渲染,GPU 通过预定义的管道处理图形。管道本身总是相同的(它通常被烧录到硬件的物理架构中),但我们可以通过多种方式对其进行配置。为此,WebGPU 提供了一个渲染管线Render Pipeline对象。
如果您熟悉 OpenGL,则可以将 WebGPU 的渲染管线视为配置渲染管线的所有有状态函数(stateful functions)的记忆值(memorized value).
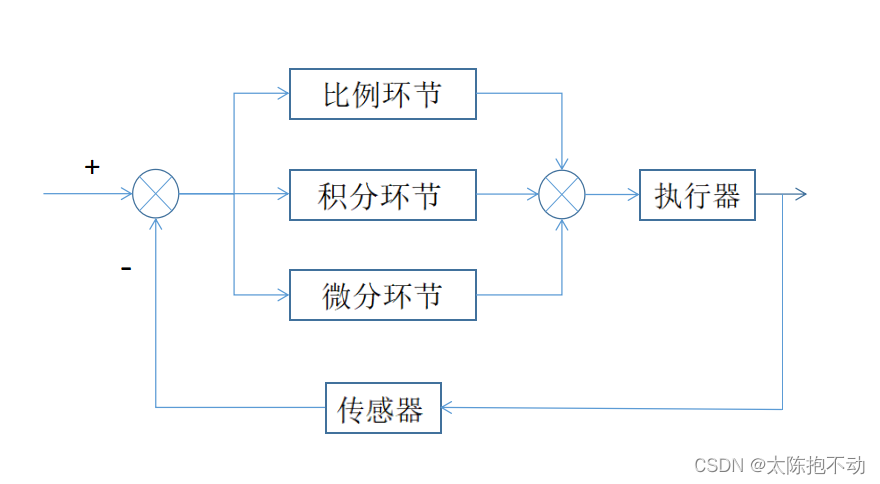
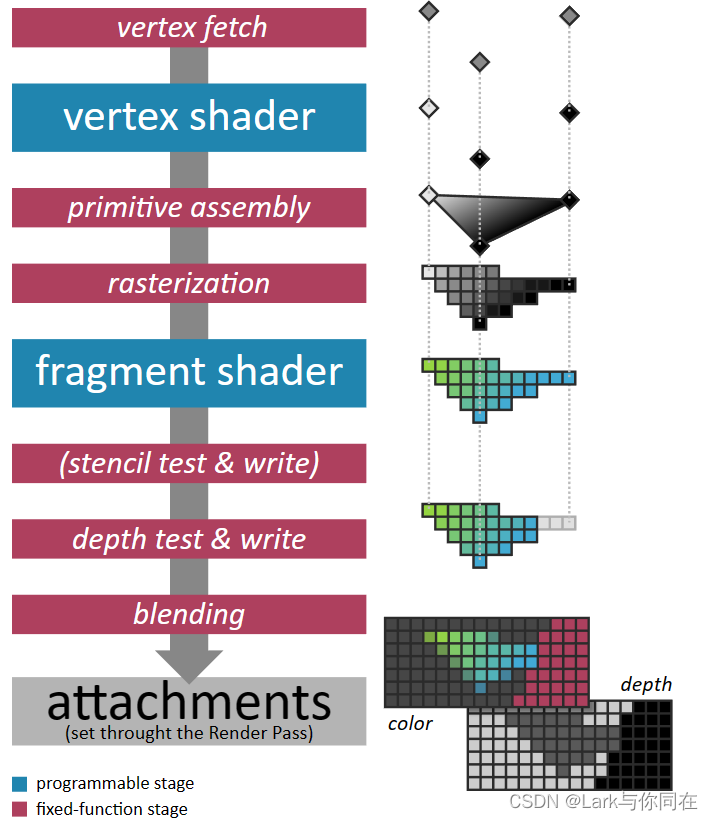
下图说明了渲染管线执行的数据处理阶段的顺序。它们中的大多数是固定函数级,为此我们只能自定义一些变量,但最强大的是可编程级。
在这些可编程阶段,真正的程序(称为着色器)以大规模并行方式执行(跨输入顶点或跨栅格化片段)。
其他图形 API 提供对可编程性更强的阶段(geometry着色器、mesh着色器、task着色器)的访问。这些不是 Web 标准的一部分。它们将来可能会作为仅限本机的扩展提供,但在很多情况下,可以使用general compute shader来模拟它们的行为。
像以往一样,我们先创建pipeline的描述字符:
C++版:
RenderPipelineDescriptor pipelineDesc;
// [...] Describe render pipeline
RenderPipeline pipeline = device.createRenderPipeline(pipelineDesc);

C版:
WGPURenderPipelineDescriptor pipelineDesc{};
pipelineDesc.nextInChain = nullptr;
// [...] Describe render pipeline
WGPURenderPipeline pipeline = wgpuDeviceCreateRenderPipeline(device, &pipelineDesc);
Vertex pipeline state(顶点管线状态)
vertex fetch以及vertex shader阶段的设置都是通过vertex state这个结构体来配置的,可以通过pipelineDesc.vertex来获取该字符。
在render pipeline 中,它hi先获取vertex的特性,包括位置,颜色,法线等,但是在我们这个历程中,我们固定三角形三个顶点的位置,因而我们完全不需要三角形的位置缓存。
pipelineDesc.vertex.bufferCount = 0;
pipelineDesc.vertex.buffers = nullptr;
Vertex Shader
Vertex shader一般包含下面几个组成:
- shader module, 包含shader的源码
- entry point,这是着色器模块中必须为每个顶点调用的函数的名称。这使给定的着色器模块能够同时包含多个渲染管线配置的入口点。在本例程中,我们对顶点和片段着色器使用相同的模块。
- 着色器常量的值赋值数组。我们暂时不使用。
pipelineDesc.vertex.module = shaderModule;
pipelineDesc.vertex.entryPoint = "vs_main";
pipelineDesc.vertex.constantCount = 0;
pipelineDesc.vertex.constants = nullptr;
Primitive pipeline state(图元管线状态)
pipelineDesc.primitive中的primitive state结构体可以设置 primitive assembly以及rasterization阶段。
rasterization,光栅化是 GPU 实现的 3D 渲染算法的核心。它将基元(primitive)(点、线或三角形)转换为一系列片段(fragments),这些片段对应于基元覆盖的像素。它插入顶点着色器输出的任何额外属性,以便每个片段接收所有属性的值。
基元程序集配置包括说明之前获取的顶点数组必须如何连接到点云、线框或三角组。我们将其设置为默认值。
C++ :
// Each sequence of 3 vertices is considered as a triangle
pipelineDesc.primitive.topology = PrimitiveTopology::TriangleList;

// We'll see later how to specify the order in which vertices should be
// connected. When not specified, vertices are considered sequentially.
pipelineDesc.primitive.stripIndexFormat = IndexFormat::Undefined;

// The face orientation is defined by assuming that when looking
// from the front of the face, its corner vertices are enumerated
// in the counter-clockwise (CCW) order.
pipelineDesc.primitive.frontFace = FrontFace::CCW;

// But the face orientation does not matter much because we do not
// cull (i.e. "hide") the faces pointing away from us (which is often
// used for optimization).
pipelineDesc.primitive.cullMode = CullMode::None;

C:
// Each sequence of 3 vertices is considered as a triangle
pipelineDesc.primitive.topology = WGPUPrimitiveTopology_TriangleList;

// We'll see later how to specify the order in which vertices should be
// connected. When not specified, vertices are considered sequentially.
pipelineDesc.primitive.stripIndexFormat = WGPUIndexFormat_Undefined;

// The face orientation is defined by assuming that when looking
// from the front of the face, its corner vertices are enumerated
// in the counter-clockwise (CCW) order.
pipelineDesc.primitive.frontFace = WGPUFrontFace_CCW;

// But the face orientation does not matter much because we do not
// cull (i.e. "hide") the faces pointing away from us (which is often
// used for optimization).
pipelineDesc.primitive.cullMode = WGPUCullMode_None;
通常我们设置剔除模式(cull MOde)以避免在渲染对象内部时浪费资源。但是对于初学者来说,几个小时在屏幕上什么也看不到只是发现三角形朝向错误的方向可能会非常令人沮丧,所以我们可以在开发时将其设置为
None。
Fragment shader
将基元(primitive)转换为片段(fragment)后,将为每个primitive调用片段着色器阶段。此着色器接收顶点着色器生成的插值,并且必须依次输出fragment的最终颜色。
请记住,所有这些阶段stages都发生在一个并行和异步的环境中。渲染大型网格时,可以在栅格化最后一个基元之前调用第一个基元的片段着色器。
fragment shader的设置非常类似vertex的设置:
C++:
FragmentState fragmentState;
fragmentState.module = shaderModule;
fragmentState.entryPoint = "fs_main";
fragmentState.constantCount = 0;
fragmentState.constants = nullptr;
// [...] We'll configure the blend stage here
pipelineDesc.fragment = &fragmentState;

C:
WGPUFragmentState fragmentState{};
fragmentState.module = shaderModule;
fragmentState.entryPoint = "fs_main";
fragmentState.constantCount = 0;
fragmentState.constants = nullptr;
// [...] We'll configure the blend stage here
pipelineDesc.fragment = &fragmentState;
请注意,片段阶段是可选的,其(可能为 null)指针也是可选的,而不是直接设置片段状态结构。
Stencil / Depth stage (模板/深度过程)
这两个概念在之前的attachment的内容中也提及。
深度测试Depth test用于丢弃与同一像素关联的其他片段后面的片段。请记住,片段是给定基元在给定像素上的投影,因此当基元相互重叠时,会为同一像素发射多个片段。片段具有深度信息,供深度测试使用。
模板测试Stencil test是另一种片段丢弃机制,用于隐藏基于先前渲染的基元的片段。让我们暂时忽略深度和模板机制,我们将在深度缓冲区章节中介绍它们。
pipelineDesc.depthStencil = nullptr;
Blending(融合过程)
混合阶段(blending stage)采用每个片段的颜色和”涂料“它到目标color attachment上。如果目标像素中的原始颜色是(rd,gd,bd,ad),而要绘制的源片段的颜色是(rs,gs,bs,as),那么最终像素的最终颜色(r,g,b,a)应该是什么?这是混合状态指定的内容。
我们还必须指定颜色要存储在最终attachment中的格式(即如何将值表示为零和一)。
C++:
BlendState blendState;
// [...] Configure blend state

ColorTargetState colorTarget;
colorTarget.format = swapChainFormat;
colorTarget.blend = &blendState;
colorTarget.writeMask = ColorWriteMask::All; // We could write to only some of the color channels.

// We have only one target because our render pass has only one output color
// attachment.
fragmentState.targetCount = 1;
fragmentState.targets = &colorTarget;

C:
WGPUBlendState blendState{};
// [...] Configure blend state

WGPUColorTargetState colorTarget{};
colorTarget.format = swapChainFormat;
colorTarget.blend = &blendState;
colorTarget.writeMask = WGPUColorWriteMask_All; // We could write to only some of the color channels.

// We have only one target because our render pass has only one output color
// attachment.
fragmentState.targetCount = 1;
fragmentState.targets = &colorTarget;
混合方程可以单独设置 rgb 通道和 alpha 通道,通常采用以下形式:

C++:
blendState.color.srcFactor = BlendFactor::SrcAlpha;
blendState.color.dstFactor = BlendFactor::OneMinusSrcAlpha;
blendState.color.operation = BlendOperation::Add;

C:
blendState.color.srcFactor = WGPUBlendFactor_SrcAlpha;
blendState.color.dstFactor = WGPUBlendFactor_OneMinusSrcAlpha;
blendState.color.operation = WGPUBlendOperation_Add;
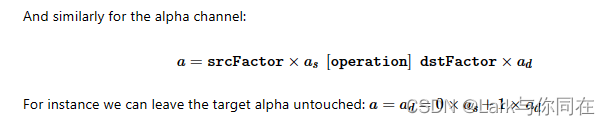
对于alpha通道:
多重采样(Multi-sampling)
前面说过,片段(fragment)是投影到特定像素上的基元(primitive)部分。实际上,我们可以将像素拆分为子元素(sub-element),称为样本(sampling),片段与样本相关联。像素的值是通过对其关联样本求平均值来计算的。
这种机制称为多重采样,用于抗锯齿(anti-aliasing),但我们暂时将其关闭,方法是将每个像素的采样数设置为 1。
// Samples per pixel
pipelineDesc.multisample.count = 1;
// Default value for the mask, meaning "all bits on"
pipelineDesc.multisample.mask = ~0u;
// Default value as well (irrelevant for count = 1 anyways)
pipelineDesc.multisample.alphaToCoverageEnabled = false;
Shaders(着色器)
点和片段可编程阶段都使用相同的着色器模块,我们必须首先创建该模块。这个模块是一种动态库,就像.dll、.so 或 .dylib 文件一样,只不过它使用你的 GPU 的二进制语言而不是你的 CPU 的二进制语言。
像任何编译的程序一样,着色器首先用人类可写的编程语言编写,然后编译成低级机器代码。但是,低级代码高度依赖于硬件,并且通常不会公开记录。因此,应用程序与着色器的源代码一起分发,这些源代码是在初始化应用程序时动态编译(compiled on the fly)的。
shader code
WebGPU 正式使用的着色器语言称为 WGSL,即 WebGPU 着色语言(WebGPU Shading Language)。任何 WebGPU 的实现都必须支持它,并且 JavaScript 版本的 API 仅支持 WGSL,但native header还提供了提供用 SPIR-V 或 GLSL 编写的着色器的可能性(仅wgpu-native支持)。
SPIR-V更像是一种中间表示,一个字节码,而不是人们手动编写的东西。它是 Vulkan API 使用的着色器语言,并且存在许多工具来交叉编译来自其他常见着色器语言(HLSL、GLSL)的代码,因此当需要重用现有的着色器代码库时,这是一个较好的选择。
另请注意,WGSL 被设计为SPIR-V 编程模型的人类可编辑版本,因此从 SPIR-V 到 WGSL 的转换是高效且无损的(为此使用 Naga 或 Tint)
三角形的绘制shader如下:
@vertex
fn vs_main(@builtin(vertex_index) in_vertex_index: u32) -> @builtin(position) vec4f {
    var p = vec2f(0.0, 0.0);
    if (in_vertex_index == 0u) {
        p = vec2f(-0.5, -0.5);
    } else if (in_vertex_index == 1u) {
        p = vec2f(0.5, -0.5);
    } else {
        p = vec2f(0.0, 0.5);
    }
    return vec4f(p, 0.0, 1.0);
}

@fragment
fn fs_main() -> @location(0) vec4f {
    return vec4f(0.0, 0.4, 1.0, 1.0);
}
这里builtin(vertex_index)的数值如何确定?思考:应该是默认为0所以后面自动进行初始化
以@开头的标记称为属性Attribute,并用各种信息装饰后面的对象。例如, @builtin(vertex_index)告诉参数in_vertex_index 这个参数可以用其他任何名称,该参数将由内置输入顶点属性(即顶点索引)填充。我们使用它来设置着色器的输出值,该值被标记为必须由光栅器解释为顶点位置的内容。@@builtin(vertex_index)in_vertex_index@builtin(position)
我们可以保存到文本中,但同样可以作为字符保存到代码中:
const char* shaderSource = R"(
[...] The WGSL shader source code
)";
创建shader模块
像之前一样,我们先创建shader的描述字符:
C++:
ShaderModuleDescriptor shaderDesc;
// [...] Describe shader module
ShaderModule shaderModule = device.createShaderModule(shaderDesc);
C:
WGPUShaderModuleDescriptor shaderDesc{};
// [...] Describe shader module
WGPUShaderModule shaderModule = wgpuDeviceCreateShaderModule(device, &shaderDesc);
乍一看,这个描述符似乎只有一组编译“提示”需要填充,我们将其留空(使用 Dawn 时甚至根本没有):
#ifdef WEBGPU_BACKEND_WGPU
shaderDesc.hintCount = 0;
shaderDesc.hints = nullptr;
#endif
nextInChain 指针是 WebGPU 扩展机制的入口点。它要么为 null,要么指向WGPUChainedStruct类型的结构。这个结构非常简单。首先,它可以递归地有一个元素(同样,null或指向某些WGPUChainedStruct类型的结构)。其次,它有一个结构类型sType,这是一个枚举,告诉链元素可以在哪个结构中铸造。定义以WGPUChainedStruct chain字段开头的每个结构都有一个关联的 SType。
要从 WGSL 代码创建着色器模块,我们使用ShaderModuleWGSLDescriptor SType。SPIR-V 着色器同样可以使用WGPUShaderModuleSPIRVDescriptor标识符创建
当shaderCodeDesc.chain转换为简单WGPUChainedStruct时,该字段对应于链接结构,必须设置为相应的 SType 枚举值
C++:
ShaderModuleWGSLDescriptor shaderCodeDesc;
// Set the chained struct's header
shaderCodeDesc.chain.next = nullptr;
shaderCodeDesc.chain.sType = SType::ShaderModuleWGSLDescriptor;
// Connect the chain
shaderDesc.nextInChain = &shaderCodeDesc.chain;

C:
WGPUShaderModuleWGSLDescriptor shaderCodeDesc{};
// Set the chained struct's header
shaderCodeDesc.chain.next = nullptr;
shaderCodeDesc.chain.sType = WGPUSType_ShaderModuleWGSLDescriptor;
// Connect the chain
shaderDesc.nextInChain = &shaderCodeDesc.chain;
最后我们填充shader源码到描述符中:
shaderCodeDesc.code = shaderSource;
Pipeline layout
在我们运行代码之前的最后一件事:着色器可能需要访问输入和输出资源(缓冲区和/或纹理)。通过配置内存布局,这些资源可供管道使用。我们的第一个示例不使用任何资源.
pipelineDesc.layout = nullptr;
实际上,将管道布局设置为 并不意味着没有输入/输出资源。相反,它要求后端通过检查着色器(在这种情况下是等效的)来自己找出布局.
测试代码及其结果
/**
 * This file is part of the "Learn WebGPU for C++" book.
 *   https://eliemichel.github.io/LearnWebGPU
 *
 * MIT License
 * Copyright (c) 2022-2023 Elie Michel
 *
 * Permission is hereby granted, free of charge, to any person obtaining a copy
 * of this software and associated documentation files (the "Software"), to deal
 * in the Software without restriction, including without limitation the rights
 * to use, copy, modify, merge, publish, distribute, sublicense, and/or sell
 * copies of the Software, and to permit persons to whom the Software is
 * furnished to do so, subject to the following conditions:
 *
 * The above copyright notice and this permission notice shall be included in all
 * copies or substantial portions of the Software.
 *
 * THE SOFTWARE IS PROVIDED "AS IS", WITHOUT WARRANTY OF ANY KIND, EXPRESS OR
 * IMPLIED, INCLUDING BUT NOT LIMITED TO THE WARRANTIES OF MERCHANTABILITY,
 * FITNESS FOR A PARTICULAR PURPOSE AND NONINFRINGEMENT. IN NO EVENT SHALL THE
 * AUTHORS OR COPYRIGHT HOLDERS BE LIABLE FOR ANY CLAIM, DAMAGES OR OTHER
 * LIABILITY, WHETHER IN AN ACTION OF CONTRACT, TORT OR OTHERWISE, ARISING FROM,
 * OUT OF OR IN CONNECTION WITH THE SOFTWARE OR THE USE OR OTHER DEALINGS IN THE
 * SOFTWARE.
 */

#include <glfw3webgpu.h>
#include <GLFW/glfw3.h>

#define WEBGPU_CPP_IMPLEMENTATION
#include <webgpu/webgpu.hpp>

#include <iostream>
#include <cassert>

using namespace wgpu;

int main (int, char**) {
	Instance instance = createInstance(InstanceDescriptor{});
	if (!instance) {
		std::cerr << "Could not initialize WebGPU!" << std::endl;
		return 1;
	}

	if (!glfwInit()) {
		std::cerr << "Could not initialize GLFW!" << std::endl;
		return 1;
	}

	glfwWindowHint(GLFW_CLIENT_API, GLFW_NO_API);
	glfwWindowHint(GLFW_RESIZABLE, GLFW_FALSE);
	GLFWwindow* window = glfwCreateWindow(640, 480, "Learn WebGPU", NULL, NULL);
	if (!window) {
		std::cerr << "Could not open window!" << std::endl;
		return 1;
	}

	std::cout << "Requesting adapter..." << std::endl;
	Surface surface = glfwGetWGPUSurface(instance, window);
	RequestAdapterOptions adapterOpts;
	adapterOpts.compatibleSurface = surface;
	Adapter adapter = instance.requestAdapter(adapterOpts);
	std::cout << "Got adapter: " << adapter << std::endl;

	std::cout << "Requesting device..." << std::endl;
	DeviceDescriptor deviceDesc;
	deviceDesc.label = "My Device";
	deviceDesc.requiredFeaturesCount = 0;
	deviceDesc.requiredLimits = nullptr;
	deviceDesc.defaultQueue.label = "The default queue";
	Device device = adapter.requestDevice(deviceDesc);
	std::cout << "Got device: " << device << std::endl;

	// Add an error callback for more debug info
	auto h = device.setUncapturedErrorCallback([](ErrorType type, char const* message) {
		std::cout << "Device error: type " << type;
		if (message) std::cout << " (message: " << message << ")";
		std::cout << std::endl;
	});

	Queue queue = device.getQueue();

	std::cout << "Creating swapchain..." << std::endl;
#ifdef WEBGPU_BACKEND_WGPU
	TextureFormat swapChainFormat = surface.getPreferredFormat(adapter);
#else
	TextureFormat swapChainFormat = TextureFormat::BGRA8Unorm;
#endif
	SwapChainDescriptor swapChainDesc;
	swapChainDesc.width = 640;
	swapChainDesc.height = 480;
	swapChainDesc.usage = TextureUsage::RenderAttachment;
	swapChainDesc.format = swapChainFormat;
	swapChainDesc.presentMode = PresentMode::Fifo;
	SwapChain swapChain = device.createSwapChain(surface, swapChainDesc);
	std::cout << "Swapchain: " << swapChain << std::endl;

	std::cout << "Creating shader module..." << std::endl;
	const char* shaderSource = R"(
@vertex
fn vs_main(@builtin(vertex_index) in_vertex_index: u32) -> @builtin(position) vec4<f32> {
	var p = vec2f(0.0, 0.0);
	if (in_vertex_index == 0u) {
		p = vec2f(-0.5, -0.5);
	} else if (in_vertex_index == 1u) {
		p = vec2f(0.5, -0.5);
	} else {
		p = vec2f(0.0, 0.5);
	}
	return vec4f(p, 0.0, 1.0);
}

@fragment
fn fs_main() -> @location(0) vec4f {
    return vec4f(0.0, 0.4, 1.0, 1.0);
}
)";

	ShaderModuleDescriptor shaderDesc;
#ifdef WEBGPU_BACKEND_WGPU
	shaderDesc.hintCount = 0;
	shaderDesc.hints = nullptr;
#endif

	// Use the extension mechanism to load a WGSL shader source code
	ShaderModuleWGSLDescriptor shaderCodeDesc;
	// Set the chained struct's header
	shaderCodeDesc.chain.next = nullptr;
	shaderCodeDesc.chain.sType = SType::ShaderModuleWGSLDescriptor;
	// Connect the chain
	shaderDesc.nextInChain = &shaderCodeDesc.chain;

	// Setup the actual payload of the shader code descriptor
	shaderCodeDesc.code = shaderSource;

	ShaderModule shaderModule = device.createShaderModule(shaderDesc);
	std::cout << "Shader module: " << shaderModule << std::endl;

	std::cout << "Creating render pipeline..." << std::endl;
	RenderPipelineDescriptor pipelineDesc;

	// Vertex fetch
	// (We don't use any input buffer so far)
	pipelineDesc.vertex.bufferCount = 0;
	pipelineDesc.vertex.buffers = nullptr;

	// Vertex shader
	pipelineDesc.vertex.module = shaderModule;
	pipelineDesc.vertex.entryPoint = "vs_main";
	pipelineDesc.vertex.constantCount = 0;
	pipelineDesc.vertex.constants = nullptr;

	// Primitive assembly and rasterization
	// Each sequence of 3 vertices is considered as a triangle
	pipelineDesc.primitive.topology = PrimitiveTopology::TriangleList;
	// We'll see later how to specify the order in which vertices should be
	// connected. When not specified, vertices are considered sequentially.
	pipelineDesc.primitive.stripIndexFormat = IndexFormat::Undefined;
	// The face orientation is defined by assuming that when looking
	// from the front of the face, its corner vertices are enumerated
	// in the counter-clockwise (CCW) order.
	pipelineDesc.primitive.frontFace = FrontFace::CCW;
	// But the face orientation does not matter much because we do not
	// cull (i.e. "hide") the faces pointing away from us (which is often
	// used for optimization).
	pipelineDesc.primitive.cullMode = CullMode::None;

	// Fragment shader
	FragmentState fragmentState;
	pipelineDesc.fragment = &fragmentState;
	fragmentState.module = shaderModule;
	fragmentState.entryPoint = "fs_main";
	fragmentState.constantCount = 0;
	fragmentState.constants = nullptr;

	// Configure blend state
	BlendState blendState;
	// Usual alpha blending for the color:
	blendState.color.srcFactor = BlendFactor::SrcAlpha;
	blendState.color.dstFactor = BlendFactor::OneMinusSrcAlpha;
	blendState.color.operation = BlendOperation::Add;
	// We leave the target alpha untouched:
	blendState.alpha.srcFactor = BlendFactor::Zero;
	blendState.alpha.dstFactor = BlendFactor::One;
	blendState.alpha.operation = BlendOperation::Add;

	ColorTargetState colorTarget;
	colorTarget.format = swapChainFormat;
	colorTarget.blend = &blendState;
	colorTarget.writeMask = ColorWriteMask::All; // We could write to only some of the color channels.

	// We have only one target because our render pass has only one output color
	// attachment.
	fragmentState.targetCount = 1;
	fragmentState.targets = &colorTarget;

	// Depth and stencil tests are not used here
	pipelineDesc.depthStencil = nullptr;

	// Multi-sampling
	// Samples per pixel
	pipelineDesc.multisample.count = 1;
	// Default value for the mask, meaning "all bits on"
	pipelineDesc.multisample.mask = ~0u;
	// Default value as well (irrelevant for count = 1 anyways)
	pipelineDesc.multisample.alphaToCoverageEnabled = false;

	// Pipeline layout
	pipelineDesc.layout = nullptr;

	RenderPipeline pipeline = device.createRenderPipeline(pipelineDesc);
	std::cout << "Render pipeline: " << pipeline << std::endl;

	while (!glfwWindowShouldClose(window)) {
		glfwPollEvents();

		TextureView nextTexture = swapChain.getCurrentTextureView();
		if (!nextTexture) {
			std::cerr << "Cannot acquire next swap chain texture" << std::endl;
			return 1;
		}

		CommandEncoderDescriptor commandEncoderDesc;
		commandEncoderDesc.label = "Command Encoder";
		CommandEncoder encoder = device.createCommandEncoder(commandEncoderDesc);

		RenderPassDescriptor renderPassDesc;

		RenderPassColorAttachment renderPassColorAttachment;
		renderPassColorAttachment.view = nextTexture;
		renderPassColorAttachment.resolveTarget = nullptr;
		renderPassColorAttachment.loadOp = LoadOp::Clear;
		renderPassColorAttachment.storeOp = StoreOp::Store;
		renderPassColorAttachment.clearValue = Color{ 0.9, 0.1, 0.2, 1.0 };
		renderPassDesc.colorAttachmentCount = 1;
		renderPassDesc.colorAttachments = &renderPassColorAttachment;

		renderPassDesc.depthStencilAttachment = nullptr;
		renderPassDesc.timestampWriteCount = 0;
		renderPassDesc.timestampWrites = nullptr;
		RenderPassEncoder renderPass = encoder.beginRenderPass(renderPassDesc);

		// In its overall outline, drawing a triangle is as simple as this:
		// Select which render pipeline to use
		renderPass.setPipeline(pipeline);
		// Draw 1 instance of a 3-vertices shape
		renderPass.draw(3, 1, 0, 0);

		renderPass.end();

		nextTexture.release();

		CommandBufferDescriptor cmdBufferDescriptor;
		cmdBufferDescriptor.label = "Command buffer";
		CommandBuffer command = encoder.finish(cmdBufferDescriptor);
		queue.submit(command);

		swapChain.present();
	}

	swapChain.release();
	device.release();
	adapter.release();
	instance.release();
	glfwDestroyWindow(window);
	glfwTerminate();

	return 0;
}