前端技术栈:HTML+CSS+JavaScript+Vue3
后端技术栈:JavaSE+MySQL+JDBC+JavaWeb
文章目录
- 前言
- 1️⃣登录功能
- 登录后端
- 登录前端
- 2️⃣商家管理
- 查询商家
- 查询商家后端
- 查询商家前端
- 增加商家
- 增加商家后端
- 增加商家前端
- 删除商家
- 删除商家后端
- 删除商家前端
- 修改商家
- 修改商家后端
- 修改商家前端
- 3️⃣鞋子管理
- 查询鞋子
- 查询鞋子后端
- 查询鞋子前端
- 增加鞋子
- 增加鞋子后端
- 增加鞋子前端
- 删除鞋子
- 删除鞋子后端
- 删除鞋子前端
- 修改鞋子
- 修改鞋子后端
- 修改鞋子前端
前言
本文项目或许不符合现实生活,无所谓,那是博主给自己做的笔记
如果认真的跟着敲了,发现有问题,欢迎私信或评论区讨论
数据库和Dao层代码采用基于JavaSE的淘宝卖鞋后端管理系统的设计与实现
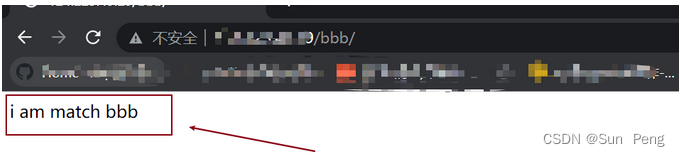
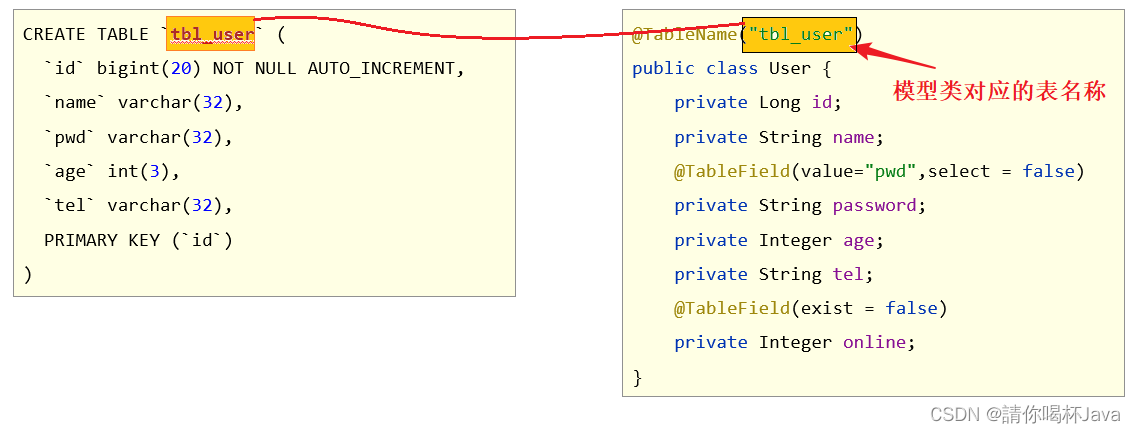
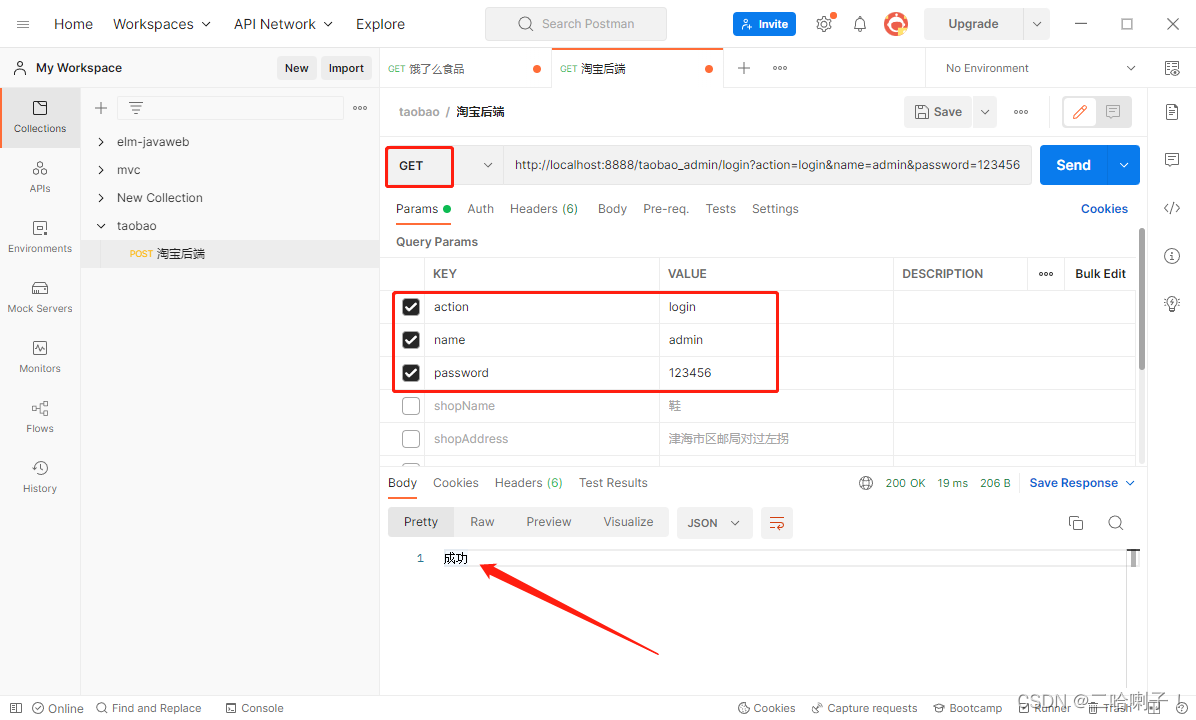
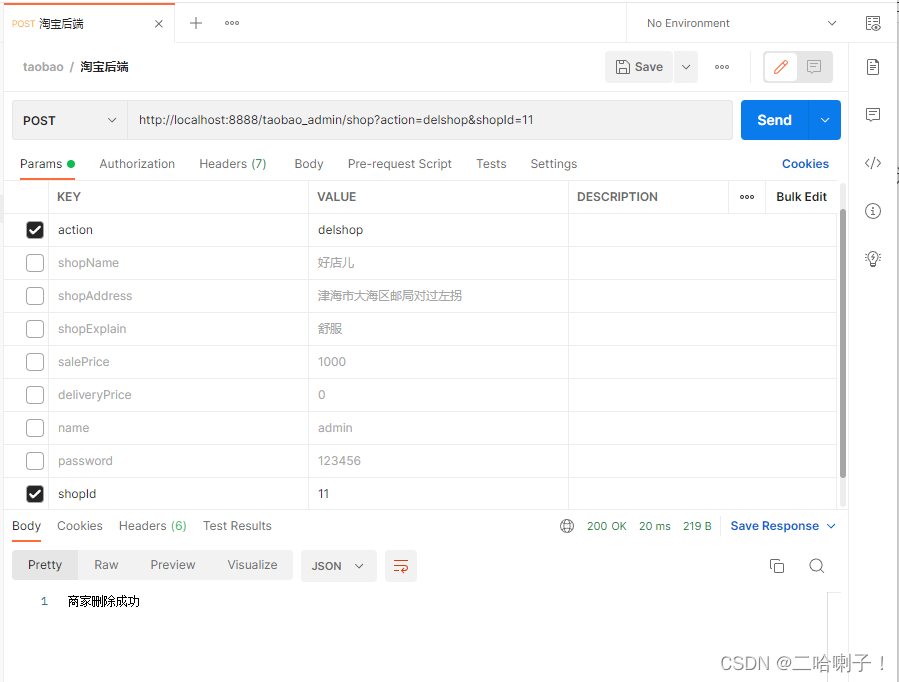
【易错点】:?action的值要与postman后端匹配
1️⃣登录功能
登录后端
在这里实体类和数据库不再重复写
一、dao包
其实就是个查询,登录的查询关注的是查没查到 ,返回值是布尔类型
public class AdminDao {
	public boolean login(Admin admin) {
		boolean result = false;
		Connection connection = null;
		PreparedStatement statement = null;
		ResultSet resultSet = null;

		connection = JdbcUtil.createConnection();
		try {
			statement = connection.prepareStatement("select * from admin where name=? and password=?");
			// 给? 赋值
			statement.setString(1, admin.getName());
			statement.setString(2,admin.getPassword());
			// 执行
			resultSet = statement.executeQuery();

			if (resultSet.next()) {
				result = true;
			}
		} catch (SQLException e) {
			// TODO 自动生成的 catch 块
			e.printStackTrace();
		} finally {
			JdbcUtil.close(resultSet, statement, connection);
		}
		return result;
	}
}
二、service包的AdminService
public class AdminService {
	private AdminDao dao = new AdminDao();
	public String login(Admin admin) {
		return dao.login(admin)?"成功":"失败";
	}
三、是controller包的LoginServlet
1、继承HttpServlet
2、加WebServlet注解,写路径
3、重新 doXXX方法
@WebServlet("/login")
public class LoginServlet extends HttpServlet{
	// 重写AdminService代码
	private AdminService service = new AdminService();

	@Override
	protected void doGet(HttpServletRequest req, HttpServletResponse resp) throws ServletException, IOException {
		// 获取请求发来的名字和密码
		String name = req.getParameter("name");
		String password = req.getParameter("password");
		// 封装
		Admin admin = new Admin();
		admin.setName(name);
		admin.setPassword(password);
		// 调用service方法
		String result = service.login(admin);
		// 发送响应数据
		PrintWriter writer = resp.getWriter();
		writer.print(result);
	}

}
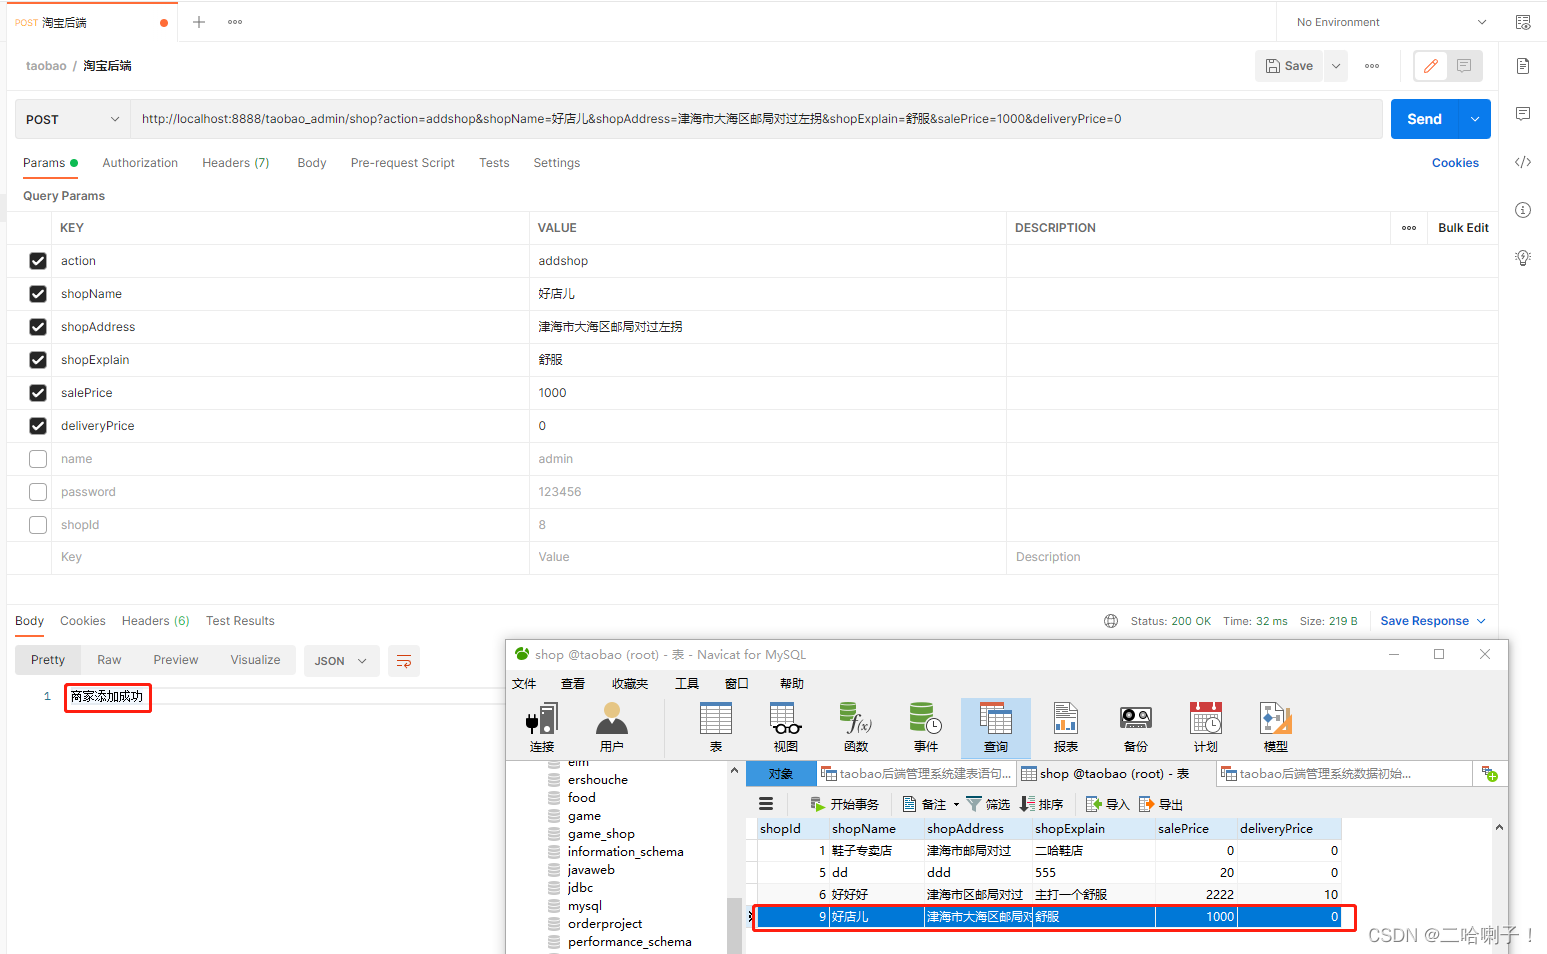
后端写完后用Postman测试:
登录前端
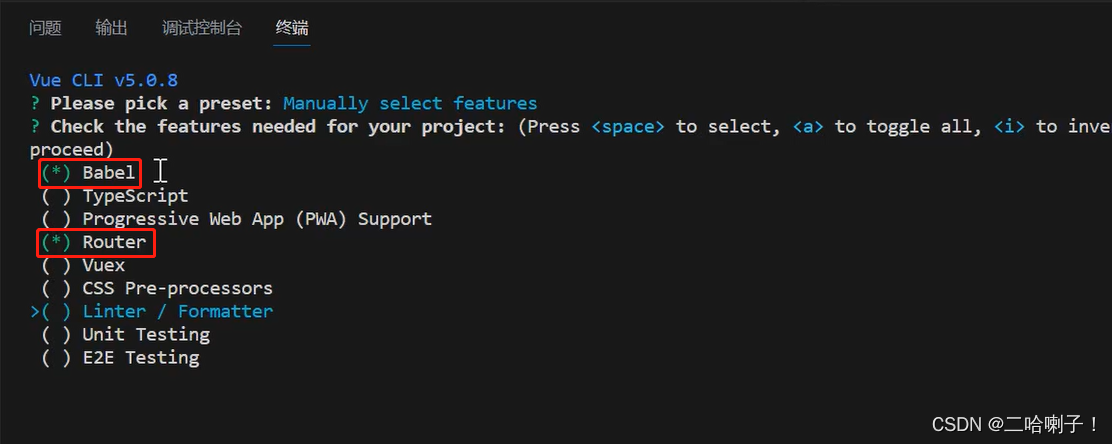
新建一个前端项目,在创建时勾选上Router选项,因为有跳转
创建好项目后分别安装 font-awesome框架、axios和qs框架
npm i font-awesome
npm i axios
npm i qs
在main.js文件中导入一个css文件用于在页面中加图标
// 图标导入
import 'font-awesome/css/font-awesome.min.css'
同时还要加个路由守卫
路由守卫目的是除了登录视图外,其他视图的访问必须是登录过的用户,如果未登录,则跳转到登录页;如果已登录,则正常进行路由跳转。
//路由守卫
//在路由实例上调用 beforeEach 方法,用于在导航之前进行拦截
router.beforeEach((to,from,next)=>{
    //获取当前用户是否已经登陆的状态
    let login = sessionStorage.getItem('login')
    //判断用户登录状态是否存在或者将要进入的路径为根目录
    if (login!=null || to.path=='/') {
        //如果用户已经登录或将要进入的是根目录,则正常进行导航
        next()
    } else {
        //如果用户未登录则强制跳转到根目录
        router.push('/')
    }
})
下一步清空项目中生成的无用代码和组件
在根组件中只留一个路由出口
<template>
  <router-view></router-view>
</template>
在views文件夹中生成IndexView和LoginView两个视图
下一步在index.js文件中导入两个视图及路由配置
import LoginView from '@/views/LoginView'
import IndexView from '@/views/IndexView'
const routes = [
  {
    // 默认访问视图
    path: '/',
    name: 'login',
    component: LoginView
  },
  {
    path: '/index',
    name: 'index',
    component: IndexView,
   }
  //  下面配置子路由
]
在 index.html 中加点样式 style,让他撑满整个整个父标记
  html,body,#app{
    width: 100%;
    height: 100%;
    margin: 0;
  }
在登录视图中:
<template>
  <div class="wrapper">
    <div class="login">
      <i class="fa fa-user-o"></i><input type="text" v-model="name"> <br>
      <i class="fa fa-lock"></i><input type="password" v-model="password"> <br>
      <button @click="login">登录</button>
    </div>
  </div>
</template>
然后加点样式
<style scoped>
.wrapper {
  width: 100%;
  height: 100%;
  background: linear-gradient(rgba(0, 0, 0, 0.6), rgba(0, 0, 0, 0.6)), url(../assets/bg.jpeg); /* 使用渐变遮罩来增强背景图的视觉效果 */
  background-repeat: no-repeat;
  background-size: cover;
  background-position: center center;
  padding: 50px 0; /* 增加上下内边距来让内容与背景之间有一定的间隔感 */
  display: flex;
  justify-content: center;
  align-items: center;
}

.login {
  max-width: 400px; /* 按实际情况增加登录框的最大宽度 */
  margin: 0 auto; /* 让登录框居中对齐 */
  padding: 30px; /* 调整上下左右内边距让内容与边缘之间有更多的间距 */
  box-shadow: 5px 5px 15px rgba(0, 0, 0, 0.3); /* 调整阴影效果的参数来产生更自然的视觉效果 */
}

input[type="text"], input[type="password"] {
  margin-bottom: 10px; /* 拉开间距 */
  margin-left: 10px; /* 拉开间距 */

  border-radius: 20px; /* 使用更大的圆角半径增强输入框的圆润感 */
  border: none; /* 取消边框使输入框看起来更为简洁 */
  background-color: rgba(255, 255, 255, 0.9); /* 使用透明度来让背景色渐变过渡,增强美感 */
  height: 50px; /* 增加输入框的高度让文字更加易读 */
  font-size: 18px; /* 调整字体大小 */
  padding: 0 20px; /* 调整左右内边距增加输入框内部空间 */
  box-shadow: 5px 5px 15px rgba(0, 0, 0, 0.1); /* 添加输入框的轻微阴影效果 */
}

button {
  width: 100%;
  height: 50px; /* 增加按钮的高度 */
  border: none;
  background-color: #4CAF50; /* 使用绿色来增强按钮的视觉效果 */
  color: #fff;
  font-size: 18px;
  border-radius: 20px; /* 使用更大的圆角半径来增强按钮的圆润感 */
  cursor: pointer;
  transition: all 0.2s ease-in-out; /* 添加按钮的渐变动画效果 */
}

button:hover {
  background-color: #3e8e41; /* 鼠标悬停时,按钮背景色变为深绿色 */
  box-shadow: 5px 5px 15px rgba(0, 0, 0, 0.3); /* 鼠标悬停时,添加更明显的阴影效果 */
}

</style>
接下来在data 配置 v-model 的两个数据(name和password)
  data () {
    return {
      // 默认为空
      naem: '',
      password: '',
    }
  },
完成绑定后后编写login方法加在methods,用 login 发请求,发请求就要导包axios
qs包是发送 get 请求,get 请求数据是拼接在地址里,所以暂不需要
import axios from 'axios';

//.....

  methods: {
    login(){
      axios.get(`http://localhost:8888/taobao_admin/login?name=${this.name}&password=${this.password}`)
      // 生成响应
      .then((resp)=>{
      // 做个弹窗
       alert(resp.data)
      })
    }
  },
输入正确的用户名和密码后点击登录,在页面上方弹出提示框提示成功,否则是提示失败
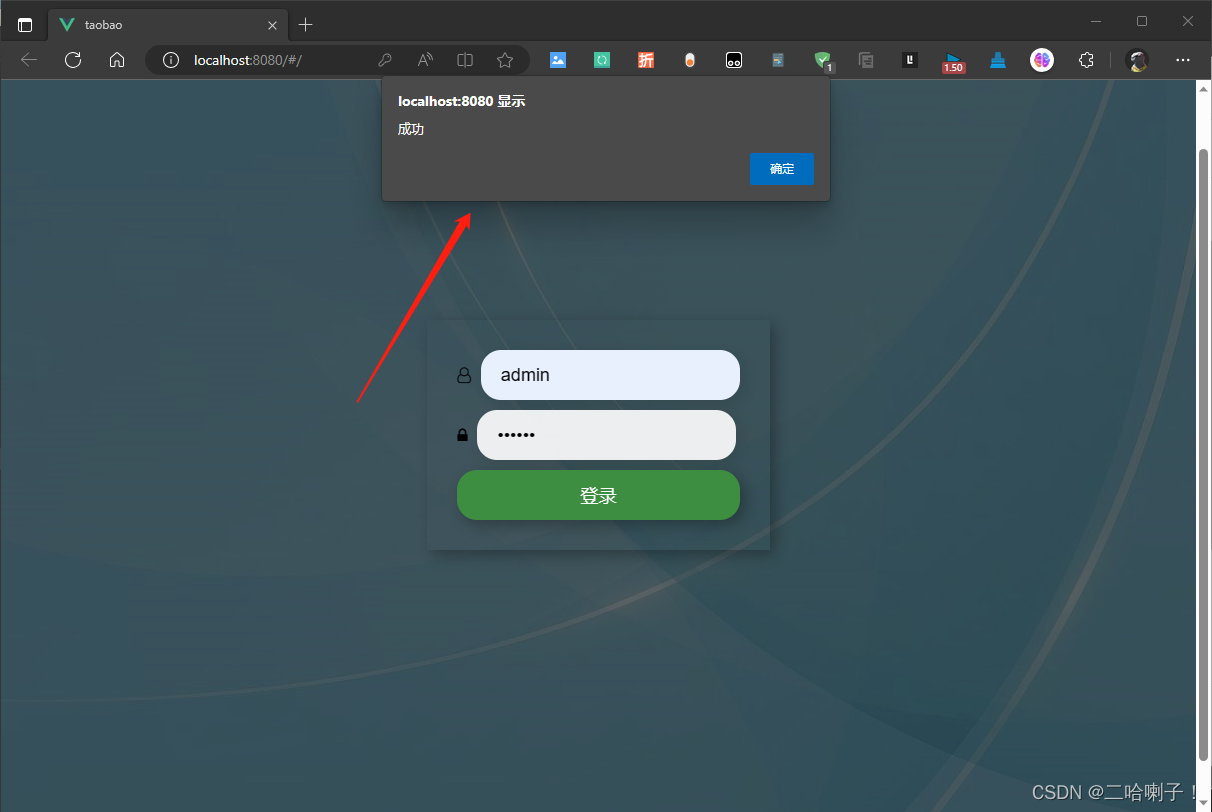
如果显示成功要完成到首页的跳转,如果失败那就接着跳转
  methods: {
    login(){
      axios.get(`http://localhost:8888/taobao_admin/login?name=${this.name}&password=${this.password}`)
      // 生成响应
      .then((resp)=>{
      // 做个弹窗
      //  alert(resp.data)
      if (resp.data=='成功') {
          sessionStorage.setItem('login',this.name)
          this.$router.push('index')
        } else {
          this.isErr = true,
          this.name = '',
          this.password = ''
        }
      })
    }
  },
【代码解释】:
当输入用户名和密码后,点击登录按钮,就会触发 login 函数。该函数使用 axios 库发送一个 GET 请求到指定的 URL,其中包含用户名和密码,等待服务器响应。如果响应返回了“成功”,就将用户名存储在浏览器的 sessionStorage 中,然后将用户重定向到“index”页面。如果响应返回其他内容,则表示登录失败,将清空用户名和密码,并将 isErr设置为 true,以便在界面上显示错误消息。
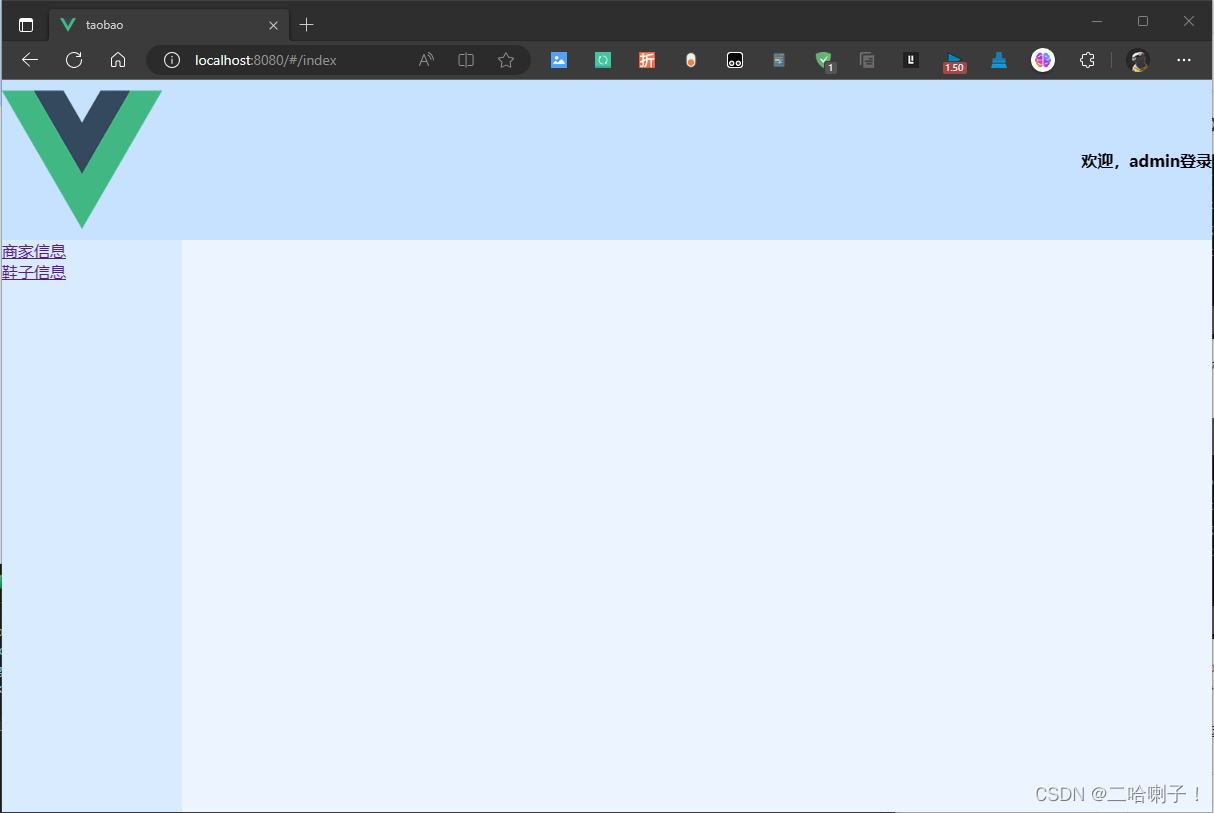
首页视图代码:
<template>
  <div class="wrapper">
    <header>
        <img src="../assets/logo.png" alt="">
        <!-- 从会话中取出的名字 -->
        <h4>欢迎,{{ name }}登录</h4>
    </header>
    <div class="main">
        <aside>
            <router-link to="">商家信息</router-link> <br>
            <router-link to="">鞋子信息</router-link> <br>
        </aside>
        <section>
            <router-view></router-view>
        </section>
    </div>
  </div>
</template>
随后加上样式代码
<style scoped>
.wrapper{
  width: 100%;
  height: 100%;
  display: flex;
  flex-direction: column;
}

header{
  width: 100%;
  flex: 0 0 100px;
  background-color: #c6e2ff;
  display: flex;
  justify-content: space-between;
  align-items: center;
}

header img{
  width: 160px;
}

.main{
  width: 100%;
  flex: 1;
  display: flex;
}

aside{
  flex: 0 0 180px;
  height: 100%;
  background-color: #d9ecff;
}

section{
  flex: 1;
  height: 100%;
  background-color: #ecf5ff;
}
</style>
插值语法中是个 name,需要在data中做个配置
  data () {
    return {
        name: ''
    }
  },
name 从会话存储中获取到的,需要写到挂载完成的钩子函数里面,挂载完毕取出会话里的数据赋值给 name
  mounted () {
    this.name = sessionStorage.getItem('login')
  }
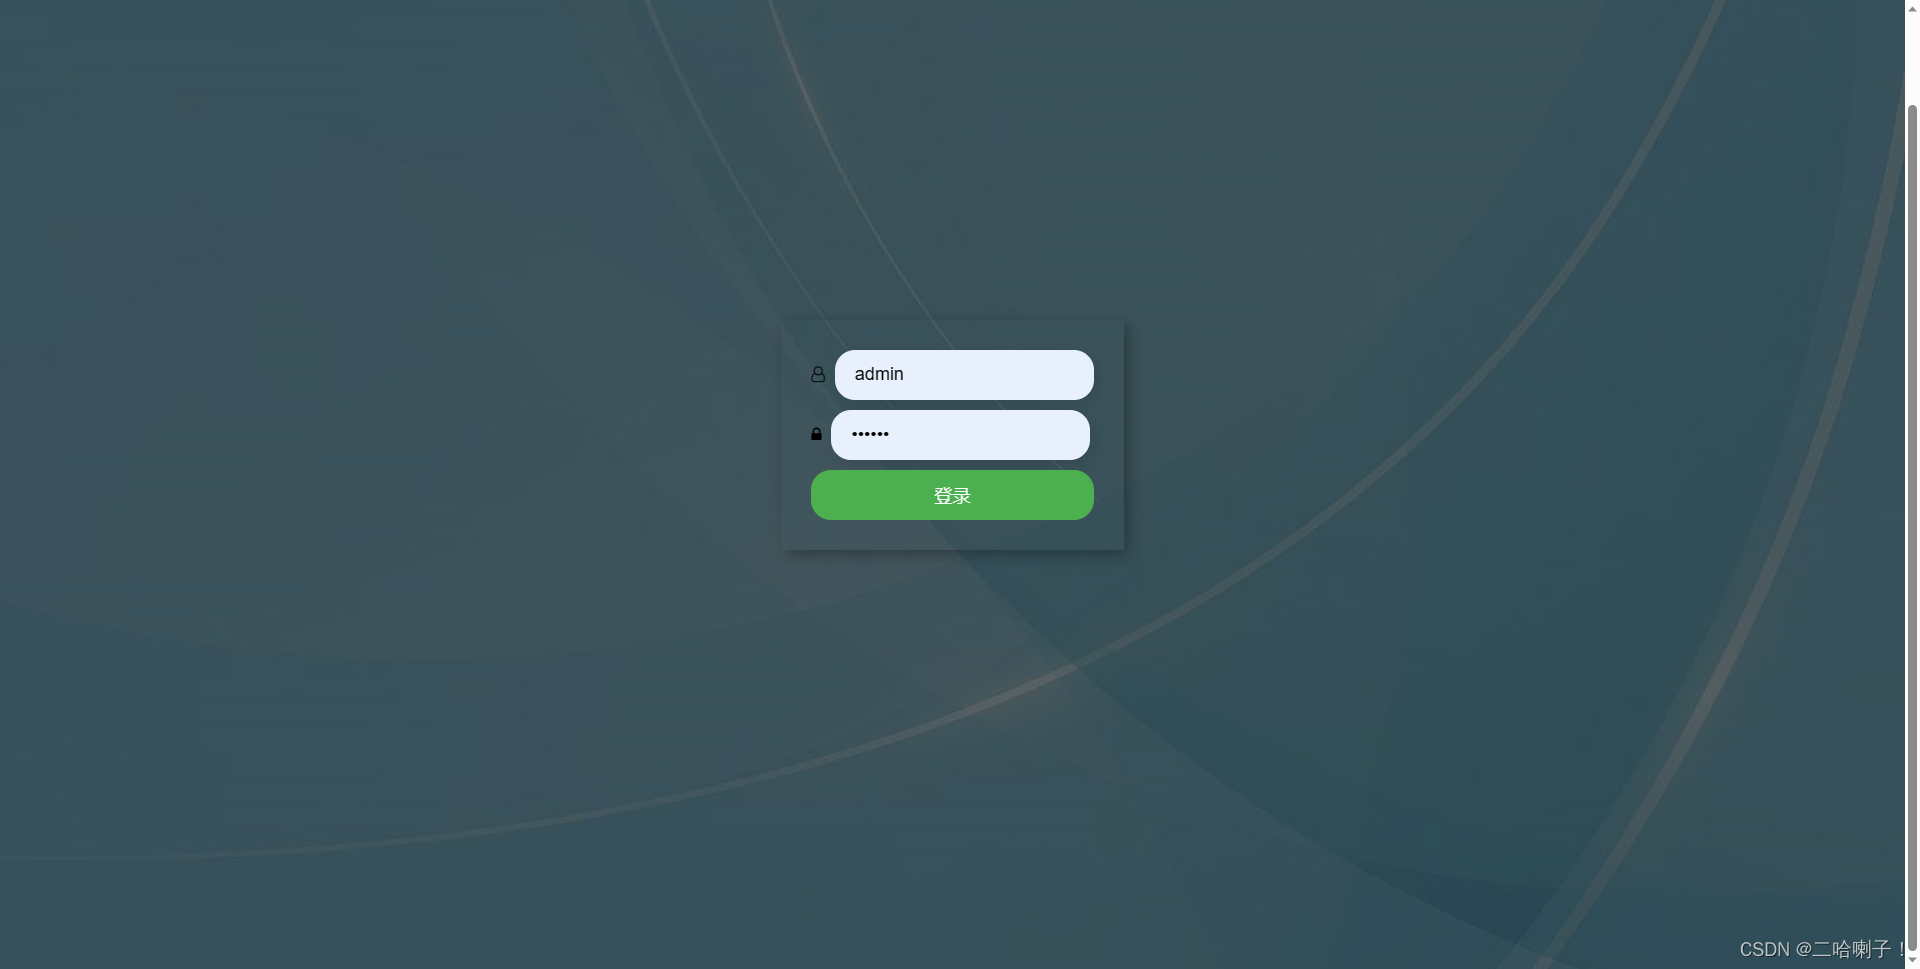
随后登陆成功
2️⃣商家管理
对于后端增删改查这里只写(按顺序)dao、service、controller
查看代码注解
查询商家
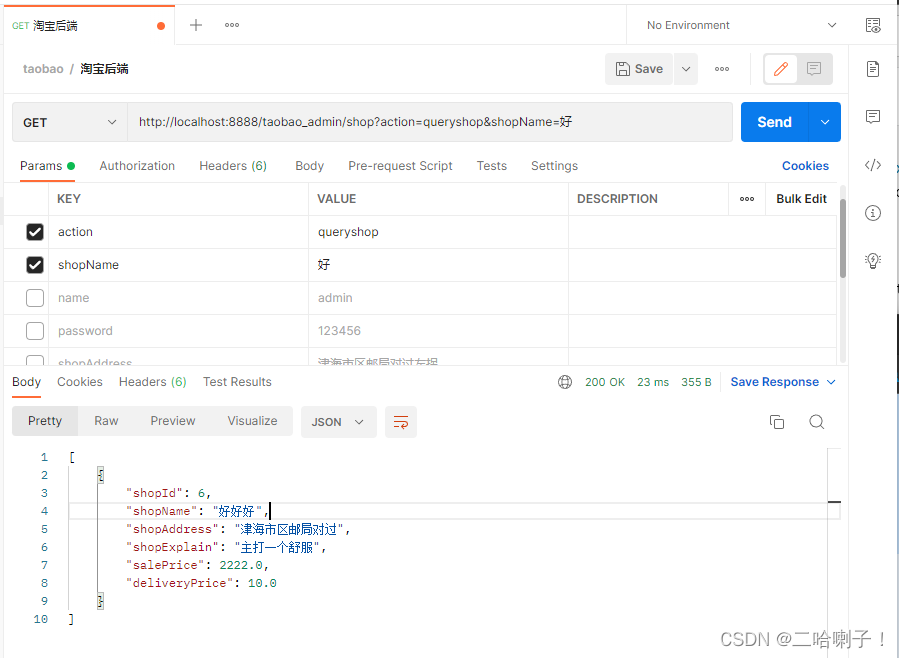
查询商家后端
这里查询方法名字的是 queryshop
dao包:
// 模糊查询
	public ArrayList<Shop> queryshop(String shopName){
		ArrayList<Shop> list = new ArrayList<>();
		Connection connection = null;
		PreparedStatement statement = null;
		ResultSet resultSet = null;

		connection = JdbcUtil.createConnection();
		try {
			statement = connection.prepareStatement("select * from shop where shopName like ?");
			statement.setString(1, "%"+shopName+"%");
			resultSet = statement.executeQuery();
			while (resultSet.next()) {
				Shop shop = new Shop();

				shop.setShopId(resultSet.getInt("shopId"));
				shop.setShopName(resultSet.getString("shopName"));
				shop.setShopAddress(resultSet.getString("shopAddress"));
				shop.setShopExplain(resultSet.getString("shopExplain"));
				shop.setSalePrice(resultSet.getDouble("salePrice"));
				shop.setDeliveryPrice(resultSet.getDouble("deliveryPrice"));
				list.add(shop);
			}
		} catch (SQLException e) {
			// TODO 自动生成的 catch 块
			e.printStackTrace();
		} finally {
			JdbcUtil.close(resultSet, statement, connection);
		}
		return list;
	}
service包:
对于查询、添加、修改有多个数据,这里写个dao类封装
//调用dao,提前创建dao对象
	private ShopDao dao = new ShopDao();

	public String queryshop(String shopName) {
		ArrayList<Shop> list = dao.queryshop(shopName);
		Gson gson = new Gson();
		return gson.toJson(list);
	}
controller包:
@WebServlet("/shop")
public class ShopController extends HttpServlet{
    private ShopService service = new ShopService();

//	req请求     resp响应
	@Override
	protected void service(HttpServletRequest req, HttpServletResponse resp) throws ServletException, IOException {

		String action = req.getParameter("action");
		PrintWriter writer = resp.getWriter();

	if (action.equals("queryshop")){
			String shopName = req.getParameter("shopName");
			String result = service.queryshop(shopName);
			writer.print(result);
		}
	}
}
postman 测试:
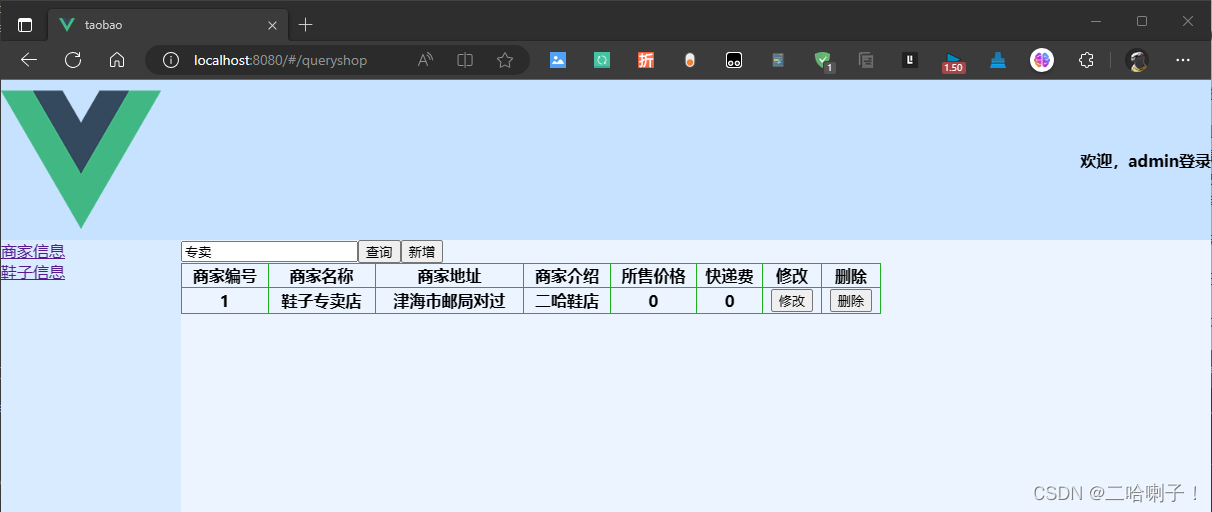
查询商家前端
在前端视图文件夹下新建文件夹shop,在里面新建视图ShopQueryView
首先在首页配置下加上查询商家的配置路由对象
  {
    path: '/index',
    name: 'index',
    component: IndexView,
    //  下面配置子路由
    children: [
      {
        path: '/queryshop',
        name: 'queryshop',
        component: () => import('@/views/shop/ShopQueryView')
      },
    ]
   },
然后
<template>
  <div>
    <input type="text" v-model="shopName" />
    <button @click="queryshop">查询</button>
    <button @click="addshop">新增</button>

    <table>
      <tr>
        <th>商家编号</th>
        <th>商家名称</th>
        <th>商家地址</th>
        <th>商家介绍</th>
        <th>所售价格</th>
        <th>快递费</th>
        <th>修改</th>
        <th>删除</th>
      </tr>
      <tr v-for="(shop, index) in items" :key="index">
        <th>{{ shop.shopId }}</th>
        <th>{{ shop.shopName }}</th>
        <th>{{ shop.shopAddress }}</th>
        <th>{{ shop.shopExplain }}</th>
        <th>{{ shop.salePrice }}</th>
        <th>{{ shop.deliveryPrice }}</th>
        <th><button @click="updateshop(index)">修改</button></th>
        <th><button @click="delshop(index)">删除</button></th>
      </tr>
    </table>
  </div>
</template>

<script>
import axios from 'axios'
export default {
  data() {
    return {
      shopName: '',

      items: []
    }
  },
  methods: {
    queryshop() {
      axios.get(`http://localhost:8888/taobao_admin/shop?action=queryshop&shopName=${this.shopName}`)
        .then((resp) => {
          this.items = resp.data
        })
    },
  },
  components: {},
  computed: {},
  watch: {},
  mounted() { }
}
</script>
增加商家
增加商家后端
这里的方法用的是 addshop
dao包:
	// 新增商家
	public int insertShop(Shop shop) {
		int result = 0;
		Connection connection = null;
		PreparedStatement statement = null;
		connection = JdbcUtil.createConnection();
		try {
			statement = connection.prepareStatement("insert into shop(shopName,shopAddress,shopExplain,salePrice,deliveryPrice) values(?,?,?,?,?)");
			statement.setString(1, shop.getShopName());
			statement.setString(2, shop.getShopAddress());
			statement.setString(3, shop.getShopExplain());
			statement.setDouble(4, shop.getSalePrice());
			statement.setDouble(5, shop.getDeliveryPrice());

			result = statement.executeUpdate();
		} catch (SQLException e) {
			// TODO 自动生成的 catch 块
			e.printStackTrace();
		} finally {
			JdbcUtil.close(statement, connection);
		}
		return result;
	}
service包:
	public String addshop(Shop shop) {
		return dao.insertShop(shop)>0?"商家添加成功":"商家添加失败";
	}
controller包:
@WebServlet("/shop")
public class ShopController extends HttpServlet{
    private ShopService service = new ShopService();

//	req请求     resp响应
	@Override
	protected void service(HttpServletRequest req, HttpServletResponse resp) throws ServletException, IOException {

		String action = req.getParameter("action");
		PrintWriter writer = resp.getWriter();

		if (action.equals("addshop")) {
			String shopName = req.getParameter("shopName");
			String shopAddress = req.getParameter("shopAddress");
			String shopExplain = req.getParameter("shopExplain");
			String salePrice = req.getParameter("salePrice");
			String deliveryPrice = req.getParameter("deliveryPrice");
			Shop shop = new Shop();

			shop.setShopName(shopName);
			shop.setShopAddress(shopAddress);
			shop.setShopExplain(shopExplain);
			shop.setSalePrice(Double.parseDouble(salePrice));
			shop.setDeliveryPrice(Double.parseDouble(deliveryPrice));

			String result = service.addshop(shop);
			writer.print(result);
		}
	}
}
后端测试:
增加商家前端
首先在 index.js 中加上配置的子路由
      {
        path: '/addshop',
        name: 'addshop',
        component: () => import('@/views/shop/ShopAddView')
      }
回到插入视图,在 methods 内 push 上地址:addshop
    addshop() {
      this.$router.push('./addshop')
    },
然后新建视图 ShopAddView,在视图里加一些输入框
这里的数据是跟controller类中的取数据的名字一致
v-model 是绑定到一个对象里的几个属性
<template>
<div>
商家名称:<input type="text" v-model="shop.shopName"> <br>
商家地址:<input type="text" v-model="shop.shopAddress"> <br>
商家介绍:<input type="text" v-model="shop.shopExplain"> <br>
商品价格:<input type="text" v-model="shop.salePrice"> <br>
快递费: <input type="text" v-model="shop.deliveryPrice"> <br>
<button @click="addshop">新增</button>
</div>
</template>
在 data 中加入要添加的内容
  data () {
    return {
      shop: {
        shopName:'',
        shopAddress: '',
        shopExplain: '',
        salePrice:'',
        deliveryPrice:'',
        action: 'addshop'
      },
    }
  },
然后导入 qs 和 axios 框架,
import qs from 'qs'
import axios from 'axios'
接下来在 methods 内编写 addshop 方法,这里的名字与前面添加按钮事件中名字一样
  methods: {
      addshop(){
    							   		// v-model是绑定到shop对象里的几个属性  简化
        axios.post('http://localhost:8888/taobao_admin/shop',qs.stringify(this.shop))
        .then( (response)=>{
        // 增加弹窗
          alert(response.data)
        } )
      },
  },
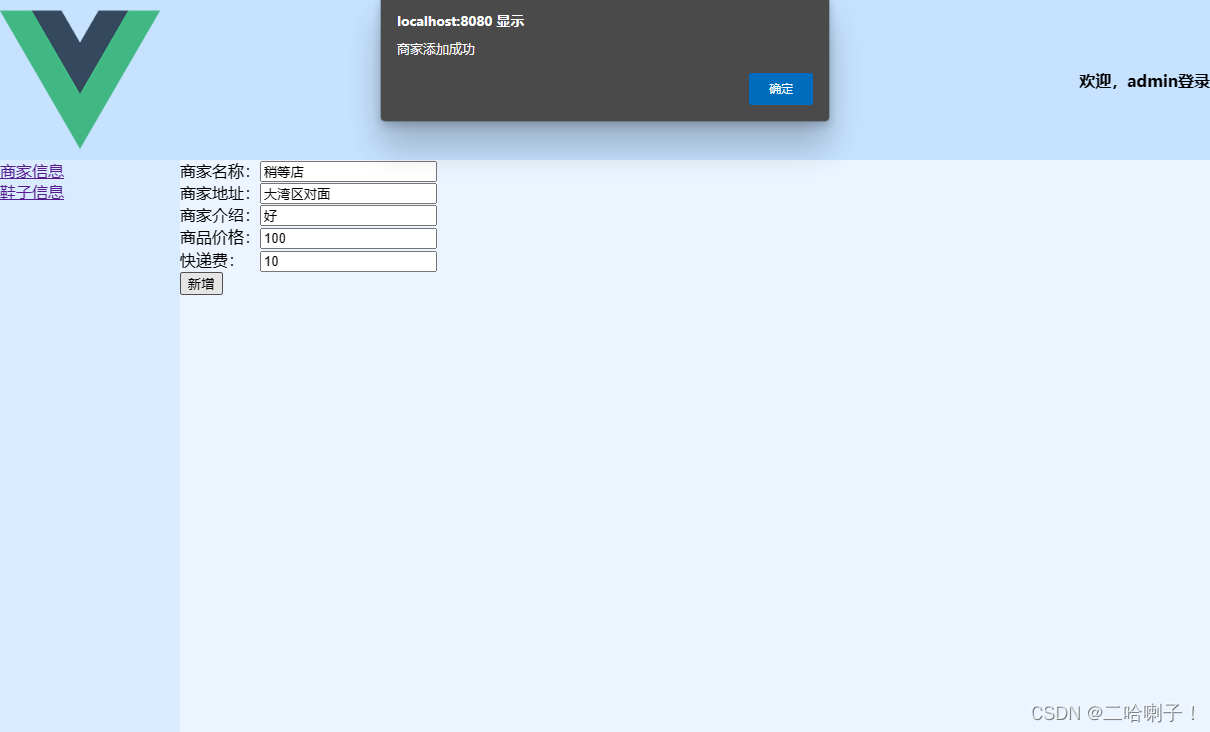
回答查询页面会发现多了条刚才添加的数据
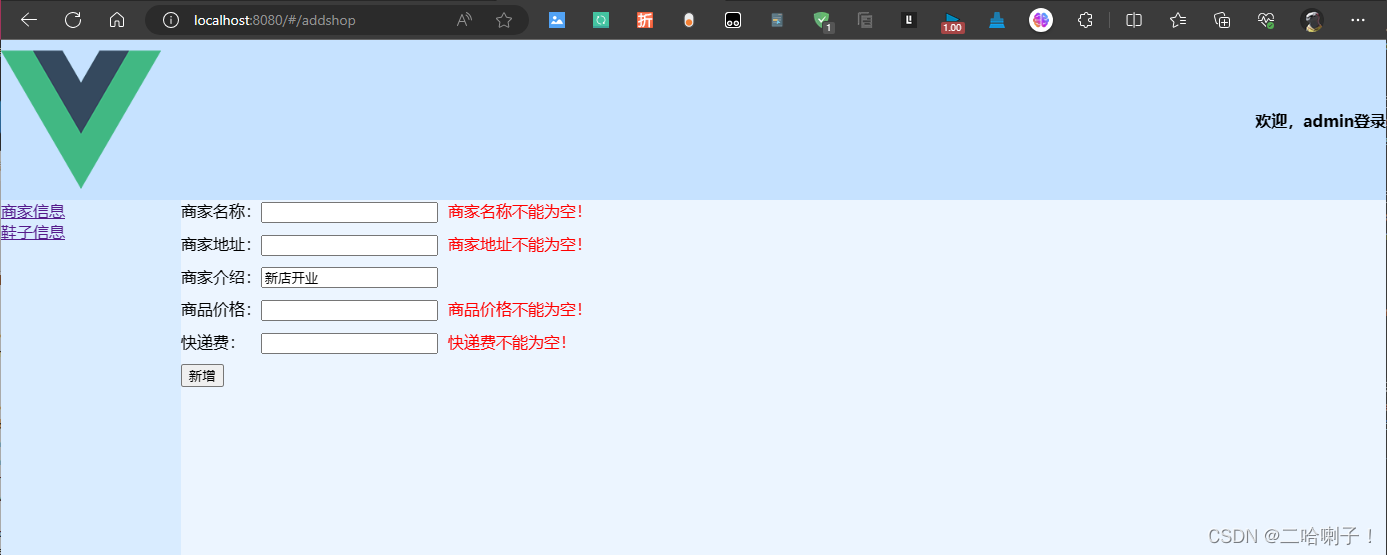
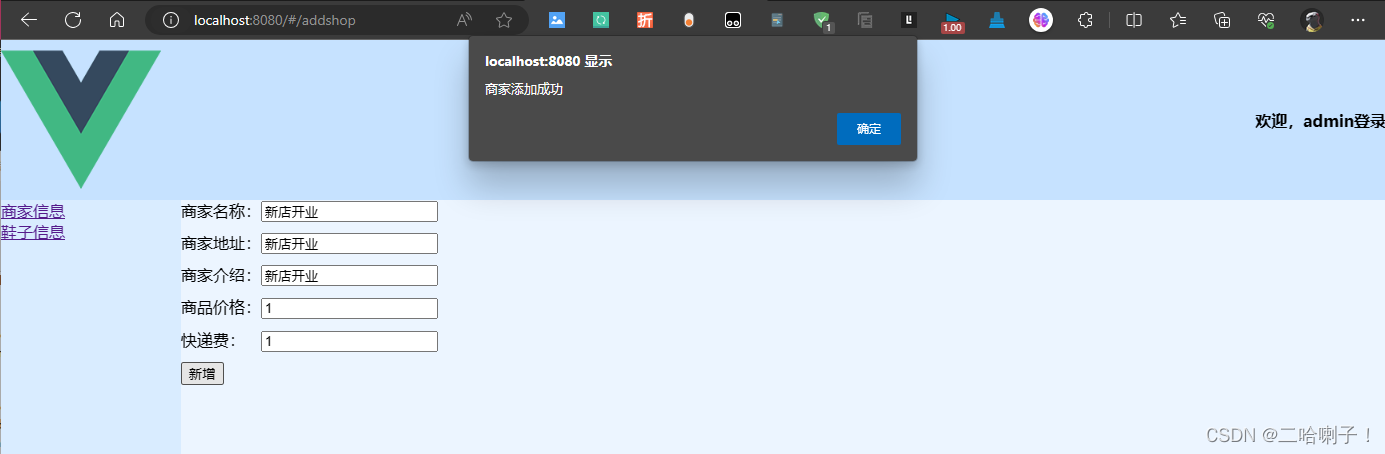
下面给添加商家加点样式,进行表单校验,检查添加的输入框是否为空。如果有任意一个输入框为空,则会展示相应的提示消息,同时不会发送请求。
<template>
<div>
<div class="form-group">
<label for="shopName">商家名称:</label>
<input type="text" id="shopName" v-model.trim="shop.shopName">
<span v-if="!shop.shopName" class="error-msg">商家名称不能为空!</span>
</div>
<div class="form-group">
<label for="shopAddress">商家地址:</label>
<input type="text" id="shopAddress" v-model.trim="shop.shopAddress">
<span v-if="!shop.shopAddress" class="error-msg">商家地址不能为空!</span>
</div>
<div class="form-group">
<label for="shopExplain">商家介绍:</label>
<input type="text" id="shopExplain" v-model.trim="shop.shopExplain">
<span v-if="!shop.shopExplain" class="error-msg">商家介绍不能为空!</span>
</div>
<div class="form-group">
<label for="salePrice">商品价格:</label>
<input type="text" id="salePrice" v-model.number="shop.salePrice">
<span v-if="!shop.salePrice" class="error-msg">商品价格不能为空!</span>
</div>
<div class="form-group">
<label for="deliveryPrice">快递费: </label>
<input type="text" id="deliveryPrice" v-model.number="shop.deliveryPrice">
<span v-if="!shop.deliveryPrice" class="error-msg">快递费不能为空!</span>
</div>
<button @click="addshop">新增</button>
<p v-if="errorMsg" class="error-msg">{{errorMsg}}</p>
</div>
</template>
<script>
import qs from 'qs'
import axios from 'axios'
export default {
data() {
return {
shop: {
shopName: '',
shopAddress: '',
shopExplain: '',
salePrice: '',
deliveryPrice: '',
action: 'addshop'
},
errorMsg: ''
}
},
methods: {
addshop() {
if (!this.shop.shopName) {
//商家名称不能为空
this.errorMsg = '商家名称不能为空!'
} else if (!this.shop.shopAddress) {
//商家地址不能为空
this.errorMsg = '商家地址不能为空!'
} else if (!this.shop.shopExplain) {
//商家介绍不能为空
this.errorMsg = '商家介绍不能为空!'
} else if (!this.shop.salePrice) {
//商品价格不能为空
this.errorMsg = '商品价格不能为空!'
} else if (!this.shop.deliveryPrice) {
//快递费不能为空
this.errorMsg = '快递费不能为空!'
} else {
axios.post('http://localhost:8888/taobao_admin/shop', qs.stringify(this.shop))
.then(response => {
alert(response.data);
})
}
}
},
components: {},
computed: {},
watch: {},
mounted() {}
}
</script>
<style scoped>
.form-group {
margin-bottom: 10px;
}
.error-msg {
color: red;
margin-left: 10px;
}
</style>
输出效果:
删除商家
删除商家后端
删除方法用的是delshop
dao包下:
	// 删除商家
	public int deleteShopId(int shopId) {
		int result = 0;
		Connection connection = JdbcUtil.createConnection();
		PreparedStatement statement = null;

		try {
			statement = connection.prepareStatement("delete from shop where shopId = ?");
			statement.setInt(1, shopId);

			result = statement.executeUpdate();

		} catch (SQLException e) {
			// TODO 自动生成的 catch 块
			e.printStackTrace();
		} finally {
			JdbcUtil.close(statement, connection);
		}
		return result;
	}
service包:
	public String remove(int shopId) {
		return dao.deleteShopId(shopId)>0?"商家删除成功":"商家删除失败";
	}
controller包:
	else if (action.equals("delshop")) {
	String shopId = req.getParameter("shopId");
	String result = service.remove(Integer.parseInt(shopId));
	writer.print(result);
后端测试:
删除商家前端
在查询视图下
// i:下标
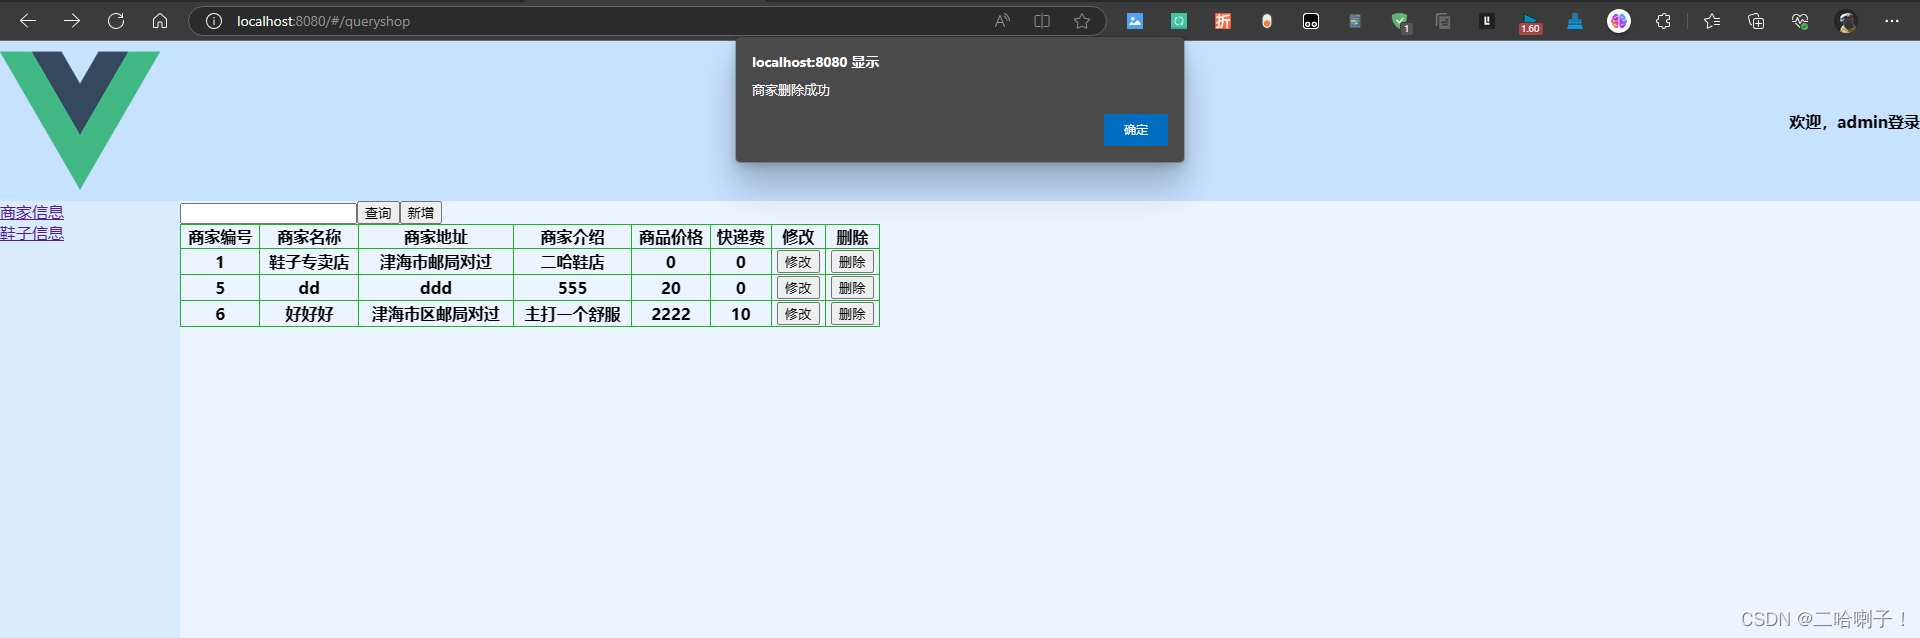
delshop(i){
// alert(this.items[i].shopId)
axios.post('http://localhost:8888/taobao_admin/shop',qs.stringify({
action: 'delshop',
shopId: this.items[i].shopId
})).then((response)=>{
alert(response.data)
// 查询删完后的结果
this.queryshop()
})
}
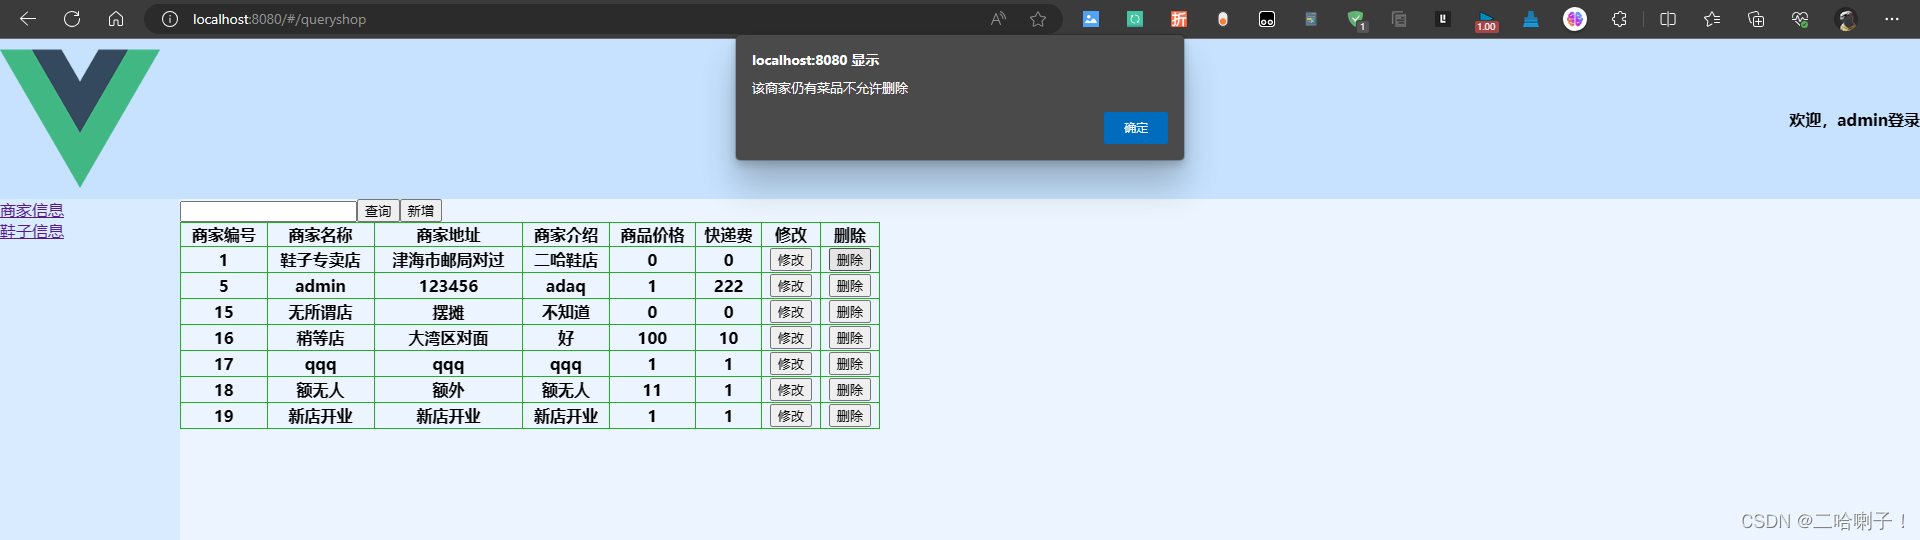
接下来给删除商家功能加点小样式:当商家仍有商品在出售时,不可以删除
首先在后端service包内,删除功能改成:
	public String remove(int shopId) {
		return dao.deleteShopId(shopId)>0?"商家删除成功":"该商家仍有菜品不允许删除";
	}
先在食品表中查商家ID,然后到商家表中删商家ID
dao包代码:
	// 删除商家
	public int deleteShopId(int shopId) {
		int result = 0;
		Connection connection = JdbcUtil.createConnection();
		PreparedStatement statement = null;
		try {
			statement = connection.prepareStatement("delete from shop where shopId = ?");
			statement.setInt(1, shopId);
			result = statement.executeUpdate();
		} catch (SQLException e) {
			// TODO 自动生成的 catch 块
			e.printStackTrace();
		} finally {
			JdbcUtil.close(statement, connection);
		}
		return result;
	}
controller包代码:
		  else if (action.equals("delshop")) {
			String shopId = req.getParameter("shopId");
			String result = service.remove(Integer.parseInt(shopId));
			writer.print(result);
		}
前端代码:
    // i:下标
    delshop(i){
        // alert(this.items[i].shopId)
        axios.post('http://localhost:8888/taobao_admin/shop',qs.stringify({
            action: 'delshop',
            shopId: this.items[i].shopId
        })).then((response)=>{
            alert(response.data)
            // 查询删完后的结果
            this.queryshop()
        })
    }
回头来写
修改商家
方法用的是:updateshop
修改商家后端
dao层:
	// 更新商家
	public int UpdateShop(Shop shop) {
		int result = 0;
		Connection connection = null;
		PreparedStatement statement = null;
		connection = JdbcUtil.createConnection();

		try {
			statement = connection.prepareStatement("update shop set shopName=?,shopAddress=?,shopExplain=?,salePrice=?,deliveryPrice=? where shopId=?");
			statement.setString(1, shop.getShopName());
			statement.setString(2, shop.getShopAddress());
			statement.setString(3, shop.getShopExplain());
			statement.setDouble(4, shop.getSalePrice());
			statement.setDouble(5, shop.getDeliveryPrice());
			statement.setInt(6, shop.getShopId());
			result = statement.executeUpdate();
		} catch (SQLException e) {
			// TODO 自动生成的 catch 块
			e.printStackTrace();
		} finally {
			JdbcUtil.close(statement, connection);
		}
		return result;

	}
service层:
	public String remove(int shopId) {
		return dao.deleteShopId(shopId)>0?"商家删除成功":"该商家仍有菜品不允许删除";
	}
controller层:
		  else if (action.equals("updateshop")) {
			String shopId = req.getParameter("shopId");
			String shopName = req.getParameter("shopName");
			String shopAddress = req.getParameter("shopAddress");
			String shopExplain = req.getParameter("shopExplain");
			String salePrice = req.getParameter("salePrice");
			String deliveryPrice = req.getParameter("deliveryPrice");

			Shop shop = new Shop();
			shop.setShopId(Integer.parseInt(shopId));
			shop.setShopName(shopName);
			shop.setShopAddress(shopAddress);
			shop.setShopExplain(shopExplain);
			shop.setSalePrice(Double.parseDouble(salePrice));
			shop.setDeliveryPrice(Double.parseDouble(deliveryPrice));

			String result = service.updateshop(shop);
			writer.print(result);

		}
修改商家前端
index.js文件夹下
      {
        path: '/updateshop',
        name: 'updateshop',
        component: () => import('@/views/shop/ShopUpdateView')
      }
查询视图
    updateshop(i) {
      this.$router.push({
        path: './updateshop',
        // query方式传参
        query: this.items[i]
      })
    },
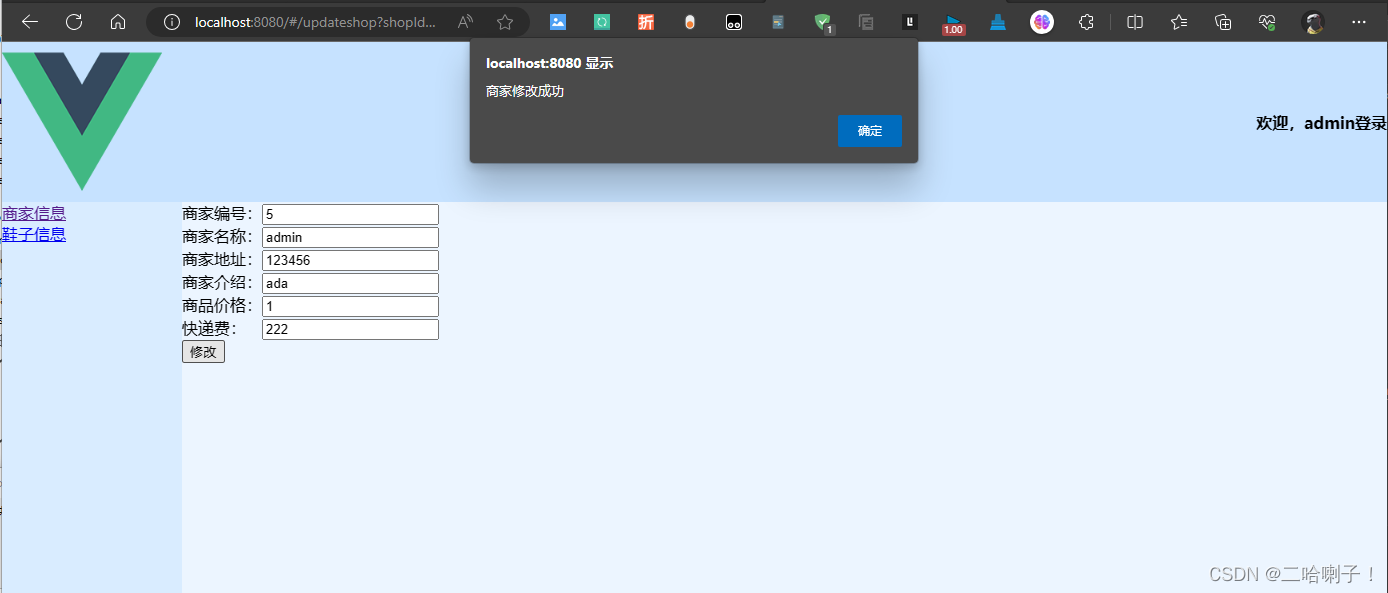
修改视图:ShopUpdateView
<template>
<div>
商家编号:<input type="text" readonly v-model="shop.shopId"> <br>
商家名称:<input type="text" v-model="shop.shopName"> <br>
商家地址:<input type="text" v-model="shop.shopAddress"> <br>
商家介绍:<input type="text" v-model="shop.shopExplain"> <br>
商品价格:<input type="text" v-model="shop.salePrice"> <br>
快递费:  <input type="text" v-model="shop.deliveryPrice"> <br>
<button @click="updateshop">修改</button>
</div>
</template>
<script>
import axios from 'axios'
import qs from 'qs'
export default {
data () {
return {
shop:{
shopId:this.$route.query.shopId,
shopName:this.$route.query.shopName,
shopAddress:this.$route.query.shopAddress,
shopExplain:this.$route.query.shopExplain,
salePrice:this.$route.query.salePrice,
deliveryPrice:this.$route.query.deliveryPrice,
action: 'update'
}
}
},
methods: {
// 发请求,1.导入 2.处理响应 .then resp:响应信息
updateshop(){
axios.post('http://localhost:8888/taobao_admin/shop?action=updateshop',qs.stringify( this.shop ))
.then( (resp)=>{
alert( resp.data )
})
}
},
components: {},
computed: {},
watch: {},
mounted () {
}
}
</script>
<style scoped>
</style>
提示:以下是项目另一组增删改查,下面代码可供参考
3️⃣鞋子管理
首先在主页面视图中让他有个跳转
<router-link to="querygoods">鞋子信息</router-link> <br>
在 index.js 文件中配置子路由
      {
        path: '/querygoods',
        name: 'querygoods',
        component: () => import('@/views/goods/GoodsQueryView')
      }
查询鞋子
这里是希望同一个查询按钮既能查到鞋子名字,又能查到他所属商家名字
查询鞋子后端
dao类代码:
    // 鞋子名模糊查询,这里用到多表连接
	public ArrayList<Goods> nameQuery(String name) {
		Connection connection = JdbcUtil.createConnection();
		PreparedStatement statement = null;
		ResultSet resultSet = null;
		ArrayList<Goods> list = new ArrayList<>();
		try {
			statement = connection.prepareStatement("select goods.goodsId,goods.goodsName,goods.goodsExplain,goods.goodsPrice,goods.shopId,shop.shopName from goods,shop where shop.shopName=? and goods.shopId=shop.shopId");
			statement.setString(1, name);
			resultSet = statement.executeQuery();
			while(resultSet.next()) {
				Goods f =new Goods();
				f.setGoodsId( resultSet.getInt("goodsId")  );
				f.setGoodsName( resultSet.getString("goodsName"));
				f.setGoodsExplain( resultSet.getString("goodsExplain"));
				f.setGoodsPrice( resultSet.getDouble("goodsPrice"));
				f.setShopId(resultSet.getInt("shopId"));
				f.setShopName( resultSet.getString("shopName"));
				list.add(f);
			}
		} catch (SQLException e) {
			e.printStackTrace();
		} finally {
			JdbcUtil.close(resultSet, statement, connection);
		}
		return list;
	}
	public ArrayList<Goods> goodsQuery(Goods goods){
		ArrayList<Goods> list = new ArrayList<>();
		Connection connection = JdbcUtil.createConnection();
		PreparedStatement statement=null;
		ResultSet resultSet=null;

		try {
			StringBuilder sql = new StringBuilder();
			sql.append(" select goods.goodsId,goods.goodsName,goods.goodsExplain,goods.goodsPrice,goods.shopId,shop.shopName");
			sql.append(" from goods,shop");
			sql.append(" where goods.shopId=shop.shopId");
			if ( goods.getGoodsName()!=null ) {
				sql.append(" and goods.goodsName like ?" );
			}
			if ( goods.getShopName()!=null ) {
				sql.append(" and shop.shopName like ?");
			}
			if ( goods.getShopId()!= null) {
				sql.append(" and goods.shopId=?");
			}

			statement = connection.prepareStatement(sql.toString());
			int index=1;
			if ( goods.getGoodsName()!=null ) {
				statement.setString(index++, "%"+goods.getGoodsName()+"%");
			}
			if ( goods.getShopName()!=null ) {
				statement.setString(index++, "%"+goods.getShopName()+"%");
			}
			if ( goods.getShopId()!=null ) {
				statement.setInt(index++, goods.getShopId());
			}
			resultSet = statement.executeQuery();
			while ( resultSet.next() ) {
				Goods f =new Goods();
				f.setGoodsId( resultSet.getInt("goodsId")  );
				f.setGoodsName( resultSet.getString("goodsName"));
				f.setGoodsExplain( resultSet.getString("goodsExplain"));
				f.setGoodsPrice( resultSet.getDouble("goodsPrice"));
				f.setShopId(resultSet.getInt("shopId"));
				f.setShopName( resultSet.getString("shopName"));
				list.add(f);
			}


		} catch (SQLException e) {
			e.printStackTrace();
		}finally {
			JdbcUtil.close(resultSet, statement, connection);
		}

		return list;
	}
service代码:
	public String query(Goods goods) {
		return new Gson().toJson(dao.goodsQuery(goods));
	}
	public String nameQuery(String name) {
		return new Gson().toJson(dao.nameQuery(name));
	}
controller类代码:
          if (action.equals("query")) {
			Goods goods = new Goods();
			String goodsName = req.getParameter("goodsName");
			String shopName = req.getParameter("shopName");
			String shopId = req.getParameter("shopId");
			goods.setGoodsName(goodsName);
			goods.setShopName(shopName);
			if (!shopId.isEmpty()) {
				goods.setShopId(Integer.parseInt(shopId));
			}
			String result = service.query(goods);
			writer.print(result);

		}else if (action.equals("queryS")) {
			String name = req.getParameter("name");
			String result = service.nameQuery(name);
			writer.print(result);
		}
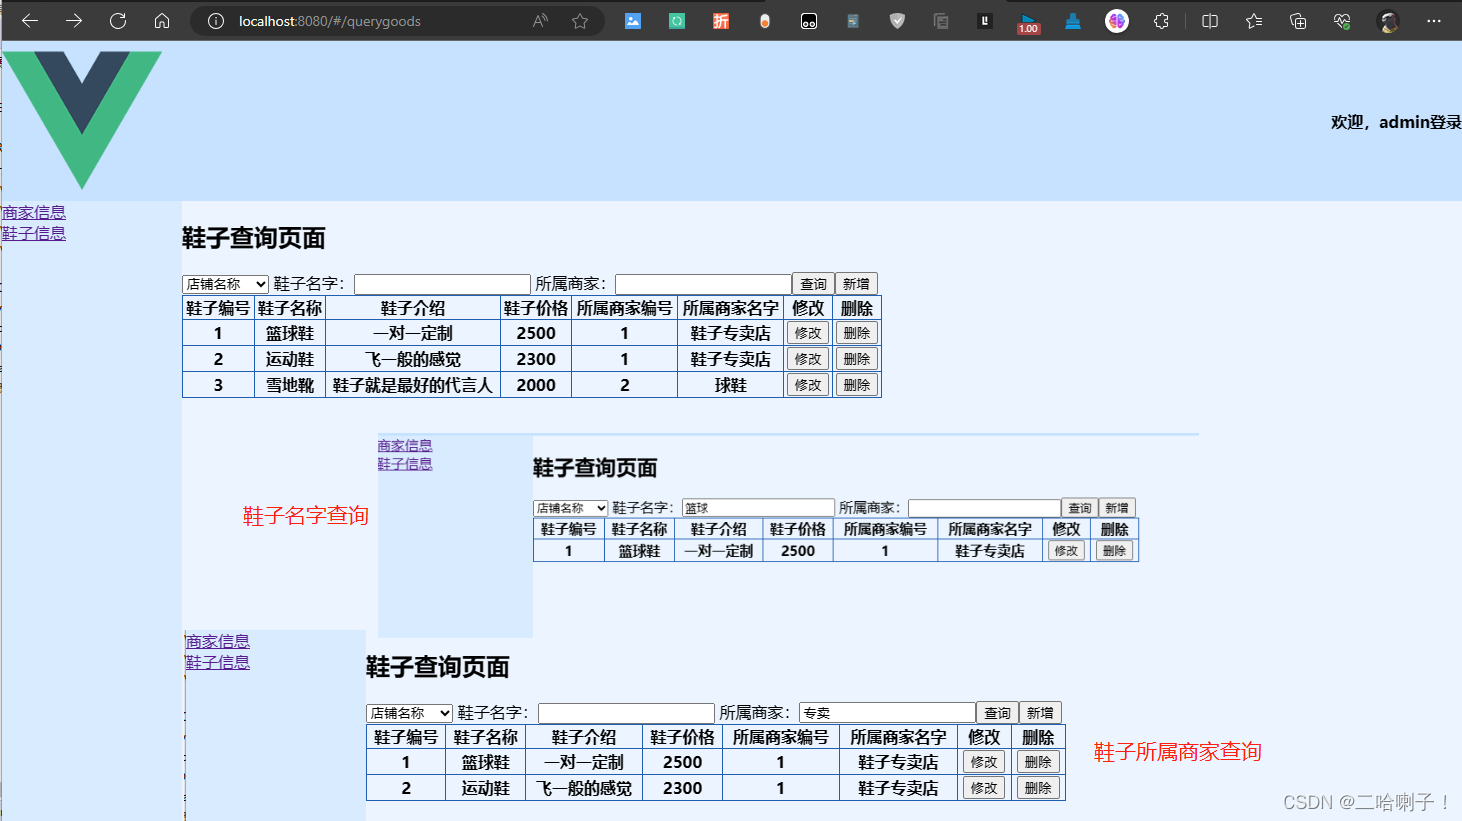
查询鞋子前端
<template>
  <div>
    <h1>鞋子查询页面</h1>
    <select v-model="id">
      <option value="">店铺名称</option>
      <option v-for="(shop, index) in shopes" :value="shop.shopId" :key="index">{{ shop.shopName }}</option>
    </select>
    鞋子名字:<input type="text" v-model="goodsName" />
    所属商家:<input type="text" v-model="shopName" />
    <button @click="querynames">查询</button>
    <button @click="addgoods">新增</button> <br>

    <table>
      <tr>
        <th>鞋子编号</th>
        <th>鞋子名称</th>
        <th>鞋子介绍</th>
        <th>鞋子价格</th>
        <th>所属商家编号</th>
        <th>所属商家名字</th>
        <th>修改</th>
        <th>删除</th>
      </tr>
      <tr v-for="(goods, index) in goodses" :key="index">
        <th>{{ goods.goodsId }}</th>
        <th>{{ goods.goodsName }}</th>
        <th>{{ goods.goodsExplain }}</th>
        <th>{{ goods.goodsPrice }}</th>
        <th>{{ goods.shopId }}</th>
        <th>{{ goods.shopName }}</th>
        <th><button @click="gotoSession(index)">修改</button></th>
        <th><button @click="delgoods(index)">删除</button></th>
      </tr>
    </table>
  </div>
</template>

<script>
import axios from 'axios'
import qs from 'qs'
export default {
  data() {
    return {
      goodsName: '',
      goodses: [],
      shopes: [],
      shopName: '',
      id: ''
    }
  },
  methods: {
    querynames() {
      axios.get(`http://localhost:8888/taobao_admin/goods?action=query&goodsName=${this.goodsName}&shopName=${this.shopName}&shopId=${this.id}`)
      .then((resp) => {
        this.goodses = resp.data
      })
    },
  },
  components: {},
  computed: {},
  watch: {},
  mounted() {
    axios.get(`http://localhost:8888/taobao_admin/shop?shopName=&action=queryshop`)
    .then((resp) => {
      this.shopes = resp.data
    })
  },
}
</script>

<style scoped>
table {
  width: 700px;
  border: 1px solid #1fb121;
  border-collapse: collapse;
}

th {
  border: 1px solid #1f5eb1;
}
</style>
增加鞋子
这里做了个下拉框显示商家名字,在点击新增按钮的时候,可以选择商家
addgoods方法
增加鞋子后端
dao包:
	public int InsertGoods(Goods goods) {
        int result = 0;
        Connection connection = null;
        PreparedStatement statement = null;
        connection = JdbcUtil.createConnection();
        try {
            statement = connection.prepareStatement("insert into goods (goodsName,goodsExplain,goodsPrice,shopId) values (?,?,?,?)");
            // 给? 赋值,用setXXX方法
            statement.setString(1, goods.getGoodsName());
            statement.setString(2, goods.getGoodsExplain());
            statement.setDouble(3, goods.getGoodsPrice());
            statement.setInt(4, goods.getShopId());
            result = statement.executeUpdate();
        } catch (SQLException e) {
            // TODO try/catch 包围
            e.printStackTrace();
        } finally {
            JdbcUtil.close(statement, connection);
        }
        return result;
    }
service包:
    public String addgoods(Goods goods) {
        return dao.InsertGoods(goods) > 0 ? "鞋子增加成功" : "鞋子增加失败";
    }
controller包:
        else if (action.equals("addgoods")) {
            String goodsName = req.getParameter("goodsName");
            String goodsExplain = req.getParameter("goodsExplain");
            String goodsPrice = req.getParameter("goodsPrice");
            String shopId = req.getParameter("shopId");

            Goods goods = new Goods();
            goods.setGoodsName(goodsName);
            goods.setGoodsExplain(goodsExplain);
            goods.setGoodsPrice(Double.parseDouble(goodsPrice));
            goods.setShopId(Integer.parseInt(shopId));
            String result = service.addgoods(goods);
            writer.print(result);

        }
增加鞋子前端
之前查询的时候已经导入的 qs框架,所以这里不必重复
在查询视图下的 methods 内加上:addgoods方法
    addgoods() {
      this.$router.push('/addgoods')
    },
新建GoodsAddView视图,在 index.js文件内加上路由配置
      {
        path: '/addgoods',
        name: 'addgoods',
        component: () => import('@/views/goods/GoodsAddView')
      }
GoodsAddView视图:
<template>
  <div>
    鞋子名称:<input type="text" v-model="goods.goodsName" required> <br>
    <p v-show="!goods.goodsName" class="err">输入鞋子名称不能为空!</p>
    鞋子描述:<input type="text" v-model="goods.goodsExplain" required> <br>
    <p v-show="!goods.goodsExplain" class="err">输入鞋子描述不能为空!</p>
    鞋子价格:<input type="text" v-model="goods.goodsPrice" required> <br>
    <p v-show="!goods.goodsPrice" class="err">输入鞋子价格不能为空!</p>
    <select v-model="goods.shopId">
      <option value="">所属商家编号</option>
      <option :value="this.shopes[index].shopId" v-for="(shop, index) in shopes" :key="index">{{ shop.shopName }}</option>
    </select>

    <p class="err">所选商家编号不能为空!</p>
    <button @click="addgoods">新增</button>
  </div>
</template>


<script>
import axios from 'axios'
import qs from 'qs'

export default {
  data () {
    return {
      goods: {
        goodsName: '',
        goodsExplain: '',
        goodsPrice: '',
        shopId: '',
        // postman后端匹配  action前是?
        action: 'addgoods'
      },
      shopes: [],
    }
  },
  methods: {
    addgoods () {
      axios.post('http://localhost:8888/taobao_admin/goods', qs.stringify(this.goods))
        .then((resp)=>{
          alert(resp.data)
        })
    }
  },

components: {},
  computed: {},
  watch: {},
  mounted() {
    axios.get(`http://localhost:8888/taobao_admin/shop?action=queryshop&shopName`)
    .then((resp) => {
      this.shopes = resp.data
      this.goods.shopId = this.shopes[0].shopId
    })
  },
}
</script>

<style scoped>
.err{
  color: red;
}
</style>
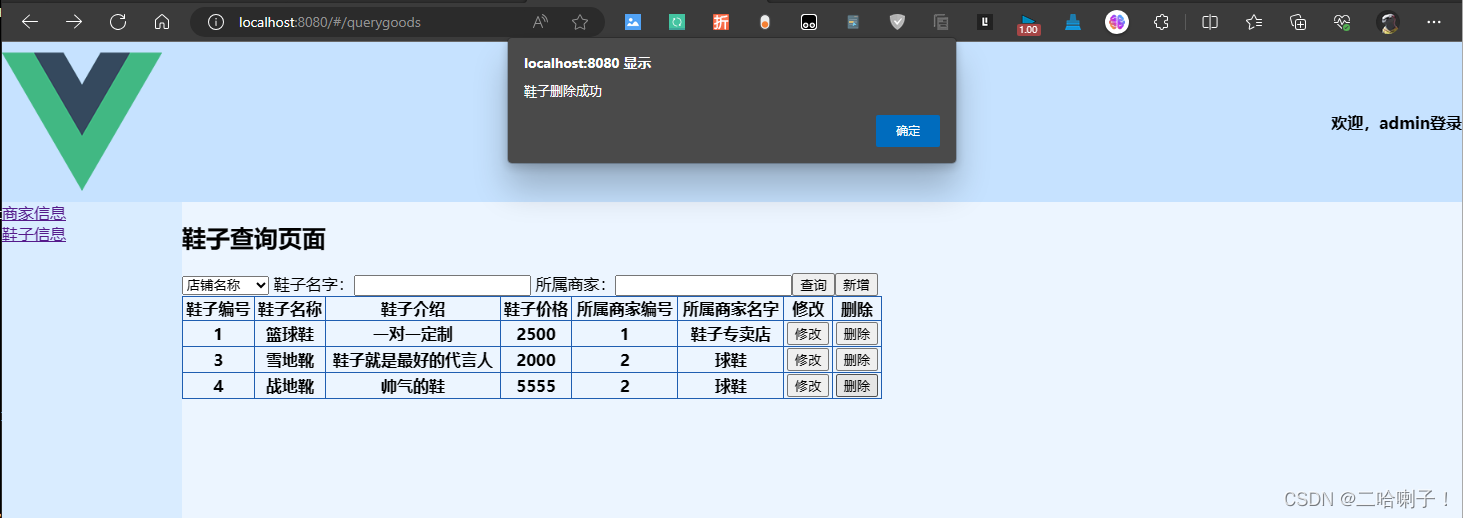
删除鞋子
delgoods 方法
删除鞋子后端
dao包代码:
    // 删除指定鞋子信息       按照主键删除
    public int DeleteGoodsId(int goodsId) {
        int result = 0;
        Connection connection = null;
        PreparedStatement statement = null;
        connection = JdbcUtil.createConnection();
        try {
            statement = connection.prepareStatement("delete from goods where goodsId=?");
            statement.setInt(1, goodsId);
            result = statement.executeUpdate();
        } catch (SQLException e) {
            e.printStackTrace();
        } finally {
            JdbcUtil.close(statement, connection);
        }
        return result;
    }
service包:
    public String remove(int goodsId) {
        return dao.DeleteGoodsId(goodsId) > 0 ? "鞋子删除成功" : "鞋子删除失败";
    }
controller包:
          else if (action.equals("delgoods")) {
            String goodsId = req.getParameter("goodsId");
            String result = service.remove(Integer.parseInt(goodsId));

            writer.print(result);
        }
删除鞋子前端
在查询视图下加上 delgoods 方法(在写查询时已经定义此方法)
    delgoods(i) {
      axios.post('http://localhost:8888/taobao_admin/goods', qs.stringify({
        action: 'delgoods',
        goodsId: this.goodses[i].goodsId
      }))
        .then((resp) => {
          alert(resp.data)
          this.querynames()
        })
    }
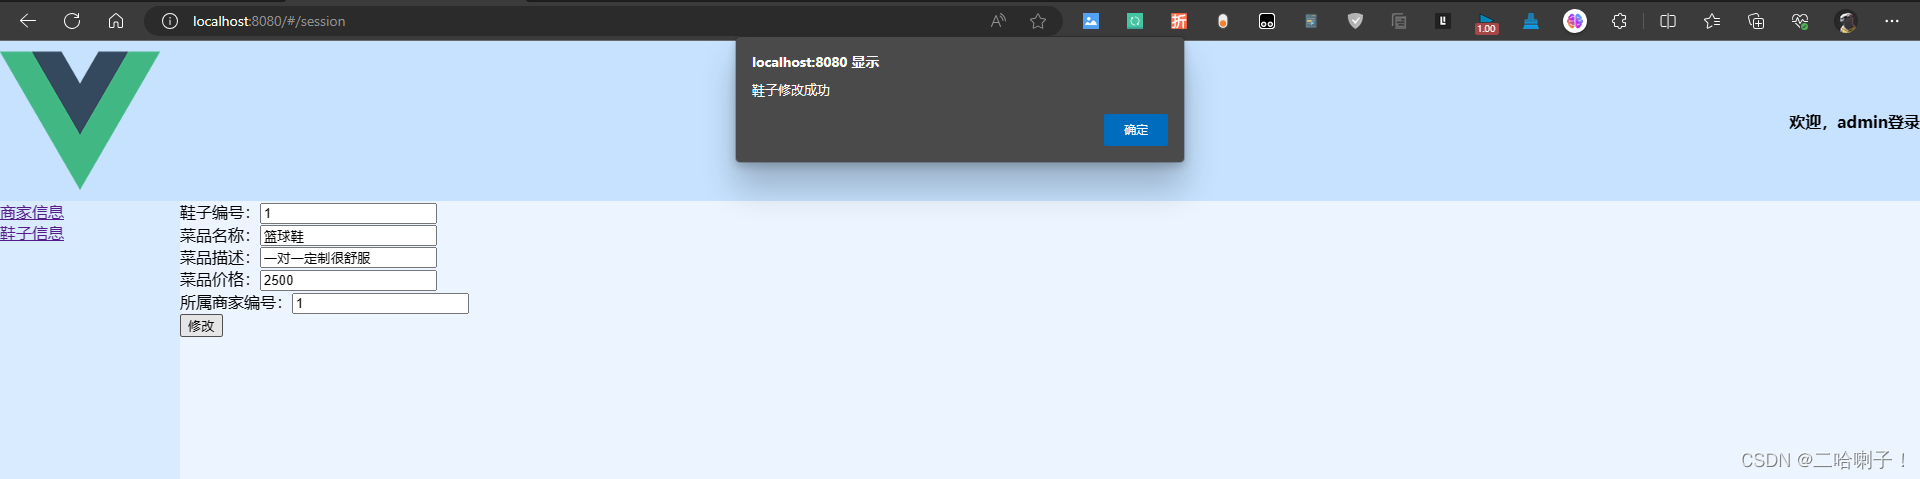
修改鞋子
用session方法修改
修改鞋子后端
dao 包代码:
    // 修改鞋子信息
    public int UpdateGoods(Goods goods) {
        int result = 0;
        Connection connection = null;
        PreparedStatement statement = null;
        connection = JdbcUtil.createConnection();
        try {
            statement = connection.prepareStatement("update goods set goodsName=?,goodsExplain=?,goodsPrice=?,shopId=? where goodsId=?");
            // 给? 赋值
            statement.setString(1,goods.getGoodsName());
            statement.setString(2,goods.getGoodsExplain());
            statement.setDouble(3,goods.getGoodsPrice());
            statement.setInt(4,goods.getShopId());
            statement.setInt(5,goods.getGoodsId());
            result = statement.executeUpdate();
        } catch (SQLException e) {
            // TODO 自动生成的 catch 块
            e.printStackTrace();
        } finally {
            JdbcUtil.close(statement, connection);
        }
        return result;
    }
service 包代码:
    public String update(Goods goods) {
        return dao.UpdateGoods(goods) > 0 ? "鞋子修改成功" : "鞋子修改失败";
    }
controller包代码:
        } else if (action.equals("updategoods")) {
            String goodsId = req.getParameter("goodsId");
            String goodsName = req.getParameter("goodsName");
            String goodsExplain = req.getParameter("goodsExplain");
            String goodsPrice = req.getParameter("goodsPrice");
            String shopId = req.getParameter("shopId");
            Goods goods = new Goods();
            goods.setGoodsId(Integer.parseInt(goodsId));
            goods.setGoodsName(goodsName);
            goods.setGoodsExplain(goodsExplain);
            goods.setGoodsPrice(Double.parseDouble(goodsPrice));
            goods.setShopId(Integer.parseInt(shopId));
            String result = service.update(goods);
            writer.print(result);
        }
修改鞋子前端
在查询页面中加上 gotoSession 方法
    gotoSession(i) {
      sessionStorage.setItem('goods',JSON.stringify(this.goodses[i]))
      this.$router.push('/session')
    },
新建视图:GoodsUpdateSessionView
在 index.js 文件中配置路由
      {
        path: '/session',
        name: 'session',
        component: () => import('@/views/goods/GoodsUpdateSessionView')
      }
修改视图页面:
<template>
  <div>
    鞋子编号:<input type="text" readonly v-model="goods.goodsId"> <br>
    菜品名称:<input type="text" v-model="goods.goodsName"> <br>
    菜品描述:<input type="text" v-model="goods.goodsExplain"> <br>
    菜品价格:<input type="text" v-model="goods.goodsPrice"> <br>
    所属商家编号:<input type="text" readonly v-model="goods.shopId"> <br>
    <button @click="updategoods">修改</button>
  </div>
</template>

<script>
import axios from 'axios'
import qs from 'qs'
export default {
  data() {
    return {
      goods: {

      }
    }
  },
  methods: {
    // 发请求,1.导入  2.处理响应 .then   resp:响应信息
    // action与后端对应  controller
    updategoods() {
      this.goods['action'] = 'updategoods'
      axios.post('http://localhost:8888/taobao_admin/goods', qs.stringify(this.goods))
        .then((resp) => {
          alert(resp.data)
        })
    }
  },
  components: {},
  computed: {},
  watch: {},
  mounted() {
    let goods = sessionStorage.getItem('goods')
    goods = JSON.parse(goods)
    this.goods = goods
  }
}
</script>
<style scoped></style>
接下来可以改改样式