😘作者简介:正在努力的99年公司职员。
👊宣言:人生就是B(birth)和D(death)之间的C(choise),做好每一个选择。
🙏创作不易,动动小手给个点赞加关注吧,有什么意见评论区告诉我,一起学习。
前言
ansible介绍
ansible是新出现的自动化运维工具,基于Python开发,集合了众多运维工具(puppet、cfengine、chef、func、fabric)的优点,实现了批量系统配置、批量程序部署、批量运行命令等功能。无客户端。
命令的执行过程
1、加载自己的配置文件,默认/etc/ansible/ansible.cfg
2、查找对应的主机配置文件,找到要执行的主机或者组。
3、加载自己对应的模块文件,如command
4、通过ansible将模块或命令生成对应的临时py文件,并将该文件传输至远程服务器
5、对应执行用户家目录的.ansible/tmp/XXX/XXX.PY文件
6、给文件+x执行
7、执行并返回结果
8、删除临时py文件,sleep 0 退出。

工作原理图
ansible的部署与操作
ansible的部署
ansible的部署比较简单,首先安装epel源,然后直接使用yum安装ansible。
安装以后可以使用以下命令来检测是否安装成功:
rpm -ql ansible 列出所有文件
rpm -qc ansible 查看配置文件
ansible --help 查看ansible帮助
ansible-doc -l 看所有模块(A10,华为,docker,EC2,aws等等广大厂商设备)
ansible-doc -s yum 看yum模块,了解其功能
#安装epel源
yum install -y epel-release
#安装ansible
yum install -y ansible
1、ansible操作
部署完成之后可以进行一些ansible的操作,首先从ansible的基础介绍,ansible有单独的hosts文件来定义ansible需要控制的主机ip。
ansible基础
1)定义主机清单
定义主机清单的文件位置:/etc/ansible/hosts
单单定义一个主机的ip属性是无法进行控制主机的,因为ansible的工作原理是通过ssh来进行对主机的远程操作,所以这里单单定义主机的ip是没有权限来远程操作主机的,这里有三种方法可以解决权限问题:
1、使用ssh-key的方式对远程主机的免密登录
ssh-keygen 生成公钥
ssh-copy-id ip地址 推送公钥到需要远程的主机
2、在ansible的hosts文件的主机后面加上:
ansible_ssh_user=root
ansible_ssh_pass=密码
3、在使用ansible对远程主机进行远程操作的时候:
使用-u 用户名 -k
输入密码
这里使用第二种方法在ansible的hosts文件加上主机的用户名密码。
#这种会无权操作远程主机
[root@localhost ~]# vim  /etc/ansible/hosts
[root@localhost ~]# cat /etc/ansible/hosts
192.168.79.158

#添加用户名密码即可
[root@localhost ~]# vim  /etc/ansible/hosts
[root@localhost ~]# cat /etc/ansible/hosts
192.168.79.158  ansible_ssh_user="root" ansible_ssh_pass="666666"
2)测试连通性
使用ansible种的ping来测试与远程主机的连通性。
输出结果为pong说明与远程主机是可以通信的。
否则需要检查hosts文件是否正确以及远程主机是否开启了ssh、或者是否更改过远程主机的ssh端口,默认ansible使用ssh的22端口,如果更改过远程主机的默认端口,需要在ansible的hosts文件指定修改后的ssh端口。
只需要在hosts种主机后面加上ansible_ssh_port=更改后的端口号
[root@localhost ~]# ansible 192.168.79.158  -m ping
192.168.79.158 | SUCCESS => {
    "ansible_facts": {
        "discovered_interpreter_python": "/usr/bin/python3"
    },
    "changed": false,
    "ping": "pong"
}
2、主机清单
包括主机组、主机子组、变量、主机ip以及主机的用户名和密码登。
1)定义主机组
为了实现同时对多台主机进行操作,这里就需要使用到主机组,
原理:
定义一个主机组,将需要远程操作的主机加入到主机组中,这样ansible只需要对主机组进行操作就相当于对组中的所有主机进行操作。
在/etx/ansible/hosts中进行配置
[root@localhost ~]# vim /etc/ansible/hosts
[root@localhost ~]# cat /etc/ansible/hosts
[web]
web1  ansible_ssh_host="192.168.79.158"  ansible_ssh_user="root" ansible_ssh_pass="666666"
web2  ansible_ssh_host="192.168.79.111"  ansible_ssh_user="root" ansible_ssh_pass="666666"
属性解析:
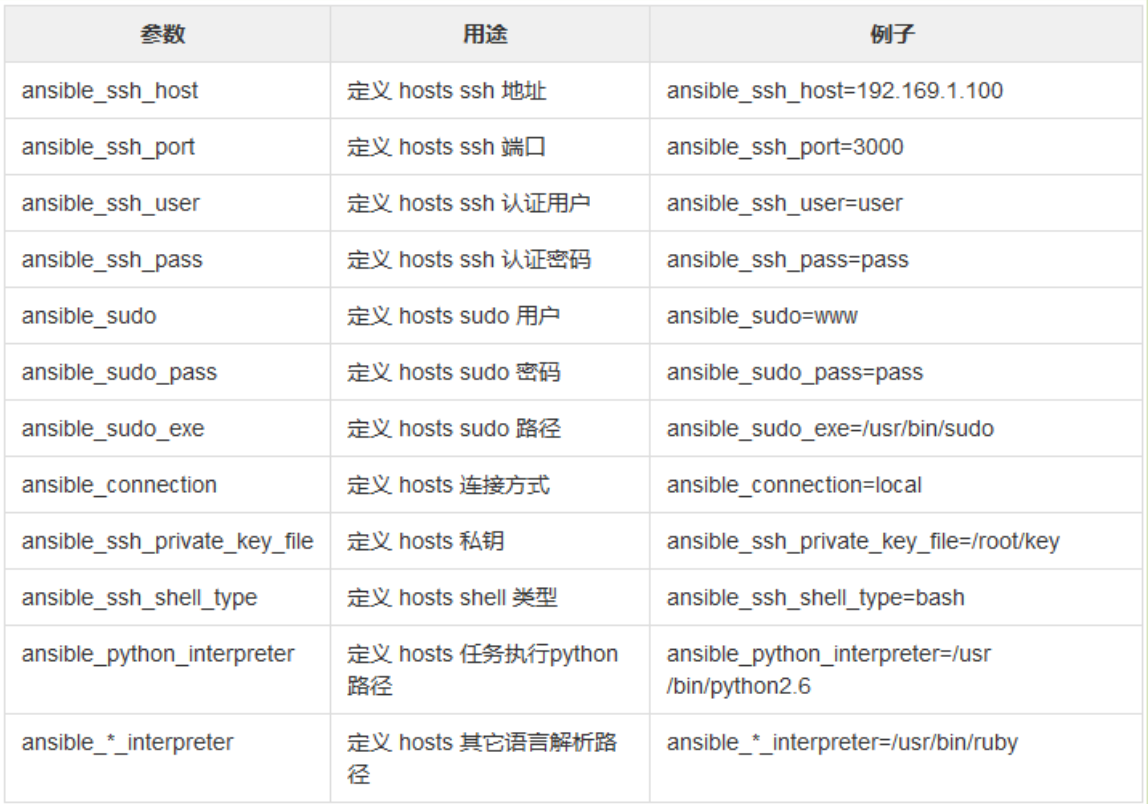
ansible_host:指定主机的ip
ansible_ssh_user:被连接的用户
ansible_ssh_pass:被连接用户的密码
ansible_ssh_port:被连接主机的ssh端口
测试连通
这个时候只需要对web进行测试连通即可测试对web1和web2的连通性。
[root@localhost ~]# ansible web -m ping
web1 | SUCCESS => {
    "ansible_facts": {
        "discovered_interpreter_python": "/usr/bin/python3"
    },
    "changed": false,
    "ping": "pong"
}
web2 | SUCCESS => {
    "ansible_facts": {
        "discovered_interpreter_python": "/usr/bin/python3"
    },
    "changed": false,
    "ping": "pong"
}
2)定义组变量
之前都是在每个主机后面加上需要远程的用户和密码,当每台主机用户和密码都一致的时候可以只用组变量来简化hosts文件内容。
[root@localhost ~]# cat /etc/ansible/hosts
[web]
web1  ansible_ssh_host="192.168.79.158"
web2  ansible_ssh_host="192.168.79.111"

#定义组变量
[web:vars]
ansible_ssh_user="root"
ansible_ssh_pass="666666"

#测试连通性
[root@localhost ~]# ansible web -m ping
web1 | SUCCESS => {
    "ansible_facts": {
        "discovered_interpreter_python": "/usr/bin/python3"
    },
    "changed": false,
    "ping": "pong"
}
web2 | SUCCESS => {
    "ansible_facts": {
        "discovered_interpreter_python": "/usr/bin/python3"
    },
    "changed": false,
    "ping": "pong"
}
常用的变量
3)子组
当需要把很多组合并在一起进行操作的时候需要用到子组。
就是定义一个主机组,然后将其他组设置为这个主机组的子组。
然后对这个父组进行操作来实现对子组所有主机的操作。
可能会有所疑问,既然要对所有主机进行操作,为什么不把这些主机放到同一个组呢?
因为不同组的主机大部分操作是不需要一致的,但是有个别操作是统一操作的,这个时候就需要将这些主机组设置为别的主机组的子组,在进行统一操作的时候对父组进行操作即可,当进行不统一的操作的时候,就去单独操作那些组即可。
[root@localhost ~]# cat /etc/ansible/hosts
#http主机组
[http]
web1  ansible_ssh_host="192.168.79.158"
#nginx主机组
[nginx]
web2  ansible_ssh_host="192.168.79.111"

#定义web组的子组为http和nginx
[web:children]
http
nginx

#web组的变量
[web:vars]
ansible_ssh_user="root"
ansible_ssh_pass="666666"

#测试web的连通性
[root@localhost ~]# ansible web -m ping
web1 | SUCCESS => {
    "ansible_facts": {
        "discovered_interpreter_python": "/usr/bin/python3"
    },
    "changed": false,
    "ping": "pong"
}
web2 | SUCCESS => {
    "ansible_facts": {
        "discovered_interpreter_python": "/usr/bin/python3"
    },
    "changed": false,
    "ping": "pong"
}
测试对web组的连通性,反馈的信息是对web1和web2主机的连通性。
3、Ad-Hoc-点对点模式
简介
临时的,在ansible中是指需要快速执行的单条命令,并且不需要保存的命令。对于复杂的命令则为 playbook。
有以下模块:
1、shell
2、复制模块
3、用户模块
4、软件包管理
5、服务模块
6、文件模块
7、收集模块
8、fetch:从远程某主机获取文件到本地
9、cron
10、group
11、script
12、unarchive
1)shell模块
可以使用ansible-doc shell查看该模块的帮助文档。
命令:ansible 需要操作的主机或者主机组 -m shell -a 'shell命令'
在web1和web2主机查看1.txt文件内容。
#远程操作web主机组,将this is ansible内容写到1.txt文件内
[root@localhost ~]# ansible web -m shell -a 'echo "this is ansible" > 1.txt'
web1 | CHANGED | rc=0 >>

web2 | CHANGED | rc=0 >>

#web1主机
[root@web1 ~]# cat 1.txt
this is ansible

#web2主机
[root@web2 ~]# cat 1.txt
this is ansible
也可以使用shell模块进行其他操作,比如重启服务、停止服务、启动服务、创建文件夹、创建用户等等所有可以通过shell命令完成的,都可以进行这样的操作。
2) 复制模块
将本机文件复制到远程主机。
可以通过:ansible-doc copy查看该模块的帮助文档。
命令:
ansible 远程主机或者主机组名 -m copy -a 'src=源文件 dest=目的路径 owner=属主 group=属组 mode=文件权限'
src:本机源文件
dest:目标主机路径
owner:设置目的主机该文件的属主
group:设置目的主机该文件的属组
mode:设置目的主机该文件的权限
#ansible本机的hosts文件
[root@localhost ~]# cat /etc/hosts
127.0.0.1   localhost localhost.localdomain localhost4 localhost4.localdomain4
::1         localhost localhost.localdomain localhost6 localhost6.localdomain6
192.169.79.158	web1
192.168.79.111	web2
192.168.79.142	ansible

#将本机的hosts文件复制到目标主机
[root@localhost ~]# ansible web -m copy -a 'src=/etc/hosts dest=/etc/hosts owner=root group=root mode=644' -o
web2 | SUCCESS => {"ansible_facts": {"discovered_interpreter_python": "/usr/bin/python3"},"changed": false,"checksum": "d3431607c0a904d9aeaabb98933d6af6e72d6b98","dest": "/etc/hosts","gid": 0,"group": "root","mode": "0644","owner": "root","path": "/etc/hosts","size": 221,"state": "file","uid": 0}
web1 | SUCCESS => {"ansible_facts": {"discovered_interpreter_python": "/usr/bin/python3"},"changed": false,"checksum": "d3431607c0a904d9aeaabb98933d6af6e72d6b98","dest": "/etc/hosts","gid": 0,"group": "root","mode": "0644","owner": "root","path": "/etc/hosts","size": 221,"state": "file","uid": 0}
#web1查看结果
[root@web1 test]# cat /etc/hosts
127.0.0.1   localhost localhost.localdomain localhost4 localhost4.localdomain4
::1         localhost localhost.localdomain localhost6 localhost6.localdomain6
192.169.79.158	web1
192.168.79.111	web2
192.168.79.142	ansible

#web2结果
[root@web2 test]# cat /etc/hosts
127.0.0.1   localhost localhost.localdomain localhost4 localhost4.localdomain4
::1         localhost localhost.localdomain localhost6 localhost6.localdomain6
192.169.79.158	web1
192.168.79.111	web2
192.168.79.142	ansible
这里的-o是简介输出。
可以使用backup=yes来进行备份复制
默认baskup是no
该属性的效果是:
该属性为yes的时候,在复制的时候,进行判断该文件是否和目标文件一致,如果不一致则将远程主机的文件备份一份,再将ansible的文件拷贝过去;
该属性为no的时候,将直接覆盖远程主机的文件。
#在ansible主机的hosts文件中添加web3的信息
[root@localhost ~]# cat /etc/hosts
127.0.0.1   localhost localhost.localdomain localhost4 localhost4.localdomain4
::1         localhost localhost.localdomain localhost6 localhost6.localdomain6
192.169.79.158	web1
192.168.79.111	web2
192.168.79.142	ansible
192.168.79.143	web3

#将ansible的hosts文件拷贝到web主机组的主机上并且路径和文件名一致,使用了backup=yes属性。
[root@localhost ~]# ansible web -m copy -a 'src=/etc/hosts dest=/etc/hosts owner=root group=root mode=644 backup=yes' -o
web1 | CHANGED => {"ansible_facts": {"discovered_interpreter_python": "/usr/bin/python3"},"backup_file": "/etc/hosts.4258.2023-07-25@10:20:42~","changed": true,"checksum": "ea1c19d125e4ca1a5ae19b476647c11299e5b876","dest": "/etc/hosts","gid": 0,"group": "root","md5sum": "2af771086ba39ad26bb4e45e733cac94","mode": "0644","owner": "root","size": 241,"src": "/root/.ansible/tmp/ansible-tmp-1690251641.5046346-2290-172151362468917/source","state": "file","uid": 0}
web2 | CHANGED => {"ansible_facts": {"discovered_interpreter_python": "/usr/bin/python3"},"backup_file": "/etc/hosts.2890.2023-07-25@10:20:42~","changed": true,"checksum": "ea1c19d125e4ca1a5ae19b476647c11299e5b876","dest": "/etc/hosts","gid": 0,"group": "root","md5sum": "2af771086ba39ad26bb4e45e733cac94","mode": "0644","owner": "root","size": 241,"src": "/root/.ansible/tmp/ansible-tmp-1690251641.5090225-2291-67229975267586/source","state": "file","uid": 0}

#发现多了一个hosts.4258.2023-07-25@10:20:42~文件
[root@web1 test]# ls /etc/hosts*
/etc/hosts  /etc/hosts.4258.2023-07-25@10:20:42~

#查看hosts文件是刚刚加了web3的hosts
[root@web1 test]# cat /etc/hosts
127.0.0.1   localhost localhost.localdomain localhost4 localhost4.localdomain4
::1         localhost localhost.localdomain localhost6 localhost6.localdomain6
192.169.79.158	web1
192.168.79.111	web2
192.168.79.142	ansible
192.168.79.143	web3
#查看另一个发现是没有web3的,也就是在拷贝前,对原本的文件进行了备份操作。
[root@web1 test]# cat /etc/hosts.4258.2023-07-25@10\:20\:42~
127.0.0.1   localhost localhost.localdomain localhost4 localhost4.localdomain4
::1         localhost localhost.localdomain localhost6 localhost6.localdomain6
192.169.79.158	web1
192.168.79.111	web2
192.168.79.142	ansible
3)用户模块
同样的使用ansible-doc user查看该模块的帮助文档。
命令语法:
ansible 远程主机组或者主机 -m user -a ' name=用户名 state=present/absent'
state=present:创建用户
state=absent:删除用户
name:用户名
uid:指定用户的uid
home:指定用户的家目录
password:指定用户的密码
group:指定用户的组
。。。。
这里就做简单的操作,一般只需要创建用户即可设置好用户得到密码以及组。
新增用户
#在web主机组的主机上都创建一个用户为sure1密码为333333
[root@localhost ~]# ansible web -m user -a 'name=sure1 password=333333 state=present'
[WARNING]: The input password appears not to have been hashed. The 'password' argument must be encrypted for this module to work properly.
web1 | CHANGED => {
    "ansible_facts": {
        "discovered_interpreter_python": "/usr/bin/python3"
    },
    "changed": true,
    "comment": "",
    "create_home": true,
    "group": 1000,
    "home": "/home/sure1",
    "name": "sure1",
    "password": "NOT_LOGGING_PASSWORD",
    "shell": "/bin/bash",
    "state": "present",
    "system": false,
    "uid": 1000
}
web2 | CHANGED => {
    "ansible_facts": {
        "discovered_interpreter_python": "/usr/bin/python3"
    },
    "changed": true,
    "comment": "",
    "create_home": true,
    "group": 1000,
    "home": "/home/sure1",
    "name": "sure1",
    "password": "NOT_LOGGING_PASSWORD",
    "shell": "/bin/bash",
    "state": "present",
    "system": false,
    "uid": 1000
}

#使用shell模块查看web1和web2主机上的用户信息
[root@localhost ~]# ansible web -m shell -a 'cat /etc/passwd | grep sure1'
web1 | CHANGED | rc=0 >>
sure1:x:1000:1000::/home/sure1:/bin/bash
web2 | CHANGED | rc=0 >>
sure1:x:1000:1000::/home/sure1:/bin/bash
删除用户
[root@localhost ~]# ansible web -m user -a 'name=sure1  state=absent' -o
web1 | CHANGED => {"ansible_facts": {"discovered_interpreter_python": "/usr/bin/python3"},"changed": true,"force": false,"name": "sure1","remove": false,"state": "absent","warnings": ["The input password appears not to have been hashed. The 'password' argument must be encrypted for this module to work properly."]}
web2 | CHANGED => {"ansible_facts": {"discovered_interpreter_python": "/usr/bin/python3"},"changed": true,"force": false,"name": "sure1","remove": false,"state": "absent","warnings": ["The input password appears not to have been hashed. The 'password' argument must be encrypted for this module to work properly."]}
[root@localhost ~]# ansible web -m shell -a 'cat /etc/passwd | grep sure1'
web1 | FAILED | rc=1 >>
non-zero return code
web2 | FAILED | rc=1 >>
non-zero return code
4)软件包模块
name 所安装的包的名称
state present:安装, latest:安装最新的, absent:卸载软件。
update_cache 强制更新yum的缓存 conf_file 指定远程yum安装时所依赖的配置文件(安装本地已有的包)。
disable_pgp_check 是否禁止GPG checking,只用于presentor latest。
disablerepo 临时禁止使用yum库。 只用于安装或更新时。
enablerepo 临时使用的yum库。只用于安装或更新时。
#在http主机组安装httpd
[root@localhost ~]# ansible http -m yum -a 'name=httpd state=present' -o
web1 | CHANGED => {"ansible_facts": {"discovered_interpreter_python": "/usr/bin/python3"},"changed": true,"msg": "","rc": 0,"results": ["Installed: apr-util-bdb-1.6.1-23.el9.x86_64","Installed: centos-logos-httpd-90.4-1.el9.noarch","Installed: httpd-2.4.57-3.el9.x86_64","Installed: mod_lua-2.4.57-3.el9.x86_64","Installed: httpd-core-2.4.57-3.el9.x86_64","Installed: apr-util-openssl-1.6.1-23.el9.x86_64","Installed: apr-1.7.0-11.el9.x86_64","Installed: httpd-filesystem-2.4.57-3.el9.noarch","Installed: mailcap-2.1.49-5.el9.noarch","Installed: mod_http2-1.15.19-4.el9.x86_64","Installed: apr-util-1.6.1-23.el9.x86_64","Installed: httpd-tools-2.4.57-3.el9.x86_64"]}
#查看http主机组的安装情况
[root@localhost ~]# ansible http -m shell -a 'rpm -ql httpd'
web1 | CHANGED | rc=0 >>
/etc/httpd/conf.modules.d/00-brotli.conf
/etc/httpd/conf.modules.d/00-systemd.conf
/usr/lib/.build-id
/usr/lib/.build-id/a5
/usr/lib/.build-id/a5/48da45d8f12522a9e0f8ec2ab86f1b909f2ec5
/usr/lib/.build-id/b7
/usr/lib/.build-id/b7/f224e87b751cc6de1e739876f017e1d97c4df4
/usr/lib/systemd/system/htcacheclean.service
/usr/lib/systemd/system/httpd.service
/usr/lib/systemd/system/httpd.socket
/usr/lib/systemd/system/httpd@.service
/usr/lib64/httpd/modules/mod_brotli.so
/usr/lib64/httpd/modules/mod_systemd.so
/usr/share/man/man5/httpd.conf.5.gz
/usr/share/man/man8/apachectl.8.gz
/usr/share/man/man8/fcgistarter.8.gz
/usr/share/man/man8/htcacheclean.8.gz
/usr/share/man/man8/htcacheclean.service.8.gz
/usr/share/man/man8/httpd.8.gz
/usr/share/man/man8/httpd.service.8.gz
/usr/share/man/man8/httpd.socket.8.gz
/usr/share/man/man8/httpd@.service.8.gz
/usr/share/man/man8/rotatelogs.8.gz
/usr/share/man/man8/suexec.8.gz

#卸载http主机组的httpd
[root@localhost ~]# ansible http -m yum -a 'name=httpd state=absent' -o
web1 | CHANGED => {"ansible_facts": {"discovered_interpreter_python": "/usr/bin/python3"},"changed": true,"msg": "","rc": 0,"results": ["Removed: mod_http2-1.15.19-4.el9.x86_64","Removed: httpd-2.4.57-3.el9.x86_64"]}
#查看http主机组的httpd
[root@localhost ~]# ansible http -m shell -a 'rpm -ql httpd'
web1 | FAILED | rc=1 >>
未安装软件包 httpd non-zero return code
5)服务模块
语法:ansible 主机名 -m service -a 'name=服务名 state=状态 enabled=yes/no'
state状态有四种:
started:启动服务
stopped停止服务
restarted:重启服务
reloaded:重载配置
enabled:
yes:开机自启
no:禁用开机自启
#在nginx主机组安装nginx
[root@localhost ~]# ansible nginx -m yum -a 'name=nginx state=present' -o
web2 | SUCCESS => {"ansible_facts": {"discovered_interpreter_python": "/usr/bin/python3"},"changed": false,"msg": "Nothing to do","rc": 0,"results": []}
#启动nginx主机组的nginx服务并且设置开机自启
[root@localhost ~]# ansible nginx -m service -a 'name=nginx state=started enabled=yes' -o

#查看nginx主机组的nginx状态
[root@localhost ~]# ansible nginx -m shell -a 'systemctl status nginx'
web2 | CHANGED | rc=0 >>
● nginx.service - The nginx HTTP and reverse proxy server
     Loaded: loaded (/usr/lib/systemd/system/nginx.service; enabled; preset: disabled)
     Active: active (running) since Tue 2023-07-25 10:51:33 CST; 28s ago
    Process: 4405 ExecStartPre=/usr/bin/rm -f /run/nginx.pid (code=exited, status=0/SUCCESS)
    Process: 4406 ExecStartPre=/usr/sbin/nginx -t (code=exited, status=0/SUCCESS)
    Process: 4407 ExecStart=/usr/sbin/nginx (code=exited, status=0/SUCCESS)
   Main PID: 4408 (nginx)
      Tasks: 2 (limit: 12150)
     Memory: 3.3M
        CPU: 20ms
     CGroup: /system.slice/nginx.service
             ├─4408 "nginx: master process /usr/sbin/nginx"
             └─4409 "nginx: worker process"

7月 25 10:51:33 web2 systemd[1]: Starting The nginx HTTP and reverse proxy server...
7月 25 10:51:33 web2 nginx[4406]: nginx: the configuration file /etc/nginx/nginx.conf syntax is ok
7月 25 10:51:33 web2 nginx[4406]: nginx: configuration file /etc/nginx/nginx.conf test is successful
7月 25 10:51:33 web2 systemd[1]: Started The nginx HTTP and reverse proxy server.
6)文件模块
语法:ansible 主机组名或主机 -m file -a 'path=文件路径/文件名 mode=文件权限 state=状态'
path:远程主机文件
mode:文件的权限
state:
directory:如果目录不存在,创建目录
file:文件不存在的话,不创建文件
touch:文件不存在的话,创建文件
link:创建软链接
hard:创建硬链接
absent:删除文件、目录、链接
创建文件
#在web主机组的/root/test目录下创建1.txt文件
[root@localhost ~]# ansible web -m file -a 'path=/root/test/1.txt mode=644 state=touch' -o
web1 | CHANGED => {"ansible_facts": {"discovered_interpreter_python": "/usr/bin/python3"},"changed": true,"dest": "/root/test/1.txt","gid": 0,"group": "root","mode": "0644","owner": "root","size": 0,"state": "file","uid": 0}
web2 | CHANGED => {"ansible_facts": {"discovered_interpreter_python": "/usr/bin/python3"},"changed": true,"dest": "/root/test/1.txt","gid": 0,"group": "root","mode": "0644","owner": "root","size": 0,"state": "file","uid": 0}

#查看创建结果
[root@localhost ~]# ansible web -m shell -a 'ls -l  /root/test'
web1 | CHANGED | rc=0 >>
总用量 0
-rw-r--r-- 1 root root 0  7月 25 11:03 1.txt
web2 | CHANGED | rc=0 >>
总用量 0
-rw-r--r-- 1 root root 0  7月 25 11:03 1.txt
可以看到1.txt文件创建成功。
创建目录
#创建目录
[root@localhost ~]# ansible web -m file -a 'path=/root/test/sure mode=644 state=directory' -o
web2 | CHANGED => {"ansible_facts": {"discovered_interpreter_python": "/usr/bin/python3"},"changed": true,"gid": 0,"group": "root","mode": "0644","owner": "root","path": "/root/test/sure","size": 6,"state": "directory","uid": 0}
web1 | CHANGED => {"ansible_facts": {"discovered_interpreter_python": "/usr/bin/python3"},"changed": true,"gid": 0,"group": "root","mode": "0644","owner": "root","path": "/root/test/sure","size": 6,"state": "directory","uid": 0}
#查看创建结果
[root@localhost ~]# ansible web -m shell -a 'ls -l  /root/test'
web1 | CHANGED | rc=0 >>
总用量 0
-rw-r--r-- 1 root root 0  7月 25 11:03 1.txt
drw-r--r-- 2 root root 6  7月 25 11:05 sure
web2 | CHANGED | rc=0 >>
总用量 0
-rw-r--r-- 1 root root 0  7月 25 11:03 1.txt
drw-r--r-- 2 root root 6  7月 25 11:05 sure
可以看到sure目录创建成功。
创建连接
创建链接的时候要加src
src:链接的源文件。
#创建软链接
[root@localhost ~]# ansible web -m file -a 'path=/root/test/2.txt src=/root/test/1.txt   state=link' -o
web1 | CHANGED => {"ansible_facts": {"discovered_interpreter_python": "/usr/bin/python3"},"changed": true,"dest": "/root/test/2.txt","gid": 0,"group": "root","mode": "0777","owner": "root","size": 16,"src": "/root/test/1.txt","state": "link","uid": 0}
web2 | CHANGED => {"ansible_facts": {"discovered_interpreter_python": "/usr/bin/python3"},"changed": true,"dest": "/root/test/2.txt","gid": 0,"group": "root","mode": "0777","owner": "root","size": 16,"src": "/root/test/1.txt","state": "link","uid": 0}

#查看创建结果
[root@localhost ~]# ansible web -m shell -a 'ls -l  /root/test'
web2 | CHANGED | rc=0 >>
总用量 0
-rw-r--r-- 1 root root  0  7月 25 11:03 1.txt
lrwxrwxrwx 1 root root 16  7月 25 11:07 2.txt -> /root/test/1.txt
drw-r--r-- 2 root root  6  7月 25 11:05 sure
web1 | CHANGED | rc=0 >>
总用量 0
-rw-r--r-- 1 root root  0  7月 25 11:03 1.txt
lrwxrwxrwx 1 root root 16  7月 25 11:07 2.txt -> /root/test/1.txt
drw-r--r-- 2 root root  6  7月 25 11:05 sure
可以看到多了一个2.txt链接文件并且源文件为1.txt
删除文件、目录
#删除sure目录
[root@localhost ~]# ansible web -m file -a 'path=/root/test/sure  state=absent' -o
web1 | CHANGED => {"ansible_facts": {"discovered_interpreter_python": "/usr/bin/python3"},"changed": true,"path": "/root/test/sure","state": "absent"}
web2 | CHANGED => {"ansible_facts": {"discovered_interpreter_python": "/usr/bin/python3"},"changed": true,"path": "/root/test/sure","state": "absent"}
#查看结果
[root@localhost ~]# ansible web -m shell -a 'ls -l  /root/test'
web2 | CHANGED | rc=0 >>
总用量 0
-rw-r--r-- 1 root root  0  7月 25 11:03 1.txt
lrwxrwxrwx 1 root root 16  7月 25 11:07 2.txt -> /root/test/1.txt
web1 | CHANGED | rc=0 >>
总用量 0
-rw-r--r-- 1 root root  0  7月 25 11:03 1.txt
lrwxrwxrwx 1 root root 16  7月 25 11:07 2.txt -> /root/test/1.txt
可以看到sure目录已经不存在了。
7)收集模块
该模块主要用于收集信息,是通过调用facts组件来实现的。
facts组件是Ansible用于采集被管机器设备信息的一个功能,我们可以使用setup模块查机器的所有facts信息,可以使用filter来查看指定信息。整个facts信息被包装在一个JSON格式的数据结构中,ansible_facts是最上层的值。
facts就是变量,内建变量 。每个主机的各种信息,cpu颗数、内存大小等。会存在facts中的某个变量中。调用后返回很多对应主机的信息,在后面的操作中可以根据不同的信息来做不同的操作。如redhat系列用yum安装,而debian系列用apt来安装软件。
#查看nginx主机组的主机ip
[root@localhost ~]# ansible nginx -m setup -a 'filter=ansible_all_ipv4_addresses'
web2 | SUCCESS => {
    "ansible_facts": {
        "ansible_all_ipv4_addresses": [
            "192.168.79.111"
        ],
        "discovered_interpreter_python": "/usr/bin/python3"
    },
    "changed": false
}
8)fetch
fetch 从远程某主机获取文件到本地
dest:用来存放文件的目录,例如存放目录为backup,源文件名称为/etc/profile ;那么在主机中,保存为/backup/master/etc/profile
src:在远程拉取的文件,并且必须是一个file,不能是目录。
#从nginx主机组将/root/test/目录下的1.txt文件拷贝到本机的/app目录下
[root@localhost ~]# ansible nginx -m fetch -a 'src=/root/test/1.txt dest=/app/' -o
web2 | CHANGED => {"changed": true,"checksum": "da39a3ee5e6b4b0d3255bfef95601890afd80709","dest": "/app/web2/root/test/1.txt","md5sum": "d41d8cd98f00b204e9800998ecf8427e","remote_checksum": "da39a3ee5e6b4b0d3255bfef95601890afd80709","remote_md5sum": null}

#用tree查看本机app目录
[root@localhost ~]# tree /app
/app
└── web2
    └── root
        └── test
            └── 1.txt

3 directories, 1 file
9)cron
action:cron backup= #如果设置,则创建一个crontab备份[yes|no]
cron_file= #如果指定,使用这个文件cron.d,而不是单个用户
day= #日应该运行的工作( 1-31, , /2, )
hour= #小时 ( 0-23, , /2, )
minute= #分钟( 0-59, , /2, )
month= #月( 1-12, *, /2, )
weekday= #周 ( 0-6 for Sunday-Saturday,, )
job= #指明运行的命令是什么
name= #定时任务描述reboot #任务在重启时运行,不建议使用,建议使用special_time
special_time #特殊的时间范围,参数:reboot(重启时),annually(每年),monthly(每月),weekly(每周),daily(每天),hourly(每小时)
state #指定状态,present表示添加定时任务,也是默认设置, absent表示删除定时任务
user #以哪个用户的身份执行
#创建计划
[root@localhost ~]# ansible nginx -m cron -a 'name="sync time from ntpserver" minute="*/10" job="/sbin/ntpdate 192.168.79.1 &> /dev/null" '
web2 | CHANGED => {
    "ansible_facts": {
        "discovered_interpreter_python": "/usr/bin/python3"
    },
    "changed": true,
    "envs": [],
    "jobs": [
        "sync time from ntpserver"
    ]
}
#查看计划
[root@localhost ~]# ansible nginx -m shell -a 'crontab -l'
web2 | CHANGED | rc=0 >>
0 12 * * * tcpdump -c 1000 tcp port 80 -w ./`date +%Y%m%d`
#Ansible: sync time from ntpserver
*/10 * * * * /sbin/ntpdate 192.168.79.1 &> /dev/null
10)group
group 用户组模块,添加或删除组
gid #设置组的GID号
name= #管理组的名称
state #指定组状态,默认为创建,设置值为absent为删除,present创建
system #设置值为yes,表示创建系统组
#创建sure1组
[root@localhost ~]# ansible nginx -m group -a 'name=sure1 state=present'
web2 | CHANGED => {
    "ansible_facts": {
        "discovered_interpreter_python": "/usr/bin/python3"
    },
    "changed": true,
    "gid": 1000,
    "name": "sure1",
    "state": "present",
    "system": false
}

#查看创建结果
[root@localhost ~]# ansible nginx -m shell -a 'cat /etc/group | grep sure1'
web2 | CHANGED | rc=0 >>
sure1:x:1000:
发现nginx主机组有了sure1组。
11)script
在指定节点运行服务端的脚本
将服务器端上的脚本放在节点机器上运行
[root@localhost ~]# vim sure.sh
[root@localhost ~]# cat sure.sh
#!/bin/bash
echo "sure" > /root/sure.txt


[root@localhost ~]# ansible nginx -m script -a './sure.sh' -o
web2 | CHANGED => {"changed": true,"rc": 0,"stderr": "Shared connection to 192.168.79.111 closed.\r\n","stderr_lines": ["Shared connection to 192.168.79.111 closed."],"stdout": "","stdout_lines": []}
[root@localhost ~]# ansible nginx -m shell -a 'cat /root/sure.txt'
web2 | CHANGED | rc=0 >>
sure
12)unarchive
默认情况下,此模块会将本地压缩包拷贝到远程机器上解压,当设置了remote_src=yes选项表示解压远程主机上的压缩包
src: 必选项, 要解压的包名
dest: 必选项, 解压到哪个目录下
remote_src:
yes: 解压远程主机上的包
no: 将管理机上的包传到远程主机上解压
[root@localhost ~]# ls
2.tar  2.txt  2.txt.24803.2023-07-14@09:13:57~  anaconda-ks.cfg  sure.sh
[root@localhost ~]# ansible nginx  -m unarchive -a 'src=/root/2.tar dest=/tmp/'
web2 | CHANGED => {
    "ansible_facts": {
        "discovered_interpreter_python": "/usr/bin/python3"
    },
    "changed": true,
    "dest": "/tmp/",
    "extract_results": {
        "cmd": [
            "/usr/bin/gtar",
            "--extract",
            "-C",
            "/tmp",
            "-f",
            "/root/.ansible/tmp/ansible-tmp-1690257451.003821-3912-95934946115738/source"
        ],
        "err": "",
        "out": "",
        "rc": 0
    },
    "gid": 0,
    "group": "root",
    "handler": "TarArchive",
    "mode": "0550",
    "owner": "root",
    "size": 4096,
    "src": "/root/.ansible/tmp/ansible-tmp-1690257451.003821-3912-95934946115738/source",
    "state": "directory",
    "uid": 0
}


[root@localhost ~]# ansible nginx -m shell -a 'ls /tmp'
web2 | CHANGED | rc=0 >>
2.txt