目录
虚拟机镜像下载
VirtualBox7下载
VirtualBox7安装镜像流程
创建虚拟机
虚拟机挂单独硬盘
网络设置
检查虚拟机配置
启动虚拟机
ubuntu配置
查询虚拟机IP地址
修改ROOT密码
更新apt
NTP同步
挂载磁盘&关闭swap
虚拟机镜像下载
目前国内操作系统镜像源非常完备,下载速度也非常快:
| 镜像源 | 地址 |
| 清华大学 | https://mirrors.tuna.tsinghua.edu.cn/ |
| 中科大 | http://mirrors.ustc.edu.cn/ubuntu-releases/20.04/ |
| 浙江大学 | http://mirrors.zju.edu.cn/ubuntu-releases/20.04/ |

目前最新的版本是23.04,保险起见我们使用22.10版本使用。
注意:
- 如果只是为了尝鲜,可以选择最新的版本安装
- 如果是后续还需要各种操作,不建议选择非常新的版本,否则出现问题都没处找
- 镜像选择一般来说centos要更好一下,主要是习惯了Ubuntu的操作
VirtualBox7下载
下载地址:https://www.virtualbox.org/wiki/Downloads
说明:
- 一定要安装virtualBox7,irtualBox7比virtualBox6多了很多功能,基本和VMWare差不多了
VirtualBox7安装镜像流程
创建虚拟机

说明:
- 需要选中“跳过自动安装”
虚拟机挂单独硬盘

网络设置

说明:
- 一般来说使用NAT网络就可以,NAT网络的效果是虚拟机可以使用HOST的网络,出去是没问题的,但是外部没法访问
- NAT网络,NAT网络和NAT差不多,最大的区别是多个虚拟机可以共享一张网络,这样这些虚拟机可以互通,在virtualbox我就使用NAT网络,NAT网络对外使用NAT端口映射出22端口,这样就可以从外部访问
- 桥接网卡:桥接网卡就是直接使用网卡资源,这时候最直接的效果就是路由器会DHCP分配一个IP地址
- 我的实验环境如下图,我希望在我的笔记本上直接SSH连接虚拟机,所以我采用桥接网卡

检查虚拟机配置

启动虚拟机
说明:
- 不要更新,直接跳过配置,一路往下走
- 记得需要安装SSH,不用认证,怎么简单怎么来
- 在设置apt源地址可以将地址的域名改成aaa,避免在安装过程中下载文件导致时长太长

点击重启就算是安装完成了,启动虚拟机很快,目前三分钟可以拉一个虚拟机出来。
ubuntu配置
查询虚拟机IP地址
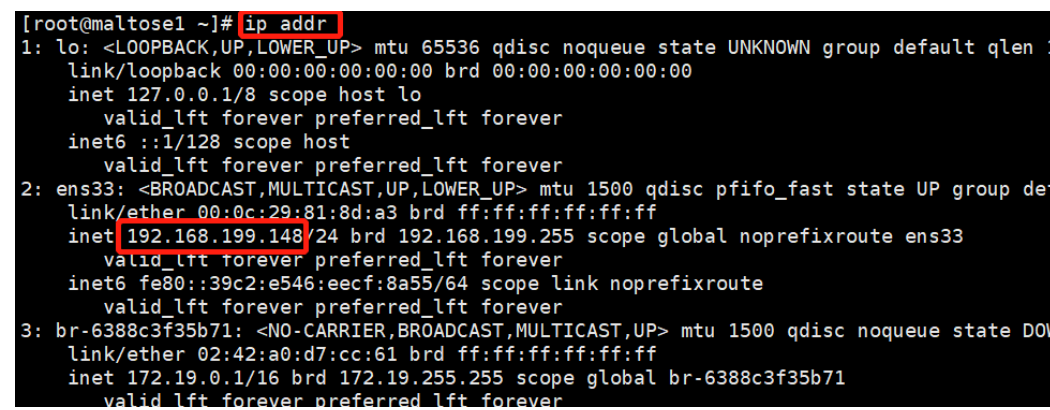
虚拟机已经安装好了,我们需要SSH登录到这台机器,但是新安装的虚拟机是没有ifconfig命令,所以我们需要ip addr查询到虚拟机IP地址:

可以查询到虚拟机IP地址:192.168.0.104
修改ROOT密码
sudo su root
passwd
更新apt
阿里云:
root@ubuntu:/home/xuanchi# cat /etc/apt/sources.list
deb http://mirrors.aliyun.com/ubuntu/ bionic main restricted universe multiverse
deb http://mirrors.aliyun.com/ubuntu/ bionic-security main restricted universe multiverse
deb http://mirrors.aliyun.com/ubuntu/ bionic-updates main restricted universe multiverse
deb http://mirrors.aliyun.com/ubuntu/ bionic-proposed main restricted universe multiverse
deb http://mirrors.aliyun.com/ubuntu/ bionic-backports main restricted universe multiverse
deb-src http://mirrors.aliyun.com/ubuntu/ bionic main restricted universe multiverse
deb-src http://mirrors.aliyun.com/ubuntu/ bionic-security main restricted universe multiverse
deb-src http://mirrors.aliyun.com/ubuntu/ bionic-updates main restricted universe multiverse
deb-src http://mirrors.aliyun.com/ubuntu/ bionic-proposed main restricted universe multiverse
deb-src http://mirrors.aliyun.com/ubuntu/ bionic-backports main restricted universe multiverse
中科大:
deb https://mirrors.ustc.edu.cn/ubuntu/ bionic main restricted universe multiverse
deb-src https://mirrors.ustc.edu.cn/ubuntu/ bionic main restricted universe multiverse
deb https://mirrors.ustc.edu.cn/ubuntu/ bionic-updates main restricted universe multiverse
deb-src https://mirrors.ustc.edu.cn/ubuntu/ bionic-updates main restricted universe multiverse
deb https://mirrors.ustc.edu.cn/ubuntu/ bionic-backports main restricted universe multiverse
deb-src https://mirrors.ustc.edu.cn/ubuntu/ bionic-backports main restricted universe multiverse
deb https://mirrors.ustc.edu.cn/ubuntu/ bionic-security main restricted universe multiverse
deb-src https://mirrors.ustc.edu.cn/ubuntu/ bionic-security main restricted universe multiverse
deb https://mirrors.ustc.edu.cn/ubuntu/ bionic-proposed main restricted universe multiverse
deb-src https://mirrors.ustc.edu.cn/ubuntu/ bionic-proposed main restricted universe multiverse
阿里云的源不给力推荐中科大的apt源,速度非常快,更新apt:
apt update
apt upgrade
遇到错误:
Err:4 http://mirrors.aliyun.com/ubuntu bionic-proposed InRelease
  The following signatures couldn't be verified because the public key is not available: NO_PUBKEY 3B4FE6ACC0B21F32
Get:5 http://mirrors.aliyun.com/ubuntu bionic-backports InRelease [83.3 kB]
Err:5 http://mirrors.aliyun.com/ubuntu bionic-backports InRelease
  The following signatures couldn't be verified because the public key is not available: NO_PUBKEY 3B4FE6ACC0B21F32
Reading package lists... Done
W: GPG error: http://mirrors.aliyun.com/ubuntu bionic InRelease: The following signatures couldn't be verified because the public key is not available: NO_PUBKEY 3B4FE6ACC0B21F32
E: The repository 'http://mirrors.aliyun.com/ubuntu bionic InRelease' is not signed.
公钥认证,我们把公钥加上,重试即可:
sudo apt-key adv --keyserver keyserver.ubuntu.com --recv-keys 3B4FE6ACC0B21F32此时会报出下面的告警:
root@ubuntu:/home/xuanchi# apt update
Hit:1 https://mirrors.ustc.edu.cn/ubuntu bionic InRelease
Hit:2 https://mirrors.ustc.edu.cn/ubuntu bionic-updates InRelease
Hit:3 https://mirrors.ustc.edu.cn/ubuntu bionic-backports InRelease
Hit:4 https://mirrors.ustc.edu.cn/ubuntu bionic-security InRelease
Hit:5 https://mirrors.ustc.edu.cn/ubuntu bionic-proposed InRelease
Reading package lists... Done
Building dependency tree... Done
Reading state information... Done
8 packages can be upgraded. Run 'apt list --upgradable' to see them.
W: https://mirrors.ustc.edu.cn/ubuntu/dists/bionic/InRelease: Key is stored in legacy trusted.gpg keyring (/etc/apt/trusted.gpg), see the DEPRECATION section in apt-key(8) for details.
W: https://mirrors.ustc.edu.cn/ubuntu/dists/bionic-updates/InRelease: Key is stored in legacy trusted.gpg keyring (/etc/apt/trusted.gpg), see the DEPRECATION section in apt-key(8) for details.
W: https://mirrors.ustc.edu.cn/ubuntu/dists/bionic-backports/InRelease: Key is stored in legacy trusted.gpg keyring (/etc/apt/trusted.gpg), see the DEPRECATION section in apt-key(8) for details.
W: https://mirrors.ustc.edu.cn/ubuntu/dists/bionic-security/InRelease: Key is stored in legacy trusted.gpg keyring (/etc/apt/trusted.gpg), see the DEPRECATION section in apt-key(8) for details.
W: https://mirrors.ustc.edu.cn/ubuntu/dists/bionic-proposed/InRelease: Key is stored in legacy trusted.gpg keyring (/etc/apt/trusted.gpg), see the DEPRECATION section in apt-key(8) for details.
说明:认证公钥之前是放在 /etc/apt/trusted.gpg,后面版本不在支持这种方式,而是一个公钥一个文件夹方式存放,搞一下:
root@ubuntu:/home/xuanchi# apt-key list
Warning: apt-key is deprecated. Manage keyring files in trusted.gpg.d instead (see apt-key(8)).
/etc/apt/trusted.gpg
--------------------
pub   rsa4096 2012-05-11 [SC]
      790B C727 7767 219C 42C8  6F93 3B4F E6AC C0B2 1F32
uid           [ unknown] Ubuntu Archive Automatic Signing Key (2012) <ftpmaster@ubuntu.com>

/etc/apt/trusted.gpg.d/ubuntu-keyring-2012-cdimage.gpg
------------------------------------------------------
pub   rsa4096 2012-05-11 [SC]
      8439 38DF 228D 22F7 B374  2BC0 D94A A3F0 EFE2 1092
uid           [ unknown] Ubuntu CD Image Automatic Signing Key (2012) <cdimage@ubuntu.com>

/etc/apt/trusted.gpg.d/ubuntu-keyring-2018-archive.gpg
------------------------------------------------------
pub   rsa4096 2018-09-17 [SC]
      F6EC B376 2474 EDA9 D21B  7022 8719 20D1 991B C93C
uid           [ unknown] Ubuntu Archive Automatic Signing Key (2018) <ftpmaster@ubuntu.com>
只需要重新导出一份然后再把老文件删掉就可以,注意那一串C0B2132指的是公钥序列号的后八位:
apt-key export C0B21F32 | sudo gpg --dearmour -o /etc/apt/trusted.gpg.d/ubuntu-me.gpg再执行apt upgrade会抛出下面错误:
The following packages have unmet dependencies:
 dpkg : Breaks: libapt-pkg5.0 (< 1.7~b) but 1.6.17 is to be installed
E: Broken packages
说明:执行下面的命令然后按照提示重新执行apt update就可以了
sudo apt remove ubuntu-advantage-toolsNTP同步
Ubuntu不知道从什么版本开始,NTP同步使用timedatectl命令管理,查看当前NTP同步状态:
root@ubuntu-2:/home/xuanchi# timedatectl status
               Local time: Sat 2023-07-22 16:22:45 UTC
           Universal time: Sat 2023-07-22 16:22:45 UTC
                 RTC time: Sat 2023-07-22 16:22:45
                Time zone: Etc/UTC (UTC, +0000)
System clock synchronized: no
              NTP service: active
          RTC in local TZ: no
timedatectl set-ntp false
timedatectl set-ntp true此时再查询NTP状态:
root@ubuntu-2:/home/xuanchi# timedatectl status
               Local time: Sat 2023-07-22 16:24:37 UTC
           Universal time: Sat 2023-07-22 16:24:37 UTC
                 RTC time: Sat 2023-07-22 16:24:36
                Time zone: Etc/UTC (UTC, +0000)
System clock synchronized: yes
              NTP service: active
          RTC in local TZ: no
重启系统出测试效果状态也是yes,那说明没问题了。
挂载磁盘&关闭swap
先看一下那个Disk可以使用:
root@ubuntu-2:/home/xuanchi# lsblk
NAME                      MAJ:MIN RM   SIZE RO TYPE MOUNTPOINTS
loop0                       7:0    0  63.3M  1 loop /snap/core20/1822
loop1                       7:1    0 111.9M  1 loop /snap/lxd/24322
loop2                       7:2    0  49.8M  1 loop /snap/snapd/18357
sda                         8:0    0    25G  0 disk
├─sda1                      8:1    0     1M  0 part
├─sda2                      8:2    0     2G  0 part /boot
└─sda3                      8:3    0    23G  0 part
  └─ubuntu--vg-ubuntu--lv 253:0    0  11.5G  0 lvm  /
sdb                         8:16   0    25G  0 disk
sr0                        11:0    1  1024M  0 rom
分区:
root@ubuntu-2:/home/xuanchi# fdisk /dev/sdb

Welcome to fdisk (util-linux 2.37.2).
Changes will remain in memory only, until you decide to write them.
Be careful before using the write command.

Device does not contain a recognized partition table.
Created a new DOS disklabel with disk identifier 0x71ed7307.

Command (m for help):


Command (m for help): n
Partition type
   p   primary (0 primary, 0 extended, 4 free)
   e   extended (container for logical partitions)
Select (default p): p
Partition number (1-4, default 1):
First sector (2048-52428799, default 2048):
Last sector, +/-sectors or +/-size{K,M,G,T,P} (2048-52428799, default 52428799):

Created a new partition 1 of type 'Linux' and of size 25 GiB.

Command (m for help): w
The partition table has been altered.
Calling ioctl() to re-read partition table.
Syncing disks.

root@ubuntu-2:/home/xuanchi# sudo mkfs.ext4 /dev/sdb
mke2fs 1.46.5 (30-Dec-2021)
Found a dos partition table in /dev/sdb
Proceed anyway? (y,N) y
Creating filesystem with 6553600 4k blocks and 1638400 inodes
Filesystem UUID: 1263fb1b-96a7-499a-bbc3-335002bb4675
Superblock backups stored on blocks:
        32768, 98304, 163840, 229376, 294912, 819200, 884736, 1605632, 2654208,
        4096000

Allocating group tables: done
Writing inode tables: done
Creating journal (32768 blocks): done
Writing superblocks and filesystem accounting information: done
写入/etc/fstab:
#/swap.img      none    swap    sw      0       0
/dev/sdb   /opt   ext4   defaults   0   0
把swap注释掉,同时把/dev/sdb加上,重启看看效果:
xuanchi@ubuntu-2:~$ df -h
Filesystem                         Size  Used Avail Use% Mounted on
tmpfs                               97M  1.1M   96M   2% /run
/dev/mapper/ubuntu--vg-ubuntu--lv   12G  4.8G  5.9G  45% /
tmpfs                              485M     0  485M   0% /dev/shm
tmpfs                              5.0M     0  5.0M   0% /run/lock
/dev/sdb                            25G   24K   24G   1% /opt
/dev/sda2                          2.0G  129M  1.7G   8% /boot
tmpfs                               97M  4.0K   97M   1% /run/user/1000