✅作者简介:大家好,我是Cisyam,热爱Java后端开发者,一个想要与大家共同进步的男人😉😉
🍎个人主页:Cisyam-Shark的博客
💞当前专栏: Vue
✨特色专栏: MySQL学习
🥭本文内容:认识Vue3
🖥️个人小站 :个人博客,欢迎大家访问
📚个人知识库: 知识库,欢迎大家访问
1. 认识Vue3
1. 1 Vue2 选项式 API vs Vue3 组合式API
<script>
export default {
  data(){
    return {
      count:0
    }
  },
  methods:{
    addCount(){
      this.count++
    }
  }
}
</script>
<script setup>
import { ref } from 'vue'
const count = ref(0)
const addCount = ()=> count.value++
</script>
特点:
- 代码量变少
- 分散式维护变成集中式维护
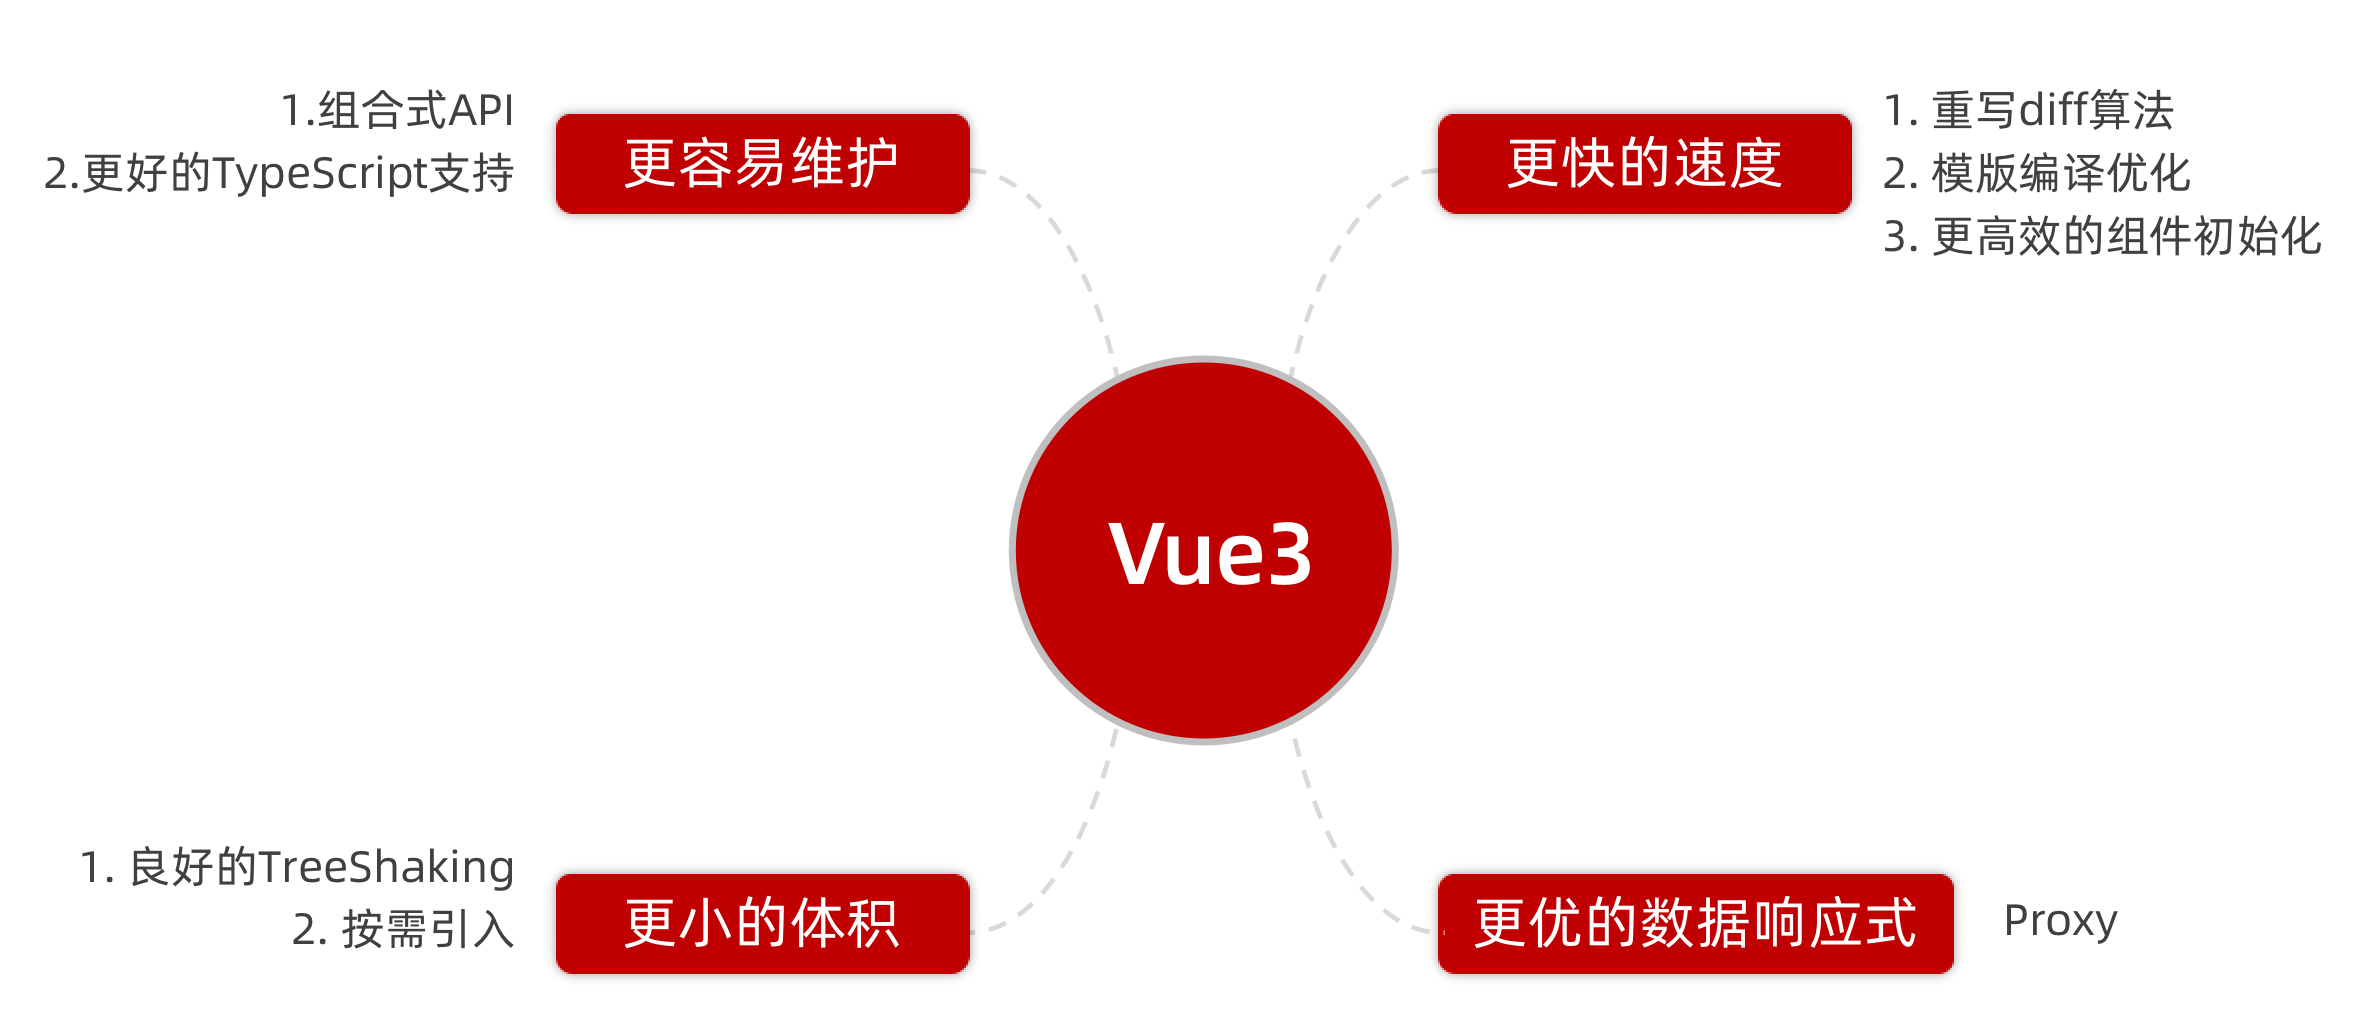
1.2 Vue3的优势
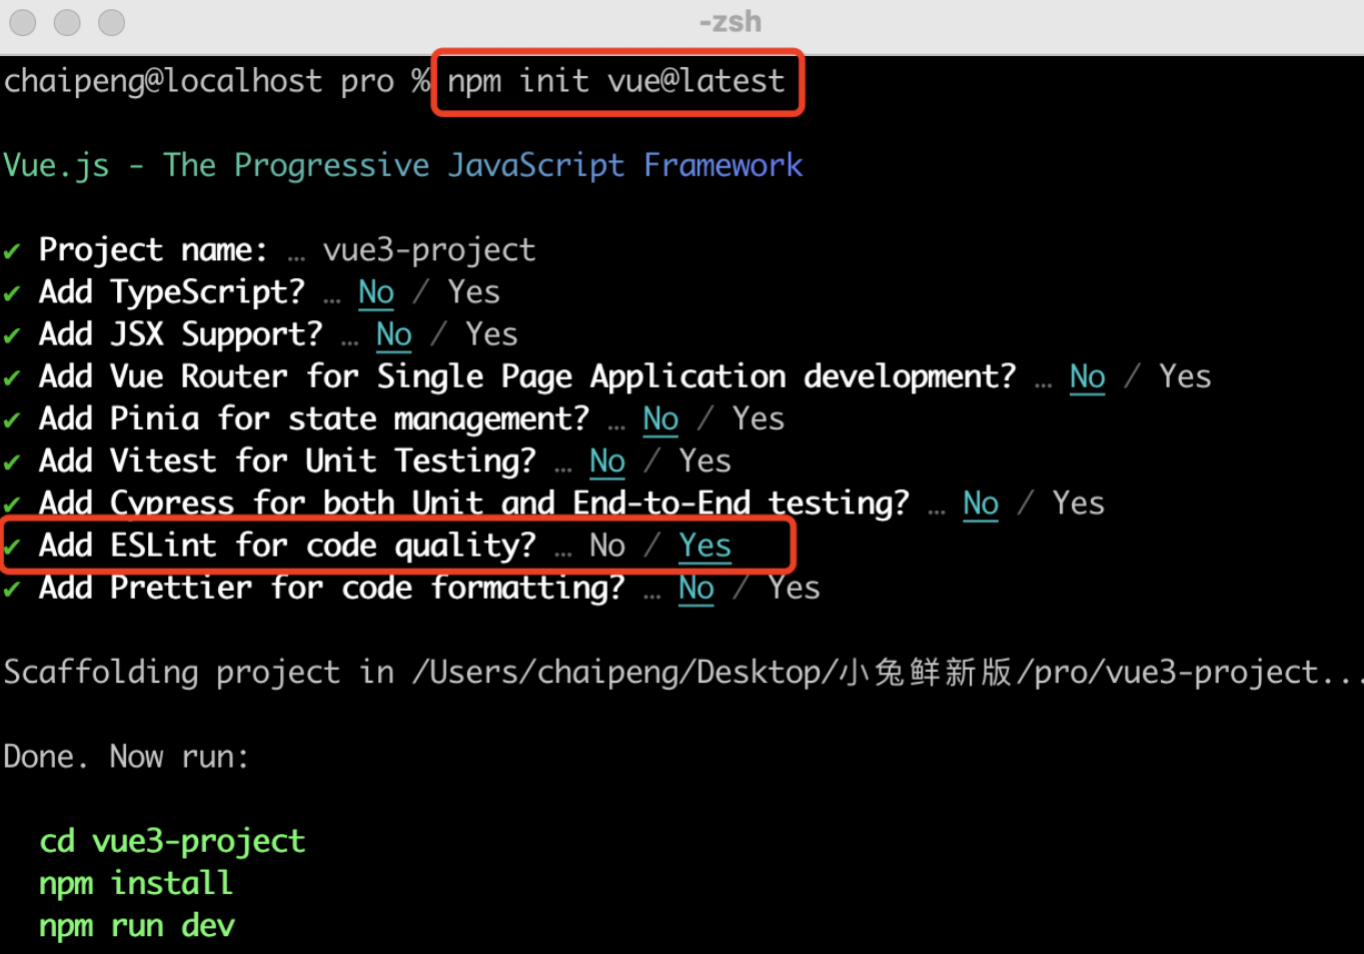
2. 使用create-vue搭建Vue3项目
2. 1 认识create-vue
create-vue是Vue官方新的脚手架工具,底层切换到了 vite (下一代前端工具链),为开发提供极速响应

2.2 使用create-vue创建项目
前置条件 - 已安装16.0或更高版本的Node.js
执行如下命令,这一指令将会安装并执行 create-vue
npm init vue@latest
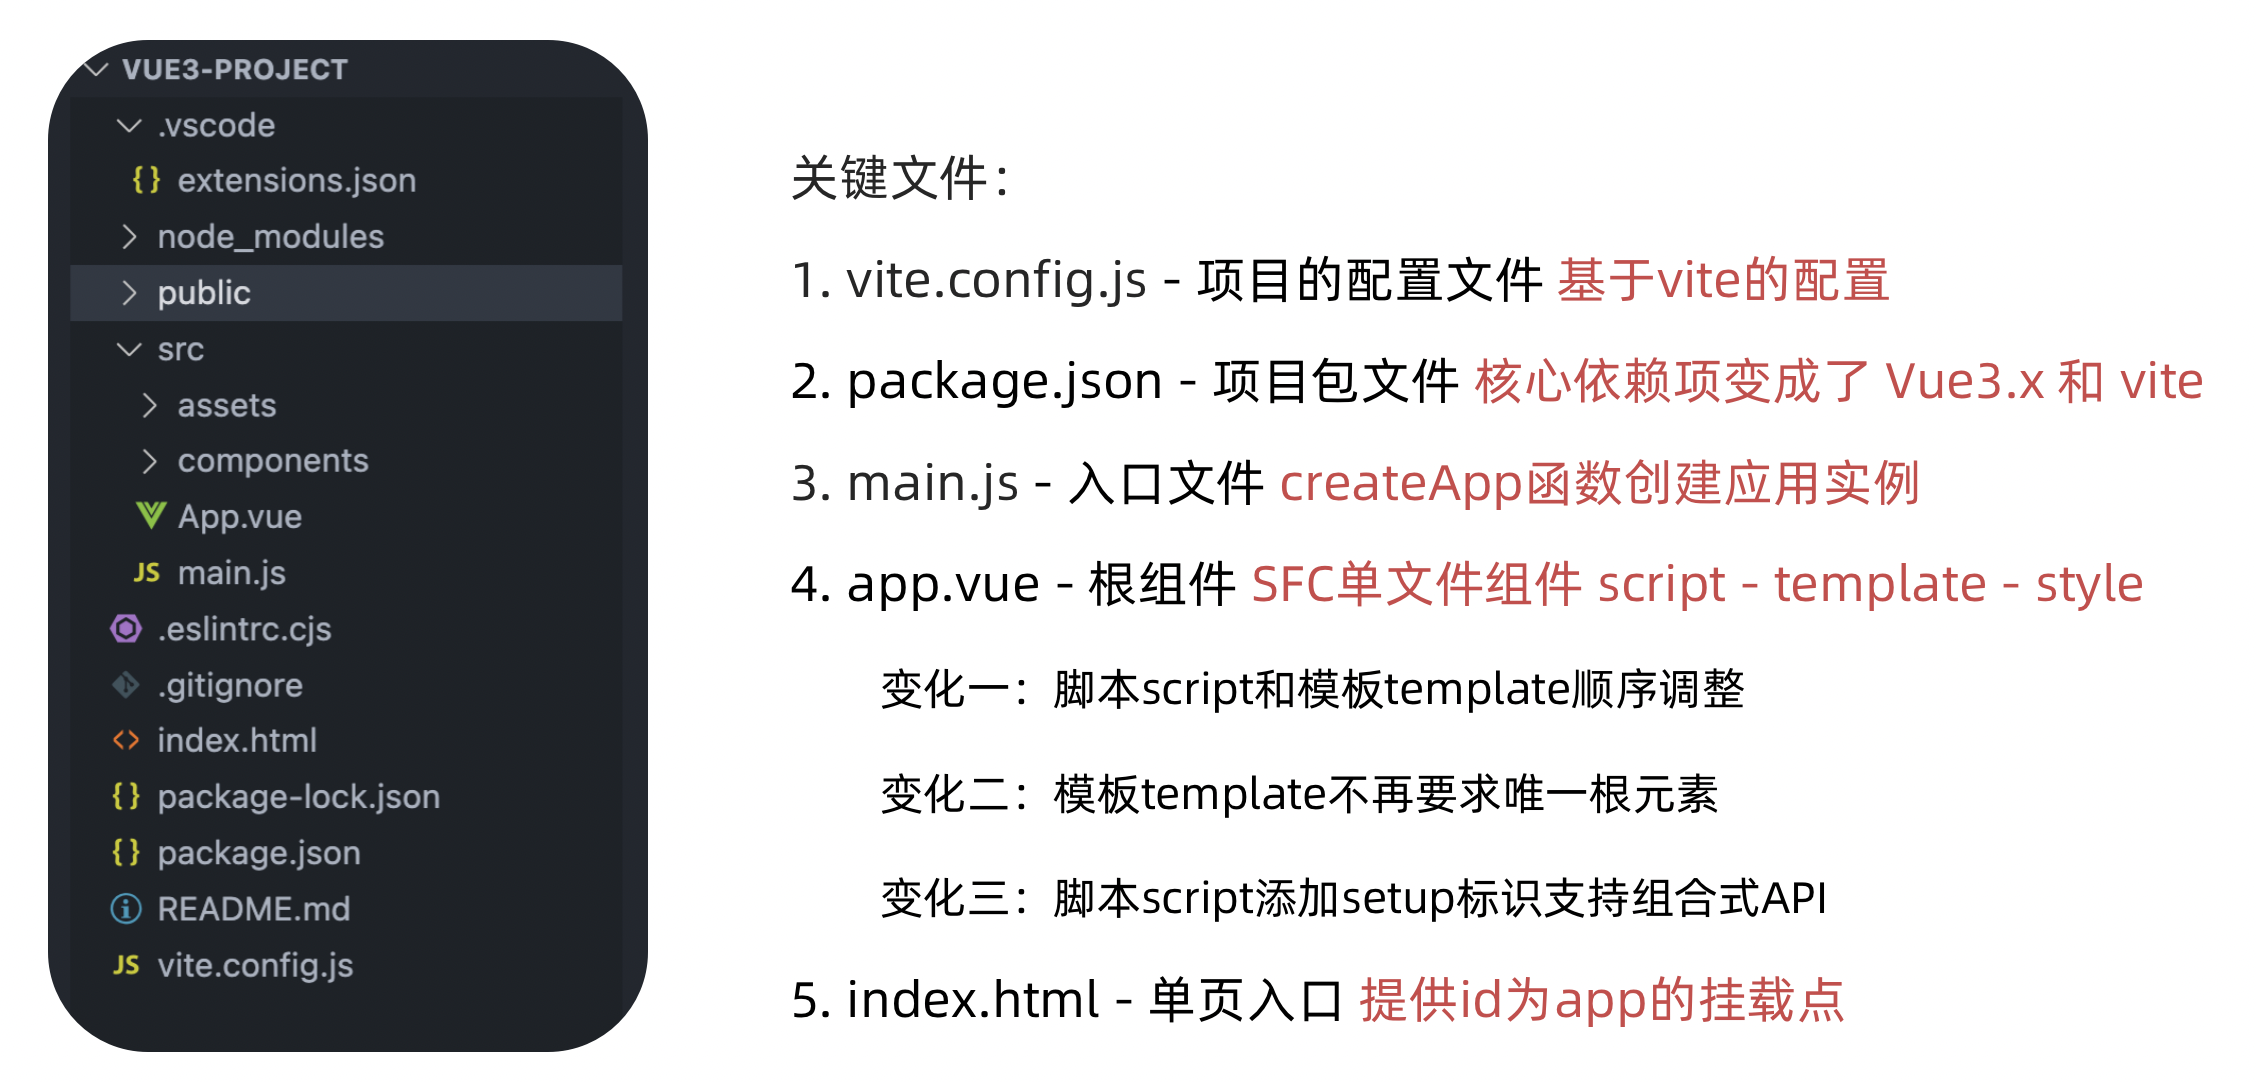
3. 熟悉项目和关键文件
4. 组合式API - setup选项
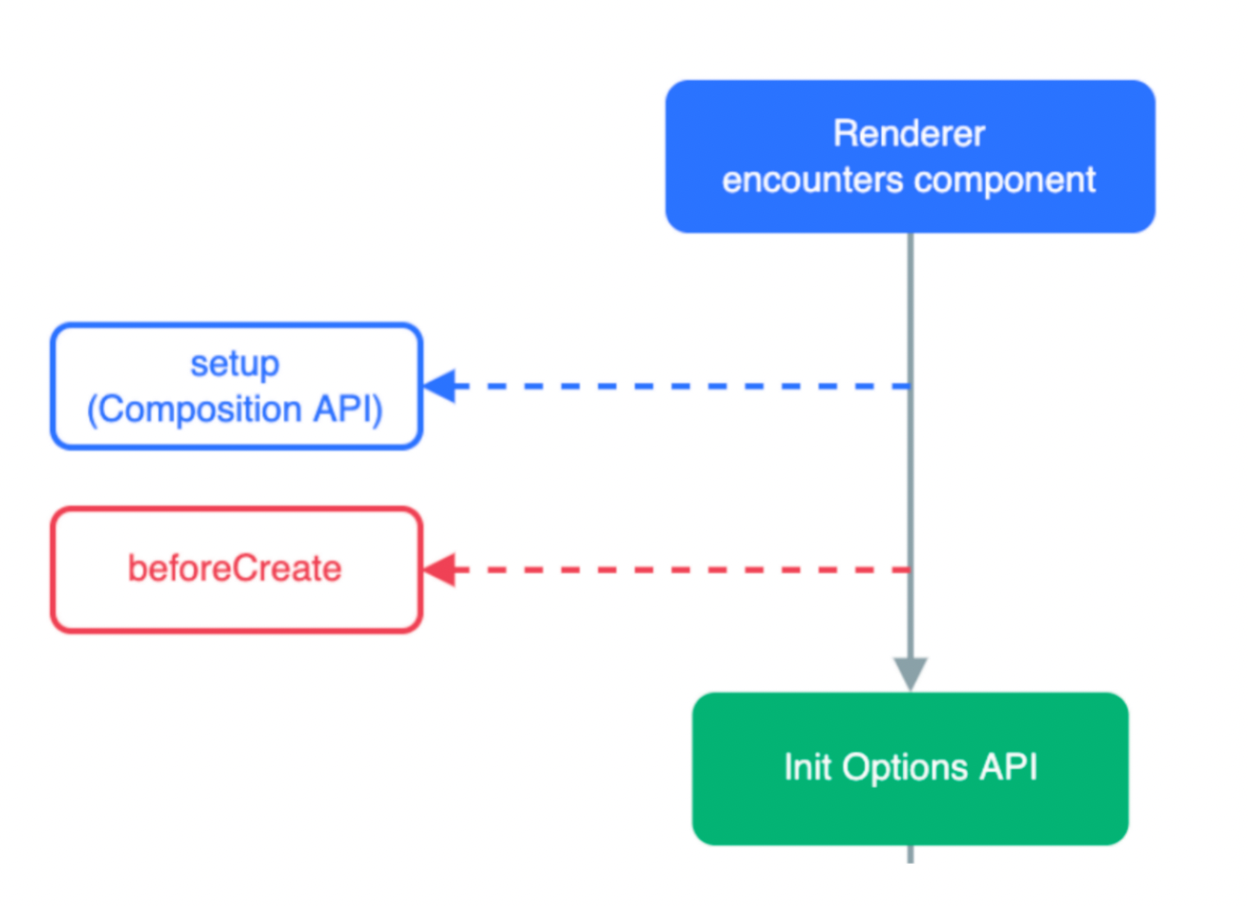
4.1 setup选项的写法和执行时机
写法
<script>
  export default {
    setup(){

    },
    beforeCreate(){

    }
  }
</script>
执行时机
在beforeCreate钩子之前执行
4.2 setup中写代码的特点
在setup函数中写的数据和方法需要在末尾以对象的方式return,才能给模版使用
<script>
  export default {
    setup(){
      const message = 'this is message'
      const logMessage = ()=>{
        console.log(message)
      }
      // 必须return才可以
      return {
        message,
        logMessage
      }
    }
  }
</script>
4.3
script标签添加 setup标记,不需要再写导出语句,默认会添加导出语句
<script setup>
  const message = 'this is message'
  const logMessage = ()=>{
    console.log(message)
  }
</script>
5. 组合式API - reactive和ref函数
5.1 reactive
接受对象类型数据的参数传入并返回一个响应式的对象
<script setup>
 // 导入
 import { reactive } from 'vue'
 // 执行函数 传入参数 变量接收
 const state = reactive({
   msg:'this is msg'
 })
 const setSate = ()=>{
   // 修改数据更新视图
   state.msg = 'this is new msg'
 }
</script>

<template>
  {{ state.msg }}
  <button @click="setState">change msg</button>
</template>
5.2 ref
接收简单类型或者对象类型的数据传入并返回一个响应式的对象
<script setup>
 // 导入
 import { ref } from 'vue'
 // 执行函数 传入参数 变量接收
 const count = ref(0)
 const setCount = ()=>{
   // 修改数据更新视图必须加上.value
   count.value++
 }
</script>

<template>
  <button @click="setCount">{{count}}</button>
</template>
5.3 reactive 对比 ref
- 都是用来生成响应式数据
- 不同点
- reactive不能处理简单类型的数据
- ref参数类型支持更好,但是必须通过.value做访问修改
- ref函数内部的实现依赖于reactive函数
- 在实际工作中的推荐
- 推荐使用ref函数,减少记忆负担,小兔鲜项目都使用ref
6. 组合式API - computed
计算属性基本思想和Vue2保持一致,组合式API下的计算属性只是修改了API写法
<script setup>
// 导入
import {ref, computed } from 'vue'
// 原始数据
const count = ref(0)
// 计算属性
const doubleCount = computed(()=>count.value * 2)

// 原始数据
const list = ref([1,2,3,4,5,6,7,8])
// 计算属性list
const filterList = computed(item=>item > 2)
</script>
7. 组合式API - watch
侦听一个或者多个数据的变化,数据变化时执行回调函数,俩个额外参数 immediate控制立刻执行,deep开启深度侦听
7.1 侦听单个数据
<script setup>
  // 1. 导入watch
  import { ref, watch } from 'vue'
  const count = ref(0)
  // 2. 调用watch 侦听变化
  watch(count, (newValue, oldValue)=>{
    console.log(`count发生了变化,老值为${oldValue},新值为${newValue}`)
  })
</script>
7.2 侦听多个数据
侦听多个数据,第一个参数可以改写成数组的写法
<script setup>
  // 1. 导入watch
  import { ref, watch } from 'vue'
  const count = ref(0)
  const name = ref('cp')
  // 2. 调用watch 侦听变化
  watch([count, name], ([newCount, newName],[oldCount,oldName])=>{
    console.log(`count或者name变化了,[newCount, newName],[oldCount,oldName])
  })
</script>
7.3 immediate
在侦听器创建时立即出发回调,响应式数据变化之后继续执行回调
<script setup>
  // 1. 导入watch
  import { ref, watch } from 'vue'
  const count = ref(0)
  // 2. 调用watch 侦听变化
  watch(count, (newValue, oldValue)=>{
    console.log(`count发生了变化,老值为${oldValue},新值为${newValue}`)
  },{
    immediate: true
  })
</script>
7.4 deep
通过watch监听的ref对象默认是浅层侦听的,直接修改嵌套的对象属性不会触发回调执行,需要开启deep
<script setup>
  // 1. 导入watch
  import { ref, watch } from 'vue'
  const state = ref({ count: 0 })
  // 2. 监听对象state
  watch(state, ()=>{
    console.log('数据变化了')
  })
  const changeStateByCount = ()=>{
    // 直接修改不会引发回调执行
    state.value.count++
  }
</script>

<script setup>
  // 1. 导入watch
  import { ref, watch } from 'vue'
  const state = ref({ count: 0 })
  // 2. 监听对象state 并开启deep
  watch(state, ()=>{
    console.log('数据变化了')
  },{deep:true})
  const changeStateByCount = ()=>{
    // 此时修改可以触发回调
    state.value.count++
  }
</script>
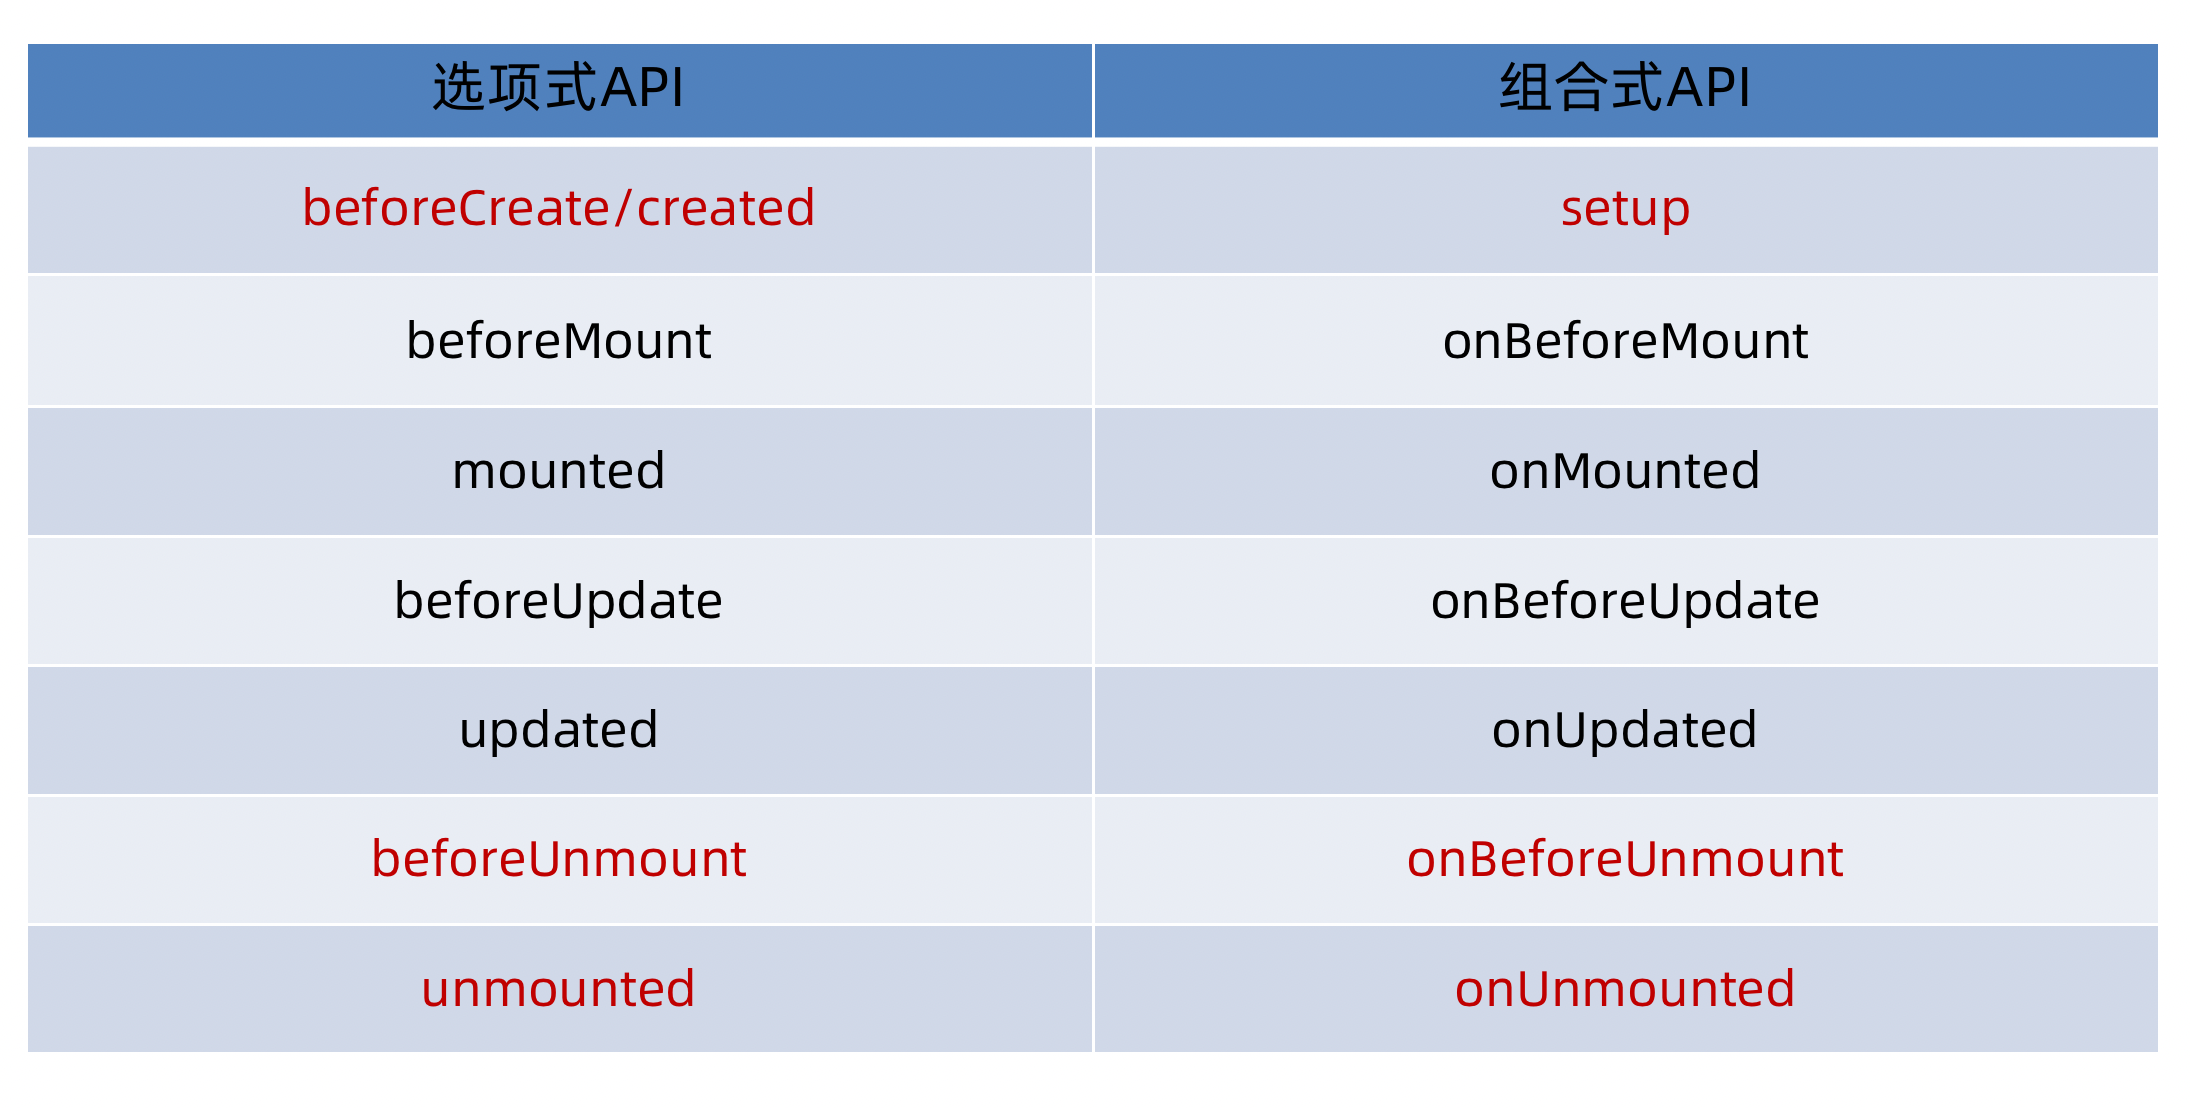
8. 组合式API - 生命周期函数
8.1 选项式对比组合式
8.2 生命周期函数基本使用
- 导入生命周期函数
- 执行生命周期函数,传入回调
<scirpt setup>
import { onMounted } from 'vue'
onMounted(()=>{
  // 自定义逻辑
})
</script>
8.3 执行多次
生命周期函数执行多次的时候,会按照顺序依次执行
<scirpt setup>
import { onMounted } from 'vue'
onMounted(()=>{
  // 自定义逻辑
})

onMounted(()=>{
  // 自定义逻辑
})
</script>
9. 组合式API - 父子通信
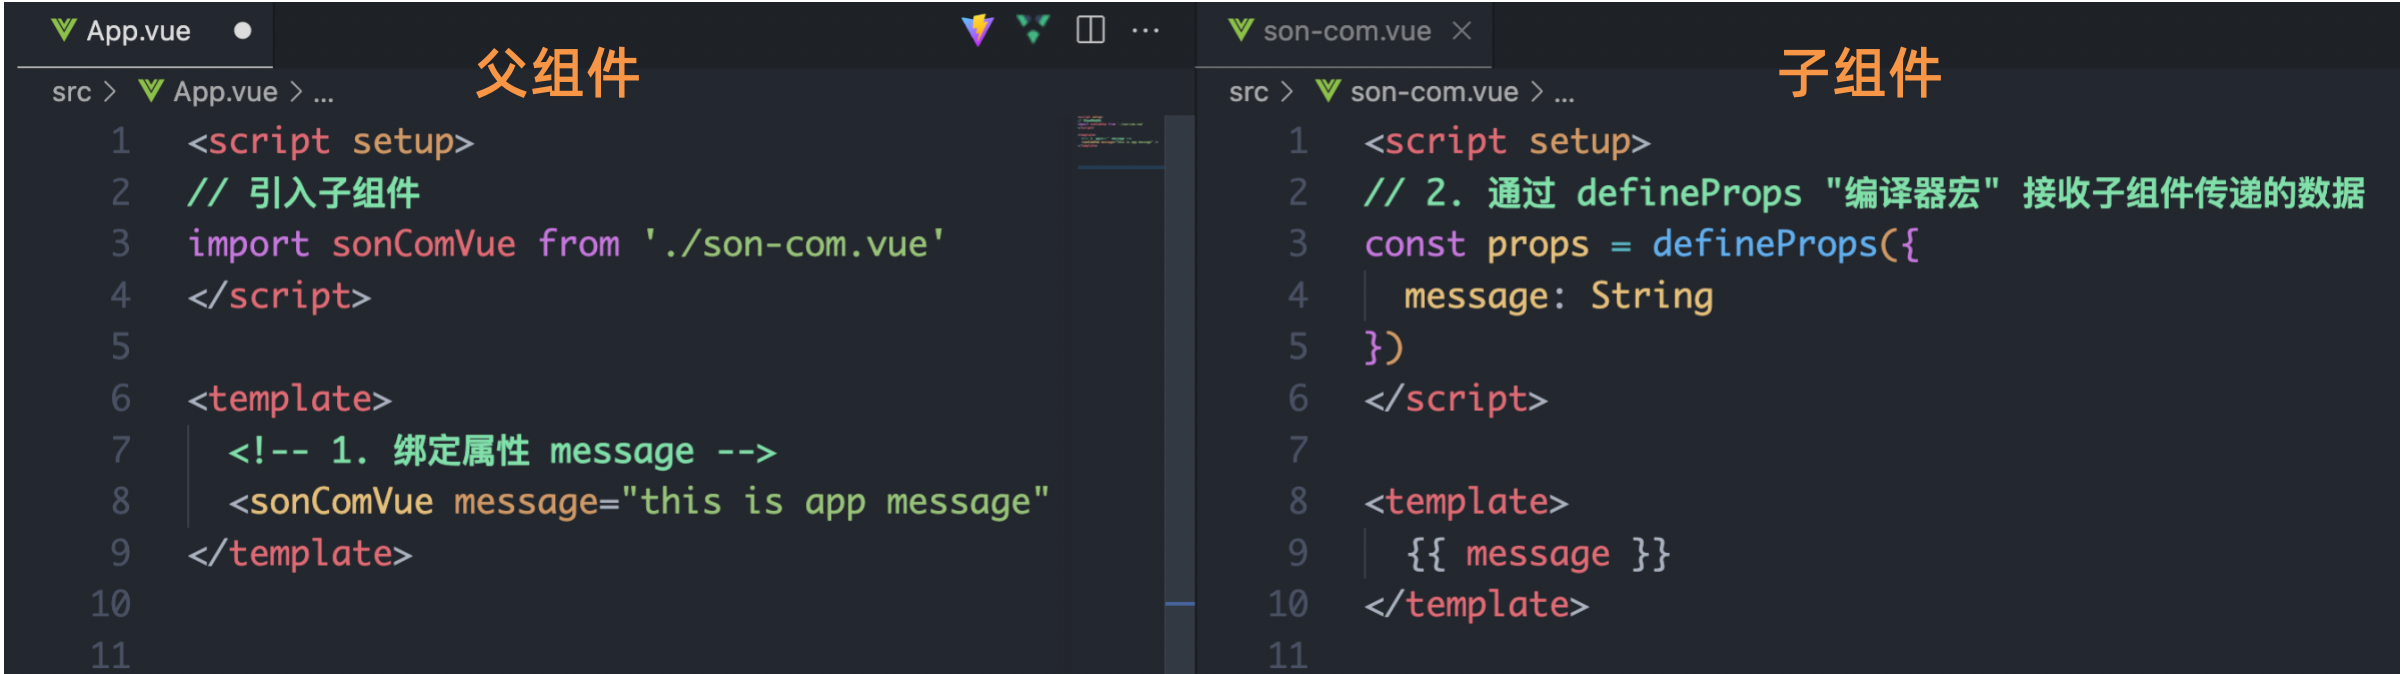
9.1 父传子
基本思想
- 父组件中给子组件绑定属性
- 子组件内部通过props选项接收数据
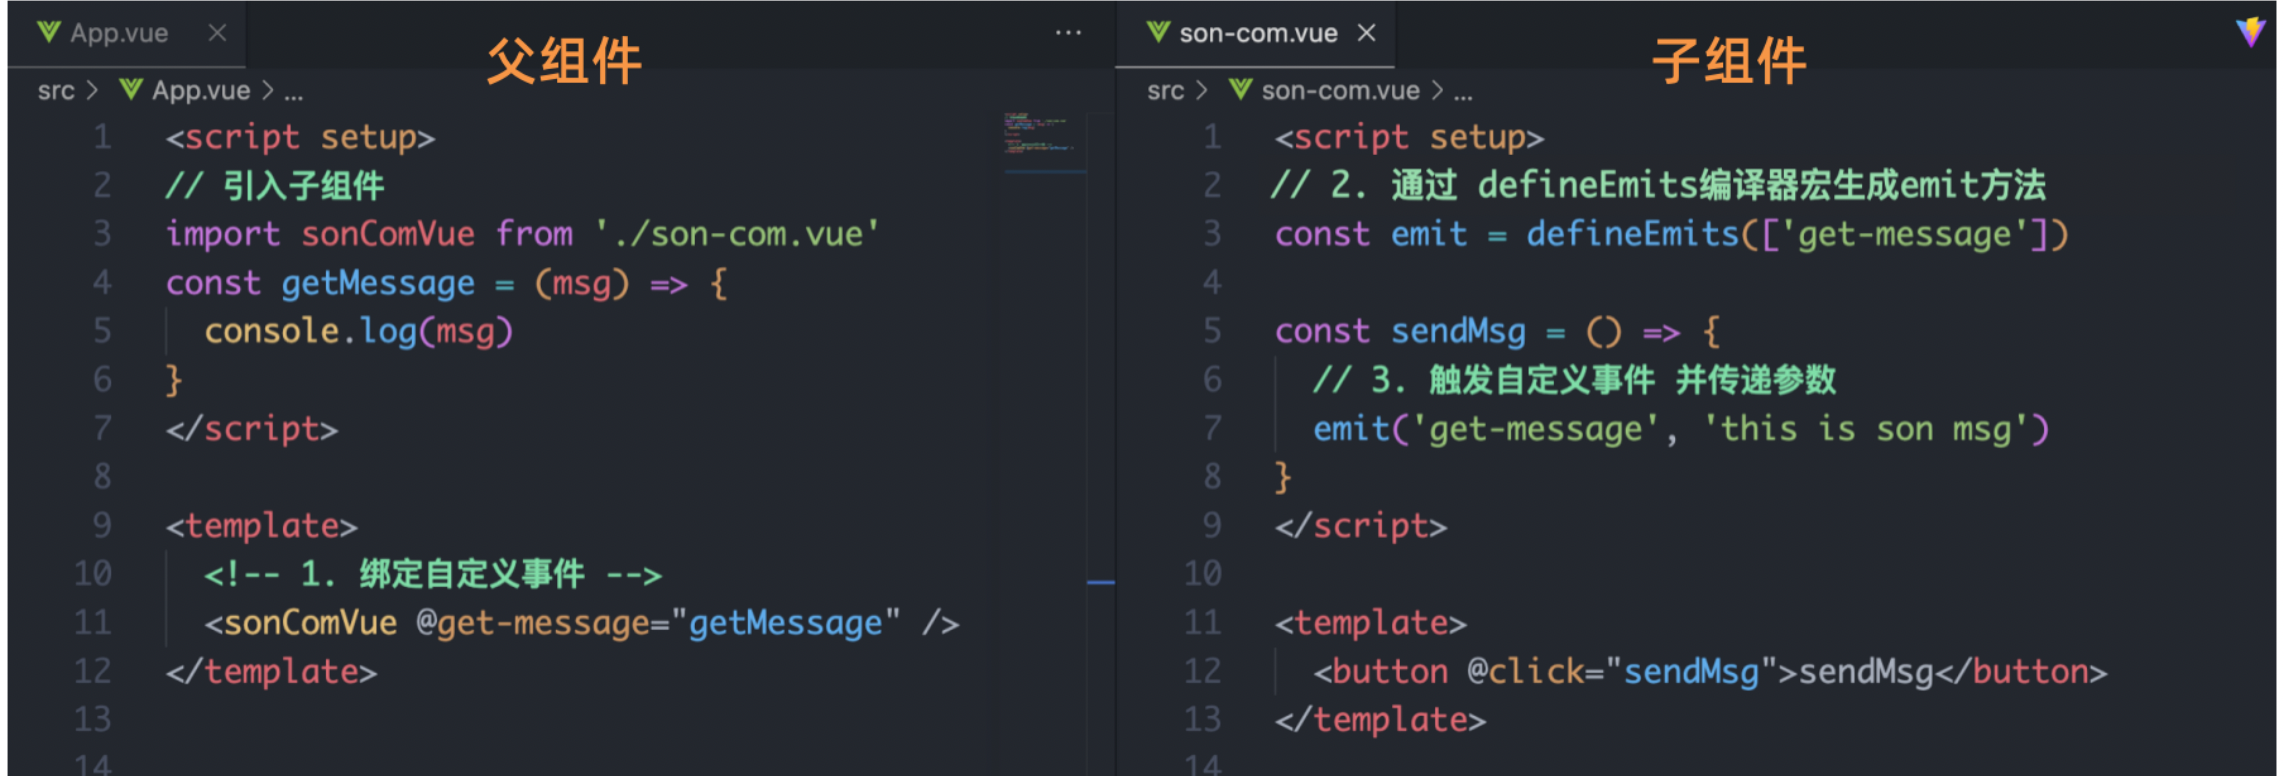
9.2 子传父
基本思想
- 父组件中给子组件标签通过@绑定事件
- 子组件内部通过 emit 方法触发事件
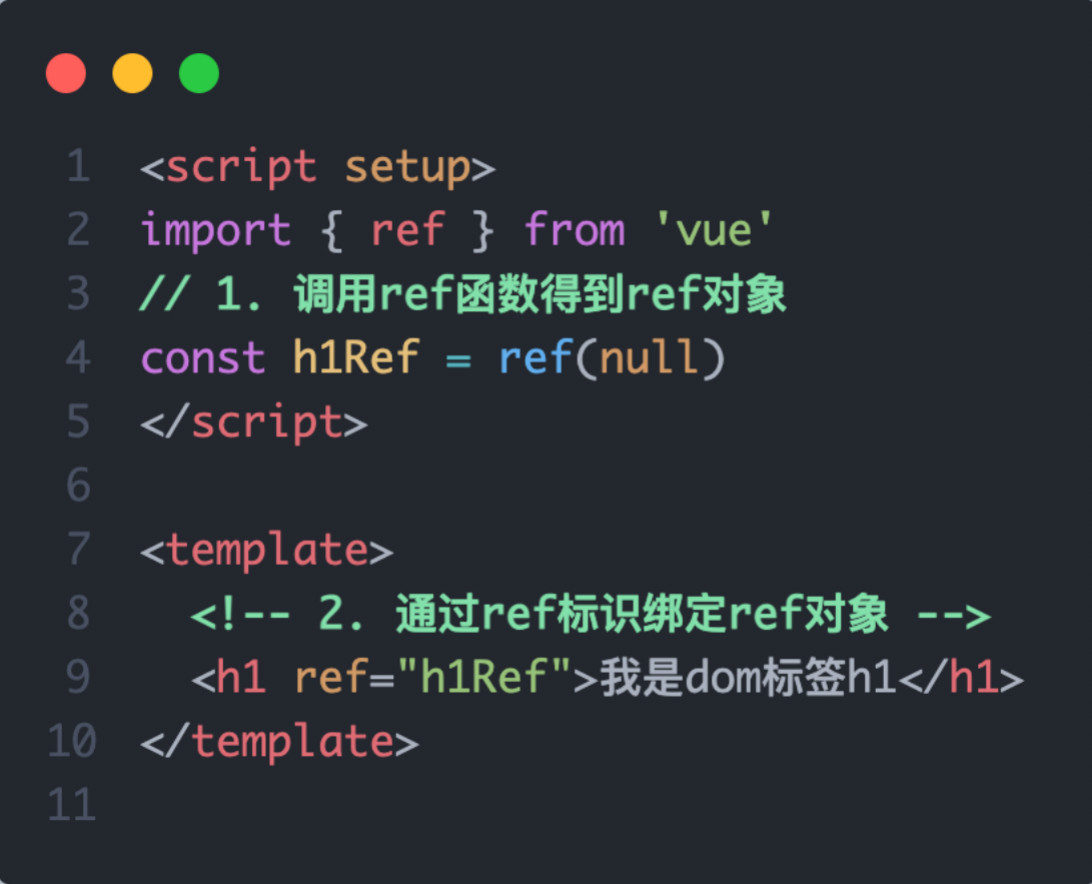
10. 组合式API - 模版引用
概念:通过 ref标识 获取真实的 dom对象或者组件实例对象
10.1 基本使用
实现步骤:
- 调用ref函数生成一个ref对象
- 通过ref标识绑定ref对象到标签
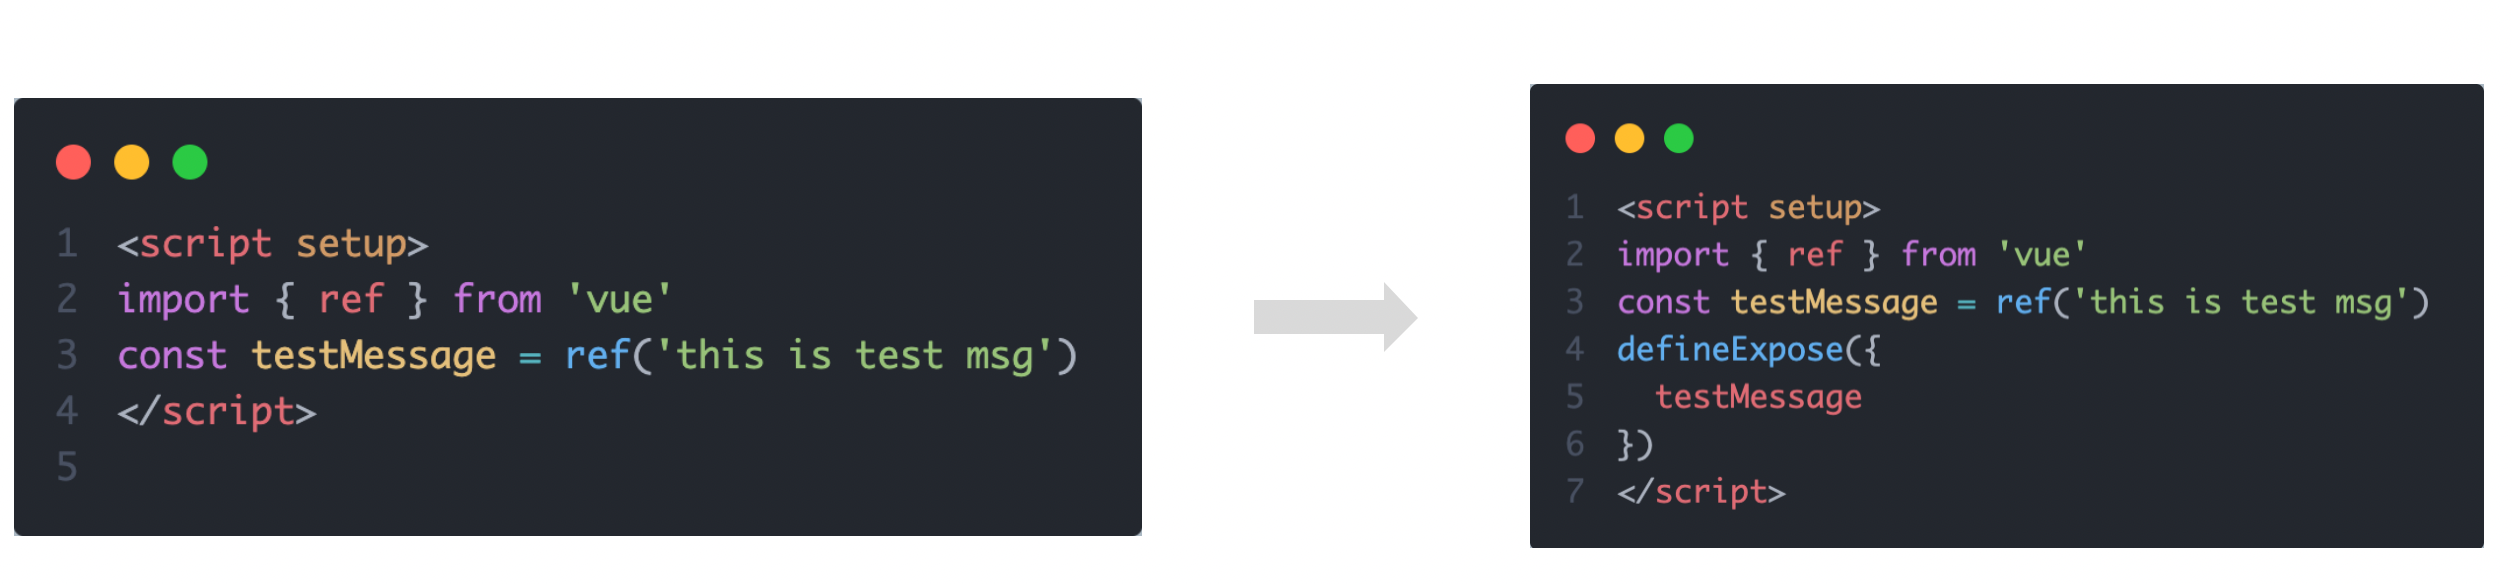
10.2 defineExpose
默认情况下在
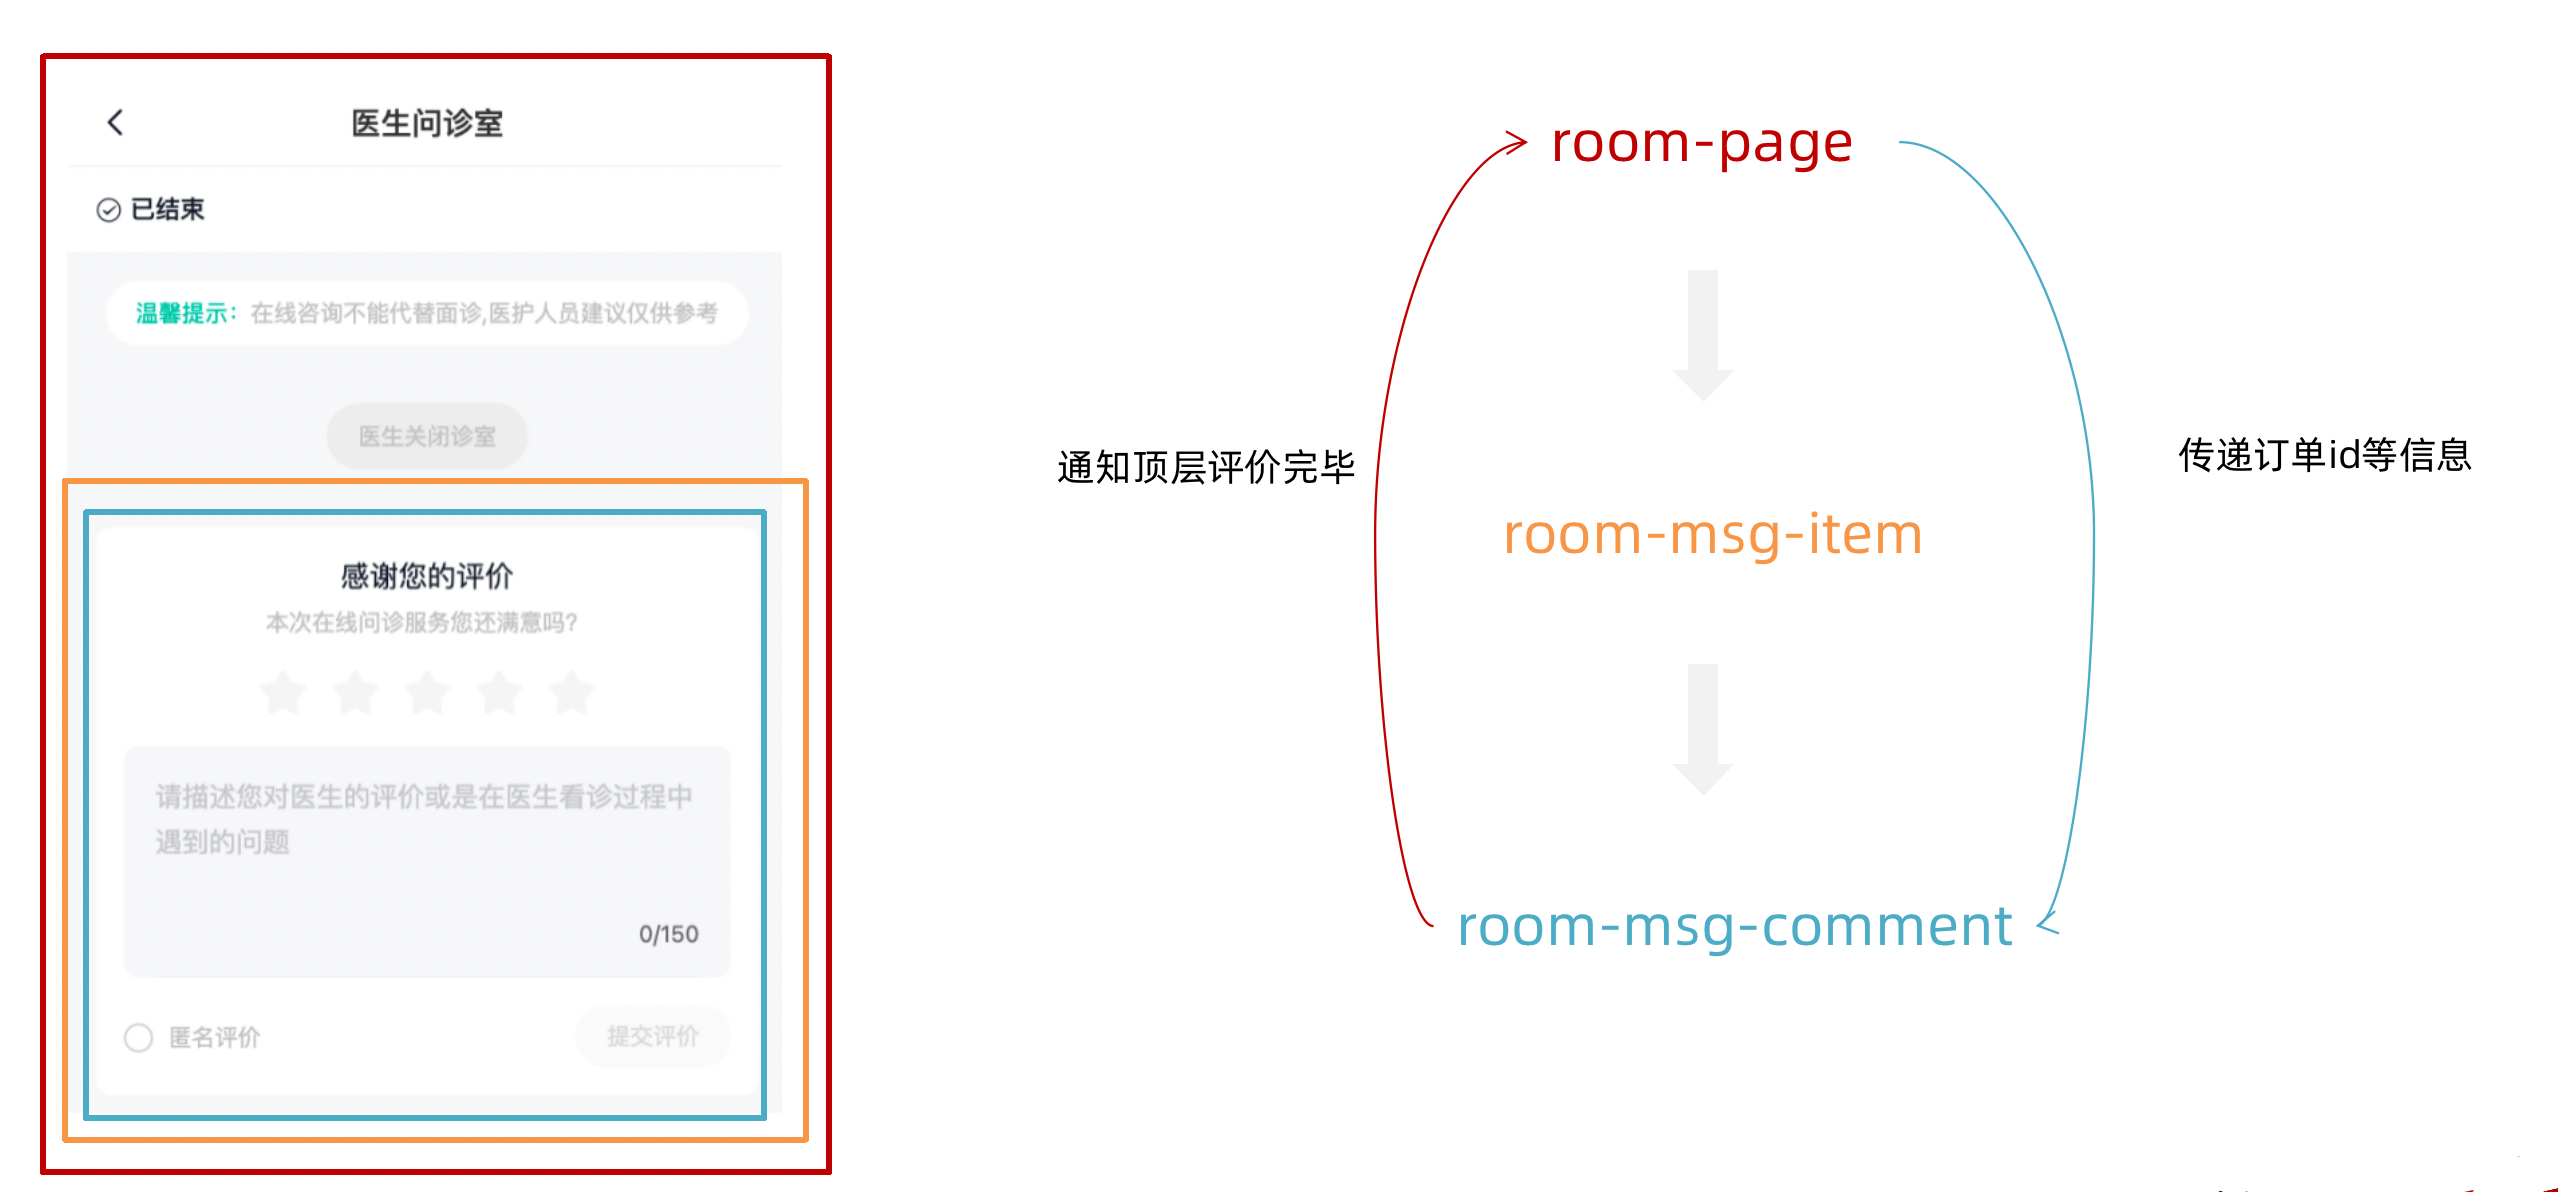
11. 组合式API - provide和inject
11.1 作用和场景
顶层组件向任意的底层组件传递数据和方法,实现跨层组件通信
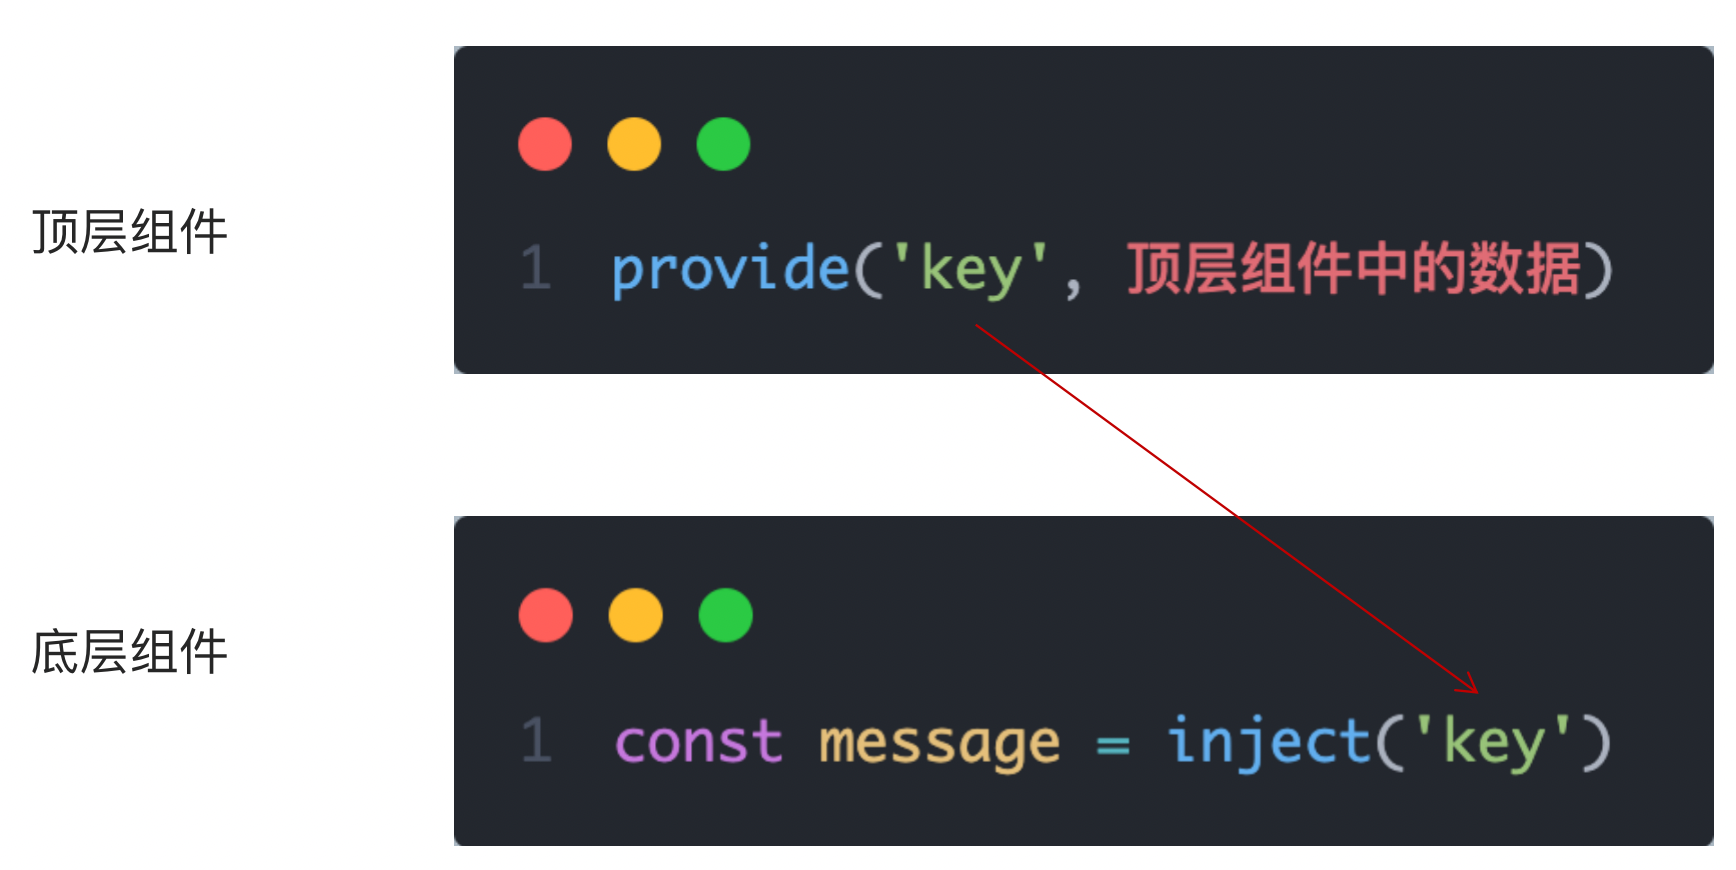
11.2 跨层传递普通数据
实现步骤
- 顶层组件通过
provide函数提供数据- 底层组件通过
inject函数提供数据
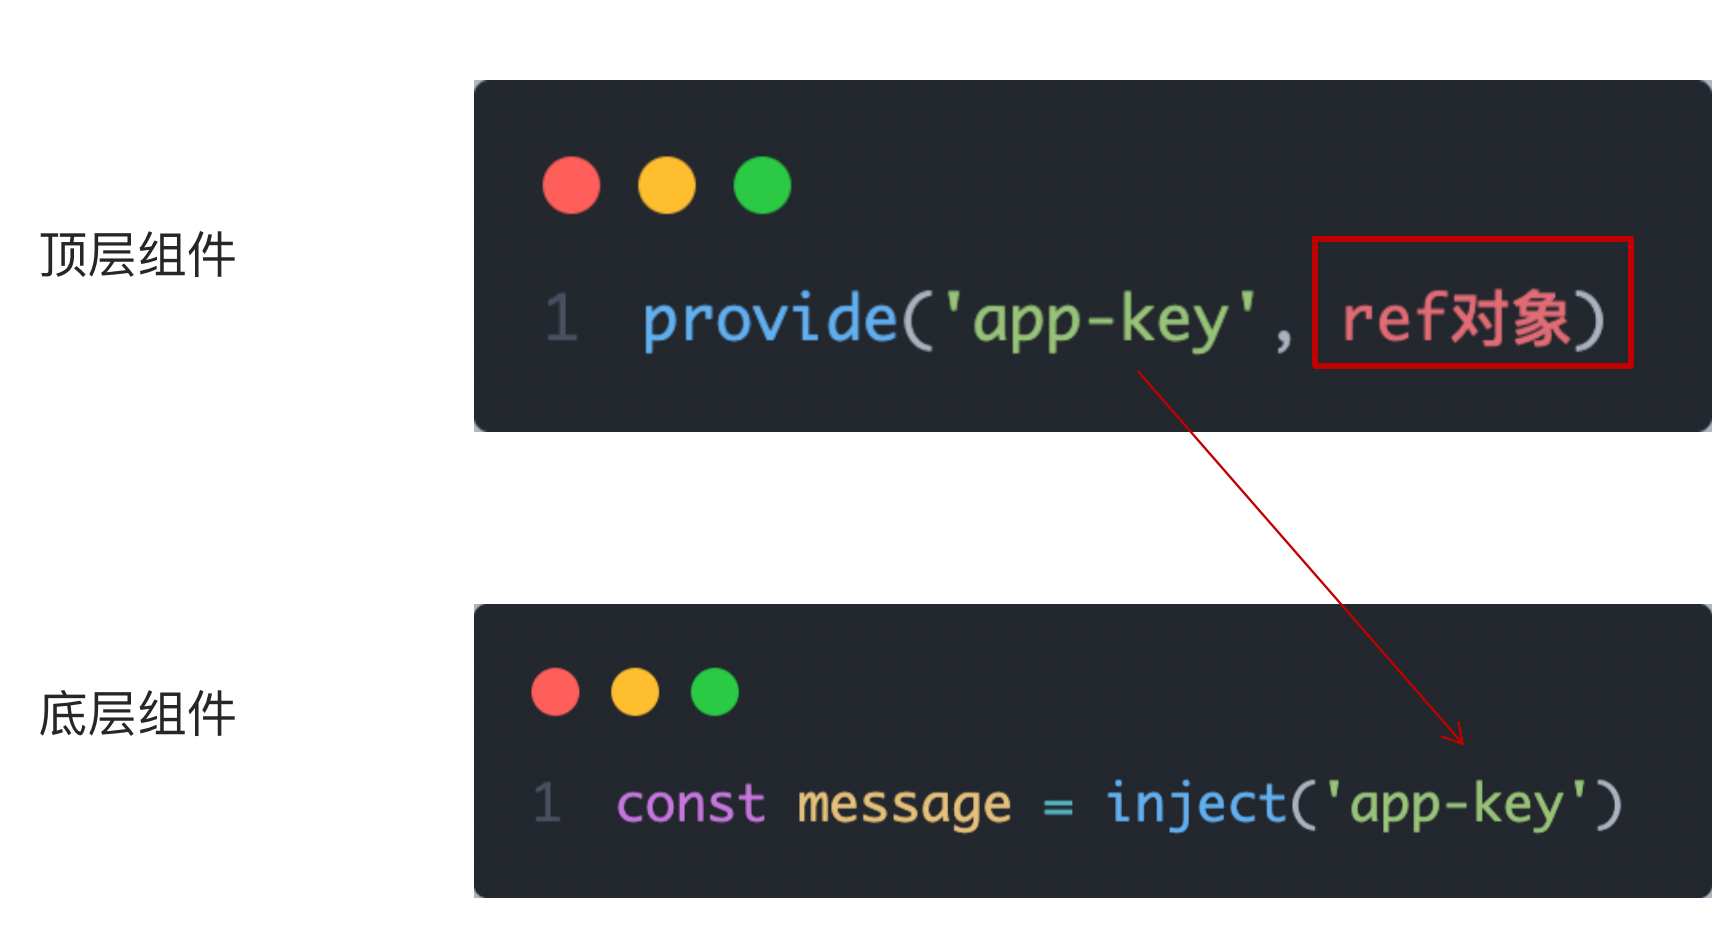
11.3 跨层传递响应式数据
在调用provide函数时,第二个参数设置为ref对象
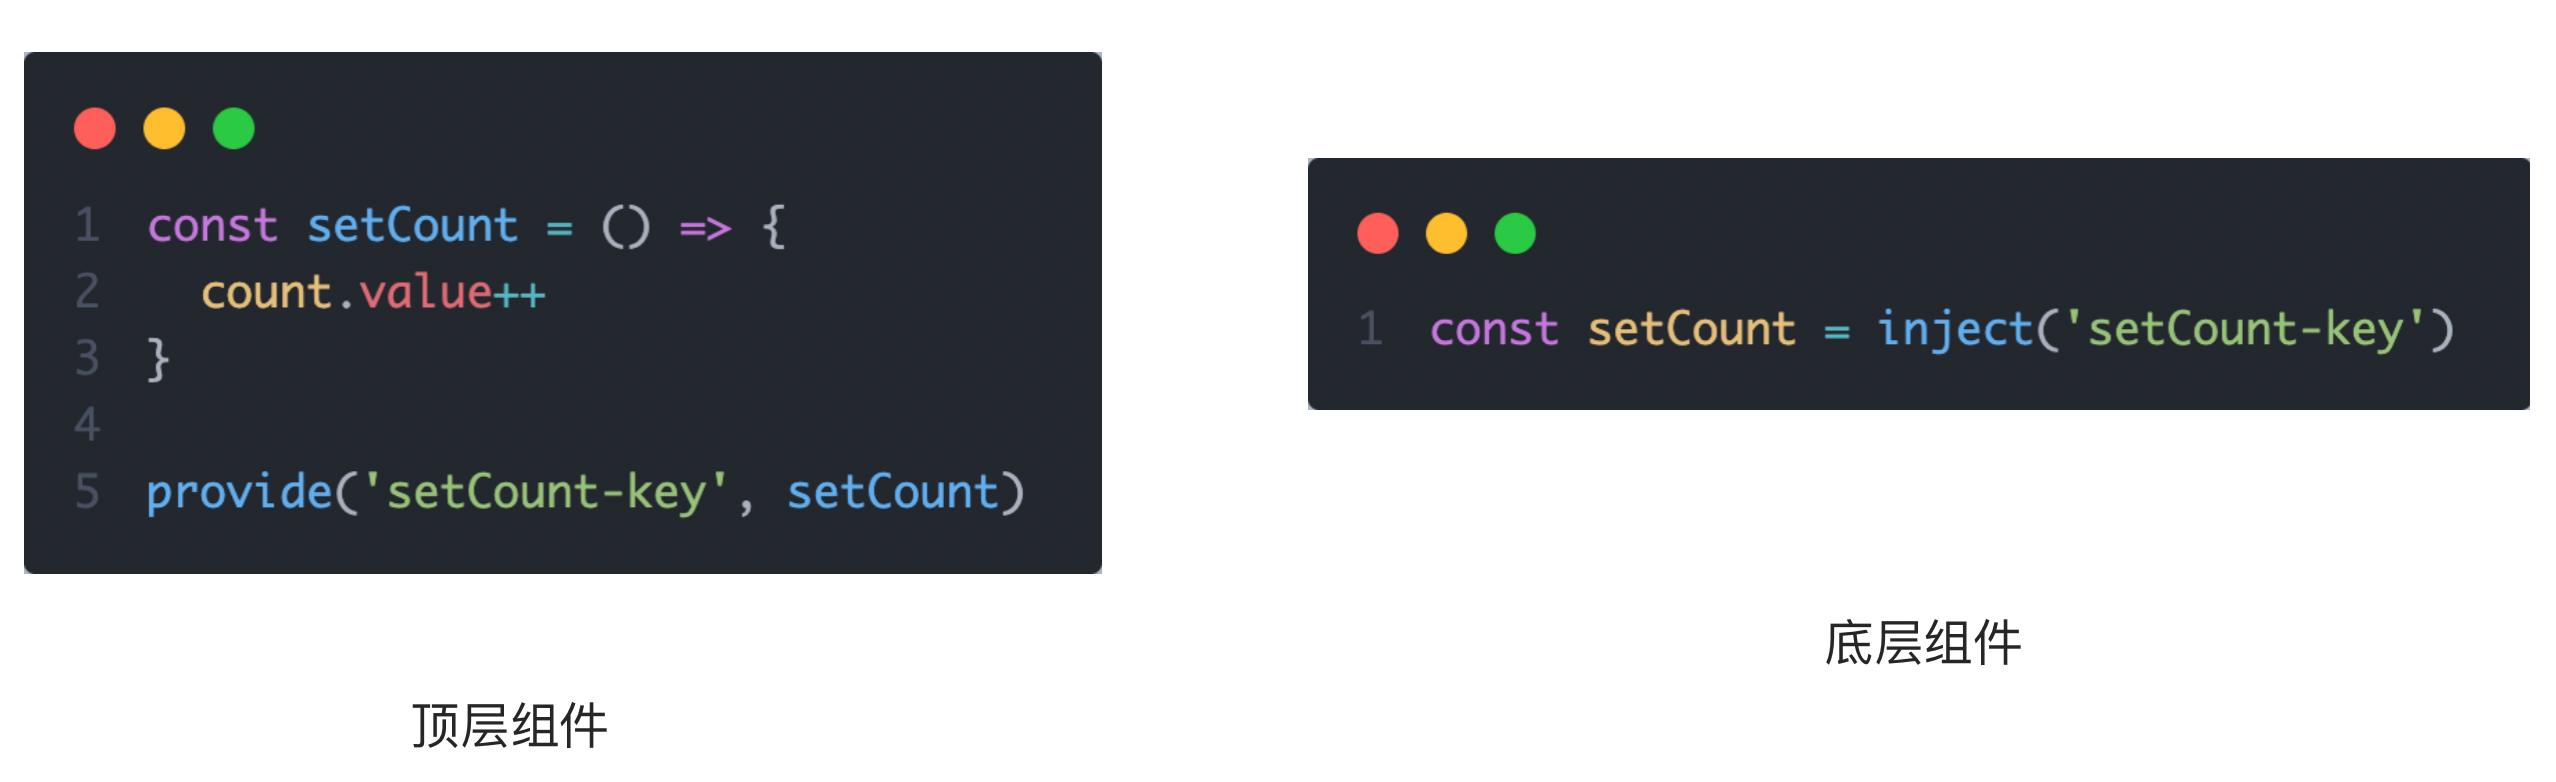
11.4 跨层传递方法
顶层组件可以向底层组件传递方法,底层组件调用方法修改顶层组件的数据
12. Vue3.3 新特性-defineOptions
背景说明:
有
但是用了
为了解决这一问题,引入了 defineProps 与 defineEmits 这两个宏。但这只解决了 props 与 emits 这两个属性。
如果我们要定义组件的 name 或其他自定义的属性,还是得回到最原始的用法——再添加一个普通的
这样就会存在两个
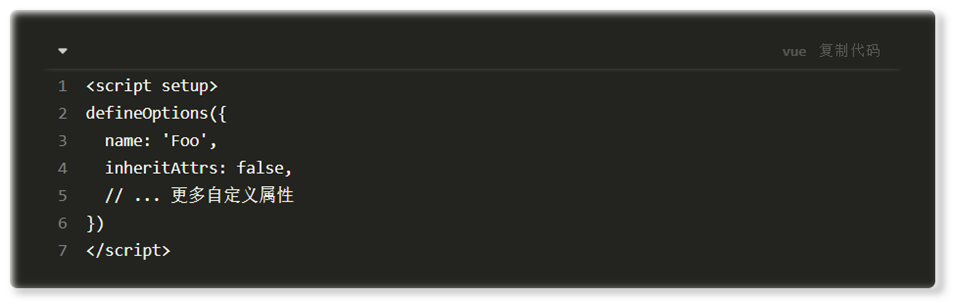
所以在 Vue 3.3 中新引入了 defineOptions 宏。顾名思义,主要是用来定义 Options API 的选项。可以用 defineOptions 定义任意的选项, props, emits, expose, slots 除外(因为这些可以使用 defineXXX 来做到)
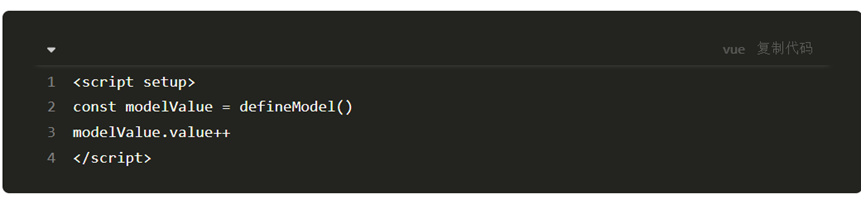
13. Vue3.3新特性-defineModel
在Vue3中,自定义组件上使用v-model, 相当于传递一个modelValue属性,同时触发 update:modelValue 事件

我们需要先定义 props,再定义 emits 。其中有许多重复的代码。如果需要修改此值,还需要手动调用 emit 函数。
于是乎 defineModel 诞生了。
生效需要配置 vite.config.js
import { fileURLToPath, URL } from 'node:url'

import { defineConfig } from 'vite'
import vue from '@vitejs/plugin-vue'

// https://vitejs.dev/config/
export default defineConfig({
  plugins: [
    vue({
      script: {
        defineModel: true
      }
    }),
  ],
  resolve: {
    alias: {
      '@': fileURLToPath(new URL('./src', import.meta.url))
    }
  }
})
14. 全局仓库Pinia
1. 为什么你应该使用 Pinia?
Pinia 是 Vue 的专属状态管理库,它允许你跨组件或页面共享状态。如果你熟悉组合式 API 的话,你可能会认为可以通过一行简单的 export const state = reactive({}) 来共享一个全局状态。对于单页应用来说确实可以,但如果应用在服务器端渲染,这可能会使你的应用暴露出一些安全漏洞。 而如果使用 Pinia,即使在小型单页应用中,你也可以获得如下功能:
- Devtools 支持
- 追踪 actions、mutations 的时间线
- 在组件中展示它们所用到的 Store
- 让调试更容易的 Time travel
- 热更新
- 不必重载页面即可修改 Store
- 开发时可保持当前的 State
- 插件:可通过插件扩展 Pinia 功能
- 为 JS 开发者提供适当的 TypeScript 支持以及自动补全功能。
- 支持服务端渲染
2. 基础示例
下面就是 pinia API 的基本用法 。你可以先创建一个 Store:
// stores/counter.js
import { defineStore } from 'pinia'

export const useCounterStore = defineStore('counter', {
  state: () => {
    return { count: 0 }
  },
  // 也可以这样定义
  // state: () => ({ count: 0 })
  actions: {
    increment() {
      this.count++
    },
  },
})
然后你就可以在一个组件中使用该 store 了:
<script setup>
import { useCounterStore } from '@/stores/counter'
const counter = useCounterStore()
counter.count++
// 自动补全! ✨
counter.$patch({ count: counter.count + 1 })
// 或使用 action 代替
counter.increment()
</script>
<template>
  <!-- 直接从 store 中访问 state -->
  <div>Current Count: {{ counter.count }}</div>
</template>
为实现更多高级用法,你甚至可以使用一个函数 (与组件 setup() 类似) 来定义一个 Store:
export const useCounterStore = defineStore('counter', () => {
  const count = ref(0)
  function increment() {
    count.value++
  }

  return { count, increment }
})
如果你还不熟悉 setup() 函数和组合式 API,别担心,Pinia 也提供了一组类似 Vuex 的 映射 state 的辅助函数。你可以用和之前一样的方式来定义 Store,然后通过 mapStores()、mapState() 或 mapActions() 访问:
const useCounterStore = defineStore('counter', {
  state: () => ({ count: 0 }),
  getters: {
    double: (state) => state.count * 2,
  },
  actions: {
    increment() {
      this.count++
    },
  },
})

const useUserStore = defineStore('user', {
  // ...
})

export default defineComponent({
  computed: {
    // 其他计算属性
    // ...
    // 允许访问 this.counterStore 和 this.userStore
    ...mapStores(useCounterStore, useUserStore)
    // 允许读取 this.count 和 this.double
    ...mapState(useCounterStore, ['count', 'double']),
  },
  methods: {
    // 允许读取 this.increment()
    ...mapActions(useCounterStore, ['increment']),
  },
})
3. 对比Vuex
Pinia 起源于一次探索 Vuex 下一个迭代的实验,因此结合了 Vuex 5 核心团队讨论中的许多想法。最后,我们意识到 Pinia 已经实现了我们在 Vuex 5 中想要的大部分功能,所以决定将其作为新的推荐方案来代替 Vuex。
与 Vuex 相比,Pinia 不仅提供了一个更简单的 API,也提供了符合组合式 API 风格的 API,最重要的是,搭配 TypeScript 一起使用时有非常可靠的类型推断支持。