文章目录
- 一、环境说明
- 二、安装配置mariadb
- 三、安装配置haproxy
- 四、验证
一、环境说明
- 使用haproxy对mysql多机单节点进行负载均衡。
| 主机IP | 角色 | 安装服务 |
|---|---|---|
| 192.168.161.131 | 后端服务器1 | mariadb,3306端口 |
| 192.168.161.132 | 后端服务器2 | mariadb,3306端口 |
| 192.168.161.133 | 调度服务器 | haproxy,mariadb客户端 |
二、安装配置mariadb
- 在后端服务器1、2上操作。
1.安装数据库,并启动。
yum -y install mariadb mariadb-common mariadb-devel mariadb-server
systemctl enable --now mariadb
2.数据库账户授权。
grant all on *.* to root@'192.168.161.%' identified by 'citms';
flush privileges;
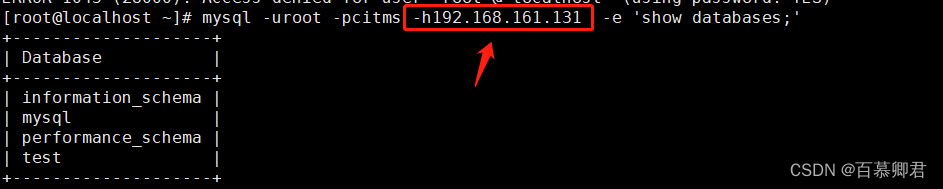
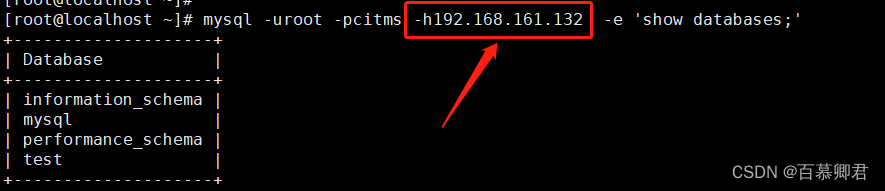
3.查看两台单节点数据库,此时并没有组成主从关系。
三、安装配置haproxy
- haproxy下载地址
1.安装依赖包,创建系统用户。
//安装依赖包。
yum -y install make gcc pcre-devel bzip2-devel openssl-devel systemd-devel

//创建用户。
useradd -r -M -s /sbin/nologin haproxy
2.解压安装包,编译安装。
tar zxf haproxy-2.9-dev1.tar.gz
cd haproxy-2.9-dev1

//编译安装。
make -j $(grep 'processor' /proc/cpuinfo |wc -l)  \
TARGET=linux-glibc  \
USE_OPENSSL=1  \
USE_ZLIB=1  \
USE_PCRE=1  \
USE_SYSTEMD=1

make install PREFIX=/usr/local/haproxy
3.配置各个负载的内核参数。
echo 'net.ipv4.ip_nonlocal_bind = 1' >>  /etc/sysctl.conf
echo 'net.ipv4.ip_forward = 1' >> /etc/sysctl.conf

//重新读取。
sysctl -p
4.提供配置文件。
mkdir /etc/haproxy

//添加以下内容。
cat > /etc/haproxy/haproxy.cfg <<EOF
#--------------全局配置----------------
global
    log 127.0.0.1 local0  info
    #log loghost local0 info
    maxconn 20480
#chroot /usr/local/haproxy
    pidfile /var/run/haproxy.pid
    #maxconn 4000
    user haproxy
    group haproxy
    daemon
#---------------------------------------------------------------------
#common defaults that all the 'listen' and 'backend' sections will
#use if not designated in their block
#---------------------------------------------------------------------
defaults
    mode http
    log global
    option dontlognull
    option httpclose
    option httplog
    #option forwardfor
    option redispatch
    balance roundrobin
    timeout connect 10s
    timeout client 10s
    timeout server 10s
    timeout check 10s
    maxconn 60000
    retries 3
#--------------统计页面配置------------------
listen admin_stats
    bind 0.0.0.0:8189
    stats enable
    mode http
    log global
    stats uri /haproxy_stats
    stats realm Haproxy\ Statistics
    stats auth admin:admin
    #stats hide-version
    stats admin if TRUE
    stats refresh 30s
#---------------web设置-----------------------
listen webcluster
    bind 0.0.0.0:3306    //修改为负载后端服务的监听端口。
    mode http
    #option httpchk GET /index.html
    log global
    maxconn 3000
    balance roundrobin
    cookie SESSION_COOKIE insert indirect nocache
    server web01 192.168.161.131:3306 check inter 2000 fall 5   //修改成后端服务器ip和监听端口。
    server web02 192.168.161.132:3306 check inter 2000 fall 5
EOF
5.设置系统服务。
cat > /usr/lib/systemd/system/haproxy.service <<EOF
[Unit]
Description=HAProxy Load Balancer
After=syslog.target network.target

[Service]
ExecStartPre=/usr/sbin/haproxy -f /etc/haproxy/haproxy.cfg   -c -q
ExecStart=/usr/sbin/haproxy -Ws -f /etc/haproxy/haproxy.cfg  -p /var/run/haproxy.pid
ExecReload=/bin/kill -USR2 $MAINPID

[Install]
WantedBy=multi-user.target
EOF

//重新加载。
systemctl daemon-reload
6.启用日志。
vim /etc/rsyslog.conf
local0.*       /var/log/haproxy.log    //添加此行

//重启服务。
systemctl restart rsyslog
7.启动haproxy。
systemctl start haproxy
四、验证
- haproxy调度器上操作。
1.安装mariadb客户端,进行测试。
yum -y install mariadb
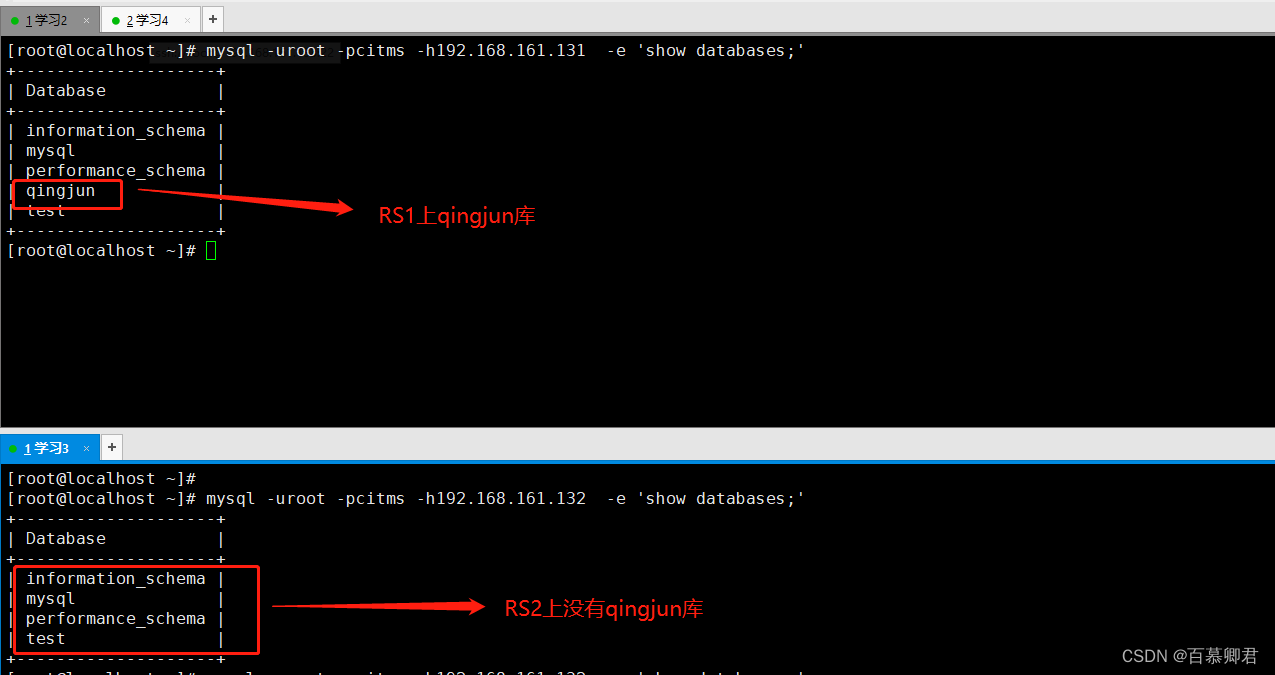
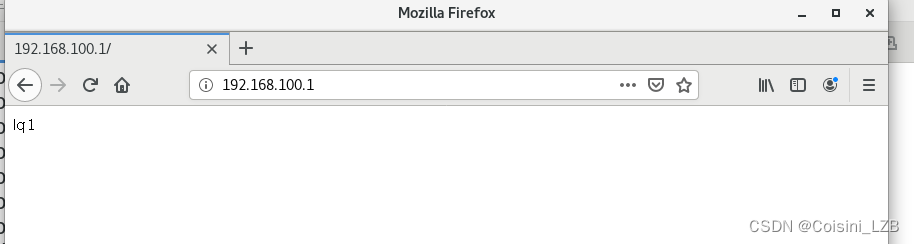
2.指定调度器ip创建qingjun数据库,查看结果是将qingjun库创建在RS1数据库上。
mysql -uroot -pcitms -h192.168.161.133 -e 'create database qingjun;'
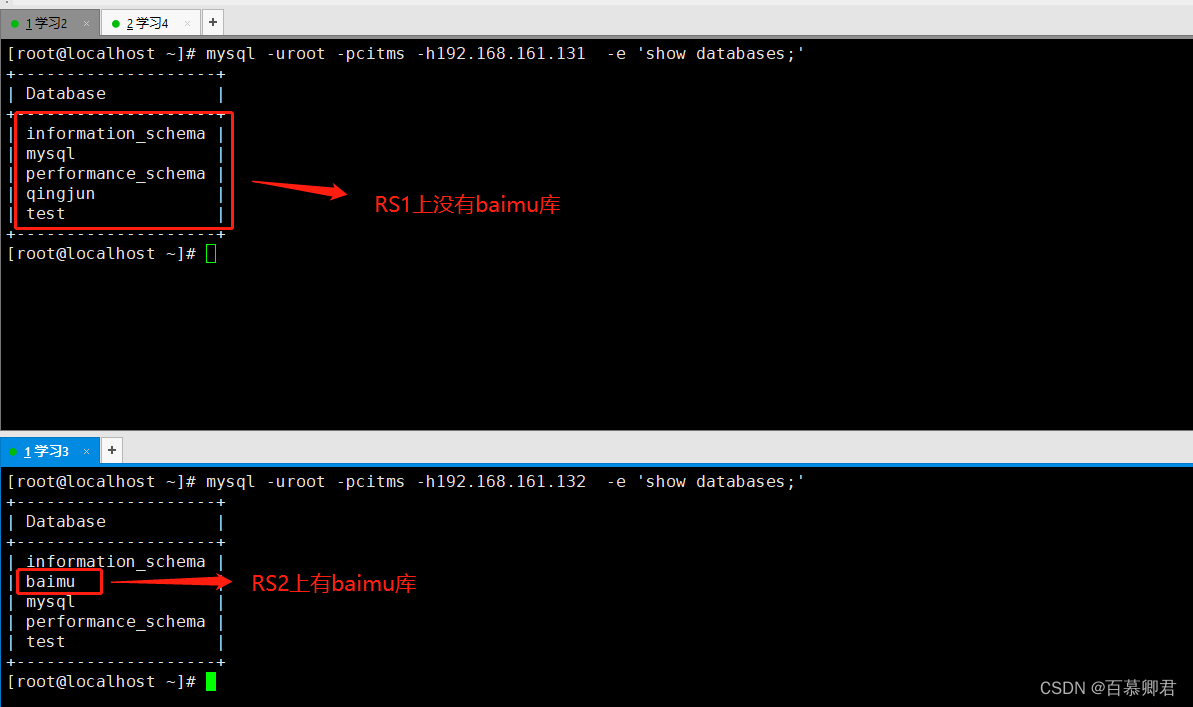
3.指定调度器ip创建baimu数据库,查看结果是将baimu库创建在RS2数据库上。
mysql -uroot -pcitms -h192.168.161.133 -e 'create database baimu;'
- 结论:和上一篇文章测试apache结果一样,是轮询调度,每请求一次时,将目标转移给另外一台后端服务器。调度谷子额较多,这里不一一列举,大家可以私下进行深度学习,整体安装流程一样,秩序更改配置文件参数即可。


![MySQL [环境配置]](https://img-blog.csdnimg.cn/64ebd6bad0c04c469f5b6e04503fc4fc.png)