构建本地单元测试
简介:
单元测试(Unit Test) 是针对 程序的最小单元 来进行正确性检验的测试工作。程序单元是应用的最小可测试部件。一个单元可能是单个程序、类、对象、方法等。
如何区分单元测试和集成测试,一般情况下,单元测试应该不依赖数据库,网络,I/O和其他模块,否则就是集成测试
单元测试特性
- 单元性(快速)
- 测试力度足够小,能够精确定位问题
- 单一职责:一个测试
case只负责一条路径,测试代码中不允许有复杂的逻辑条件 - 独立性(无依赖)
- 避免单元测试之间的依赖关系,一个测试的运行不依赖于其他测试代码的运行结果
- 不依赖数据:与数据库交互时不能假设数据存在,可调用
Dao中的Insert方法来准备数据
- 不依赖外部环境,建议使用
Mock - 可重复性(幂等性)
- 不破坏数据:和数据库相关的单元测试,必须设定自动回滚机制
@Transactional
- 不破坏数据:和数据库相关的单元测试,必须设定自动回滚机制
- 每次执行的结果都相同
- 自验证
- 不靠人来检查,必须使用断言
- 尽可能断言具体的内容(简单的为空判断起不到太大的作用)
- 测试代码必须有好的前置条件和后置断言
- 异常的验证使用
expectedExceptions
单元测试规范
基本准则:
- 【强制】核心应用核心业务增量代码一定要写单元测试。
- 【强制】单元测试类的命名应该和被测试类保持一致xxxTest,测试方法为被测方法名testXxx,所在包的命名和被测试类的包名保持一致。注意:单元测试持续集成的时候会用到maven插件maven-surefire-plugin,这个插件目标会自动执行测试源码路径(默认为src/test/Java/)下所有符合命名模式的测试类。模式为:*/Test.java:任何子目录下所有命名以Test结尾的Java类。
- 【强制】单元测试应该是全自动/非交互式的,测试套件通常是定期执行的,执行过程必须完全自动化才有意义。输出结果需要人工检查的测试不是一个好的单元测试。单元测试中不准使用System.out来进行人肉验证,必须使用assert来验证、代码执行路径方式验证(mock)或者数据存在性验证(dao数据库操作)。
- 【强制】保持测试的独立性,为了保证测试稳定可靠且便于维护,测试用例之间决不能有相互依赖,也不能依赖执行的先后次序。
- 【强制】开发必须保证自己写的单元测试能在本地执行通过,才能提交。
- 【强制】重视边界值测试。
- 【强制】不需要的单元测试直接删除,不要注释掉,如果非要注释请写清楚注释理由。
- 【推荐】对于单元测试,要保证测试力度足够小,能够精确定位问题。对于依赖本应用之外的所有第三方环境的单元测试,统一使用Mock的方式进行测试,即做到尽可能的摆脱对环境依赖、持续重复运行。
- 【推荐】写测试代码的目的是为了提高业务代码质量,严禁为达到测试要求而书写不规范测试代码;对于不可测的代码建议做必要的重构,使代码变的可测
目录&命名规范
目录:
- src/test/java
文件命名规范:
- 单元测试包结构和源码结构必须保持一致,如下图所示:
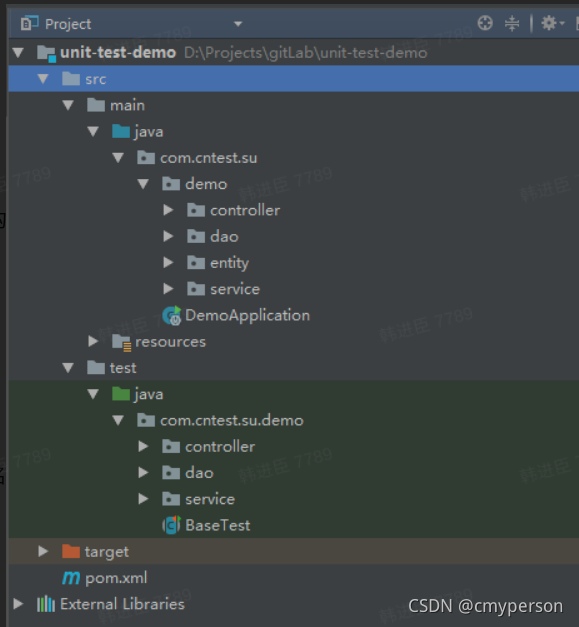
- 单元测试文件名字是由“被测试文件名 + Test”组成,如下图所示:
-
测试方法:
1:1情形:testXxx
1:N情形:testXxxx_测式场景
前言
如何判断应该使用什么框架来书写测试用例:
-
纯java函数可以使用Junit来进线书写单元测试和断言,如下图所示:
public class Utils {
public static boolean isNumeric(String str) {
for (int i = str.length(); --i >= 0;) {
if (!Character.isDigit(str.charAt(i))) {
return false;
}
}
return true;
}
}
public class UtilsTest {
@Test
public void testIsNumeric() {
String testData = "1233";
boolean isNumeric = Utils.isNumeric(testData);
Assert.assertTrue(isNumeric);
//false
String testErrorData = "1233aaa";
boolean isErrorNumeric = Utils.isNumeric(testErrorData);
Assert.assertFalse(isErrorNumeric);
}
}
-
有安卓相关方法需要使用其他单元测试框架,但是需要测试的函数需要根据实际情况来选择对应框架,我们比较倾向于两种安卓相关的单元测试框架PowerMock(是用来 Mock 依赖的类或者接口,对那些不容易构建的对象用一个虚拟对象来代替,实现了对静态方法、构造方法、私有方法以及 Final 方法的模拟支持),Robolectric(在 JVM 中实现了 Android SDK 运行的环境,让我们无需运行虚拟机/真机就可以跑单元测试) 。
什么时候使用PowerMock:
- 依赖其他模块的类或者接口mock出需要测试的对象来进行单测,具体可以参考下面示例(Dao mock示例),这个示例可以比较直观的看出mock了一个User对象来进行单元测试的。
什么时候使用Robolectric:
- 有上下文context 相关方法可以使用 (application = ApplicationProvider.getApplicationContext();)
- Android原生控件相关测试
在写测试用例时,我们会必然用到一种场景:一个测试类中的方法, 有的需要在Robolectric运行器中 ,有的需要在PowerMock 运行器中进行测试,针对这种场景我们需要做一下简单的配置即可,在RobolectricTestRunner 运行器中使用PowerMock的MockitoRule 方式进行使用。 如下示例所示:
以ImageUtils的rotate()方法为例(在本例中没必要使用Robolectric,单纯为了举例)
/**
* Return the rotated bitmap.
*
* @param src The source of bitmap.
* @param degrees The number of degrees.
* @param px The x coordinate of the pivot point.
* @param py The y coordinate of the pivot point.
* @param recycle True to recycle the source of bitmap, false otherwise.
* @return the rotated bitmap
*/
public static Bitmap rotate(final Bitmap src,
final int degrees,
final float px,
final float py,
final boolean recycle) {
if (isEmptyBitmap(src)) return null;
if (degrees == 0) return src;
Matrix matrix = new Matrix();
matrix.setRotate(degrees, px, py);
Bitmap ret = Bitmap.createBitmap(src, 0, 0, src.getWidth(), src.getHeight(), matrix, true);
if (recycle && !src.isRecycled() && ret != src) src.recycle();
return ret;
}
测试方法如下,在此次测试中,RunWith设置的是RobolectricTestRunner,同样mock了Bitmap对象。
@RunWith(RobolectricTestRunner.class)
@PowerMockIgnore({ "org.mockito.*", "org.robolectric.*", "android.*", "org.powermock.*" })
@PrepareForTest(Bitmap.class)
@Config(sdk = 28)
public class imageUtilsTest2 {
@Rule
public PowerMockRule rule = new PowerMockRule();
private Bitmap bitmap;
@Before
public void init() {
MockitoAnnotations.initMocks(this);
PowerMockito.mockStatic(Bitmap.class);
bitmap = PowerMockito.mock(Bitmap.class);
}
@Test
public void imagetest() {
when(bitmap.getWidth()).thenReturn(100);
when(bitmap.getHeight()).thenReturn(100);
when(bitmap.createBitmap(any(Bitmap.class), anyInt(), anyInt(), anyInt(), anyInt(),
any(Matrix.class), anyBoolean())).thenReturn(bitmap);
assertNotNull(ImageUtils.rotate(bitmap, 0, 10, 10, false));
assertNull(ImageUtils.rotate(null, 0, 10, 10, false));
assertNotNull(ImageUtils.rotate(bitmap, 0, 10, 10, true));
assertNull(ImageUtils.rotate(null, 0, 10, 10, true));
}
参考:
研发工程师首先需要罗列出项目主干逻辑,这样有利于单元测试的开展。 第一步以非UI类代码入手,如:Utils类中的公共方法、和UI无关、比较独立的方法先开始接入,先挑一些比较重要的case做。
如何运行单元测试
你可以在 Android Studio 中或从命令行运行测试。
在 Android Studio 中项目 APP test 目录下
- AS ——Select Run/Debug —— Configuration ——Edit Configuration ——配置 ——OK
- 如果想测试单个测试用例的方法或者类,右键选中要测试的方法或类(比如:Run listGoesOverTheFold(),Run HelloWorldEspressoTest),直接Run 选中的方法或者类名即可
- 想要全部 Run 所有测试用例可以选择整个 test 下的 java 文件夹,右键 Run All Tests
JUnit
JUnit是Java单元测试的根基,基本上都是通过断言来验证函数返回值/对象的状态是否正确。测试用例的运行和验证都依赖于它来进行。
JUnit的用途主要是:
- 提供了若干注解,轻松地组织和运行测试。
- 提供了各种断言api,用于验证代码运行是否符合预期。
- 在Android项目中纯java函数可以使用junit
简单介绍一下几个常用注解:
| @Test | 表示此方法为测试方法 |
| @Before | 在每个测试方法前执行,可做初始化操作 |
| @After | 在每个测试方法后执行,可做释放资源操作 |
| @Ignore | 忽略的测试方法 |
| @BeforeClass | 在类中所有方法前运行。此注解修饰的方法必须是static void |
| @AfterClass | 在类中最后运行。此注解修饰的方法必须是static void |
| @RunWith | 指定该测试类使用某个运行器(Runner的概念) |
| @Parameters | 指定测试类的测试数据集合 |
| @Rule | 重新制定测试类中方法的行为 |
| @FixMethodOrder | 指定测试类中方法的执行顺序 |
ps: 一个测试类单元测试的执行顺序为: @BeforeClass –> @Before –> @Test –> @After –> @AfterClass
常用的断言,也可以自行查阅官方wiki。
| assertEquals | 断言传入的预期值与实际值是相等的 |
| assertNotEquals | 断言传入的预期值与实际值是不相等的 |
| assertArrayEquals | 断言传入的预期数组与实际数组是相等的 |
| assertNull | 断言传入的对象是为空 |
| assertNotNull | 断言传入的对象是不为空 |
| assertTrue | 断言条件为真 |
| assertFalse | 断言条件为假 |
| assertSame | 断言两个对象引用同一个对象,相当于“==” |
| assertNotSame | 断言两个对象引用不同的对象,相当于“!=” |
| assertThat | 断言实际值是否满足指定的条件 |
构建测试环境
在 Android Studio 项目中,你必须将本地单元测试的源文件存储在 module-name/src/test/java/ 中。当你创建新项目时,此目录已存在。
在应用的顶级 build.gradle 文件中,请将以下库指定为依赖项 (若已存在则不需要添加):
dependencies {
// Required -- JUnit 4 framework
testImplementation 'junit:junit:4.12'
}
创建本地单元测试类
你的本地单元测试类应编写为 JUnit 4 测试类。JUnit 是最受欢迎且应用最广泛的 Java 单元测试框架。与原先的版本相比,JUnit 4 可让你以更简洁且更灵活的方式编写测试,因为 JUnit 4 不要求你执行以下操作:
- 扩展
junit.framework.TestCase类。
- 在测试方法名称前面加上
'test'关键字作为前缀。
- 使用
junit.framework或junit.extensions软件包中的类。
如需创建基本的 JUnit 4 测试类,请创建包含一个或多个测试方法的类。测试方法以 @Test 注释开头,并且包含用于运用和验证要测试的组件中的单项功能的代码。
以下示例展示了如何实现本地单元测试类:
验证是否返回正确的结果。
import com.google.common.truth.Truth.assertThat;
import org.junit.Test;
import org.junit.runner.RunWith;
import org.junit.runners.JUnit4;
@RunWith(JUnit4.class)
public class EmailValidatorTest {
@Test
public void emailValidator_CorrectEmailSimple_ReturnsTrue() {
//断言实际值是否满足指定的条件
assertThat(EmailValidator.isValidEmail("name@email.com")).isTrue();
}
}
对象的判空校验:
@RunWith(JUnit4.class)
public class JUnitSample {
Object object;
//初始化方法,通常进行用于测试的前置条件/依赖对象的初始化
@Before
public void setUp() throws Exception {
object = new Object();
}
//测试方法,必须是public void
@Test
public void test() {
Assert.assertNotNull(object);
}
//在每个测试方法后执行,可做释放资源操作
@After
public void close() {
}
}
计算器示例
public class Calculator {
//加
public int add(int a, int b) {
return a + b;
}
//减
public int subtract(int a, int b) {
return a - b;
}
//乘
public int multiply(int a, int b) {
return a * b;
}
//除
public int divide(int a, int b) throws Exception {
if (0 == b) {
throw new Exception("除数不能为0");
}
return a / b;
}
}
测试用例
public class CalculatorTest {
private Calculator mCalculator;
//初始化方法,通常进行用于测试的前置条件/依赖对象的初始化
@Before
public void setup() {
mCalculator = new Calculator();
}
@Test
public void testAdd() {
int result = mCalculator.add(1, 2);
//断言传入的预期值与实际值是相等的
Assert.assertEquals(3, result);
}
@Test
public void testSubtract() {
int result = mCalculator.subtract(1, 2);
//断言传入的预期值与实际值是相等的
Assert.assertEquals(-1, result);
}
@Test
public void testMultiply() {
int result = mCalculator.multiply(1, 2);
//断言传入的预期值与实际值是相等的
Assert.assertEquals(2, result);
}
@Test
public void testDivide() {
int result = 0;
try {
result = mCalculator.divide(4, 2);
} catch (Exception e) {
e.printStackTrace();
Assert.fail();
}
//断言传入的预期值与实际值是相等的
Assert.assertEquals(2, result);
}
//在每个测试方法后执行,可做释放资源操作
@After
public void close() {
}
}
JUnit4 验证是否抛出异常
-
expected声明方式
@Test(expected= IllegalArgumentException.class)
public void shouldNotAddNegativeWeights() {
weightCalculator.addItem(-5);
}
-
@Rule方式
@Rule
public ExpectedException thrown = ExpectedException.none();
@Test
public void shouldNotAddNegativeWeights() {
thrown.expect(IllegalArgumentException.class);
thrown.expectMessage("Cannot add negative weight");
weightCalculator.addItem(-5);
}
Powermock
在看PowerMockito 之前先说下什么是Mockito, 因为PowerMockito是基于Mockito的扩展。
Mockito简介
Mocktio是Mock的工具类,主要是Java的类库,Mock就是伪装的意思。他们适用于单元测试中,对于单元测试来说,我们不希望依赖于第三方的组件,比如数据库、Webservice等。在写单元测试的时候,我们如果遇到了这些需要依赖第三方的情况,我们可以使用mock的技术,伪造出来我们自己想要的结果。对于Java而言,mock的对象主要是Java 方法和 Java类。 但是Mocktio也有它的不足之处,因为Mocktio不能mock static、final、private等对象,这时候就引出了Powermock框架。
Powermock简介
PowerMock 也是一个单元测试模拟框架,它是在Mockito 单元测试模拟框架的基础上做出的扩展,所以二者的api都非常相似。 通过提供定制的类加载器以及一些字节码篡改技巧的应用,PowerMock 实现了对静态方法、构造方法、私有方法以及 Final 方法的模拟支持,对静态初始化过程的移除等强大的功能。因为 PowerMock 在扩展功能时完全采用和被扩展的框架相同的 API, 熟悉 PowerMock 所支持的模拟框架的开发者会发现 PowerMock 非常容易上手。PowerMock 的目的就是在当前已经被大家所熟悉的接口上通过添加极少的方法和注释来实现额外的功能。当Powermock和mockito结合使用的时候,我们需要考虑兼容性的问题。两者的版本需要兼容,如下图所示:
PowerMock主要是对Mockito增强,主要是以下几个常用场景
- mock静态方法
- 跳过私有方法
- 更改子类无法访问的父类私有field
- 更改类的私有static常量
- 模拟New构造函数
添加配置和依赖:
android {
testOptions {
unitTests {
includeAndroidResources = true
}
}
}
testImplementation 'junit:junit:4.12'
//三方单元测试框架
testImplementation 'org.powermock:powermock-api-mockito2:2.0.2'
testImplementation 'org.powermock:powermock-module-junit4:2.0.0'
testImplementation 'org.powermock:powermock-module-junit4-rule:2.0.0'
testImplementation 'org.powermock:powermock-classloading-xstream:2.0.0'
使用 PowerMock,首先需要使用@RunWith(PowerMockRunner.class)将测试用例的 Runner 改为PowerMockRunner。如果要 Mockstatic、final、private等方法的时候,就需要加注解@PrepareForTest。
在项目根目录下的gradle.properties文件中添加下面的配置(在Android Studio 3.3+以上不需要):
android.enableUnitTestBinaryResources=true
常用api:
Mock
Powermockito.mock() 方 法 主 要 是 根 据 class 创 建 一 个 对 应 的 mock 对 象 ,
powermock 的创建方式可不像 easymock 等使用 proxy 的方式创建,他是会在你运行的
过程中动态的修改 class 字节码文件的形式来创建的。
spy
如果一个对象,只希望mock它的部分方法,而其他方法希望和真实对象的行为一致,可以使用spy。时,没有通过when设置过的方法,测试调用时,行为和真实对象一样
DoReturn…when…then
我们可以看到,每次当我们想给一个 mock 的对象进行某种行为的预期时,都会使用
do…when…then…这样的语法,其实理解起来非常简单:做什么、在什么时候、然后返回
什么。DoReturn不会进入mock方法的内部
when…thenReturn
其实理解起来非常简单:做什么、在什么时候、然后返回
什么。需要注意的是:mock的对象,所有没有调用when设置过的方法,在测试时调用,返回的都是对应返回类型的默认值。when…thenReturn会进入mock方法的内部
doNothing().when(…)…
调用后什么都不做的
doThrow(Throwable).when(…)…
调用后抛异常
Verify
当我们测试一个 void 方法的时候,根本没有办法去验证一个 mock 对象所执行后的结
果,因此唯一的方法就是检查方法是否被调用,在后文中将还会专门来讲解。
@PrepareForTest
PowerMock的Runner提前准备一个已经根据某种预期改变过的class,PowerMockito mock私有方法,静态方法和final方法的时候添加这个注解,可以作用在类和方法(某些情况下不起作用)上
注意点:
如果一个测试类中有被@PrepareForTest(XXX.class)修饰的方法,如果测试类中有多个测试方法,单独 Run 被PrepareForTest 修饰的方法是会失败:
- 必须Run整个测试类(XXXTest.class)。
- 可以将@PrepareForTest(XXX.class)放在当前测试类的顶部,如果测试类中需要有多个PrepareForTest 可以以逗号隔开进行添加,如下图所示:
@RunWith(PowerMockRunner.class)
@PrepareForTest({Utils.class, Presenter.class})
public class UtilsTest {}
示例
初始化注入方式:
现在我们mock一个对象有四种方式,分别是普通方式、注解方式、运行器方法、MockitoRule方法。
推荐使用一,二种方式。
- 普通方式:
import org.junit.Assert;
import org.junit.Test;
import org.powermock.api.mockito.PowerMockito;
import java.util.ArrayList;
public class MockitoTest {
@Test
public void testNotNull() {
ArrayList arrayList = PowerMockito.mock(ArrayList.class);
Assert.assertNotNull(mArrayList);
}
}
- 注解方式
import org.junit.Assert;
import org.junit.Before;
import org.junit.Test;
import org.mockito.Mock;
import org.mockito.MockitoAnnotations;
import java.util.ArrayList;
public class MockitoAnnotationsTest {
@Mock
private ArrayList mArrayList;
@Before
public void setup() {
MockitoAnnotations.initMocks(this);
}
@Test
public void testNotNull() {
Assert.assertNotNull(mArrayList);
}
}
- 运行器方法:(android中,运行器使用Robolectric,该用法不可使用)
import org.junit.Test;
import org.junit.runner.RunWith;
import org.mockito.Mock;
import org.mockito.junit.MockitoJUnitRunner;
import java.util.ArrayList;
import static org.junit.Assert.assertNotNull;
@RunWith(PowerMockRunner.class)
public class MockitoJUnitRunnerTest {
@Mock //<--使用@Mock注解
ArrayList mArrayList;
@Test
public void testIsNotNull(){
assertNotNull(mArrayList);
}
}
- MockitoRule方法
import java.util.ArrayList;
import static org.junit.Assert.assertNotNull;
public class MockitoRuleTest {
@Mock //<--使用@Mock注解
ArrayList mArrayList;
@Rule //<--使用@Rule
public MockitoRule mockitoRule = MockitoJUnit.rule();
@Test
public void testIsNotNull(){
assertNotNull(mArrayList);
}
}
验证某些行为:
@Test
public void testListIsAdd() throws Exception {
mArrayList = PowerMockito.mock(ArrayList.class);
//使用mock对象执行方法
mArrayList.add("one");
mArrayList.clear();
//检验方法是否调用
verify(mArrayList).add("one");
verify(mArrayList).clear();
}
可以直接调用mock对象的方法,比如ArrayList.add()或者ArrayList.clear(),然后我们通过verify函数进行校验。
参数匹配器:
import org.mockito.ArgumentMatcher;
import java.util.List;
public class ListOfTwoElements implements ArgumentMatcher<List> {
public boolean matches(List list) {
return list.size() == 2;
}
public String toString() {
//printed in verification errors
return "[list of 2 elements]";
}
}
@Test
public void testArgumentMatchers() throws Exception {
mArrayList = PowerMockito.mock(ArrayList.class);
when(mArrayList.get(anyInt())).thenReturn("不管请求第几个参数 我都返回这句");
Assert.assertEquals("不管请求第几个参数 我都返回这句", mArrayList.get(0));
Assert.assertEquals("不管请求第几个参数 我都返回这句", mArrayList.get(39));
//当mockList调用addAll()方法时,「匹配器」如果传入的参数list size==2,返回true;
when(mArrayList.addAll(argThat(getListMatcher()))).thenReturn(true);
//根据API文档,我们也可以使用lambda表达式: 「匹配器」如果传入的参数list size==3,返回true;
// when(mArrayList.addAll(argThat(list -> list.size() == 3))).thenReturn(true);
boolean b1 = mArrayList.addAll(Arrays.asList("one", "two"));
boolean b2 = mArrayList.addAll(Arrays.asList("one", "two", "three"));
verify(mArrayList).addAll(argThat(getListMatcher()));
Assert.assertTrue(b1);
Assert.assertTrue(!b2);
}
private ListOfTwoElements getListMatcher() {
return new ListOfTwoElements();
}
对于一个Mock的对象,有时我们需要进行校验,但是基础的API并不能满足我们校验的需要,我们可以自定义Matcher,比如案例中,我们自定义一个Matcher,只有容器中两个元素时,才会校验通过。
验证方法的调用次数:
@Test
public void testVerifyTimes() throws Exception {
mArrayList = PowerMockito.mock(ArrayList.class);
mArrayList.add("once");
mArrayList.add("twice");
mArrayList.add("twice");
mArrayList.add("three times");
mArrayList.add("three times");
mArrayList.add("three times");
verify(mArrayList).add("once"); //验证mockList.add("once")调用了一次 - times(1) is used by default
verify(mArrayList, times(1)).add("once");//验证mockList.add("once")调用了一次
//调用多次校验
verify(mArrayList, times(2)).add("twice");
verify(mArrayList, times(3)).add("three times");
//从未调用校验
verify(mArrayList, never()).add("four times");
//至少、至多调用校验
verify(mArrayList, atLeastOnce()).add("three times");
verify(mArrayList, atMost(5)).add("three times");
}
抛出预期的异常:
@Test
public void testThrowNullPointerException() {
mArrayList = PowerMockito.mock(ArrayList.class);
doThrow(new NullPointerException("throwTest5.抛出空指针异常")).when(mArrayList).clear();
mArrayList.add("string");//这个不会抛出异常
mArrayList.clear();
}
@Test
public void testThrowIllegalArgumentException() {
mArrayList = PowerMockito.mock(ArrayList.class);
doThrow(new IllegalArgumentException("你的参数似乎有点问题")).when(mArrayList).add(anyInt());
mArrayList.add(12);//抛出了异常,因为参数是Int
}
校验方法执行顺序:
@Test
public void testListAddOrder() throws Exception {
List singleMock = mock(List.class);
singleMock.add("first add");
singleMock.add("second add");
InOrder inOrder = Mockito.inOrder(singleMock);
//inOrder保证了方法的顺序执行,如果顺序执行错误将failed
inOrder.verify(singleMock).add("first add");
inOrder.verify(singleMock).add("second add");
List firstMock = mock(List.class);
List secondMock = mock(List.class);
firstMock.add("first add");
secondMock.add("second add");
InOrder inOrder1 = Mockito.inOrder(firstMock, secondMock);
//下列代码会确认是否firstMock优先secondMock执行add方法
inOrder1.verify(firstMock).add("first add");
inOrder1.verify(secondMock).add("second add");
}
有时候我们需要校验方法执行顺序的先后,如案例所示,inOrder对象会判断方法执行顺序,如果顺序不对,该测试案例failed。
方法连续调用:
@Test
public void testContinueMethod() throws Exception {
Person person = mock(Person.class);
when(person.getName())
.thenReturn("第一次调用返回")
.thenThrow(new RuntimeException("方法调用第二次抛出异常"))
.thenReturn("第三次调用返回");
//另外一种方式
// when(person.getName()).thenReturn("第一次调用返回", "第二次调用返回", "第三次调用返回");
String name1 = person.getName();
String name2 = "";
try {
name2 = person.getName();
} catch (Exception e) {
name2 = e.getMessage();
}
String name3 = person.getName();
Assert.assertEquals("第一次调用返回", name1);
Assert.assertEquals("方法调用第二次抛出异常", name2);
// Assert.assertEquals("第二次调用返回", name2);
Assert.assertEquals("第三次调用返回", name3);
}
回调方法测试 thenAnswer:
@Test
public void testCallBack() throws Exception {
mArrayList = PowerMockito.mock(ArrayList.class);
when(mArrayList.add(anyString())).thenAnswer(new Answer<Boolean>() {
@Override
public Boolean answer(InvocationOnMock invocation) throws Throwable {
Object[] args = invocation.getArguments();
Object mock = invocation.getMock();
return false;
}
});
boolean first = mArrayList.add("第1次返回false");
Assert.assertFalse(first);
// lambda表达式
when(mArrayList.add(anyString())).then(invocation -> true);
boolean second = mArrayList.add("第2次返回true");
Assert.assertFalse(second);
when(mArrayList.add(anyString())).thenReturn(false);
boolean three = mArrayList.add("第3次返回false");
Assert.assertFalse(three);
}
Spy:监控真实对象
@Test
public void testSpyList() throws Exception {
List list = new ArrayList();
List spyList = PowerMockito.spy(list);//会创建真实对象
//当spyList调用size()方法时,return100
when(spyList.size()).thenReturn(100);
spyList.add("one");
String position0 = (String) spyList.get(0);
int size = spyList.size();
Assert.assertEquals("one", position0);
Assert.assertTrue(size == 100);
//下面这行代码会报错! java.lang.IndexOutOfBoundsException: 因为真实的只添加了一条数据
// String position1 = (String) spyList.get(1);
verify(spyList).add("one");
verify(spyList).size();
/*
* 请注意!下面这行代码会报错! java.lang.IndexOutOfBoundsException: Index: 10, Size: 2
不可能 : 因为当调用spy.get(0)时会调用真实对象的get(0)函数,此时会发生异常,因为真实List对象是空的
* */
// when(spyList.get(10)).thenReturn("ten");
//应该这么使用
doReturn("ten").when(spyList).get(9);
String position10 = (String) spyList.get(9);
Assert.assertEquals("ten", position10);
//Mockito并不会为真实对象代理函数调用,实际上它会拷贝真实对象。因此如果你保留了真实对象并且与之交互
//不要期望从监控对象得到正确的结果。当你在监控对象上调用一个没有被stub的函数时并不会调用真实对象的对应函数,你不会在真实对象上看到任何效果。
//因此结论就是 : 当你在监控一个真实对象时,你想在stub这个真实对象的函数,那么就是在自找麻烦。或者你根本不应该验证这些函数。
}
Mock 参数传递的对象:
测试对象
public class MethodUtils {
public boolean callArgumentInstance(File file) {
return file.exists();
}
}
测试代码:
public class MethodUtilsTest {
@Test
public void testCallArgumentInstance() {
// Mock 对象,也可以使用 org.mockito.Mock 注解标记来实现
File file = PowerMockito.mock(File.class);
MethodUtils methodUtils = new MethodUtils();
// 录制 Mock 对象行为
PowerMockito.when(file.exists()).thenReturn(true);
// 验证方法行为
Assert.assertTrue(methodUtils.callArgumentInstance(file));
}
}
Mock 方法内部 new 出来的对象:
测试对象
import java.io.File;
public class CreateDirUtil {
public boolean createDirectoryStructure(String directoryPath) {
File directory = new File(directoryPath);
if (directory.exists()) {
String msg = "\"" + directoryPath + "\" 已经存在.";
throw new IllegalArgumentException(msg);
}
return directory.mkdirs();
}
}
测试用例
// 必须加注解 @PrepareForTest 和 @RunWith
@RunWith(PowerMockRunner.class)
public class CreateDirUtilTest {
@Test
@PrepareForTest(CreateDirUtil.class)
public void testCreateDirectoryStructureWhenPathDoesntExist() throws Exception {
final String directoryPath = "seemygod";
//创建File的模拟对象
File directoryMock = mock(File.class)
;
//在当前测试用例下,当出现new File("seemygod")时,就返回模拟对象
PowerMockito.whenNew(File.class).withArguments(directoryPath).thenReturn(directoryMock);
//当调用模拟对象的exists时,返回false
when(directoryMock.exists()).thenReturn(false);
//当调用模拟对象的mkdirs时,返回true
when(directoryMock.mkdirs()).thenReturn(true);
assertTrue(new CreateDirUtil().createDirectoryStructure(directoryPath));
//验证new File(directoryPath); 是否被调用过
verifyNew(File.class).withArguments(directoryPath);
}
}
Mock 普通对象的 final 方法:
测试对象
public class MethodUtils {
public boolean callFinalMethod(MethodDependency methodDependency) {
return methodDependency.isAlive();
}
}
public class MethodDependency {
public final boolean isAlive() {
// do something
return false;
}
}
测试用例
// 必须加注解 @PrepareForTest 和 @RunWith
@RunWith(PowerMockRunner.class)
public class MethodUtilsTest {
@Test
// 在测试方法之上加注解 @PrepareForTest,注解里写的类是需要 Mock 的 final 方法所在的类。
@PrepareForTest(MethodDependency.class)
public void testCallFinalMethod() {
MethodDependency methodDependency = PowerMockito.mock(MethodDependency.class);
MethodUtils methodUtils = new MethodUtils();
PowerMockito.when(methodDependency.isAlive()).thenReturn(true);
Assert.assertTrue(methodUtils.callFinalMethod(methodDependency));
}
}
Mock 静态方法:
测试代码
public class MethodUtils {
public boolean callStaticMethod() {
return MethodDependency.isExist();
}
}
public class MethodDependency {
public static boolean isExist() {
// do something
return false;
}
}
测试用例
// 必须加注解 @PrepareForTest 和 @RunWith
@RunWith(PowerMockRunner.class)
public class MethodUtilsTest {
@Test
// 在测试方法之上加注解 @PrepareForTest,注解里写的类是需要 Mock 的 static 方法所在的类。
@PrepareForTest(MethodDependency.class)
public void testCallStaticMethod() {
MethodUtils methodUtils = new MethodUtils();
// 表示需要 Mock 这个类里的静态方法
PowerMockito.mockStatic(MethodDependency.class);
PowerMockito.when(MethodDependency.isExist()).thenReturn(true);
Assert.assertTrue(methodUtils.callStaticMethod());
}
}
Mock 私有方法:
测试代码
public class MethodUtils {
public boolean callPrivateMethod() {
return isExist();
}
private boolean isExist() {
return false;
}
}
测试用例
// 必须加注解 @PrepareForTest 和 @RunWith
@RunWith(PowerMockRunner.class)
public class MethodUtilsTest {
@Test
// 在测试方法之上加注解 @PrepareForTest,注解里写的类是需要 Mock 的 private 方法所在的类。
@PrepareForTest(MethodUtils.class)
public void testCallPrivateMethod() throws Exception {
MethodUtils methodUtils = PowerMockito.mock(MethodUtils.class);
PowerMockito.when(methodUtils.callPrivateMethod()).thenCallRealMethod();
PowerMockito.when(methodUtils, "isExist").thenReturn(true);
Assert.assertTrue(methodUtils.callPrivateMethod());
}
}
Mock JDK 中 System 类的静态、私有方法:
测试代码
public class MethodUtils {
public boolean callSystemFinalMethod(String str) {
return str.isEmpty();
}
public String callSystemStaticMethod(String str) {
return System.getProperty(str);
}
}
测试用例
// 必须加注解 @PrepareForTest 和 @RunWith
@RunWith(PowerMockRunner.class)
public class MethodUtilsTest
@Test
// 和 Mock 普通对象的 static、final 方法一样,只不过注解 @PrepareForTest 里写的类不一样
// 注解里写的类是需要调用系统方法所在的类。
@PrepareForTest(MethodUtils.class)
public void testCallSystemFinalMethod() {
String str = PowerMockito.mock(String.class);
MethodUtils methodUtils = new MethodUtils();
PowerMockito.when(str.isEmpty()).thenReturn(false);
Assert.assertFalse(methodUtils.callSystemFinalMethod(str));
}
@Test
@PrepareForTest(MethodUtils.class)
public void testCallSystemStaticMethod() {
MethodUtils methodUtils = new MethodUtils();
PowerMockito.mockStatic(System.class);
PowerMockito.when(System.getProperty("aaa")).thenReturn("bbb");
Assert.assertEquals("bbb", methodUtils.callSystemStaticMethod("aaa"));
}
}
Mock 依赖类中的方法(whenNew):
public class MethodUtils {
public boolean callDependency() {
MethodDependency methodDependency = new MethodDependency();
return methodDependency.isGod("hh");
}
}
public class MethodDependency {
public boolean isGod(String oh){
System.out.println(oh);
return false;
}
}
测试用例
// 必须加注解 @PrepareForTest 和 @RunWith
@RunWith(PowerMockRunner.class)
public class TestClassUnderTest {
@Test
// 注解里写的类是依赖类所在的类。
@PrepareForTest(MethodUtils.class)
public void testDependency() throws Exception {
MethodUtils methodUtils = new MethodUtils();
MethodDependency methodDependency = mock(MethodDependency.class);
whenNew(MethodUtils.class).withAnyArguments().thenReturn(methodDependency);
when(methodDependency.isGod(anyString())).thenReturn(true);
Assert.assertTrue(methodUtils.callDependency());
}
}
关于调用自身的静态私有方法
有时候我们会调用到测试类自己的私有方法,例如现在有一个类FileUtils,我们要测试它的readFile2List()方法,代码如下。
/**
* Return the lines in file.
*
* @param file The file.
* @param st The line's index of start.
* @param end The line's index of end.
* @param charsetName The name of charset.
* @return the lines in file
*/
public static List<String> readFile2List(final File file,
final int st,
final int end,
final String charsetName) {
if (!isFileExists(file)) return null;
if (st > end) return null;
BufferedReader reader = null;
...
return null;
}
private static boolean isFileExists(final File file) {
return file != null && file.exists();
}
在需要测试的方法中调用了自己的isFileExists()函数,该函数的返回会影响到整个测试方法的结果,所以我们需要对该方法执行时给定一个结果(当然我们也可以用when方法使file.exists()返回给定结果,该方案不在本例范围内)
@Test
@PrepareForTest({FileIOUtils.class})
public void testGetFileByPath() throws Exception {
FileIOUtils utils = mock(FileIOUtils.class);
File file = mock(File.class);
//我们可以通过Whitebox调用自身的隐私方法
when(Whitebox.invokeMethod(utils, "isFileExists", any(String.class))).thenReturn(false);
assertNull(FileIOUtils.readFile2List(file));
}
Dao mock示例:
entity以及Dao接口:
public class User {
private Long id;
private String name;
public Long getId() {
return id;
}
public void setId(Long id) {
this.id = id;
}
public String getName() {
return name;
}
public void setName(String name) {
this.name = name;
}
}
public interface UserService {
/**
* 创建新用戶
*/
void createNewUser(User user) throws Exception;
}
public class UserServiceImpl implements UserService {
private UserDao mUserDao;
public void createNewUser(User user) throws Exception {
// 参数校验
if (user == null || user.getId() == null || isEmpty(user.getName())) {
throw new IllegalArgumentException();
}
// 查看是否是重复数据
Long id = user.getId();
User dbUser = mUserDao.queryUser(id);
if (dbUser != null) {
throw new Exception("用户已经存在");
}
try {
mUserDao.insertUser(dbUser);
} catch (Exception e) {
// 隐藏Database异常,抛出服务异常
throw new Exception("数据库语句执行失败", e);
}
}
private boolean isEmpty(String str) {
if (str == null || str.trim().length() == 0) {
return true;
}
return false;
}
public void setUserDao(UserDao userDao) {
this.mUserDao = userDao;
}
}
测试用例:
import org.junit.Test;
import org.mockito.invocation.InvocationOnMock;
import org.mockito.stubbing.Answer;
import static org.mockito.Mockito.*;
import java.sql.SQLException;
public class UserServiceImplTest {
@Test(expected = IllegalArgumentException.class)
public void testNullUser() throws Exception {
UserService userService = new UserServiceImpl();
// 创建mock
UserDao userDao = mock(UserDao.class);
((UserServiceImpl) userService).setUserDao(userDao);
userService.createNewUser(null);
}
@Test(expected = IllegalArgumentException.class)
public void testNullUserId() throws Exception {
UserService userService = new UserServiceImpl();
// 创建mock
UserDao userDao = mock(UserDao.class);
((UserServiceImpl) userService).setUserDao(userDao);
User user = new User();
user.setId(null);
userService.createNewUser(user);
}
@Test(expected = IllegalArgumentException.class)
public void testNullUserName() throws Exception {
UserService userService = new UserServiceImpl();
// 创建mock对象
UserDao userDao = mock(UserDao.class);
((UserServiceImpl) userService).setUserDao(userDao);
User user = new User();
user.setId(1L);
user.setName("");
userService.createNewUser(user);
}
@Test(expected = Exception.class)
public void testCreateExistUser() throws Exception {
UserService userService = new UserServiceImpl();
// 创建mock
UserDao userDao = mock(UserDao.class);
User returnUser = new User();
returnUser.setId(1L);
returnUser.setName("Vikey");
//指定行为
when(userDao.queryUser(1L)).thenReturn(returnUser);
((UserServiceImpl) userService).setUserDao(userDao);
User user = new User();
user.setId(1L);
user.setName("Vikey");
userService.createNewUser(user);
}
@Test(expected = Exception.class)
public void testCreateUserOnDatabaseException() throws Exception {
UserService userService = new UserServiceImpl();
// 创建mock
UserDao userDao = mock(UserDao.class);
//指定行为 调用后抛异常
doThrow(new SQLException("SQL is not valid")).when(userDao).insertUser(any(User.class));
((UserServiceImpl) userService).setUserDao(userDao);
User user = new User();
user.setId(1L);
user.setName("Vikey");
userService.createNewUser(user);
}
@Test
public void testCreateUser() throws Exception {
UserService userService = new UserServiceImpl();
// 创建mock
UserDao userDao = mock(UserDao.class);
//拦截行为
doAnswer(new Answer<Void>() {
public Void answer(InvocationOnMock invocation) throws Throwable {
System.out.println("Insert data into user table");
return null;
}
}).when(userDao).insertUser(any(User.class));
((UserServiceImpl) userService).setUserDao(userDao);
User user = new User();
user.setId(1L);
user.setName("Vikey");
userService.createNewUser(user);
}
}
Robolectric github issues
普通的AndroidJunit测试需要跑到设备或模拟器上去,需要打包apk运行,这样速度很慢,相当于每次运行app一样。而Robolectric通过实现一套能运行的Android代码的JVM环境,然后在运行unit test的时候去截取android相关的代码调用,然后转到自己实现的代码去执行这个调用的过程,从而达到能够脱离Android环境运行Android测试代码的目的。
添加配置和依赖:
android {
//使用robolectric必须配置
testOptions {
unitTests {
includeAndroidResources = true
}
}
}
dependencies {
testImplementation 'org.robolectric:robolectric:4.4'
}
如工程遇到以下问题需添加此依赖:
testImplementation ('org.bouncycastle:bcprov-jdk15on:1.64') {
force = true
}
在项目根目录下的gradle.properties文件中添加下面的配置(在Android Studio 3.3+以上不需要):
android.enableUnitTestBinaryResources=true
我这里是依赖的Robolectric 4.4版本的,是目前最新版本,对Android Gradle Plugin / Android Studio 的要求是 3.2或者更新,后续如果有版本更新,可以参考官方的《配置迁移指南》。
测试类配置:
@RunWith(RobolectricTestRunner.class)
@Config(constants = BuildConfig.class, sdk = {Build.VERSION_CODES.P})
public class MainActivityTest {
}
- Config配置
在Robolectric当中你可以通过@Config注解来配置一些跟Android相关的系统配置
配置SDK版本
Robolectric会根据manifest文件配置的targetSdkVersion选择运行测试代码的SDK版本,如果你想指定sdk来运行测试用例,可以通过下面的方式配置:
@Config(sdk = Build.VERSION_CODES.P)
public class SandwichTest {
@Config(sdk = Build.VERSION_CODES.KITKAT)
public void testGetSandwich_shouldReturnHamSandwich() {
}
}
配置Application类
Robolectric会根据manifest文件配置的Application配置去实例化一个Application类,如果你想在测试用例中重新指定,可以通过下面的方式配置:
@Config(application = CustomApplication.class)
public class SandwichTest {
@Config(application = CustomApplicationOverride.class)
public void testGetSandwich_shouldReturnHamSandwich() {
}
}
我们在单元测试的时候需要给Robolectric单独实现一个application,因为在实际的Application类的oncreate()方法中我们会去初始化第三方的库,这可能导致运行测试方法报错,比如有些第三方会调用static{ Library.load() }静态加载so库等。为测试类配置一个空的Application类,通过@Config指定:
public class RobolectricApp extends Application {
@Override
public void onCreate() {
super.onCreate();
}
}
@Config(application = RobolectricApp.class)
指定Resource路径
Robolectric可以让你配置manifest、resource和assets路径,可以通过下面的方式配置:
@Config(manifest = "some/build/path/AndroidManifest.xml",
assetDir = "some/build/path/assetDir",
resourceDir = "some/build/path/resourceDir")
public class SandwichTest {
@Config(manifest = "other/build/path/AndroidManifest.xml")
public void testGetSandwich_shouldReturnHamSandwich() {
}
}
使用第三方Library Resources
当Robolectric测试的时候,会尝试加载所有应用提供的资源,但如果你需要使用第三方库中提供的资源文件,你可能需要做一些特别的配置。不过如果你使用gradle来构建Android应用,这些配置就不需要做了,因为Gradle Plugin会在build的时候自动合并第三方库的资源,但如果你使用的是Maven,那么你需要配置libraries变量:
@RunWith(RobolectricTestRunner.class)
@Config(libraries = {
"build/unpacked-libraries/library1",
"build/unpacked-libraries/library2"
})
public class SandwichTest {
}
使用限定的资源文件
Android会在运行时加载特定的资源文件,如根据设备屏幕加载不同分辨率的图片资源、根据系统语言加载不同的string.xml,在Robolectric测试当中,你也可以进行一个限定,让测试程序加载特定资源.多个限定条件可以用破折号拼接在在一起。
/**
* 使用qualifiers加载对应的资源文件
*/
@Config(qualifiers = "zh-rCN")
@Test
public void testString() throws Exception {
final Context context = ApplicationProvider.getApplicationContext();
assertThat(context.getString(R.string.app_name), is("单元测试Demo"));
}
可参考:Using Qualified Resources
我们可以在Config类的源码中看到支持的哪些属性配置:
通过Properties文件配置
如果你嫌通过注解配置上面的东西麻烦,你也可以把以上配置放在一个Properties文件之中,然后通过@Config指定配置文件,比如,首先创建一个配置文件robolectric.properties:
# 放置Robolectric的配置选项:
sdk=21
manifest=some/build/path/AndroidManifest.xml
assetDir=some/build/path/assetDir
resourceDir=some/build/path/resourceDir
然后把robolectric.properties文件放到src/test/resources目录下,运行的时候,会自动加载里面的配置
系统属性配置
robolectric.offline:true代表关闭运行时获取jar包
robolectric.dependency.dir:当处于offline模式的时候,指定运行时的依赖目录
robolectric.dependency.repo.id:设置运行时获取依赖的Maven仓库ID,默认是sonatype
robolectric.dependency.repo.url:设置运行时依赖的Maven仓库地址,默认是https://oss.sonatype.org/content/groups/public/
robolectric.logging.enabled:设置是否打开调试开关
以上设置可以通过Gradle进行配置,如:
android {
testOptions {
unitTests.all {
systemProperty 'robolectric.dependency.repo.url', 'https://local-mirror/repo'
systemProperty 'robolectric.dependency.repo.id', 'local'
}
}
}
设备配置
可参考:Device Configuration
注意,从Roboelectric3.3开始,测试运行程序将在classpath中查找名为/com/android/tools/test_config.properties的文件。如果找到它,它将用于为测试提供默认manifest, resource, 和 asset 资源文件的位置,而无需在测试中指定@config(constants=buildconfig.class)或@config(manifest=…“,res=…”,assets=…“)。另外,Roboelectric在运行单元测试方法时,必须确保构R.class已经构建生成。
常用测试场景
-
获取上下文菜单
//第一种方式 已过时
Context context = RuntimeEnvironment.application;
//第二种方式
Context context2 = ApplicationProvider.getApplicationContext();
-
验证Activity页面跳转
public class MainActivity extends Activity implements View.OnClickListener {
private final static String TAG = MainActivity.class.getSimpleName();
private Button mLoginBtn;
@Override
protected void onCreate(Bundle savedInstanceState) {
super.onCreate(savedInstanceState);
setContentView(R.layout.activity_main);
initView();
}
private void initView() {
mLoginBtn = (Button) findViewById(R.id.btn_login);
mLoginBtn.setOnClickListener(this);
}
@Override
public void onClick(View v) {
switch (v.getId()) {
case R.id.btn_login:
Intent intent = new Intent(this, LoginActivity.class);
startActivity(intent);
break;
default:
break;
}
}
}
然后在测试类中添加测试方法对点击事件进行测试:
@RunWith(RobolectricTestRunner.class)
@Config(shadows = {ShadowLog.class}, sdk = {Build.VERSION_CODES.P})
@PowerMockIgnore({"org.mockito.*", "org.robolectric.*", "android.*", "org.json.*", "sun.security.*", "javax.net.*"})
@PrepareForTest({MainActivity.class})
public class MainActivityTest {
@Before
public void setUp(){
//输出日志配置,用System.out代替Android的Log.x
ShadowLog.stream = System.out;
}
@Test
public void testOnClick() {
//创建Activity
MainActivity mainActivity = Robolectric.setupActivity(MainActivity.class);
Assert.assertNotNull(mainActivity);
//模拟点击
mainActivity.findViewById(R.id.btn_login).performClick();
// 获取对应的Shadow类
ShadowActivity shadowActivity = shadowOf(activity);
// 借助Shadow类获取启动下一Activity的Intent
Intent nextIntent = shadowActivity.getNextStartedActivity();
// 校验Intent的正确性
assertEquals(nextIntent.getComponent().getClassName(), LoginActivity.class.getName());
}
}
其中@RunWith(RobolectricTestRunner.class)指定Robolectric运行器,不用多说了。
@Config(shadows = {ShadowLog.class}, sdk = sdk = {Build.VERSION_CODES.P})通过配置shadows = {ShadowLog.class}和在@Before函数中指定ShadowLog.stream = System.out是为了用java的System.out代替Android的Log输出,这样就能在run时的控制台看到Android的日志输出了。
@PowerMockIgnore({"org.mockito.", "org.robolectric.", "android.", "org.json.", "sun.security.", "javax.net."})通过PowerMockIgnore注解定义所忽略的package路径,防止所定义的package路径下的class类被PowerMockito测试框架mock。
在setUp()方法中调用MockitoAnnotations.initMocks(this);初始化PowerMockito注解,为@PrepareForTest(YourStaticClass.class)注解提供支持。
Robolectric.setupActivity是用来创建Activity, 当 Robolectric.setupActivity返回的时候,默认会调用Activity的生命周期: onCreate -> onStart -> onResume。
前面说过目标MainActivity中是点击按钮跳到一个LoginActivity, 为了测试这一点,我们可以检查当用户单击“登录”按钮时,是否启动了正确的Intent。因为Roboelectric是一个单元测试框架,实际上并不会真正的去启动MainActivity,但是我们可以检查MainActivity是否触发了正确的Intent,以达到验证目的。
右键去运行testOnClick()方法:
-
验证Toast显示
同样是上面的代码,我们点击按钮时弹出一个Toast然后去测试Toast是否已经显示:
@Override
public void onClick(View v) {
switch (v.getId()) {
case R.id.btn_login:
Toast.makeText(this, "测试", Toast.LENGTH_SHORT).show();
break;
default:
break;
}
}
测试类:
@Test
public void testToast() {
MainActivity mainActivity = Robolectric.setupActivity(MainActivity.class);
mainActivity.findViewById(R.id.btn_login).performClick();
// 判断Toast已经弹出
assertNotNull(ShadowToast.getLatestToast());
//验证捕获的最近显示的Toast
Assert.assertEquals("测试", ShadowToast.getTextOfLatestToast());
//捕获所有已显示的Toast
List<Toast> toasts = shadowOf(ApplicationProvider.getApplicationContext()).getShownToasts();
Assert.assertThat(toasts.size(), is(1));
Assert.assertEquals(Toast.LENGTH_SHORT, toasts.get(0).getDuration());
}
关于Shadow
前面的代码中都会出现一个shadow的关键词,Roboelectric通过一套测试API扩展了Android framework,这些API提供了额外的可配置性,并提供了对测试有用的Android组件的内部状态和历史的访问性。这种访问性就是通过Shadow类(影子类)来实现的,许多测试API都是对单个Android类的扩展,你可以使用Shadows.shadowOf()方法访问。
Roboelectric几乎针对所有的Android组件提供了一个Shadow开头的类,例如ShadowActivity、ShadowDialog、ShadowToast、ShadowApplication等等。Robolectric通过这些Shadow类来模拟Android系统的真实行为,当这些Android系统类被创建的时候,Robolectric会查找对应的Shadow类并创建一个Shadow类对象与原始类对象关联。每当系统类的方法被调用的时候,Robolectric会保证Shadow对应的方法会调用。每个Shadow对象都可以修改或扩展Android操作系统中相应类的行为。因此我们可以用Shadow类的相关方法对Android相关的对象进行测试。
更多关于Shadow的知识请参考官方介绍:Shadows
-
验证Dialog显示
@Override
public void onClick(View v) {
switch (v.getId()) {
case R.id.btn_login:
showDialog();
break;
default:
break;
}
}
public void showDialog(){
AlertDialog alertDialog = new AlertDialog.Builder(this)
.setMessage("测试showDialog")
.setTitle("提示")
.create();
alertDialog.show();
}
测试类:
@Test
public void testShowDialog() {
MainActivity mainActivity = Robolectric.setupActivity(MainActivity.class);
// 捕获最近显示的Dialog
AlertDialog dialog = ShadowAlertDialog.getLatestAlertDialog();
// 判断Dialog尚未弹出
Assert.assertNull(dialog);
//点击按钮
mainActivity.findViewById(R.id.btn_login).performClick();
// 捕获最近显示的Dialog
dialog = ShadowAlertDialog.getLatestAlertDialog();
// 判断Dialog已经弹出
Assert.assertNotNull(dialog);
// 获取Shadow类进行验证
ShadowAlertDialog shadowDialog = Shadows.shadowOf(dialog);
Assert.assertEquals("测试showDialog", shadowDialog.getMessage());
}
-
验证UI组件状态
以CheckBox为例:
@Test
public void testCheckBoxState() throws Exception {
MainActivity activity = Robolectric.setupActivity(MainActivity.class);
CheckBox checkBox = activity.findViewById(R.id.checkbox);
// 验证CheckBox初始状态
Assert.assertFalse(checkBox.isChecked());
// 点击按钮反转CheckBox状态
checkBox.performClick();
// 验证状态是否正确
Assert.assertTrue(checkBox.isChecked());
// 点击按钮反转CheckBox状态
checkBox.performClick();
// 验证状态是否正确
Assert.assertFalse(checkBox.isChecked());
}
-
访问资源文件
使用ApplicationProvider.getApplicationContext()可以获取到Application对象,方便我们使用。比如访问资源文件。
@Test
public void testResource() throws Exception {
Application application = ApplicationProvider.getApplicationContext();
String appName = application.getString(R.string.app_name);
Assert.assertEquals("AndroidUnitTestApplication", appName);
}
-
验证Intent参数传递
@Test
public void testStartActivityWithIntent() throws Exception {
Intent intent = new Intent();
intent.putExtra("test", "HelloWorld");
Activity activity = Robolectric.buildActivity(MainActivity.class, intent).create().get();
Bundle extras = activity.getIntent().getExtras();
assertNotNull(extras);
assertEquals("HelloWorld", extras.getString("test"));
}
-
验证BroadcastReceiver
我们先在Activity中注册一个广播:
public class MainActivity extends Activity {
private final static String TAG = MainActivity.class.getSimpleName();
@Override
protected void onCreate(Bundle savedInstanceState) {
super.onCreate(savedInstanceState);
setContentView(R.layout.activity_main);
}
public static final String ACTION_TEST = "com.fly.unit.test";
public static final String ACTION_TEST2 = "com.fly.unit.test2";
private BroadcastReceiver mTestBroadcastReceiver = new BroadcastReceiver() {
@Override
public void onReceive(Context context, Intent intent) {
Log.e(TAG, "mTestBroadcastReceiver onReceive: " + intent.getAction());
if (ACTION_TEST.equals(intent.getAction())) {
String name = intent.getStringExtra("name");
PreferenceManager.getDefaultSharedPreferences(context)
.edit()
.putString("name", name)
.apply();
}
}
};
@Override
protected void onResume() {
super.onResume();
IntentFilter intentFilter = new IntentFilter(ACTION_TEST);
intentFilter.addAction(ACTION_TEST2);
LocalBroadcastManager.getInstance(this)
.registerReceiver(mTestBroadcastReceiver, intentFilter);
}
@Override
protected void onPause() {
super.onPause();
LocalBroadcastManager.getInstance(this).unregisterReceiver(mTestBroadcastReceiver);
}
}
我们使用LocalBroadcastManager在onResume()方法中注册了拥有两个Action的广播,然后在onPause中反注册了这个广播。在onReceive方法中只针对ACTION_TEST这个action做了sp保存的操作。下面测试类进行验证
@Test
public void testBroadcastReceive() throws Exception {
MainActivity mainActivity = Robolectric.setupActivity(MainActivity.class);
LocalBroadcastManager broadcastManager = ShadowLocalBroadcastManager.getInstance(mainActivity);
Intent intent = new Intent(MainActivity.ACTION_TEST);
intent.putExtra("name", "小明");
//发送广播
broadcastManager.sendBroadcast(intent);
SharedPreferences preferences = PreferenceManager.getDefaultSharedPreferences(mainActivity);
//通过验证sp保存的值验证广播是否收到
Assert.assertEquals("小明", preferences.getString("name", null));
intent = new Intent(MainActivity.ACTION_TEST2);
intent.putExtra("name", "小红");
//再次发送一个广播
broadcastManager.sendBroadcast(intent);
//验证新的参数值是否被保存(由于广播中我们没有对这个Action处理,因此sp中的name应该还是上次的)
Assert.assertNotEquals("小红", preferences.getString("name", null));
}
同时控制台也能看到log输出:
同样我们也可以通过控制生命周期验证广播是否被注销了,上面代码MainActivity是在onPause()方法中反注册了广播,如果我们忘记了反注册广播这一点,那么在onPause()方法之后发送广播应该还是会收到。
@Test
public void testBroadcastReceive2() throws Exception {
ActivityController<MainActivity> controller = Robolectric.buildActivity(MainActivity.class);
controller.setup();
controller.pause();
LocalBroadcastManager broadcastManager = ShadowLocalBroadcastManager.getInstance(RuntimeEnvironment.application);
broadcastManager.sendBroadcast(new Intent(MainActivity.ACTION_TEST));
//自行验证,例如可以看是否有log输出
}
验证静态广播是否注册:
<receiver android:name=".receiver.MyReceiver"
android:exported="false">
<intent-filter>
<action android:name="com.test.receiver.MyReceiver"/>
</intent-filter>
</receiver>
@Test
public void testBroadcastReceive3() {
Intent intent = new Intent("com.test.receiver.MyReceiver");
PackageManager packageManager = RuntimeEnvironment.application.getPackageManager();
List<ResolveInfo> resolveInfos = packageManager.queryBroadcastReceivers(intent, 0);
assertNotNull(resolveInfos);
assertThat(resolveInfos.size(), Matchers.greaterThan(0));
}
-
验证Service
跟Activity一样可以通过ServiceController验证Service的生命周期:
public class MyService extends Service {
private final String TAG = MyService.class.getSimpleName();
@Nullable
@Override
public IBinder onBind(Intent intent) {
Log.d(TAG, "onBind");
return null;
}
@Override
public void onCreate() {
super.onCreate();
Log.d(TAG, "onCreate");
}
@Override
public boolean onUnbind(Intent intent) {
Log.d(TAG, "onUnbind");
return super.onUnbind(intent);
}
@Override
public void onDestroy() {
super.onDestroy();
Log.d(TAG, "onDestroy");
}
@Override
public int onStartCommand(Intent intent, int flags, int startId) {
Log.d(TAG, "onStartCommand");
return super.onStartCommand(intent, flags, startId);
}
}
测试代码:
@Test
public void testServiceLifecycle() throws Exception {
//验证Service生命周期
ServiceController<MyService> controller = Robolectric.buildService(MyService.class);
controller.create();
// verify something
controller.startCommand(0, 0);
// verify something
controller.bind();
// verify something
controller.unbind();
// verify something
controller.destroy();
// verify something
}
控制台输出:
跟Robolectric.setupActivity一样,可以调用Robolectric.setupService直接创建一个Service实例:
MyService myService = Robolectric.setupService(MyService.class);
//verify somthing
但是Robolectric.setupService只会调用Service的onCreate()方法。
也可以像验证Activity的启动那样,验证在某个时刻是否启动了目标Service(如验证点击按钮启动一个Service):
@Test
public void testServiceCreate() {
final MainActivity mainActivity = Robolectric.setupActivity(MainActivity.class);
mainActivity.findViewById(R.id.btn_login).performClick();
Intent intent = new Intent(mainActivity, MyService.class);
Intent actual = ShadowApplication.getInstance().getNextStartedService();
Assert.assertEquals(intent.getComponent(), actual.getComponent());
}
验证在Activity的onCreate方法中启动了Service:
@Test
public void testServiceCreate() {
ActivityController<MainActivity> controller = Robolectric.buildActivity(MainActivity.class);
MainActivity mainActivity = controller.create().get();
Intent intent = new Intent(mainActivity, MyService.class);
Intent actual = ShadowApplication.getInstance().getNextStartedService();
Assert.assertEquals(intent.getComponent(), actual.getComponent());
}
测试IntentService:
public class SampleIntentService extends IntentService {
public SampleIntentService() {
super("SampleIntentService");
}
@Override
protected void onHandleIntent(Intent intent) {
SharedPreferences.Editor editor = getApplicationContext().getSharedPreferences(
"example", Context.MODE_PRIVATE).edit();
editor.putString("SAMPLE_DATA", "sample data");
editor.apply();
}
}
测试代码:
@Test
public void addsDataToSharedPreference() {
Application application = RuntimeEnvironment.application;
RoboSharedPreferences preferences = (RoboSharedPreferences) application
.getSharedPreferences("example", Context.MODE_PRIVATE);
Intent intent = new Intent(application, SampleIntentService.class);
SampleIntentService registrationService = new SampleIntentService();
registrationService.onHandleIntent(intent);
assertNotSame("", preferences.getString("SAMPLE_DATA", ""), "");
}
-
验证DelayedRunnable
我们在UI主线程有时会执行一些postDelayed Runnable操作,例如点击按钮时postDelayed一个Runnable来设置UI状态:
@Override
public void onClick(View v) {
switch (v.getId()) {
case R.id.btn_login:
mLoginBtn.postDelayed(new Runnable() {
@Override
public void run() {
mLoginBtn.setText("测试");
}
}, 500);
//或者类似这样的:
// new Handler().postDelayed(new Runnable() {
// @Override
// public void run() {
// mLoginBtn.setText("测试");
// }
// }, 500);
break;
default:
break;
}
}
这种操作虽然最终也会发生在UI主线程上进行,但是发生并不是即时的,如果你像之前一样使用下面的代码进行测试,则会验证失败:
@Test
public void testPostRunnable() {
MainActivity mainActivity = Robolectric.setupActivity(MainActivity.class);
Assert.assertNotNull(mainActivity);
Button btn = mainActivity.findViewById(R.id.btn_login);
btn.performClick();
Assert.assertEquals("测试", btn.getText());
}
这时可以通过 ShadowLooper.runUiThreadTasksIncludingDelayedTasks()或者ShadowLooper.runMainLooperOneTask()方法使所有UI线程上的延时任务即刻发生,我们在performClick()方法之后调这个方法,然后就可以正常断言了:
@Test
public void testPostRunnable() {
MainActivity mainActivity = Robolectric.setupActivity(MainActivity.class);
Assert.assertNotNull(mainActivity);
//模拟点击
Button btn = mainActivity.findViewById(R.id.btn_login);
btn.performClick();
ShadowLooper.runUiThreadTasksIncludingDelayedTasks();
//使用下面这句也可以做到
//ShadowLooper.runMainLooperOneTask();
Assert.assertEquals("测试", btn.getText());
}
SQLite -- 单元测试
关于如何对SQLite数据库进行单元测试,我们使用本地单元测试 Robolectric + JUnit 对数据库进行测试。 这样做的原因是:Robolectric可以模拟Android的运行环境,让Android代码脱离手机/模拟器,直接运行在JVM上面,速度比在真机/模拟器上要快很多。
构建测试环境
以 Android Studio 为例,我们需要在 module-name/src/test/java/ 中进行测试。当你创建新项目时,此目录已存在。
在应用的顶级app build.gradle 文件中,请将以下库指定为依赖项:
testImplementation 'junit:junit:4.12'
testImplementation 'org.robolectric:robolectric:4.4'
如果出现以下错误,需添加下面依赖
testImplementation ('org.bouncycastle:bcprov-jdk15on:1.64') {
force = true
}
将以下代码行添加到同一 build.gradle 文件的 android{} 中:
android {
testOptions {
unitTests {
includeAndroidResources = true
}
}
}
Gradle 构建文件示例
apply plugin: 'com.android.application'
android {
testOptions {
unitTests {
includeAndroidResources = true
}
}
}
dependencies {
testImplementation 'junit:junit:4.12'
testImplementation 'org.robolectric:robolectric:4.4'
testImplementation ('org.bouncycastle:bcprov-jdk15on:1.64') {
force = true
}
}
示例:
DbTestHelper:
package com.smartisanos.filemanagerservice;
import android.content.Context;
import android.database.sqlite.SQLiteDatabase;
import android.database.sqlite.SQLiteOpenHelper;
import androidx.annotation.Nullable;
public class DbTestHelper extends SQLiteOpenHelper {
private static final int DB_VERSION = 1;
public DbTestHelper(Context context, String dbName) {
this(context, dbName, DB_VERSION);
}
public DbTestHelper(Context context, String dbName, int dbVersion) {
this(context, dbName, null, dbVersion);
}
public DbTestHelper(@Nullable Context context, @Nullable String name,
@Nullable SQLiteDatabase.CursorFactory factory, int version) {
super(context, name, factory, version);
}
@Override
public void onCreate(SQLiteDatabase db) {
createLruTable(db);
}
@Override
public void onUpgrade(SQLiteDatabase db, int oldVersion, int newVersion) {
}
public void createLruTable(SQLiteDatabase db) {
db.execSQL("CREATE TABLE IF NOT EXISTS TestBean ( id INTEGER PRIMARY KEY, name )");
}
}
TestBean:
package com.smartisanos.filemanagerservice;
public class TestBean {
private int mId;
private String mName = "";
public TestBean(int id, String name) {
this.mId = id;
this.mName = name;
}
public int getId() {
return mId;
}
public void setId(int id) {
this.mId = id;
}
public String getName() {
return mName;
}
public void setName(String name) {
this.mName = name;
}
}
TestDbDAO:
package com.smartisanos.filemanagerservice;
import android.content.ContentValues;
import android.database.Cursor;
import android.database.sqlite.SQLiteDatabase;
public class TestDbDAO {
private static boolean isTableExist;
private SQLiteDatabase db;
public TestDbDAO(SQLiteDatabase db) {
this.db = db;
}
public void closeDb() {
db.close();
}
/**
* insert TestBean
*/
public void insert(TestBean bean) {
checkTable();
ContentValues values = new ContentValues();
values.put("id", bean.getId());
values.put("name", bean.getName());
db.insert("TestBean", "", values);
}
/**
* 获取对应id的TestBean
*/
public TestBean get(int id) {
checkTable();
Cursor cursor = null;
try {
cursor = db.rawQuery("SELECT * FROM TestBean", null);
if (cursor != null && cursor.moveToNext()) {
String name = cursor.getString(cursor.getColumnIndex("name"));
return new TestBean(id, name);
}
} catch (Exception e) {
e.printStackTrace();
} finally {
if (cursor != null) {
cursor.close();
}
cursor = null;
}
return null;
}
/**
* 检查表是否存在,不存在则创建表
*/
private void checkTable() {
if (!isTableExist()) {
db.execSQL("CREATE TABLE IF NOT EXISTS TestBean ( id INTEGER PRIMARY KEY, name )");
}
}
private boolean isTableExist() {
if (isTableExist) {
return true; // 上次操作已确定表已存在于数据库,直接返回true
}
Cursor cursor = null;
try {
String sql = "SELECT COUNT(*) AS c FROM sqlite_master WHERE type ='table' AND name " +
"='TestBean' ";
cursor = db.rawQuery(sql, null);
if (cursor != null && cursor.moveToNext()) {
int count = cursor.getInt(0);
if (count > 0) {
isTableExist = true; // 记录Table已创建,下次执行isTableExist()时,直接返回true
return true;
}
}
} catch (Exception e) {
e.printStackTrace();
} finally {
if (cursor != null) {
cursor.close();
}
cursor = null;
}
return false;
}
}
RoboApp:
如果使用应用本身实现的BaseApplication,不利于单元测试。BaseApplication是项目本来的Application,但是使用Robolectric往往会指定一个测试专用的Application(命名为RoboApp),这么做好处是隔离App的所有依赖。如果用Robolectric单元测试,不配置RoboApp,就会调用原来的BaseApplication,而BaseApplication有很多第三方库依赖,常见的有static{ Library.load() }静态加载so库。于是,执行BaseApplication生命周期时,robolectric就报错了。
package com.smartisanos.filemanagerservice;
import android.app.Application;
public class RoboApp extends Application {
}
正确的使用方式是我们为Robolectric 单独实现一个 Application,使用方式是在单元测试XXTest加上@Config(application = RoboApp.class)。
@RunWith(RobolectricTestRunner.class)
@Config(application = RoboApp.class)
public class SQLiteExampleTest {
}
SQLiteExampleTest:
package com.smartisanos.filemanagerservice;
import org.junit.After;
import org.junit.Assert;
import org.junit.Before;
import org.junit.Test;
import org.junit.runner.RunWith;
import org.robolectric.RobolectricTestRunner;
import org.robolectric.RuntimeEnvironment;
import org.robolectric.annotation.Config;
@RunWith(RobolectricTestRunner.class)
@Config(manifest = Config.NONE, application = RoboApp.class)
public class SQLiteExampleTest {
private static final String DB_NAME = "lruFileTest.db";
private TestDbDAO dbDAO;
@Before
public void setUp() {
DbTestHelper dbHelper = new DbTestHelper(RuntimeEnvironment.application, DB_NAME);
dbDAO = new TestDbDAO(dbHelper.getWritableDatabase());
}
@Test
public void testInsertAndGet() {
dbDAO.insert(new TestBean(1, "键盘"));
TestBean retBean = dbDAO.get(1);
Assert.assertEquals(retBean.getId(), 1);
Assert.assertEquals(retBean.getName(), "键盘");
}
@After
public void closeDb() {
dbDAO.closeDb();
}
}