一、path
1 获取路径中的基础名称
const path = require('path')

// console.log(__filename) // /Users/liuchongyang/Desktop/分享/网页读取本地文件/node.js

// 1 获取路径中的基础名称
/**
 * 01 返回的就是接收路径当中的最后一部分
 * 02 第二个参数表示扩展名,如果说没有设置则返回完整的文件名称带后缀
 * 03 第二个参数做为后缀时,如果没有在当前路径中被匹配到,那么就会忽略
 * 04 处理目录路径的时候如果说,结尾处有路径分割符,则也会被忽略掉
 */
 console.log(path.basename(__filename)) // node.js
console.log(path.basename(__filename, '.js')) // node
console.log(path.basename(__filename, '.css')) // node.js
console.log(path.basename('/a/b/c')) //c
console.log(path.basename('/a/b/c/'))  // c
2 获取路径目录名 (路径)
// 2 获取路径目录名 (路径)
/**
 * 01 返回路径中最后一个部分的上一层目录所在路径
 */
console.log(path.dirname(__filename)) // /Users/liuchongyang/Desktop/分享/网页读取本地文件
console.log(path.dirname('/a/b/c')) // /a/b
3 获取路径的扩展名
/**
 * 01 返回 path路径中相应文件的后缀名
 * 02 如果 path 路径当中存在多个点,它匹配的是最后一个点,到结尾的内容
 */
console.log(path.extname(__filename)) // .js
console.log(path.extname('/a/b')) // ''
console.log(path.extname('/a/b/index.html.js.css')) // .css
console.log(path.extname('/a/b/index.html.js.')) // .
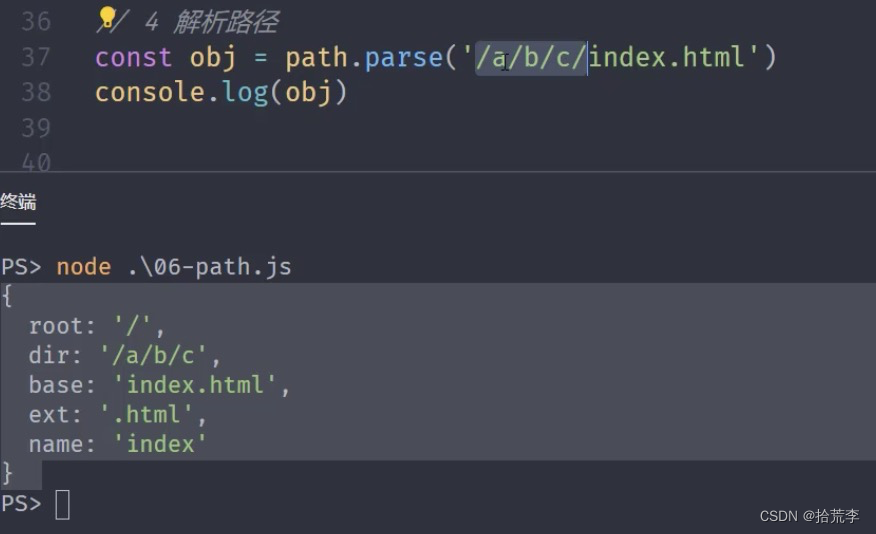
4 解析路径
/**
 * 01 接收一个路径,返回一个对象,包含不同的信息
 * 02 root dir base ext name
 */
const obj = path.parse('/a/b/c/index.html')
const obj = path.parse('/a/b/c/')
const obj = path.parse('./a/b/c/')
console.log(obj.name)
5 序列化路径
// 5 序列化路径
/* const obj = path.parse('./a/b/c/')
console.log(path.format(obj)) */

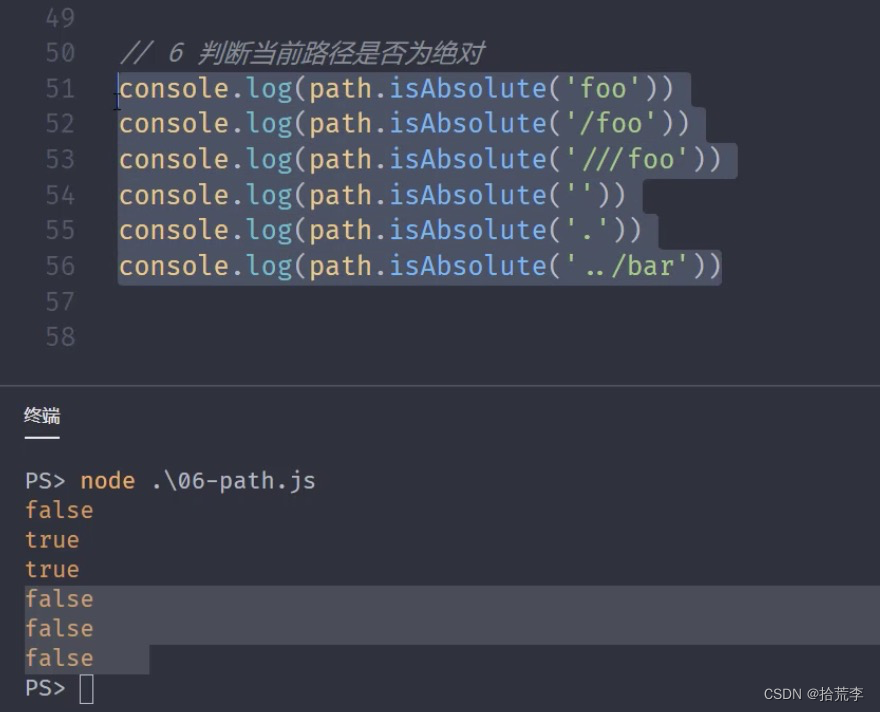
6 判断当前路径是否为绝对
/* console.log(path.isAbsolute('foo'))
console.log(path.isAbsolute('/foo'))
console.log(path.isAbsolute('///foo'))
console.log(path.isAbsolute(''))
console.log(path.isAbsolute('.'))
console.log(path.isAbsolute('../bar')) */
7 拼接路径
console.log(path.join('a/b', 'c', 'index.html')) // a/b/c/index.html
console.log(path.join('/a/b', 'c', 'index.html')) // /a/b/c/index.html
console.log(path.join('/a/b', 'c', '../', 'index.html')) // /a/b/index.html
console.log(path.join('/a/b', 'c', './', 'index.html')) // /a/b/c/index.html
console.log(path.join('/a/b', 'c', '', 'index.html')) // /a/b/c/index.html
console.log(path.join('')) // .
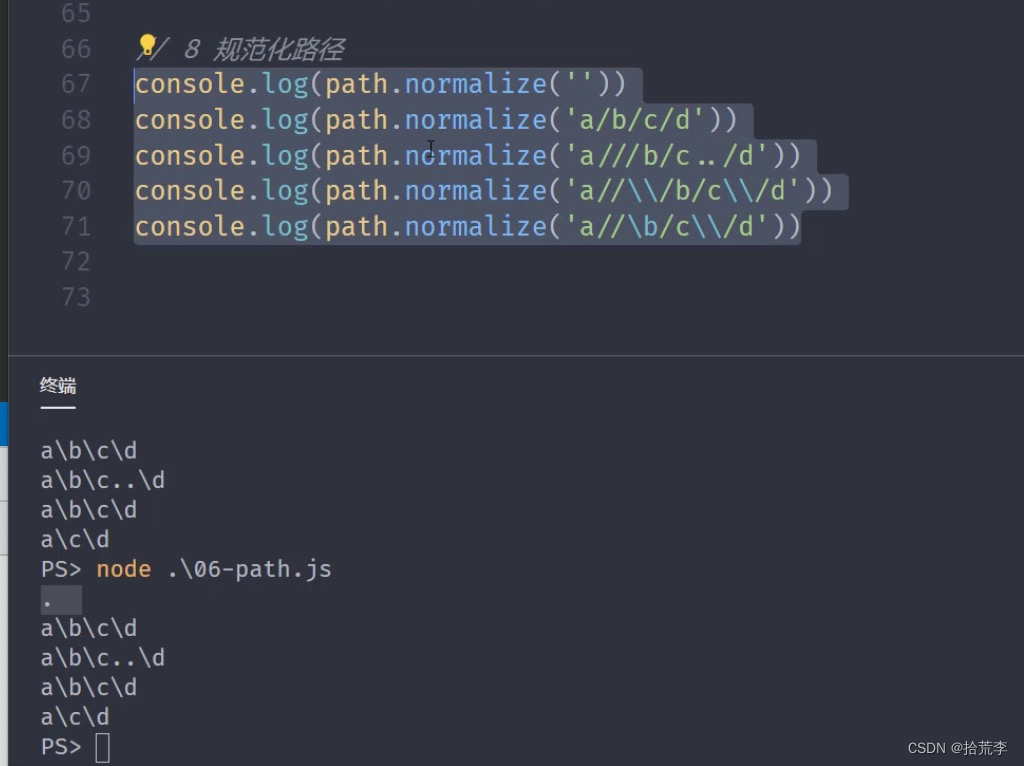
8 规范化路径
// 8 规范化路径
console.log(path.normalize(''))
console.log(path.normalize('a/b/c/d'))
console.log(path.normalize('a///b/c../d'))
console.log(path.normalize('a//\\/b/c\\/d'))
console.log(path.normalize('a//\b/c\\/d'))
9 绝对路径
// console.log(path.resolve())
/**
 * resolve([from], to)
 */
// console.log(path.resolve('/a', '../b'))
console.log(path.resolve('index.html')) // /Users/liuchongyang/Desktop/分享/网页读取本地文件/index.html
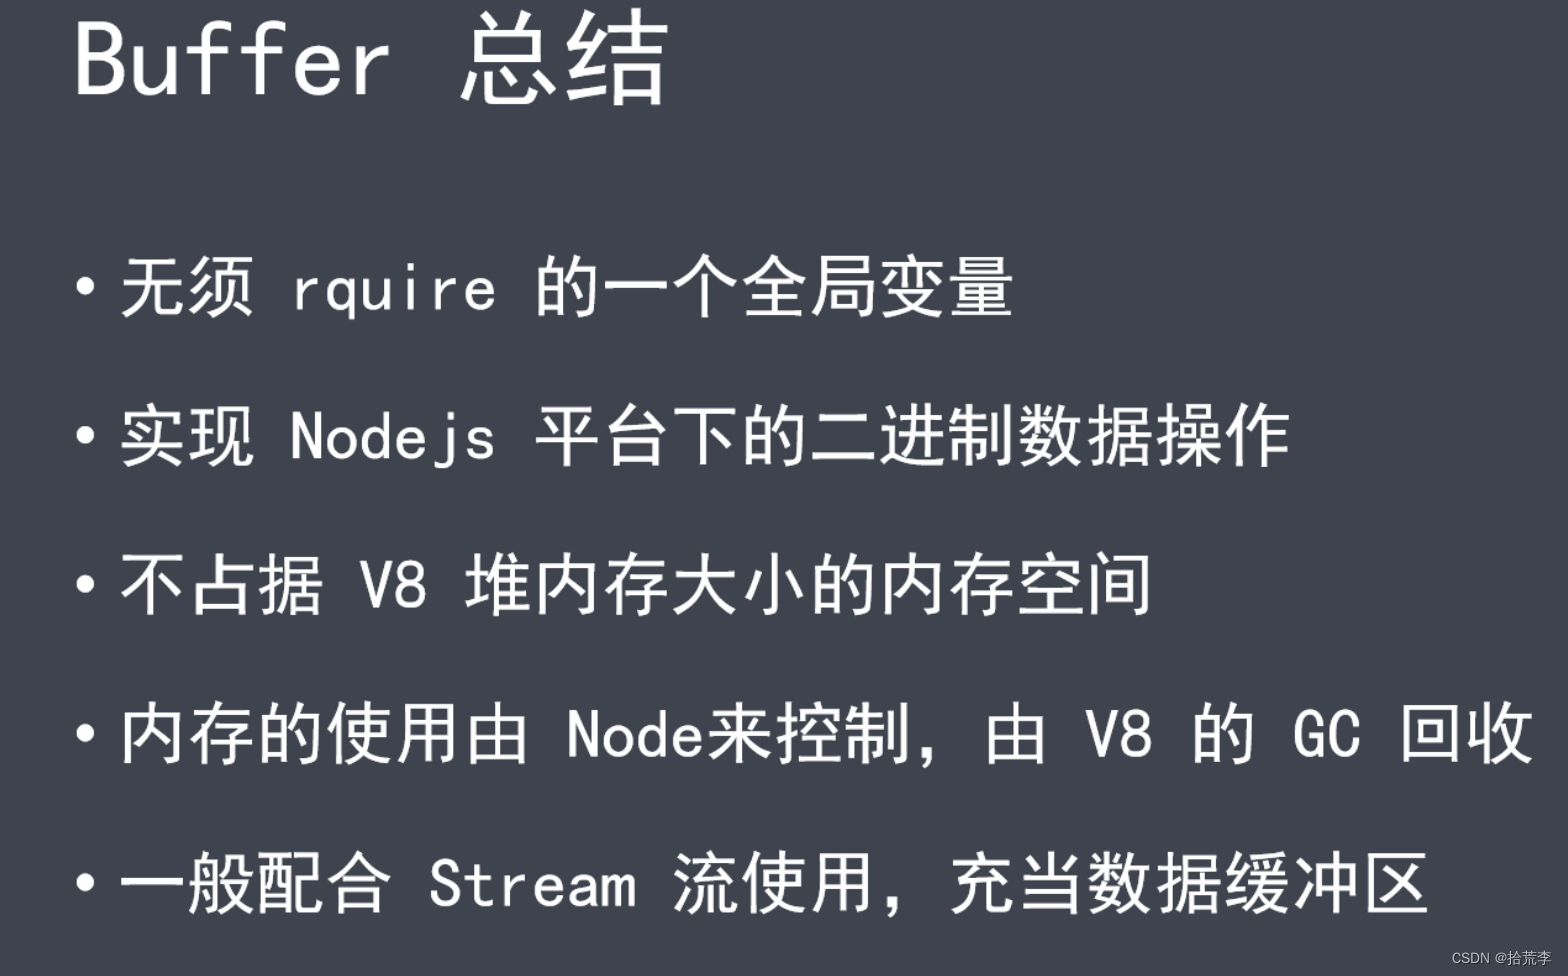
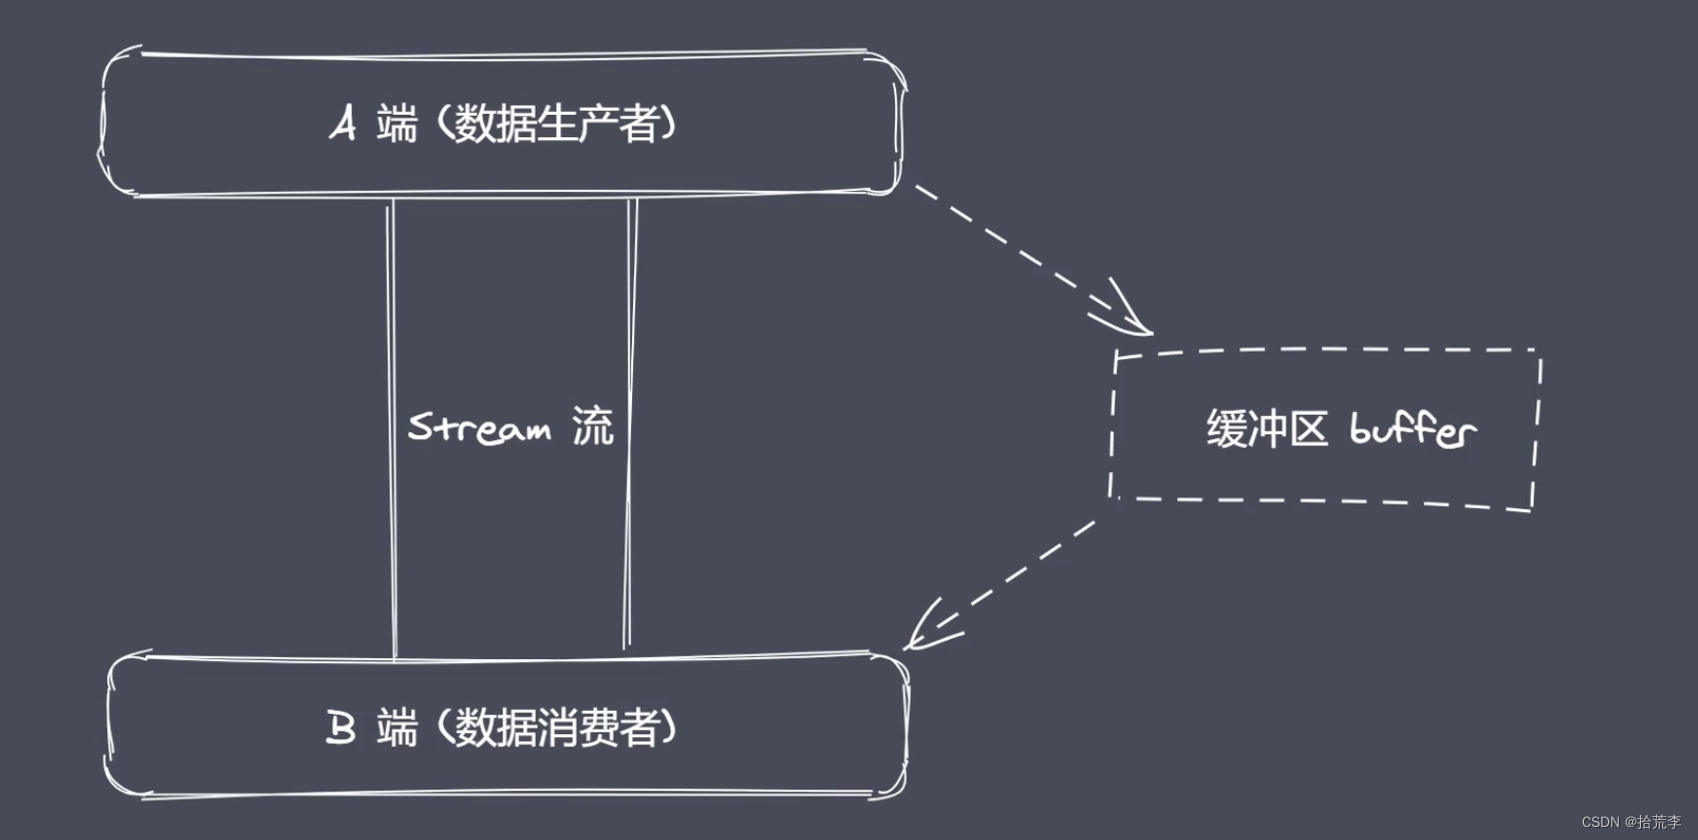
二、全局变量之Buffer
const b1 = Buffer.alloc(10) // 创建一个长度10的空buffer
const b2 = Buffer.allocUnsafe(10) // 方法创建一个指定大小的新缓冲区对象

console.log(b1) // <Buffer 00 00 00 00 00 00 00 00 00 00>
console.log(b2) // <Buffer c0 ff 83 0d 01 00 00 00 f0 a9>

// from
const b1 = Buffer.from('中') // 创建一个buffer
console.log(b1) // <Buffer e4 b8 ad>

const b1 = Buffer.from([0xe4, 0xb8, 0xad])
console.log(b1) // <Buffer e4 b8 ad>
console.log(b1.toString())  // '中'


 const b1 = Buffer.from('中')
console.log(b1) // <Buffer e4 b8 ad>
console.log(b1.toString())  // '中'

const b1 = Buffer.alloc(3)
const b2 = Buffer.from(b1)

console.log(b1) // <Buffer 00 00 00>
console.log(b2) //<Buffer 00 00 00>

b1[0] = 1
console.log(b1) // <Buffer 01 00 00>
console.log(b2) // <Buffer 00 00 00>
let buf = Buffer.alloc(6)

// fill
 buf.fill(123)
console.log(buf) // <Buffer 7b 7b 7b 7b 7b 7b>
console.log(buf.toString()) // {{{{{{

// write
 buf.write('123', 1, 4)
console.log(buf) // <Buffer 00 31 32 33 00 00>
console.log(buf.toString()) // '123'

// toString
buf = Buffer.from('你好')
console.log(buf) // <Buffer e4 bd a0 e5 a5 bd>
console.log(buf.toString('utf-8', 3, 9)) // 好

// slice
 buf = Buffer.from('教育')
let b1 = buf.slice(-3)
console.log(b1) // <Buffer e8 82 b2>
console.log(b1.toString()) // 育

// indexOf
buf = Buffer.from('zce爱前端,爱、教育,爱大家,我爱所有')
console.log(buf)
console.log(buf.indexOf('爱qc', 4)) // -1

// copy
let b1 = Buffer.alloc(6)
let b2 = Buffer.from('11')

b2.copy(b1, 3, 3, 6)
console.log(b1.toString())
console.log(b2.toString())
/* let b1 = Buffer.from('11')
let b2 = Buffer.from('教育')

let b = Buffer.concat([b1, b2], 9)
console.log(b)
console.log(b.toString()) */

// isBuffer
let b1 = '123'
console.log(Buffer.isBuffer(b1))
buffer split方法封装
ArrayBuffer.prototype.split = function (sep) {
  let len = Buffer.from(sep).length
  let ret = []
  let start = 0
  let offset = 0

  while( offset = this.indexOf(sep, start) !== -1) {
    ret.push(this.slice(start, offset))
    start = offset + len
  }
  ret.push(this.slice(start))
  return ret
}

let buf = 'zce吃馒头,吃面条,我吃所有吃'
let bufArr = buf.split('吃')
console.log(bufArr) // [ 'zce', '馒头,', '面条,我', '所有', '' ]
三、文件操作api
const fs = require('fs')
const path = require('path')

// readFile
/* fs.readFile(path.resolve('data1.txt'), 'utf-8', (err, data) => {
  console.log(err)
  if (!null) {
    console.log(data)
  }
}) */

// writeFile
/* fs.writeFile('data.txt', '123', {
  mode: 438,
  flag: 'w+',
  encoding: 'utf-8'
}, (err) => {
  if (!err) {
    fs.readFile('data.txt', 'utf-8', (err, data) => {
      console.log(data)
    })
  }
}) */

// appendFile
/* fs.appendFile('data.txt', 'hello node.js',{},  (err) => {
  console.log('写入成功')
}) */

// copyFile
/* fs.copyFile('data.txt', 'test.txt', () => {
  console.log('拷贝成功')
}) */

// watchFile
fs.watchFile('data.txt', {interval: 20}, (curr, prev) => {
  if (curr.mtime !== prev.mtime) {
    console.log('文件被修改了')
    fs.unwatchFile('data.txt')
  }
})
四、md转html实现
md-to-html.js
const fs = require('fs')
const path = require('path')
const marked = require('marked')
const browserSync = require('browser-sync')

/**
 * 01 读取 md 和 css 内容
 * 02 将上述读取出来的内容替换占位符,生成一个最终需要展的 Html 字符串
 * 03 将上述的 Html 字符写入到指定的 Html 文件中
 * 04 监听 md 文档内容的变经,然后更新 html 内容
 * 05 使用 browser-sync 来实时显示 Html 内容
 */

let mdPath = path.join(__dirname, process.argv[2])
let cssPath = path.resolve('github.css')
let htmlPath = mdPath.replace(path.extname(mdPath), '.html')

fs.watchFile(mdPath, (curr, prev) => {
  if (curr.mtime !== prev.mtime) {
    fs.readFile(mdPath, 'utf-8', (err, data) => {
      // 将 md--》html
      let htmlStr = marked(data)
      fs.readFile(cssPath, 'utf-8', (err, data) => {
        let retHtml = temp.replace('{{content}}', htmlStr).replace('{{style}}', data)
        // 将上述的内容写入到指定的 html 文件中,用于在浏览器里进行展示
        fs.writeFile(htmlPath, retHtml, (err) => {
          console.log('html 生成成功了')
        })
      })
    })
  }
})

browserSync.init({
  browser: '',
  server: __dirname,
  watch: true,
  index: path.basename(htmlPath)
})

const temp = `
    <!DOCTYPE html>
    <html lang="en">
    <head>
        <meta charset="UTF-8">
        <title></title>
        <style>
            .markdown-body {
                box-sizing: border-box;
                min-width: 200px;
                max-width: 1000px;
                margin: 0 auto;
                padding: 45px;
            }
            @media (max-width: 750px) {
                .markdown-body {
                    padding: 15px;
                }
            }
            {{style}}
        </style>
    </head>
    <body>
        <div class="markdown-body">
            {{content}}
        </div>
    </body>
    </html>
`
五、文件打开与关闭
const fs = require('fs')
const path = require('path')

// open
/* fs.open(path.resolve('data.txt'), 'r', (err, fd) => {
  console.log(fd)
}) */

// close
fs.open('data.txt', 'r', (err, fd) => {
  console.log(fd)
  fs.close(fd, err => {
    console.log('关闭成功')
  })
})
六、大文件读写操作

const fs = require('fs')

// read : 所谓的读操作就是将数据从磁盘文件中写入到 buffer 中
let buf = Buffer.alloc(10)

/**
 * fd 定位当前被打开的文件
 * buf 用于表示当前缓冲区
 * offset 表示当前从 buf 的哪个位置开始执行写入
 * length 表示当前次写入的长度
 * position 表示当前从文件的哪个位置开始读取
 */
/* fs.open('data.txt', 'r', (err, rfd) => {
  console.log(rfd)
  fs.read(rfd, buf, 1, 4, 3, (err, readBytes, data) => {
    console.log(readBytes)
    console.log(data)
    console.log(data.toString())
  })
}) */

// write 将缓冲区里的内容写入到磁盘文件中
buf = Buffer.from('1234567890')
fs.open('b.txt', 'w', (err, wfd) => {
  fs.write(wfd, buf, 2, 4, 0, (err, written, buffer) => {
    console.log(written, '----')
    fs.close(wfd)
  })
})
七、大文件拷贝自定义实现
const fs = require('fs')

/**
 * 01 打开 a 文件,利用 read 将数据保存到 buffer 暂存起来
 * 02 打开 b 文件,利用 write 将 buffer 中数据写入到 b 文件中
 */
let buf = Buffer.alloc(10)

// 01 打开指定的文件
/* fs.open('a.txt', 'r', (err, rfd) => {
  // 03 打开 b 文件,用于执行数据写入操作
  fs.open('b.txt', 'w', (err, wfd) => {
    // 02 从打开的文件中读取数据
    fs.read(rfd, buf, 0, 10, 0, (err, readBytes) => {
      // 04 将 buffer 中的数据写入到 b.txt 当中
      fs.write(wfd, buf, 0, 10, 0, (err, written) => {
        console.log('写入成功')
      })
    })
  })
}) */

// 02 数据的完全拷贝
/* fs.open('a.txt', 'r', (err, rfd) => {
  fs.open('b.txt', 'a+', (err, wfd) => {
    fs.read(rfd, buf, 0, 10, 0, (err, readBytes) => {
      fs.write(wfd, buf, 0, 10, 0, (err, written) => {
        fs.read(rfd, buf, 0, 5, 10, (err, readBytes) => {
          fs.write(wfd, buf, 0, 5, 10, (err, written) => {
            console.log('写入成功')
          })
        })
      })
    })
  })
}) */

const BUFFER_SIZE = buf.length
let readOffset = 0

fs.open('a.txt', 'r', (err, rfd) => {
  fs.open('b.txt', 'w', (err, wfd) => {
    function next () {
      fs.read(rfd, buf, 0, BUFFER_SIZE, readOffset, (err, readBytes) => {
        if (!readBytes) {
          // 如果条件成立,说明内容已经读取完毕
          fs.close(rfd, ()=> {})
          fs.close(wfd, ()=> {})
          console.log('拷贝完成')
          return
        }
        readOffset += readBytes
        fs.write(wfd, buf, 0, readBytes, (err, written) => {
          next()
        })
      })
    }
    next()
  })
})
八、目录操作api
const fs = require('fs')

// 一、access
/* fs.access('a.txt', (err) => {
  if (err) {
    console.log(err)
  } else {
    console.log('有操作权限')
  }
}) */

// 二、stat
/* fs.stat('a.txt', (err, statObj) => {
  console.log(statObj.size)
  console.log(statObj.isFile()) // 是不是文件
  console.log(statObj.isDirectory()) // 是不是目录
}) */

// 三、mkdir
/* fs.mkdir('a/b/c', {recursive: true}, (err) => {
  if (!err) {
    console.log('创建成功')
  }else{
    console.log(err)
  }
}) */

// 四、rmdir
fs.rmdir('a', {recursive: true}, (err) => { // 删除目录
  if (!err) {
    console.log('删除成功')
  } else {
    console.log(err)
  }
})

// 五、readdir
/* fs.readdir('a/b', (err, files) => {
  console.log(files)
}) */

// 六、unlink
/* fs.unlink('a/a.txt', (err) => { // 删除文件
  if (!err) {
    console.log('删除成功')
  }
}) */
九、commonJs规范
- 任意一个文件就是一个模块,具有独立作用域
- 使用require导入其他模块
- 将模块id传入require实现目标模块定位
module属性
- 任意js文件就是一个模块,可以直接使用module属性
- id:返回模块标识符,一般是一个绝对路径
- filename:返回文件模块的绝对路径
- loaded:返回布尔值,表示模块是否完全完成加载
- parent:返回对象存放调用当前模块的模块
- children:返回数组,存放当前模块调用的其他模块
- exports:返回当前模块需要暴露的内容
- paths:返回数组,存放不同目录下的node_modules位置
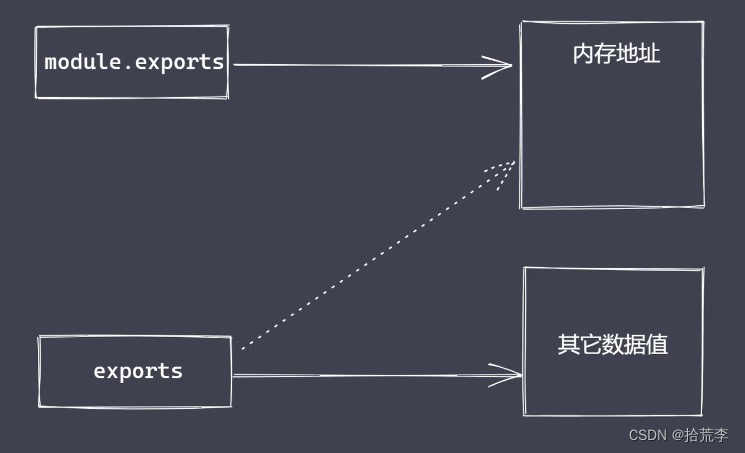
module.exports与exports区别


十、VM模块使用
内置模块
创建独立运行的沙箱环境
const fs = require('fs')
const vm = require('vm')

let age = 33
let content = fs.readFileSync('test.txt', 'utf-8')

// eval
// eval(content) // 可以运行代码

// new Function
/* console.log(age)
let fn = new Function('age', "return age + 1") // 可以运行,但逻辑复杂
console.log(fn(age)) */

vm.runInThisContext(content) // 互相隔离

console.log(age)
十一、事件模块
const EventEmitter = require('events')

const ev = new EventEmitter()

// on
/* ev.on('事件1', () => {
  console.log('事件1执行了---2')
})

ev.on('事件1', () => {
  console.log('事件1执行了')
})

// emit
ev.emit('事件1')
ev.emit('事件1') */

// once
/* ev.once('事件1', () => {
  console.log('事件1执行了')
})
ev.once('事件1', () => {
  console.log('事件1执行了--2')
})

ev.emit('事件1')
ev.emit('事件1') */

// off
/* let cbFn = (...args) => {
  console.log(args)
}
ev.on('事件1', cbFn) */

/* ev.emit('事件1')
ev.off('事件1', cbFn) */
// ev.emit('事件1', 1, 2, 3)

/* ev.on('事件1', function () {
  console.log(this)
})
ev.on('事件1', function () {
  console.log(2222)
})

ev.on('事件2', function () {
  console.log(333)
})

ev.emit('事件1') */

const fs = require('fs')

const crt = fs.createReadStream()
crt.on('data')
十二、发布订阅
class PubSub{
  constructor() {
    this._events = {}
  }

  // 注册
  subscribe(event, callback) {
    if (this._events[event]) {
      // 如果当前 event 存在,所以我们只需要往后添加当前次监听操作
      this._events[event].push(callback)
    } else {
      // 之前没有订阅过此事件
      this._events[event] = [callback]
    }
  }

  // 发布
  publish(event, ...args) {
    const items = this._events[event]
    if (items && items.length) {
      items.forEach(function (callback) {
        callback.call(this, ...args)
      })
    }
  }
}

let ps = new PubSub()
ps.subscribe('事件1', () => {
  console.log('事件1执行了')
})
ps.subscribe('事件1', () => {
  console.log('事件1执行了---2')
})

ps.publish('事件1')
ps.publish('事件1')
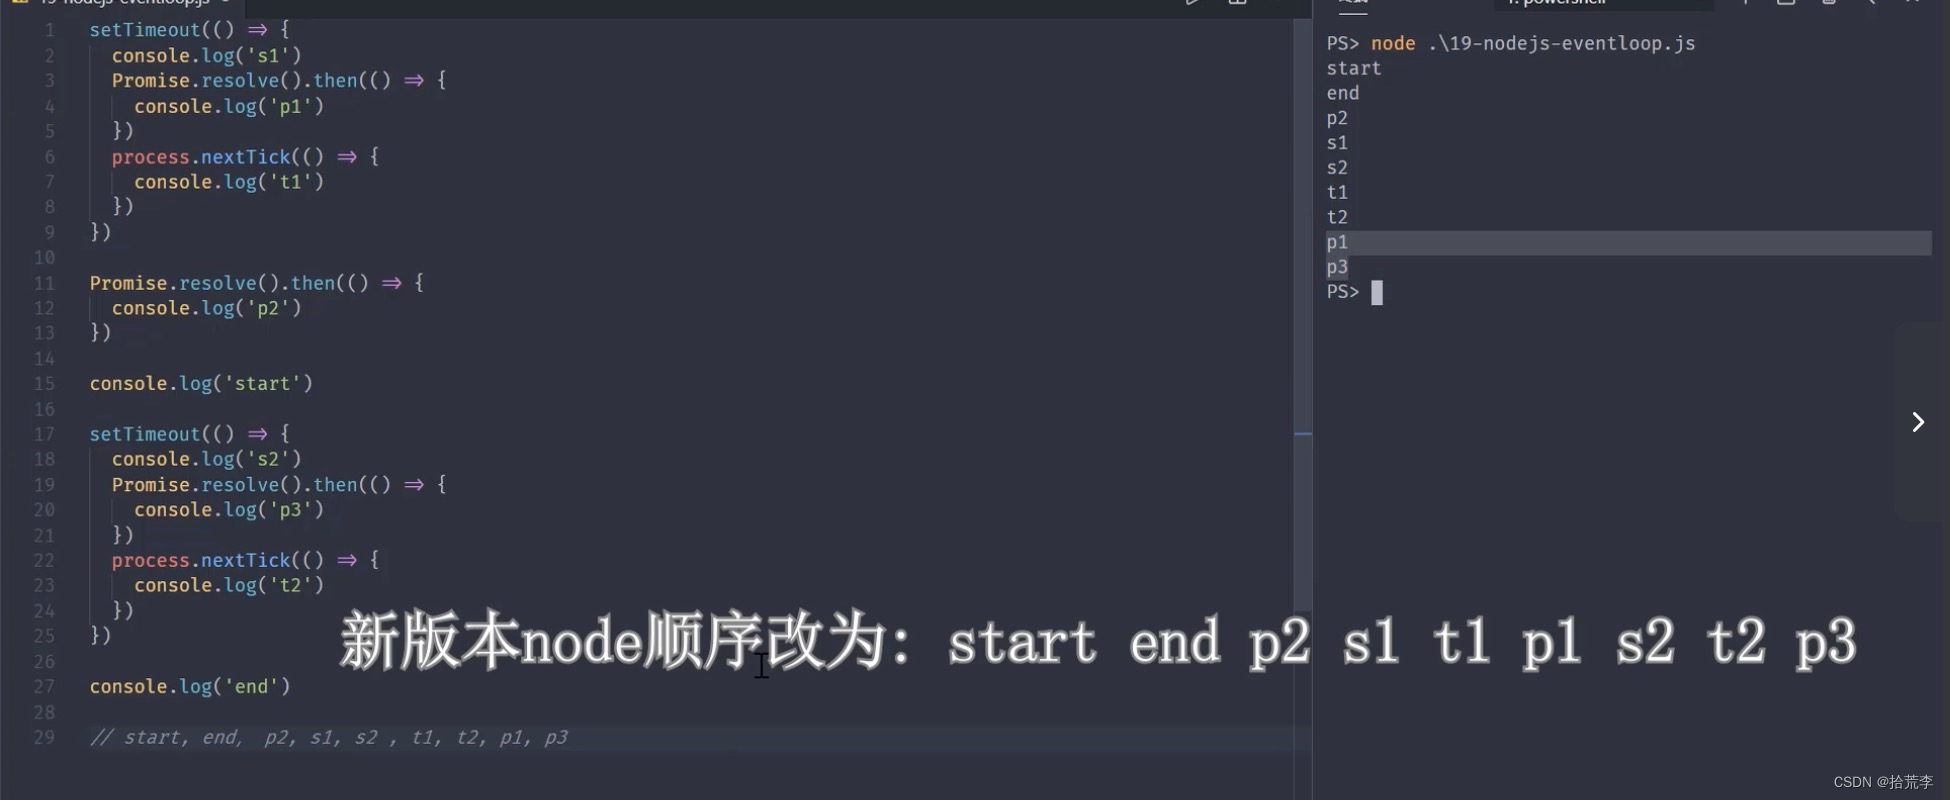
十三、nodejs事件循环机制

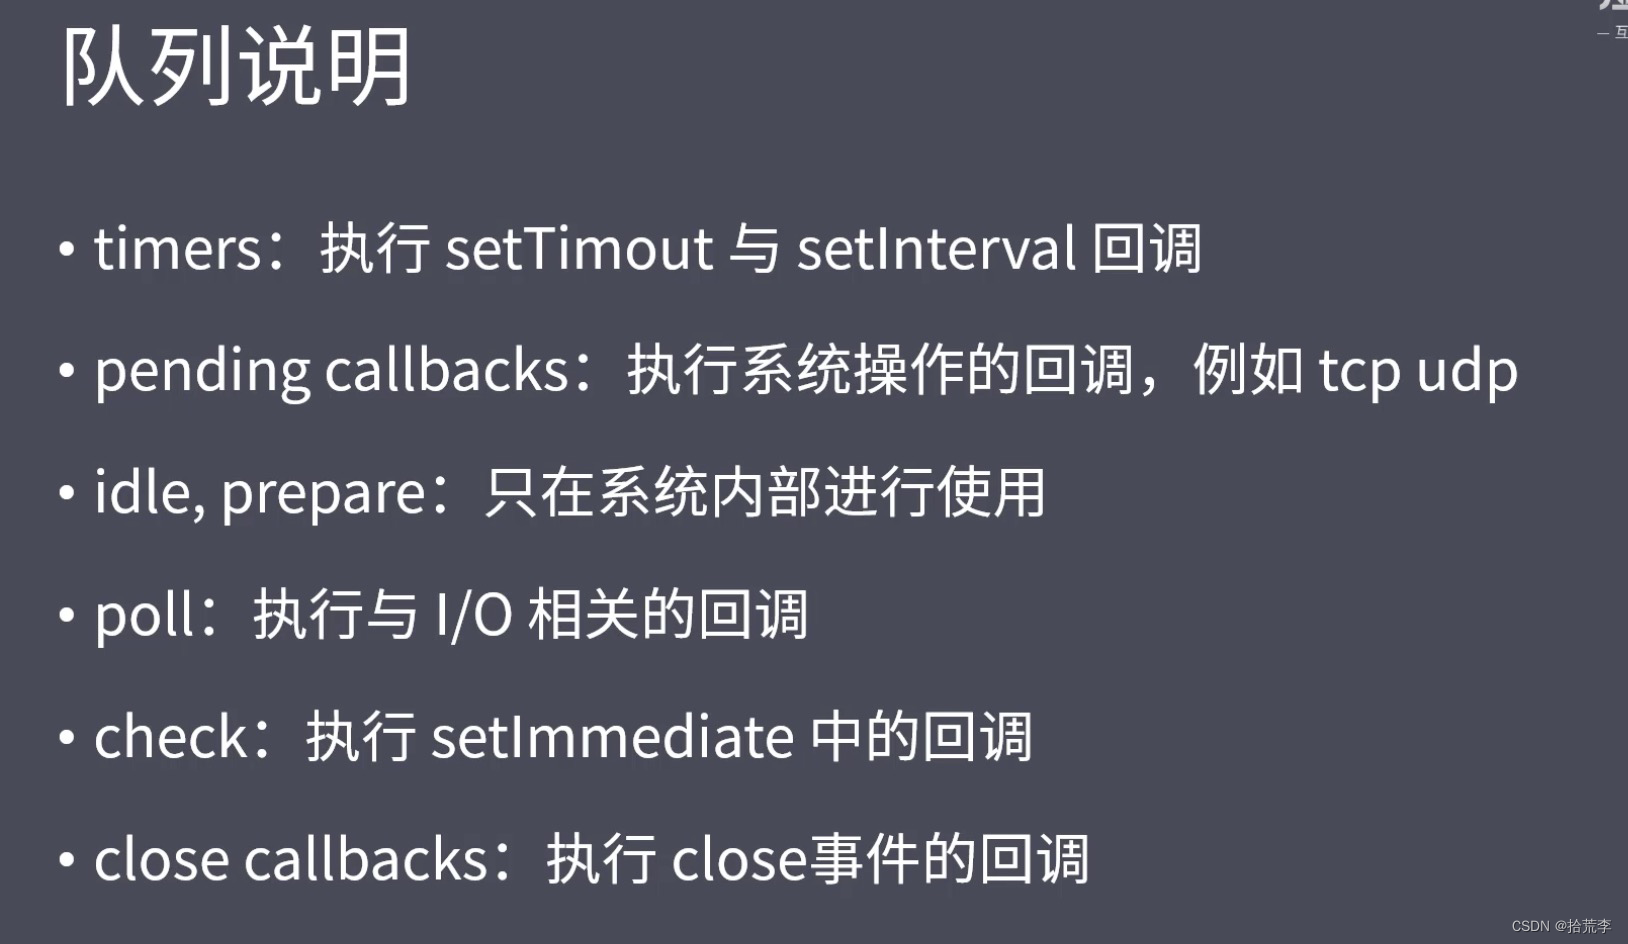

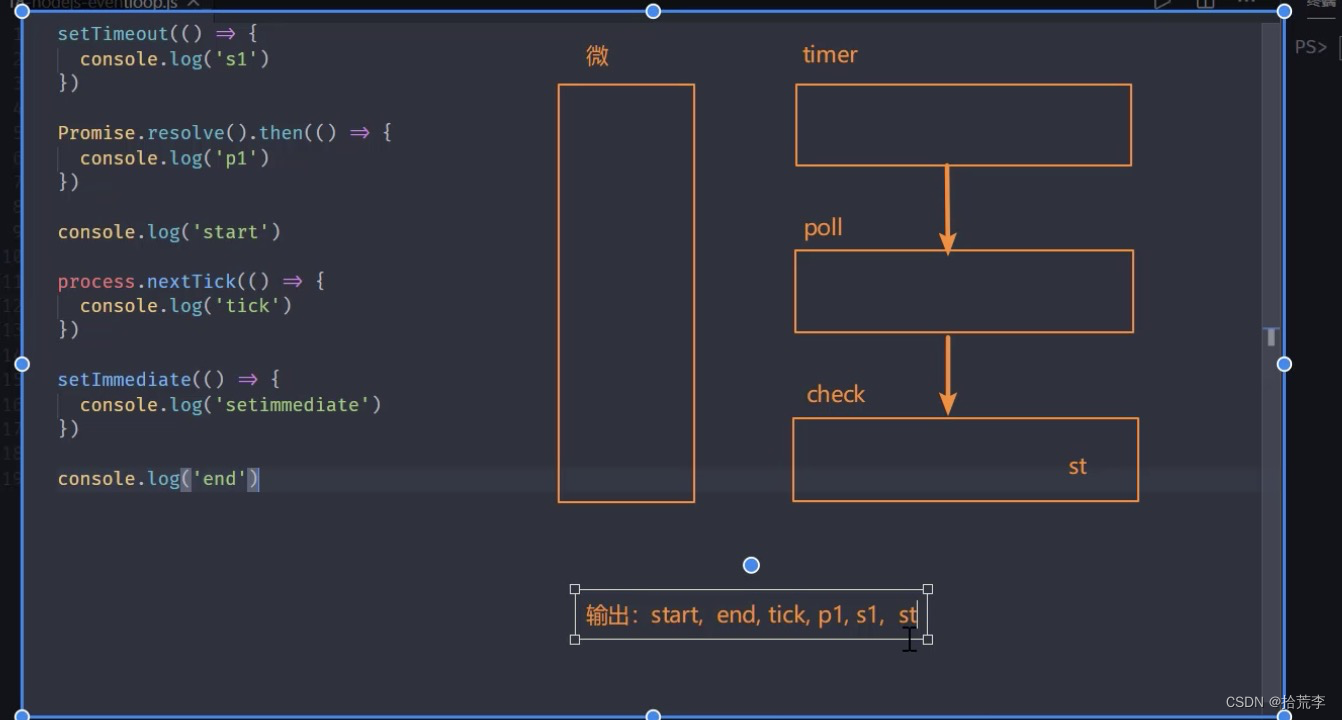
**注意:**nextTick优先级高于promise
微任务优先级
- 浏览器事件循环中,微任务存放在事件队列,先进先出
- Nodejs中process.nextTick先于promise.then
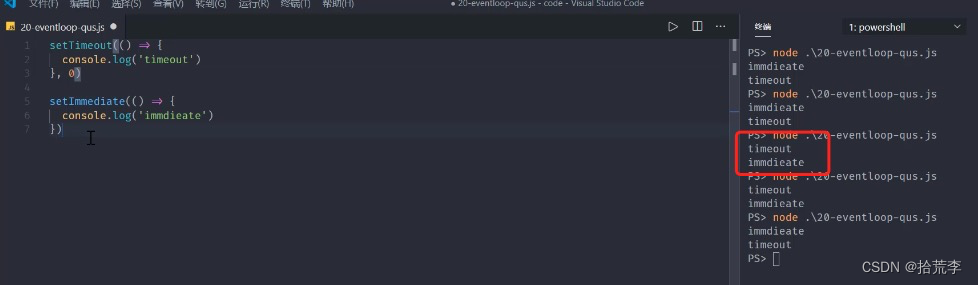
十四、nodejs事件环常见问题
多次快速执行之后,有时会出现下面问题
// 复现
setTimeout(() => {
  console.log('timeout')
}, 0)

setImmediate(() => {
  console.log('immdieate')
})
const fs = require('fs')

fs.readFile('./eventEmitter.js', () => {
  setTimeout(() => {
    console.log('timeout')
  }, 0)

  setImmediate(() => {
    console.log('immdieate')
  })
})
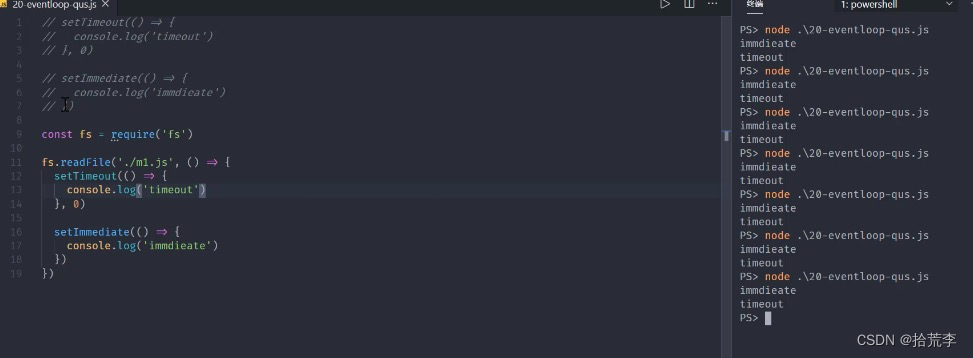
这样会正常
十五、核心模块之stream
如果我们读取一个G的电影
这里会有下面问题

使用流操作会有下面优势

nodejs中流的分类


十六、自定义可读流
const {Readable} = require('stream')

// 模拟底层数据
let source = ['lg', 'zce', 'syy']

// 自定义类继承 Readable
class MyReadable extends Readable{
  constructor(source) {
    super()
    this.source = source
  }
  _read() {
    let data = this.source.shift() || null
    this.push(data)
  }
}

// 实例化
let myReadable = new MyReadable(source)

/* myReadable.on('readable', () => {
  let data = null
  while((data = myReadable.read(2)) != null) {
    console.log(data.toString())
  }
}) */

myReadable.on('data', (chunk) => {
  console.log(chunk.toString())
})
十七、自定义可写流
const {Writable} = require('stream')

class MyWriteable extends Writable{
  constructor() {
    super()
  }
  _write(chunk, en, done) {
    process.stdout.write(chunk.toString() + '<----')
    process.nextTick(done)
  }
}

let myWriteable = new MyWriteable()

myWriteable.write('11教育', 'utf-8', () => {
  console.log('end')
})
十八、stream之双工和转换流
Duplex是双工流,即能生产优能消费
stream-duplex.js
let {Duplex} = require('stream')

class MyDuplex extends Duplex{
  constructor(source) {
    super()
    this.source = source
  }
  _read() {
    let data = this.source.shift() || null
    this.push(data)
  }
  _write(chunk, en, next) {
    process.stdout.write(chunk)
    process.nextTick(next)
  }
}

let source = ['a', 'b', 'c']
let myDuplex = new MyDuplex(source)

/* myDuplex.on('data', (chunk) => {
  console.log(chunk.toString())
}) */
myDuplex.write('11教育', () => {
  console.log(1111)
})
stream-transform.js
let {Duplex} = require('stream')

class MyDuplex extends Duplex{
  constructor(source) {
    super()
    this.source = source
  }
  _read() {
    let data = this.source.shift() || null
    this.push(data)
  }
  _write(chunk, en, next) {
    process.stdout.write(chunk)
    process.nextTick(next)
  }
}

let source = ['a', 'b', 'c']
let myDuplex = new MyDuplex(source)

/* myDuplex.on('data', (chunk) => {
  console.log(chunk.toString())
}) */
myDuplex.write('11', () => {
  console.log(1111)
})
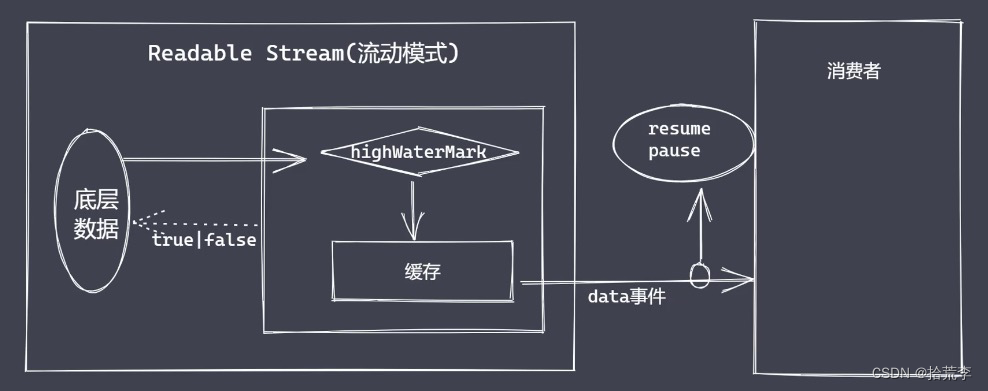
十九、文件可读流事件与应用
const fs = require('fs')

let rs = fs.createReadStream('test.txt', {
  flags: 'r',
  encoding: null,
  fd: null,
  mode: 438,
  autoClose: true,
  start: 0,
  // end: 3,
  highWaterMark: 4
})

/* rs.on('data', (chunk) => {
  console.log(chunk.toString())
  rs.pause()
  setTimeout(() => {
    rs.resume()
  }, 1000)
}) */

/* rs.on('readable', () => {
  let data = rs.read()
  console.log(data)
  let data
  while((data = rs.read(1)) !== null) {
    console.log(data.toString())
    console.log('----------', rs._readableState.length)
  }
}) */

rs.on('open', (fd) => {
  console.log(fd, '文件打开了')
})

rs.on('close', () => {
  console.log('文件关闭了')
})
let bufferArr = []
rs.on('data', (chunk) => {
  bufferArr.push(chunk)
})

rs.on('end', () => {
  console.log(Buffer.concat(bufferArr).toString())
  console.log('当数据被清空之后')
})

rs.on('error', (err) => {
  console.log('出错了')
})
二十、文件可写流
const fs = require('fs')

const ws = fs.createWriteStream('test.txt', {
  flags: 'w',
  mode: 438,
  fd: null,
  encoding: "utf-8",
  start: 0,
  highWaterMark: 3
})

let buf = Buffer.from('abc')

// 字符串 或者  buffer ===》 fs rs
/* ws.write(buf, () => {
  console.log('ok2')
}) */

/* ws.write('11', () => {
  console.log('ok1')
}) */

/* ws.on('open', (fd) => {
  console.log('open', fd)
}) */

ws.write("2")

// close 是在数据写入操作全部完成之后再执行
/* ws.on('close', () => {
  console.log('文件关闭了')
}) */

// end 执行之后就意味着数据写入操作完成
ws.end('11')


// error
ws.on('error', (err) => {
  console.log('出错了')
})
二十一、write执行流程
const fs = require('fs')

let ws = fs.createWriteStream('test.txt', {
  highWaterMark: 3
})

let flag = ws.write('1')
console.log(flag)

flag = ws.write('2')
console.log(flag)

// 如果 flag 为 false 并不是说明当前数据不能被执行写入
//

ws.on('drain', () => {
  console.log('11')
})
- 第一次调用write方法时是将数据直接写入到文件中
- 第二次开始write方法就是将数据写入至缓存
- 生产速度和消费速度是不一样的,一般情况下生产速度要比消费速度快快很多
- 当flag为false之后并不意味着当前次的数据不能被写入了 但是我们应该告知数据的生产者,当前的消费速度已经跟不上生产速度了,所以这个时候,我们一般将可读流模块修改为暂停模式。
- 当数据生产者暂停之后,消费者会慢慢的消化它内部缓存中的数据,直到可以再次被执行写入操作。
- 当缓存区可以继续写入数据时如何让生产者知道?drain事件
二十二、控制写入速度
/**
 * 需求:“11” 写入指定的文件
 * 01 一次性写入
 * 02 分批写入
 * 对比:
 */
let fs = require('fs')

let ws = fs.createWriteStream('test.txt', {
  highWaterMark: 3
})

// ws.write('11')
let source = "11".split('')
let num = 0
let flag = true

function executeWrite () {
  flag = true
  while(num !== 4 && flag) {
    flag = ws.write(source[num])
    num++
  }
}

executeWrite()

ws.on('drain', () => {
  console.log('drain 执行了')
  executeWrite()
})

// pipe
二十三、背压机制
node.js的stream已实现了背压机制
内存溢出、GC频繁调用、其他进程变慢
let fs = require('fs')

let rs = fs.createReadStream('test.txt', {
  highWaterMark: 4
})

let ws = fs.createWriteStream('test1.txt', {
  highWaterMark: 1
})

let flag = true

/* rs.on('data', (chunk) => {
  flag = ws.write(chunk, () => {
    console.log('写完了')
  })
  if (!flag) {
    rs.pause()
  }
})

ws.on('drain', () => {
  rs.resume()
}) */

rs.pipe(ws)
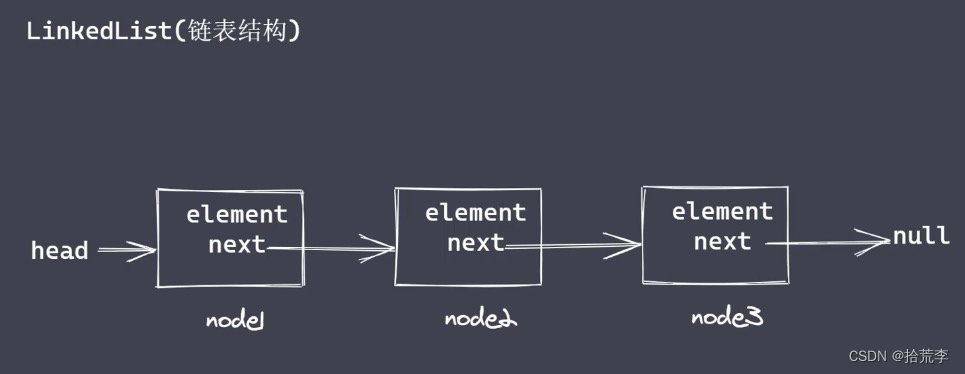
二十四、链表结构
为什么不采用数组存储数据?
数组缺点
- 数组存储数据的长度具有上限
- 数组存在塌陷问题
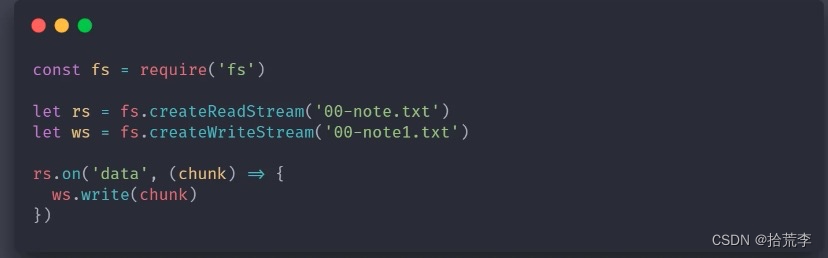
二十五、pipe方法使用
const fs = require('fs')
const myReadStream = require('./ReadStream')

// const rs = fs.createReadStream('./f9.txt', {
//   highWaterMark: 4
// })

const rs = new myReadStream('./f9.txt')

const ws = fs.createWriteStream('./f10.txt')

rs.pipe(ws)

// data