基于 XML 的 AOP 开发
问题1:在通知方法中如何定义切入点表达式?
问题2:如何配置切面?
问题3:在配置类上如何开启AOP注解功能?
1.1 快速入门
①导入 AOP 相关坐标
②创建目标接口和目标类(内部有切点)
③创建切面类(内部有增强方法)
④将目标类和切面类的对象创建权交给 spring
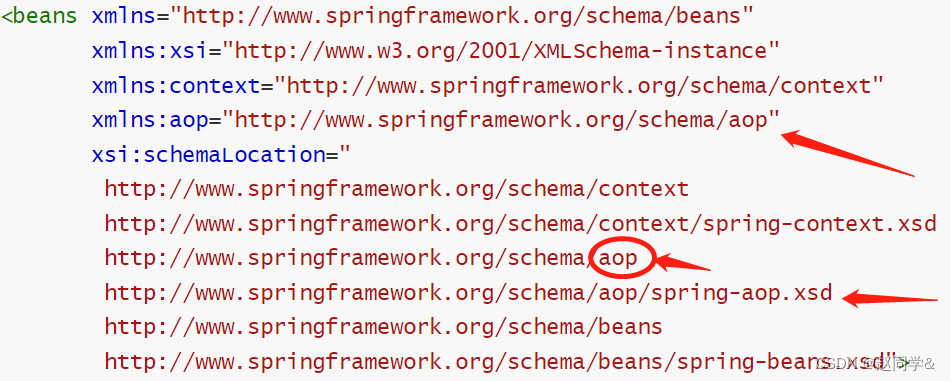
⑤在 applicationContext.xml 中配置织入关系
⑥测试代码
1.1.1实现步骤
第一步 导入 AOP 相关坐标
<!--导入spring的context坐标,context依赖aop-->
<dependency>
  <groupId>org.springframework</groupId>
  <artifactId>spring-context</artifactId>
  <version>5.0.5.RELEASE</version>
</dependency>
<!-- aspectj的织入 -->
<dependency>
  <groupId>org.aspectj</groupId>
  <artifactId>aspectjweaver</artifactId>
  <version>1.8.13</version>
</dependency>
第二步 创建目标接口和目标类(内部有切点)
/*
    目标接口
 */
public interface TargetInterface {
    public void method();

}

@Component
public class Terget implements TargetInterface {
    @Override
    public void method() {
        System.out.println("Target 正在运行中....");
    }
}
第三步 创建切面类(内部有增强方法)
public class MyAspect {
    //前置增强方法
    public void before(){
        System.out.println("前置代码增强.....");
    }
}
导入aop命名空间
第四步 在 applicationContext.xml 中配置织入关系
配置切点表达式和前置增强的织入关系
<aop:config>
<!--引用myAspect的Bean为切面对象-->
<aop:aspect ref="myAspect">
<!--配置Target的method方法执行时要进行myAspect的before方法前置增强-->
<aop:before method="before" pointcut="execution(public void com.by.aop.Target.method())"></aop:before>
</aop:aspect>
</aop:config>
<!--优化代码-->
<aop:config>
<aop:aspect ref="myAspect">
<aop:pointcut id="mypointcut" expression="execution(public void com.by.aop.Target.method())"/>
<aop:before method="before" pointcut-ref="mypointcut"></aop:before>
</aop:aspect>
</aop:config>第六步 测试代码
@RunWith(SpringJUnit4ClassRunner.class)
@ContextConfiguration("classpath:applicationContext.xml")
public class AopTest {
    @Autowired
    private TargetInterface target;
    @Test
    public void test1(){
        target.method();
    }
}
1.2 XML 配置 AOP 详解
1.2.1 切点表达式的写法
表达式语法:
execution([修饰符] 返回值类型 包名.类名.方法名(参数))-
访问修饰符可以省略
-
返回值类型、包名、类名、方法名可以使用星号* 代表任意
-
包名与类名之间一个点 . 代表当前包下的类,两个点 .. 表示当前包及其子包下的类
-
参数列表可以使用两个点 .. 表示任意个数,任意类型的参数列表
例如:
execution(public void com.by.aop.Target.method())
execution(void com.by.aop.Target.*(..))
execution(* com.by.aop.*.*(..))
execution(* com.by..*.*(..))
execution(* *..*.*(..))
1.2.2.通知的类型
通知的配置语法:
<aop:通知类型 method=“切面类中方法名” pointcut=“切点表达式"></aop:通知类型>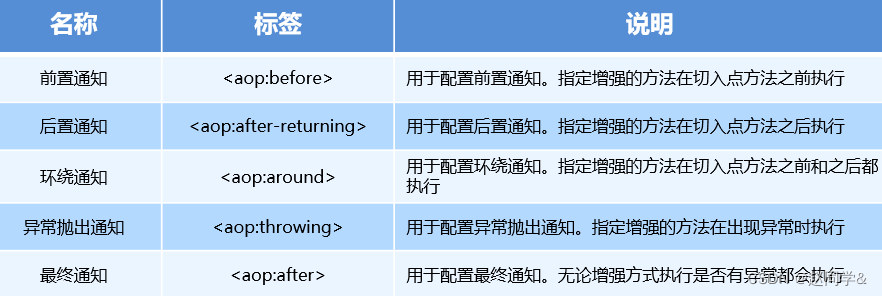
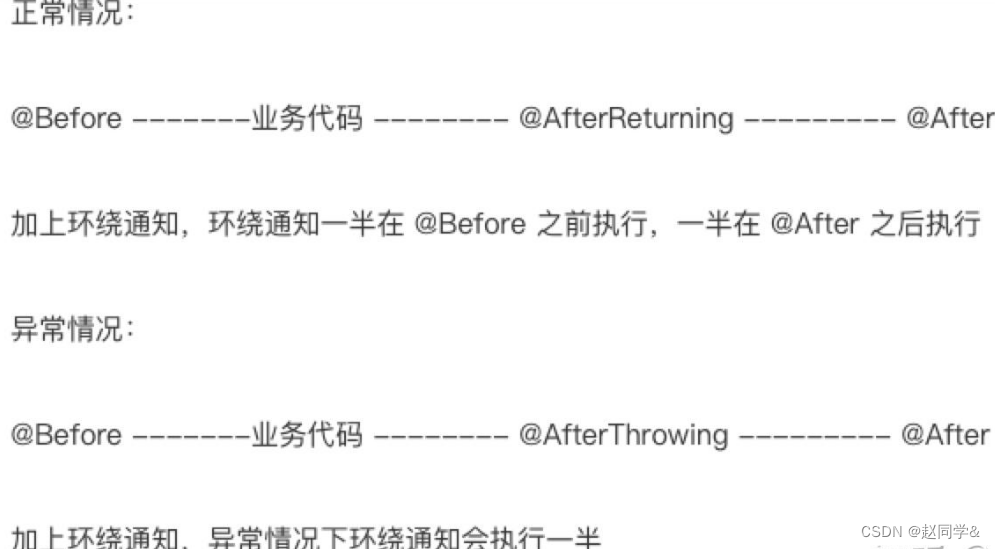
通知执行顺序
1.2.3 切点表达式的抽取
当多个增强的切点表达式相同时,可以将切点表达式进行抽取,在增强中使用 pointcut-ref 属性代替 pointcut 属性来引用抽取后的切点表达式。
<aop:config>
    <!--引用myAspect的Bean为切面对象-->
    <aop:aspect ref="myAspect">
        <aop:pointcut id="myPointcut" expression="execution(* com.by.aop.*.*(..))"/>
        <aop:before method="before" pointcut-ref="myPointcut"></aop:before>
    </aop:aspect>
</aop:config>
1.3 知识要点
-
aop织入的配置
<aop:config>
    <aop:aspect ref=“切面类”>
        <aop:before method=“通知方法名称” pointcut=“切点表达式"></aop:before>
    </aop:aspect>
</aop:config>-
通知的类型:前置通知、后置通知、环绕通知、异常抛出通知、最终通知
-
切点表达式的写法:
execution([修饰符] 返回值类型 包名.类名.方法名(参数))2.基于注解的 AOP 开发
2.1 AOP案例思路分析
-
案例设定:测定接口执行效率
-
简化设定:在接口执行前输出当前系统时间
-
开发模式:XML or ==注解==
-
思路分析:
-
导入坐标(pom.xml)
-
制作连接点方法(原始操作,dao接口与实现类)
-
制作共性功能 (通知类与通知)
-
定义切入点
-
绑定切入点与通知关系(切面)
-
2.2 AOP入门案例实现
【第二步】定义dao接口与实现类
public interface BookDao {
    public void save();
    public void update();
}

@Repository
public class BookDaoImpl implements BookDao {
    @Override
    public void save() {
        System.out.println(System.currentTimeMillis());
        System.out.println("book dao save ...");
    }
    @Override
    public void update() {
        System.out.println("book dao update ...");

    }
}
【第三步】定义通知类,制作通知方法
//通知类必须配置成Spring管理的bean
@Component
public class MyAdvice {
    public void method(){
        System.out.println(System.currentTimeMillis());
    }
}
【第四步】定义切入点表达式、配置切面(绑定切入点与通知关系)
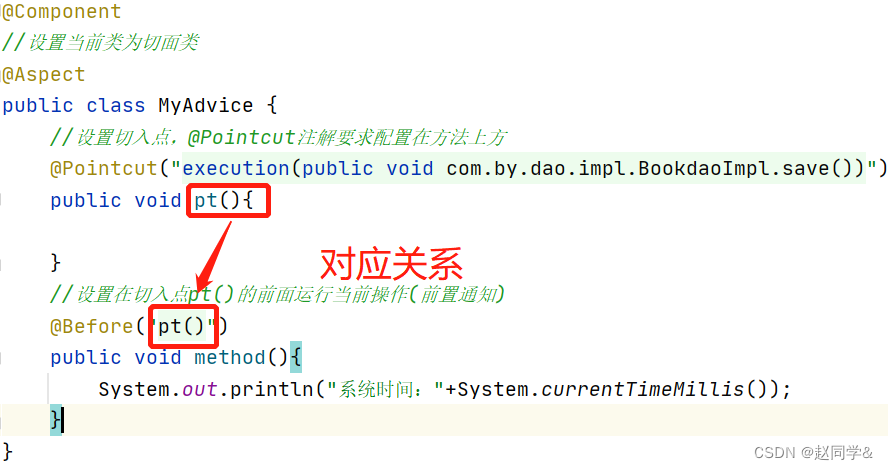
//通知类必须配置成Spring管理的bean
@Component
//设置当前类为切面类类
@Aspect
public class MyAdvice {
//设置切入点,@Pointcut注解要求配置在方法上方
@Pointcut("execution(void com.by.dao.BookDao.save())")
public void pt(){
}
//设置在切入点pt()的前面运行当前操作(前置通知)
@Before("pt()")
public void method(){
System.out.println(System.currentTimeMillis());
}
}
【第五步】在配置类中进行Spring注解包扫描和开启AOP功能
@Configuration
@ComponentScan("com.by")
//开启注解开发AOP功能
@EnableAspectJAutoProxy
public class SpringConfig {
}
测试类和运行结果
public class App {
    public static void main(String[] args) {
        ApplicationContext ctx = new AnnotationConfigApplicationContext(SpringConfig.class);
        BookDao bookDao = ctx.getBean(BookDao.class);
        bookDao.update();
    }
}
3. 注解+配置文件结合案例
基于注解+配置的aop开发步骤:
①创建目标接口和目标类(内部有切点)
②创建切面类(内部有增强方法)
③将目标类和切面类的对象创建权交给 spring
④在切面类中使用注解配置织入关系
⑤在配置文件中开启组件扫描和 AOP 的自动代理
⑥测试
3.1 AOP入门案例实现
第一步 创建目标接口和目标类(内部有切点)
public interface TargetInterface {
public void method();
}
public class Target implements TargetInterface {
@Override
public void method() {
System.out.println("Target running....");
}
}第二步 创建切面类(内部有增强方法)
public class MyAspect {
    //前置增强方法
    public void before(){
        System.out.println("前置代码增强.....");
    }
}
第三步 将目标类和切面类的对象创建权交给 spring
@Component("target")
public class Target implements TargetInterface {
    @Override
    public void method() {
        System.out.println("Target running....");
    }
}
@Component("myAspect")
public class MyAspect {
    public void before(){
        System.out.println("前置代码增强.....");
    }
}
第四步 在切面类中使用注解配置织入关系
@Component("myAspect")
@Aspect
public class MyAspect {
    @Before("execution(* com.by.aop.*.*(..))")
    public void before(){
        System.out.println("前置代码增强.....");
    }
}
第五步 在配置文件中开启组件扫描和 AOP 的自动代理
<!--组件扫描-->
<context:component-scan base-package="com.by.aop"/>
<!--aop的自动代理-->
<aop:aspectj-autoproxy></aop:aspectj-autoproxy>第六步 测试代码
@RunWith(SpringJUnit4ClassRunner.class)
@ContextConfiguration("classpath:applicationContext.xml")
public class AopTest {
    @Autowired
    private TargetInterface target;
    @Test
    public void test1(){
        target.method();
    }
}
4. AOP工作流程【理解】
什么是目标对象?什么是代理对象?
4.1 AOP工作流程
-
Spring容器启动
-
读取所有切面配置中的切入点
-
初始化bean,判定bean对应的类中的方法是否匹配到任意切入点
-
匹配失败,创建原始对象
-
匹配成功,创建原始对象(目标对象)的代理对象
-
-
获取bean执行方法
-
获取的bean是原始对象时,调用方法并执行,完成操作
-
获取的bean是代理对象时,根据代理对象的运行模式运行原始方法与增强的内容,完成操作
-
4.2 AOP核心概念
目标对象(Target):被代理的对象,也叫原始对象,该对象中的方法没有任何功能增强。
代理对象(Proxy):代理后生成的对象,由Spring帮我们创建代理对象。
4.3 在测试类中验证代理对象
public class App {
    public static void main(String[] args) {
        ApplicationContext ctx = new AnnotationConfigApplicationContext(SpringConfig.class);
        BookDao bookDao = ctx.getBean(BookDao.class);
        bookDao.update();
        //打印对象的类名
        System.out.println(bookDao.getClass());
    }
}
回顾切入点表达式
5.1 语法格式
-
切入点:要进行增强的方法
-
切入点表达式:要进行增强的方法的描述方式execution(void com.by.dao.BookDao.update())execution(void com.by.dao.impl.BookDaoImpl.update())
-
描述方式一:执行com.by.dao包下的BookDao接口中的无参数update方法
-
描述方式二:执行com.by.dao.impl包下的BookDaoImpl类中的无参数update方法
-
-
切入点表达式标准格式:动作关键字(访问修饰符 返回值 包名.类/接口名.方法名(参数) 异常名)execution(public User com.by.service.UserService.findById(int))
-
动作关键字:描述切入点的行为动作,例如execution表示执行到指定切入点
-
访问修饰符:public,private等,可以省略
-
返回值:写返回值类型
-
包名:多级包使用点连接
-
类/接口名:
-
方法名:
-
参数:直接写参数的类型,多个类型用逗号隔开
-
异常名:方法定义中抛出指定异常,可以省略
-
5.2 通配符
目的:可以使用通配符描述切入点,快速描述。
-
:单个独立的任意符号,可以独立出现,也可以作为前缀或者后缀的匹配符出现
匹配com.by包下的任意包中的UserService类或接口中所有find开头的带有一个参数的方法
execution(public * com.by.*.UserService.find*(*))-
.. :多个连续的任意符号,可以独立出现,常用于简化包名与参数的书写
匹配com包下的任意包中的UserService类或接口中所有名称为findById的方法
execution(public User com..UserService.findById(..))-
+:专用于匹配子类类型
execution(* *..*Service+.*(..))5.3 书写技巧
-
所有代码按照标准规范开发,否则以下技巧全部失效
-
描述切入点通==常描述接口==,而不描述实现类
-
访问控制修饰符针对接口开发均采用public描述(==可省略访问控制修饰符描述==)
-
返回值类型对于增删改类使用精准类型加速匹配,对于查询类使用*通配快速描述
-
==包名==书写==尽量不使用..匹配==,效率过低,常用*做单个包描述匹配,或精准匹配
-
==接口名/类名==书写名称与模块相关的==采用*匹配==,例如UserService书写成*Service,绑定业务层接口名
-
==方法名==书写以==动词==进行==精准匹配==,名词采用匹配,例如getById书写成getBy,selectAll书写成selectAll
-
参数规则较为复杂,根据业务方法灵活调整
-
通常==不使用异常==作为==匹配==规则