前言
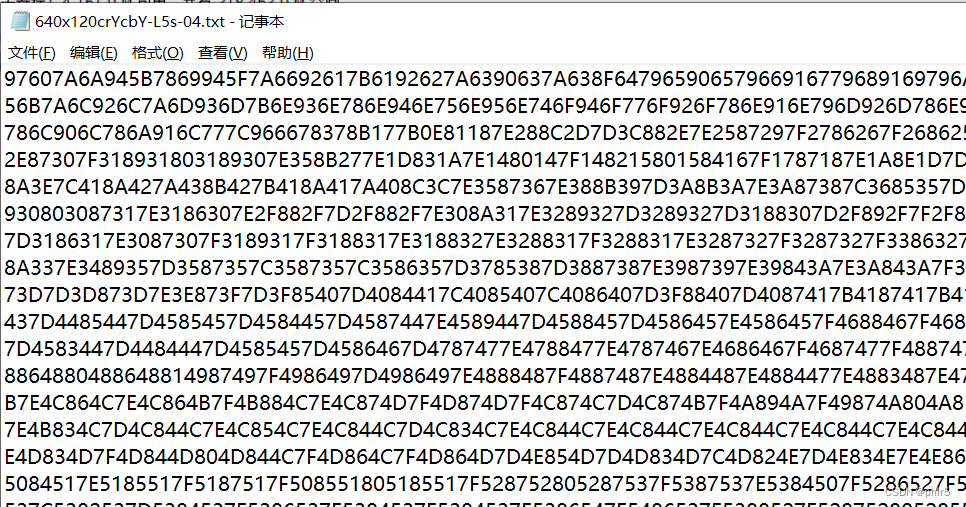
摄像头用的OV的2640,输出YCbYcr的十六进制数据,数据保存成字符串形式的hex文件,之后用Python读取文件,并显示图片。
文章先搭建Python环境,之后编程实现十六进制数据显示图片的功能。
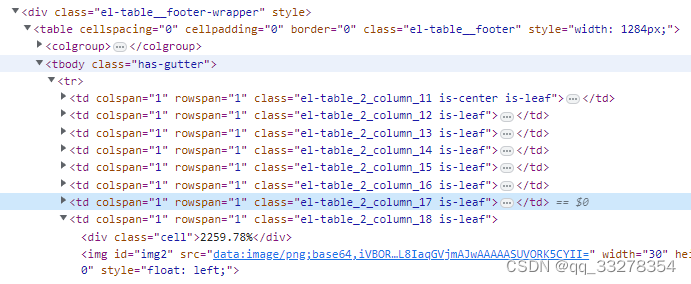
十六进制文件格式如下图:
python安装目录及文档
1、编译运行
在IDLE (Python 3.10 64-bit)中可以编译运行,也可以在cmd下面运行。
1、在cmd下执行 py
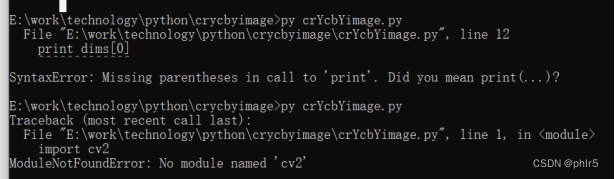
Win10+Python3.10+OpenCV4.6.0加载显示图片
参考文章:
https://blog.csdn.net/chexlong/article/details/126596461
1、安装 opencv,制定地址,否则timeout
Win10+Python3.10+OpenCV4.6.0加载显示图片用win键+X启动Windows powershell 管理员模式,执行

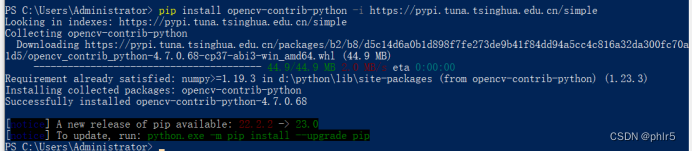
PS C:\Users\Administrator> pip install opencv-python -i https://pypi.tuna.tsinghua.edu.cn/simple
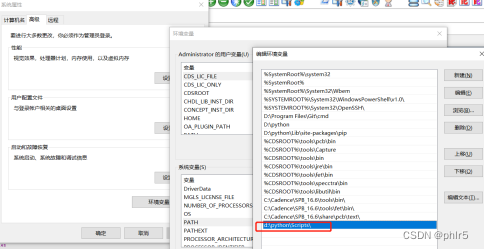
有可能不认pip命令,把路径加到path里面
安装完成之后检查一下

接下来使用下边命令安装opencv-contrib-python。那么它与opencv-python有啥区别呢?opencv-python是只包含了主要模块的包,opencv-contrib-python包含了主要模块以及扩展模块,扩展模块主要是包含了一些带专利的收费算法(如shift特征检测)以及一些在测试的新的算法(稳定后会合并到主要模块)。如果您用不到扩展模块,这个也可以不安装。
pip install opencv-contrib-python -i https://pypi.tuna.tsinghua.edu.cn/simple
 之后就可以写py程序了。
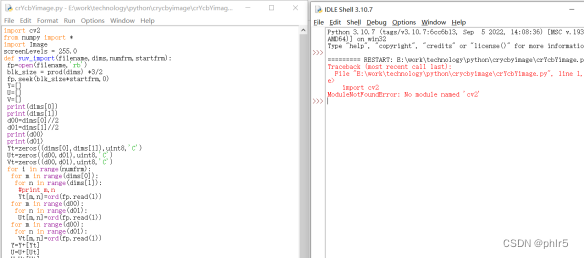
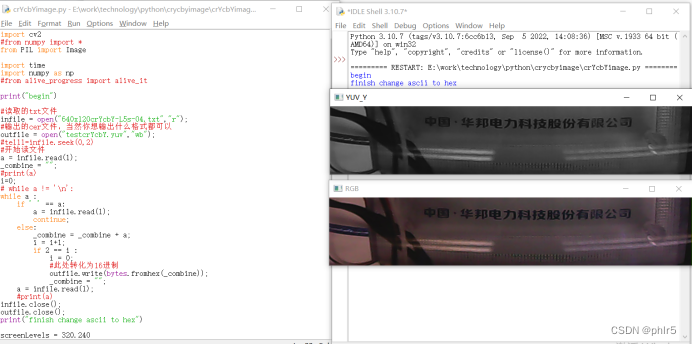
e:\work\technology\python\crycbyimage\crYcbYimage.py
十六进YCbYCr摄像头数据接收并显示图像
源码如下:
· 首先,进入终端(命令行),使用pip命令安装numpy库和PIL库
· 安装numpy: pip3 install numpy
· 安装pillow: pip3 install pillow
· · 安装好了之后,新建一个’crYcbYimage.py’,输入以下代码:
import cv2
#from numpy import *
from PIL import Image
import time
import numpy as np
#from alive_progress import alive_it
print(“begin”)
#读取的txt文件
infile = open(“640x120crYcbY-L5s-04.txt”,“r”);
#输出的cer文件,当然你想输出什么格式都可以
outfile = open(“testcrYcbY.yuv”,“wb”);
#tell1=infile.seek(0,2)
#开始读文件
a = infile.read(1);
_combine = “”;
#print(a)
i=0;
while a != ‘\n’:
while a :
if ’ ’ == a:
a = infile.read(1);
continue;
else:
_combine = _combine + a;
i = i+1;
if 2 == i :
i = 0;
#此处转化为16进制
outfile.write(bytes.fromhex(_combine));
_combine = “”;
a = infile.read(1);
#print(a)
infile.close();
outfile.close();
print(“finish change ascii to hex”)
screenLevels = 320.240
#读取YUV格式图像文件
def read_yuv422(image_path, rows, cols):
“”"
:param image_path: 待转换的.yuv图像文件路径
:param rows: 图像行数
:param cols: 图像列数
:return: y,u,v分量
“”"
# 创建y分量
img_y_1 = np.zeros((rows, int(cols/2)), np.uint8)
img_y_2 = np.zeros((rows, int(cols / 2)), np.uint8)
img_y = np.zeros((rows, cols), np.uint8)

# 创建u分量
img_u = np.zeros((rows, int(cols / 2)), np.uint8)

# 创建v分量
img_v = np.zeros((rows, int(cols / 2)), np.uint8)

# 读取内存中数据
reader=open(image_path, 'rb')
# reader.seek(0,0)
for i in range(rows):
    for j in range(int(cols/2)):
        #temp=reader.read(1)
        #print(temp,i,j)

        img_v[i, j] = ord(reader.read(1))
        img_y_1[i, j] = ord(reader.read(1))


        img_u[i, j] = ord(reader.read(1))
        img_y_2[i, j] = ord(reader.read(1))

for i in range(rows):
    for j in range(int(cols/2)):
        img_y[i, 2*j] = img_y_1[i, j]
        img_y[i, 2*j+1] = img_y_2[i,j]

return img_y, img_u, img_v
#把YUV格式数据转换为RGB格式
def yuv2rgb422(y, u, v):
“”"
:param y: y分量
:param u: u分量
:param v: v分量
:return: rgb格式数据以及r,g,b分量
“”"
rows, cols = y.shape[:2]

# 创建r,g,b分量
r = np.zeros((rows, cols), np.uint8)
g = np.zeros((rows, cols), np.uint8)
b = np.zeros((rows, cols), np.uint8)

for i in range(rows):
    for j in range(int(cols/2)):
        r[i, 2 * j] = max(0,min(255,y[i, 2 * j] + 1.402 * (v[i, j] - 128)))
        g[i, 2 * j] = max(0,min(255,y[i, 2 * j] - 0.34414 * (u[i, j] - 128) - 0.71414 * (v[i, j] - 128)))
        b[i, 2 * j] = max(0,min(255,y[i, 2 * j] + 1.772 * (u[i, j] - 128)))

        r[i, 2 * j+1] = max(0,min(255,y[i, 2 * j+1] + 1.402 * (v[i, j] - 128)))
        g[i, 2 * j+1] = max(0,min(255,y[i, 2 * j+1] - 0.34414 * (u[i, j] - 128) - 0.71414 * (v[i, j] - 128)))
        b[i, 2 * j+1] = max(0,min(255,y[i, 2 * j+1] + 1.772 * (u[i, j] - 128)))

rgb = cv2.merge([b, g, r])

return rgb, r, g, b
img_yuv=read_yuv422(‘testcrYcbY.yuv’,120,640)
cv2.imshow(“YUV_Y”,img_yuv[0])#显示从文件提取出的Y分量
cv2.imwrite(“img-onlyY04.jpg”,img_yuv[0])
img_rgb=yuv2rgb422(img_yuv[0],img_yuv[1],img_yuv[2])
cv2.imshow(“RGB”,img_rgb[0])
cv2.imwrite(“img04.jpg”,img_rgb[0])
cv2.waitKey(0)
演示效果
欢迎V28775855交流