.net开发安卓入门 - 基本交互
- 前言
- TextView
- EditText
- Button
- xml代码如下
- C#代码如下
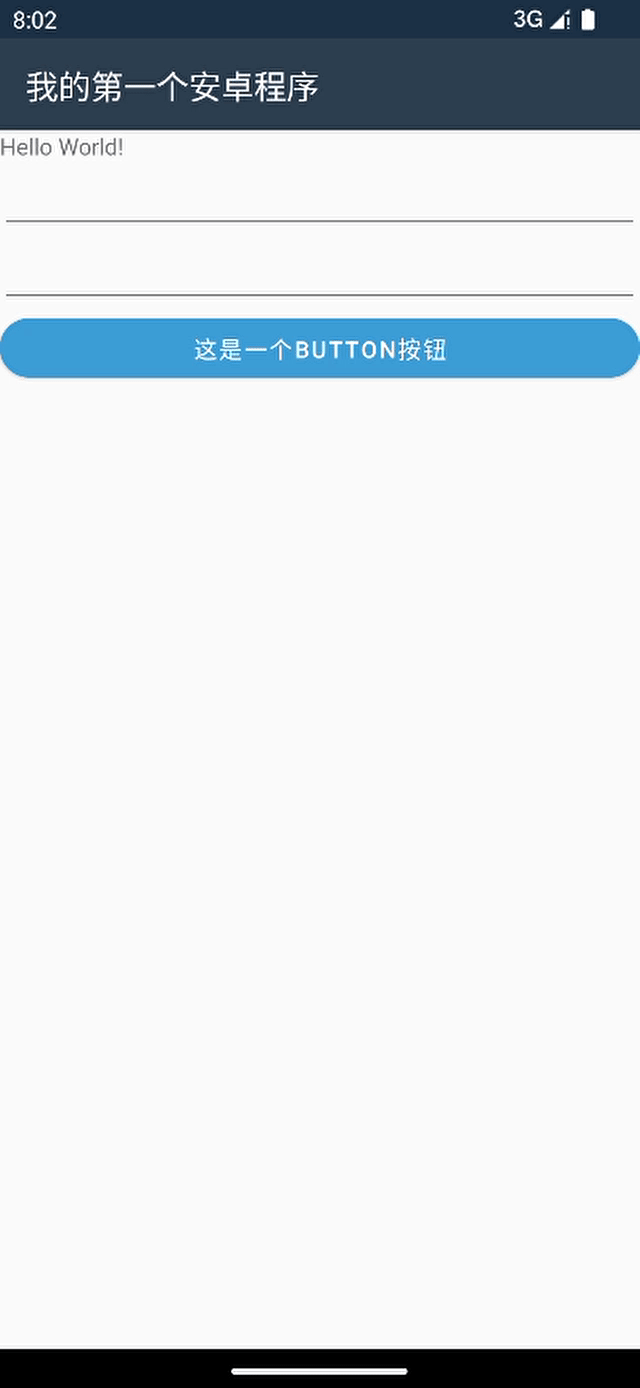
- 运行效果
- 优化代码
- 先看原生Android给一个View添加点击事件的三种方式
- 在Xamarin.Android中添加onClick也的两种办法
- 使用onClick绑定前后台调用处理逻辑
- 第一步:
- 第二步:
- 第三步:引用Mono.Android.Export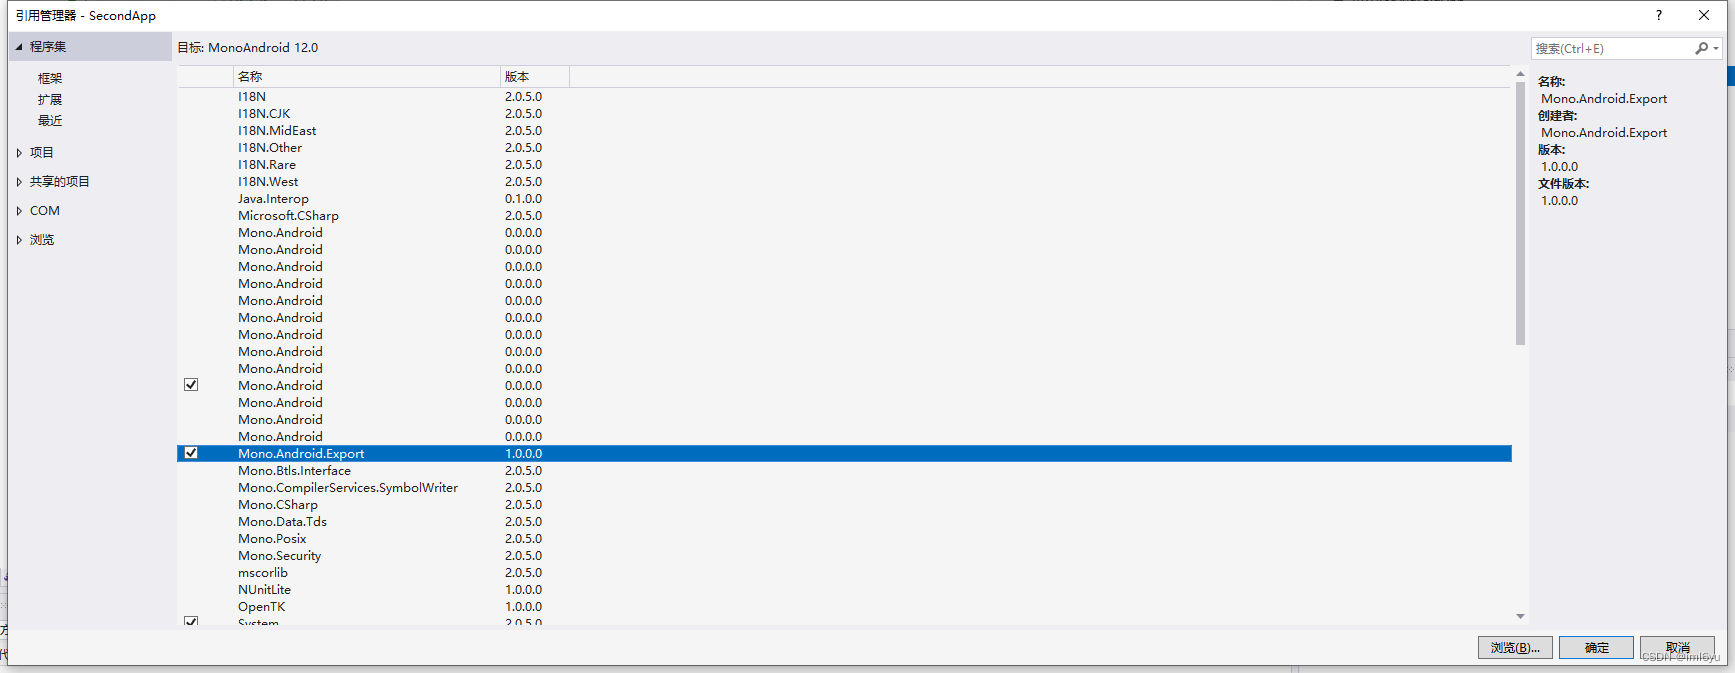
- 注意事项
前言
上一篇文章介绍了第一个程序 HelloWorldhttps://blog.csdn.net/iml6yu/article/details/128236761,
接下来介绍一些基本交互
TextView
在上问中为了展示Hello World,使用了TextView空间,代码如下
<?xml version="1.0" encoding="utf-8"?>
<RelativeLayout xmlns:android="http://schemas.android.com/apk/res/android"
    xmlns:app="http://schemas.android.com/apk/res-auto"
    xmlns:tools="http://schemas.android.com/tools"
    android:layout_width="match_parent"
    android:layout_height="match_parent">
  <TextView
      android:layout_width="match_parent"
      android:layout_height="wrap_content"
      android:text="Hello World!"/>

</RelativeLayout>
为了方便展示,我暂时将布局设置成线性布局,关于布局的内容请查看
EditText
输入文本框
我们添加一个EditText, 并且指定ID ,代码如下
<?xml version="1.0" encoding="utf-8"?>
<LinearLayout
    xmlns:android="http://schemas.android.com/apk/res/android"
    xmlns:app="http://schemas.android.com/apk/res-auto"
    xmlns:tools="http://schemas.android.com/tools"
    android:layout_width="match_parent"
    android:layout_height="match_parent"
    android:orientation="vertical">
    <TextView
        android:layout_width="match_parent"
        android:layout_height="wrap_content"
        android:text="Hello World!"/>
    <!-- 一个输入文本框 -->
    <EditText
        android:id="@+id/txtInput"
        android:layout_width="match_parent"
        android:layout_height="wrap_content"
        android:inputType="text" />

    <!-- 一个数字输入文本框 -->
    <EditText
        android:id="@+id/txtNumInput"
        android:layout_width="match_parent"
        android:layout_height="wrap_content"
        android:inputType="number" />


</LinearLayout>
Button
添加一个Button按钮,然后增加事件,按下Button后使用Toast进行提示
xml代码如下
<?xml version="1.0" encoding="utf-8"?>
<LinearLayout
    xmlns:android="http://schemas.android.com/apk/res/android"
    xmlns:app="http://schemas.android.com/apk/res-auto"
    xmlns:tools="http://schemas.android.com/tools"
    android:layout_width="match_parent"
    android:layout_height="match_parent"
    android:orientation="vertical">
    <TextView
        android:layout_width="match_parent"
        android:layout_height="wrap_content"
        android:text="Hello World!"/>
    <!-- 一个输入文本框 -->
    <EditText
        android:id="@+id/txtInput"
        android:layout_width="match_parent"
        android:layout_height="wrap_content"
        android:inputType="text" />

    <!-- 一个数字输入文本框 -->
    <EditText
        android:id="@+id/txtNumInput"
        android:layout_width="match_parent"
        android:layout_height="wrap_content"
        android:inputType="number" />

    <Button
        android:id="@+id/btnTest"
        android:layout_width="match_parent"
        android:layout_height="wrap_content"
        android:text="这是一个Button按钮"
        app:cornerRadius="40dp"

        />
</LinearLayout>
C#代码如下
找到 MainActivity文件
在OnCreate中添加对控件的操作内容。代码如下:
using Android.App;
using Android.OS;
using Android.Runtime;
using Android.Widget;
using AndroidX.AppCompat.App;

namespace 我的第一个安卓程序
{
    [Activity(Label = "@string/app_name", Theme = "@style/AppTheme", MainLauncher = true)]
    public class MainActivity : AppCompatActivity
    {
        protected override void OnCreate(Bundle savedInstanceState)
        {
            base.OnCreate(savedInstanceState);
            Xamarin.Essentials.Platform.Init(this, savedInstanceState);
            // Set our view from the "main" layout resource
            SetContentView(Resource.Layout.activity_main);

            #region *****************在这里添加了用户控件处理代码start*****************
            //找到两个edittext
            var txtInput = FindViewById<EditText>(Resource.Id.txtInput);
            var txtNumInput = FindViewById<EditText>(Resource.Id.txtNumInput);
            //找到btn按钮
            var button = FindViewById<Button>(Resource.Id.btnTest);
            button.Click += (es, ee) => {
                //吐司内容
                Toast.MakeText(this, $"txtInput的内容是:{txtInput.Text},txtNumInput数字是:{txtNumInput.Text}", ToastLength.Long).Show();
            };
            #endregion *****************在这里添加了用户控件处理代码end*****************
        }
        public override void OnRequestPermissionsResult(int requestCode, string[] permissions, [GeneratedEnum] Android.Content.PM.Permission[] grantResults)
        {
            Xamarin.Essentials.Platform.OnRequestPermissionsResult(requestCode, permissions, grantResults);

            base.OnRequestPermissionsResult(requestCode, permissions, grantResults);
        }
    }
}
运行效果
优化代码
如果虽然实现了一个功能,那是因为当前只有一个Button,这样还是比较容易添加事件的,如果存在多个,代码书写上就会存在一些工作量,有没有其他办法呢?
先看原生Android给一个View添加点击事件的三种方式
- 使用匿名对象
*Java*
((ImageButton) findViewById(R.id.music_cover)) .setOnClickListener(new View.OnClickListener() {
    @Override public void onClick(View v) { }
});
- 使用实现了View.OnClickListener的对象
先实现此接口:
class MyClickListener implements View.OnClickListener{
    @Override public void onClick(View v) {
    }
}
使用时
((ImageButton) findViewById(R.id.music_cover)).setOnClickListener(new MyClickListener());
- 使用 android:onClick属性
android:onClick=“onViewClick”
代码如下:
 <Button
        android:id="@+id/btnTest"
        android:layout_width="match_parent"
        android:layout_height="wrap_content"
        android:text="这是一个Button按钮"
        app:cornerRadius="40dp"
        android:onClick="ShowMessage"

        />
在Activity中实现此命名方法
public void ShowMessage(View v){
        Toast.makeText(this,"onclick", Toast.LENGTH_SHORT).show();
    }
在Xamarin.Android中添加onClick也的两种办法
- 如上demo中使用的Click事件方法。
- 方法二 也是使用onClick进行绑定
使用onClick绑定前后台调用处理逻辑
第一步:
修改xml代码如下
 <Button
        android:id="@+id/btnTest"
        android:layout_width="match_parent"
        android:layout_height="wrap_content"
        android:text="这是一个Button按钮"
        app:cornerRadius="40dp"
        android:onClick="ShowMessage"

        />
第二步:
在对应的Activity中添加对应的方法,代码如下(当前demo就是添加到MainActivity.cs文件中)
using Android.App;
using Android.OS;
using Android.Runtime;
using Android.Views;
using Android.Widget;
using AndroidX.AppCompat.App;

namespace 我的第一个安卓程序
{
    [Activity(Label = "@string/app_name", Theme = "@style/AppTheme", MainLauncher = true)]
    public class MainActivity : AppCompatActivity
    {
        protected override void OnCreate(Bundle savedInstanceState)
        {
            base.OnCreate(savedInstanceState);
            Xamarin.Essentials.Platform.Init(this, savedInstanceState);
            // Set our view from the "main" layout resource
            SetContentView(Resource.Layout.activity_main);

            #region *****************在这里添加了用户控件处理代码start*****************
            //找到两个edittext
            var txtInput = FindViewById<EditText>(Resource.Id.txtInput);
            var txtNumInput = FindViewById<EditText>(Resource.Id.txtNumInput);
            //找到btn按钮
            var button = FindViewById<Button>(Resource.Id.btnTest);
            button.Click += (es, ee) =>
            {
                //吐司内容
                Toast.MakeText(this, $"txtInput的内容是:{txtInput.Text},txtNumInput数字是:{txtNumInput.Text}", ToastLength.Long).Show();
            };
            #endregion *****************在这里添加了用户控件处理代码end*****************
        }
        public override void OnRequestPermissionsResult(int requestCode, string[] permissions, [GeneratedEnum] Android.Content.PM.Permission[] grantResults)
        {
            Xamarin.Essentials.Platform.OnRequestPermissionsResult(requestCode, permissions, grantResults);

            base.OnRequestPermissionsResult(requestCode, permissions, grantResults);
        }

        [Java.Interop.Export]
        public void ShowMessage(View viwe)
        {
            Toast.MakeText(this, $" 这是通过ShowMessage进来的", ToastLength.Long).Show();
        }
    }
}
要注意代码增加了ShowMessage方法,并且指定了特性
第三步:引用Mono.Android.Export
注意事项
使用这个属性的view必须是可点击的,比如Button,ImageButton等这些本身就是可点击的,那TextView可以使用不呢?肯定可以,但是一定要 设置另外一个属性,android:clickable=“true”.
https://developer.aliyun.com/article/261387
![[附源码]Python计算机毕业设计SSM基于云服务器网上论坛设计(程序+LW)](https://img-blog.csdnimg.cn/ede49777320d4a5fac73e110750b39d9.png)


![Docker[3]-Docker的常用命令](https://img-blog.csdnimg.cn/1a085b428ecf4a19a582f38aeed5cf06.png)