目录
前言: 上文传送
4.六大模式实际操作(续)
4.4 路由模式:
---> 4.4.1 消费者配置类
---> 4.4.2 消费者代码
--->4.4.3 生产者代码
4.5 主题模式: (路由升级版)
---> 4.5.1 消费者配置类
---> 4.5.2 消费者代码
---> 4.5.3 生产者代码
---> 4.5.4 测试效果
4.6 RPC异步调用模式(用的少)
---> 4.6.1 消费者配置类
---> 4.6.2 消费者代码
---> 4.6.3 生产者代码
---> 4.6.4 实现效果
文章总结:
前言: 上文传送
微服务 02-rabbitmq在springboot中如何使用(上篇)
4.六大模式实际操作(续)
4.4 路由模式:
---> 4.4.1 消费者配置类
package cn.pingzhuyan.rabbitmq.config;

import org.springframework.amqp.core.DirectExchange;
import org.springframework.amqp.core.FanoutExchange;
import org.springframework.amqp.core.Queue;
import org.springframework.context.annotation.Bean;
import org.springframework.context.annotation.Configuration;

/**
 * rabbitmq的默认手动确认模式
 * @author pzy
 * @version 0.1.0
 * @description: TODO
 */
@Configuration
public class RabbitConfig {

    /**
     * 创建(声明)一个简单队列
     * @return
     */
    @Bean
    public Queue helloQueue(){
//        return new Queue("PZY",true,false,false);
        return new Queue("PZY");
    }

    /**
     * 创建radioFanout交换机
     * 消费者需要绑定此交换机
     * @return
     */
    @Bean
    public FanoutExchange radioFanout(){
        return new FanoutExchange("PZY_RADIO",false,false);
    }

    /**
     * 路由模式 指定路由交换机
     * 指定接收路由键
     * @return
     */
    @Bean
    public DirectExchange directExchange(){
        return new DirectExchange("PZY_DIRECT",false,false);
    }

}
---> 4.4.2 消费者代码
package cn.pingzhuyan.rabbitmq.directM4;

import org.springframework.amqp.rabbit.annotation.Exchange;
import org.springframework.amqp.rabbit.annotation.Queue;
import org.springframework.amqp.rabbit.annotation.QueueBinding;
import org.springframework.amqp.rabbit.annotation.RabbitListener;
import org.springframework.stereotype.Component;

/**
 * 路由交换机消费者
 *
 * @author pzy
 * @version 0.1.0
 * @description: TODO
 */
@Component
public class DirectM4Consumer {

    @RabbitListener(bindings = @QueueBinding(
            value = @Queue,  //不写就是随机队列, false true true
            exchange = @Exchange(name = "PZY_DIRECT", declare = "false"),//交换机(PZY_RADIO, 不创建并使用已经存在的交换机)
            key = {"pzy1", "pzy2"}
    ))
    public void radioFanoutMessage1(String msg) {
        System.out.printf("消费者1接收到<1/2>: %s\n", msg);
    }

    @RabbitListener(bindings = @QueueBinding(
            value = @Queue,  //不写就是随机队列, false true true
            exchange = @Exchange(name = "PZY_DIRECT", declare = "false"),//交换机(PZY_RADIO, 不创建并使用已经存在的交换机)
            key = {"pzy3", "pzy4"}
    ))
    public void radioFanoutMessage2(String msg) {
        System.out.printf("消费者2接收到<3/4>: %s\n", msg);
    }

}
--->4.4.3 生产者代码
package cn.pingzhuyan.rabbitmq.directM4;

import org.springframework.amqp.core.AmqpTemplate;
import org.springframework.beans.factory.annotation.Autowired;
import org.springframework.scheduling.annotation.Async;
import org.springframework.scheduling.annotation.Scheduled;
import org.springframework.stereotype.Component;

import java.util.Random;

/**
 * 路由交换机生产者
 *
 * @author pzy
 * @version 0.1.0
 * @description: TODO
 */
@Component
public class DirectM4Provider {

    @Autowired
    private AmqpTemplate amqpTemplate;


    @Async
    @Scheduled(cron = "*/1 * * * * ?")
    public void directSend01() {

        int num = new Random().nextInt(4) + 1;//生成1-4的随机数

        System.out.println("生产者1: <发布和订阅模式>定时(1次/s)发送 -> " + "我是消息,编号是: " + num);

        amqpTemplate.convertAndSend("PZY_DIRECT", "pzy" + num, "我是消息,编号是: " + num);
    }


}
4.5 主题模式: (路由升级版)
---> 4.5.1 消费者配置类
    /**
     * 主题模式(升级版路由) 指定路由交换机
     * 指定接收路由键表达式
     * @return
     */
    @Bean
    public TopicExchange topicExchange(){
        return new TopicExchange("PZY_TOPIC",false,false);
    }
---> 4.5.2 消费者代码
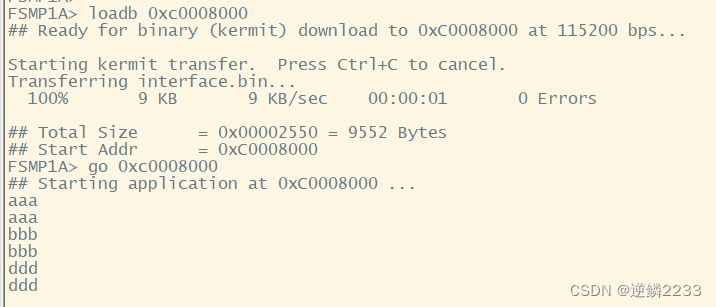
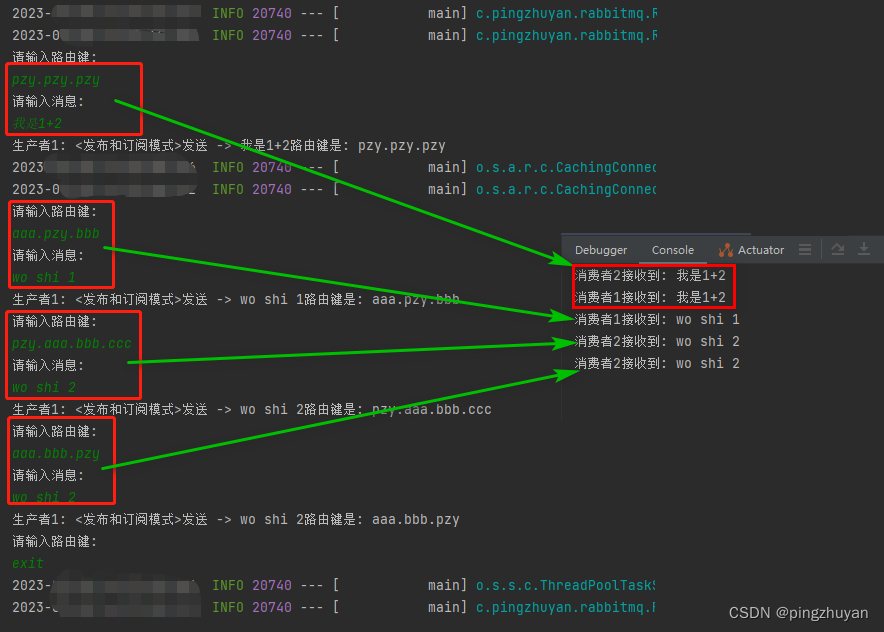
//测试四种
//1. pzy.pzy.pzy 1和2 都能收到
//2. aaa.pzy.bbb 1能收到
//3. pzy.aaa.bbb.ccc 2能收到
//4. aaa.bbb.pzy 2能收到
package cn.pingzhuyan.rabbitmq.topicM5;

import org.springframework.amqp.rabbit.annotation.Exchange;
import org.springframework.amqp.rabbit.annotation.Queue;
import org.springframework.amqp.rabbit.annotation.QueueBinding;
import org.springframework.amqp.rabbit.annotation.RabbitListener;
import org.springframework.stereotype.Component;

/**
 * 路由交换机消费者
 * 测试四种
 * 1. pzy.pzy.pzy     1和2 都能收到
 * 2. aaa.pzy.bbb     1能收到
 * 3. pzy.aaa.bbb.ccc 2能收到
 * 4. aaa.bbb.pzy     2能收到
 *
 * @author pzy
 * @version 0.1.0
 * @description: TODO
 */
@Component
public class TopicM5Consumer {

    /**
     * 消费者1
     *
     * @param msg
     */
    @RabbitListener(bindings = @QueueBinding(
            value = @Queue,  //不写就是随机队列, false true true
            exchange = @Exchange(name = "PZY_TOPIC", declare = "false"),//交换机(PZY_RADIO, 不创建并使用已经存在的交换机)
            key = {"*.pzy.*"}
    ))
    public void radioFanoutMessage1(String msg) {
        System.out.printf("消费者1接收到: %s\n", msg);
    }

    /**
     * 消费者2
     *
     * @param msg
     */
    @RabbitListener(bindings = @QueueBinding(
            value = @Queue,  //不写就是随机队列, false true true
            exchange = @Exchange(name = "PZY_TOPIC", declare = "false"),//交换机(PZY_RADIO, 不创建并使用已经存在的交换机)
            key = {"pzy.#", "*.*.pzy"}
    ))
    public void radioFanoutMessage2(String msg) {
        System.out.printf("消费者2接收到: %s\n", msg);
    }

}
---> 4.5.3 生产者代码
@PostConstruct解释传送门===> : 启动类加载时方法执行的几种实现方式
package cn.pingzhuyan.rabbitmq.topicM5;

import org.springframework.amqp.core.AmqpTemplate;
import org.springframework.beans.factory.annotation.Autowired;
import org.springframework.stereotype.Component;

import javax.annotation.PostConstruct;
import java.util.Scanner;

/**
 * 主题模式生产者
 *
 * @author pzy
 * @version 0.1.0
 * @description: TODO
 */
@Component
public class TopicM5Provider {

    @Autowired
    private AmqpTemplate amqpTemplate;

    @PostConstruct
    public void topicSend01() {

        for (; ; ) {
            System.out.println("请输入路由键: ");
            String routingKey = new Scanner(System.in).nextLine();

            /*中断测试,启动程序完成*/
            if ("exit".equalsIgnoreCase(routingKey)) break;

            System.out.println("请输入消息: ");
            String message = new Scanner(System.in).nextLine();

            System.out.println("生产者1: <发布和订阅模式>发送 -> " + message + "路由键是: " + routingKey);

            amqpTemplate.convertAndSend("PZY_TOPIC", routingKey, message);
        }
    }
}
---> 4.5.4 测试效果
4.6 RPC异步调用模式(用的少)
---> 4.6.1 消费者配置类
---> 4.6.2 消费者代码
---> 4.6.3 生产者代码
---> 4.6.4 实现效果
文章总结:
到此 springboot整合rabbitmq的基础demo结束了 代码一行行敲得 结果都是实际测试成功的
还有其他写法 后续可能会补充进去 , 欢迎评论