目录
Vue2:
1. 路由:
2. 路由规则:
3. 实现切换(active-class可配置高亮样式)
4. 指定展示位置
5. 路由的query参数
6. params传参:
7. 多级路由
8. 路由的props配置
9. 的replace属性
10. 编程式路由导航
11. 缓存路由组件
12. 两个新的生命周期钩子
Vue3:
Vue2:
1. 路由:
- 理解:一个路由(route)就是一组映射关系(key-value),多个路由需要路由器(router)进行管理。
- 前端路由:key是路径,value是组件
2. 路由规则:
编写router配置项(在router文件夹中的index.js文件中)
       //引入VueRouter插件
       import VueRouter from 'vue-router'
       //引入路由组件
       import About from '../components/About
       import Home from '../componets/Home

       //创建router实例对象,去管理路由规则
       const router = new VueRouter({
         routes:[
           {
             path:'/about',
             component:About
           },
           {
             path:'/home',
             component:Home
           }
         ]
       })

       //暴露router
       export default router
3. 实现切换(active-class可配置高亮样式)
<router-link active-class='active' to='/about'>About</router-link>4. 指定展示位置
<router-view></router-view>5. 路由的query参数
1)传递参数的组件(携带参数有【to的字符串】写法和【to的对象】写法):
      //跳转并携带query参数,to的字符串写法
      <router-link :to="`/home/message/detail?id=${m.id}&title=${m.title}`">{{m.title}}</router-link>

      //跳转并携带query参数,to的对象写法
      <router-link :to="{
          path:'/home/message/detail',
          query:{
            id:m.id,
            title:m.title
          }
        }">
          {{m.title}}
        </router-link>
2)接收参数的组件:
<template>
  <ul>
      <li>消息编号:{{$route.query.id}}</li>
      <li>消息标题:{{$route.query.title}}</li>
  </ul>
</template>
6. params传参:
首先我们要注意的第一个点:
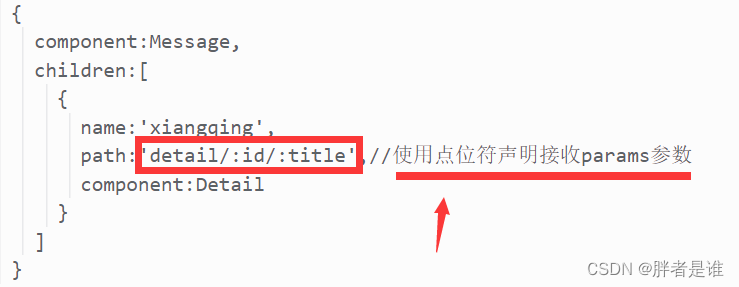
1)传递参数的组件:
<!--跳转路由并携带params参数,to的字符串写法-->
<router-link :to="`/home/message/detail/${m.id}/${m.title}`">{{m.title}}</router-link>
<!--跳转路由并携带params参数,to的对象写法-->
<router-link
:to="{
name:'xiangqing',
params:{
id:m.id,
title:m.title
}
}"
>{{m.title}}
</router-link>特别注意:路由携带params参数时,若使用to的对象写法,则不能使用path配置项,必须使用name配置!!
2)接收参数的组件:
<template>
  <ul>
      <li>消息编号:{{$route.params.id}}</li>
      <li>消息标题:{{$route.params.title}}</li>
  </ul>
</template>
7. 多级路由
配置路由规则(在router文件中的index.js文件中)使用children配置项:
        routes:[
        {
          path:'/about',
          component:About,
        },
        {
          path:'/home',
          component:Home,
          children:[//通过children配置子级路由
            {
              path:'news', //此处一定不要写成 /news
              component:News,
            },
            {
              path:'message',//同理可得
              component:Message,
            }
          ]
        }
      ]
ps:children配置项里的path路径不要加【/】
8. 路由的props配置
作用:让路由组件更方便的收到参数。
              {
                 path:'message',
                 component:Message,
                 children:[
                     {
                        name:'xiangqing',
                        path:'detail',
                        component:Detail,
                        //props的第一种写法,值为对象,该对象中的所有key-value都会以props的形式传给Detail组件
                        //props:{a:1,b:'hello'}

                        //props的第二种写法,值为布尔值.若布尔值为真,就会把该路由组件收到的所有params参数,以props的形式传给Detail组件
                        //props:true

                        //props的第三种写法,值为函数(在query接收参数时)
                        props($route){
                            return {id:$route.query.id,title:$route.query.title}
                        }
                     }
                 ]
             }
几个注意点:
- 路由组件通常存放在pages文件夹中,一般组件通常存放在components文件
- 通过切换,‘隐藏’了的路由组件,默认是被销毁掉的,需要的时候再去挂载
- 每个组件都有自己的$route属性,里面存储自己的路由信息
- 整个应用只有一个router,可以通过组件的$router属性获取到
9. <router-link>的replace属性
- 作用:控制中由跳转时操作浏览器历史记录的模式
- 浏览器的历史有两种写入方式:分别为push和replace,push是追加历史记录,replace是替换当前记录,路由跳转时候默认为push
- 如何开启replace模式:<router-link replace……>News<router-link>
10. 编程式路由导航
除了借助<router-link>实现路由跳转,我们还可以通过编程式路由跳转,它相比 <router-link>实现路由跳转来说,使用路由跳转更加的灵活。废话不多说,我们来看一下具体是怎么实现的:
结构:
<template>
   <div>
    <ul>
      <li v-for="m in messageList" :key="m.id">
          {{m.title}}
        <button @click="pushShow(m)">push查看</button>
        <button @click="replaceShow(m)">replace查看</button>
      </li>
    </ul>
    <hr>
    <router-view></router-view>
   </div>
</template>
Click触发的事件:
 methods:{
      pushShow(m){
        this.$router.push({
          name:'xiangqing',
          query:{
            id:m.id,
            title:m.title
          }
        })
      },
      replaceShow(m){
        this.$router.replace({
          name:'xiangqing',
          query:{
            id:m.id,
            title:m.title
          }
        })
      }
    }
  }
- this.$router.forward() 前进
- this.$router.back() 后退
- this.$router.go(-2) 正数是前进几步,负数是后退几步
11. 缓存路由组件
作用:让不展示的路由组件保持挂载,不被销毁
      <!--缓存多个组件-->
      <!--<keep-alive  :include="['News','Message']">-->
      <!--缓存一个组件-->
      <keep-alive  include="News">
        <router-view></router-view>
      </keep-alive>
注意:News是组件名
12. 两个新的生命周期钩子
- 作用:路由组件所独有的两个钩子,用于捕获路由组件的激活状态
- 具体名字:
1)activated 路由组件被激活时触发
2)deactivated 路由组件失活时触发。
activated(){
//激活
console.log('激活了')
this.timer = setInterval(() =>{
this.opacity -= 0.01
if(this.opacity <= 0)this.opacity = 1
},16)
},
deactivated(){
//失活
console.log('失活了')
clearInterval(this.timer)
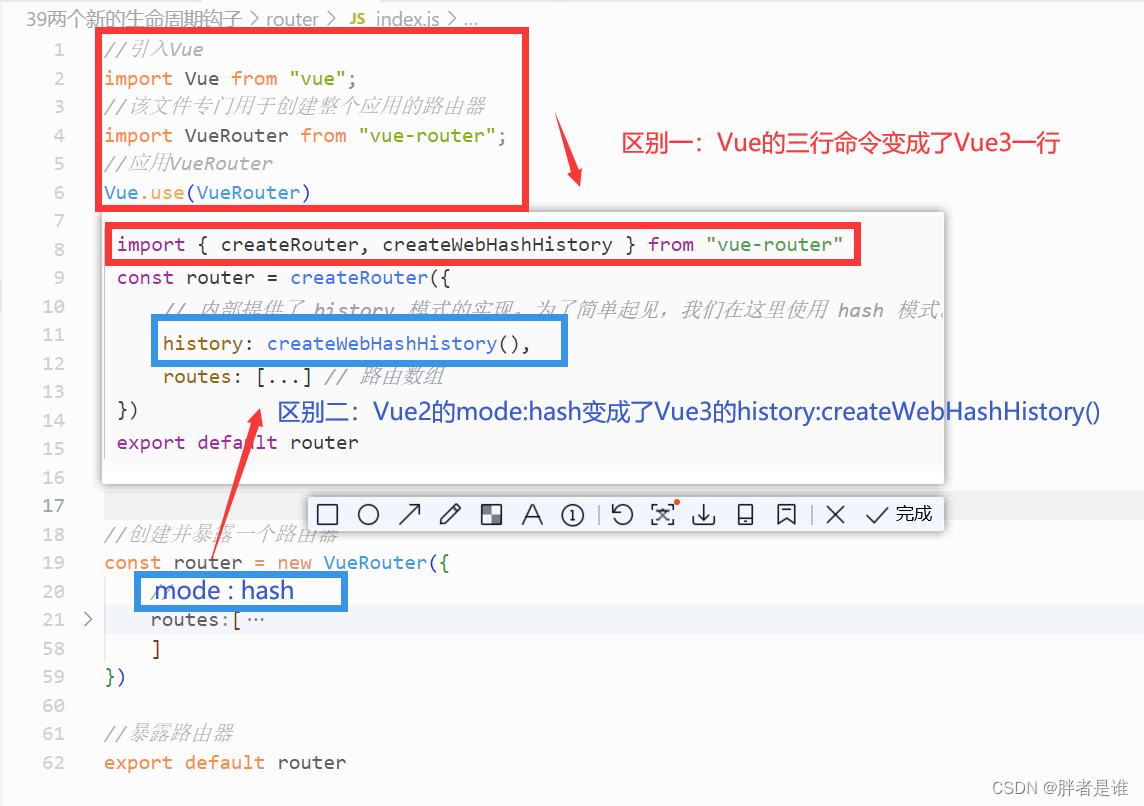
}Vue3:
Vue2的路由基本介绍完了,那么在Vue3中,又作出了哪些调整呢?
在index.js中:
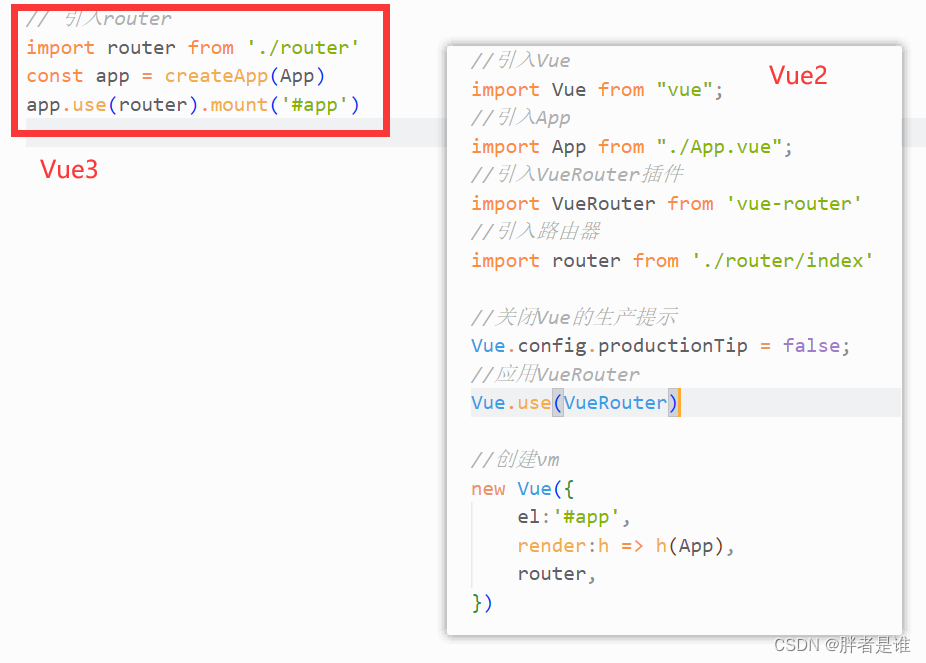
在main.js中:
VUE3中某些组件使用:
- import { useRouter, useRoute } from 'vue-router' 【按需引入】
- useRouter, useRoute是方法,分别相当于VUE2中的$router、$route
<script setup>
	import { ref, watch } from 'vue'
	import { useRouter, useRoute } from 'vue-router'
	const router = useRouter() // 和 vue2中的this.$router 是一样的
	const toDetail = (id) => {
		router.push({
			path: `/detail`
			query: {
				id: id
			}
		})
	}

	const route = useRoute() // 和 vue2中的this.$route 是一样的
	watch(route, () => {
	    // ...
	})
</script>


![[附源码]Python计算机毕业设计Django疫情期间小学生作业线上管理系统](https://img-blog.csdnimg.cn/31597253376a4e3084e85db5cdd0d6e4.png)

![[附源码]Python计算机毕业设计Django智能家电商城](https://img-blog.csdnimg.cn/71c136aab6b3465a8d2c8bf67061f916.png)