Devops之制品库平台实践-nexus
目录
本节实践
| 实战名称 |
|---|
| 💘 实践:配置Maven代理仓库(测试成功)-2022.6.7 |
| 💘 实践:创建Maven本地仓库(依赖)-2022.6.10(测试成功) |
| 💘 实践:创建Raw本地仓库(制品)(测试成功)-2022.6.10 |
| 💘 实践:使用管理页面上传制品(测试成功)-2023.6.27 |
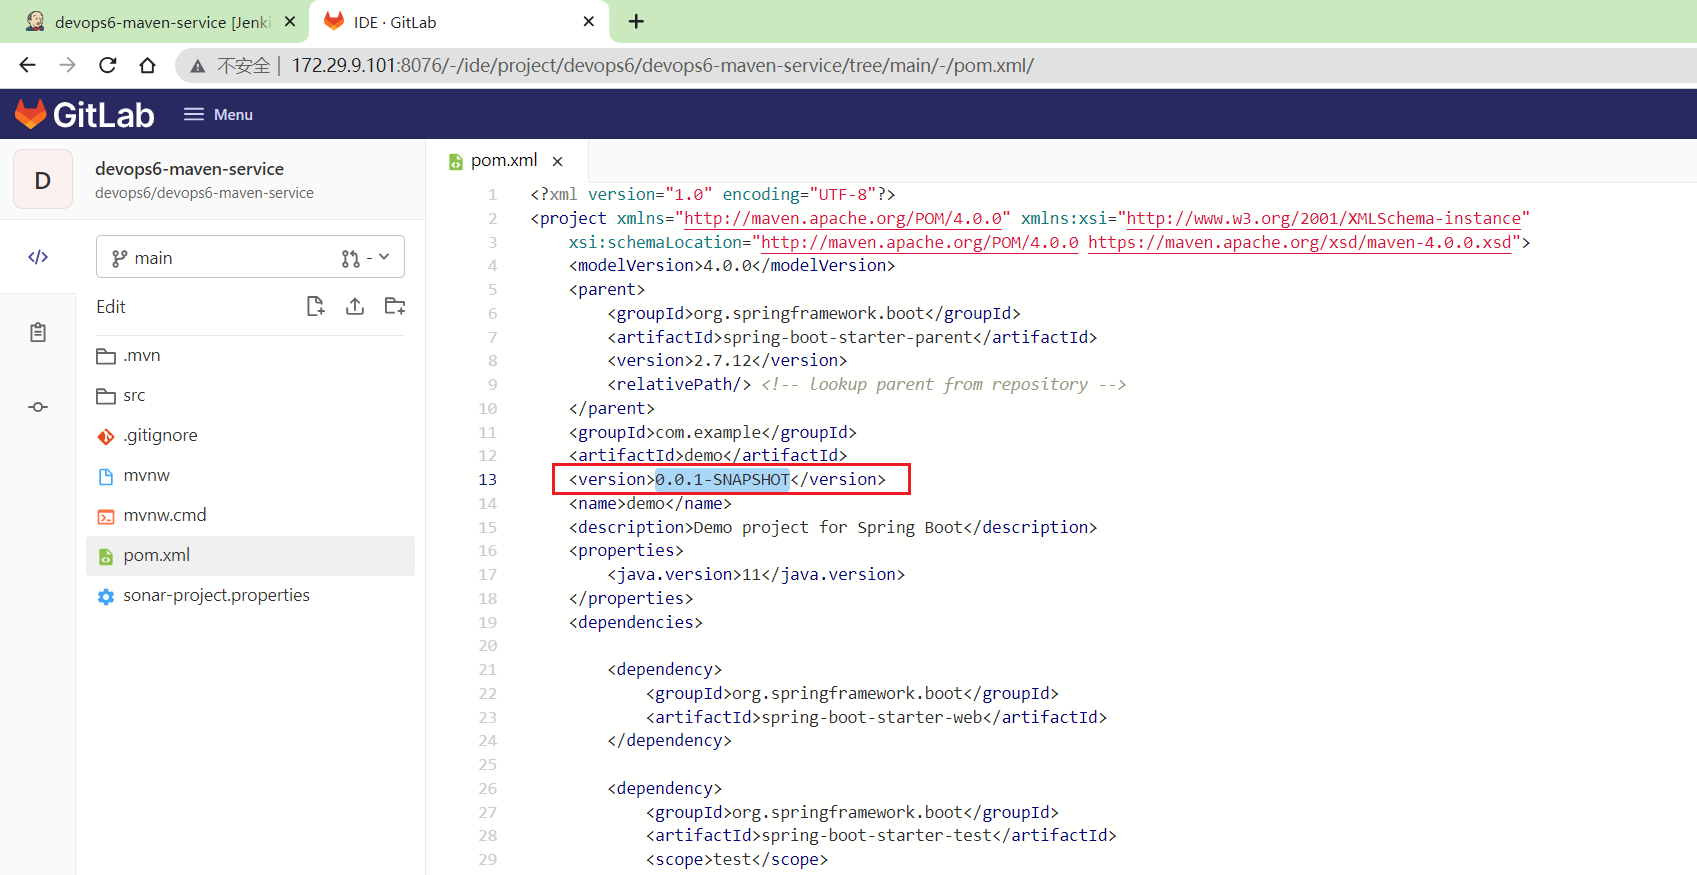
| 💘 实践:使用mvn命令上传制品(自定义pom信息(灵活))-2022.6.11 |
| 💘 实践:直接读取pom文件(扩展)-2022.6.11(测试成功) |
| 💘 实践:使用Jenkins插件上传制品(把信息写死)(测试成功)-2023.6.28 |
| 💘 实践:使用Jenkins插件上传制品(读取POM文件上传制品)(测试成功)-2023.6.28 |
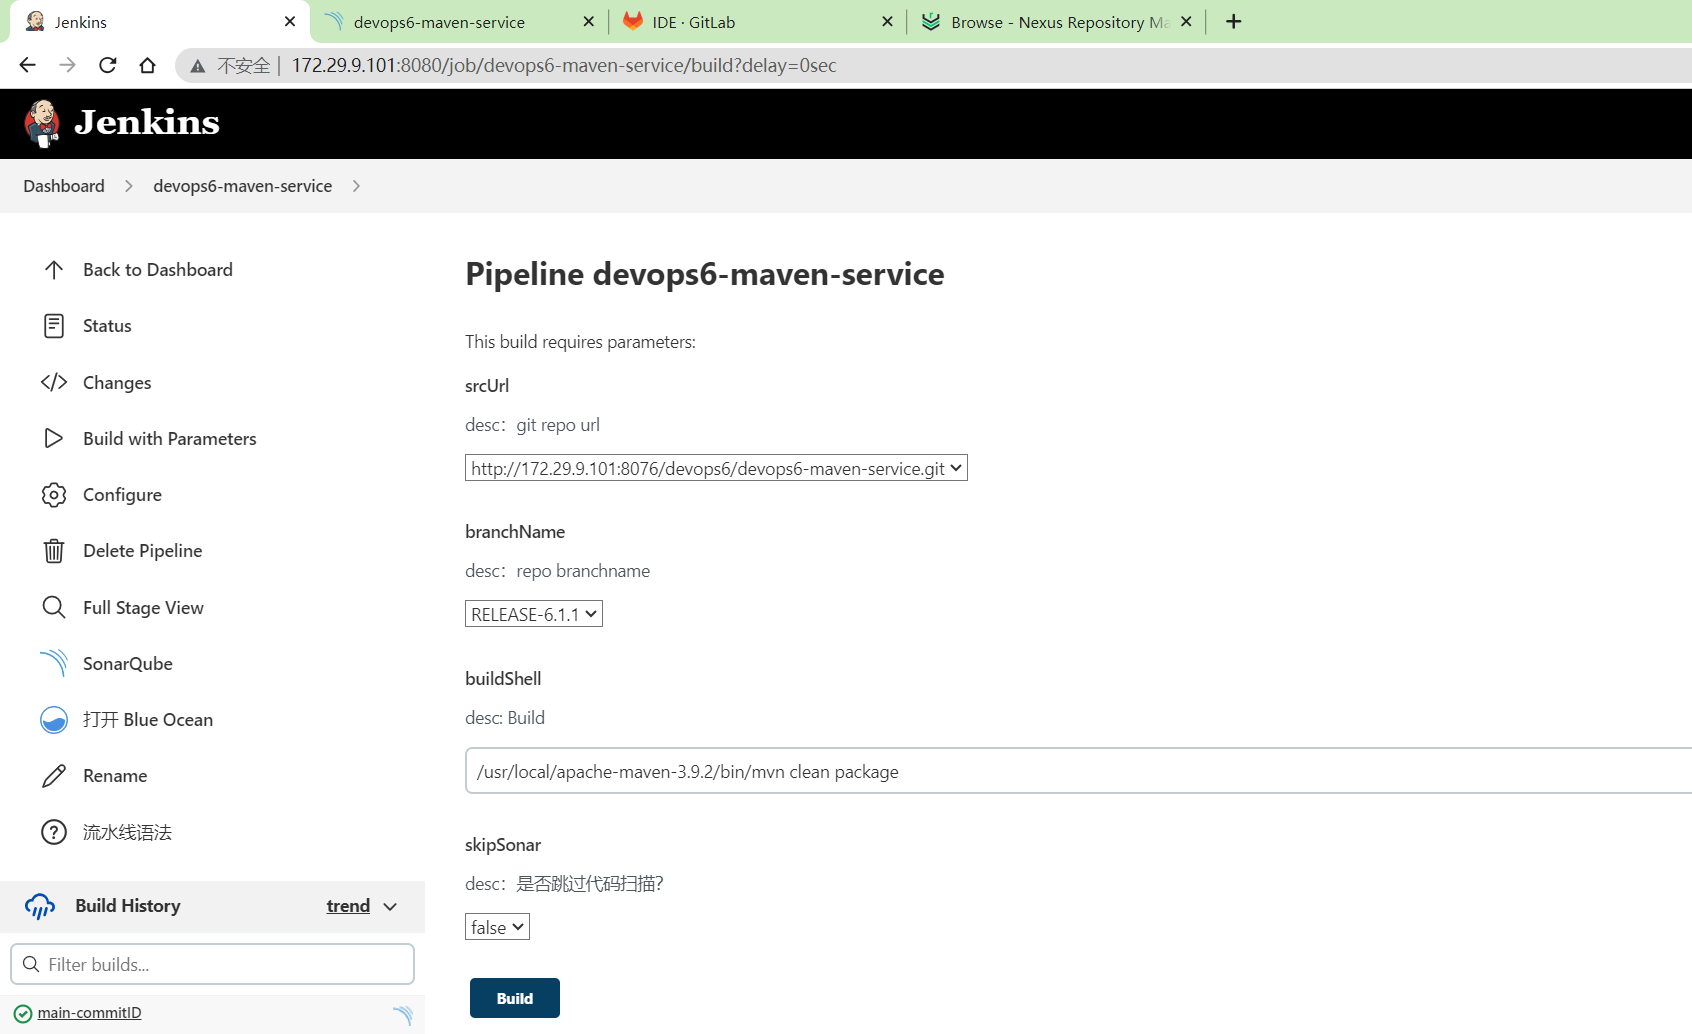
| 💘 扩展: 可以在Jenkins页面添加参数, 让用户输入后进行发布(测试成功)-2023.6.28 |
| 💘 实践:Jenkins插件获取包路径-2023.6.29(测试成功) |
| 💘 实践:CI综合实践-2023.6.29(测试成功) |
1、Nexus基本功能简介
官网:https://www.sonatype.com/products/nexus-repository?topnav=true
官方文档: https://help.sonatype.com/repomanager3/product-information/release-notes
工作流定义:
- 集成流水线: 提交代码,构建,单测,代码扫描,上传制品【生成制品】
- 发布流水线: 输入版本号, 输入部署环境.(从对应环境的制品库中取制品)
制品类型: 二进制制品, docker镜像
核心技能点:
- 制品库管理规范(创建)
- 上传制品
- 下载制品
从3.x开始,它默认支持许多主流的软件包格式。Docker、Maven、Npm:
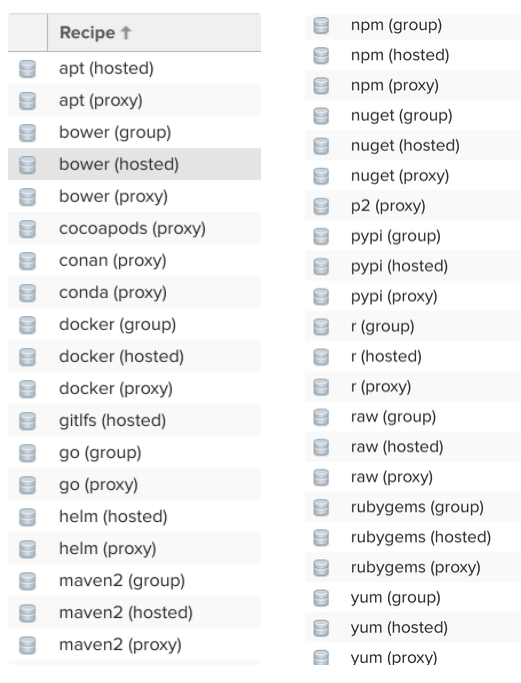
仓库类型:
- proxy 代理仓库。
- hosted 私有仓库。
- group 仓库组,将多个仓库组合在一起,通过同一个URL对外提供。
代理仓库 : Maven、Npm等。用于存储外网公共仓库中的插件和依赖,不可进行修改和私自上传。
2、Nexus3安装部署配置
- docker部署
## 1、下载镜像
docker pull sonatype/nexus3:3.53.0

## 2、创建数据存储目录
mkdir -p /data/devops6/nexus3/data
chmod 777 -R /data/devops6/nexus3/

## 3、启动命令
docker run -itd \
-p 8081:8081 \
-v /data/devops6/nexus3/:/nexus-data \
--restart=always \
--name nexus3 sonatype/nexus3:3.53.0

## 4、访问
http://172.29.9.101:8081
- 查看日志来确定Nexus是否已启动并准备就绪
docker logs nexus3 -f
- 在日志中,看到
Started Sonatype Nexus OSS 3.53.0-01,这意味着Nexus可以使用了。现在转到浏览器并打开:
http://172.29.9.101:8081
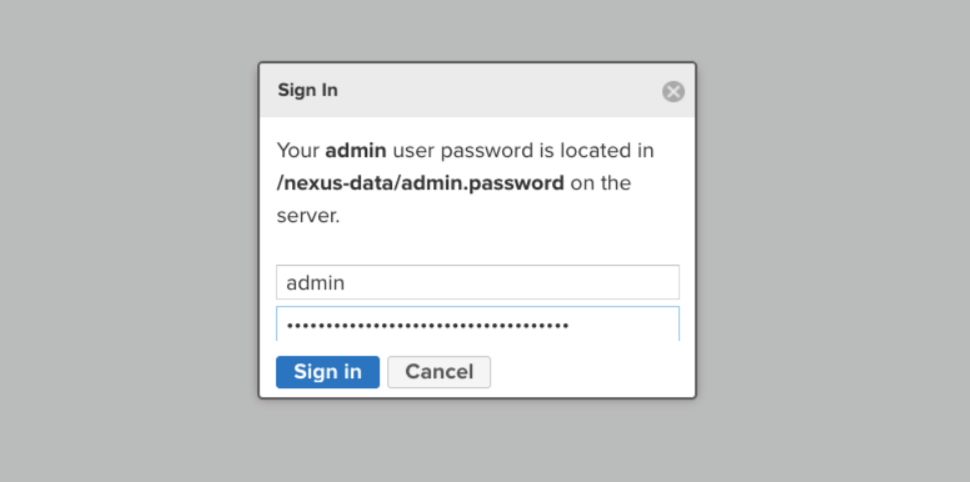
- 安装完成后, 默认的admin账号密码存储在了数据目录,获取初始化密码:
docker exec nexus3 cat /nexus-data/admin.password
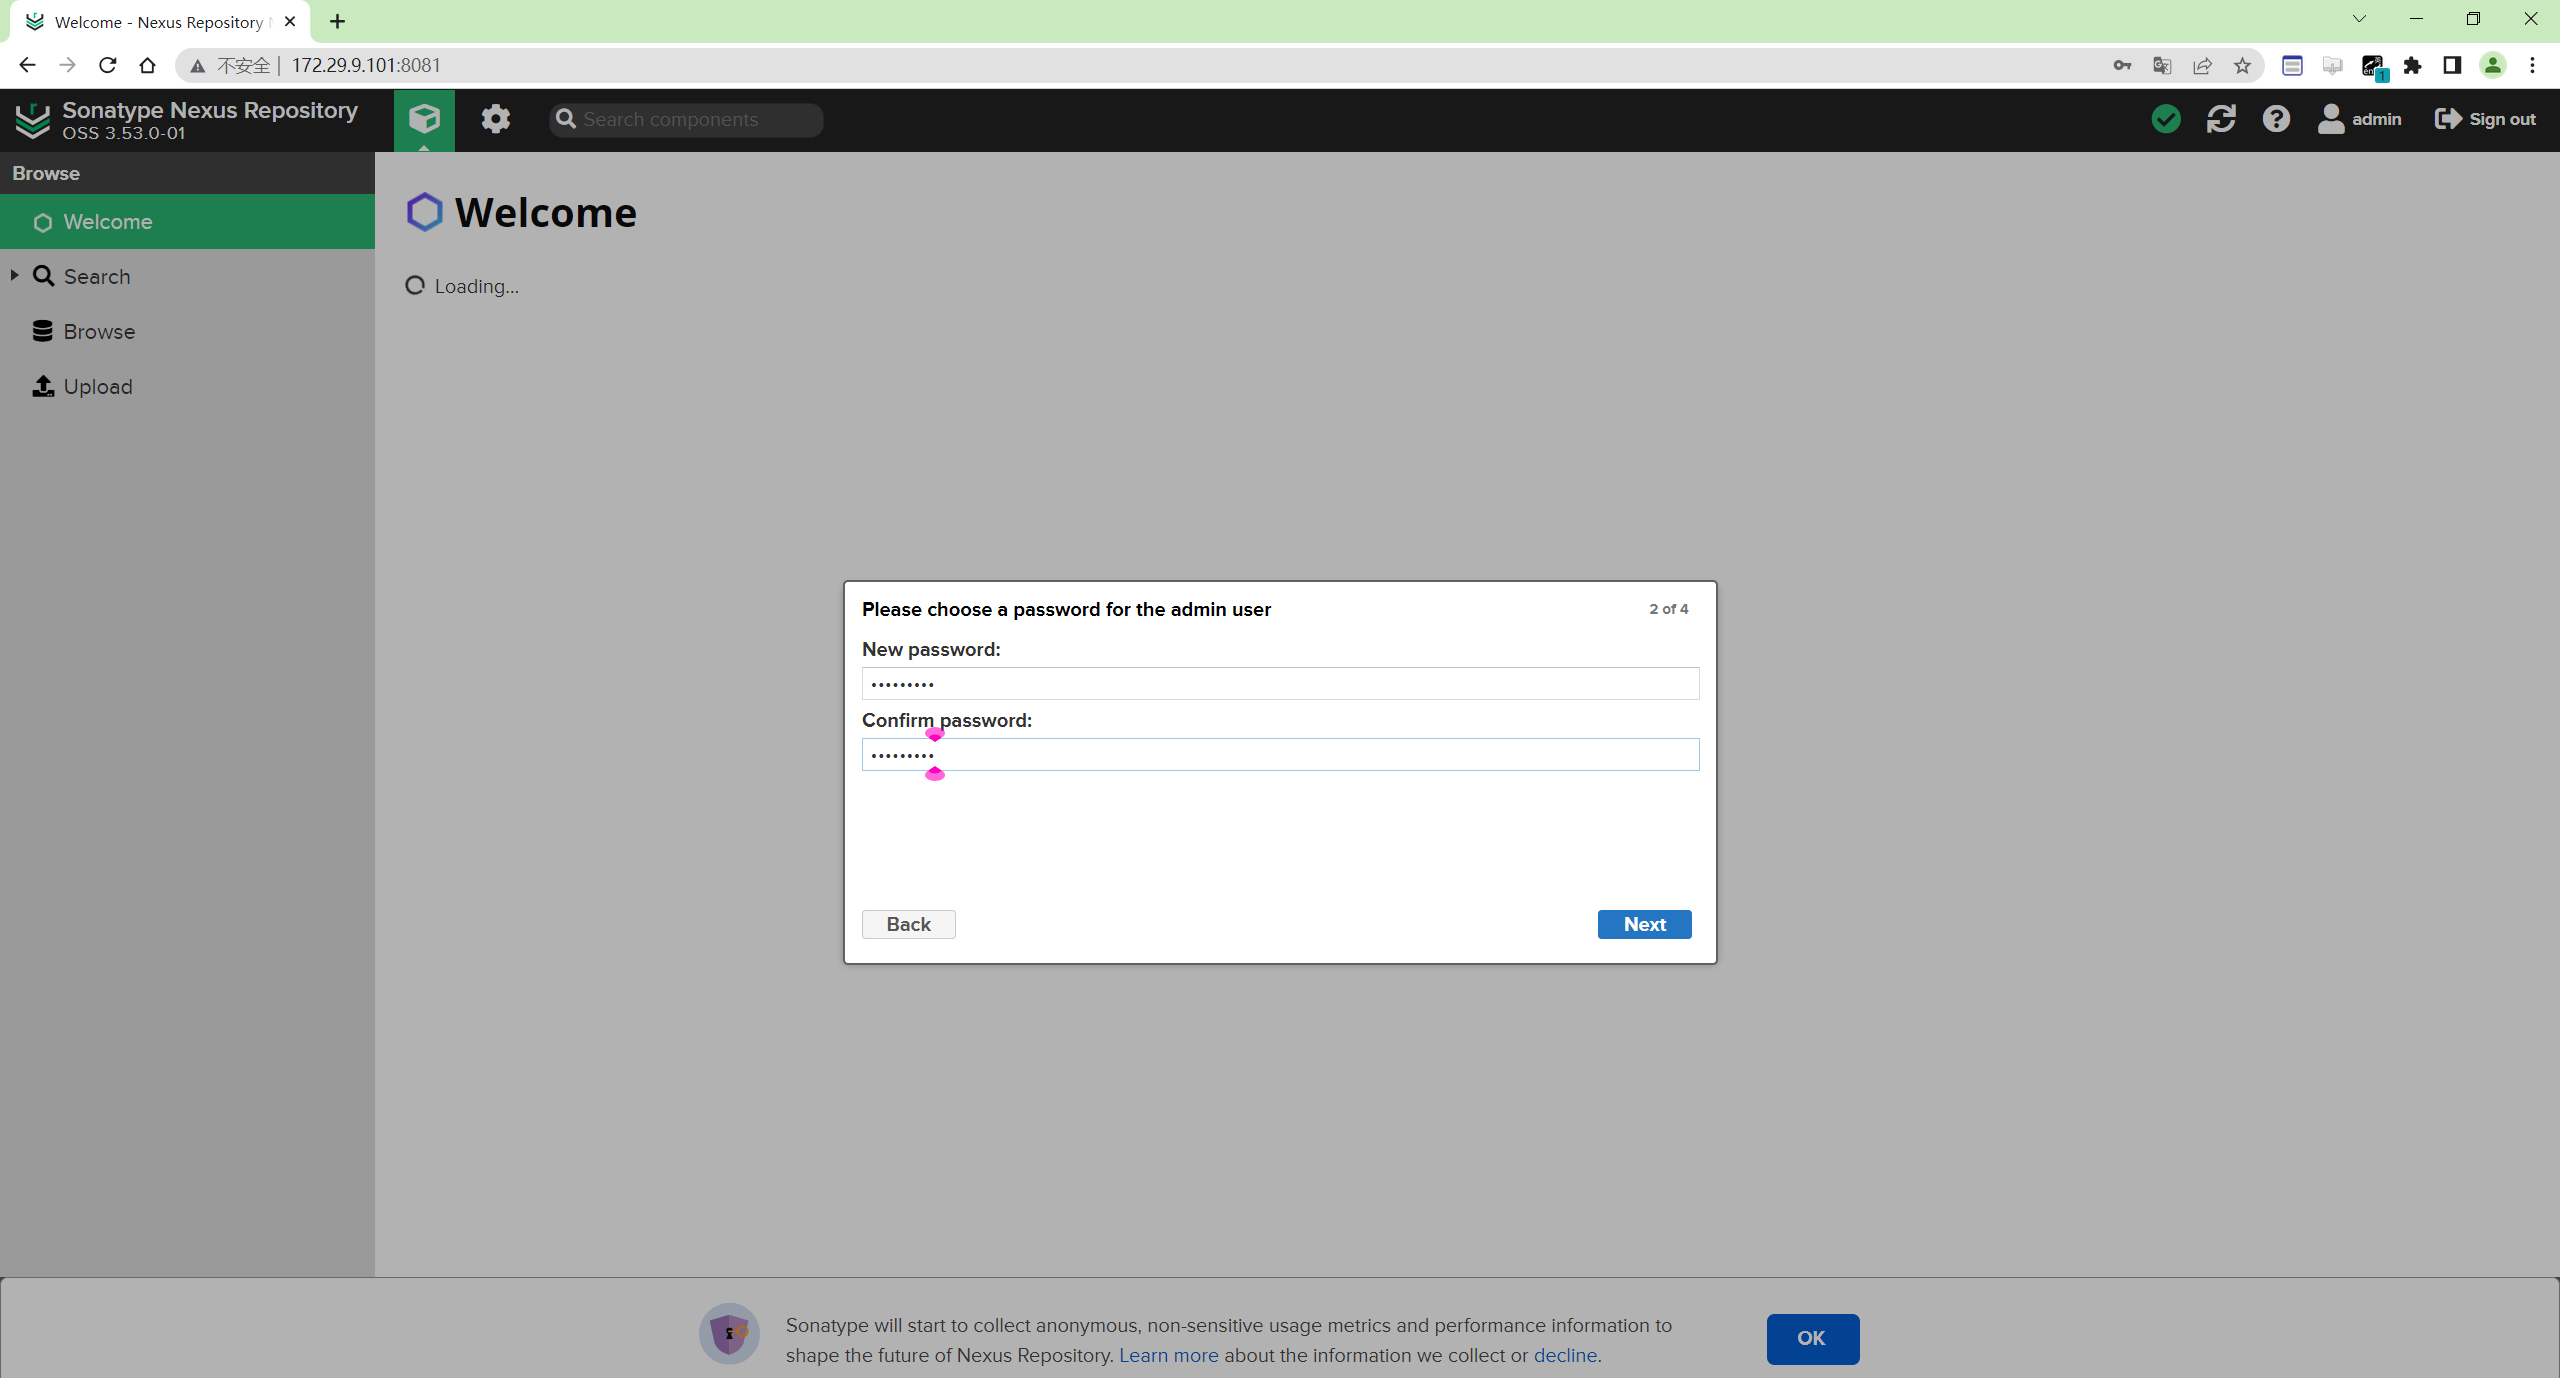
登录后需要更新密码 admin/Admin@123
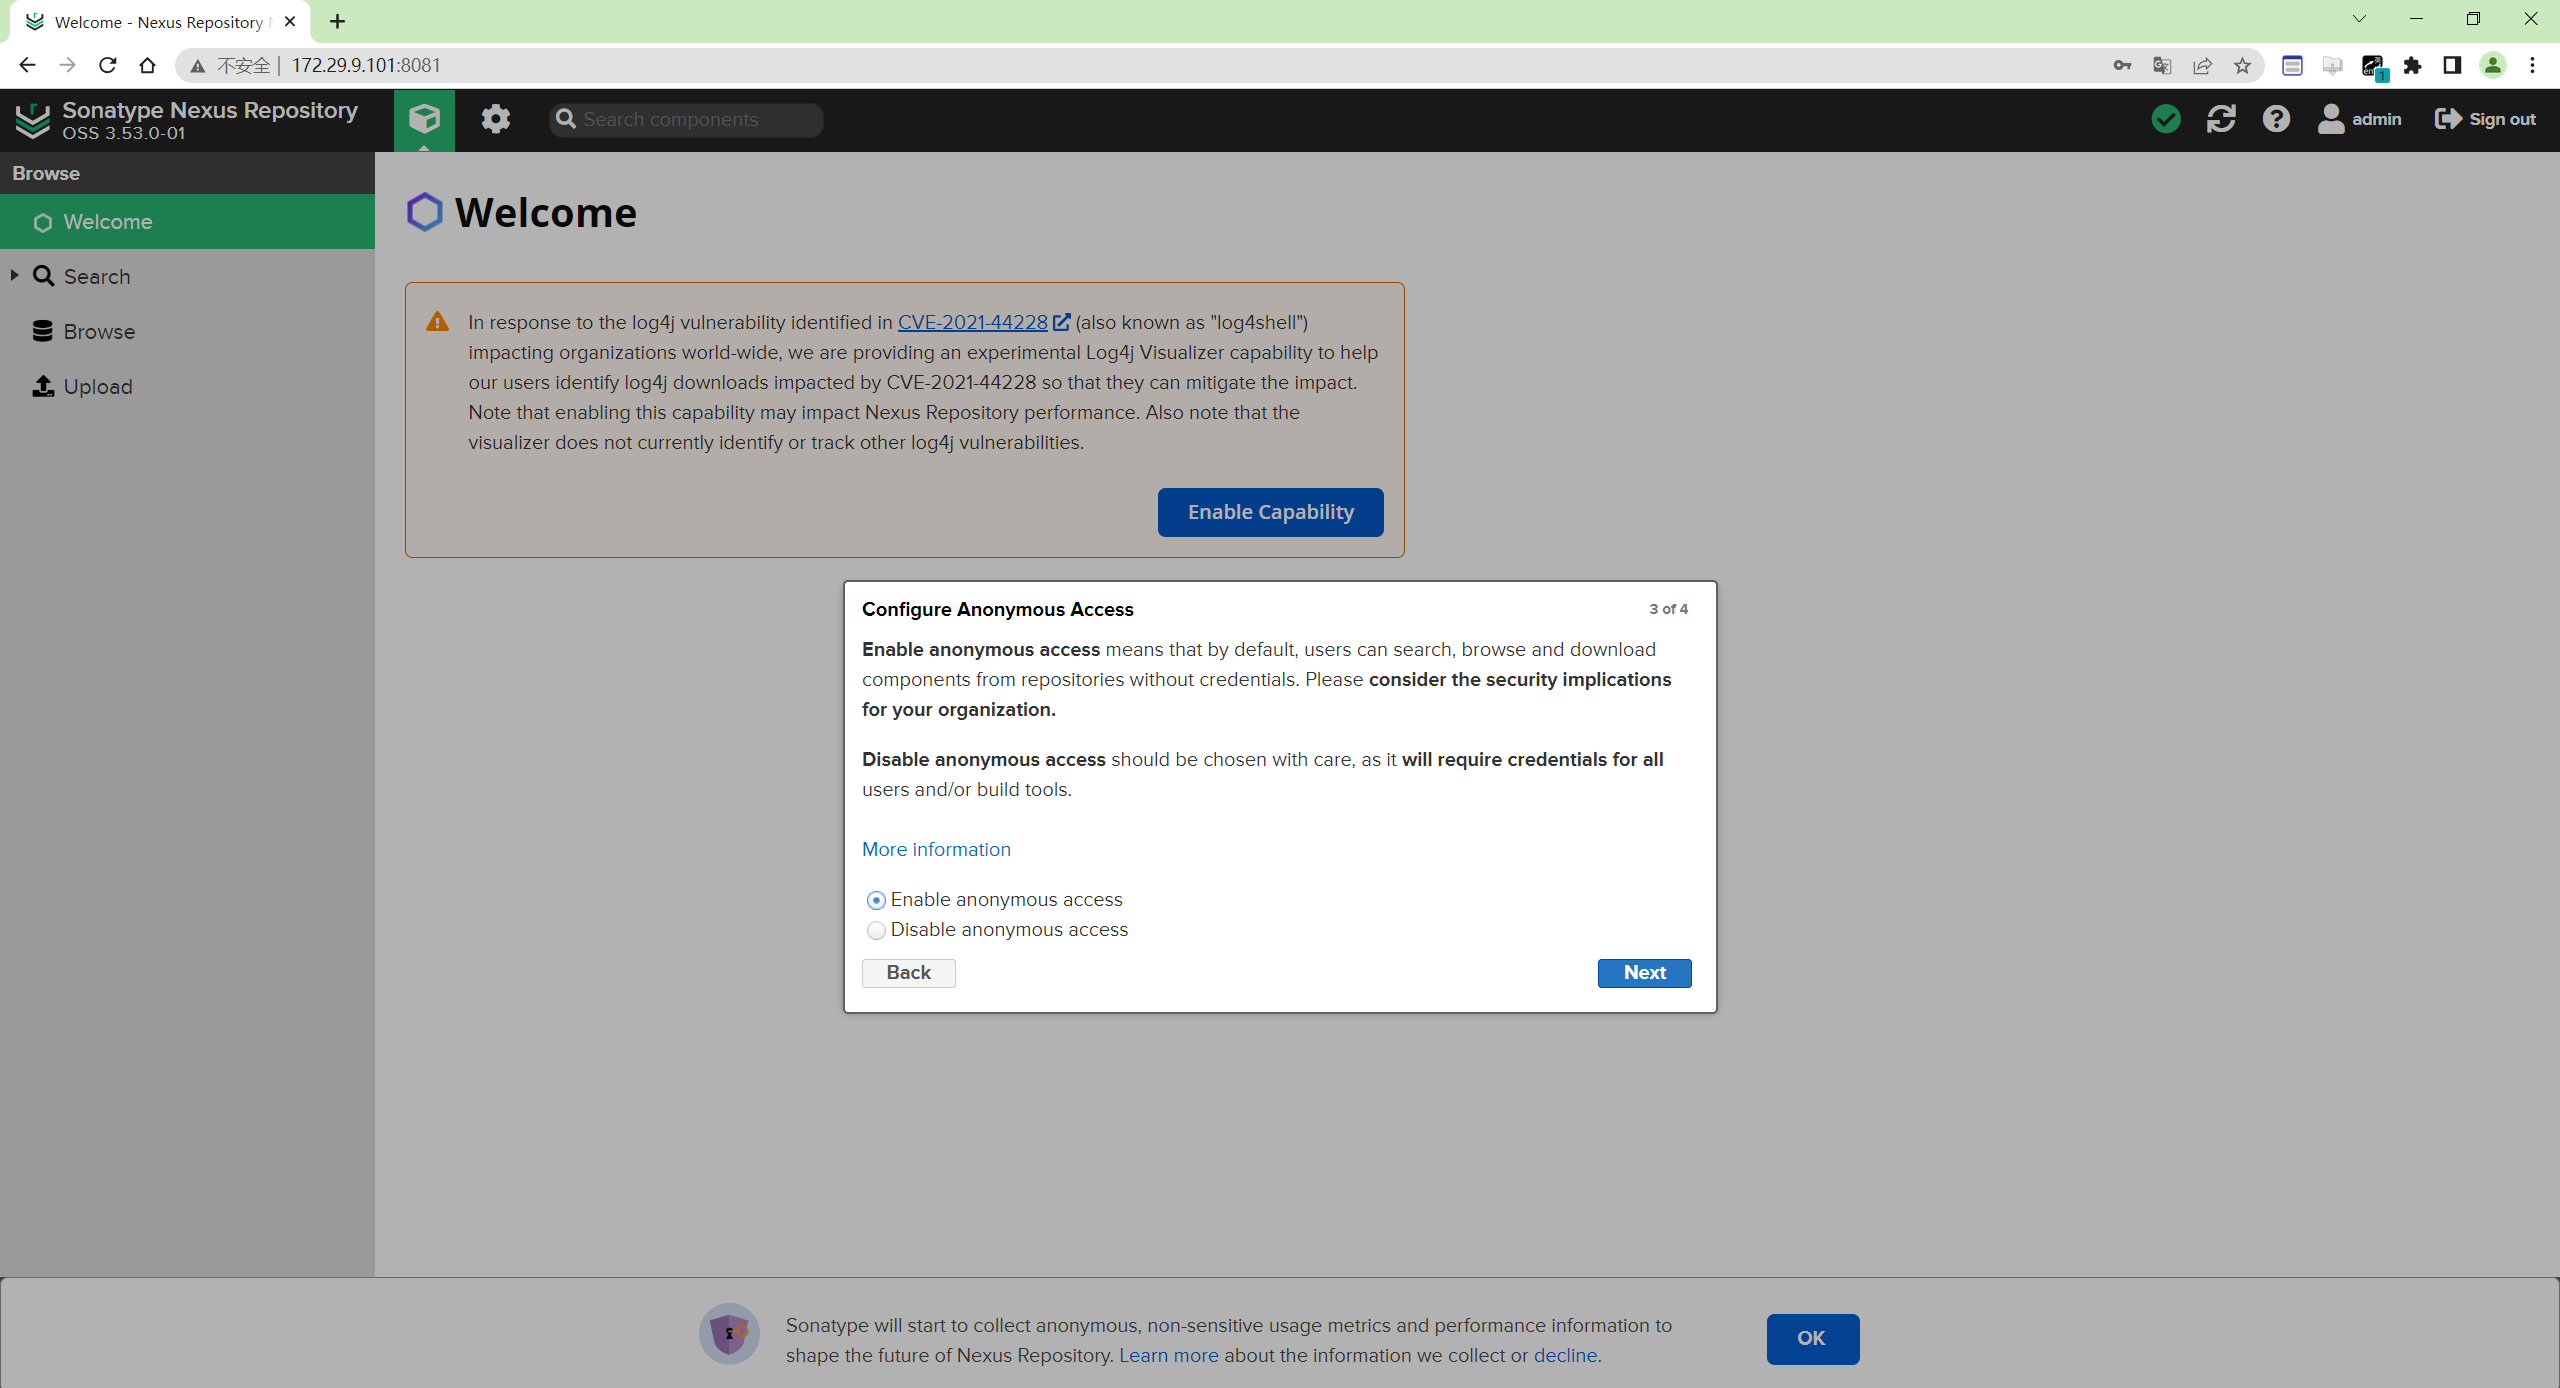
这里可以启用匿名用户登录,无所谓的:
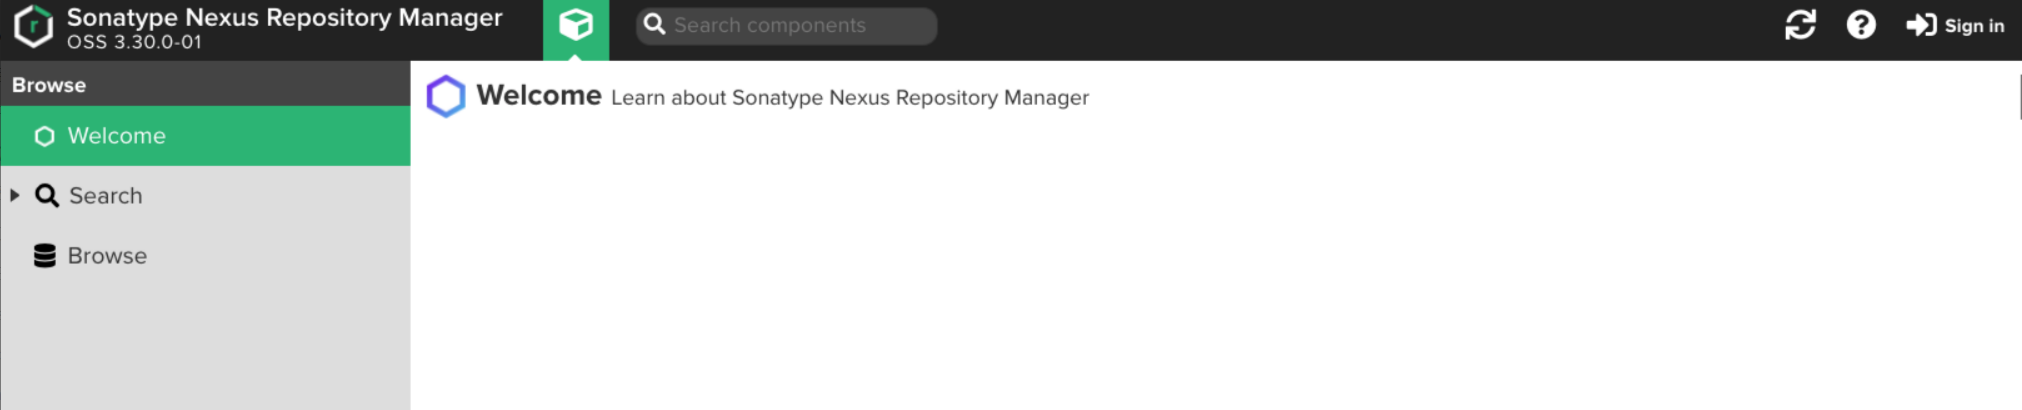
- 登录后
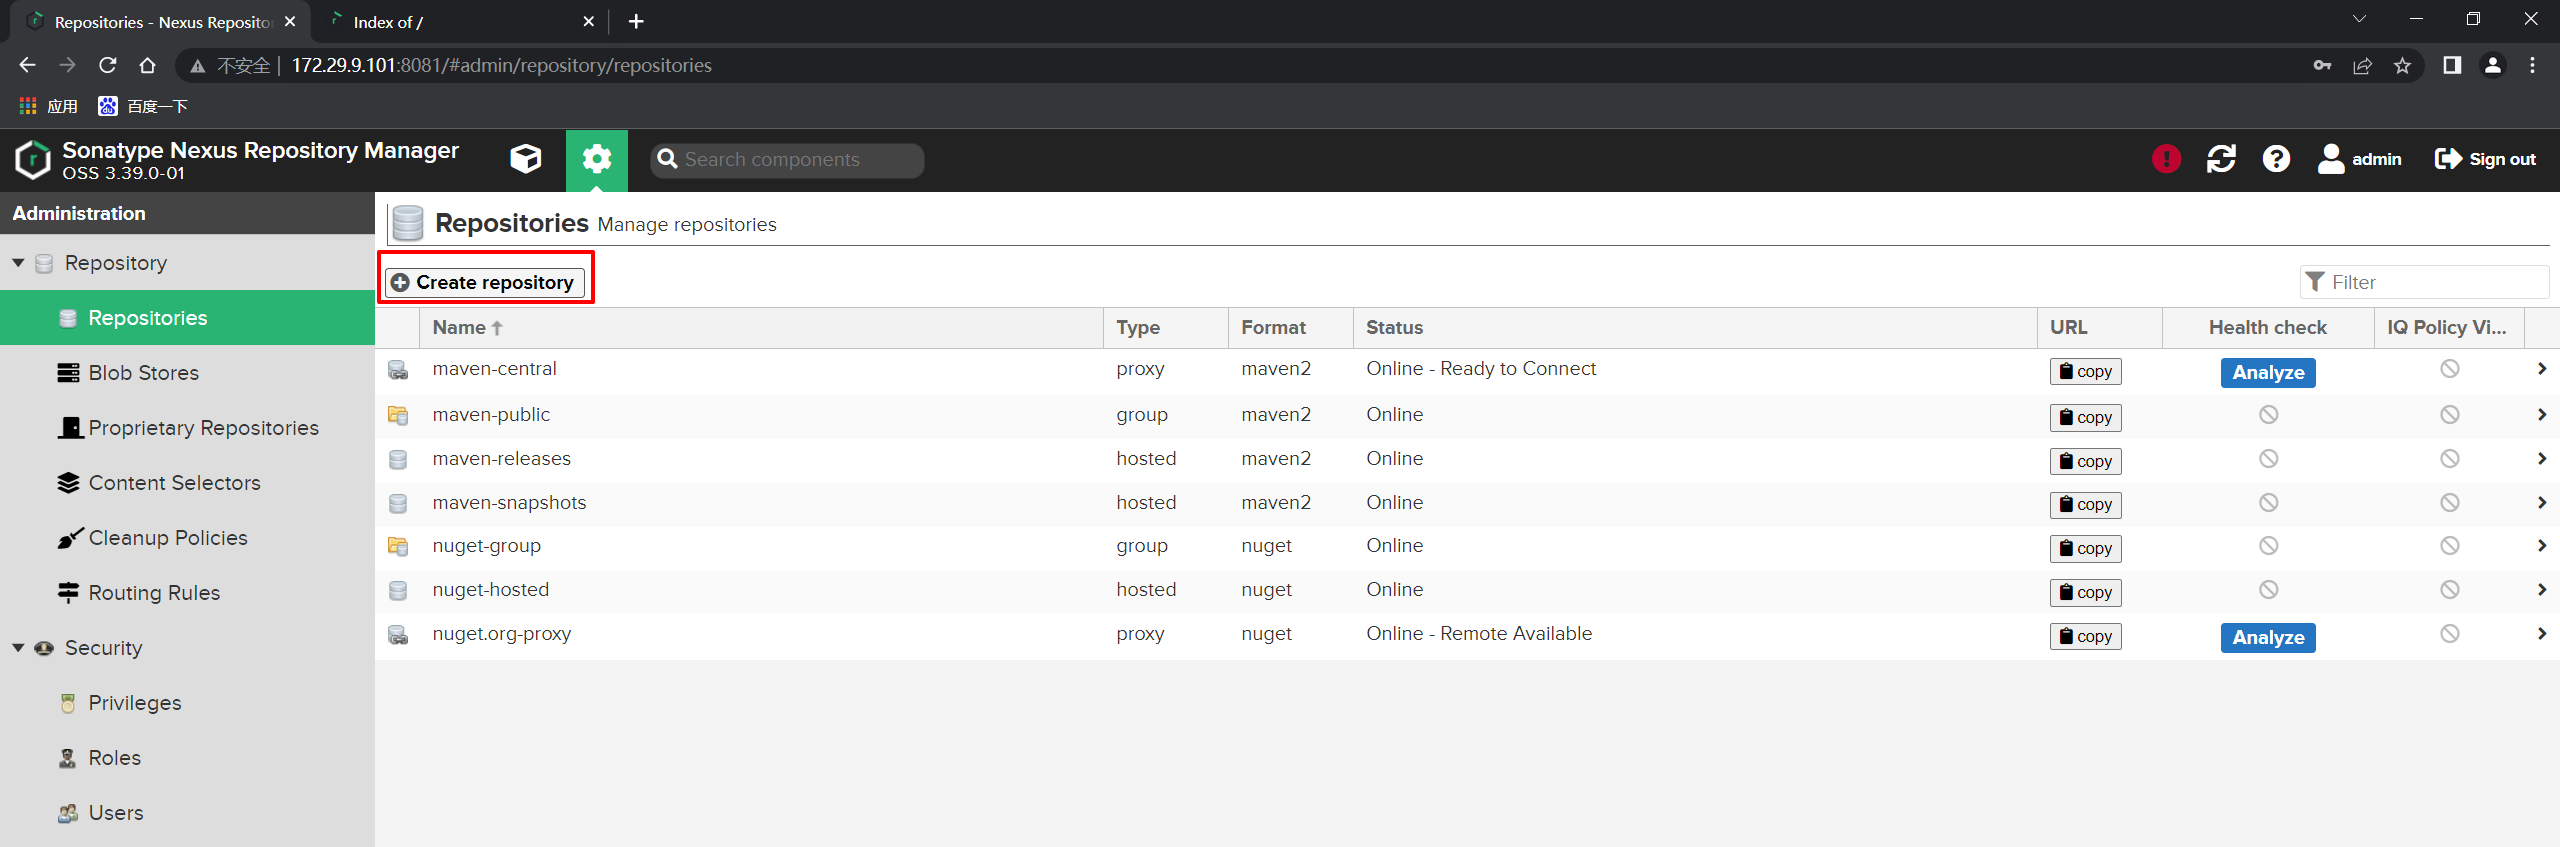
3、Nexus制品库应用实践
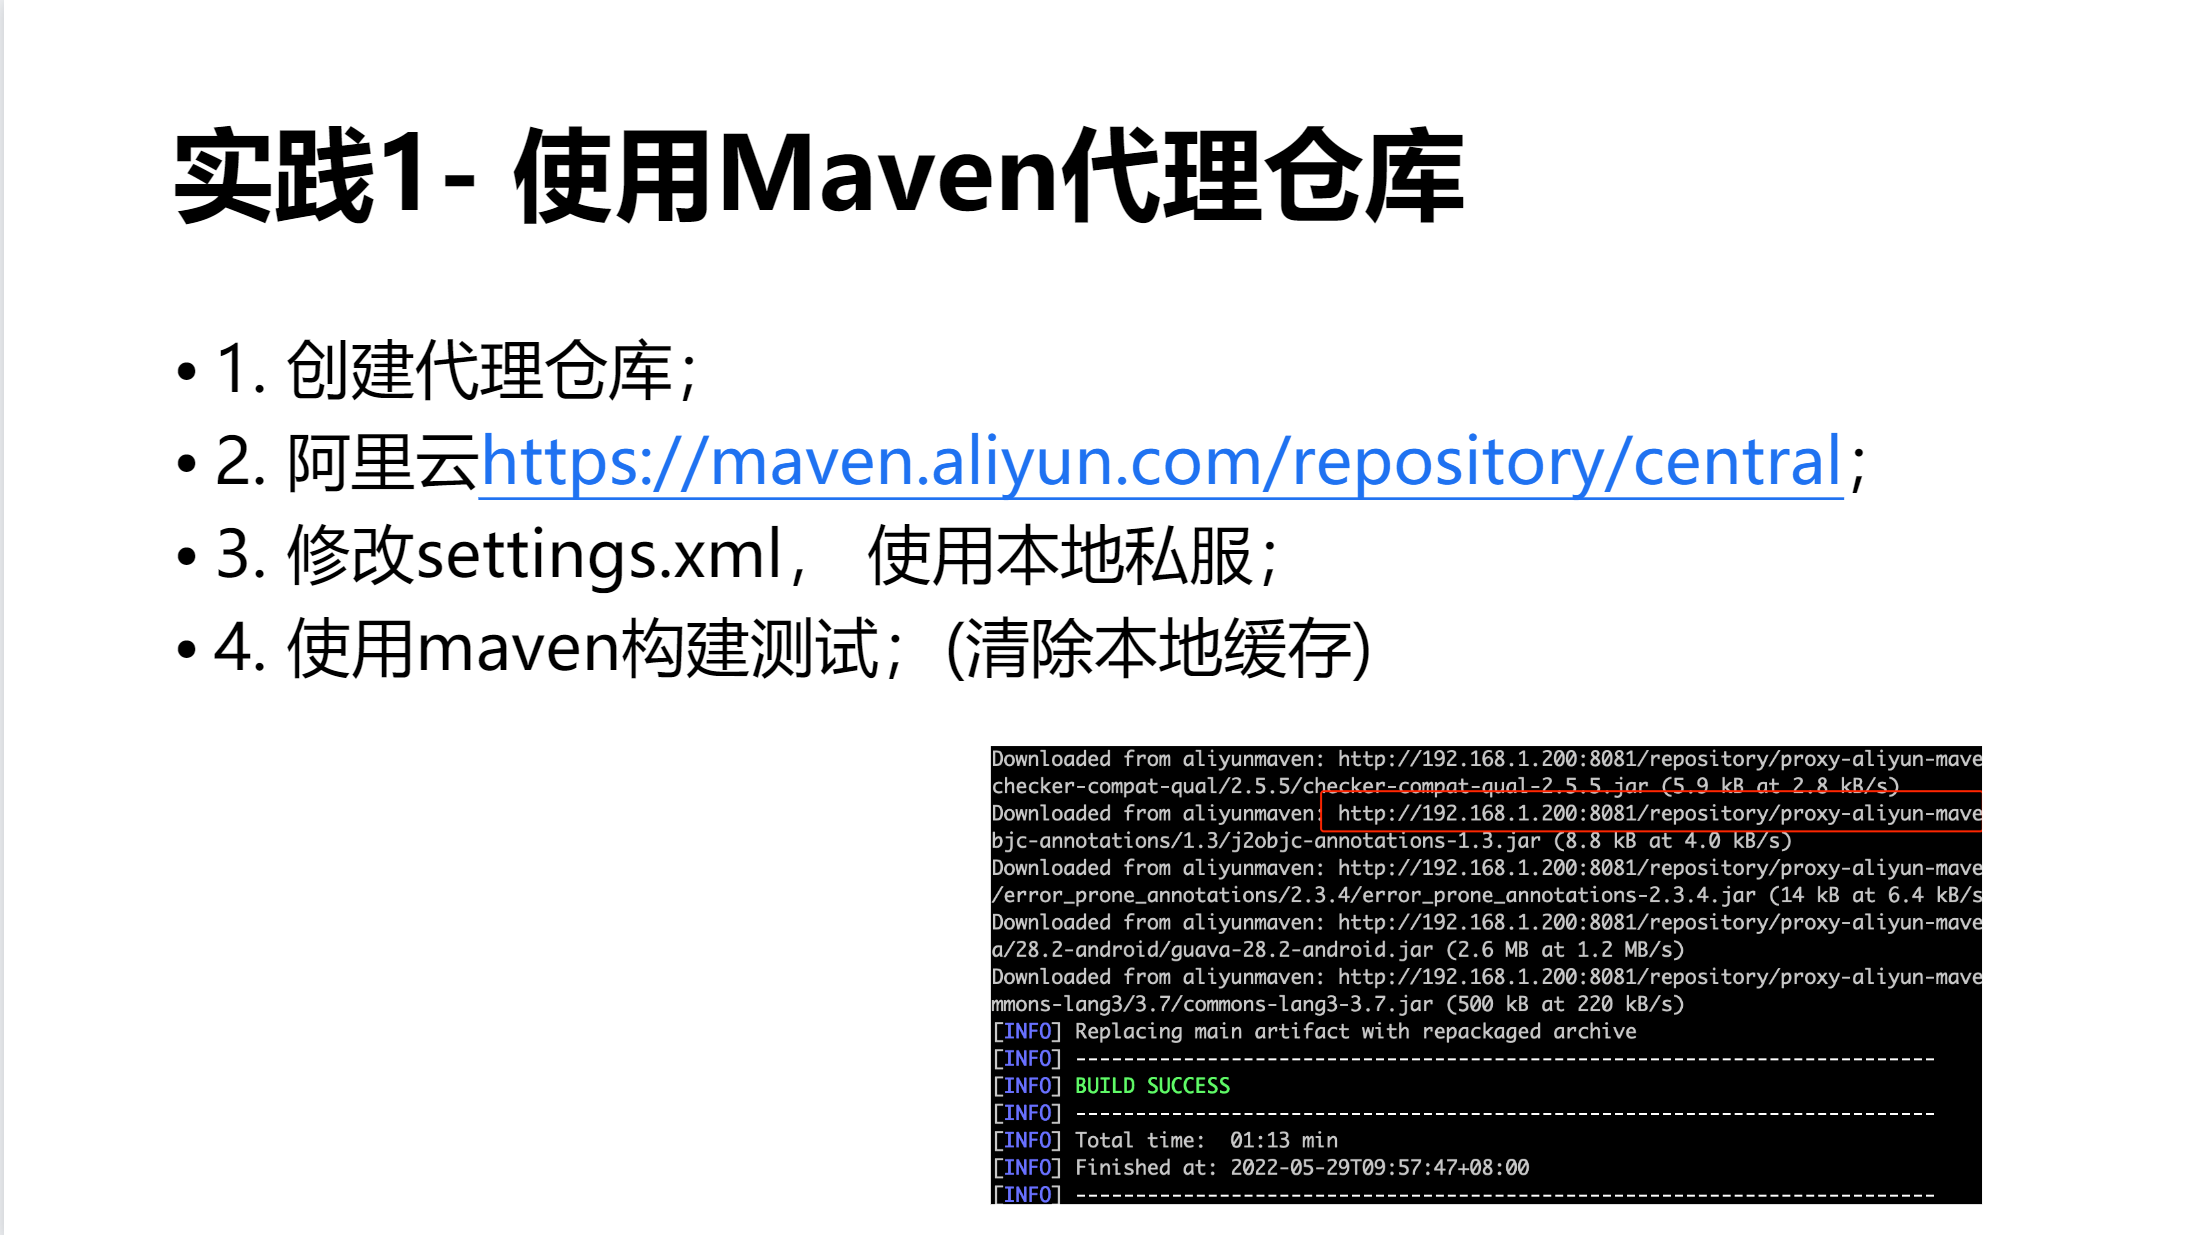
1.搭建Maven私服(代理仓库)
默认开发同学在进行开发的时候会使用一些包管理工具,例如:maven、ant、gradle这些都是常见项目编译构建工具 。这些工具可以理解为是一个命令行工具, 本身不会存储任何依赖包,而是通过公网官方的仓库中下载当前项目构建所需要的包。 (内网的速度要比公网快,这会直接影响管道的构建速度)

使用私服,就是在企业内部建立单一的可信源, 例如:我们在公司通过nexus创建一个代理仓库, 将公网仓库中的maven包代理到内网仓库中。 这样整个公司的同学就可以直接访问内网的私服进行下载构建依赖包。(减少了引入不信任依赖的风险)
代理仓库不会一下子把公网仓库中的所有包下载到本地,而是按需缓存。 例如: 此时我需要使用aa这个包, 如果代理仓库中没有, 则请求外部服务器下载这个包并进行缓存。第二次访问的时候,就直接访问代理仓库了。、
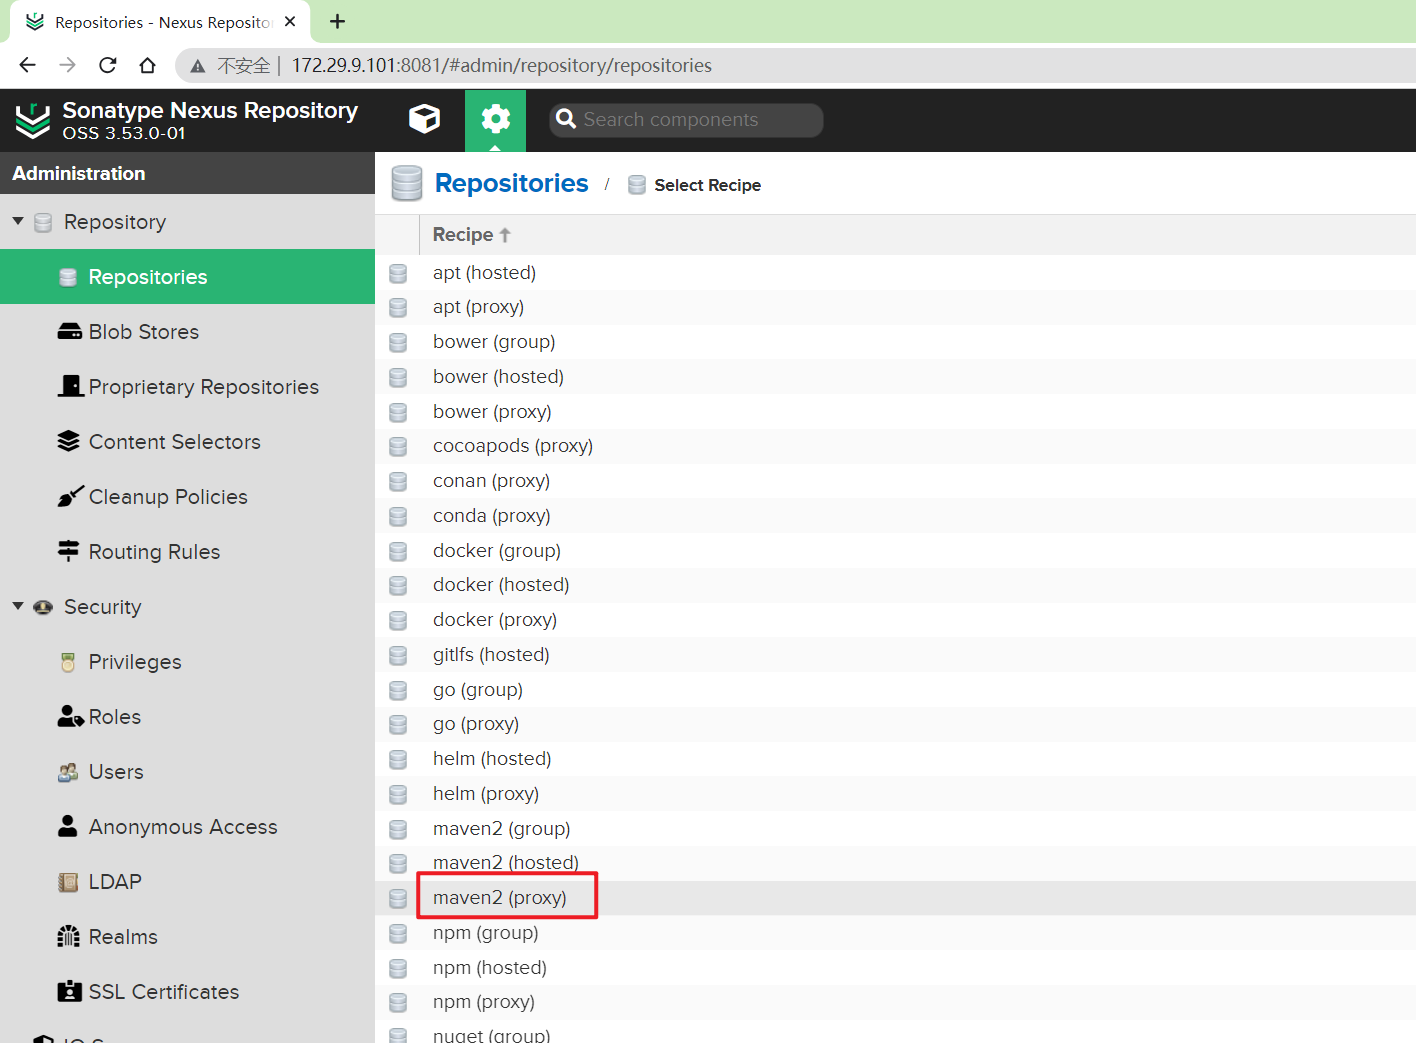
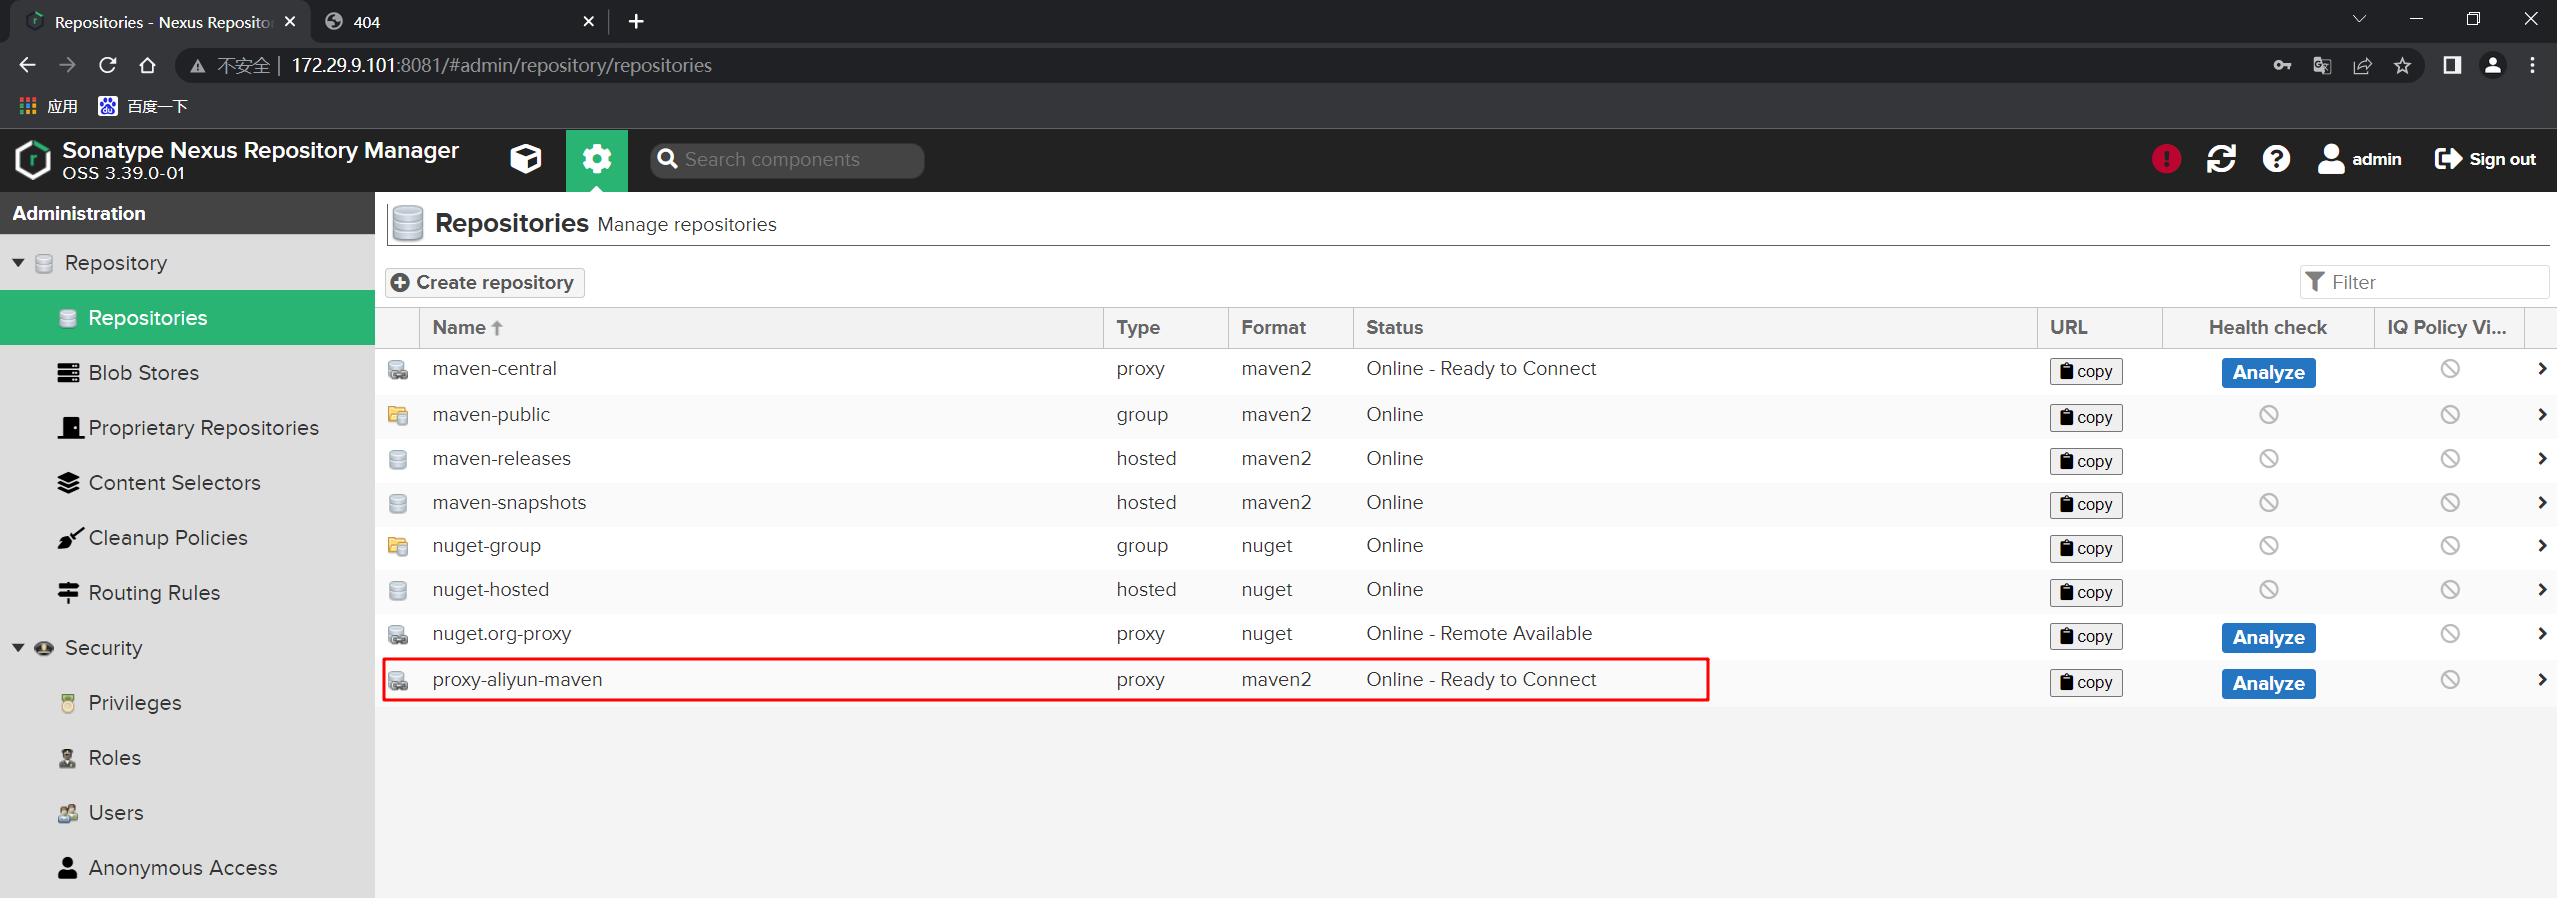
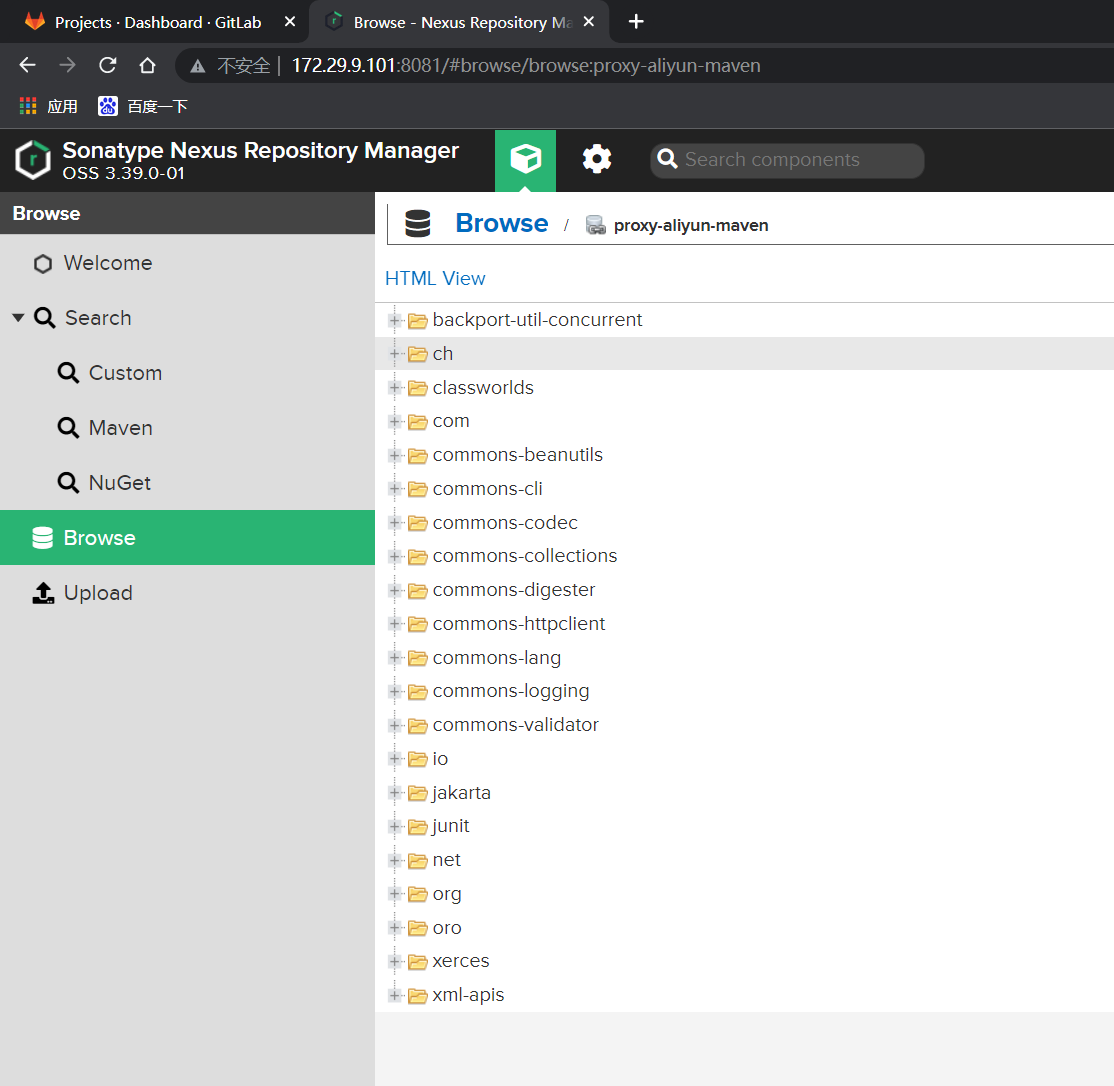
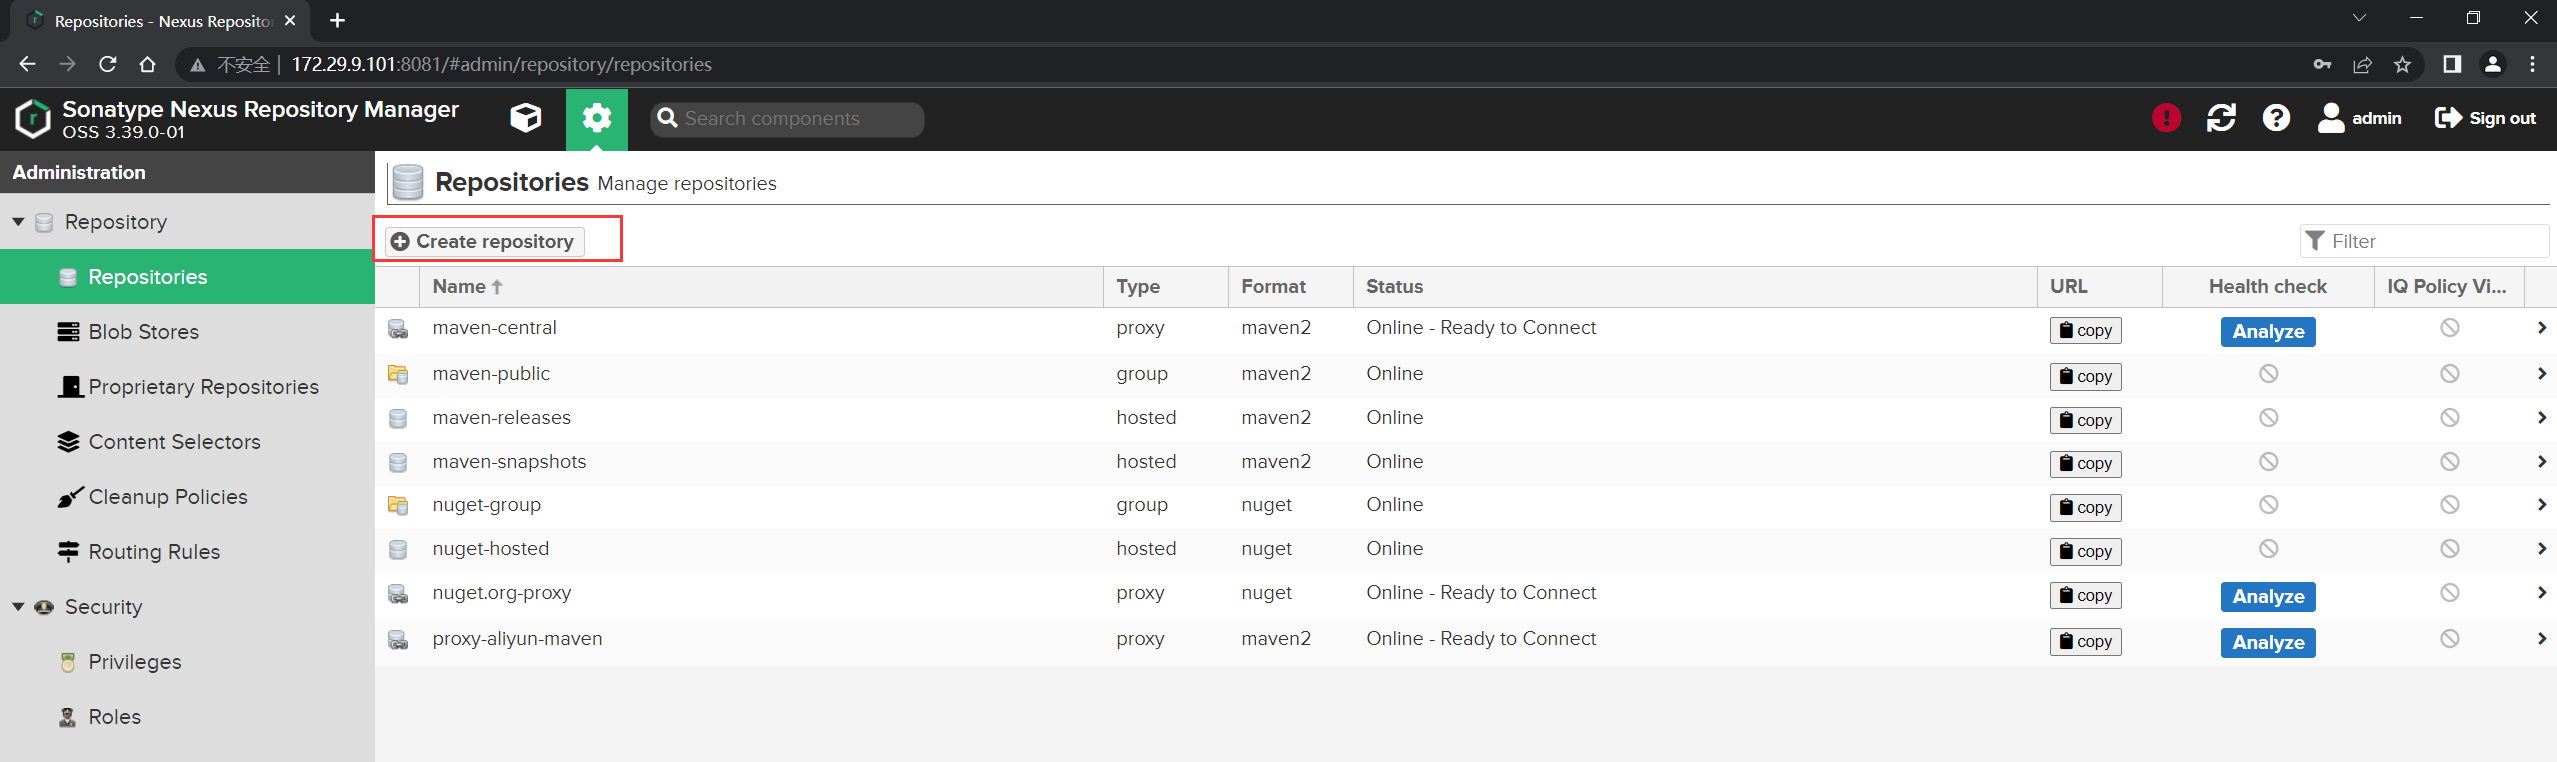
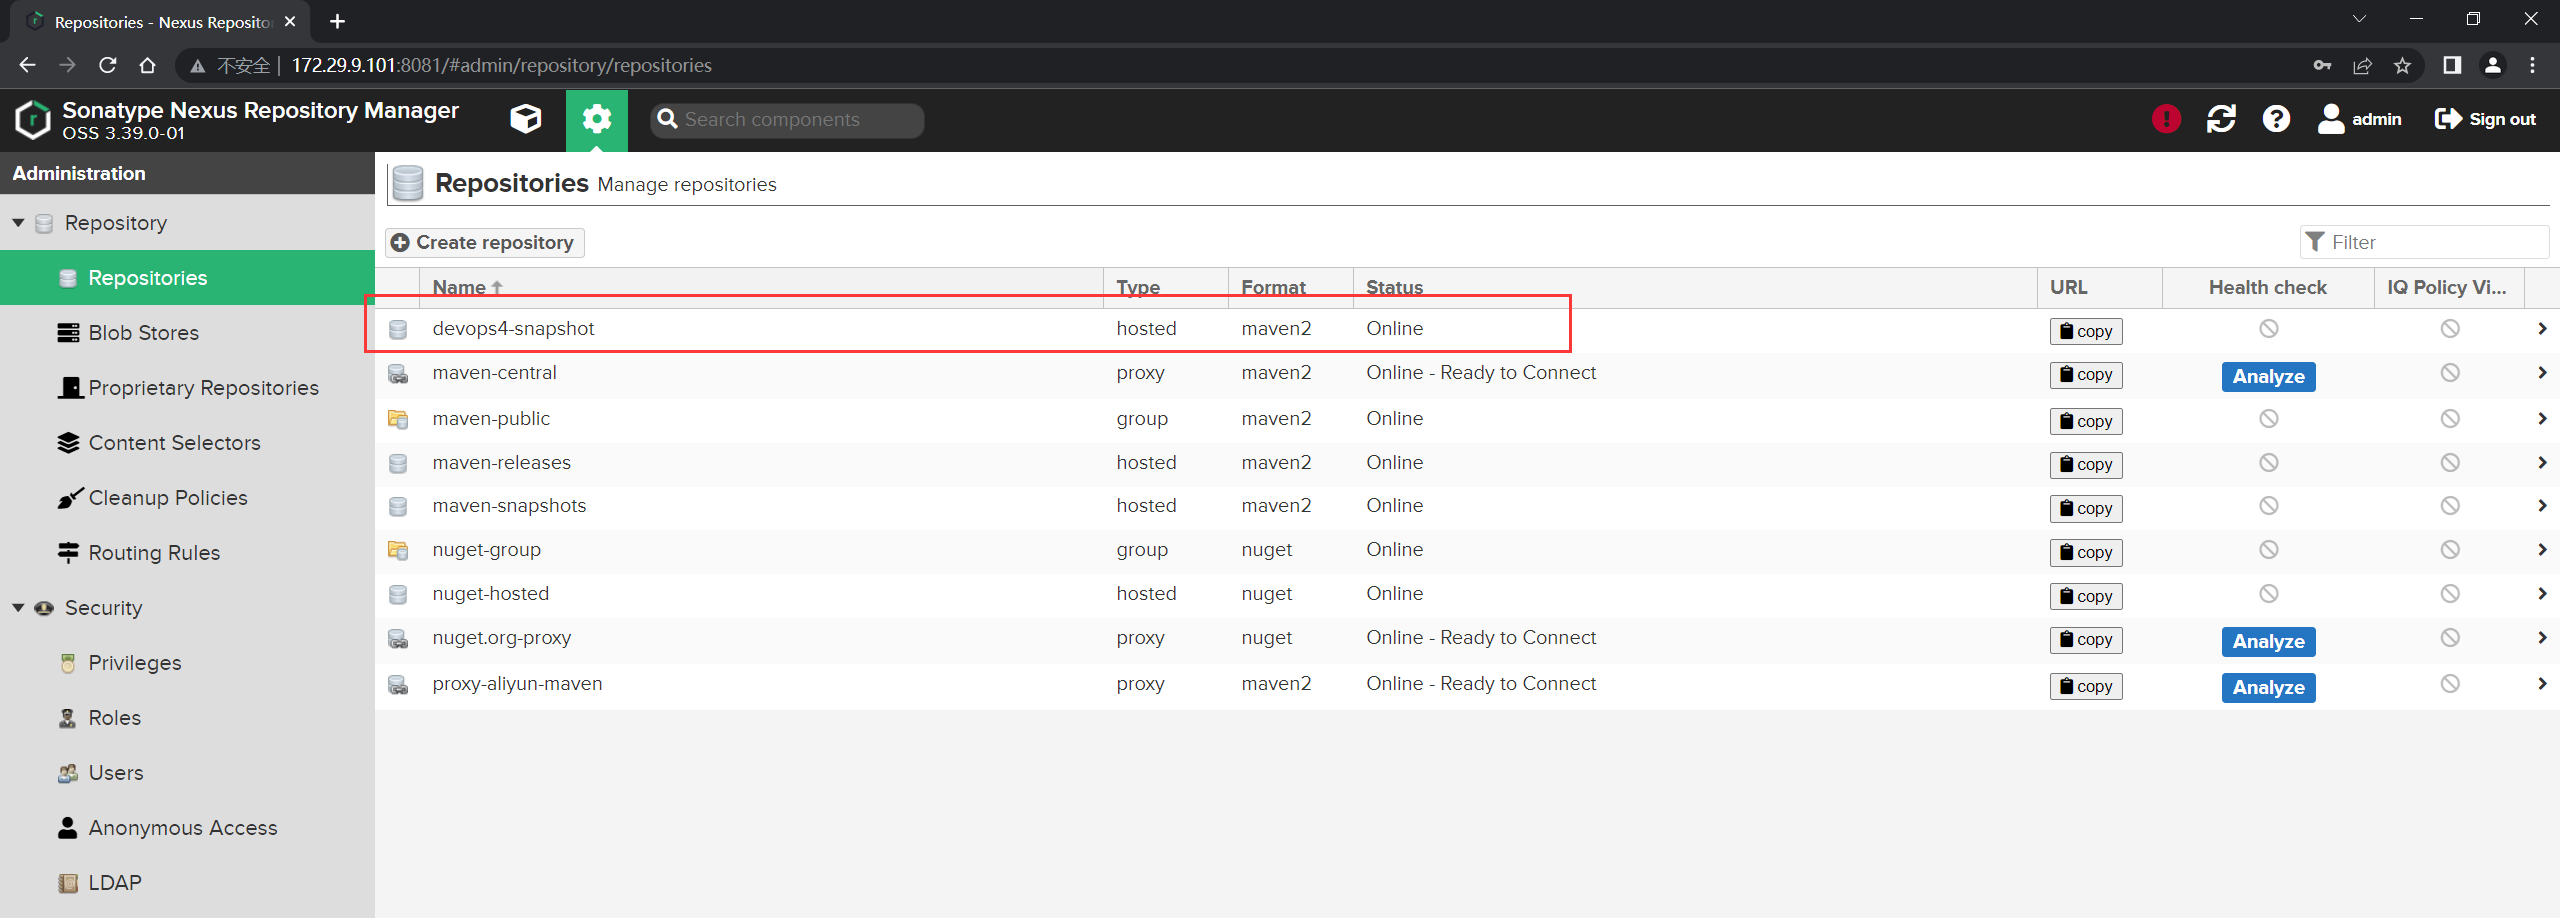
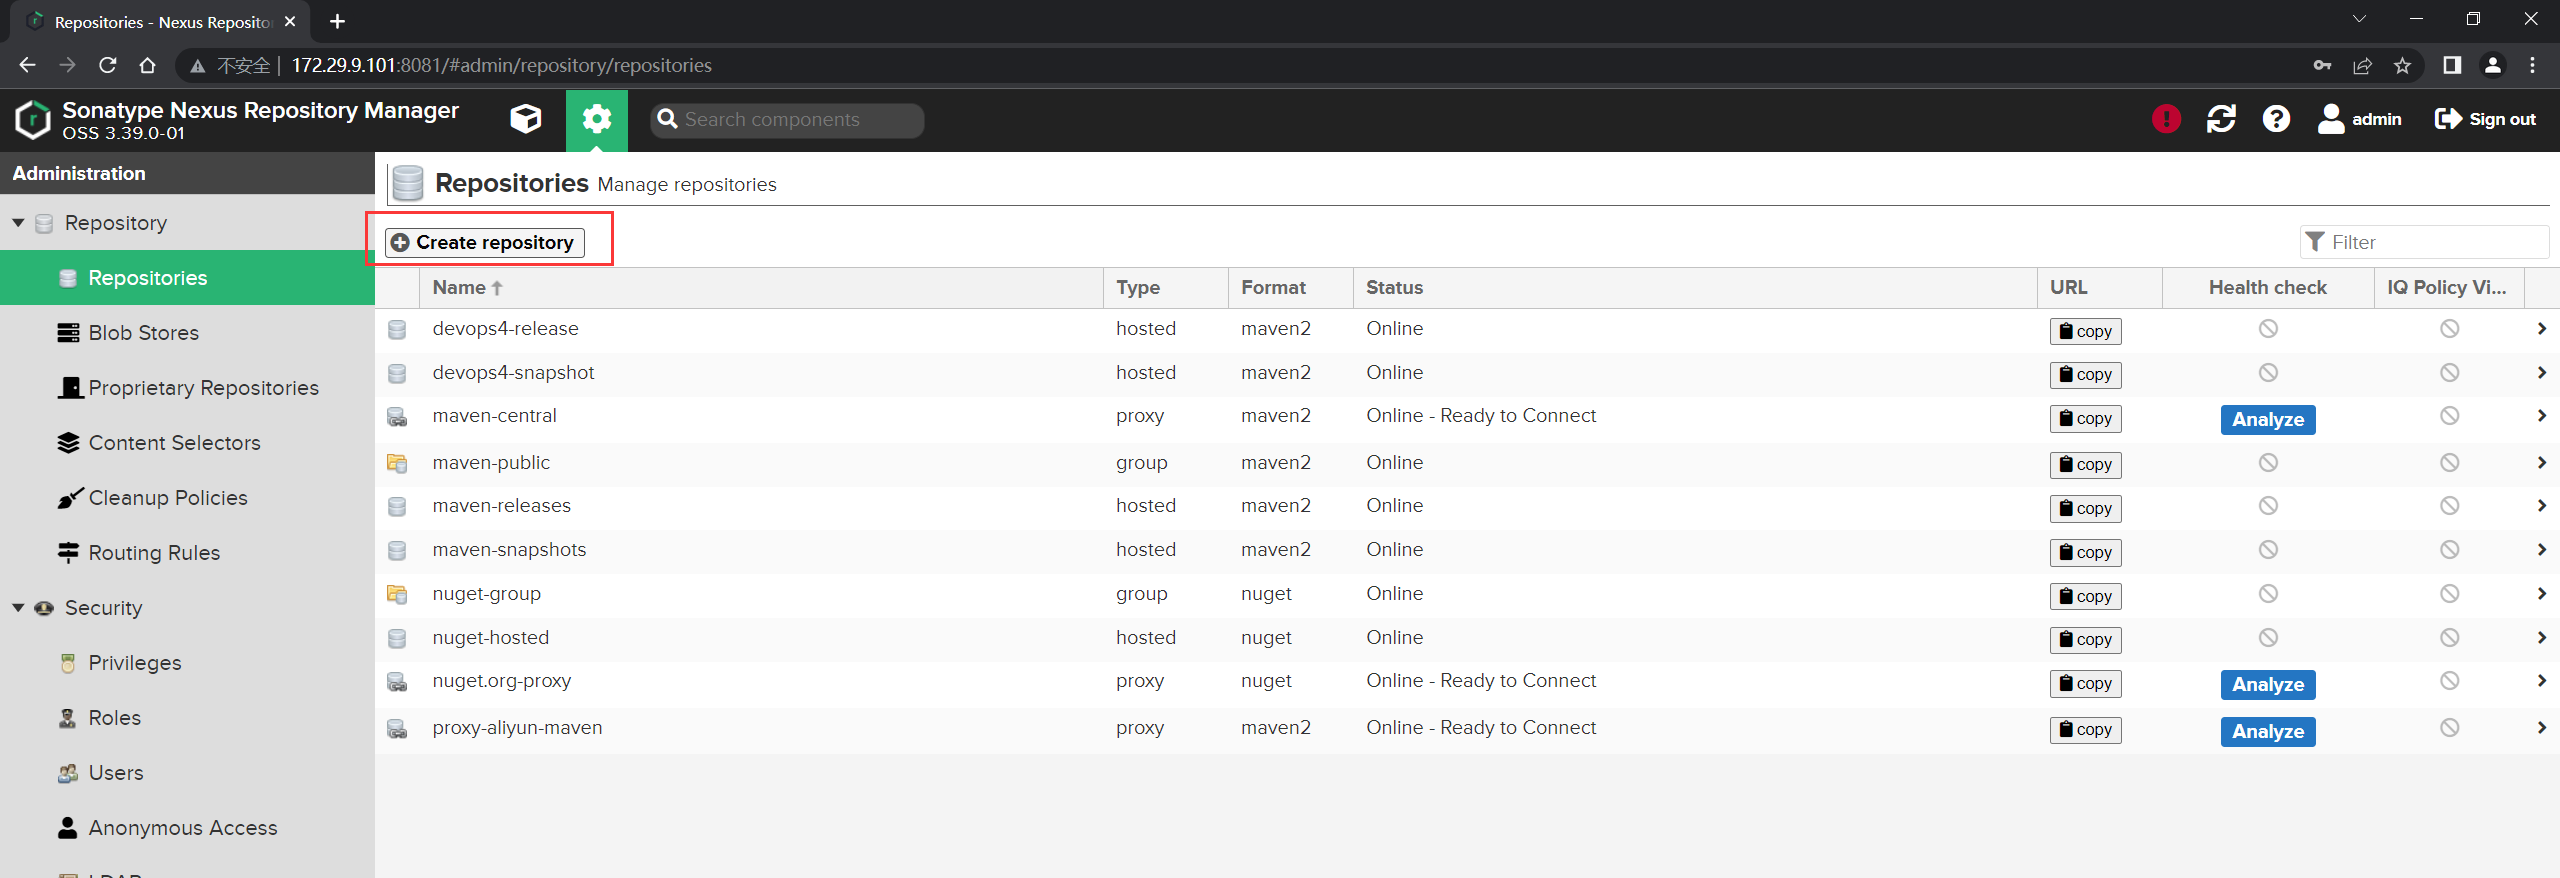
安装nexus后,默认存在以下图中的仓库, 这些仓库是官方默认配置好的maven私服。(可以直接使用)

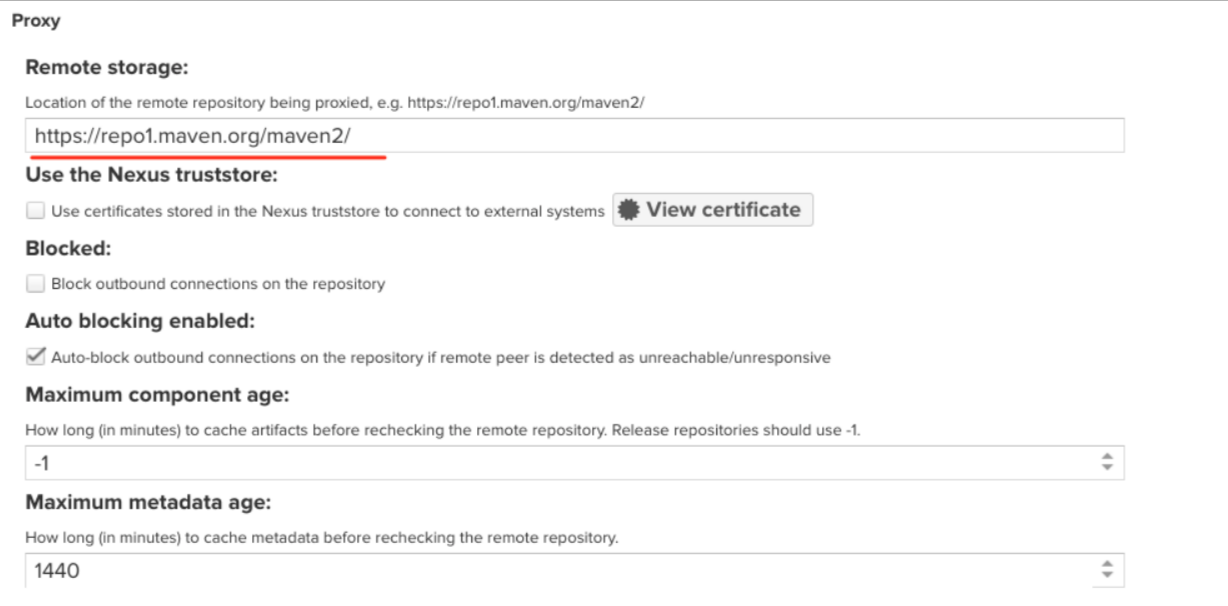
进入其中一个仓库, 可以看到默认的配置。即: 代理公网repo1中的包到本地;
| 💘 实践:配置Maven代理仓库(测试成功)-2022.6.7 |
- 实验环境
nexus3.39.0-01
apache-maven-3.8.5
- 实验软件(无)
- 创建
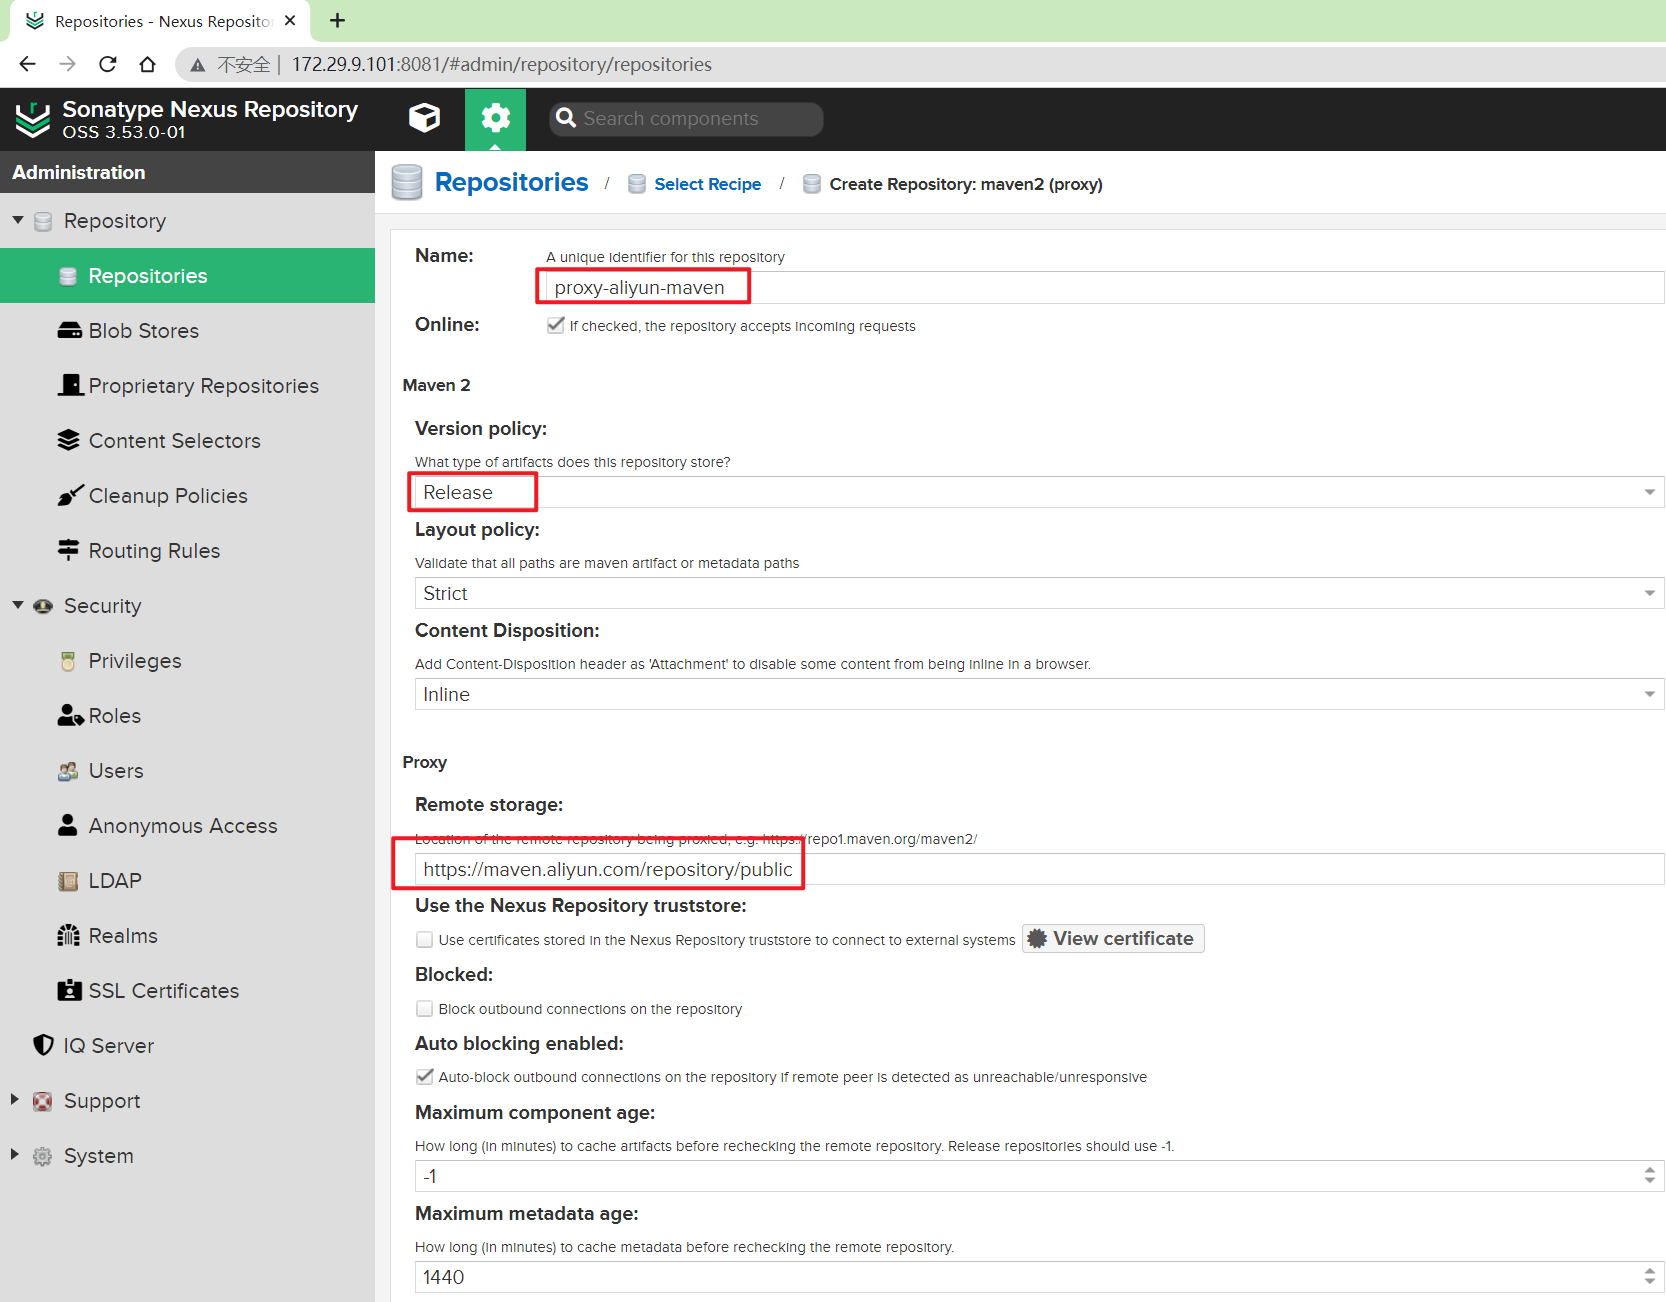
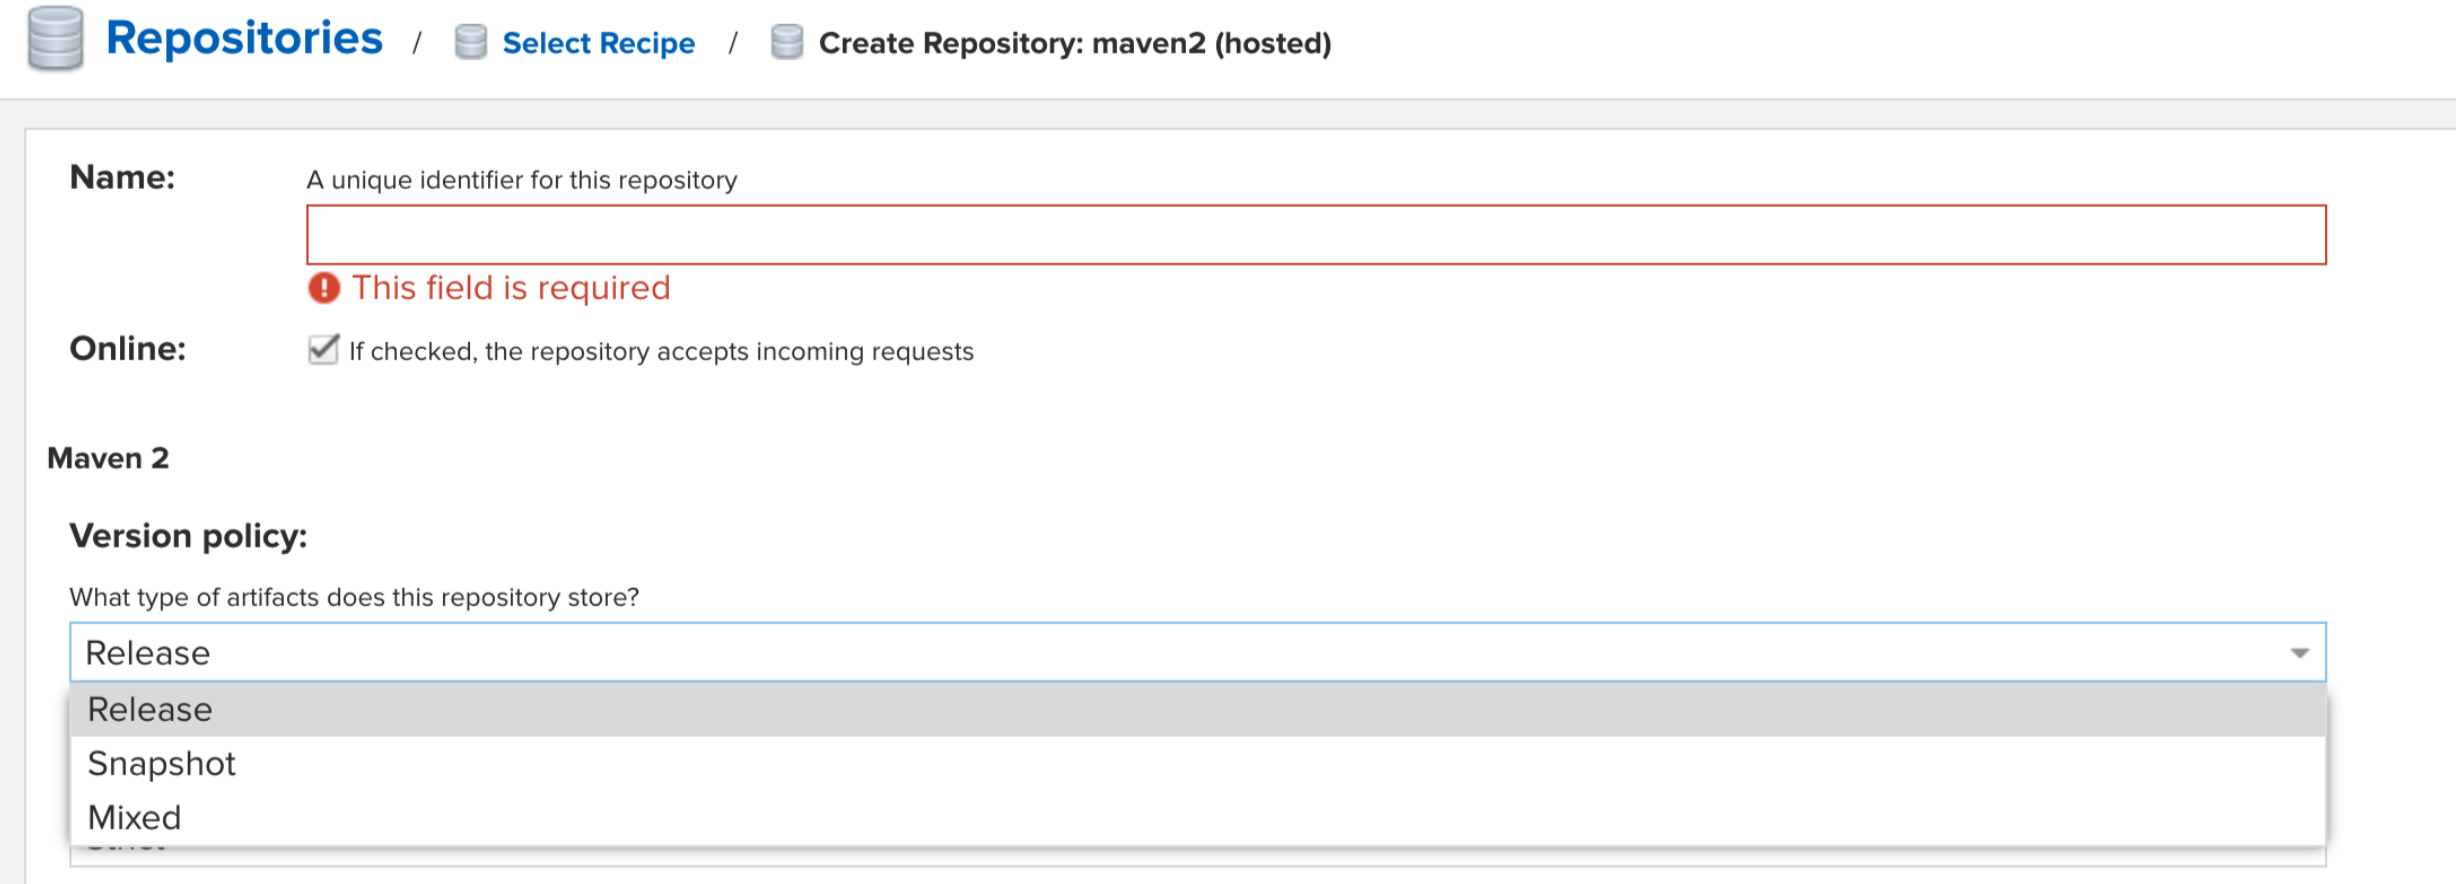
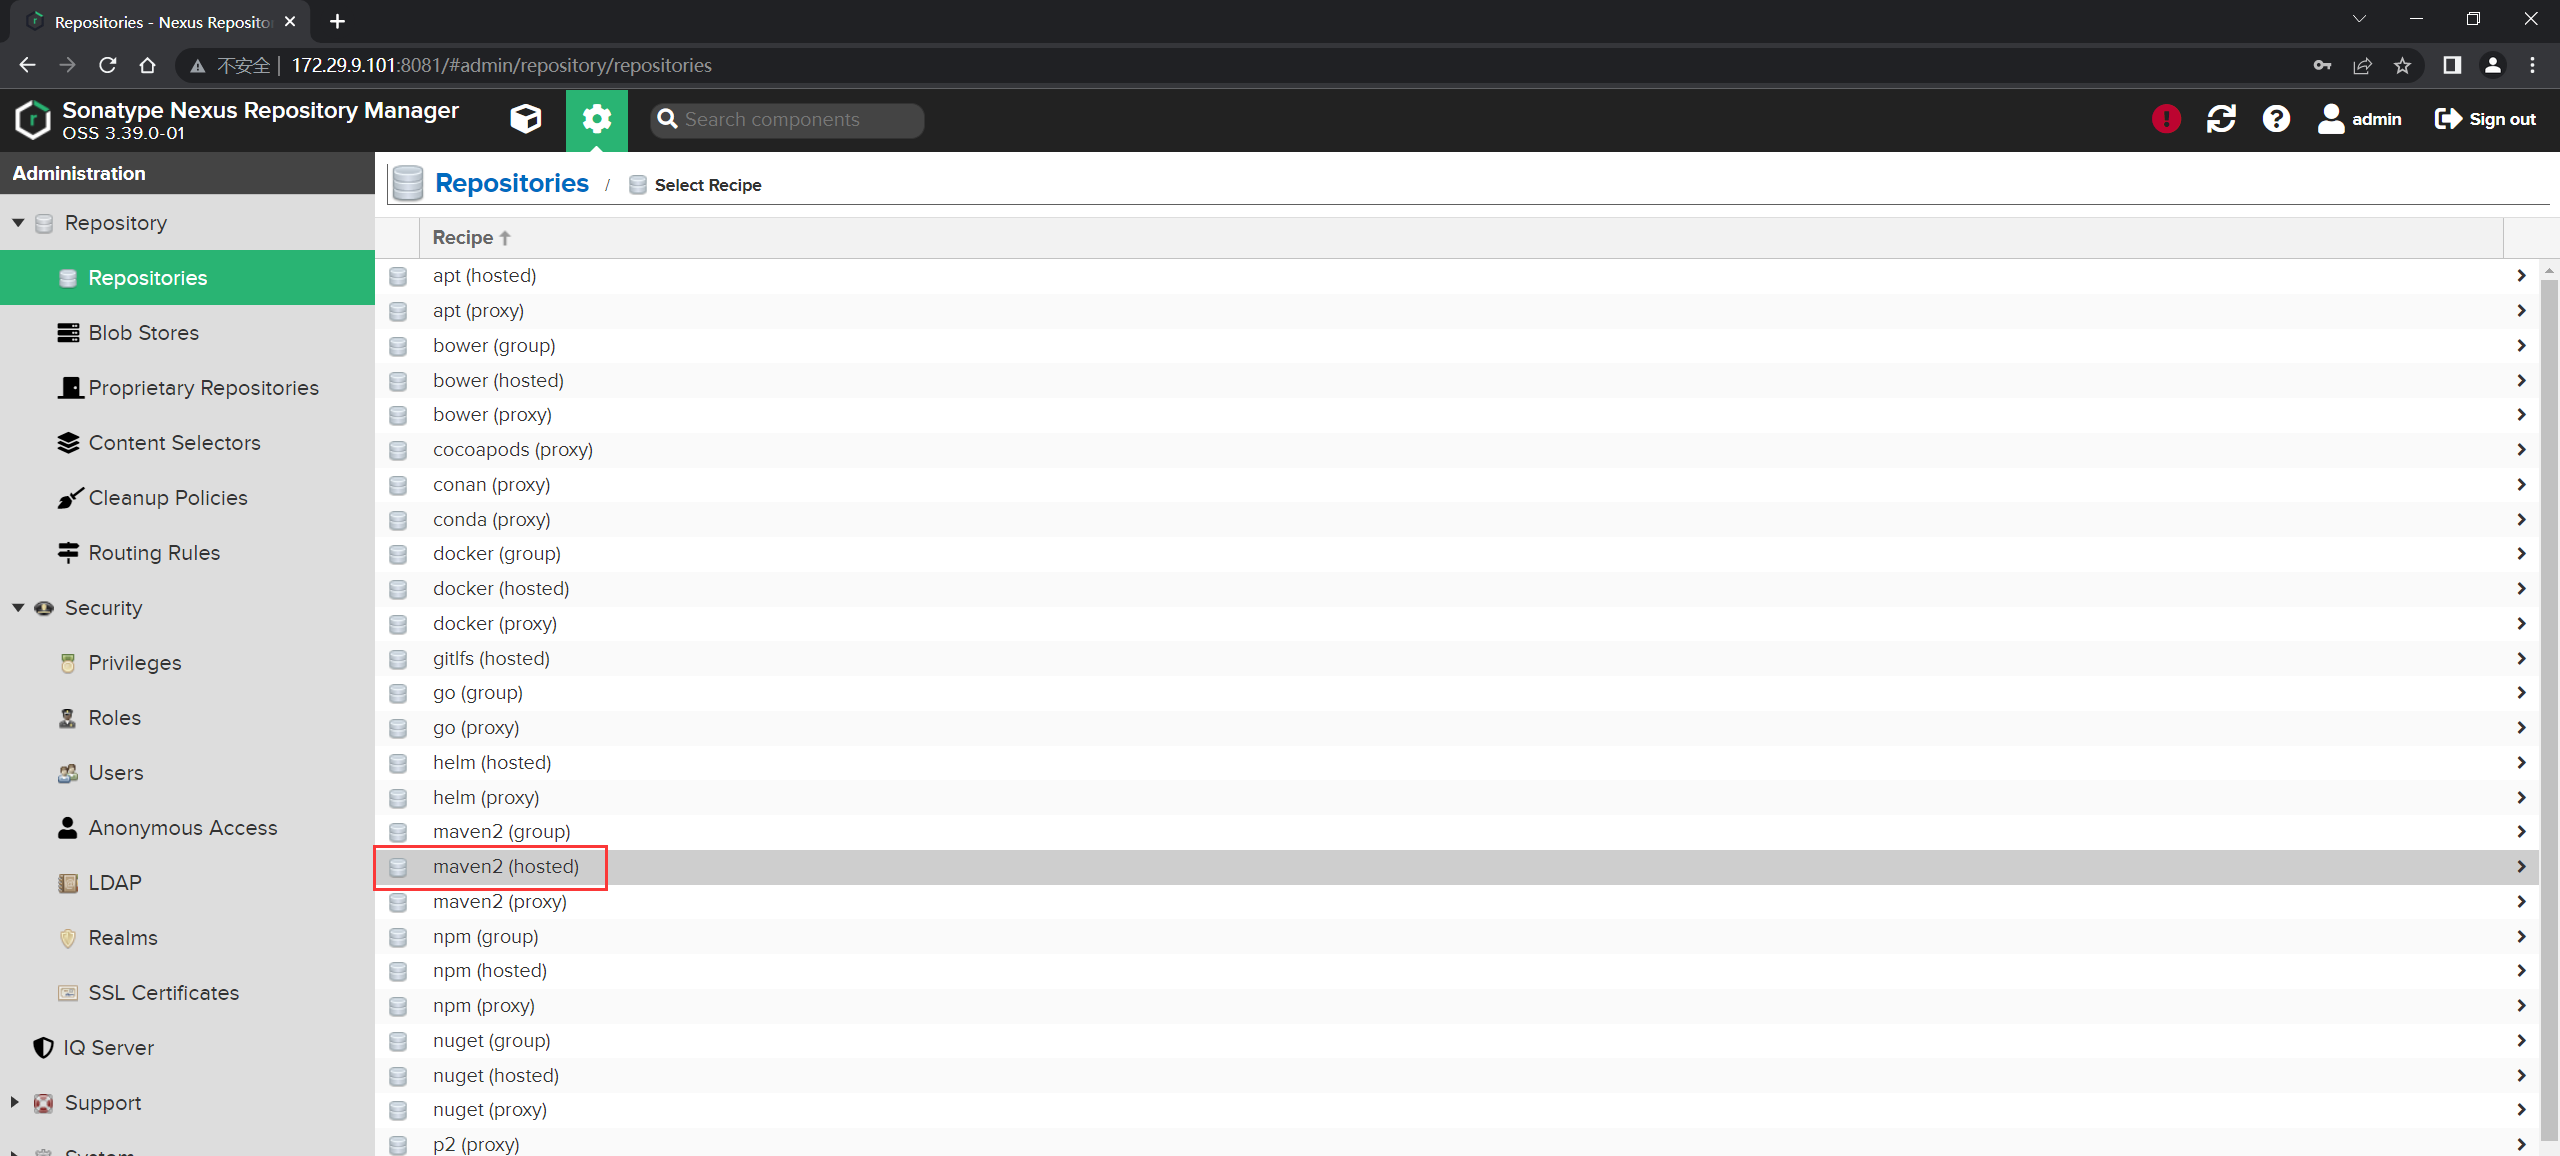
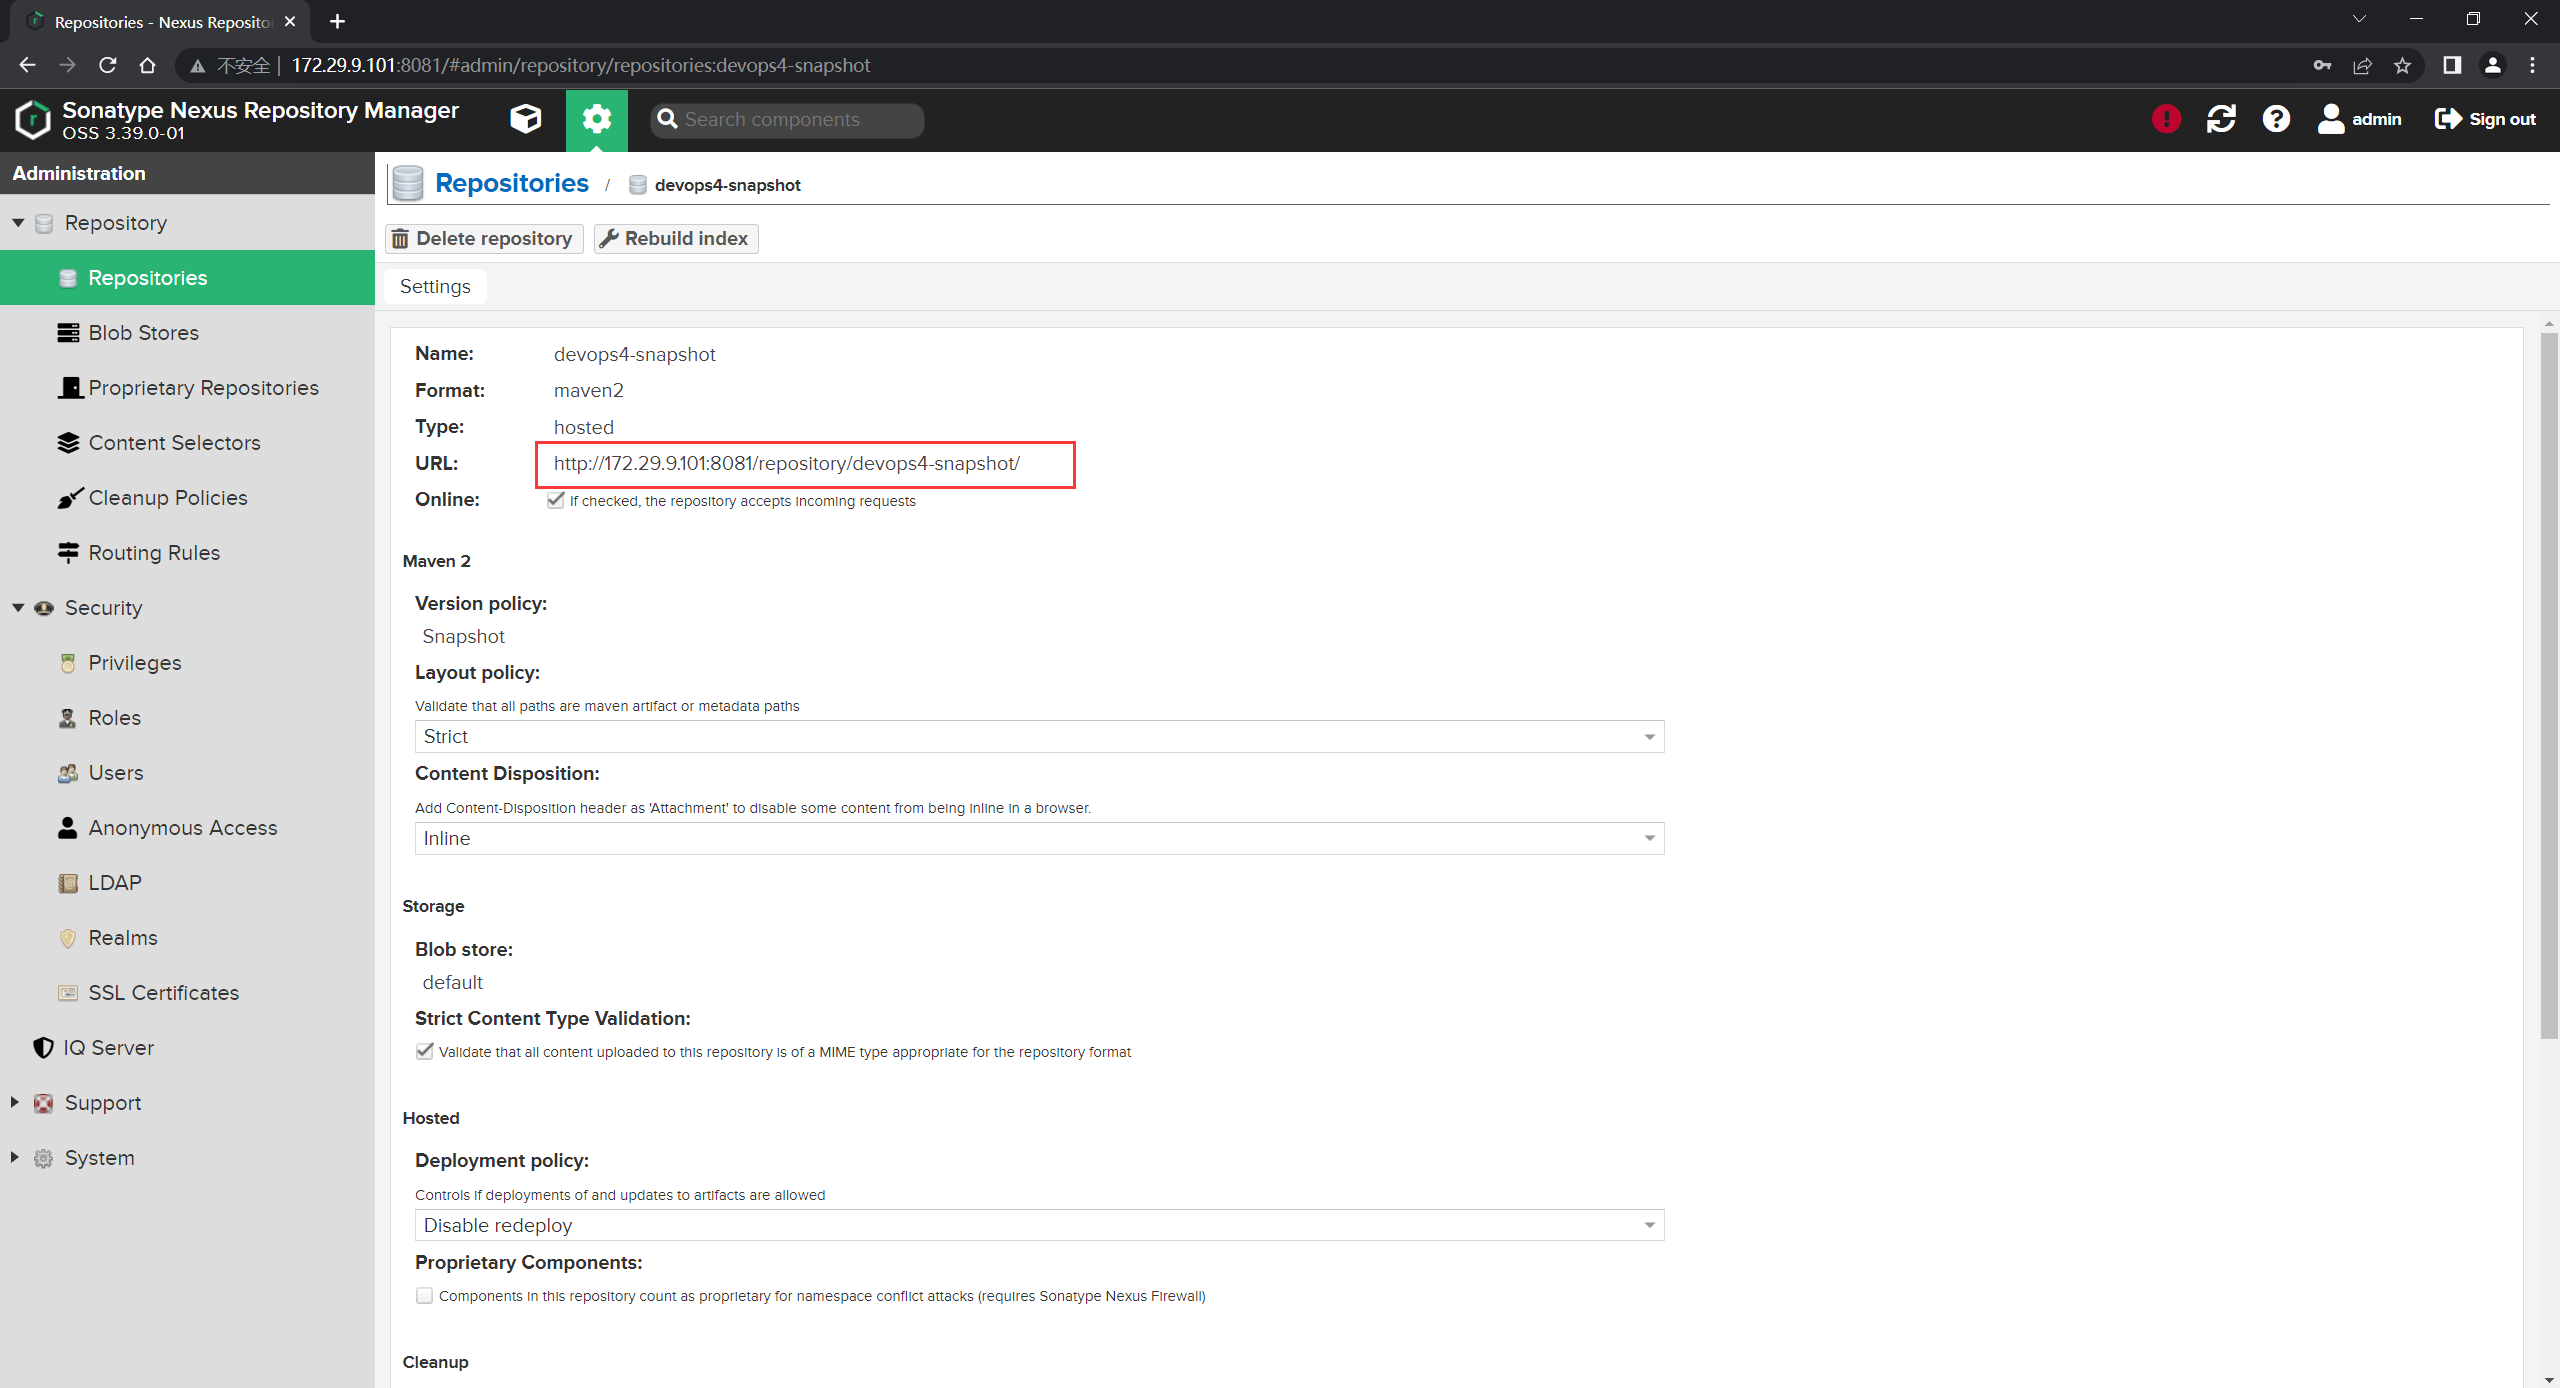
proxy-aliyun-maven仓库:仓库类型选择proxy,制品策略类型选择Release,其他默认。
- 编辑maven构建节点的
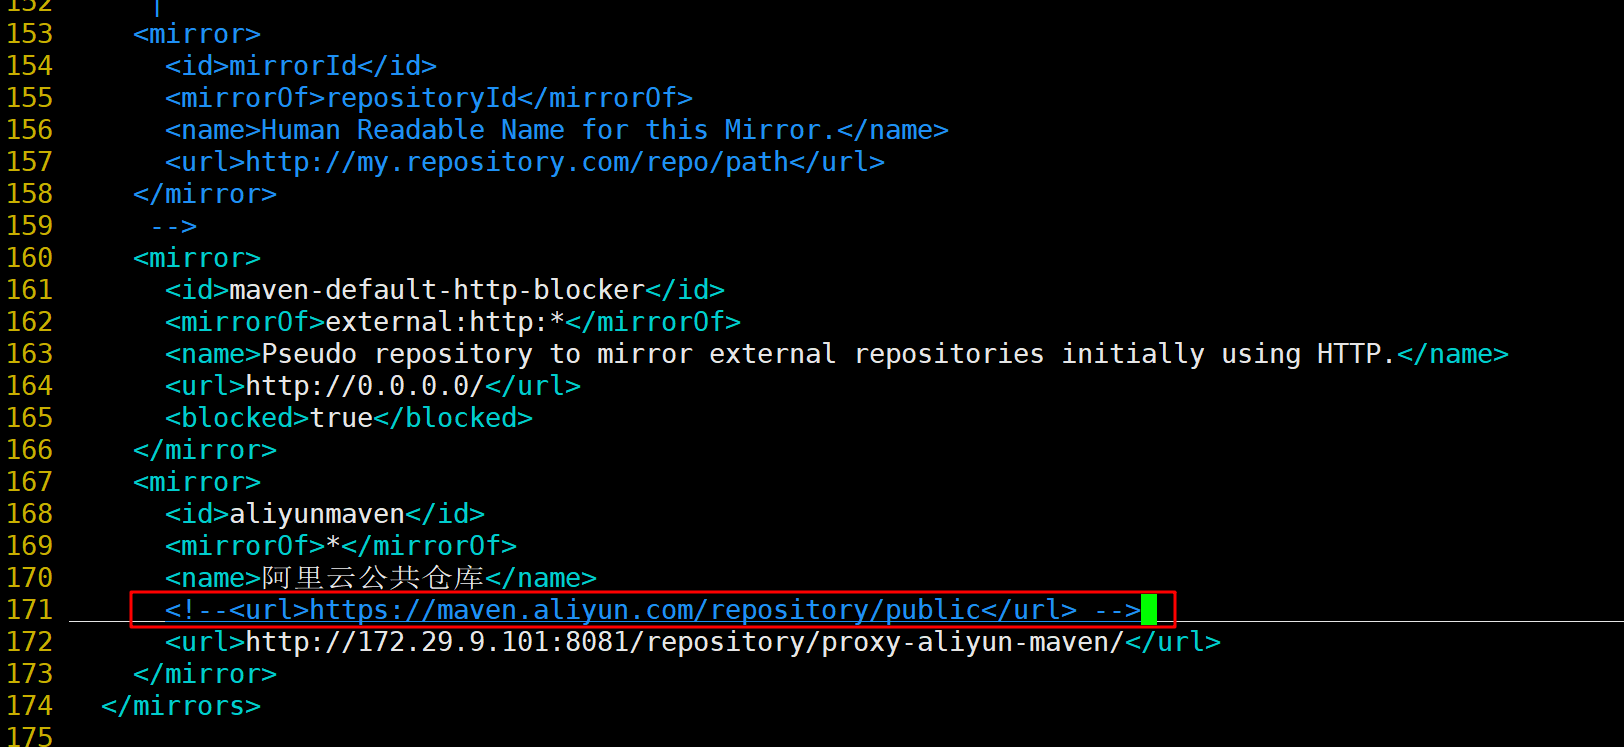
settings.xml文件,配置阿里云代理仓库地址
[root@devops conf]#vim /usr/local/apache-maven-3.8.5/conf/settings.xml
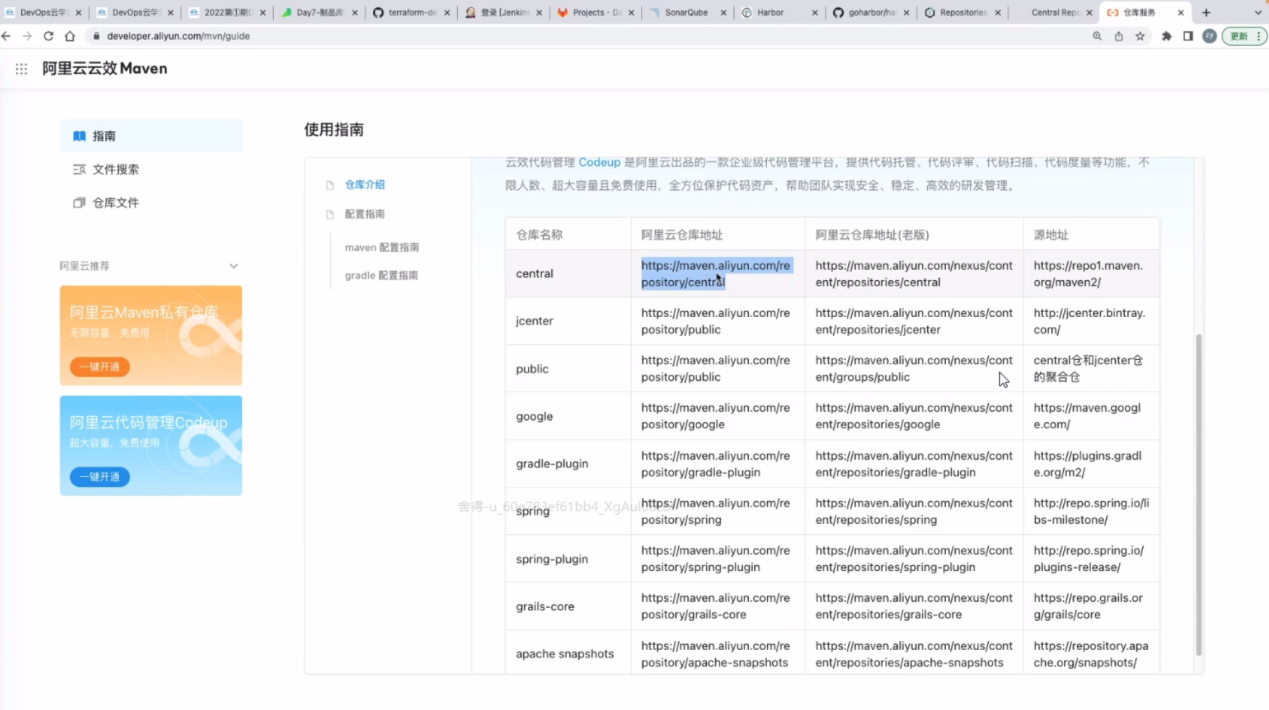
https://maven.aliyun.com/repository/public
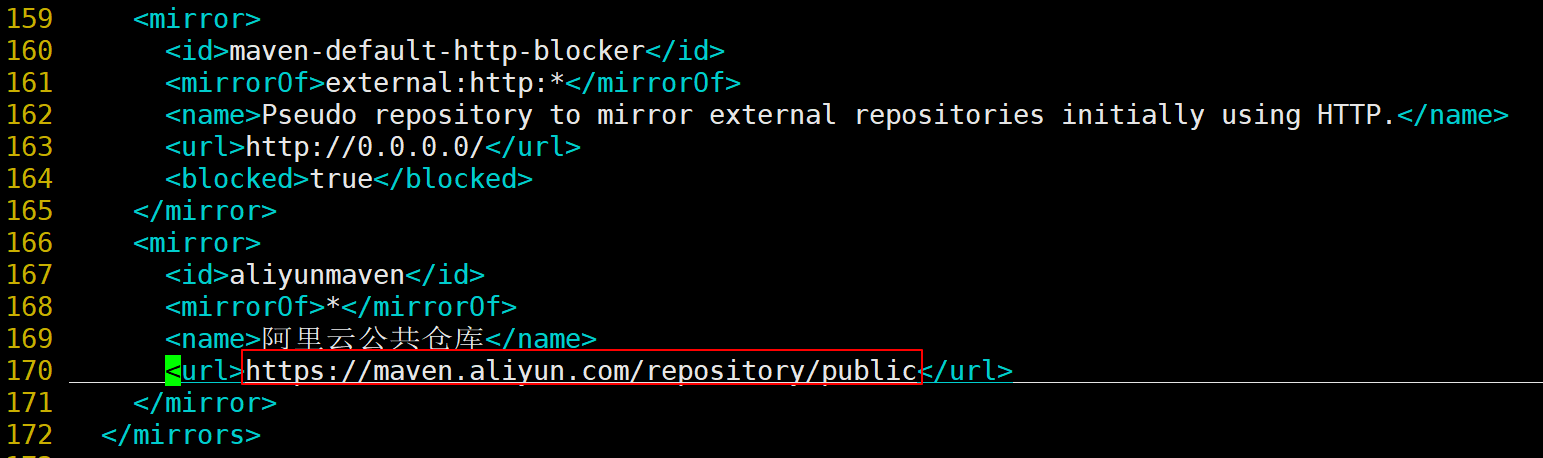
注意:
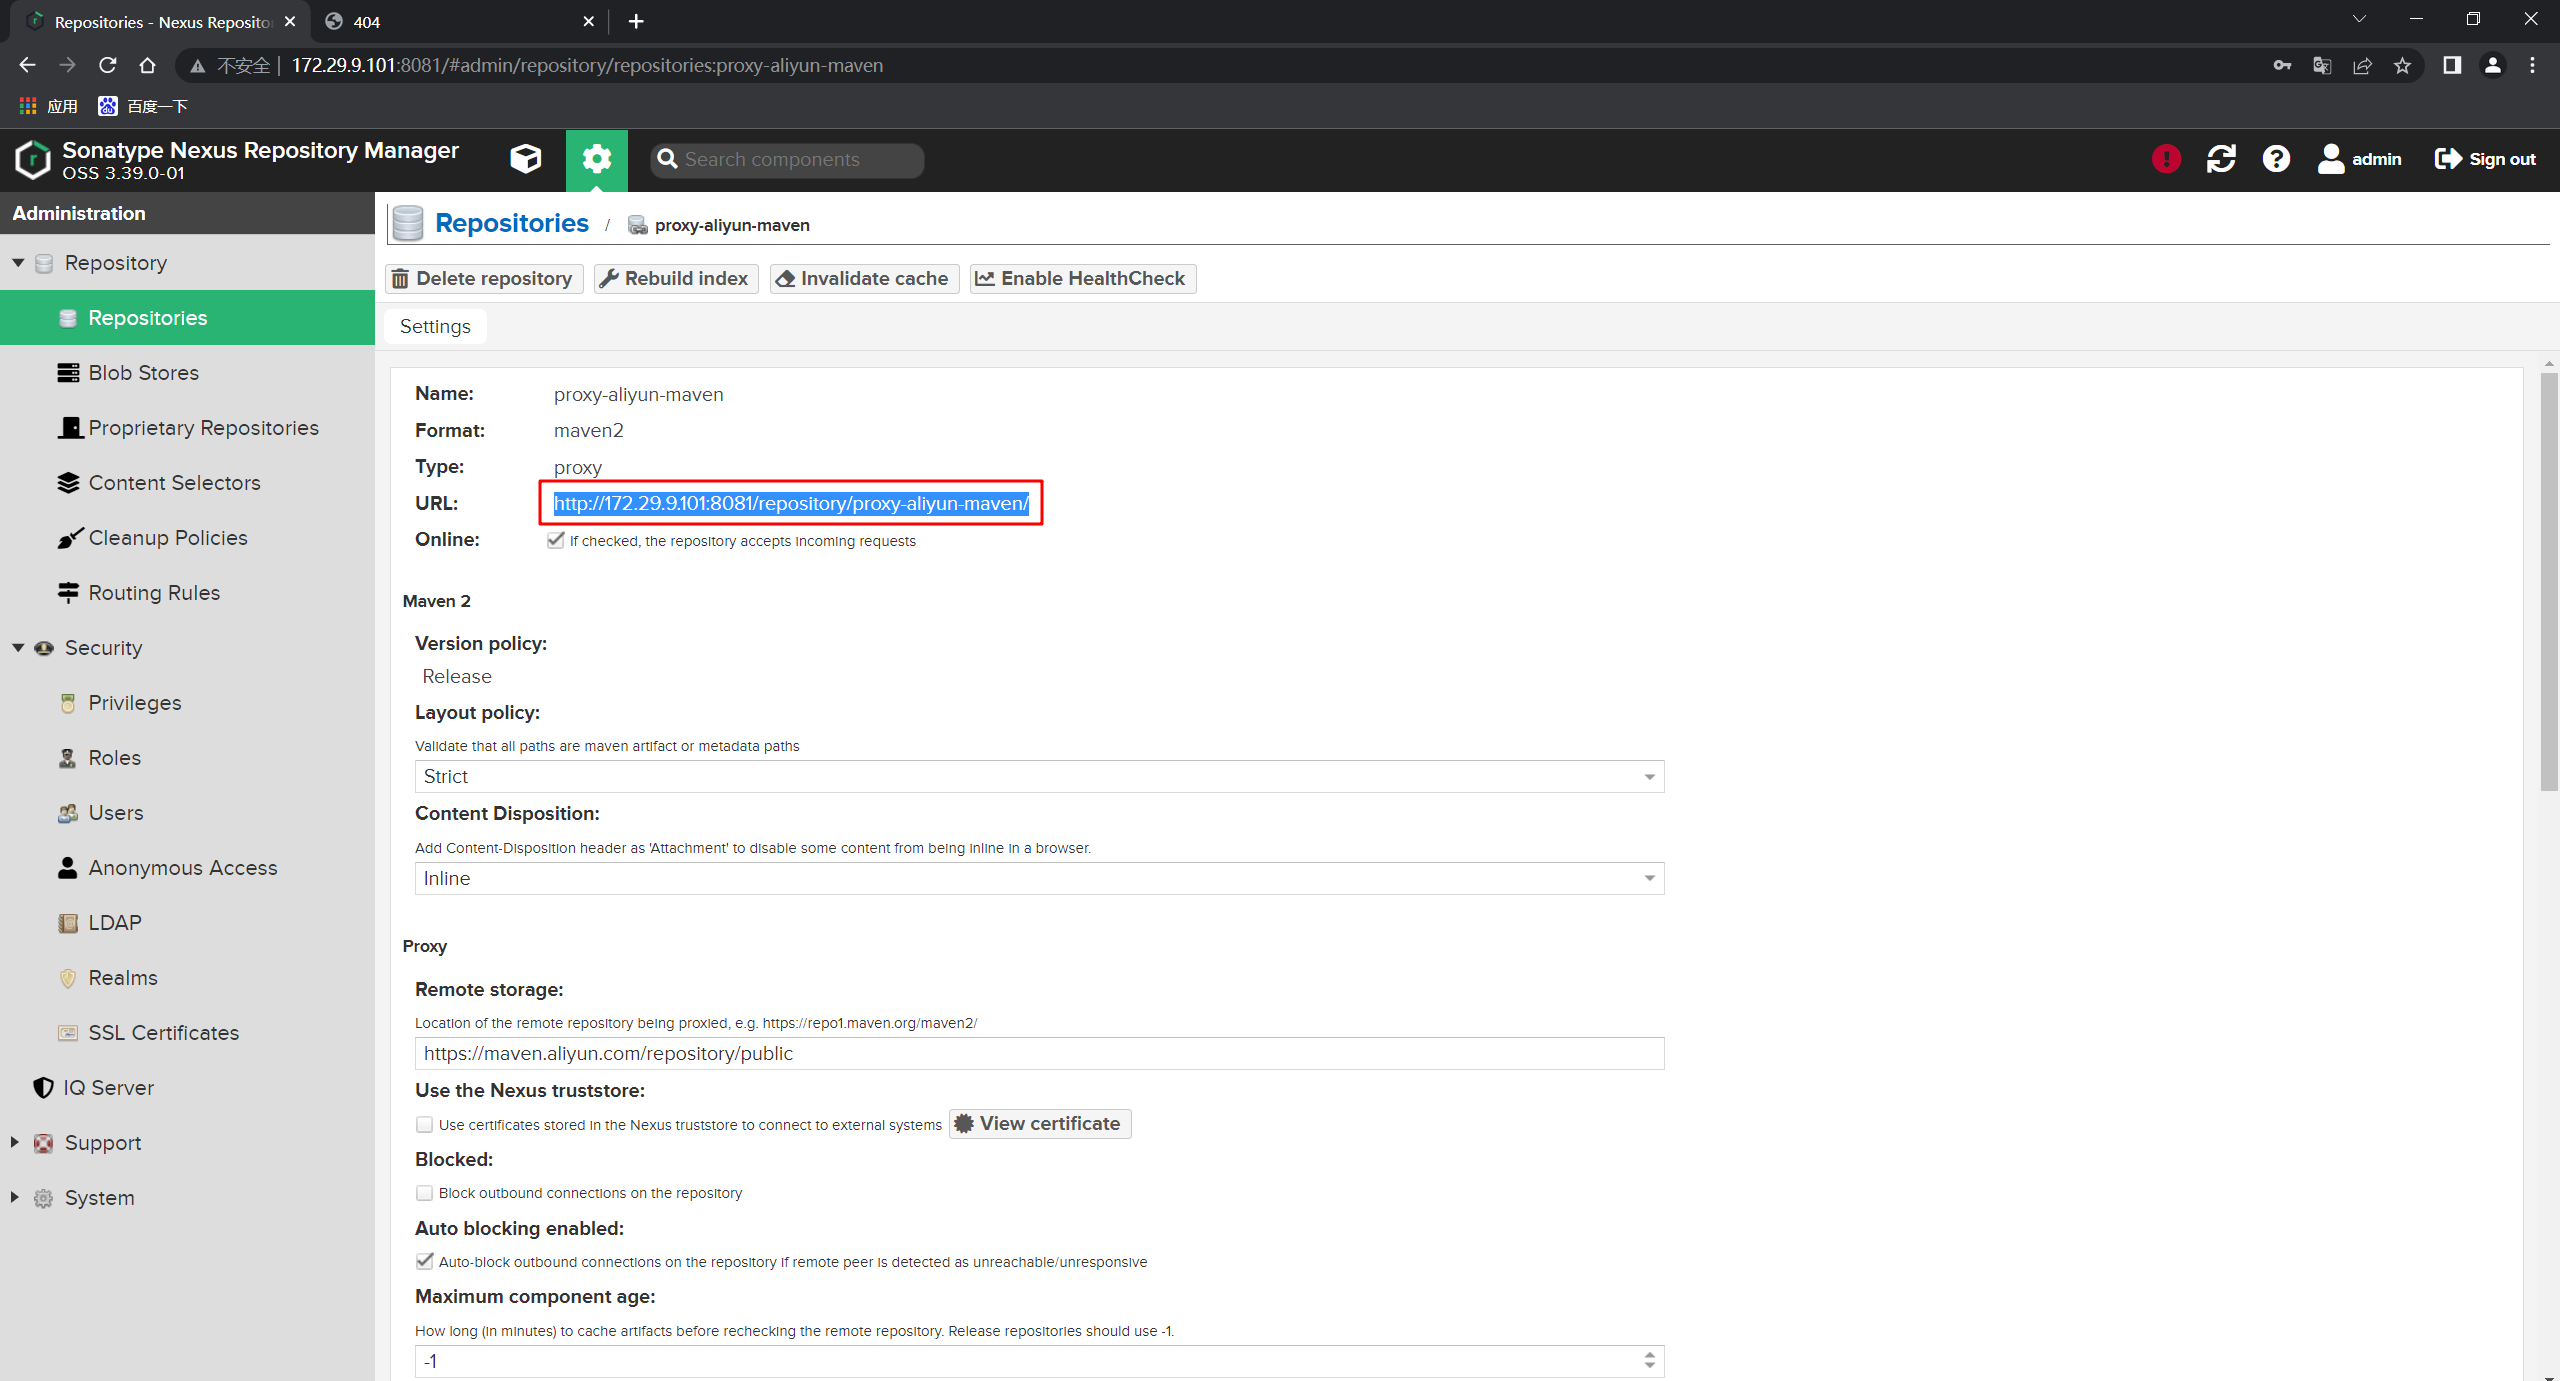
- 创建完成后如下:
http://172.29.9.101:8081/repository/proxy-aliyun-maven/
- 配置maven软件的配置文件
[root@devops conf]#vim /usr/local/apache-maven-3.8.5/conf/settings.xml
<url>http://172.29.9.101:8081/repository/proxy-aliyun-maven/</url>
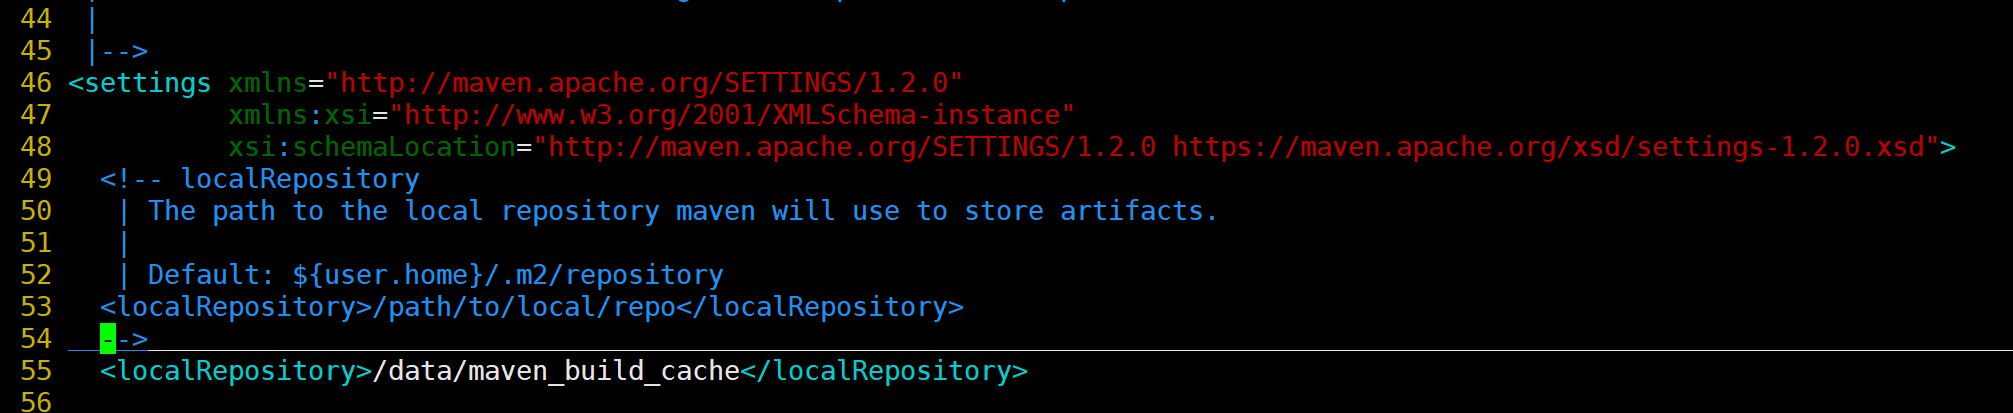
- 删除本地缓存:
[root@devops conf]#rm -rf ~/.m2/
[root@devops conf]#rm -rf /data/maven_build_cache/*
[root@devops conf]#vim /usr/local/apache-maven-3.8.5/conf/settings.xml
- 测试效果:
来到一个java项目里,使用maven进行测试效果:
[root@devops devops4-maven-service-master]#pwd
/root/devops4-maven-service-master
[root@devops devops4-maven-service-master]#ls
build.sh mvnw mvnw.cmd pom.xml README.md sonar-project.properties src
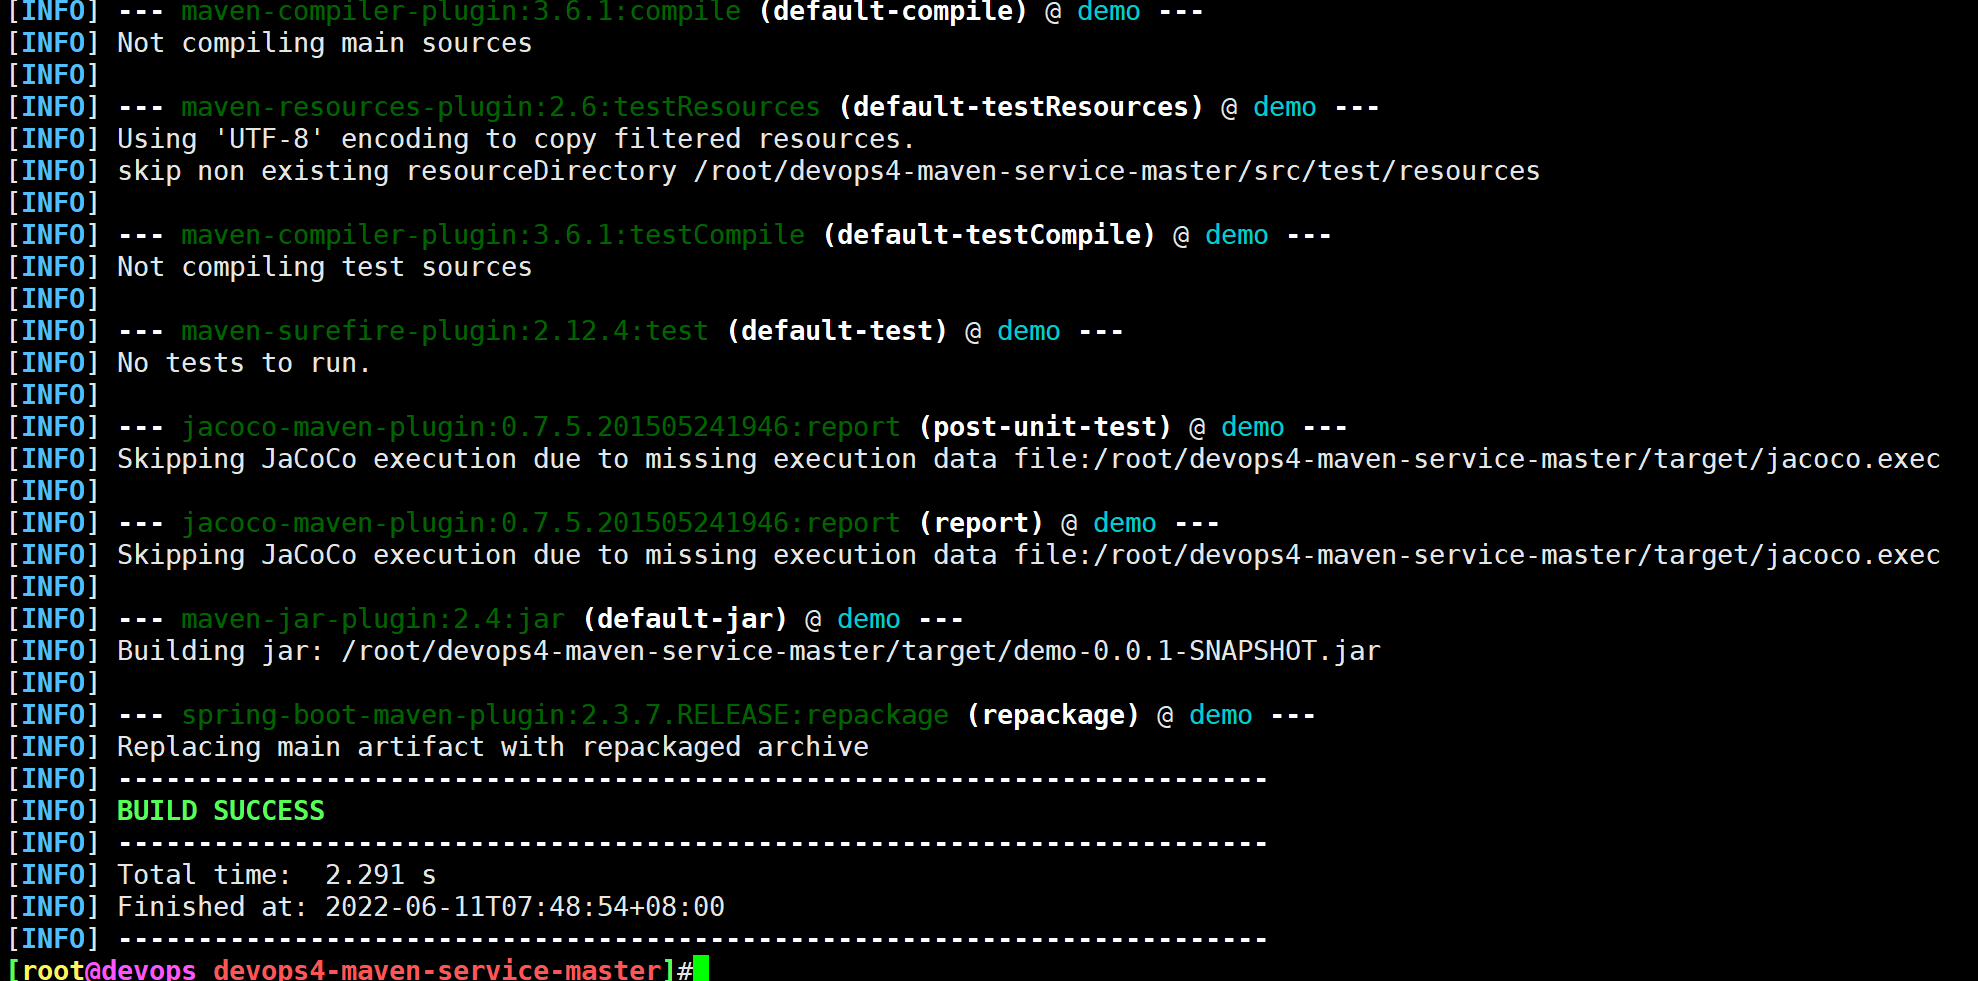
[root@devops devops4-maven-service-master]#mvn clean package
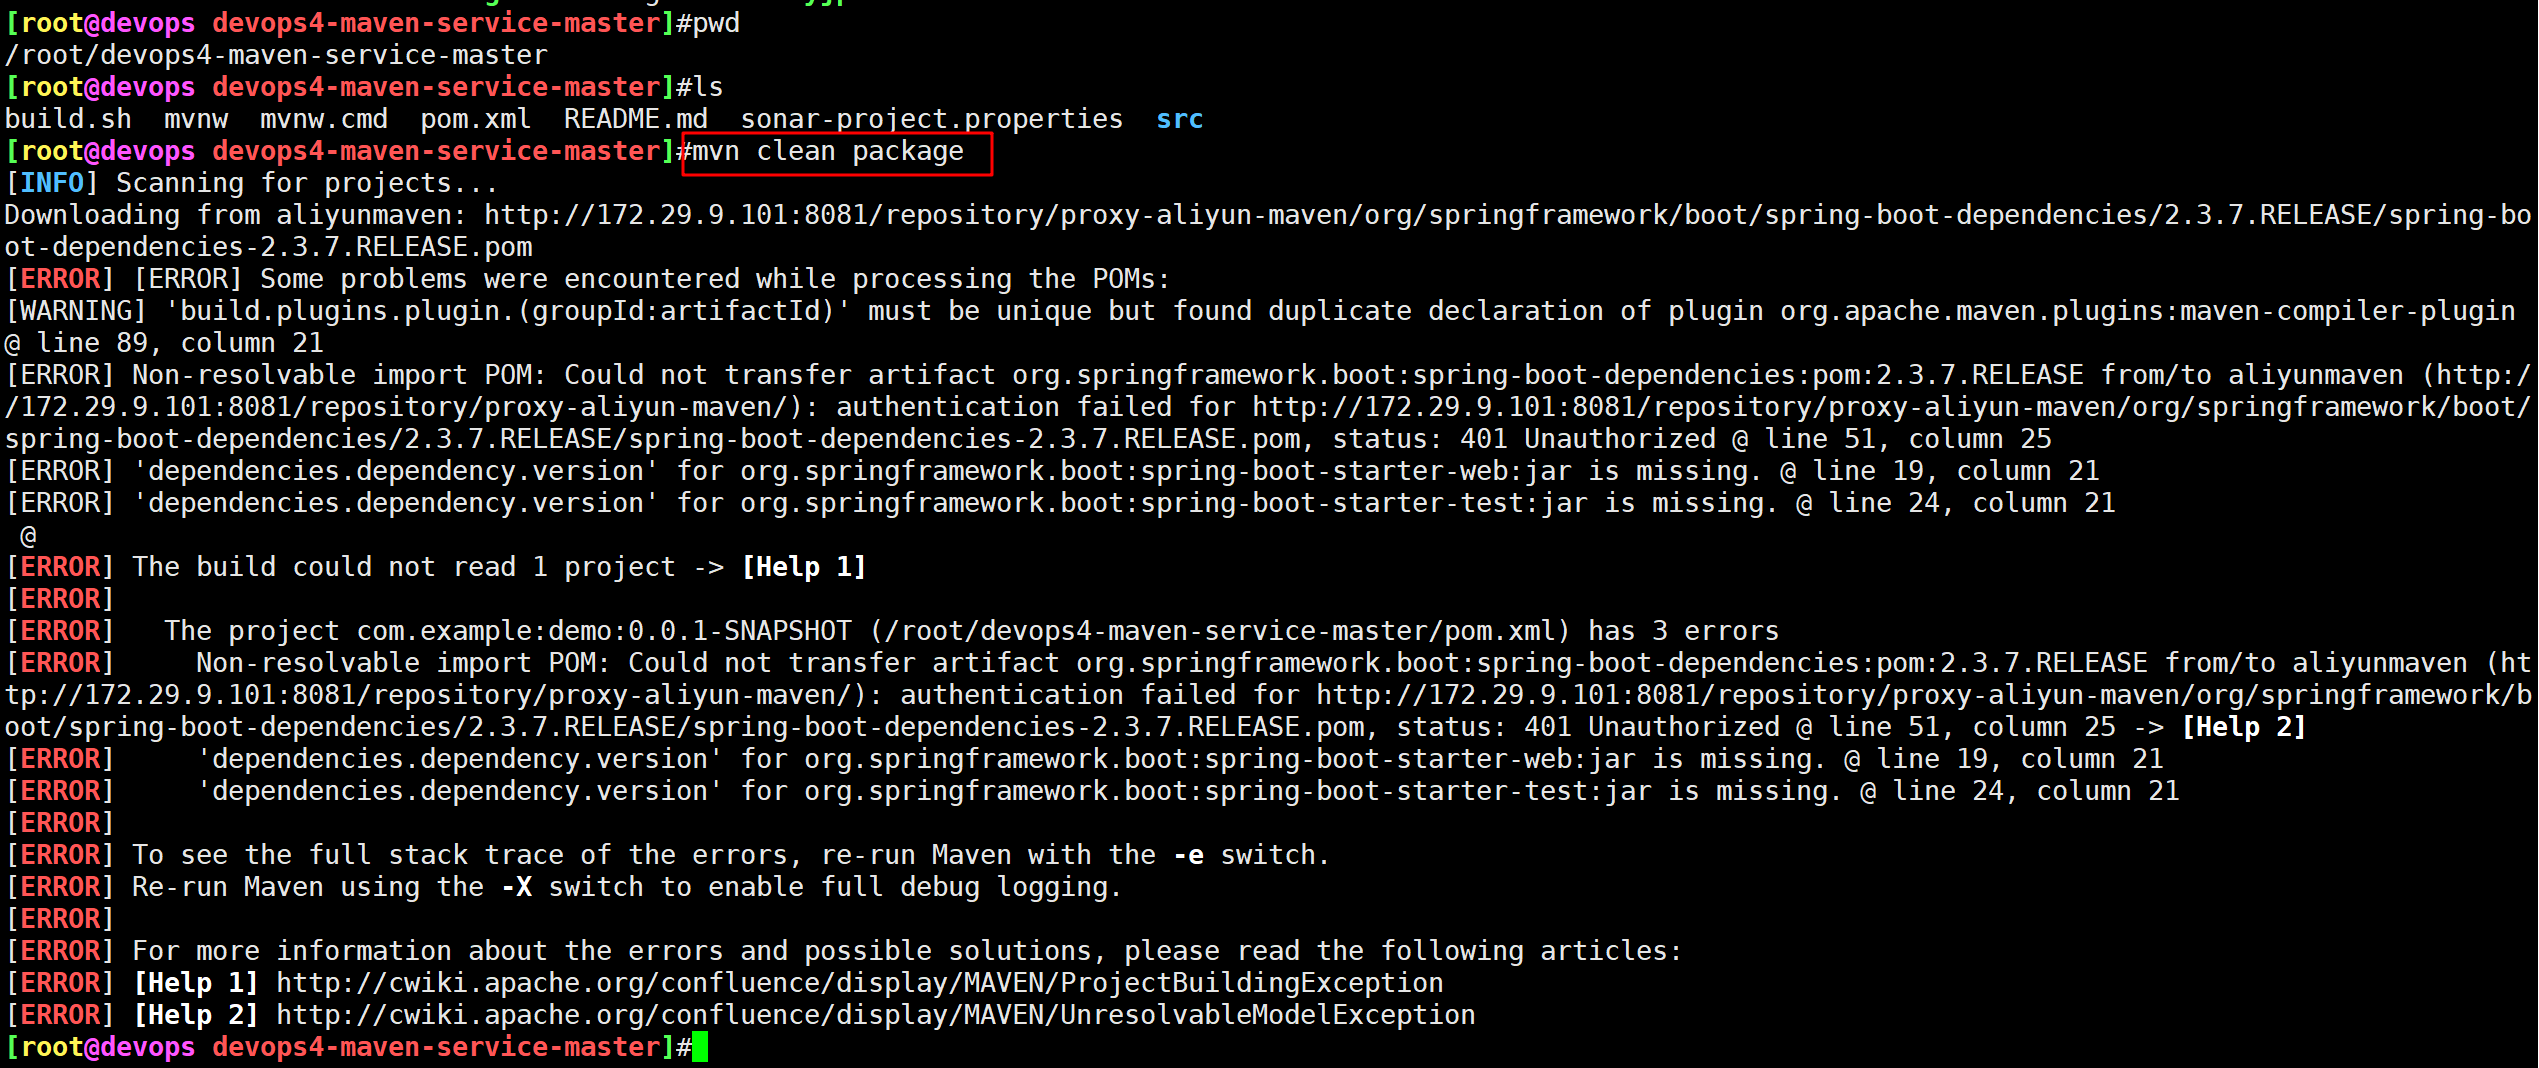
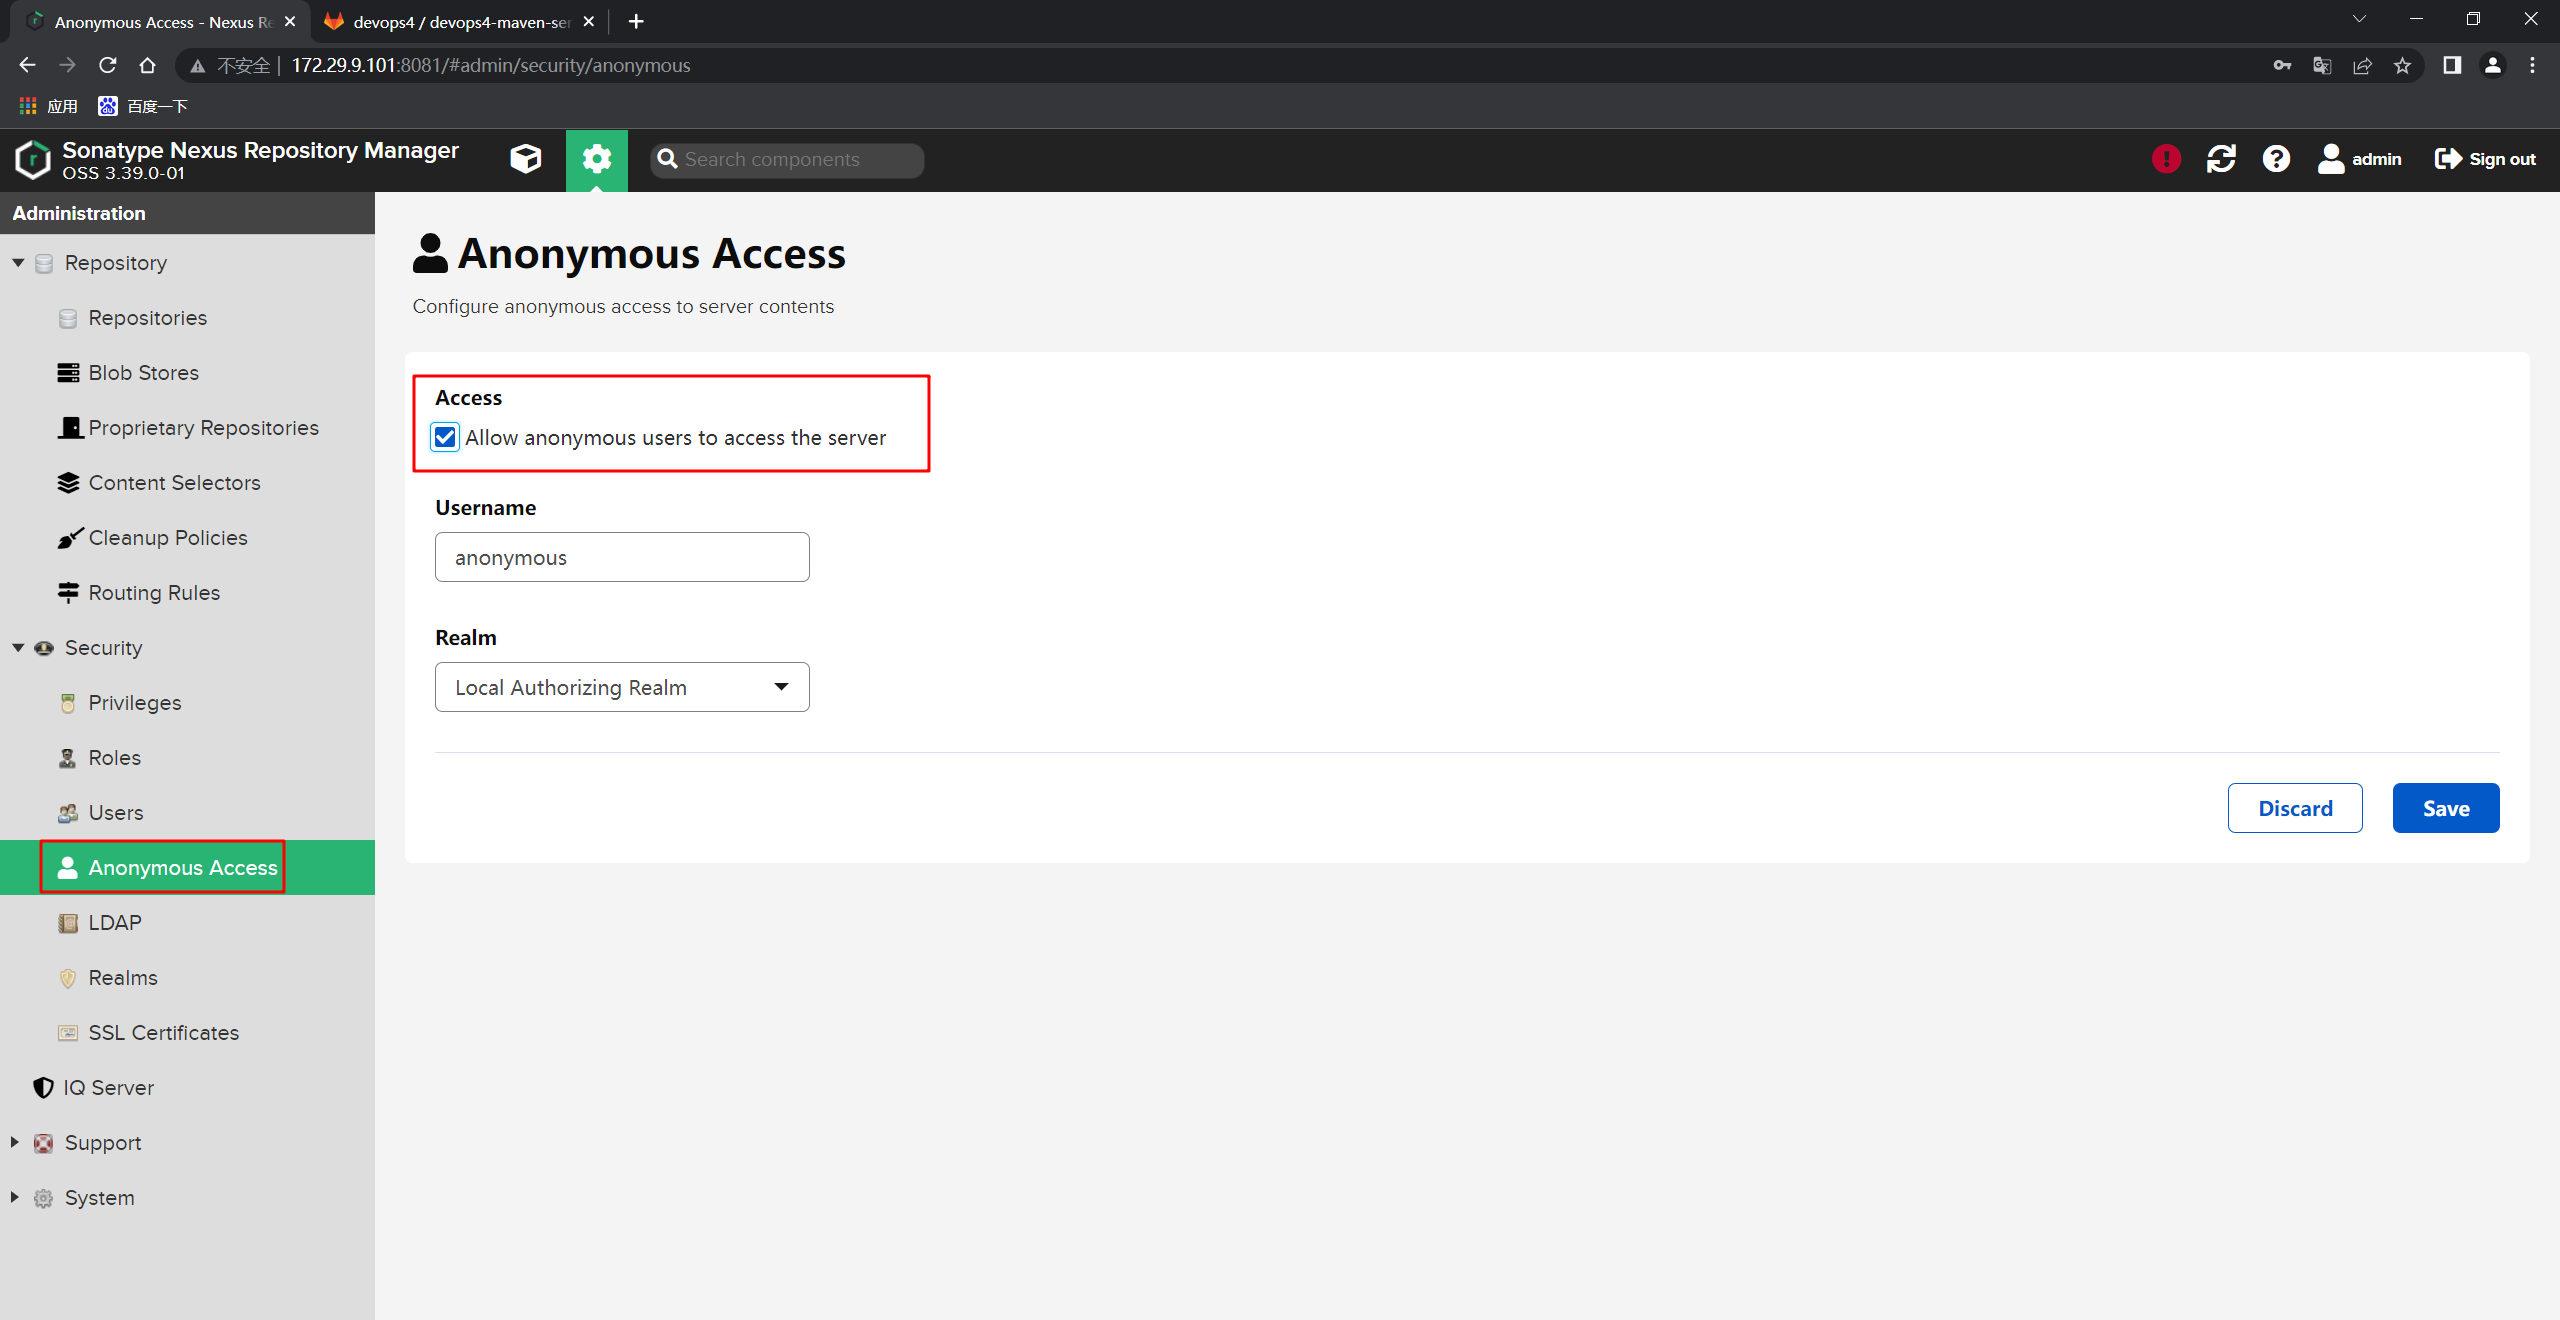
此时会报一个错误的,这里我们要配置下权限:
这种公网的,我们一般不加权限:
再次构建,观察效果:
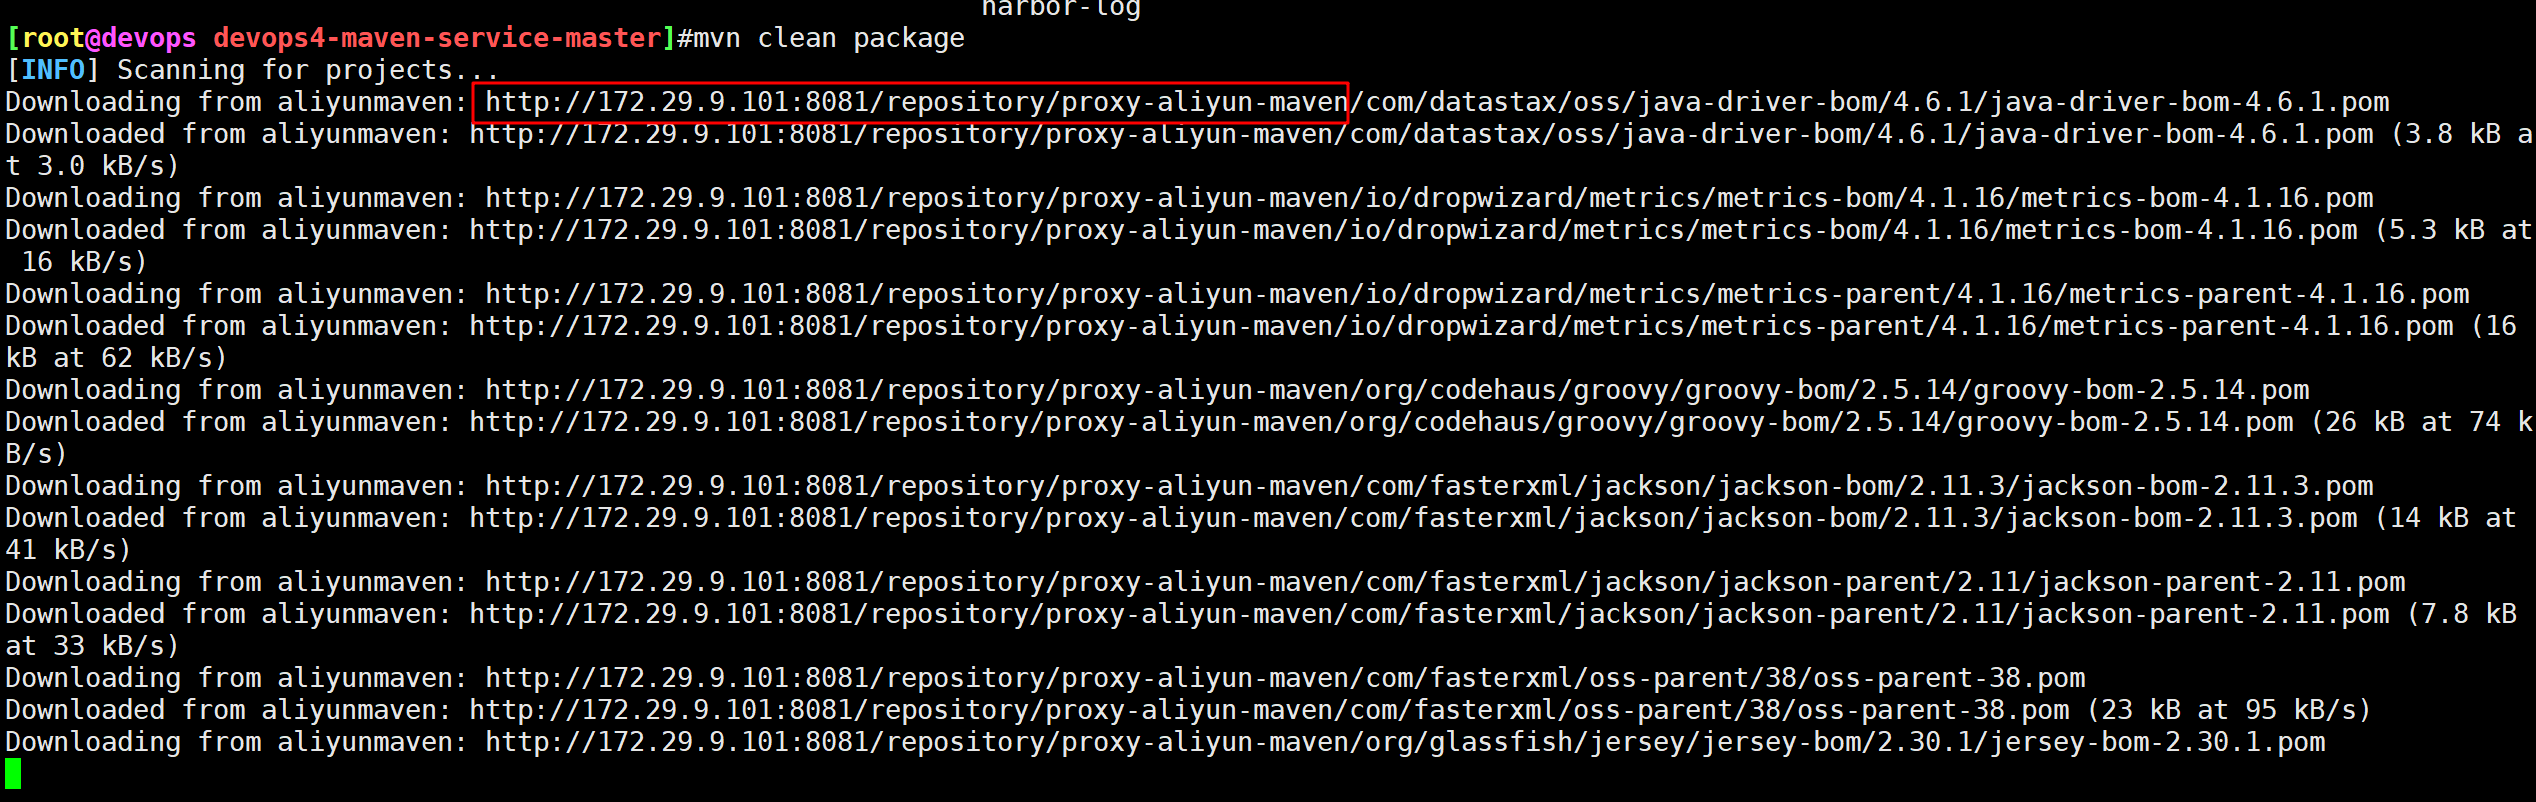
可以看到能够正常下载。
- 来到这里也是可以看到下载的包:
测试成功。😘
2.搭建制品库(本地仓库 依赖包)
本地仓库:以Maven为例:
- RELEASE类型仓库(存放制品稳定版) 这个里面的包一般是需要手动指定的;
- SNAPSHOT类型仓库(存放制品开发版) 这个里面的包一般是自动生成版本号的;
切记:release类型的仓库只能存放release版本的包。不能将release类型的包上传到snapshot仓库,同理snapshot类型的包也不能上传到release类型的仓库中。
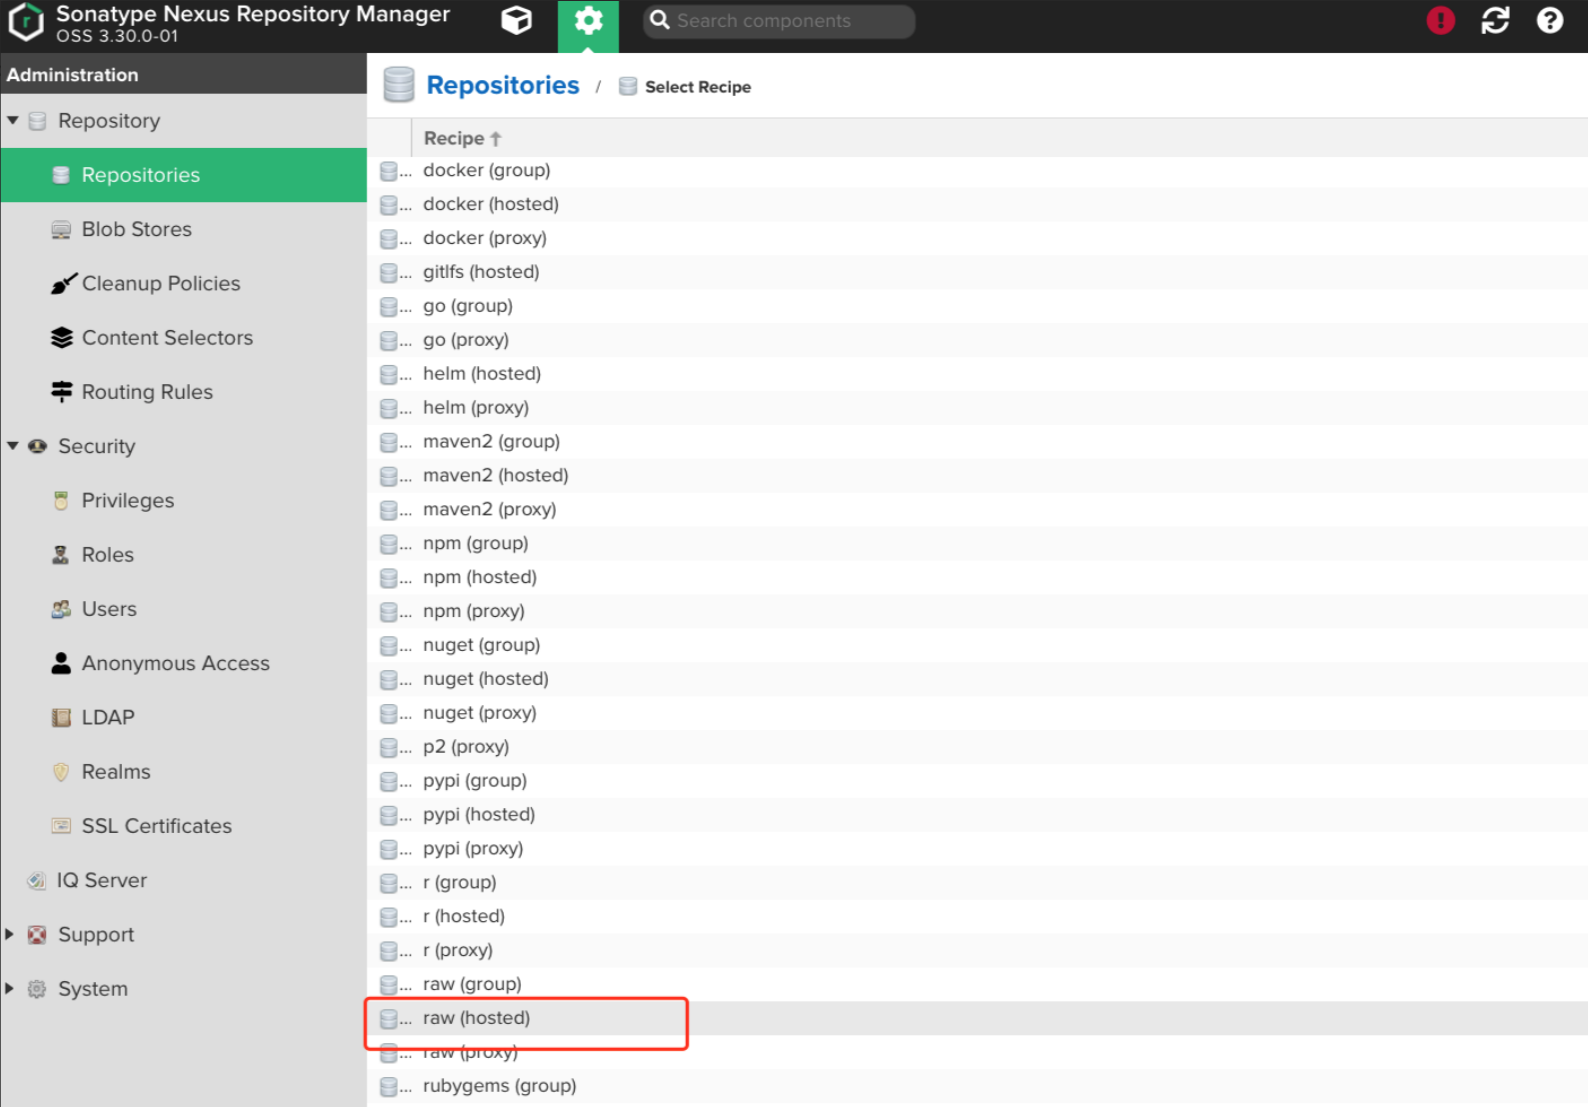
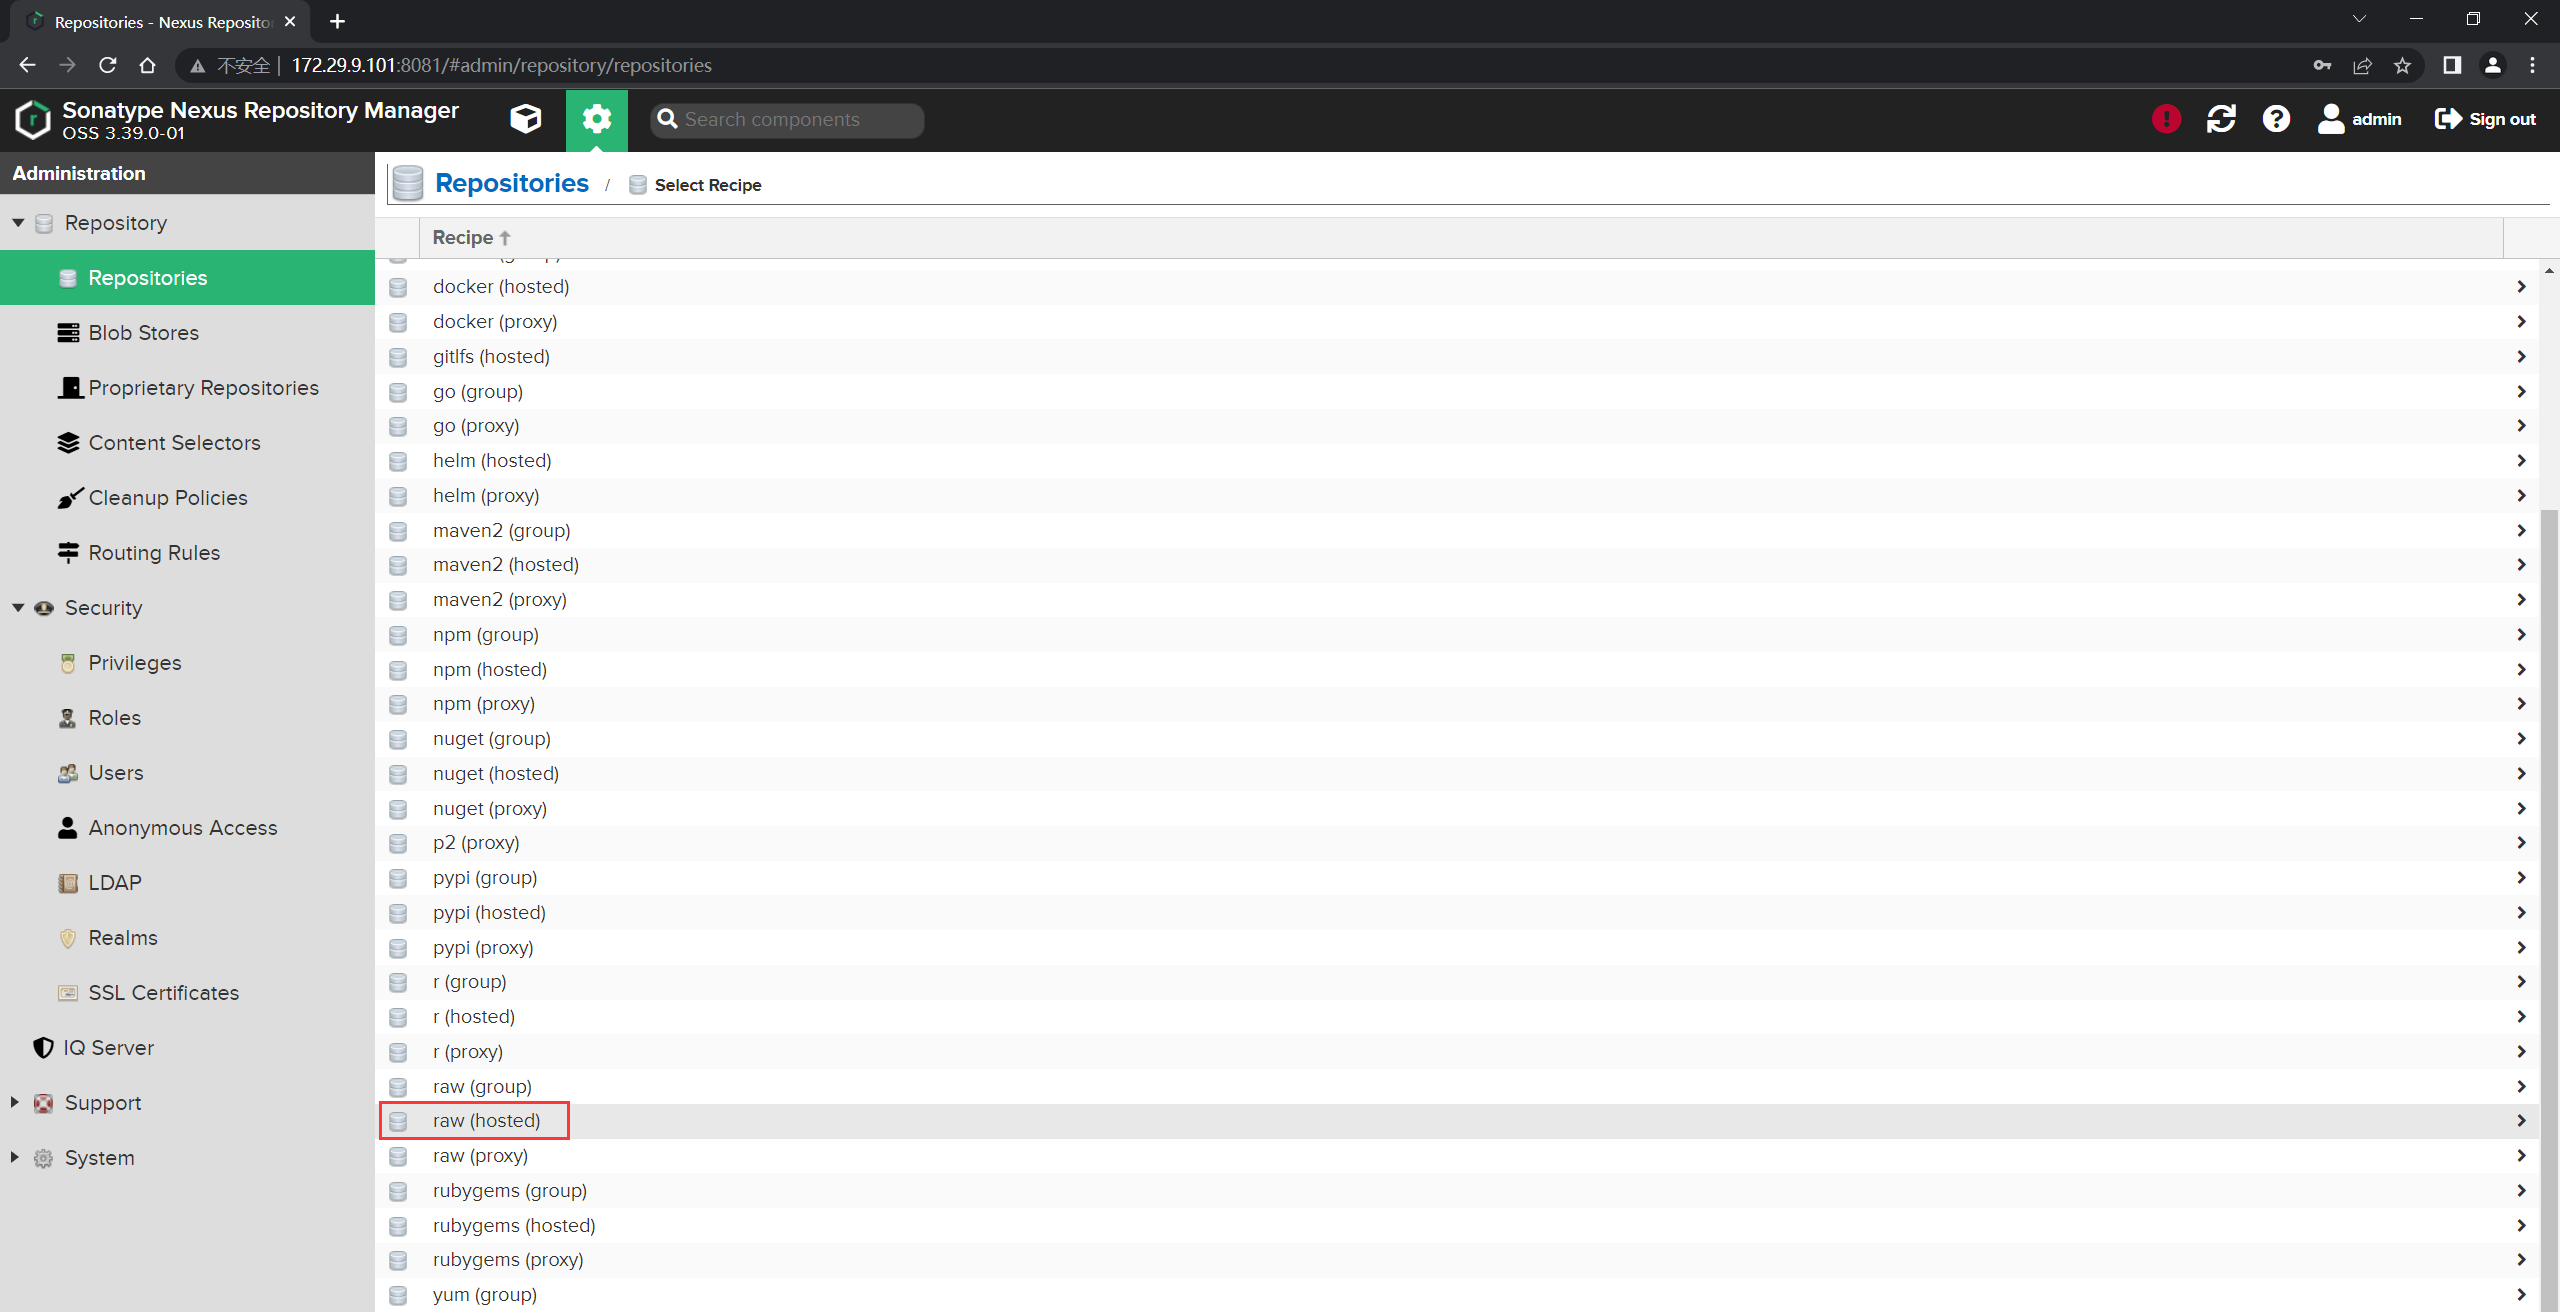
- 新建raw类型的仓库: raw可以理解为普通的文件存储;
raw格式就是一块普通的存储。(制品就传到这种类型的仓库里去)
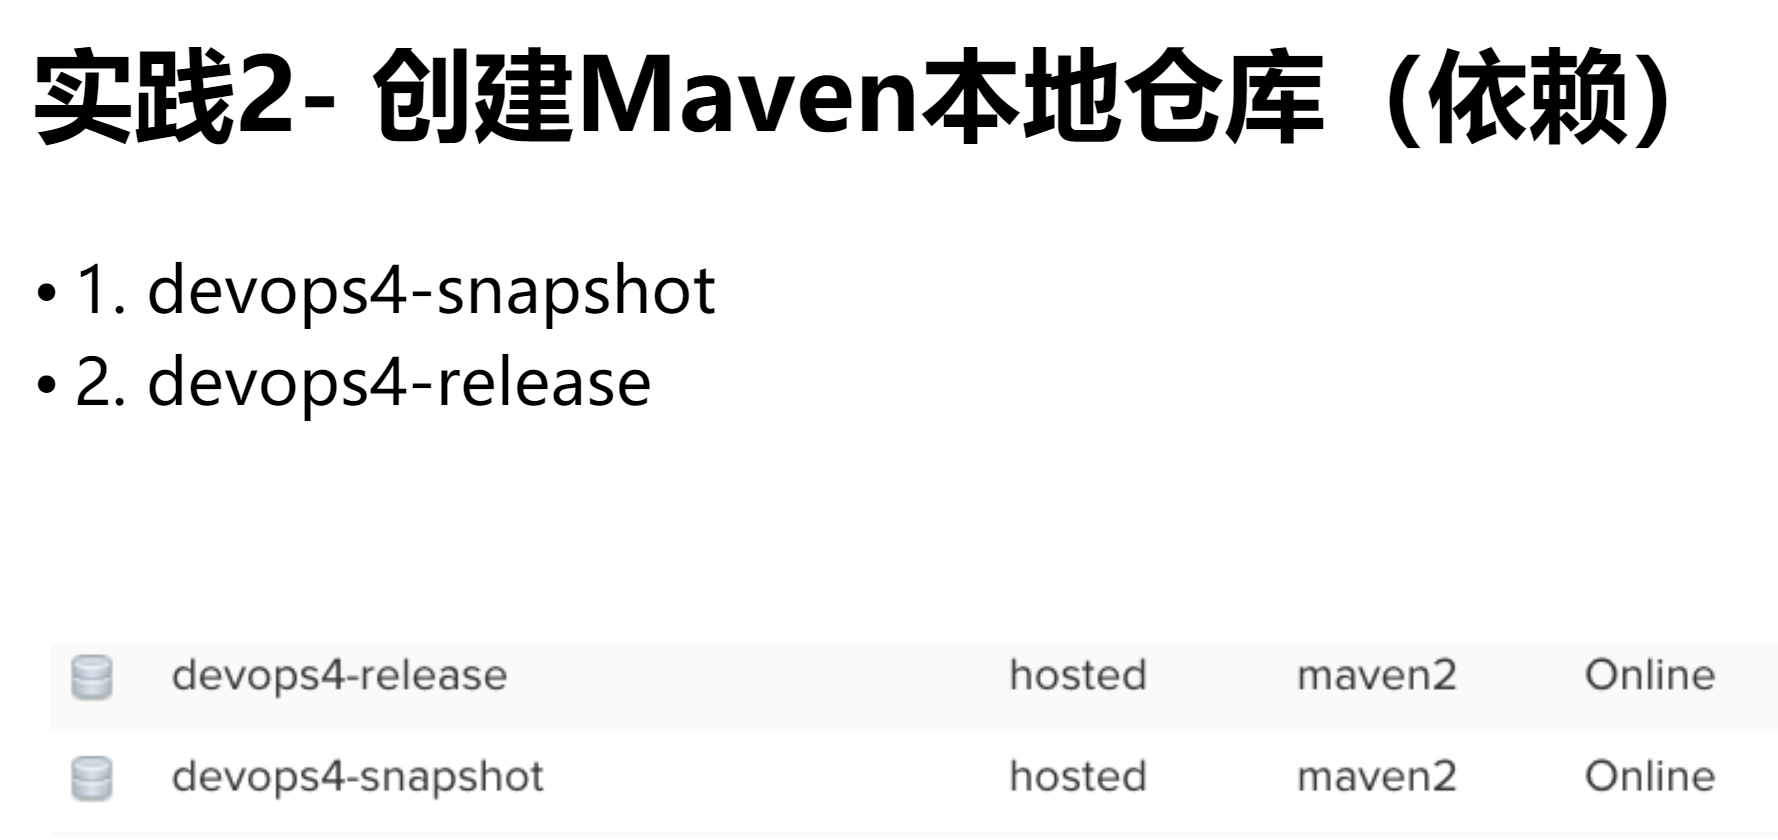
① 创建Maven本地仓库(依赖)
| 💘 实践:创建Maven本地仓库(依赖)-2022.6.10(测试成功) |
- 创建仓库:
选择hosted类型:
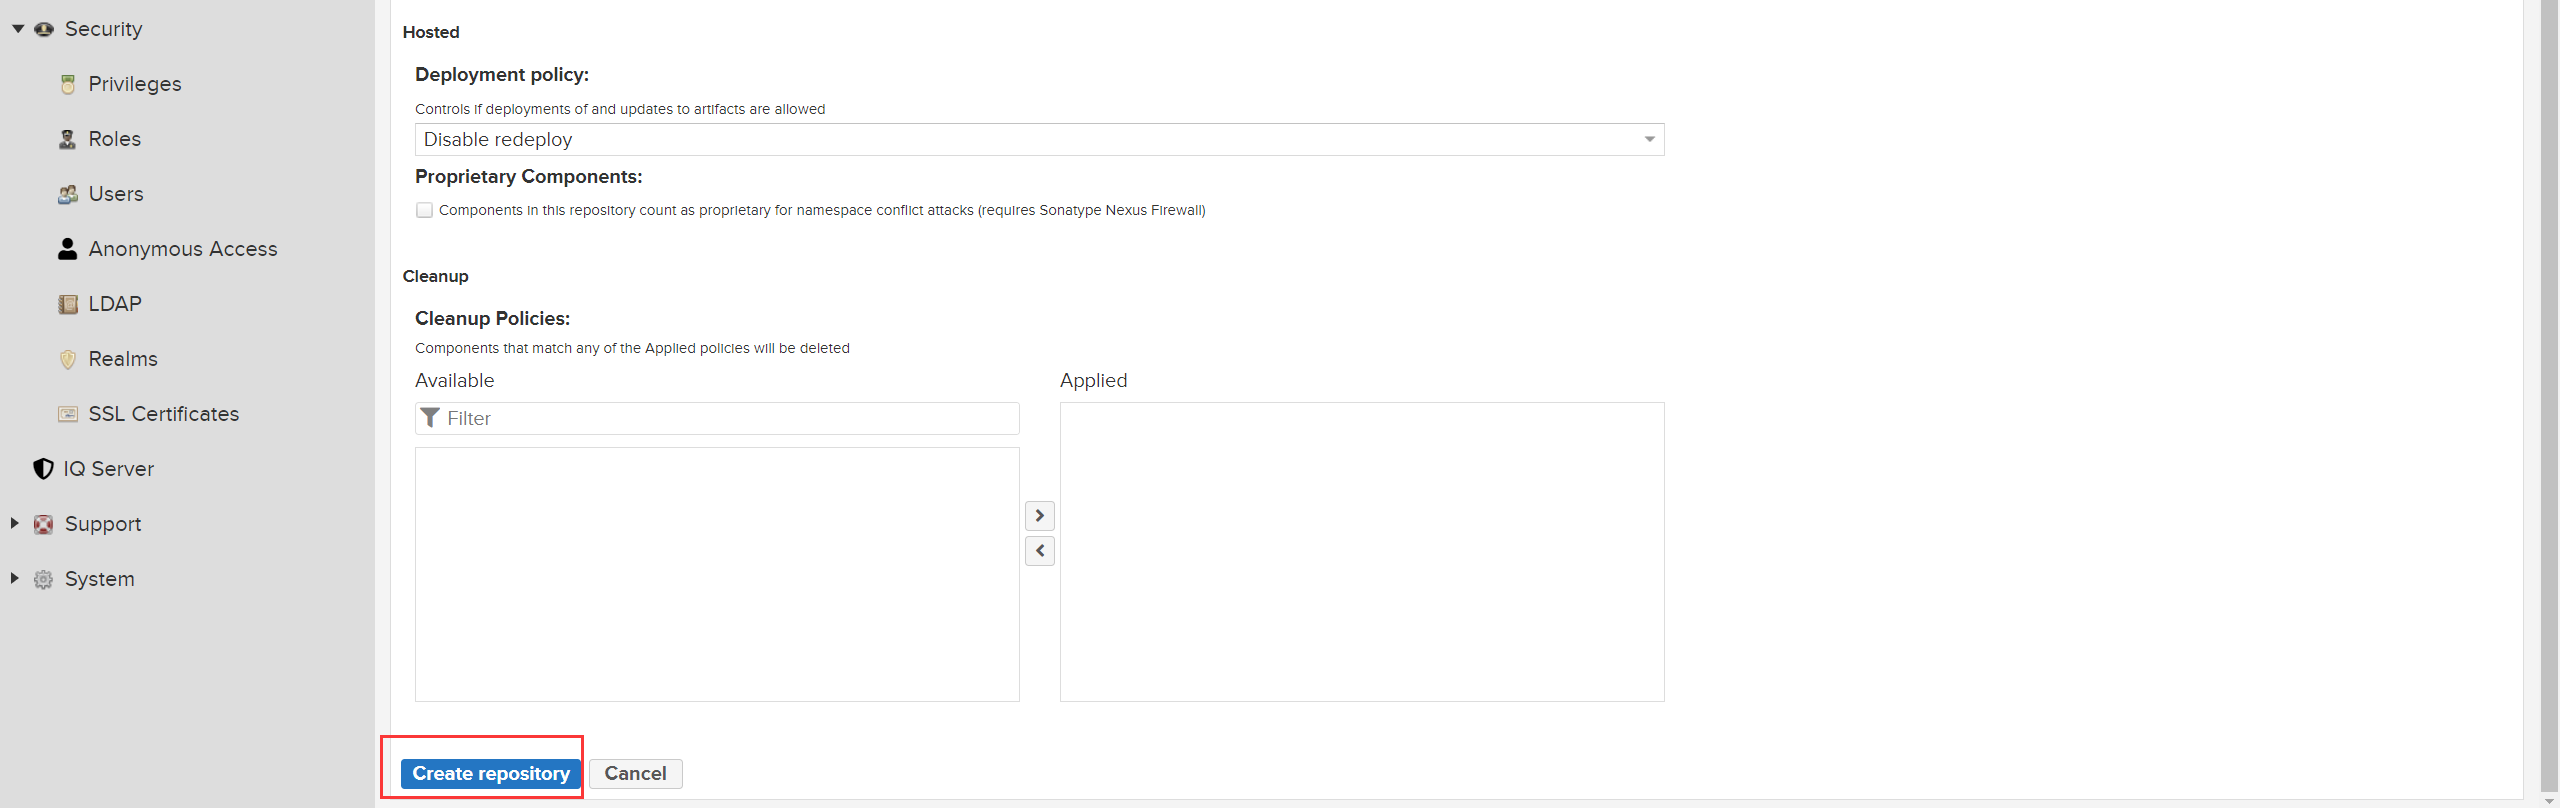
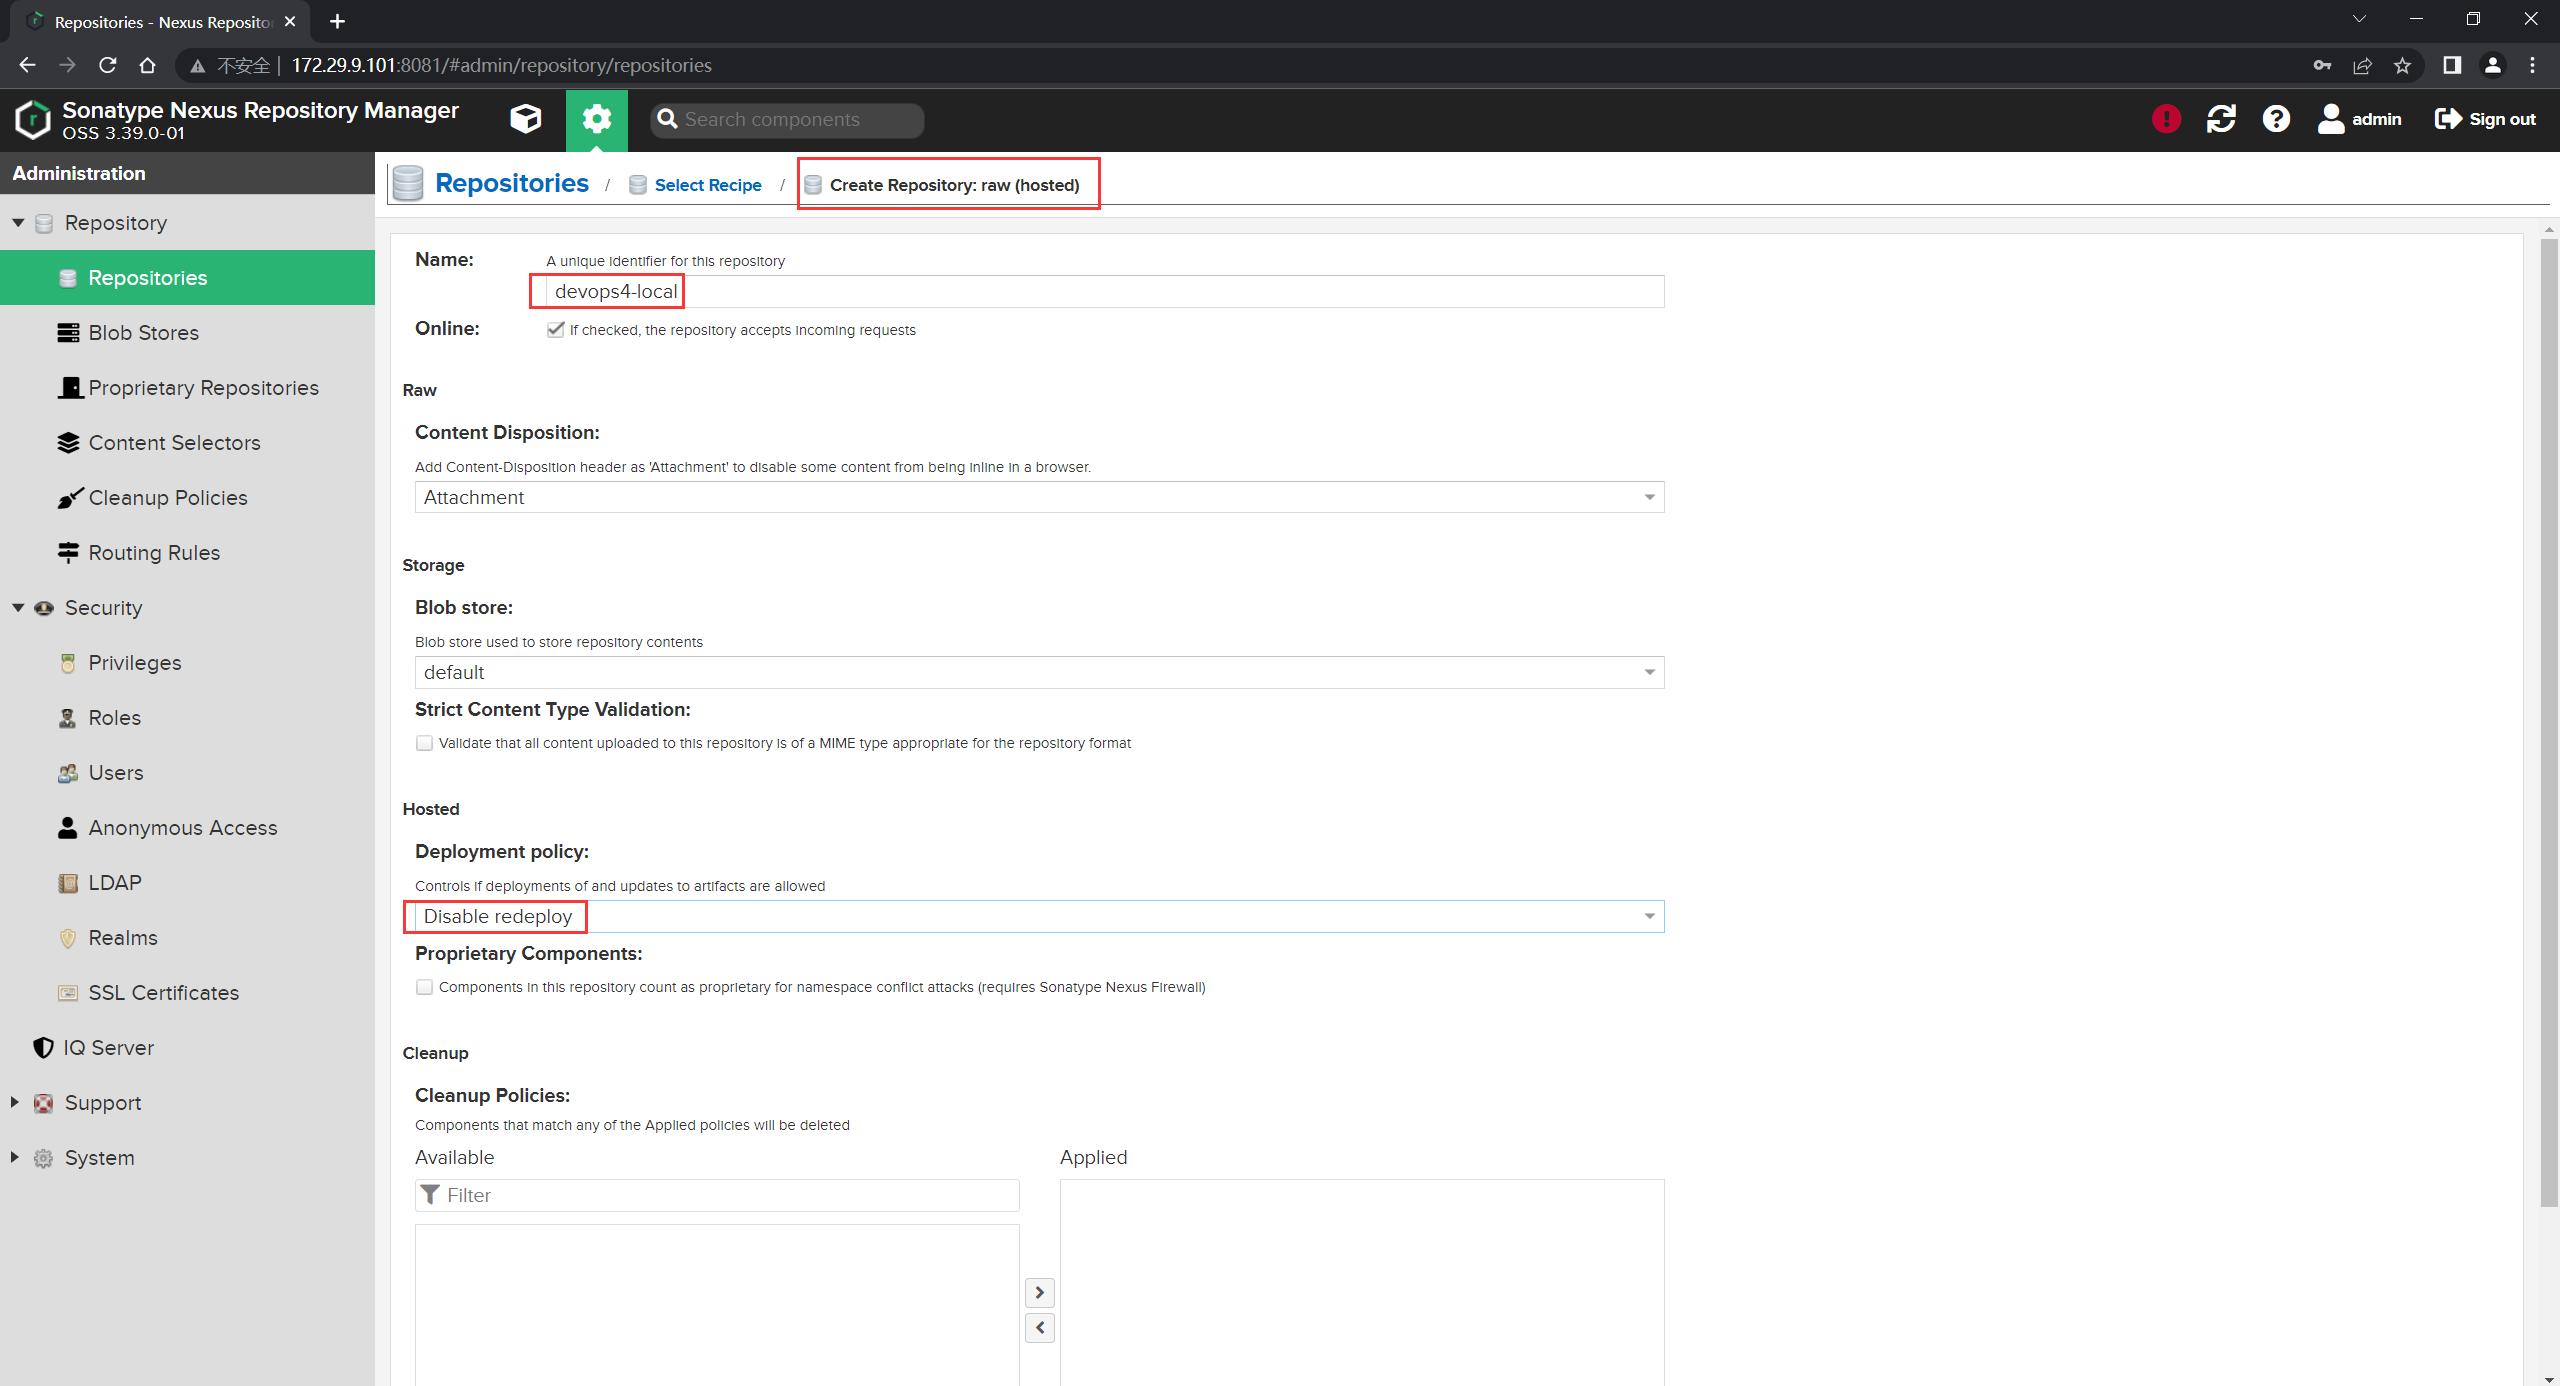
- 定义和配置仓库的信息: 名称、存储、是否允许重新上传:
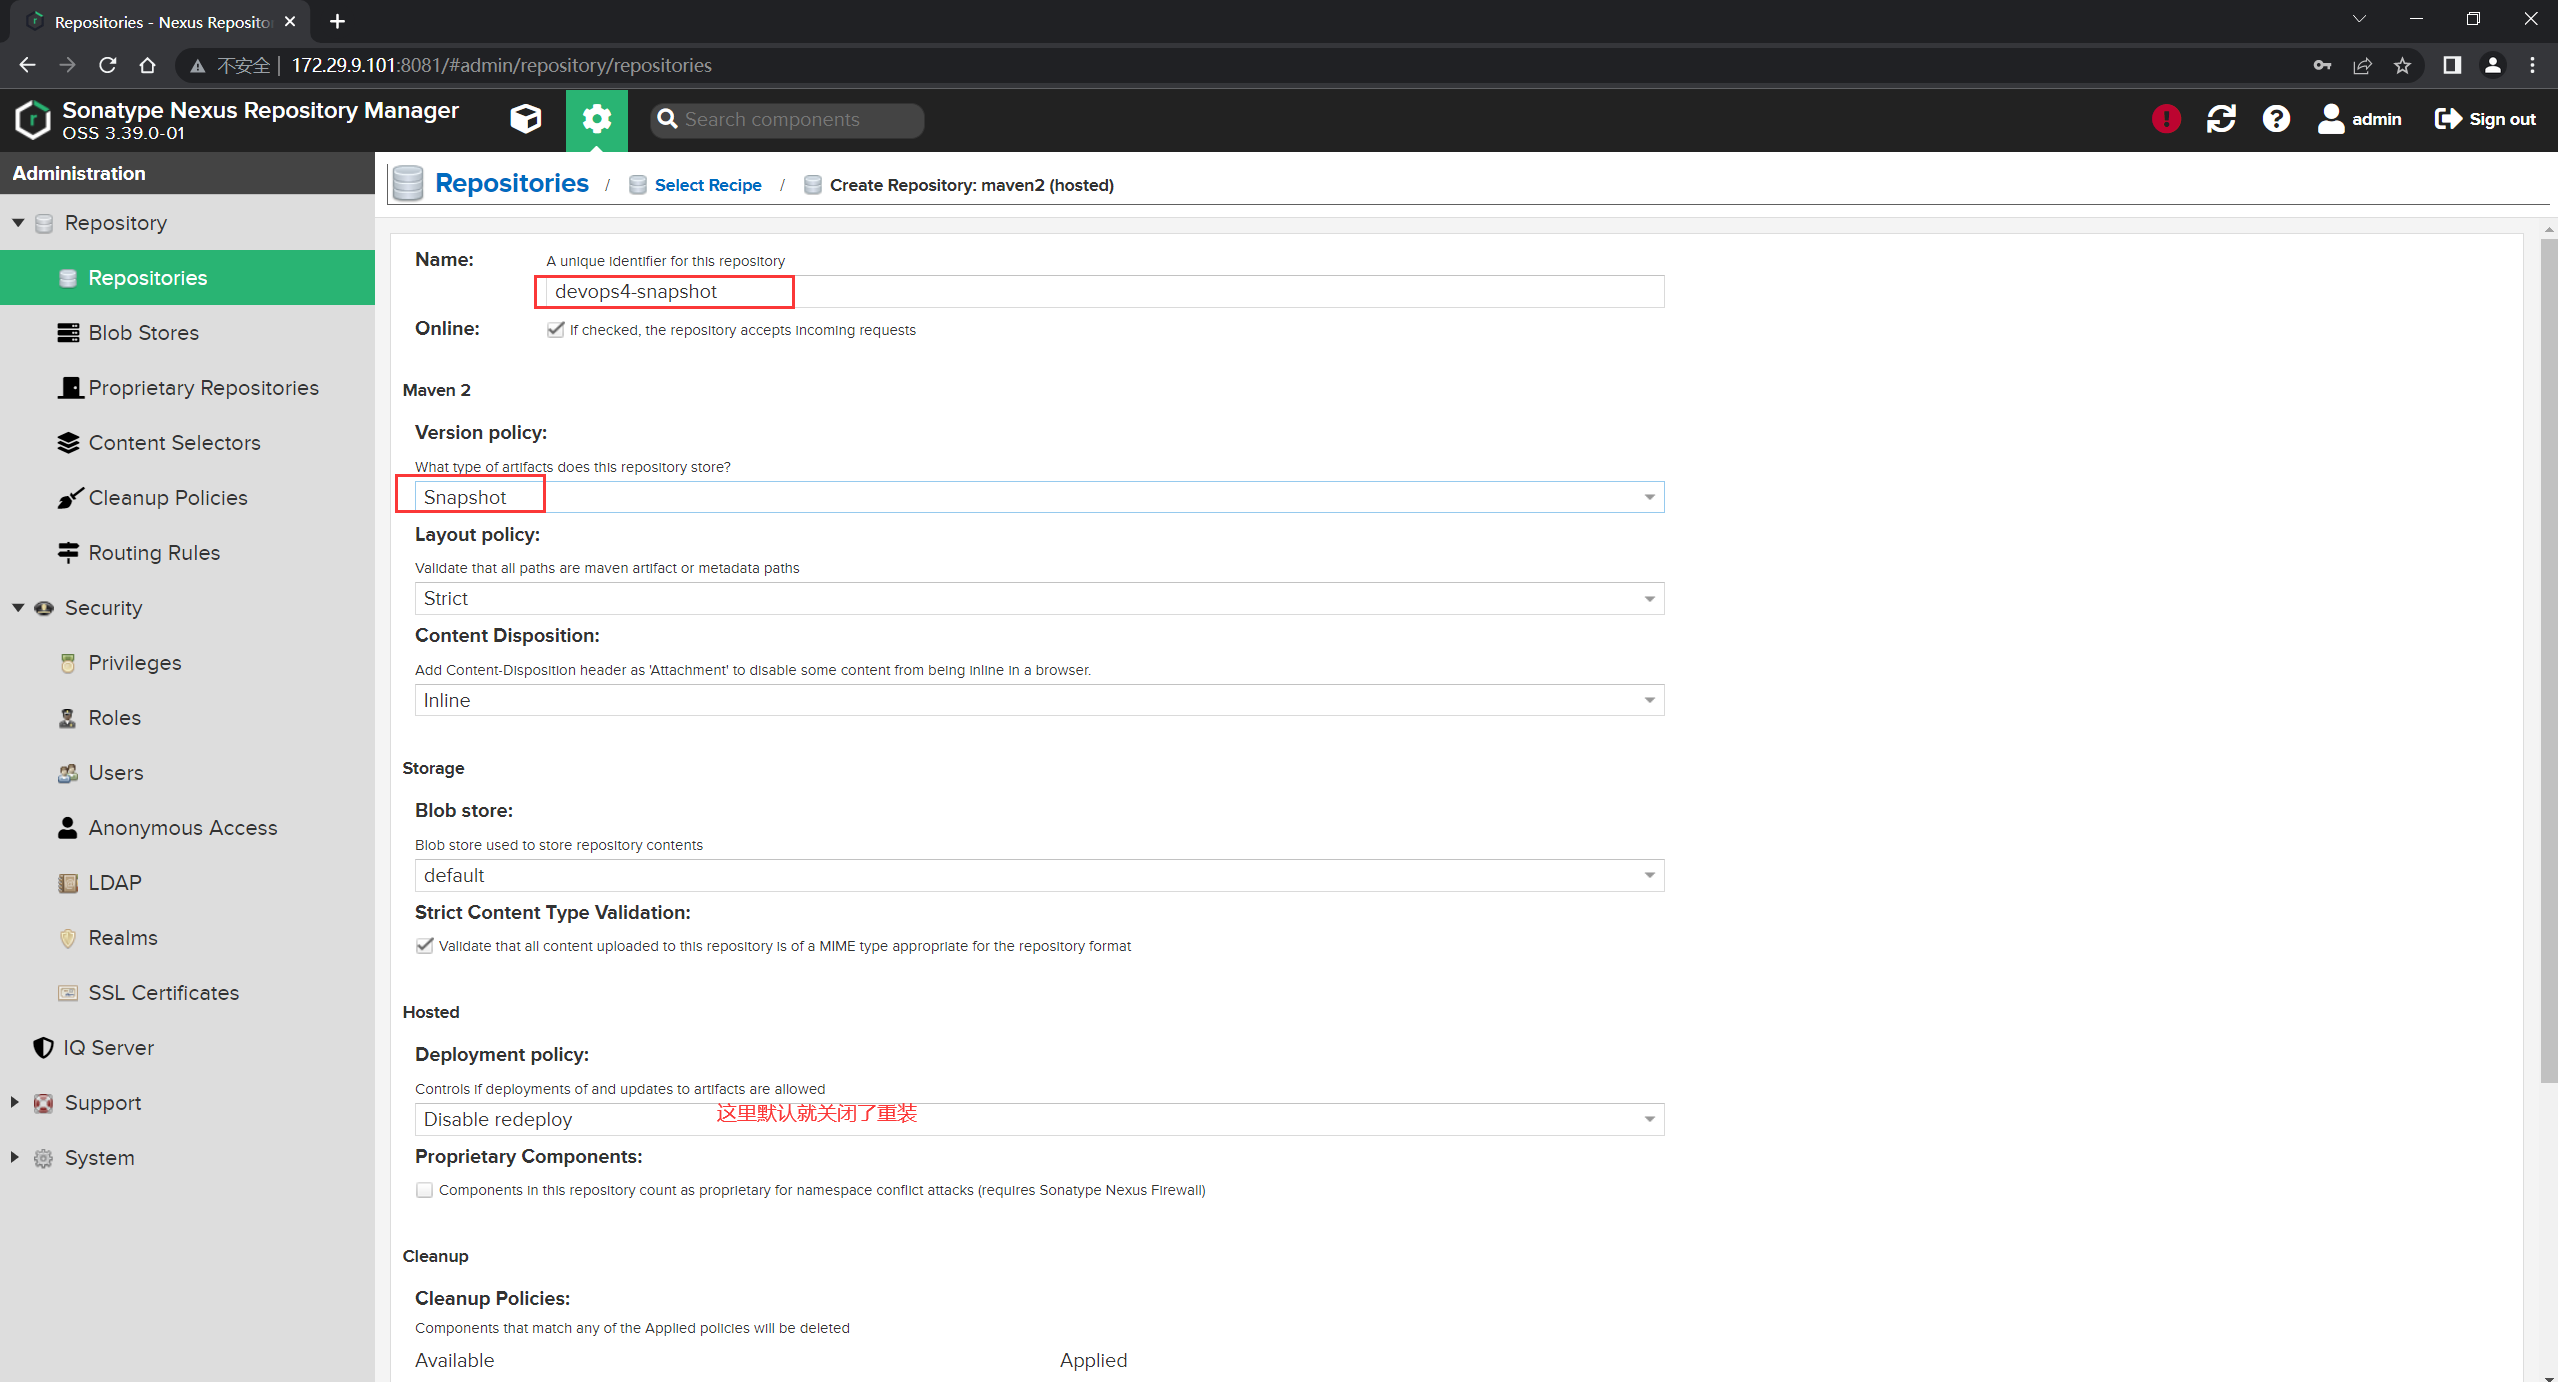
最后点击Create repositry:
- 观察效果:
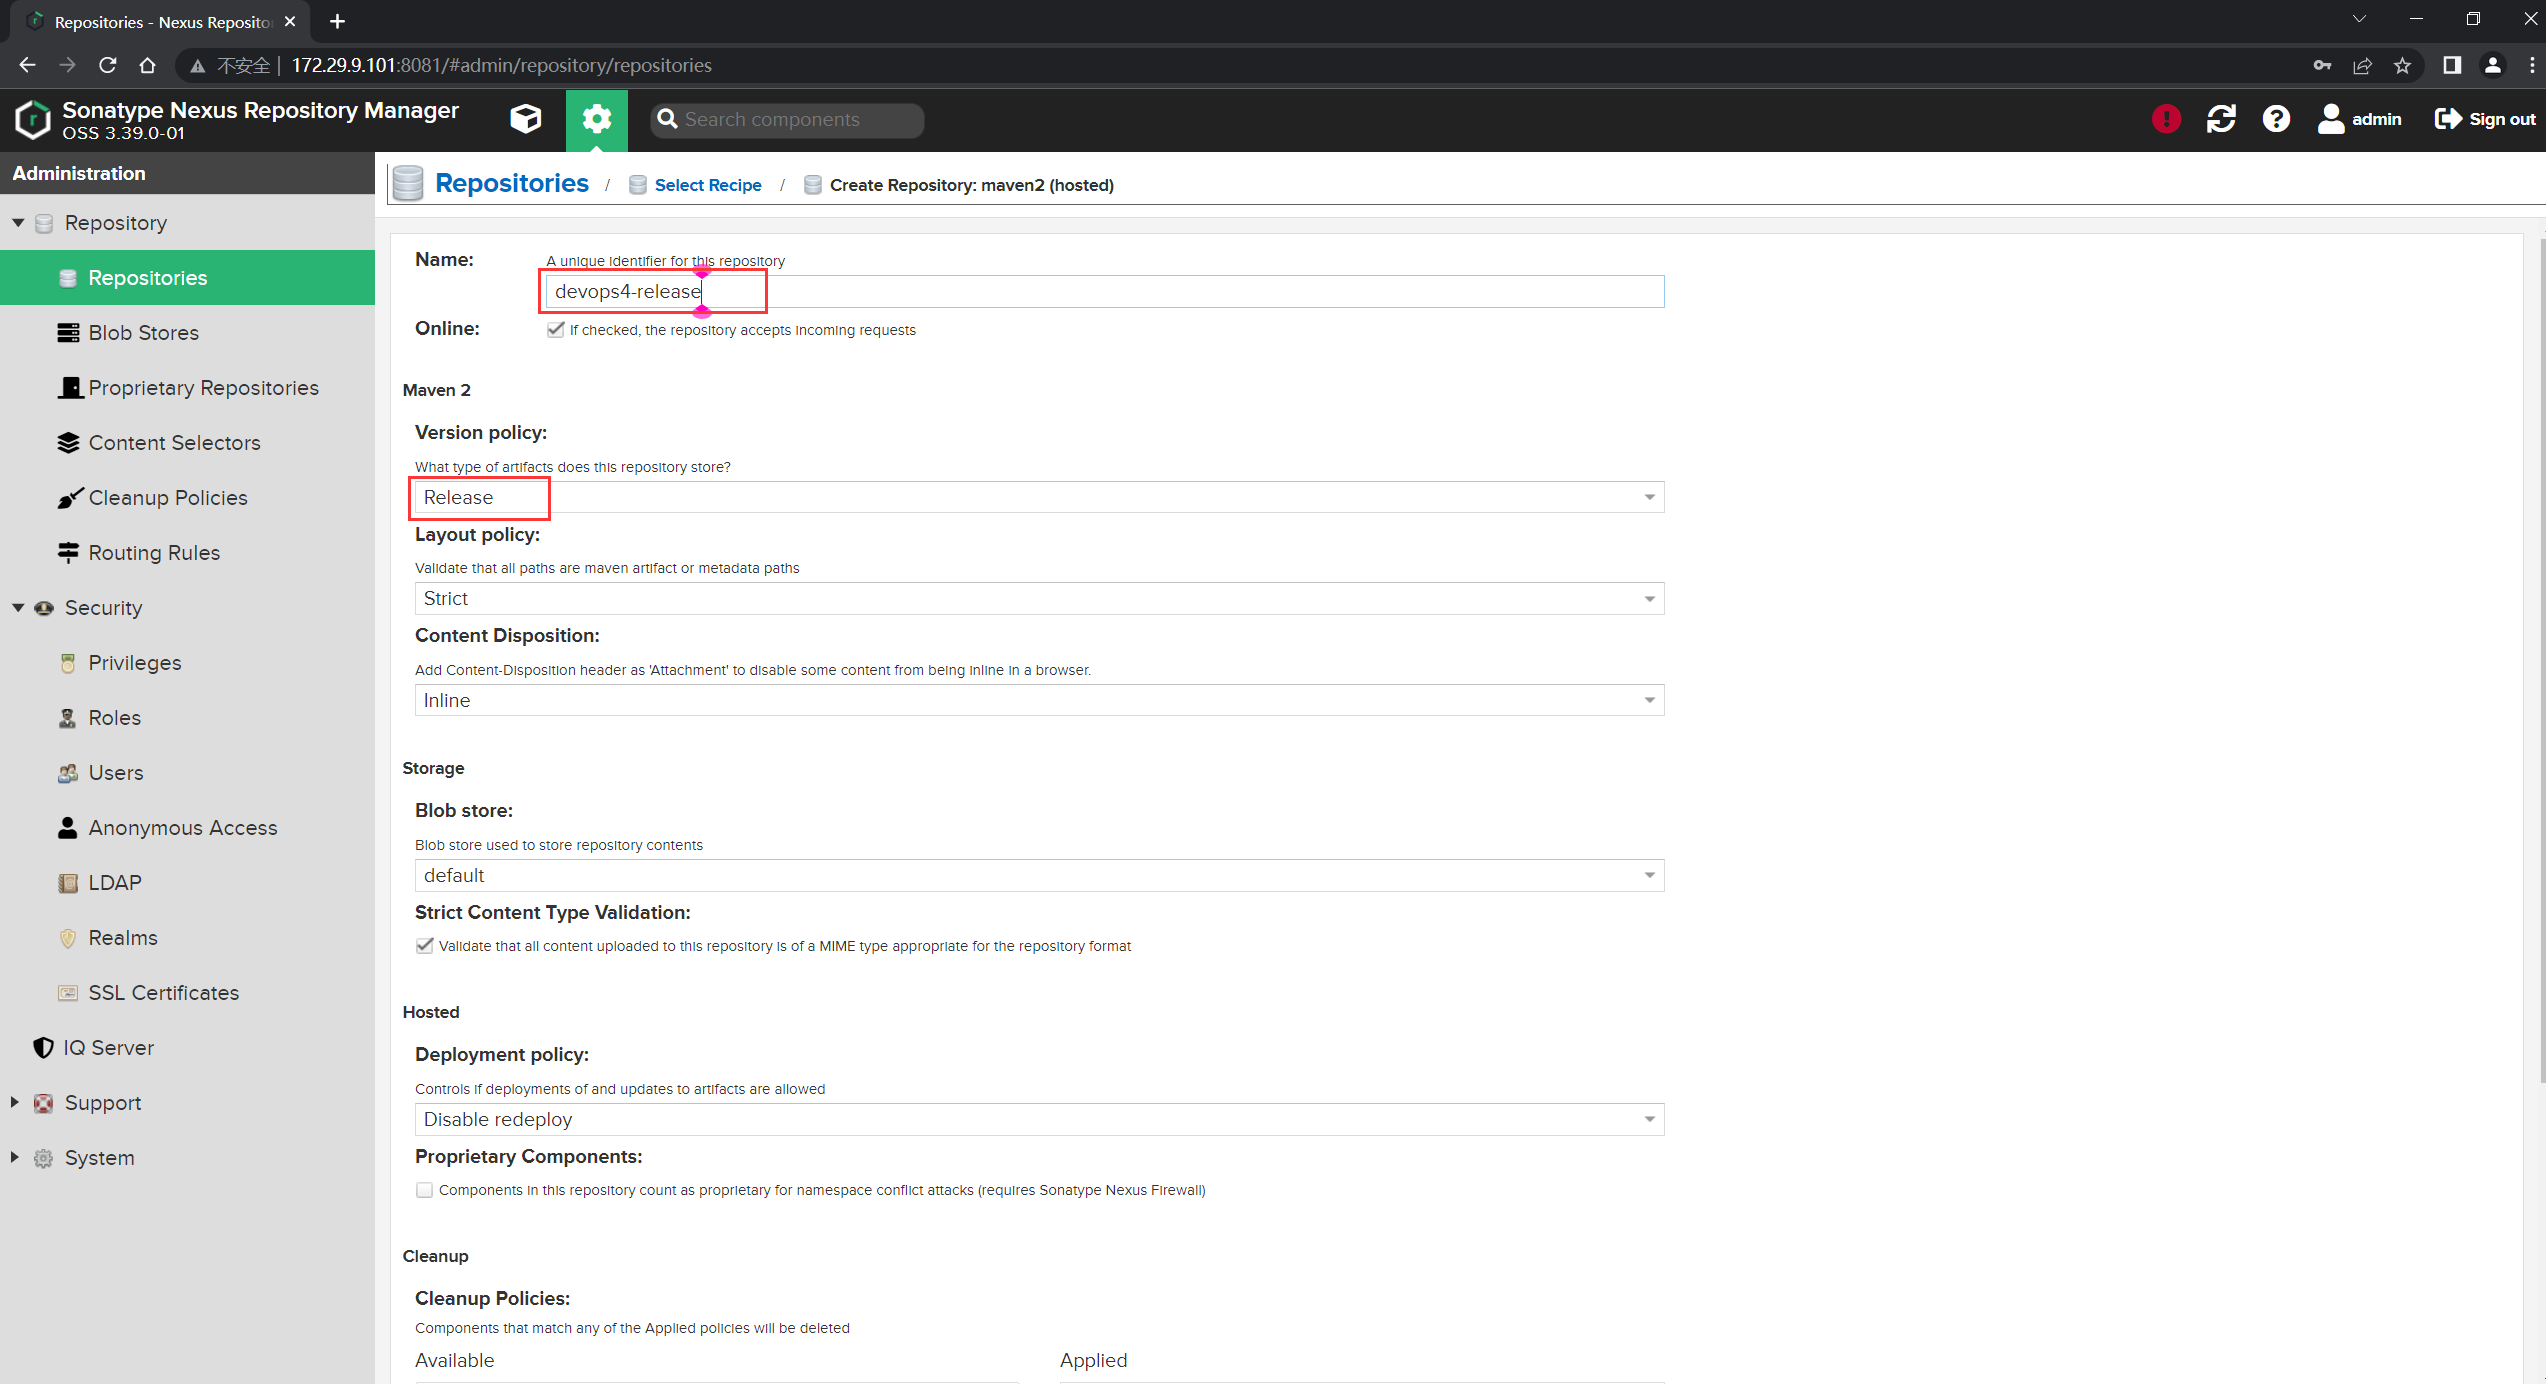
- 同理,我们再创建一个
devops4-release的本地仓库:

测试完成。😘
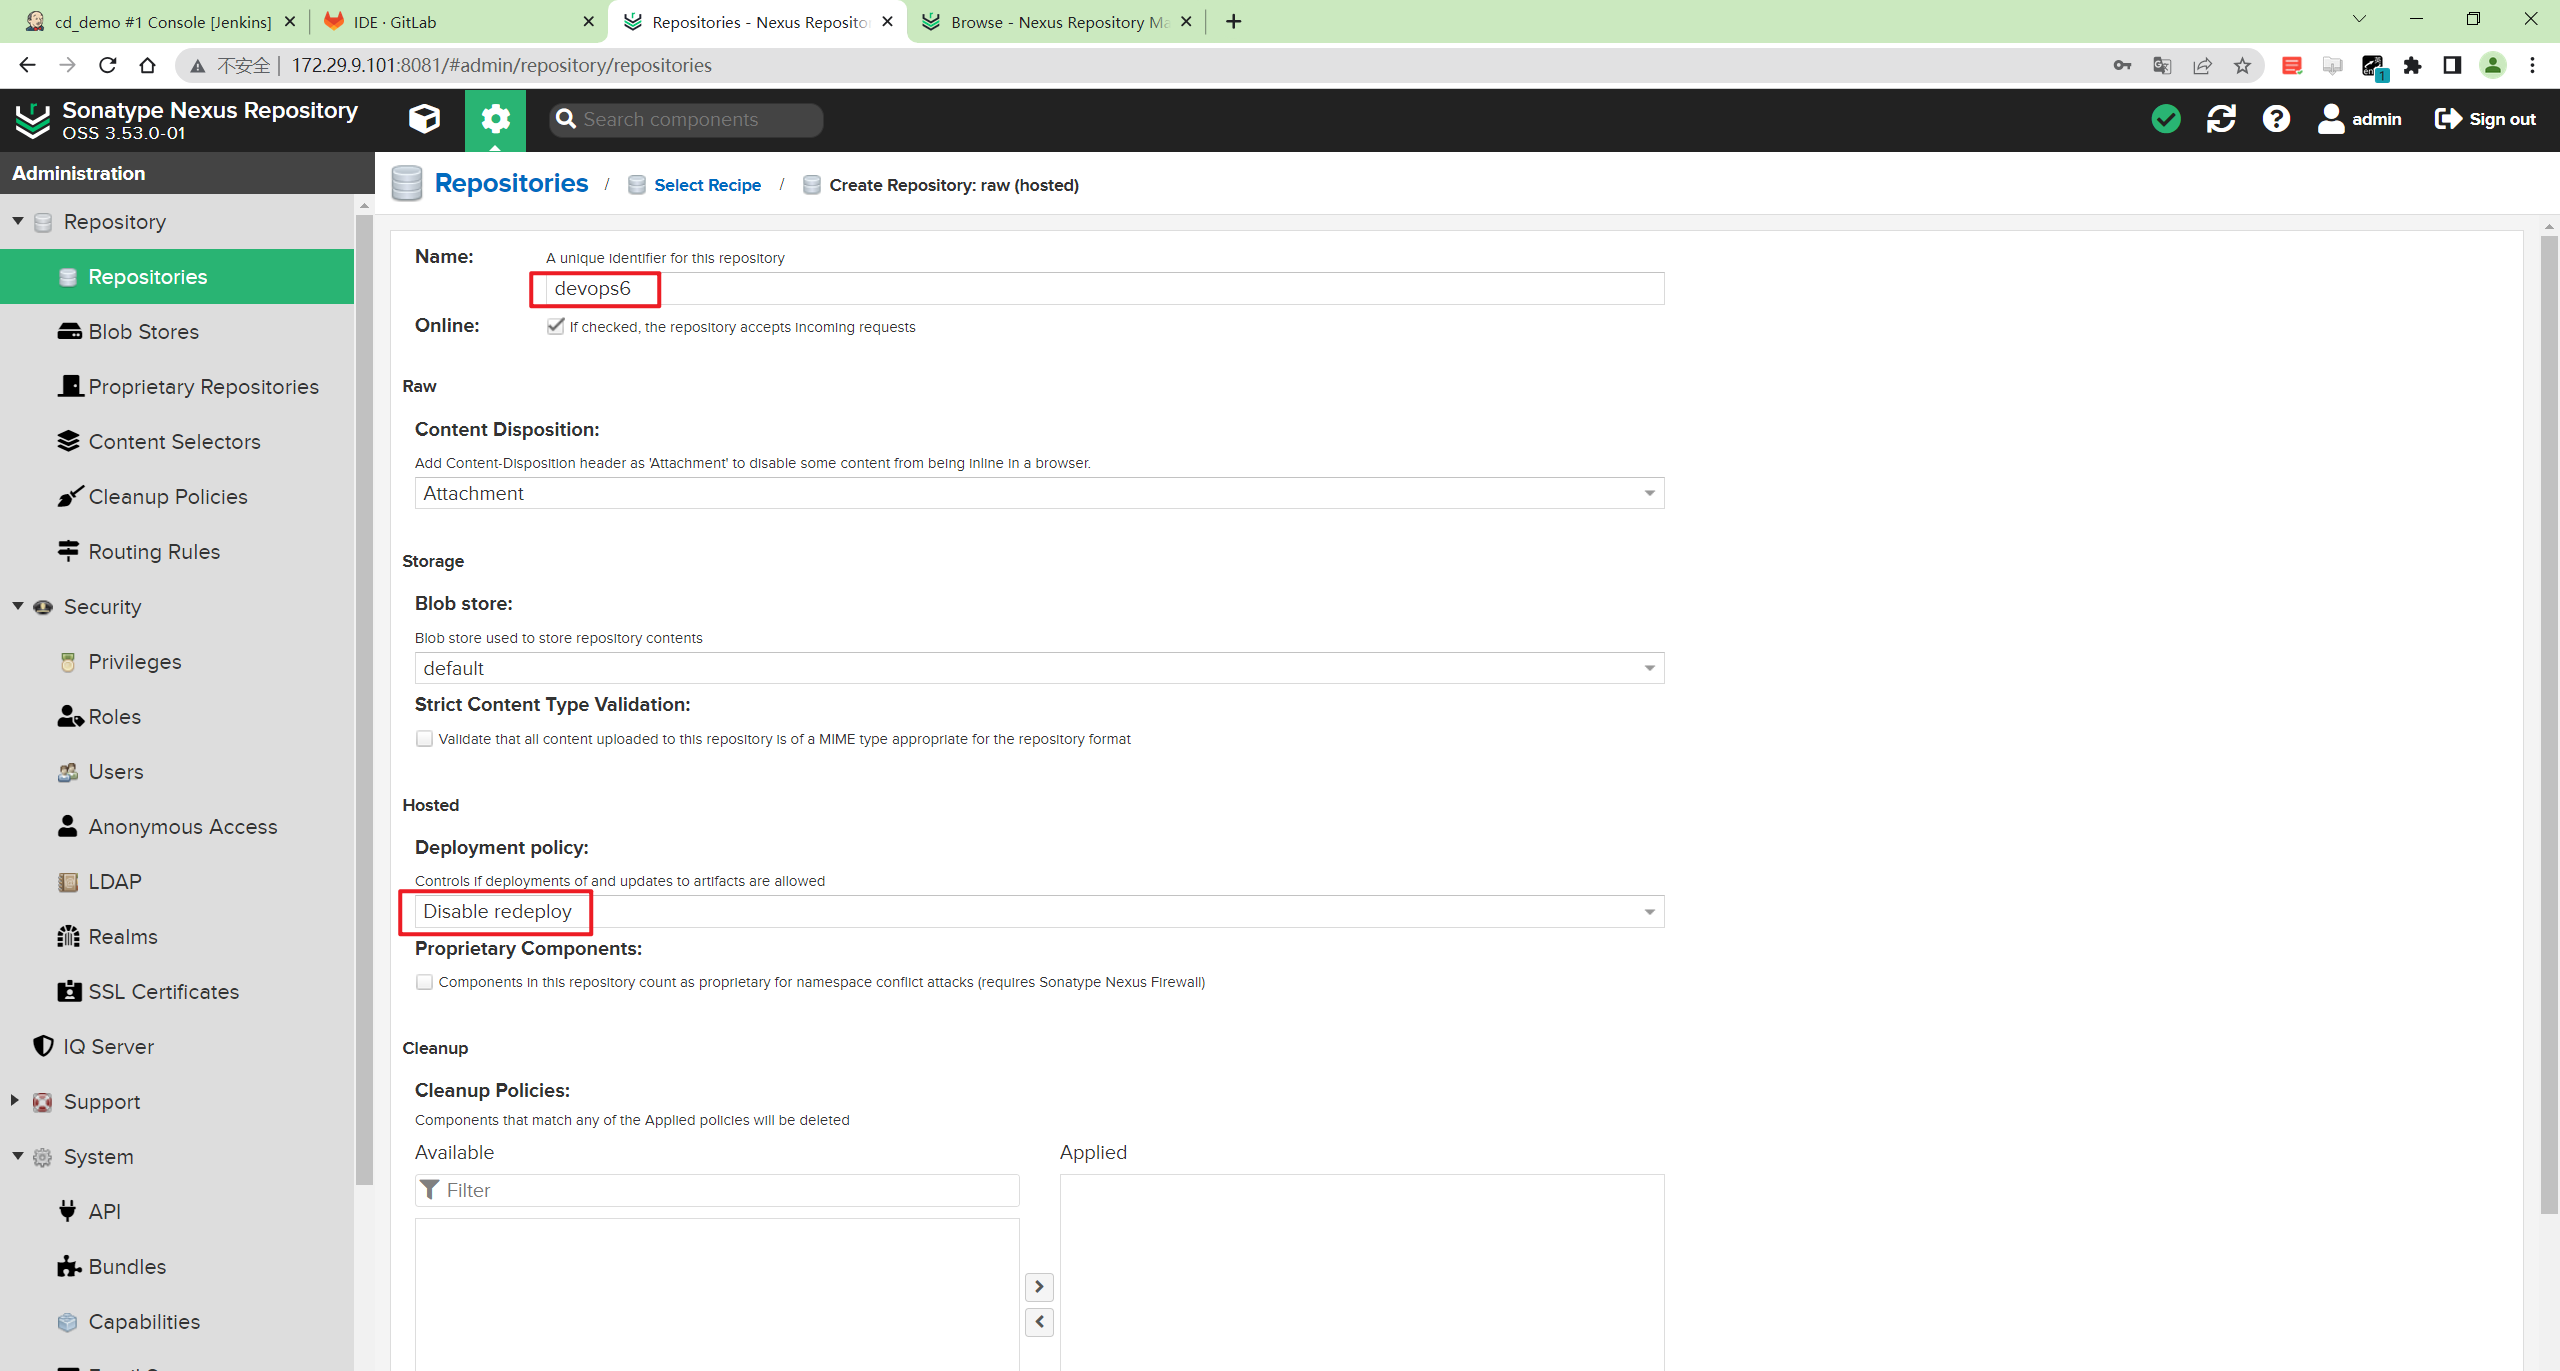
② 创建Raw本地仓库(制品)
| 💘 实践:创建Raw本地仓库(制品)(测试成功)-2022.6.10 |
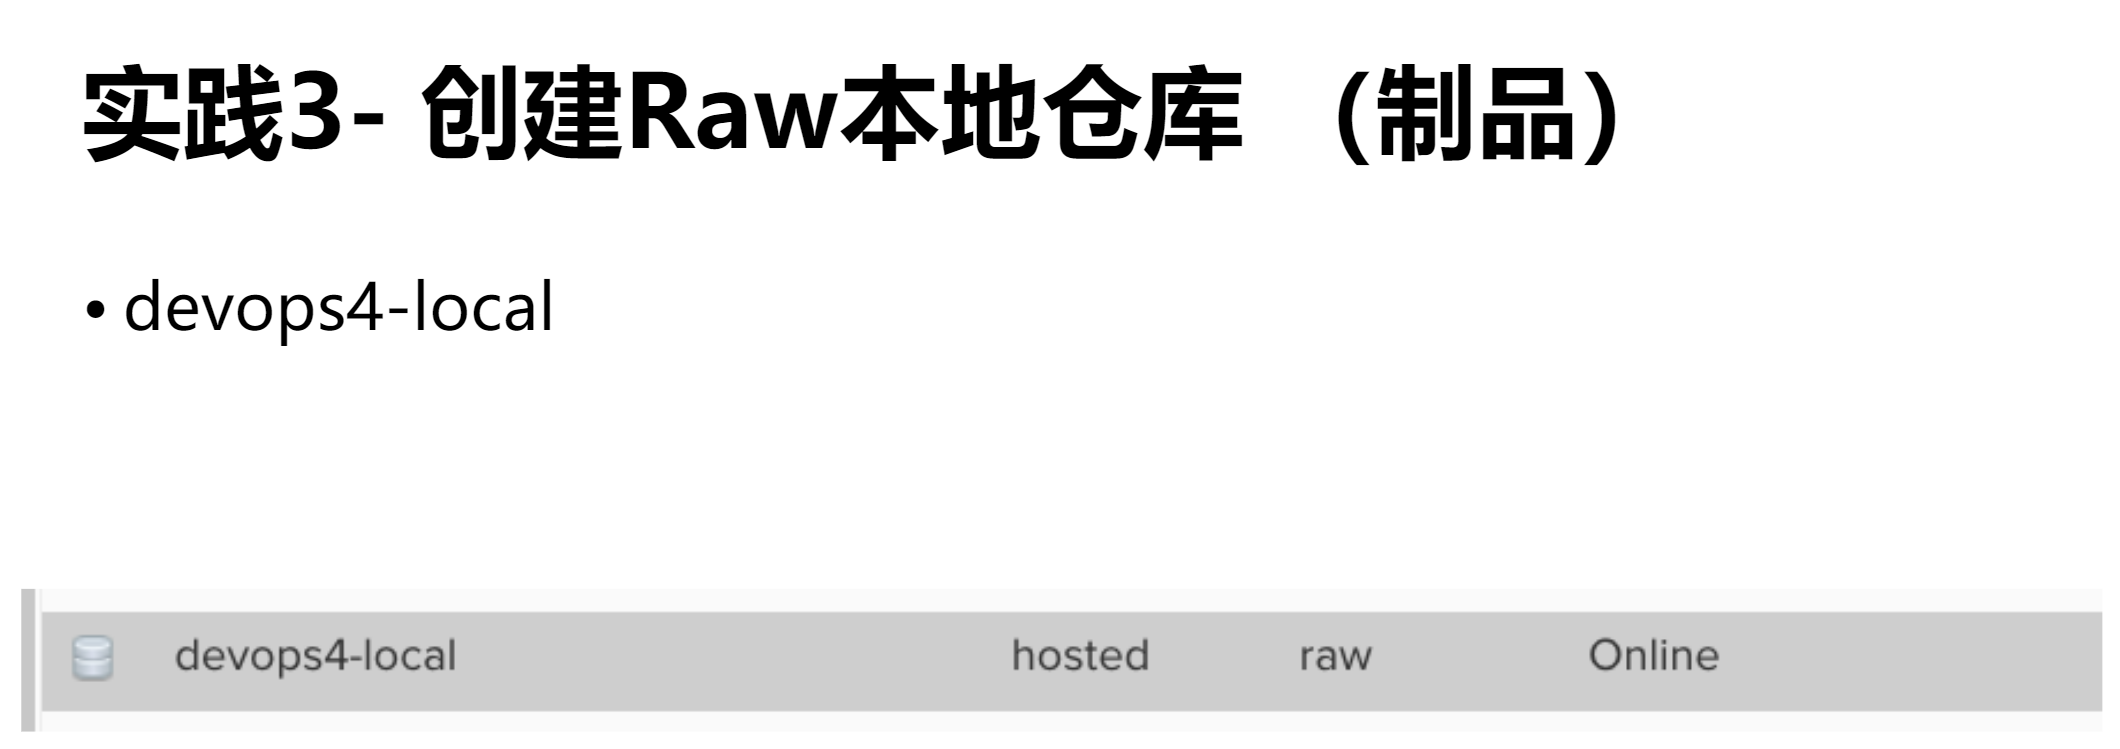
- 创建仓库:
选择raw(hosted)类型:
填写仓库名,并创建:
- 观察效果:

- 模拟上传一个图片:
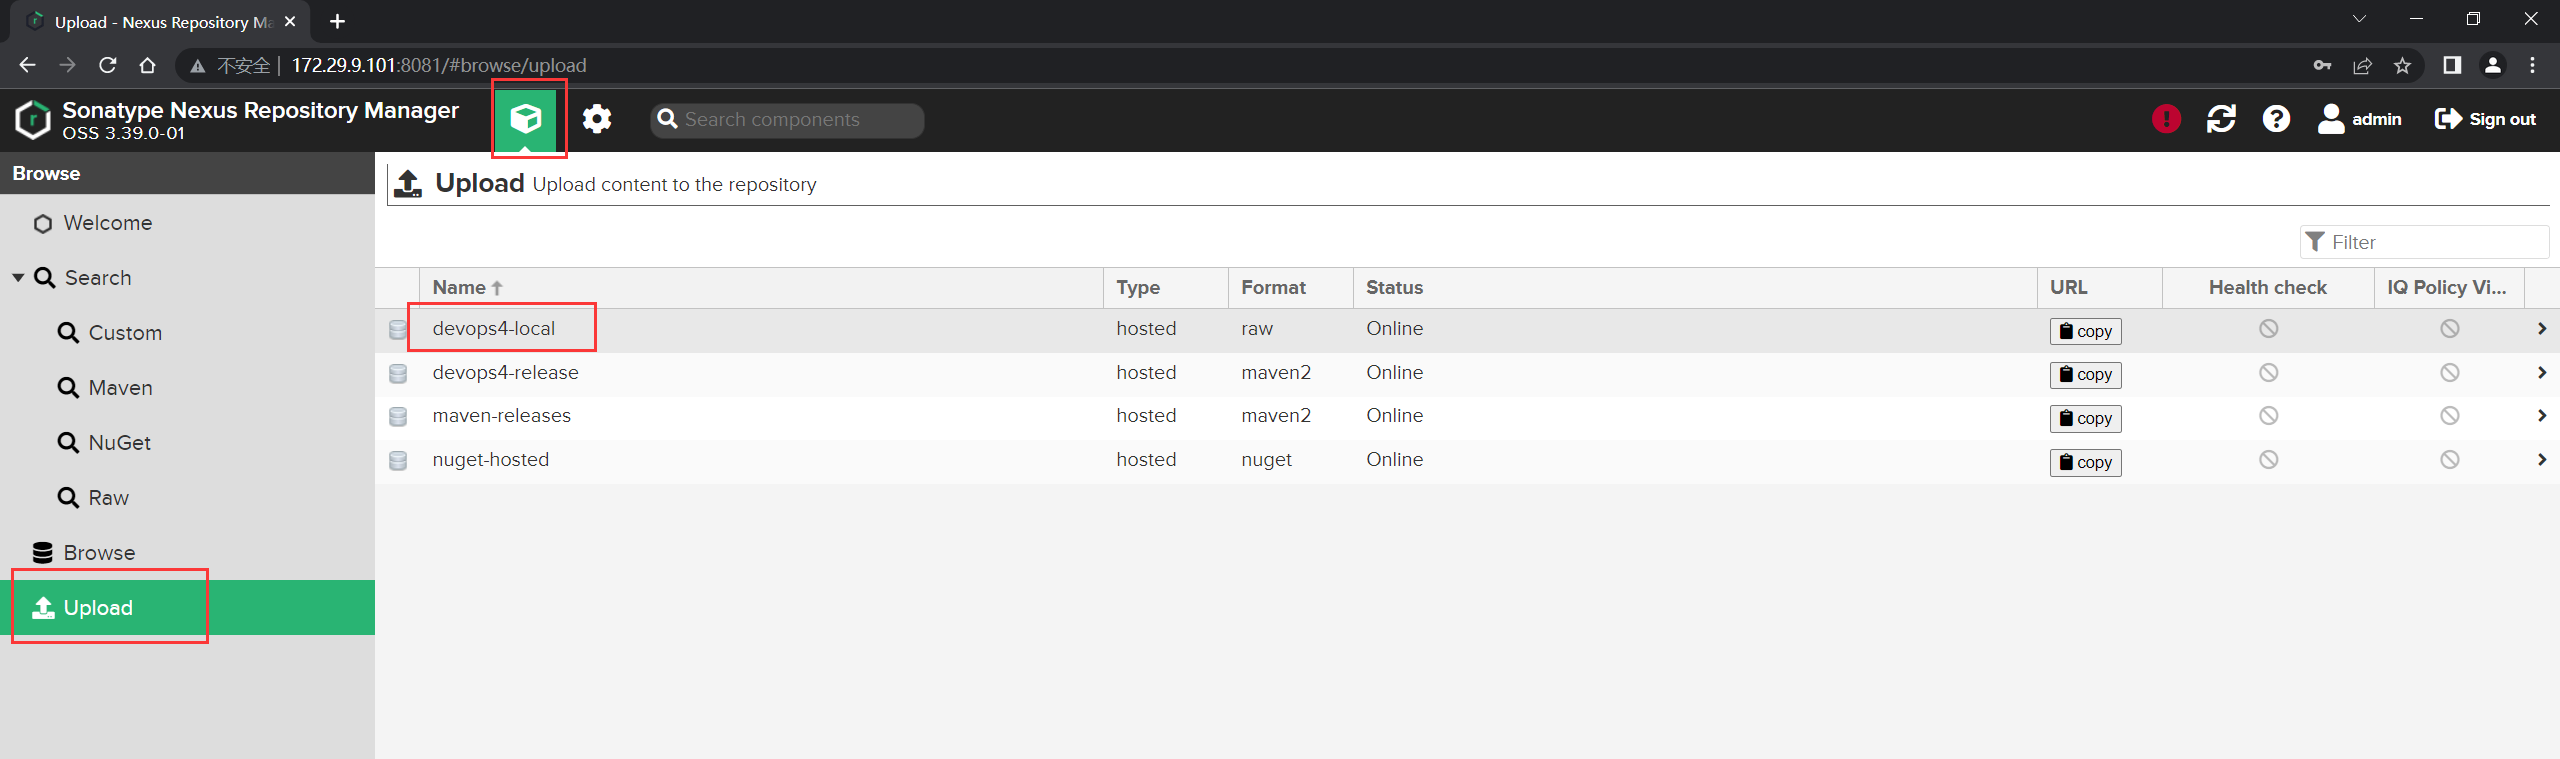
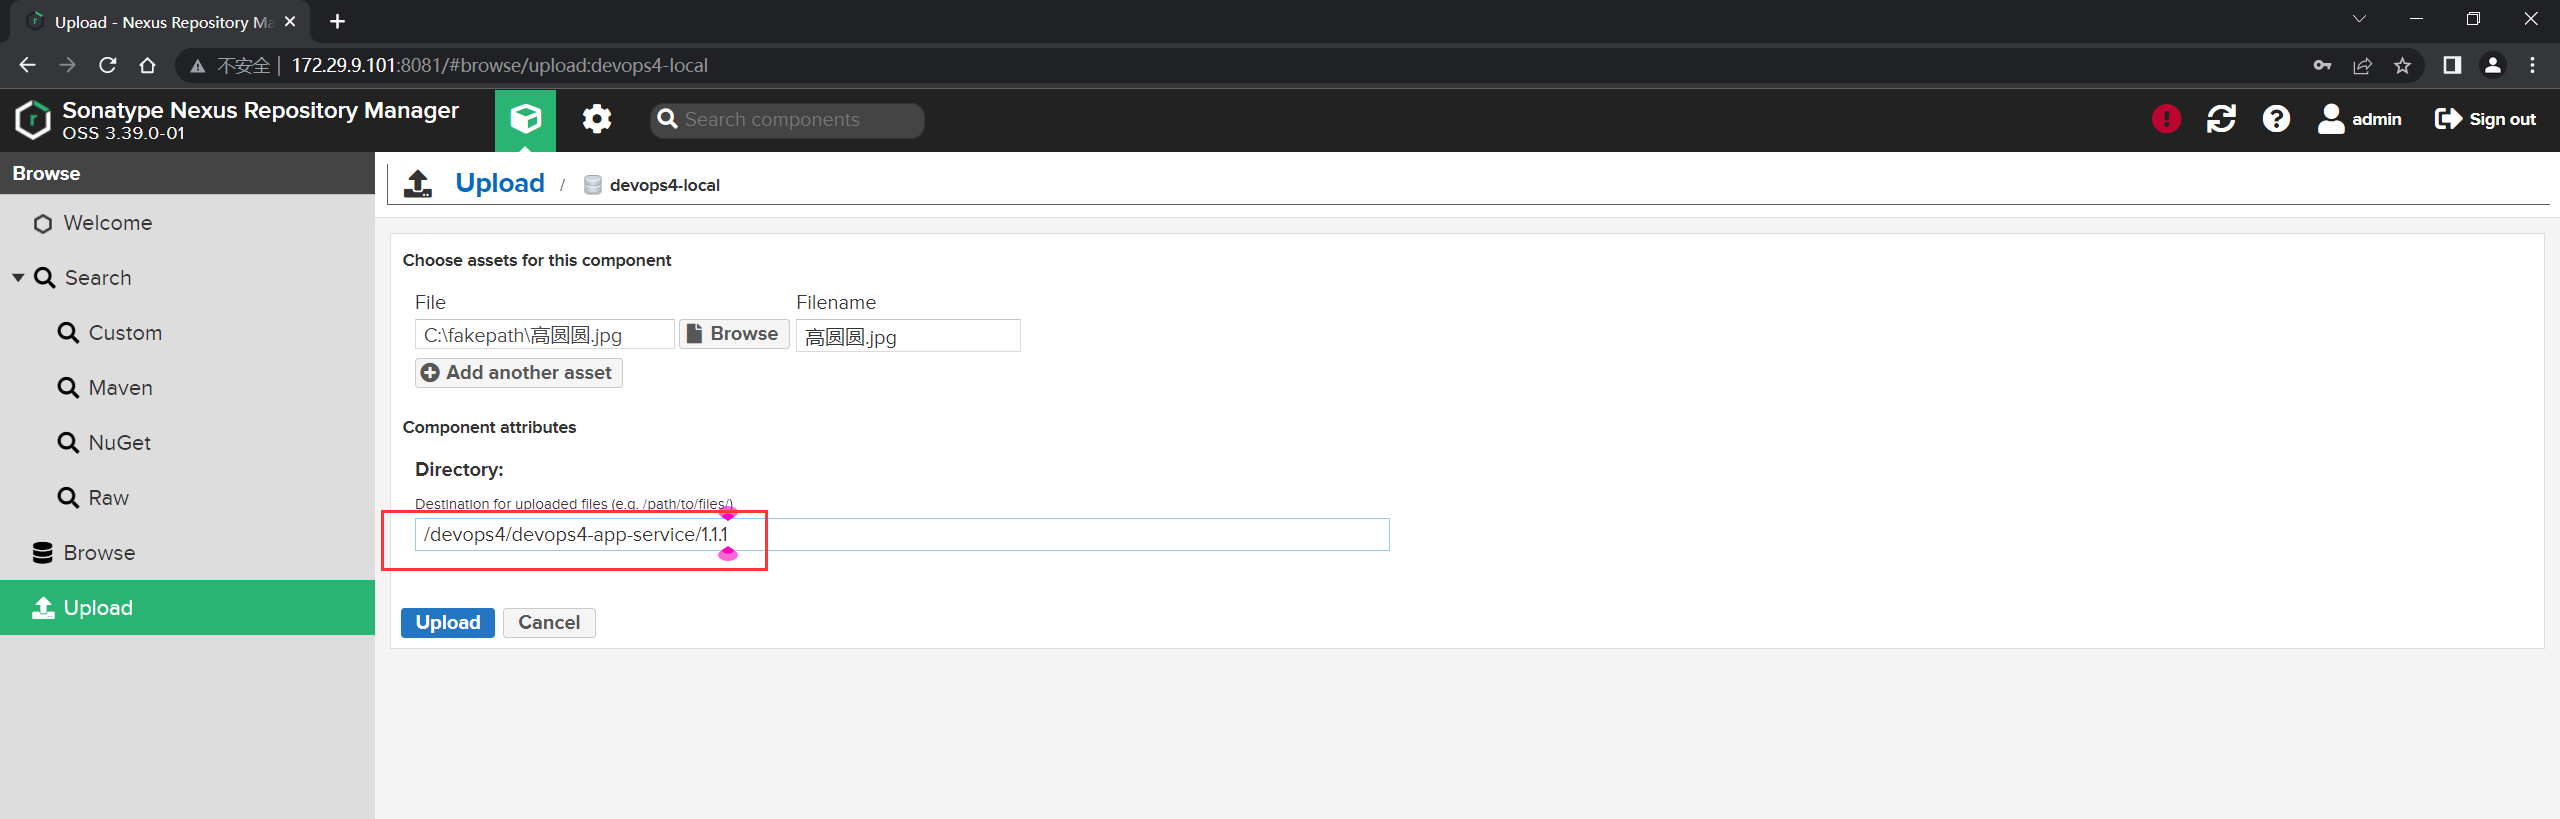
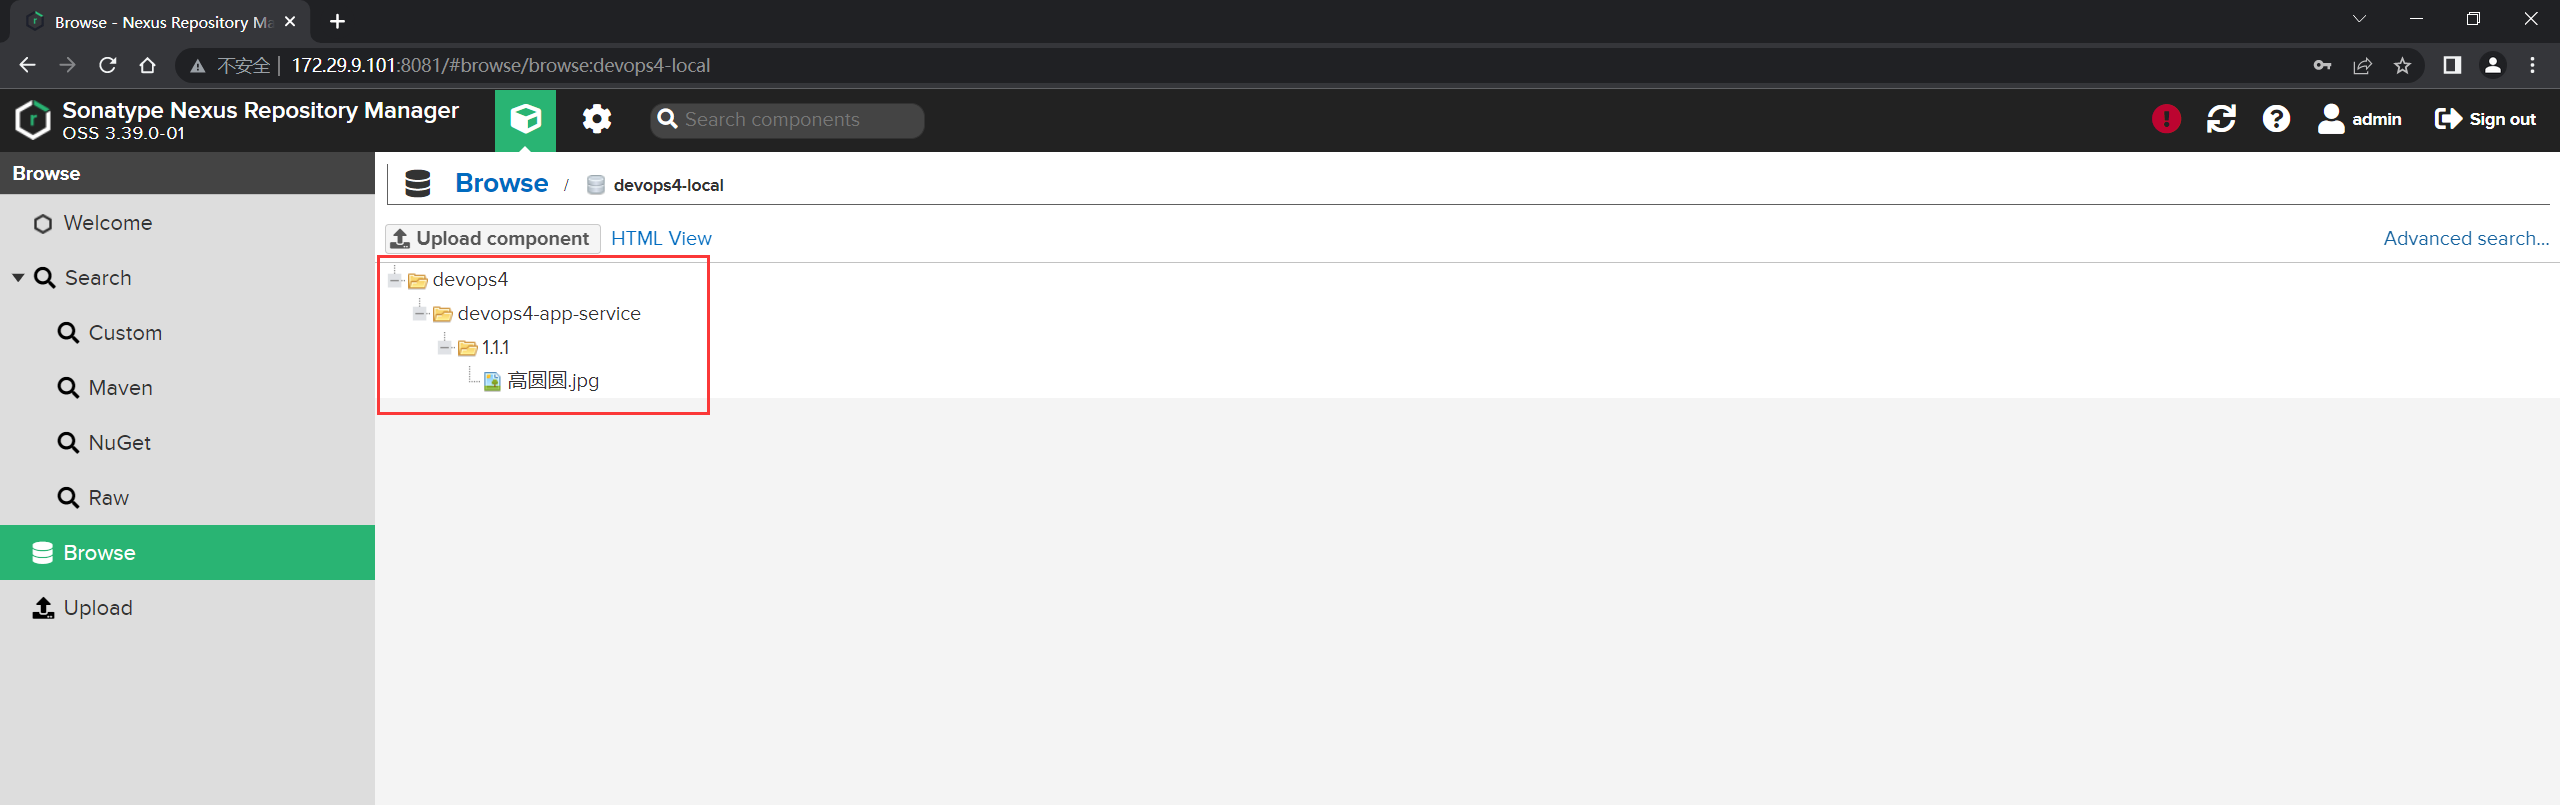
测试结束。😘
4、CI流水线中集成制品库
1.使用管理页面上传制品
页面很方便上传,但是有时候不太好用…例如出现上传失败等问题(暂时无法解决,不同版本的nexus有些api不对应的坑)。
| 💘 实践:使用管理页面上传制品(测试成功)-2023.6.27 |
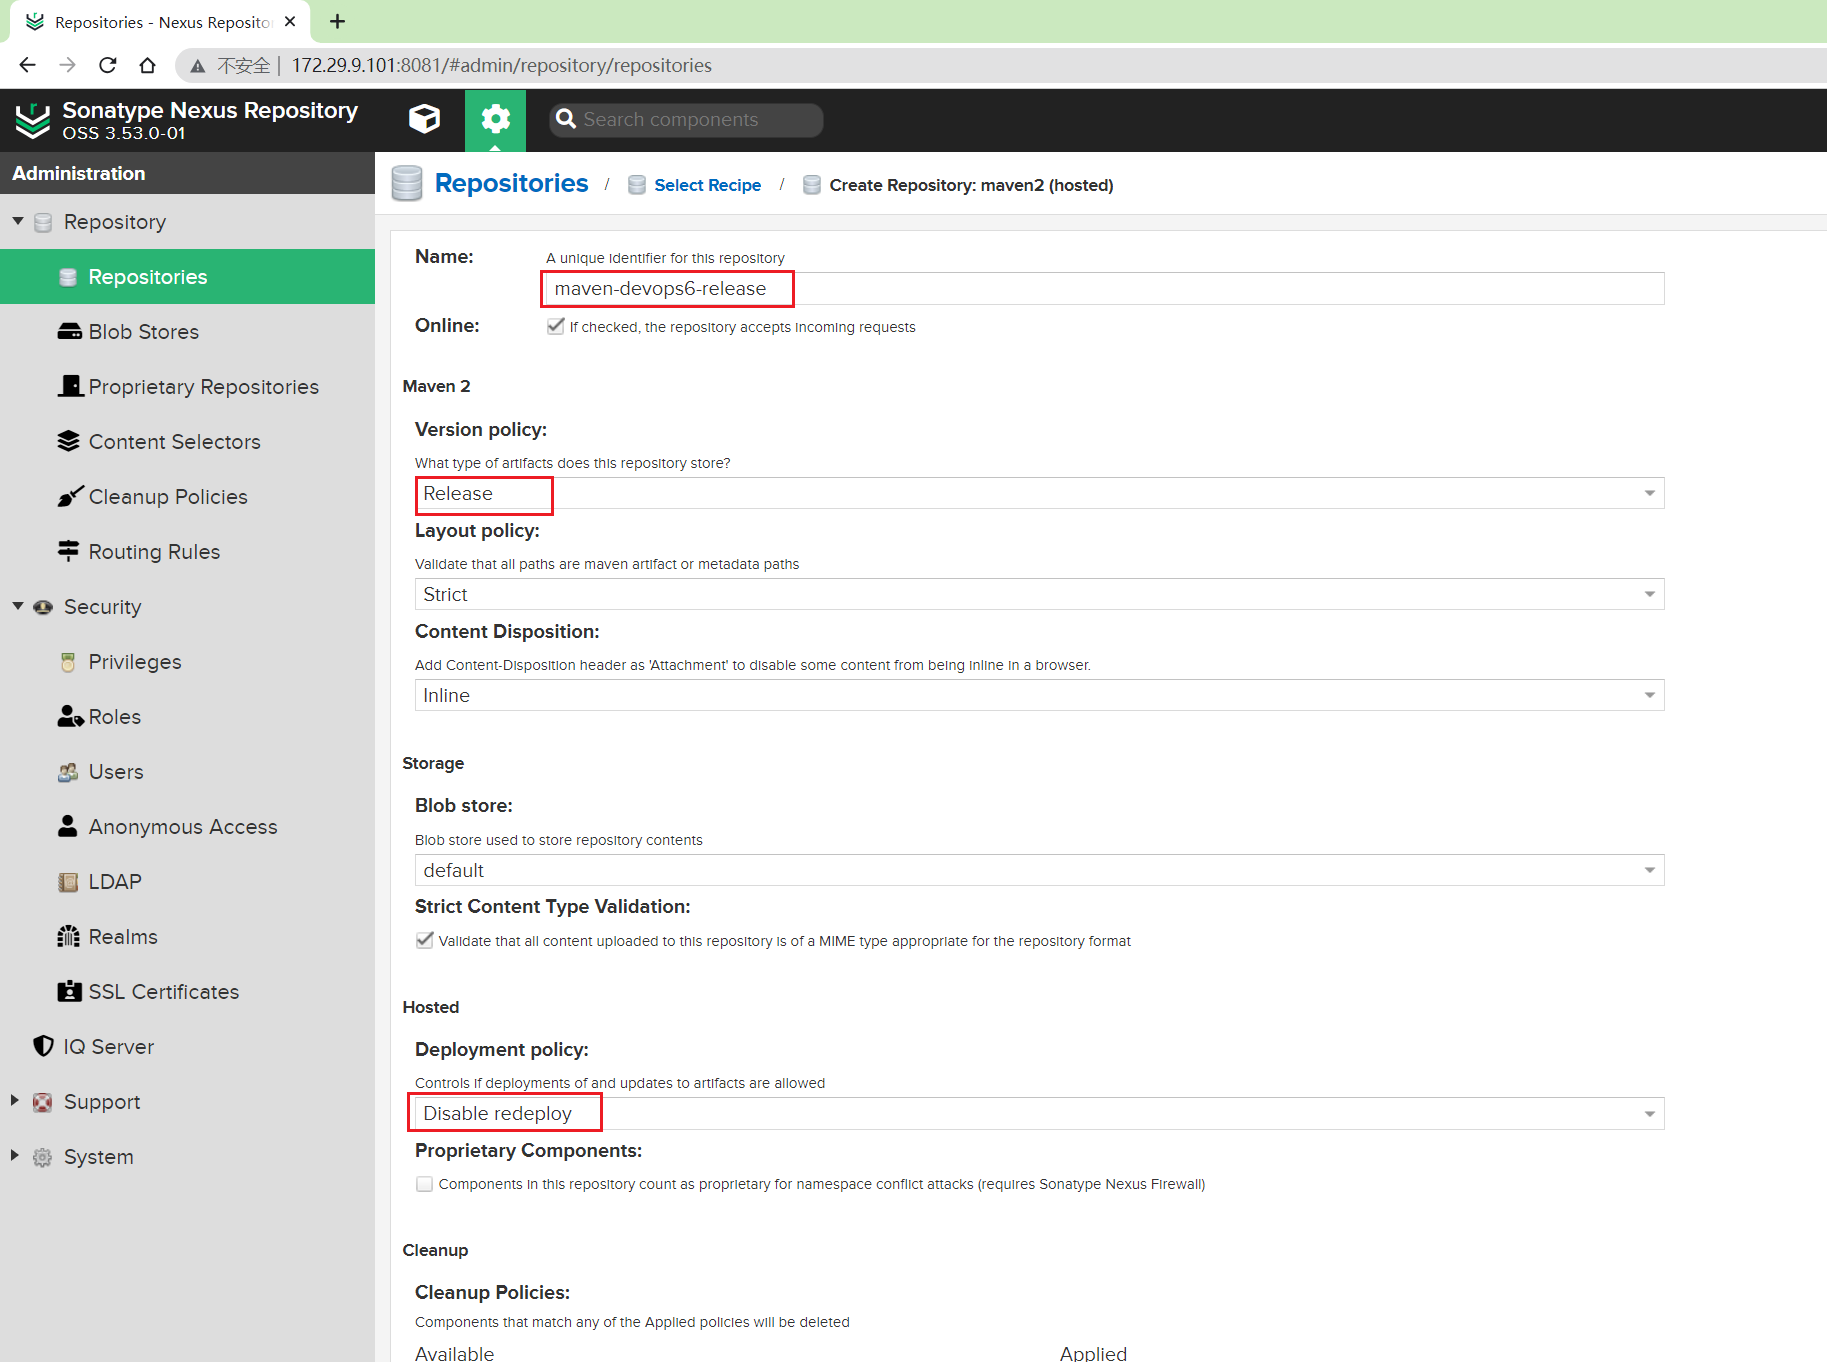
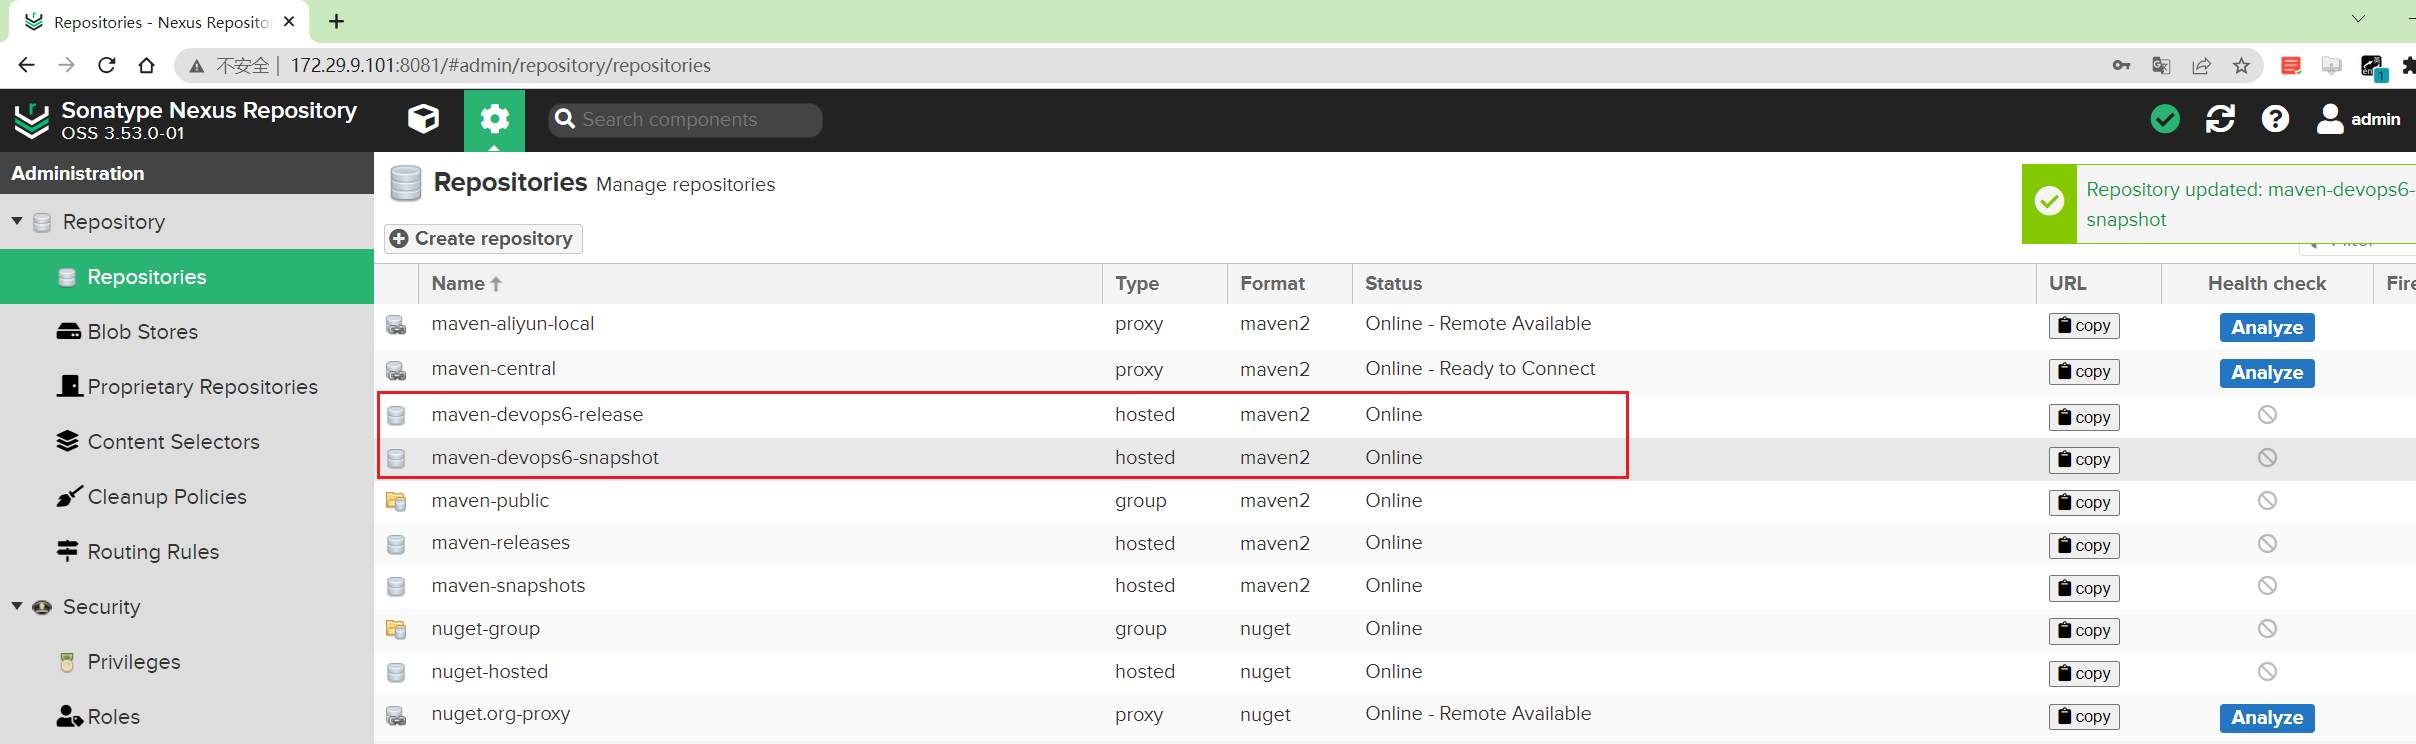
- 我们来创建
maven-devops6-release和maven-devops6-snapshot2个maven仓库
- 这次来手动上传下jenkins agent的
agent.jar包。

- 先来模拟一次报错提示
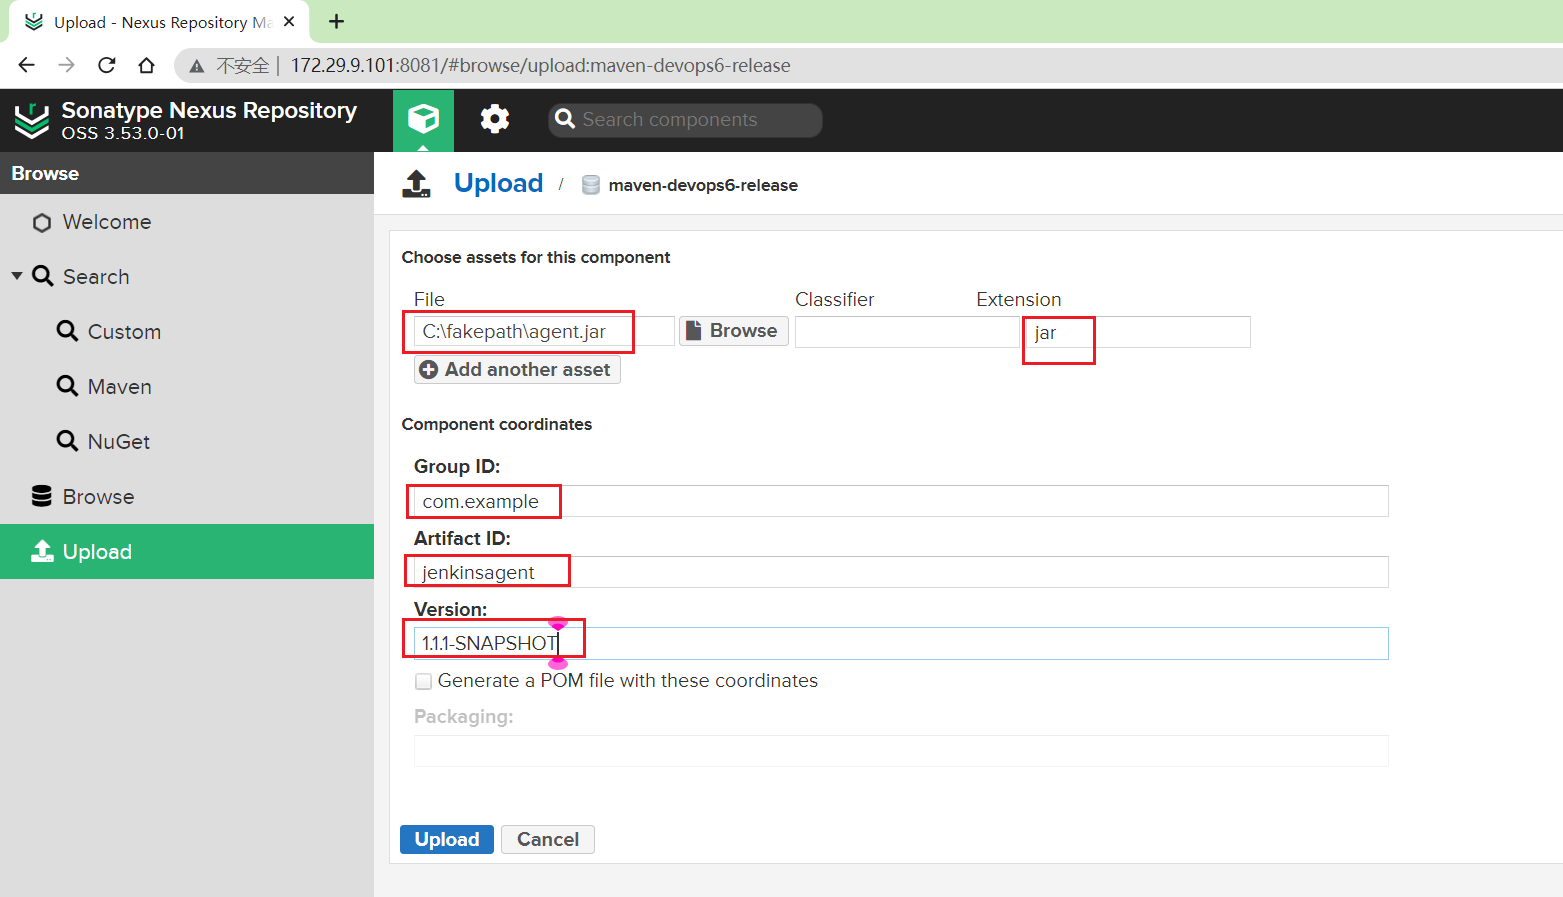
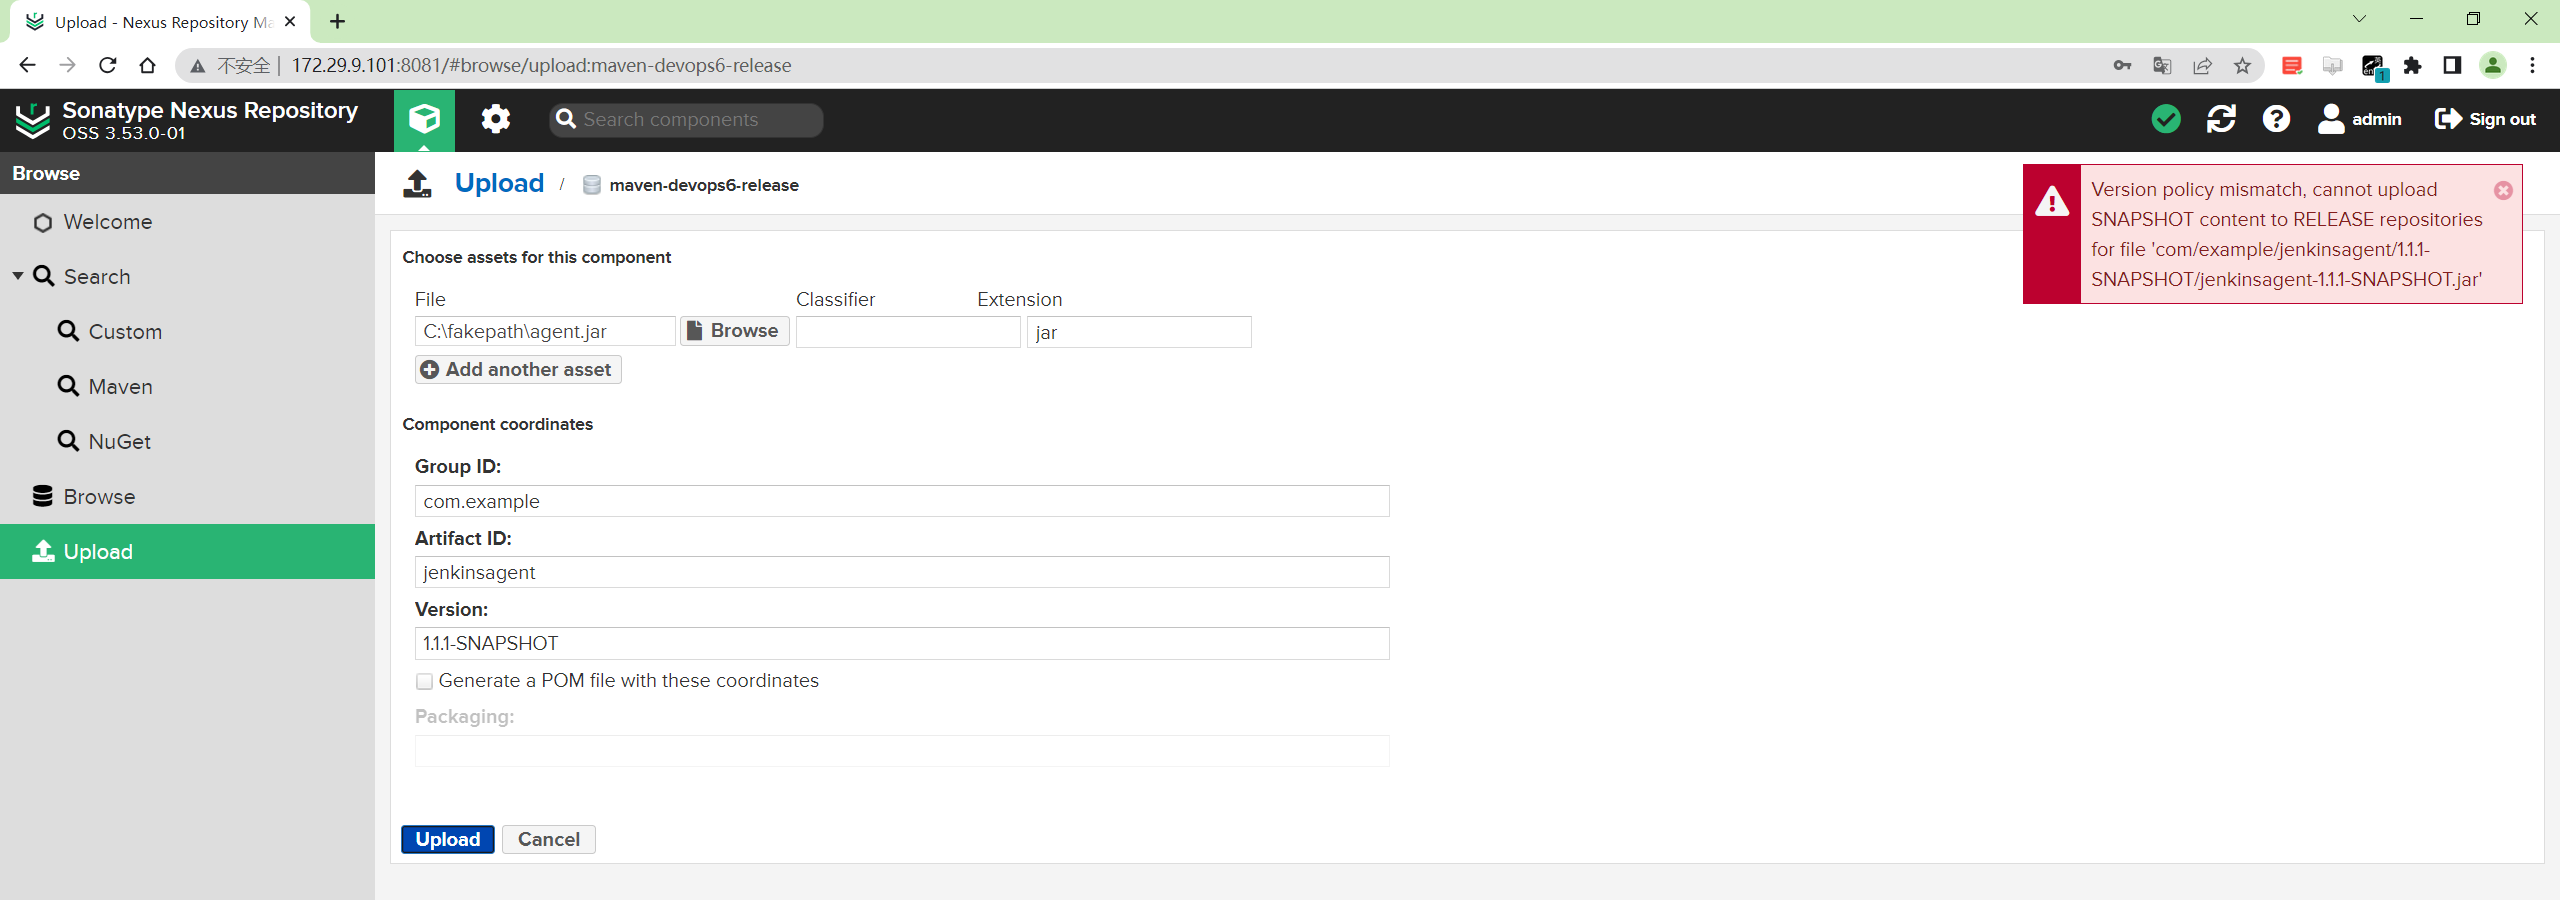
我们指定jar包Version是1.1.1-SNAPSHOT,但是我们往RELEASE类型的仓库上传,肯定就会报错的啦。
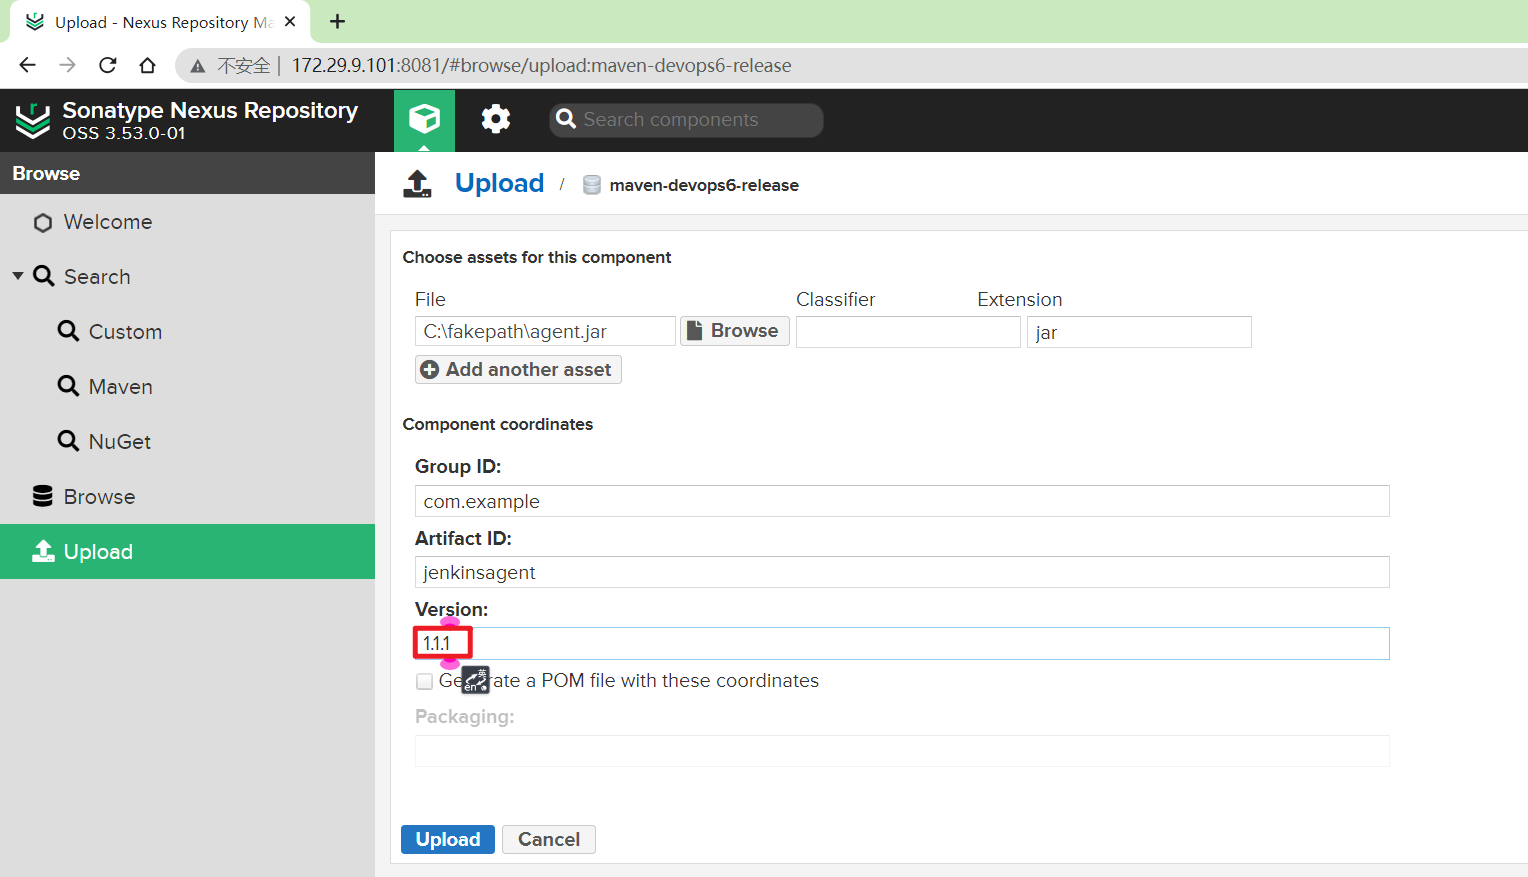
- 我们改变下这里的Version字段内容,然后再次上传,观察下现象
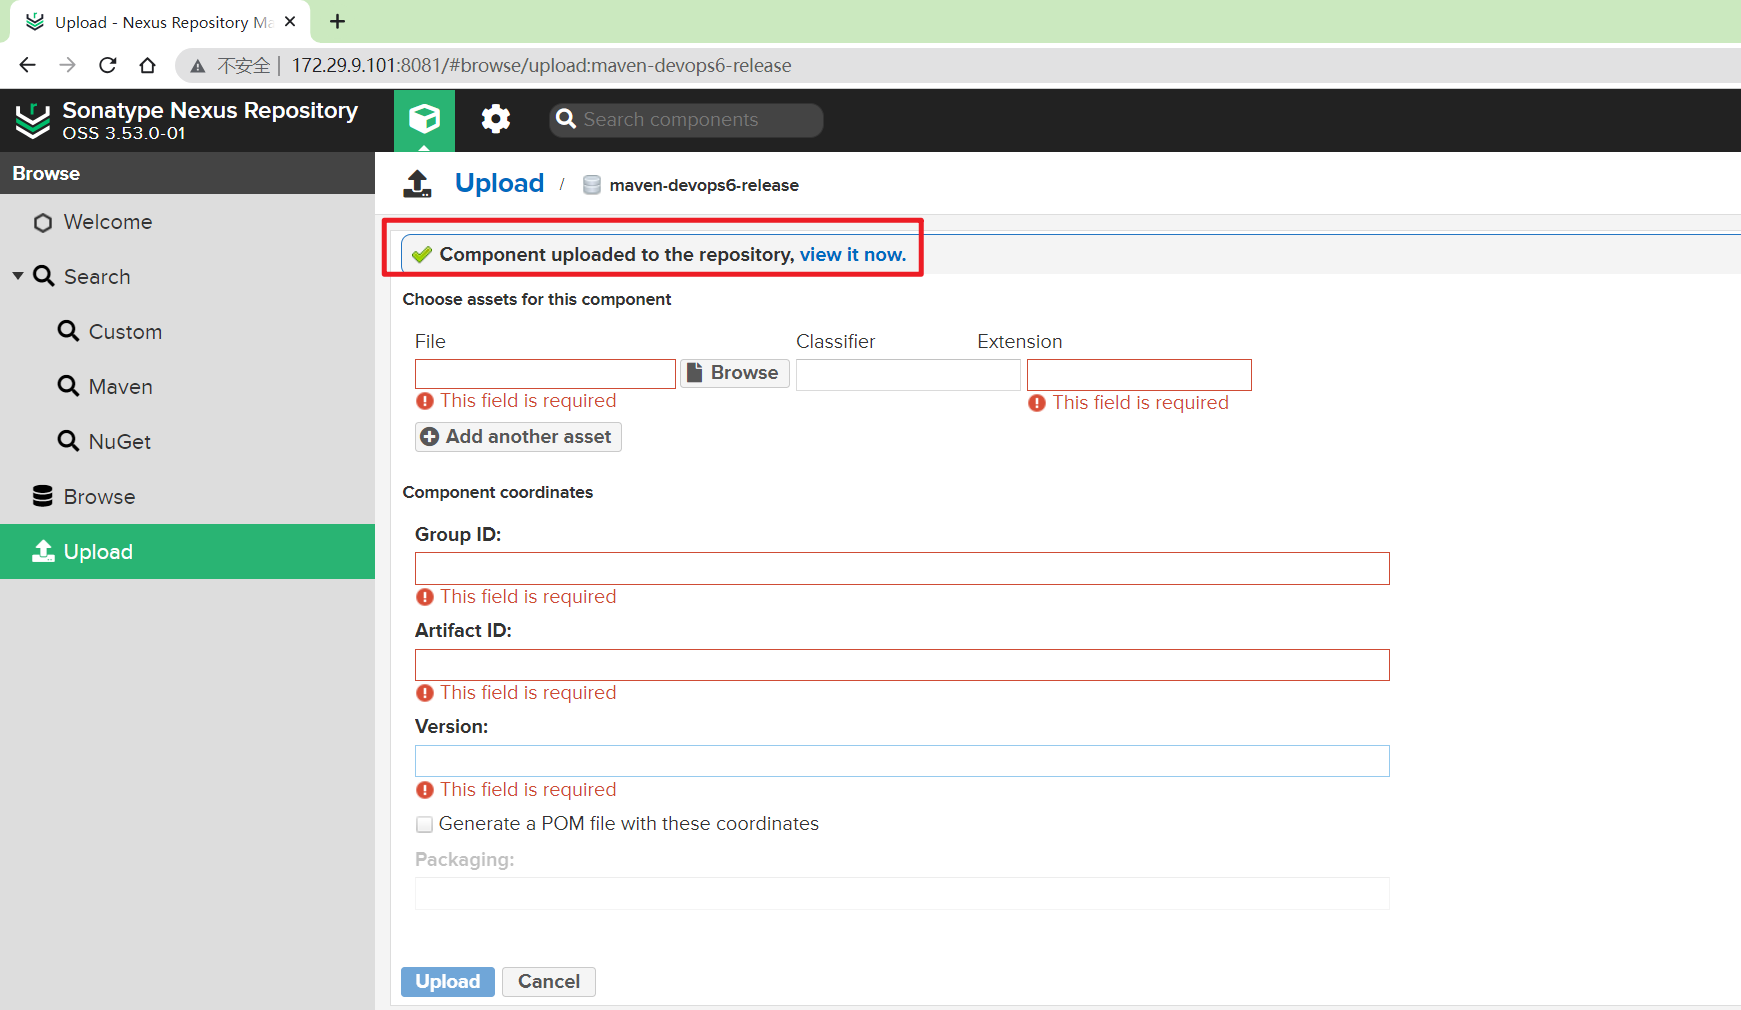
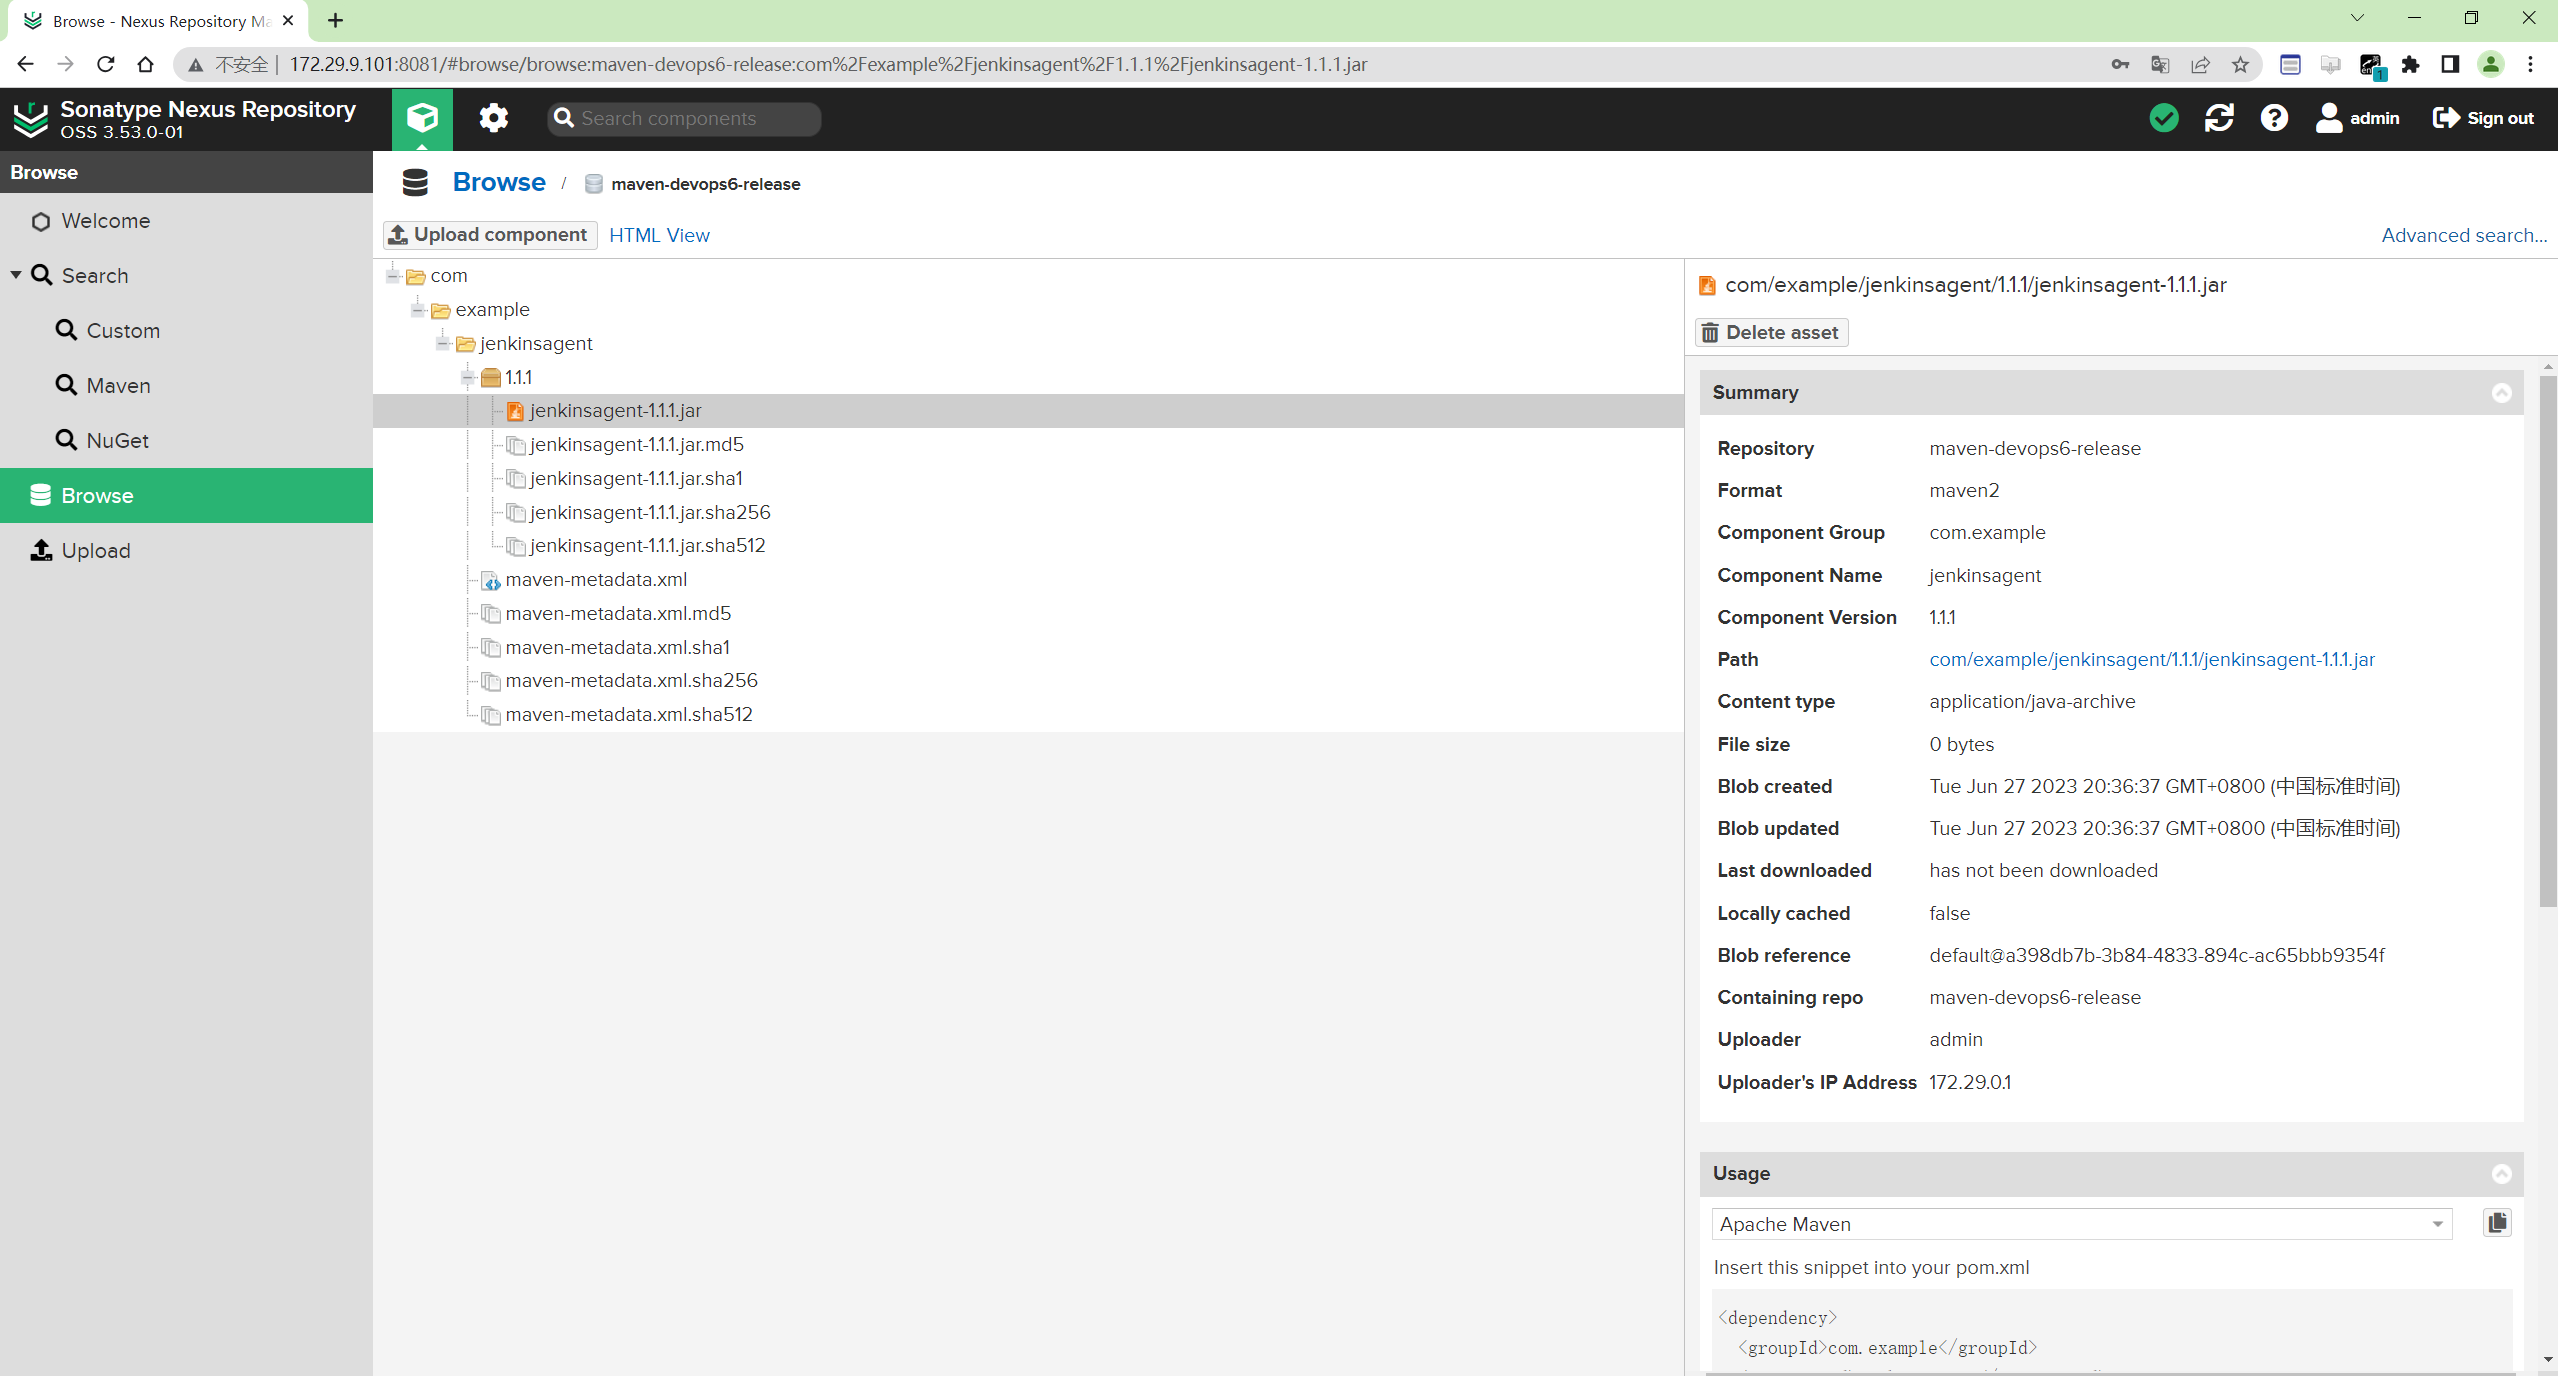
此时,就可以正常上传成功了。
2.使用maven指令上传制品
参考:https://support.sonatype.com/hc/en-us/articles/213465818-How-can-I-programmatically-upload-an-artifact-into-Nexus-2-

如果是0.0.1或者0.0.1-RELEASE,就是RELEASE版本。
🍀 扩展:
如果是maven类型的具有源码的项目, 可以直接使用mvn命令上传,更加方便。
//上传制品使用maven命令
def PushArtifactsByMvn(repoName,filePath ){
    sh """
        mvn deploy:deploy-file \
            -DgeneratePom=false \
            -DrepositoryId="maven-hosted" \
            -Durl=http://192.168.1.200:8081/repository/"${repoName}" \
            -DpomFile=pom.xml \
            -Dfile="${filePath}"
    """
}

PushArtifactsByMvn("${params.repoName}","target/${pkg}")
① 方法1:使用mvn命令上传制品(自定义pom信息(灵活))
| 💘 实践:使用mvn命令上传制品(自定义pom信息(灵活))-2022.6.11 |
- 实验环境
sonatype/nexus3:3.53.0
apache-maven-3.9.2
-
实验软件(无)
-
上传制品之前, 肯定得确定目标仓库是存在的。 如果不存在我们可以新建一个 hosted类型的maven仓库。
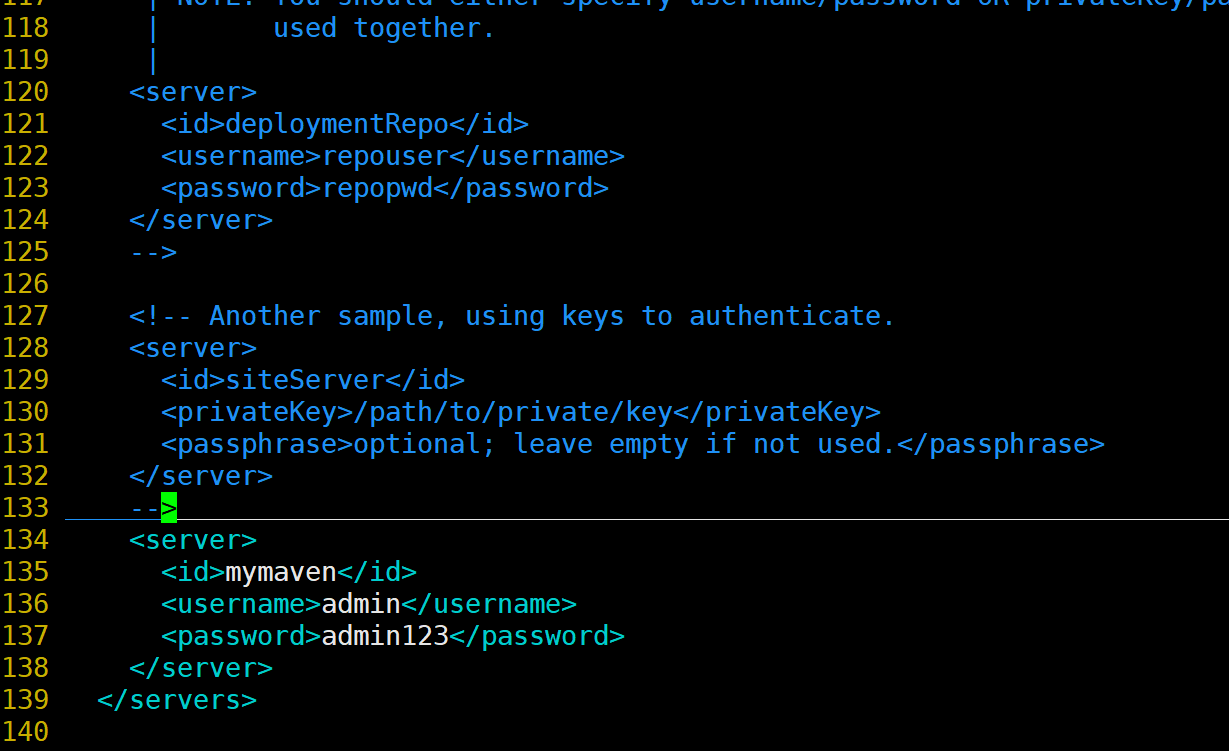
- 仓库已经有了, 需要更新maven的配置文件,在settings.xml中添加仓库的认证信息。如下:
    <server>
      <id>mymaven</id>
      <username>admin</username>
      <password>admin123</password>
    </server>
[root@devops ~]#vim /usr/local/apache-maven-3.8.5/conf/settings.xml
    <server>
      <id>mymaven</id>
      <username>admin</username>
      <password>admin123</password>
    </server>
- 上传制品前记得先要编译构建下的:
[root@devops ~]#cd
[root@devops ~]#cd devops4-maven-service-master
[root@devops devops4-maven-service-master]#ls
build.sh  mvnw  mvnw.cmd  pom.xml  README.md  sonar-project.properties  src  target
[root@devops devops4-maven-service-master]#mvn clean package
[root@devops devops4-maven-service-master]#pwd
/root/devops4-maven-service-master
[root@devops devops4-maven-service-master]#ls
build.sh  mvnw  mvnw.cmd  pom.xml  README.md  sonar-project.properties  src  target
[root@devops devops4-maven-service-master]#ls target/
classes  demo-0.0.1-SNAPSHOT.jar  demo-0.0.1-SNAPSHOT.jar.original  maven-archiver
- 开始上传:
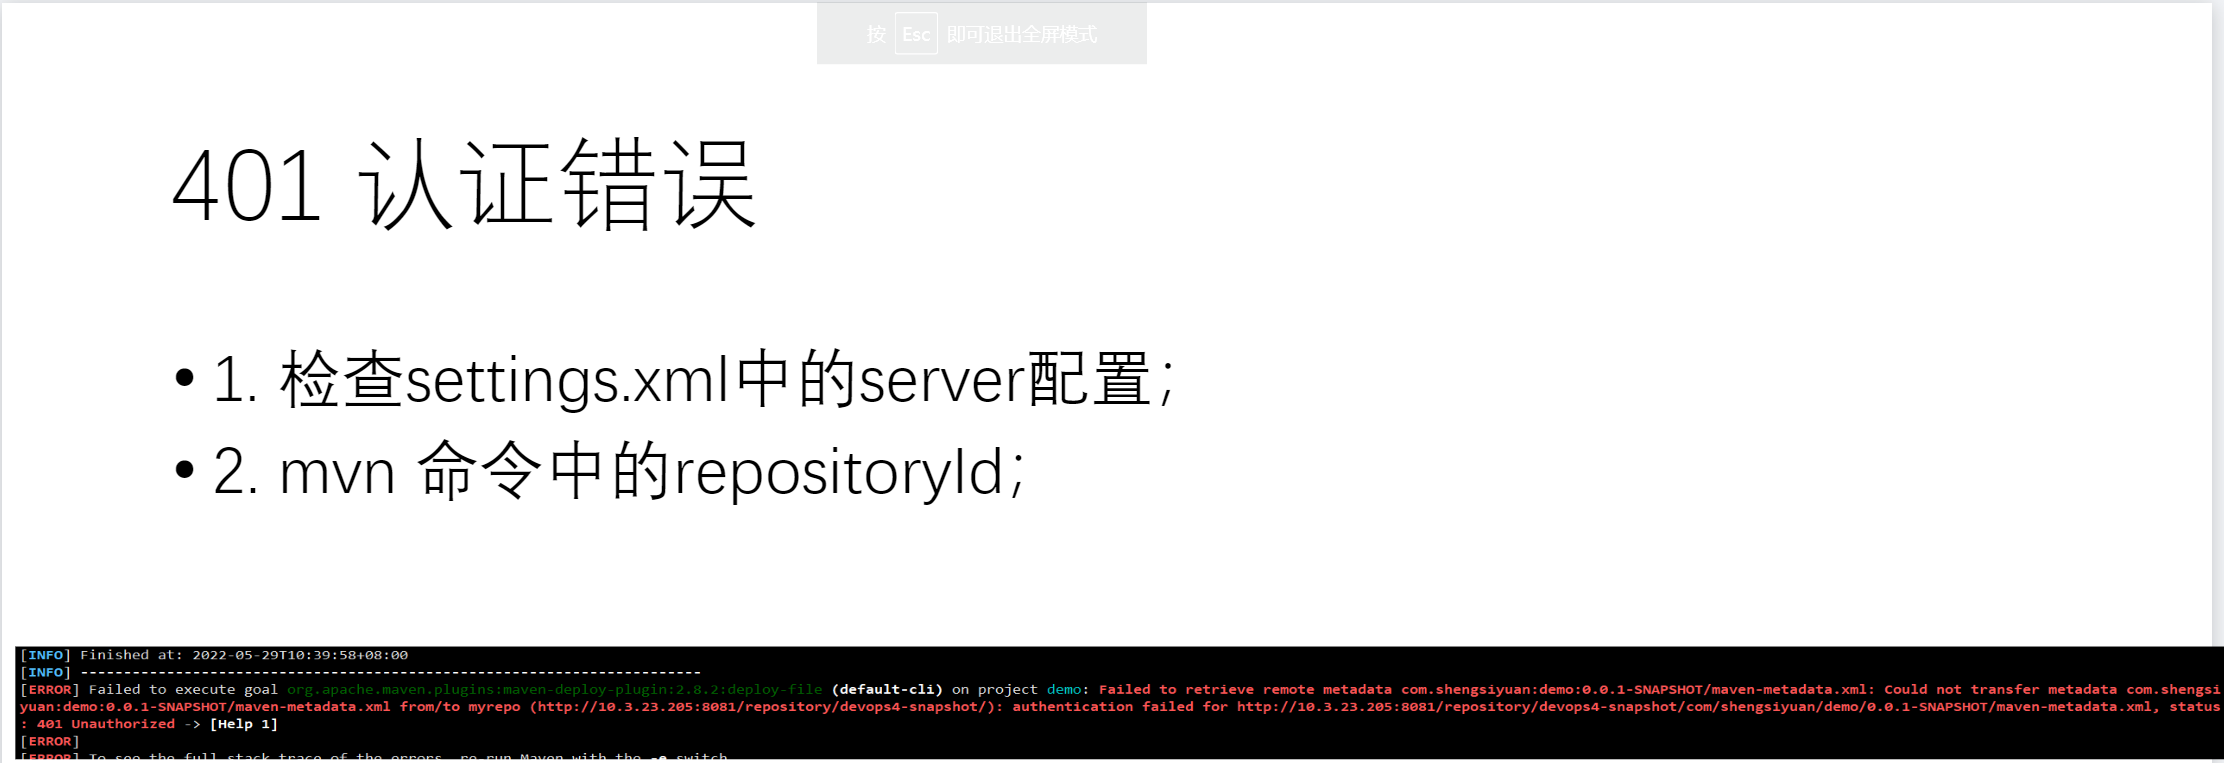
注意使用mvn deploy 发布时,-DrepositoryId参数的值要与上面配置文件中的<server>标签中的<id>一致。不然会出现401,用户认证失败的问题。
mvn deploy:deploy-file
-DgroupId=xxxxxx #pom中的groupId
-DartifactId=xxxxxx #pom中的artifactId
-Dversion=xxxxxx #pom中的版本号version
-Dpackaging=xxxxxx #pom中打包方式
-Dfile=xxxxxx #本地文件
-Durl=xxxxxx #仓库url
-DrepositoryId=xxxxxx #对应的是setting.xml(认证)
Maven上传报错, 401 可以确定是认证的错误。 需要检查认证信息。
[ERROR] Failed to execute goal org.apache.maven.plugins:maven-deploy-plugin:2.8.2:deploy-file (default-cli) on project demo: Failed to deploy artifacts: Could not transfer artifact com.devops:zeyang:jar:1.1.1 from/to remote-repository (http://192.168.1.200:8081/repository/devops-maven/): authentication failed for http://192.168.1.200:8081/repository/devops-maven/com/devops/zeyang/1.1.1/zeyang-1.1.1.jar, status: 401 Unauthorized -> [Help 1]
替换参数, 执行命令开始上传制品。
mvn deploy:deploy-file \
-DgroupId=com.devops \
-DartifactId=xyy \
-Dversion=1.1.1-snapshot \
-Dpackaging=jar \
-Dfile=target/demo-0.0.1-SNAPSHOT.jar \
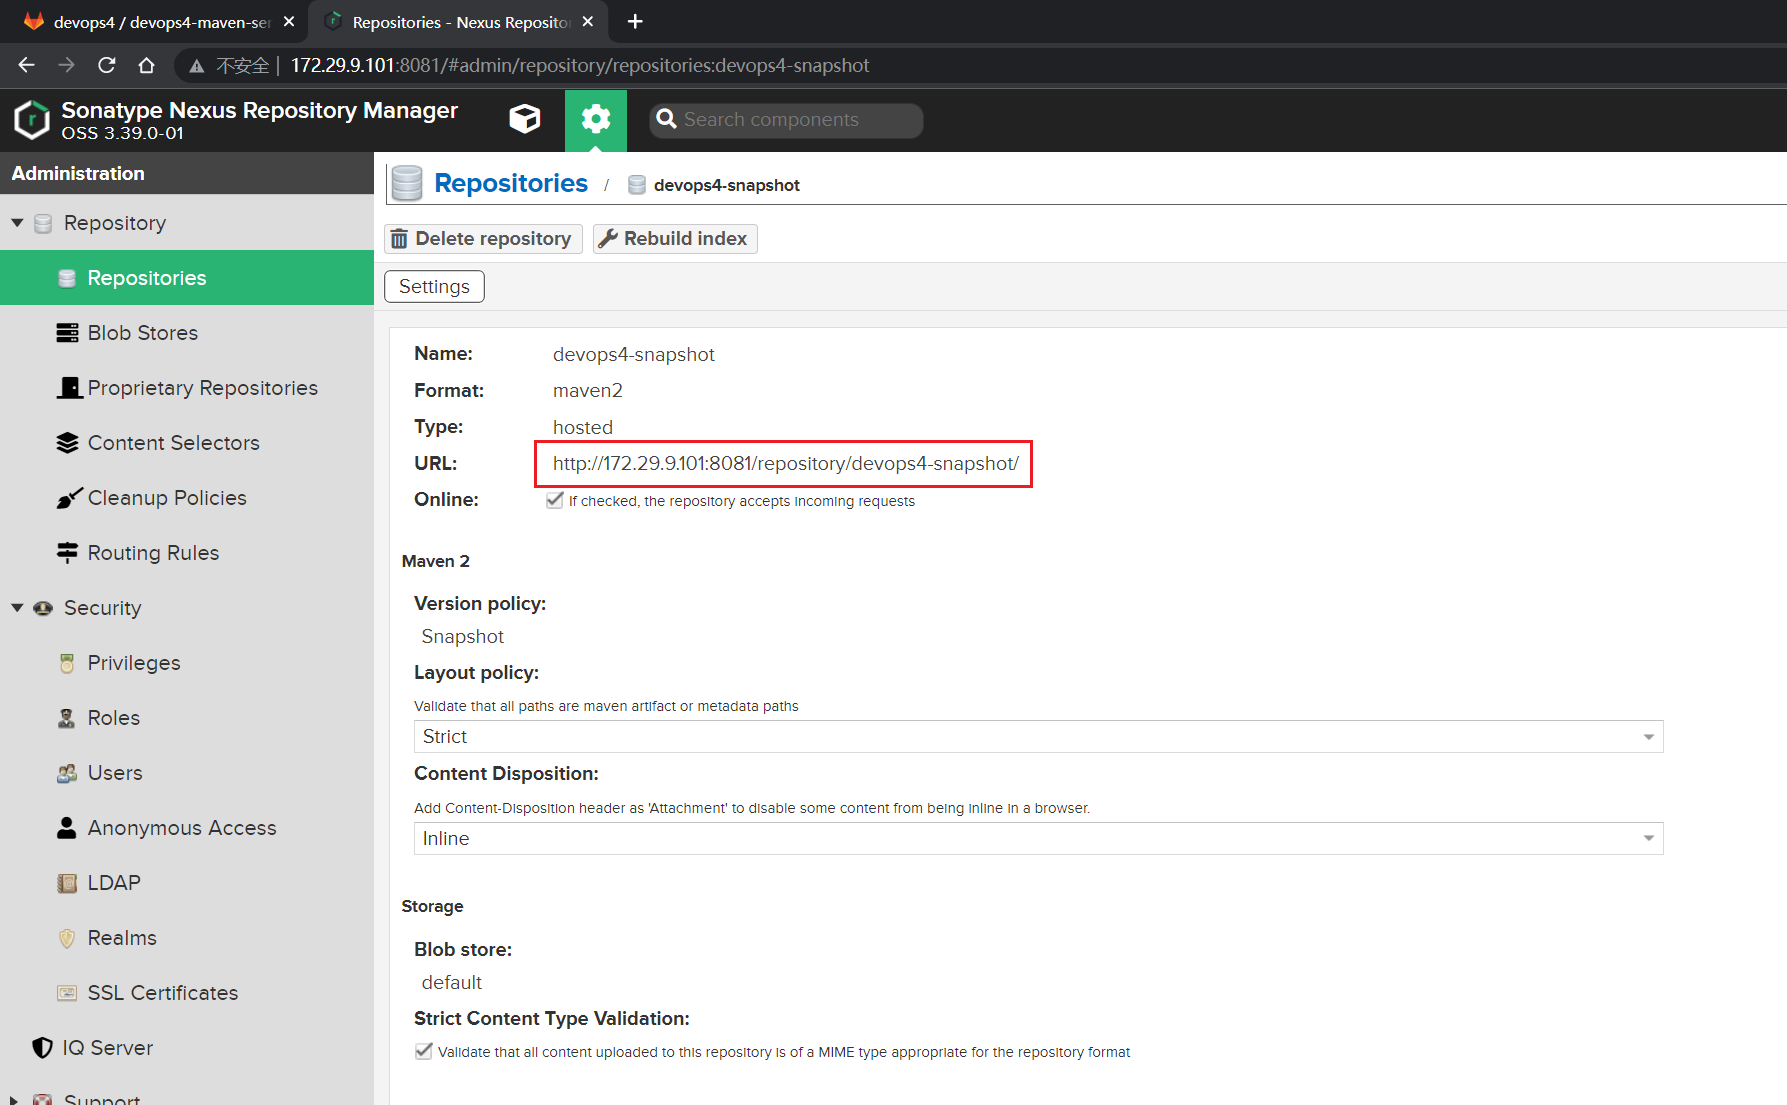
-Durl=http://172.29.9.101:8081/repository/devops4-snapshot/ \
-DrepositoryId=mymaven

- 我们再次修改下参数观察下效果:
mvn deploy:deploy-file \
-DgroupId=com.devops \
-DartifactId=xyy \
-Dversion=1.1.1-SNAPSHOT \
-Dpackaging=jar  \
-Dfile=target/demo-0.0.1-SNAPSHOT.jar \
-Durl=http://172.29.9.101:8081/repository/devops4-snapshot/  \
-DrepositoryId=mymaven


#注意:默认是会生成pom文件的。
#如果不想生成pom文件,则可以使用如下选项
-DgeneratePom=false
这里的
-Dversion=1.1.1-SNAPSHOTSNAPSHOT一定要大写才行的!否则会被认为是release类型的制品,当然也就不能上传到snapshot仓库了。
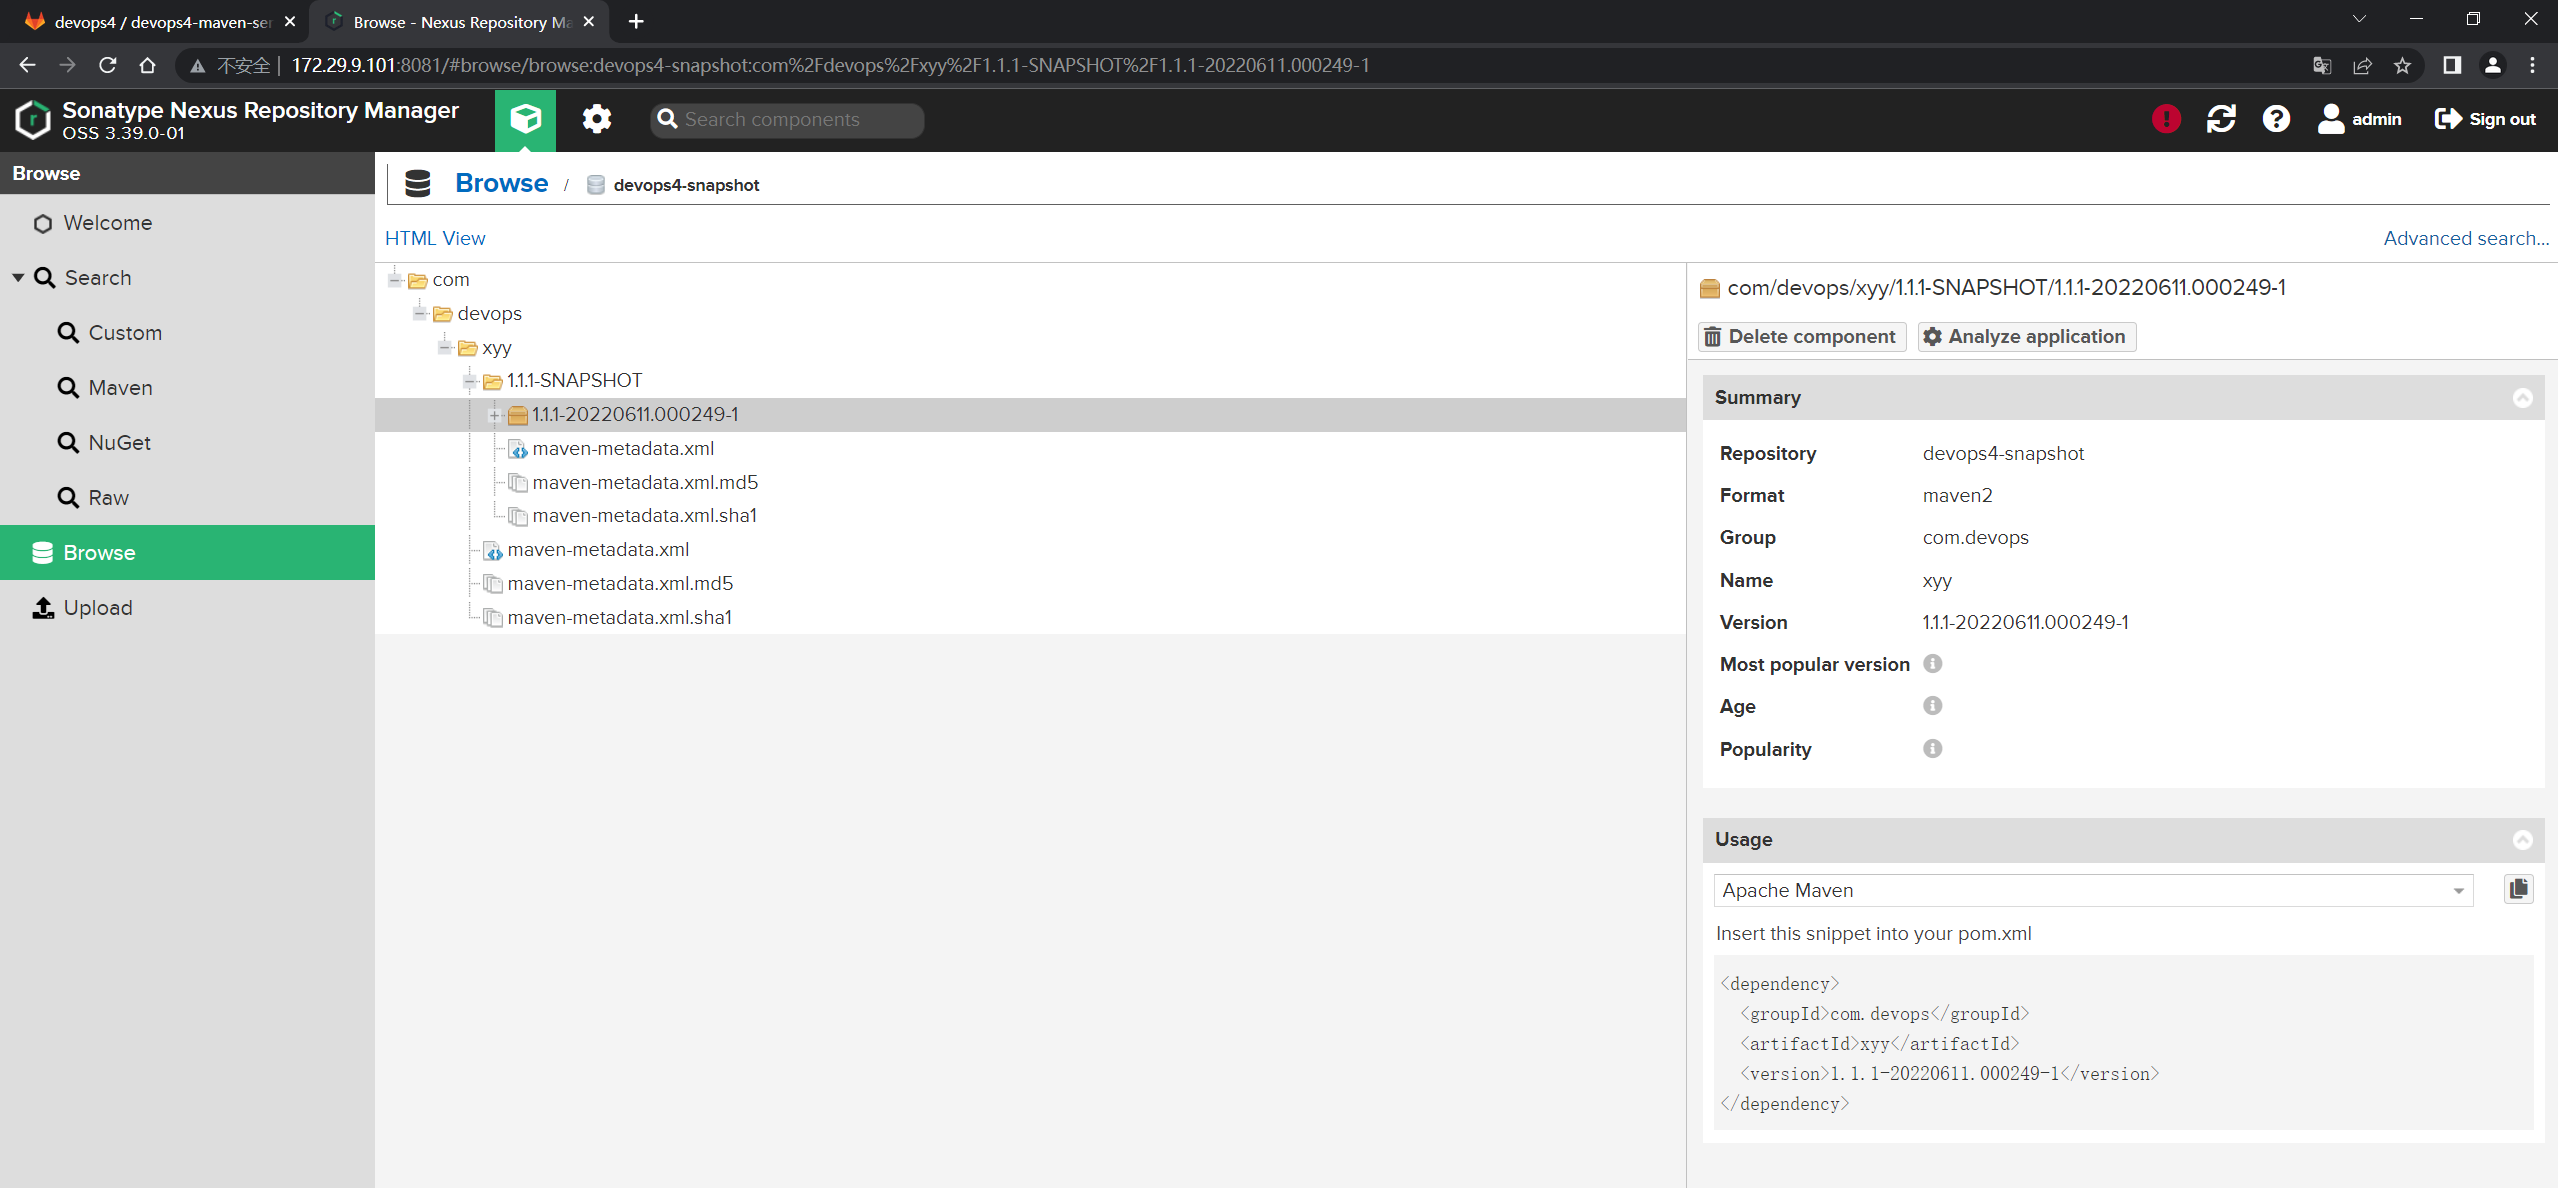
可以看到,本次上传成功了:

备注:Pom文件就是个坐标。
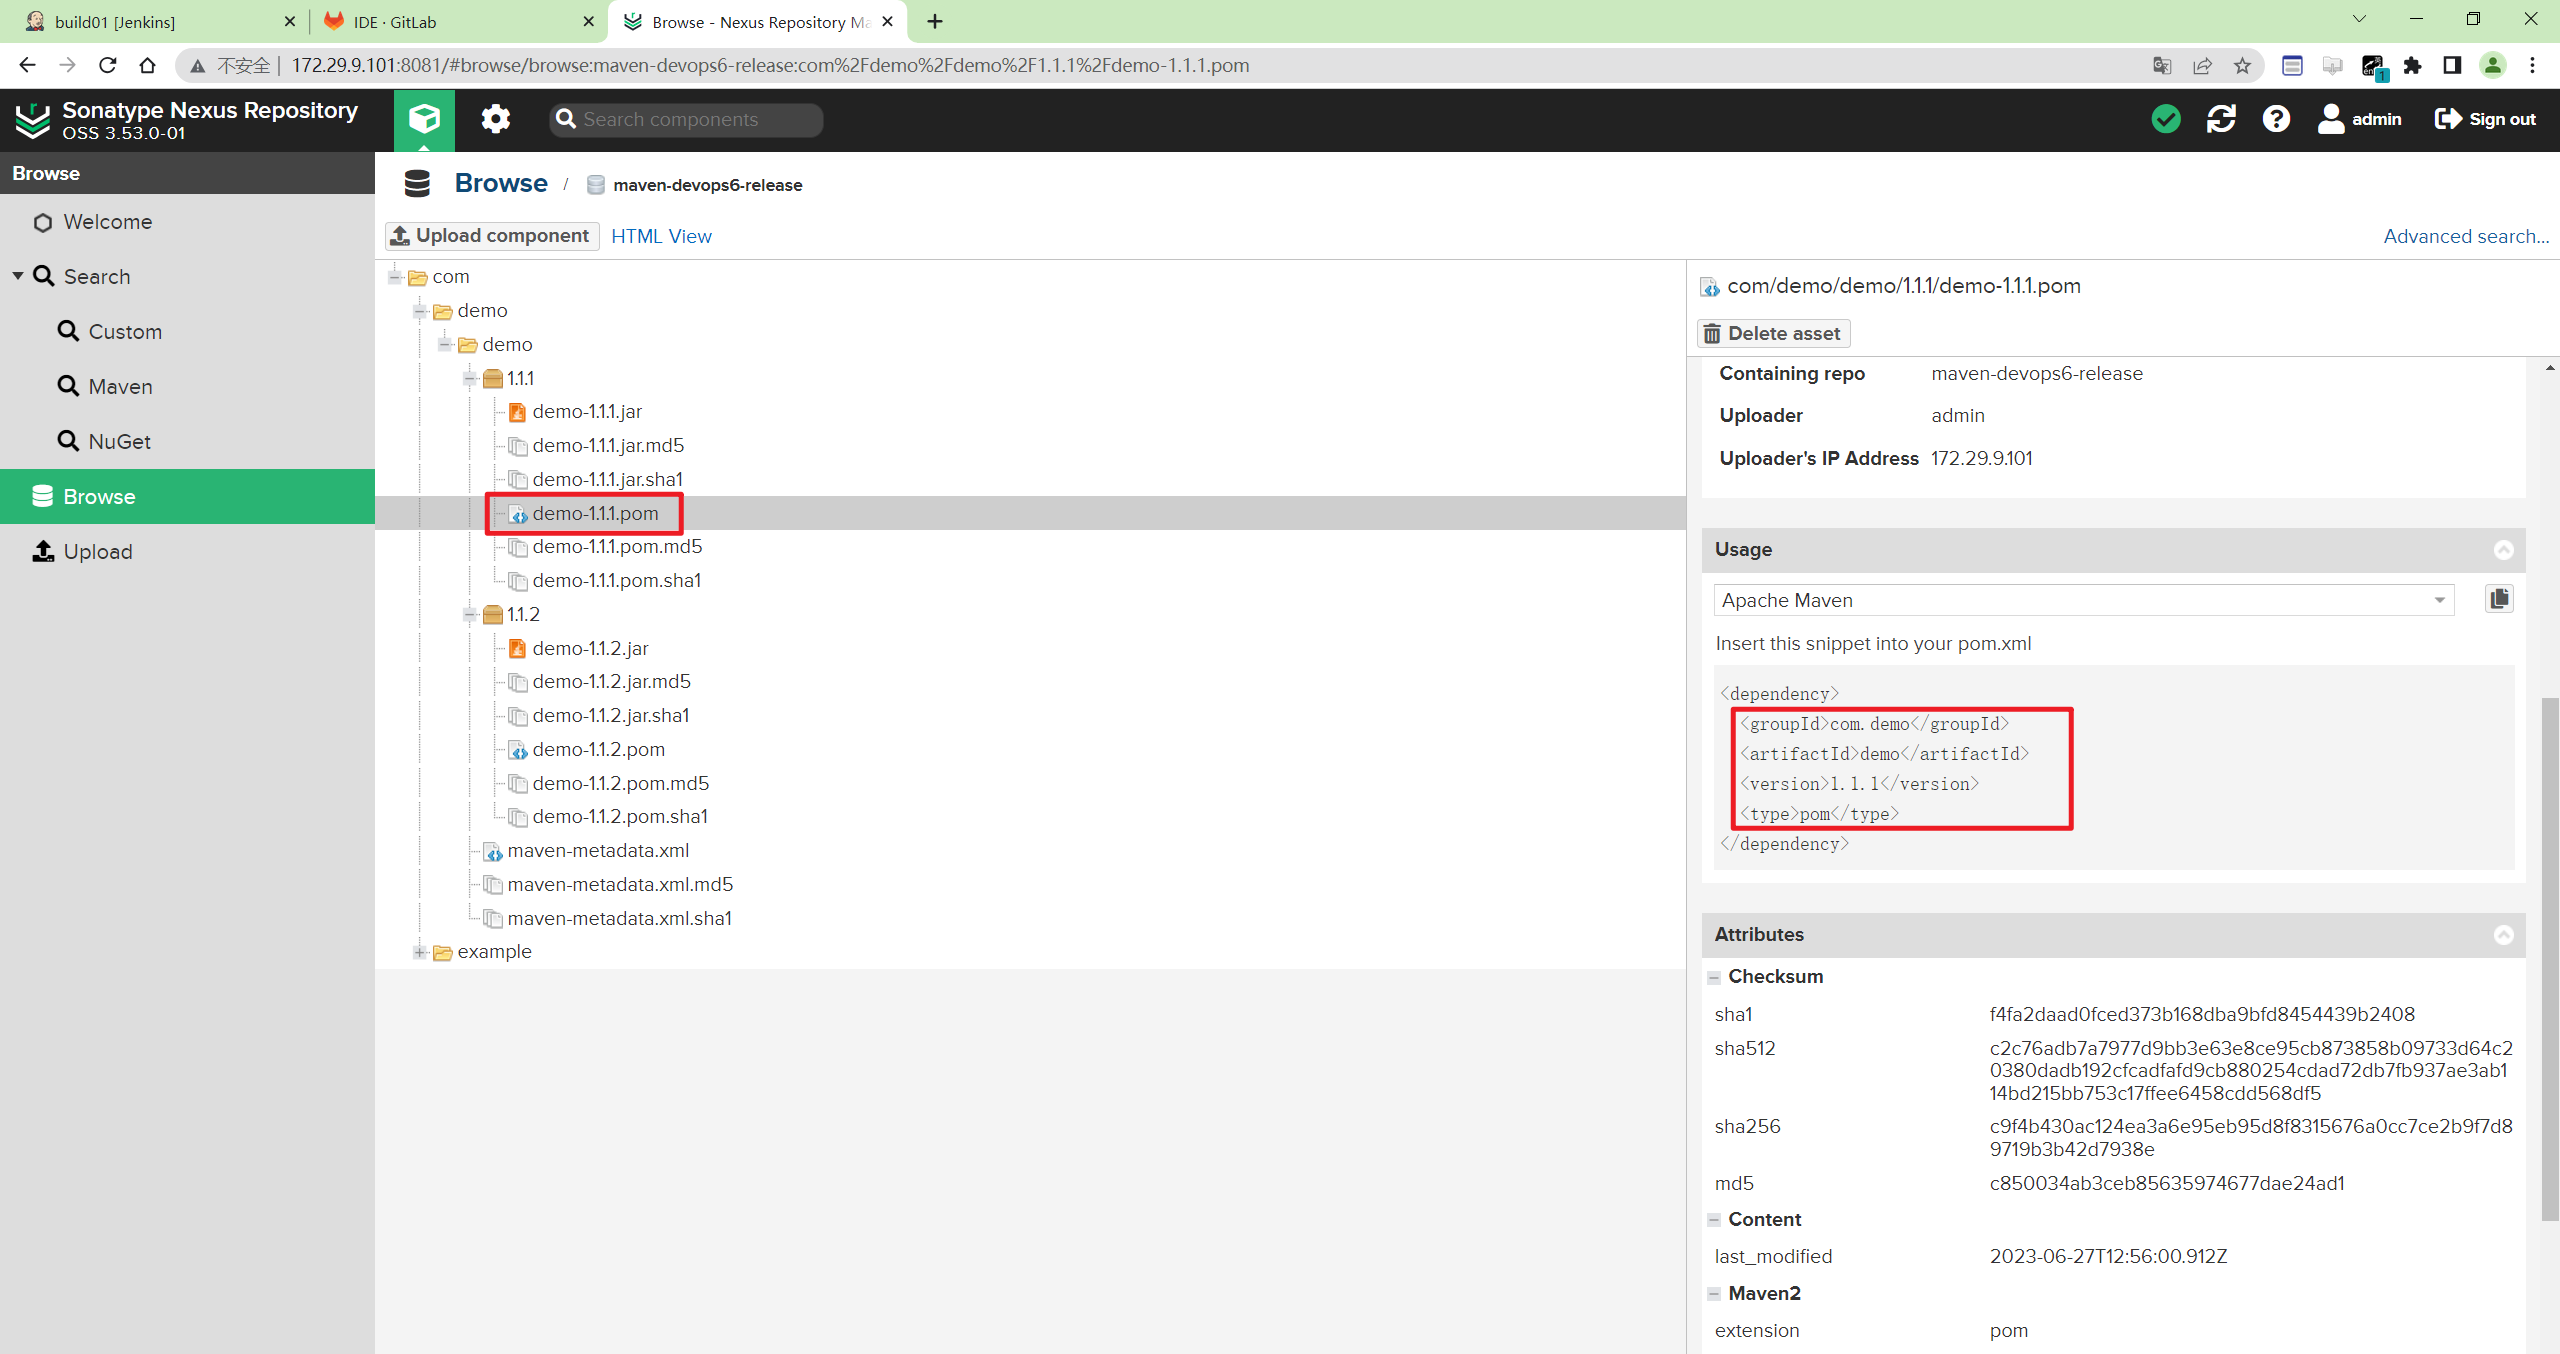
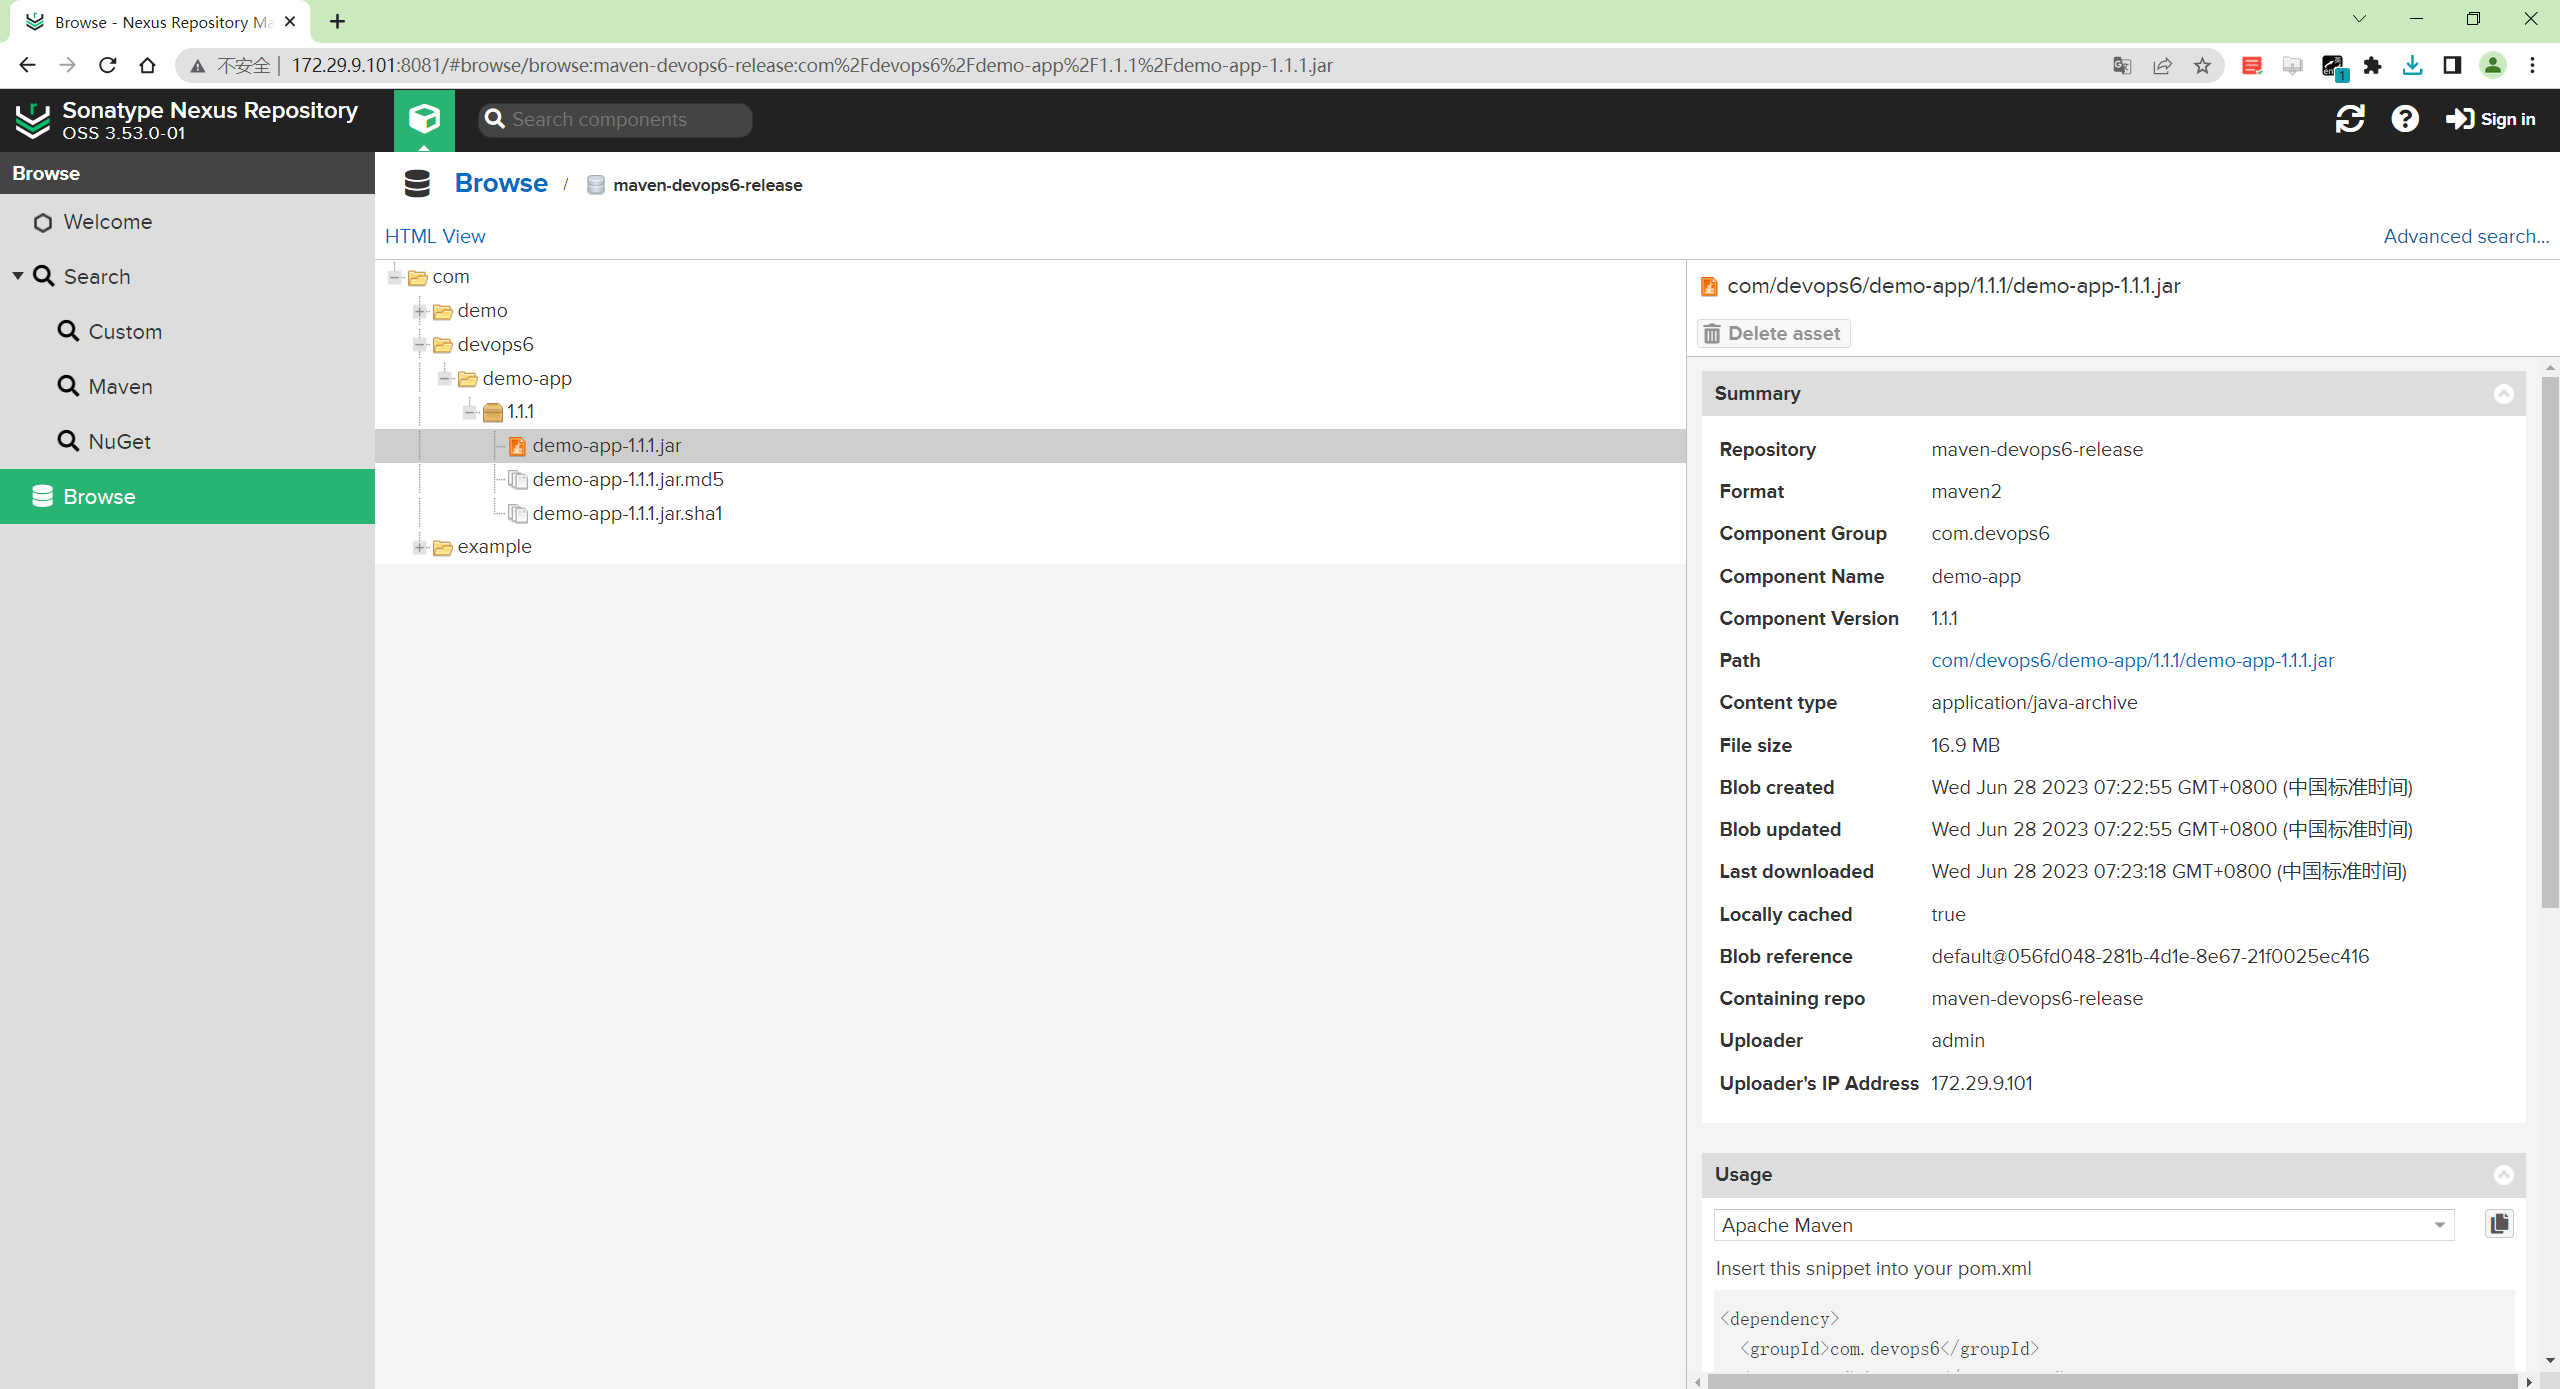
- 验证:制品已经上传成功了。
测试成功。😘
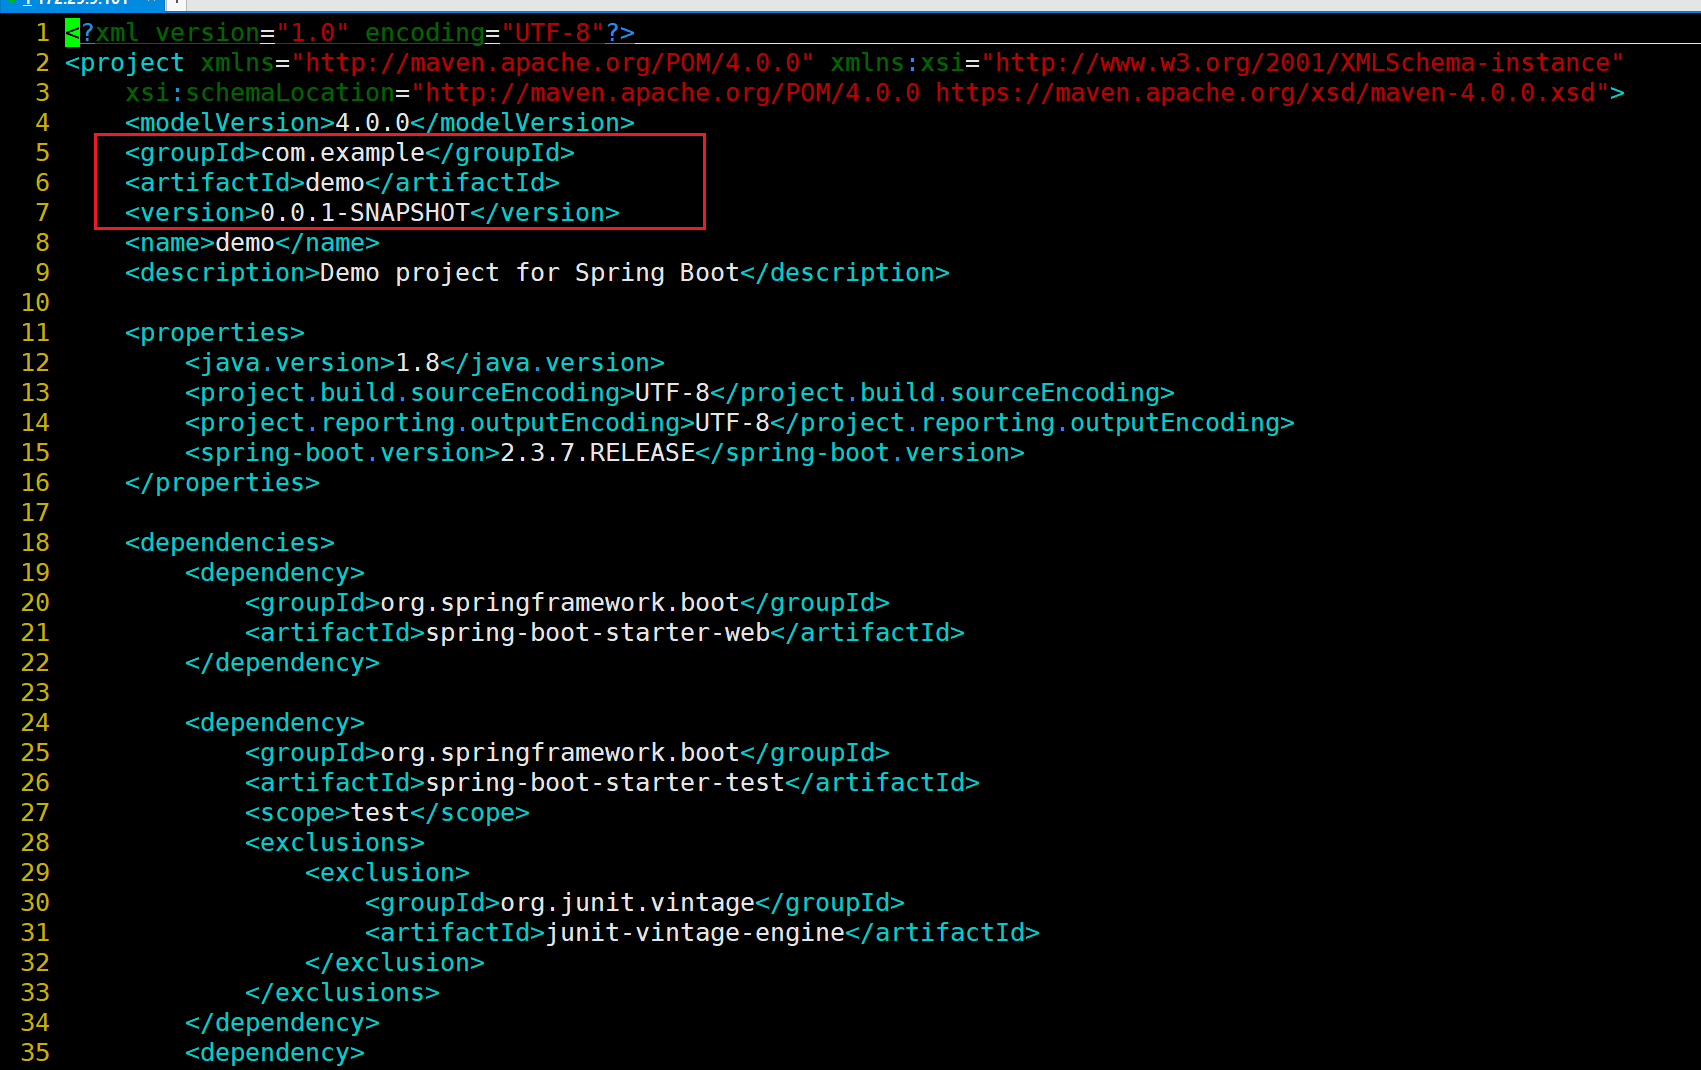
② 方法2:直接读取pom文件(扩展)
| 💘 实践:直接读取pom文件(扩展)-2022.6.11(测试成功) |
- 实验环境
- 默认项目下是已经有
pom.xml文件了:
sonatype/nexus3:3.53.0
apache-maven-3.9.2
- 实验软件(无)
[root@devops devops4-maven-service-master]#ls
build.sh  mvnw  mvnw.cmd  pom.xml  README.md  sonar-project.properties  src  target
[root@devops devops4-maven-service-master]#cat pom.xml
- 这里直接使用命令上传:
mvn deploy:deploy-file \
-DgeneratePom=true \
-DrepositoryId=mymaven \
-Durl=http://172.29.9.101:8081/repository/devops4-snapshot/ \
-DpomFile=pom.xml \
-Dfile=target/demo-0.0.1-SNAPSHOT.jar
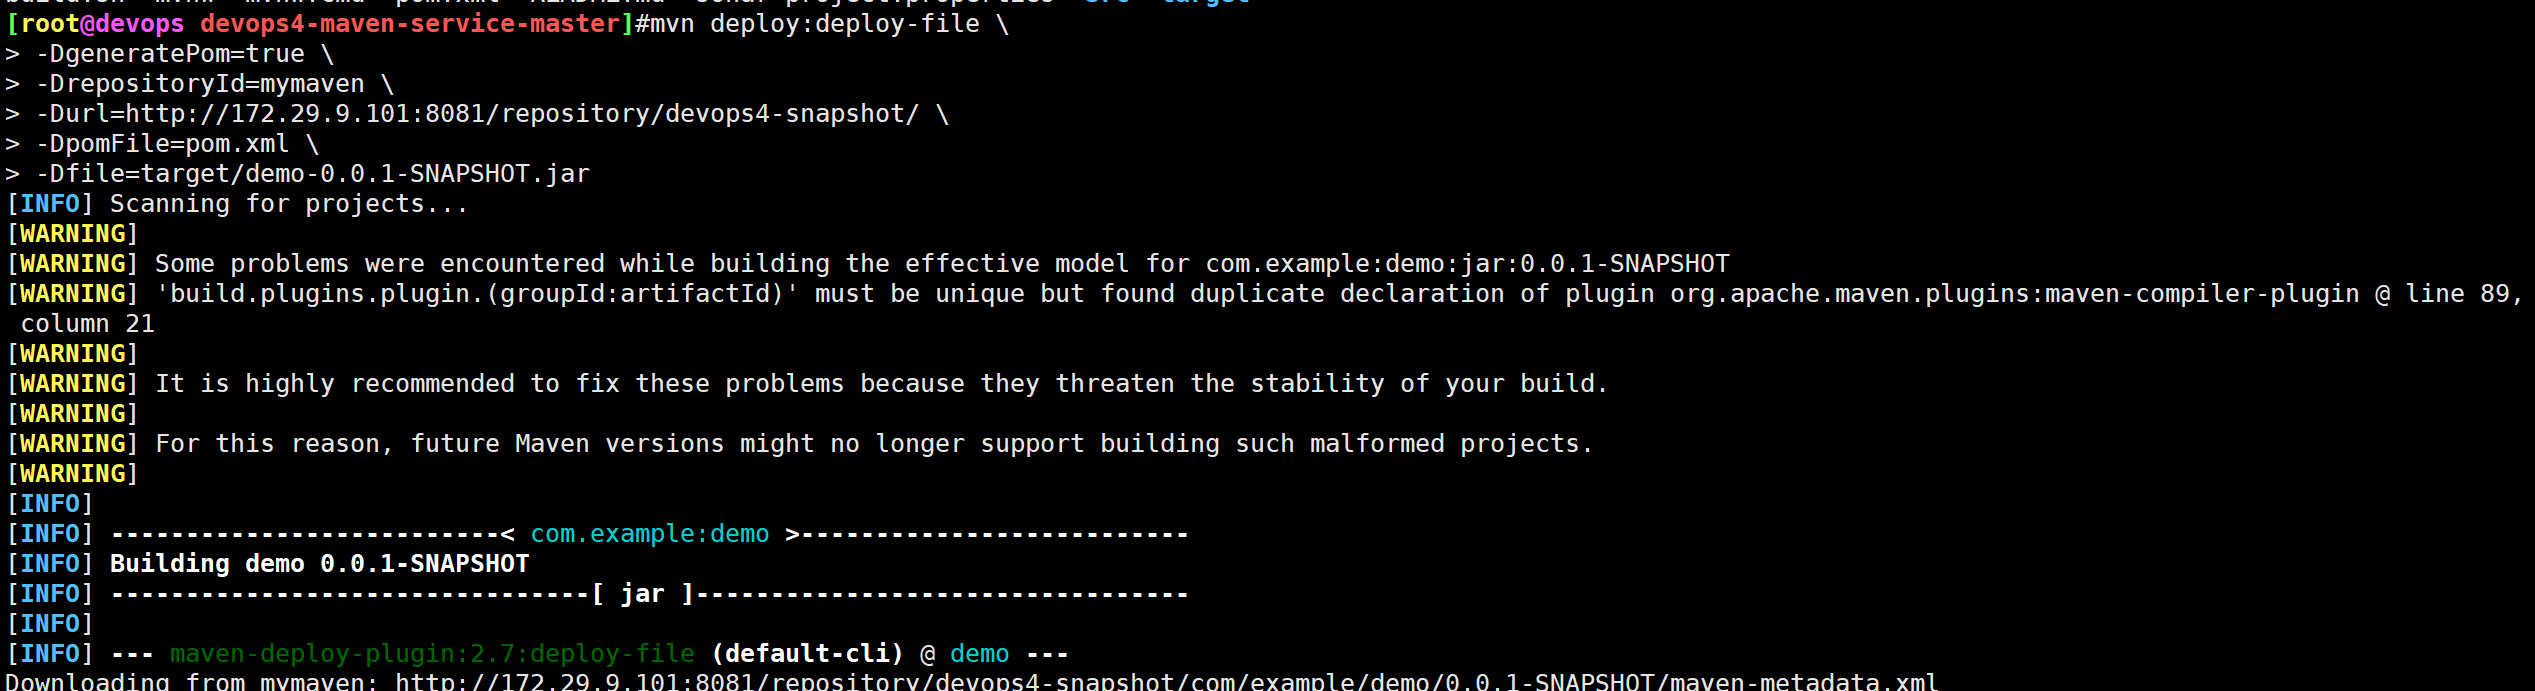
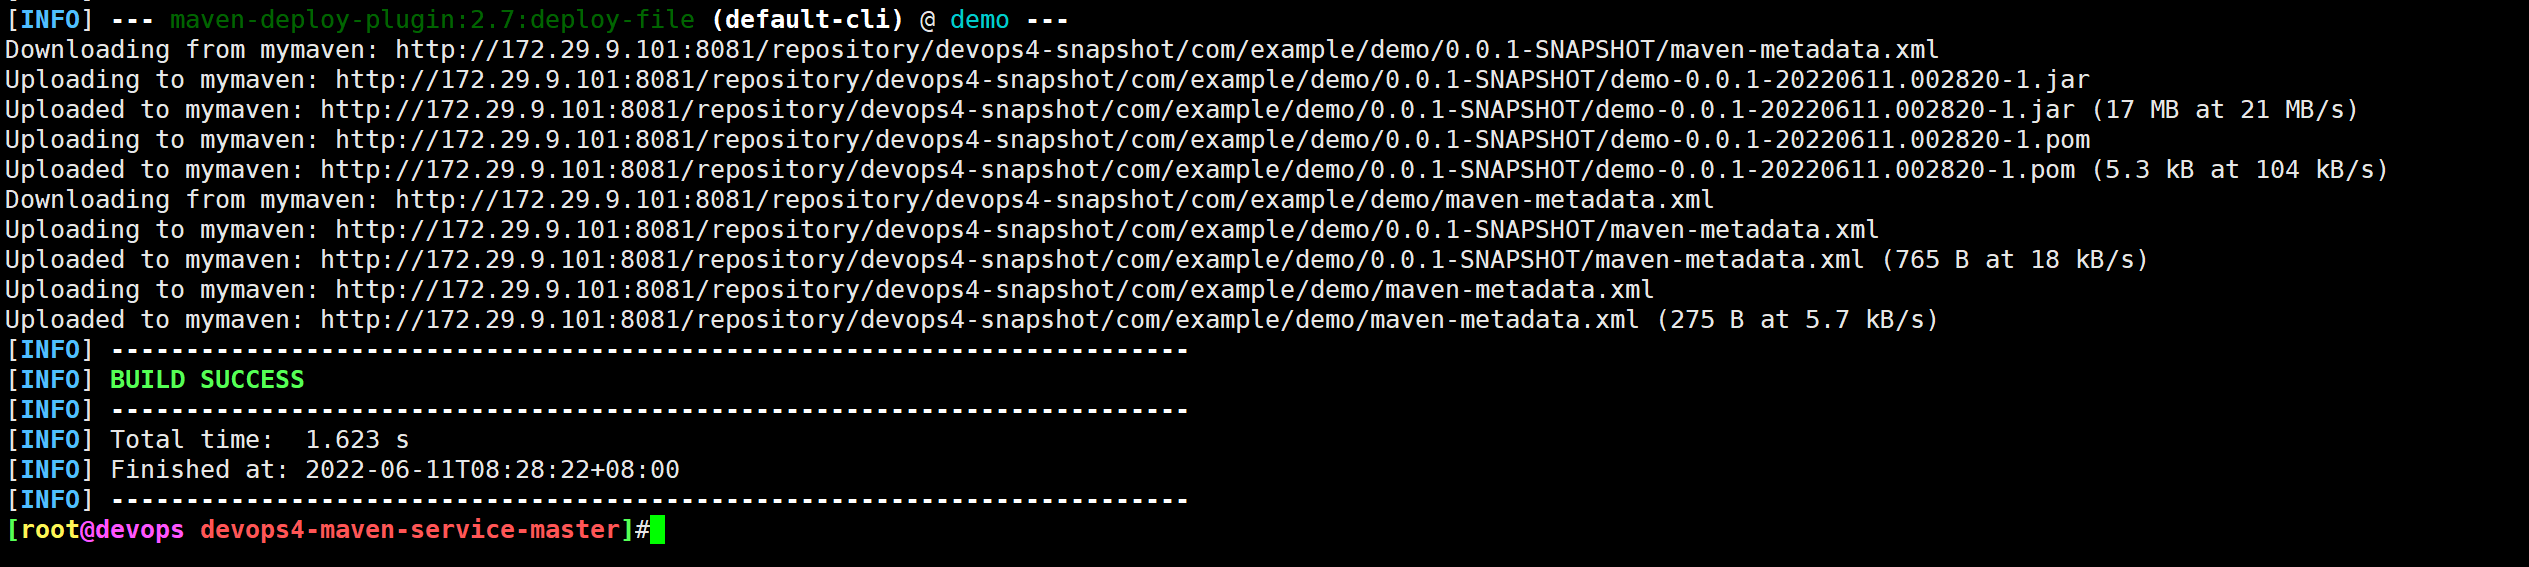
- 验证:
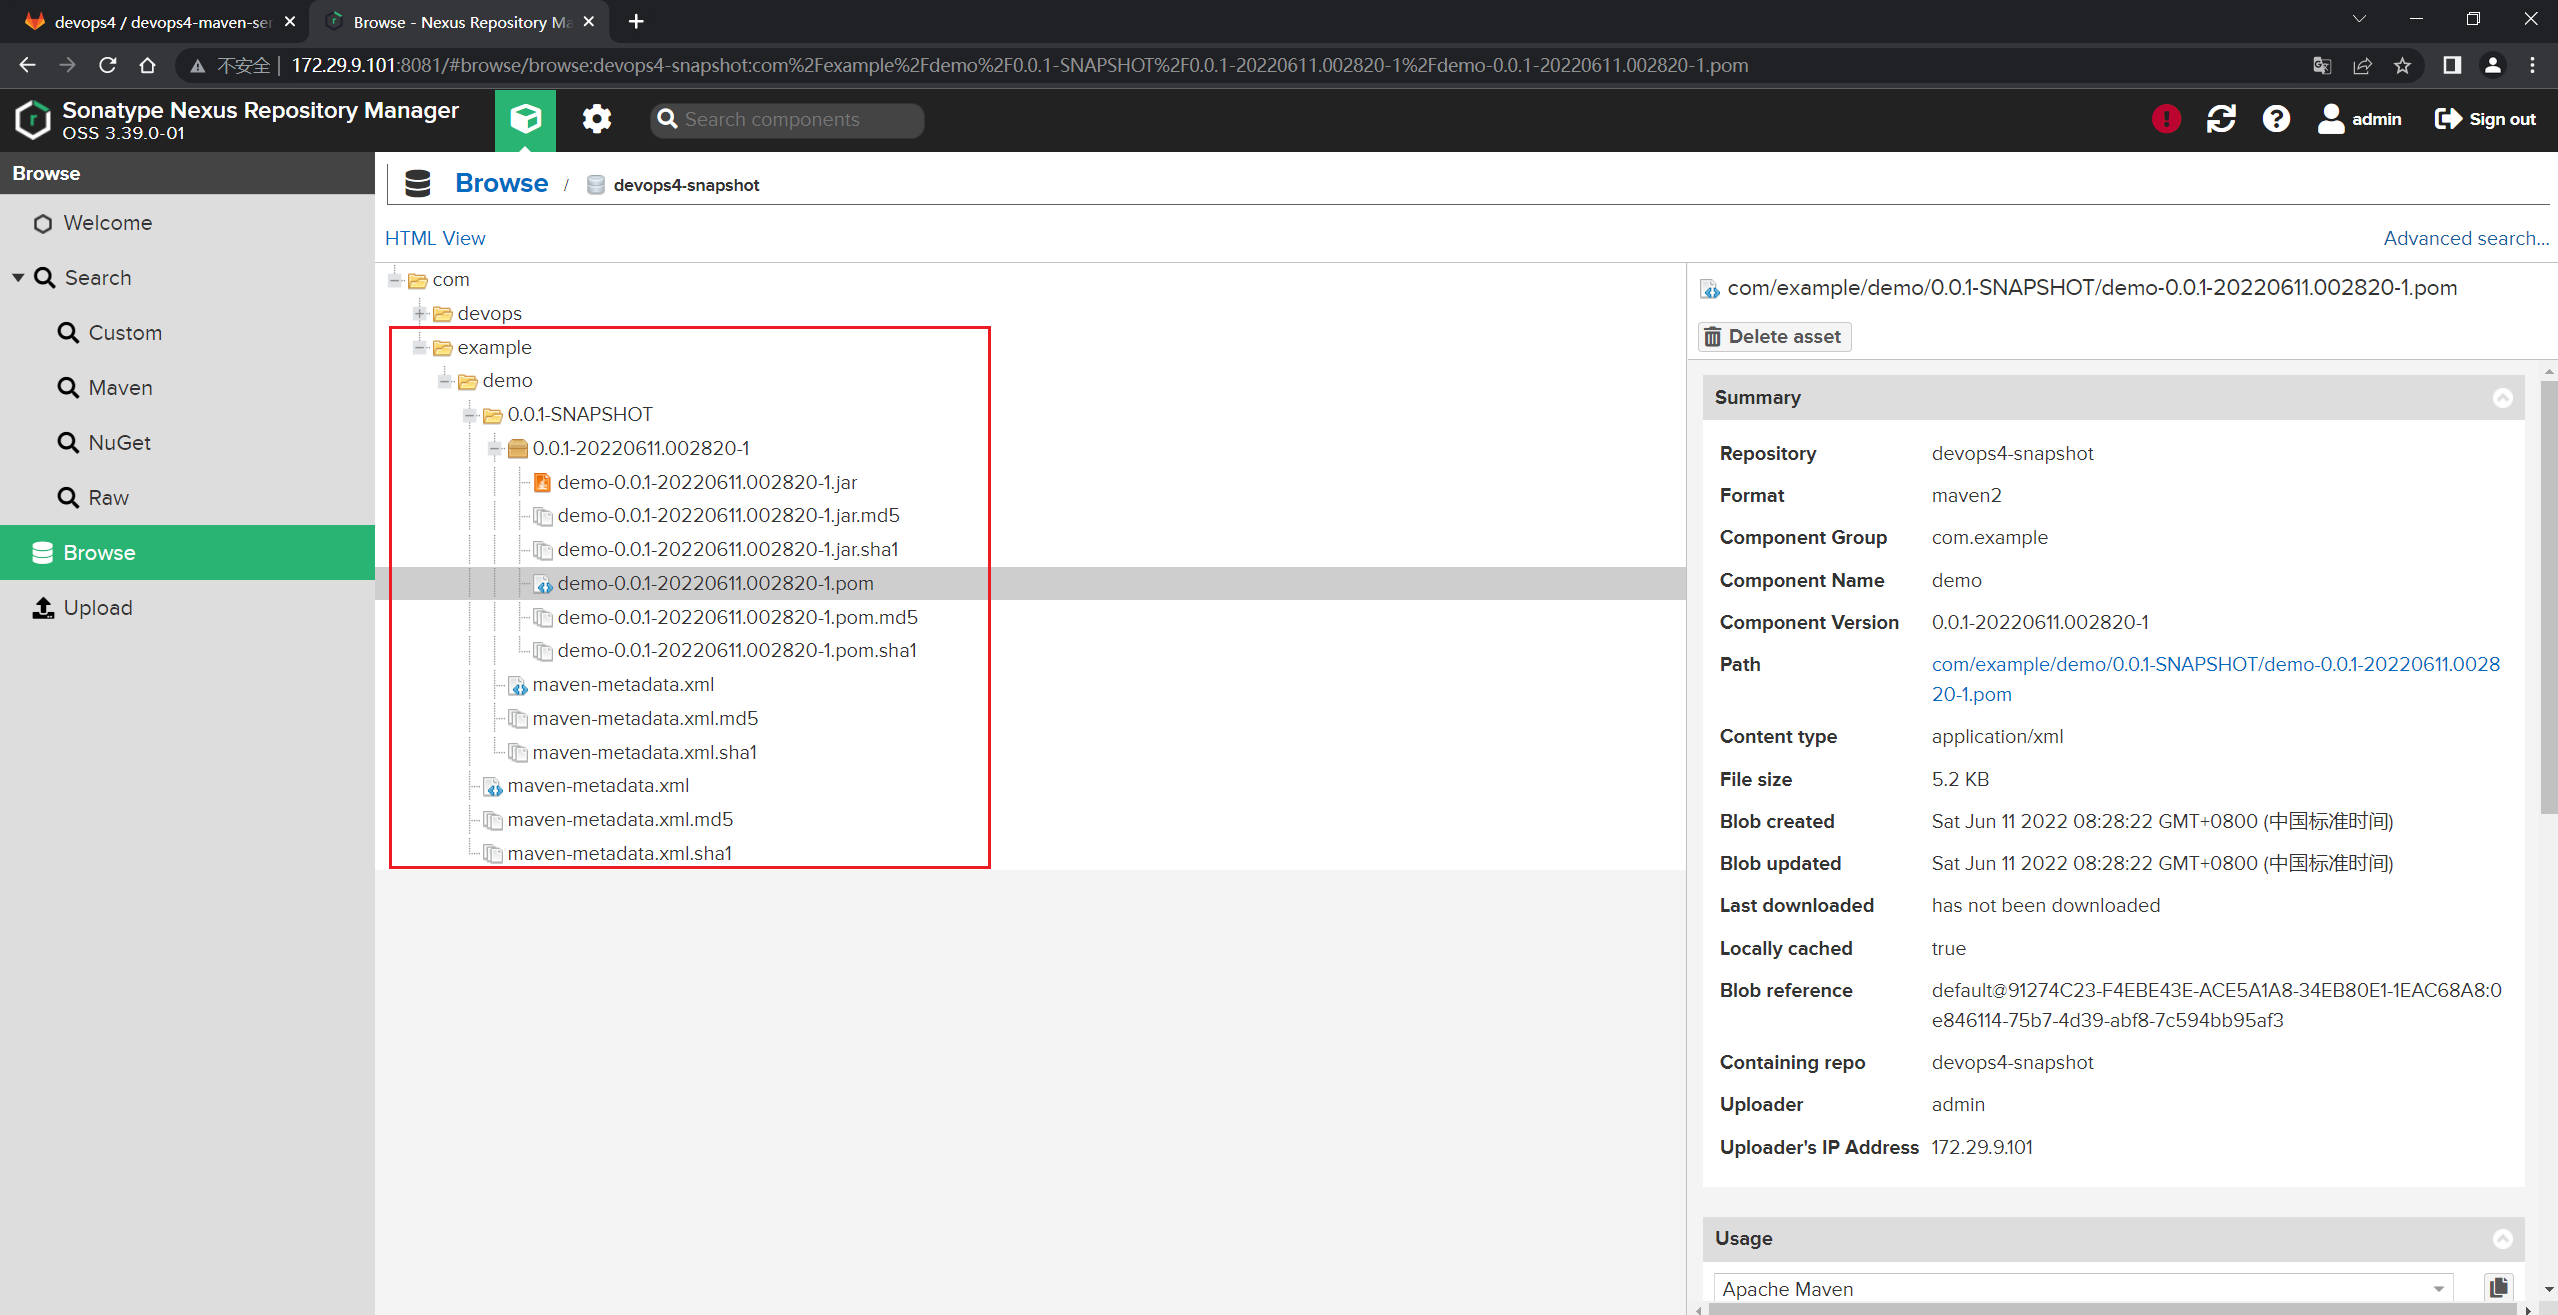
测试成功。😘
⚠️ FAQ:
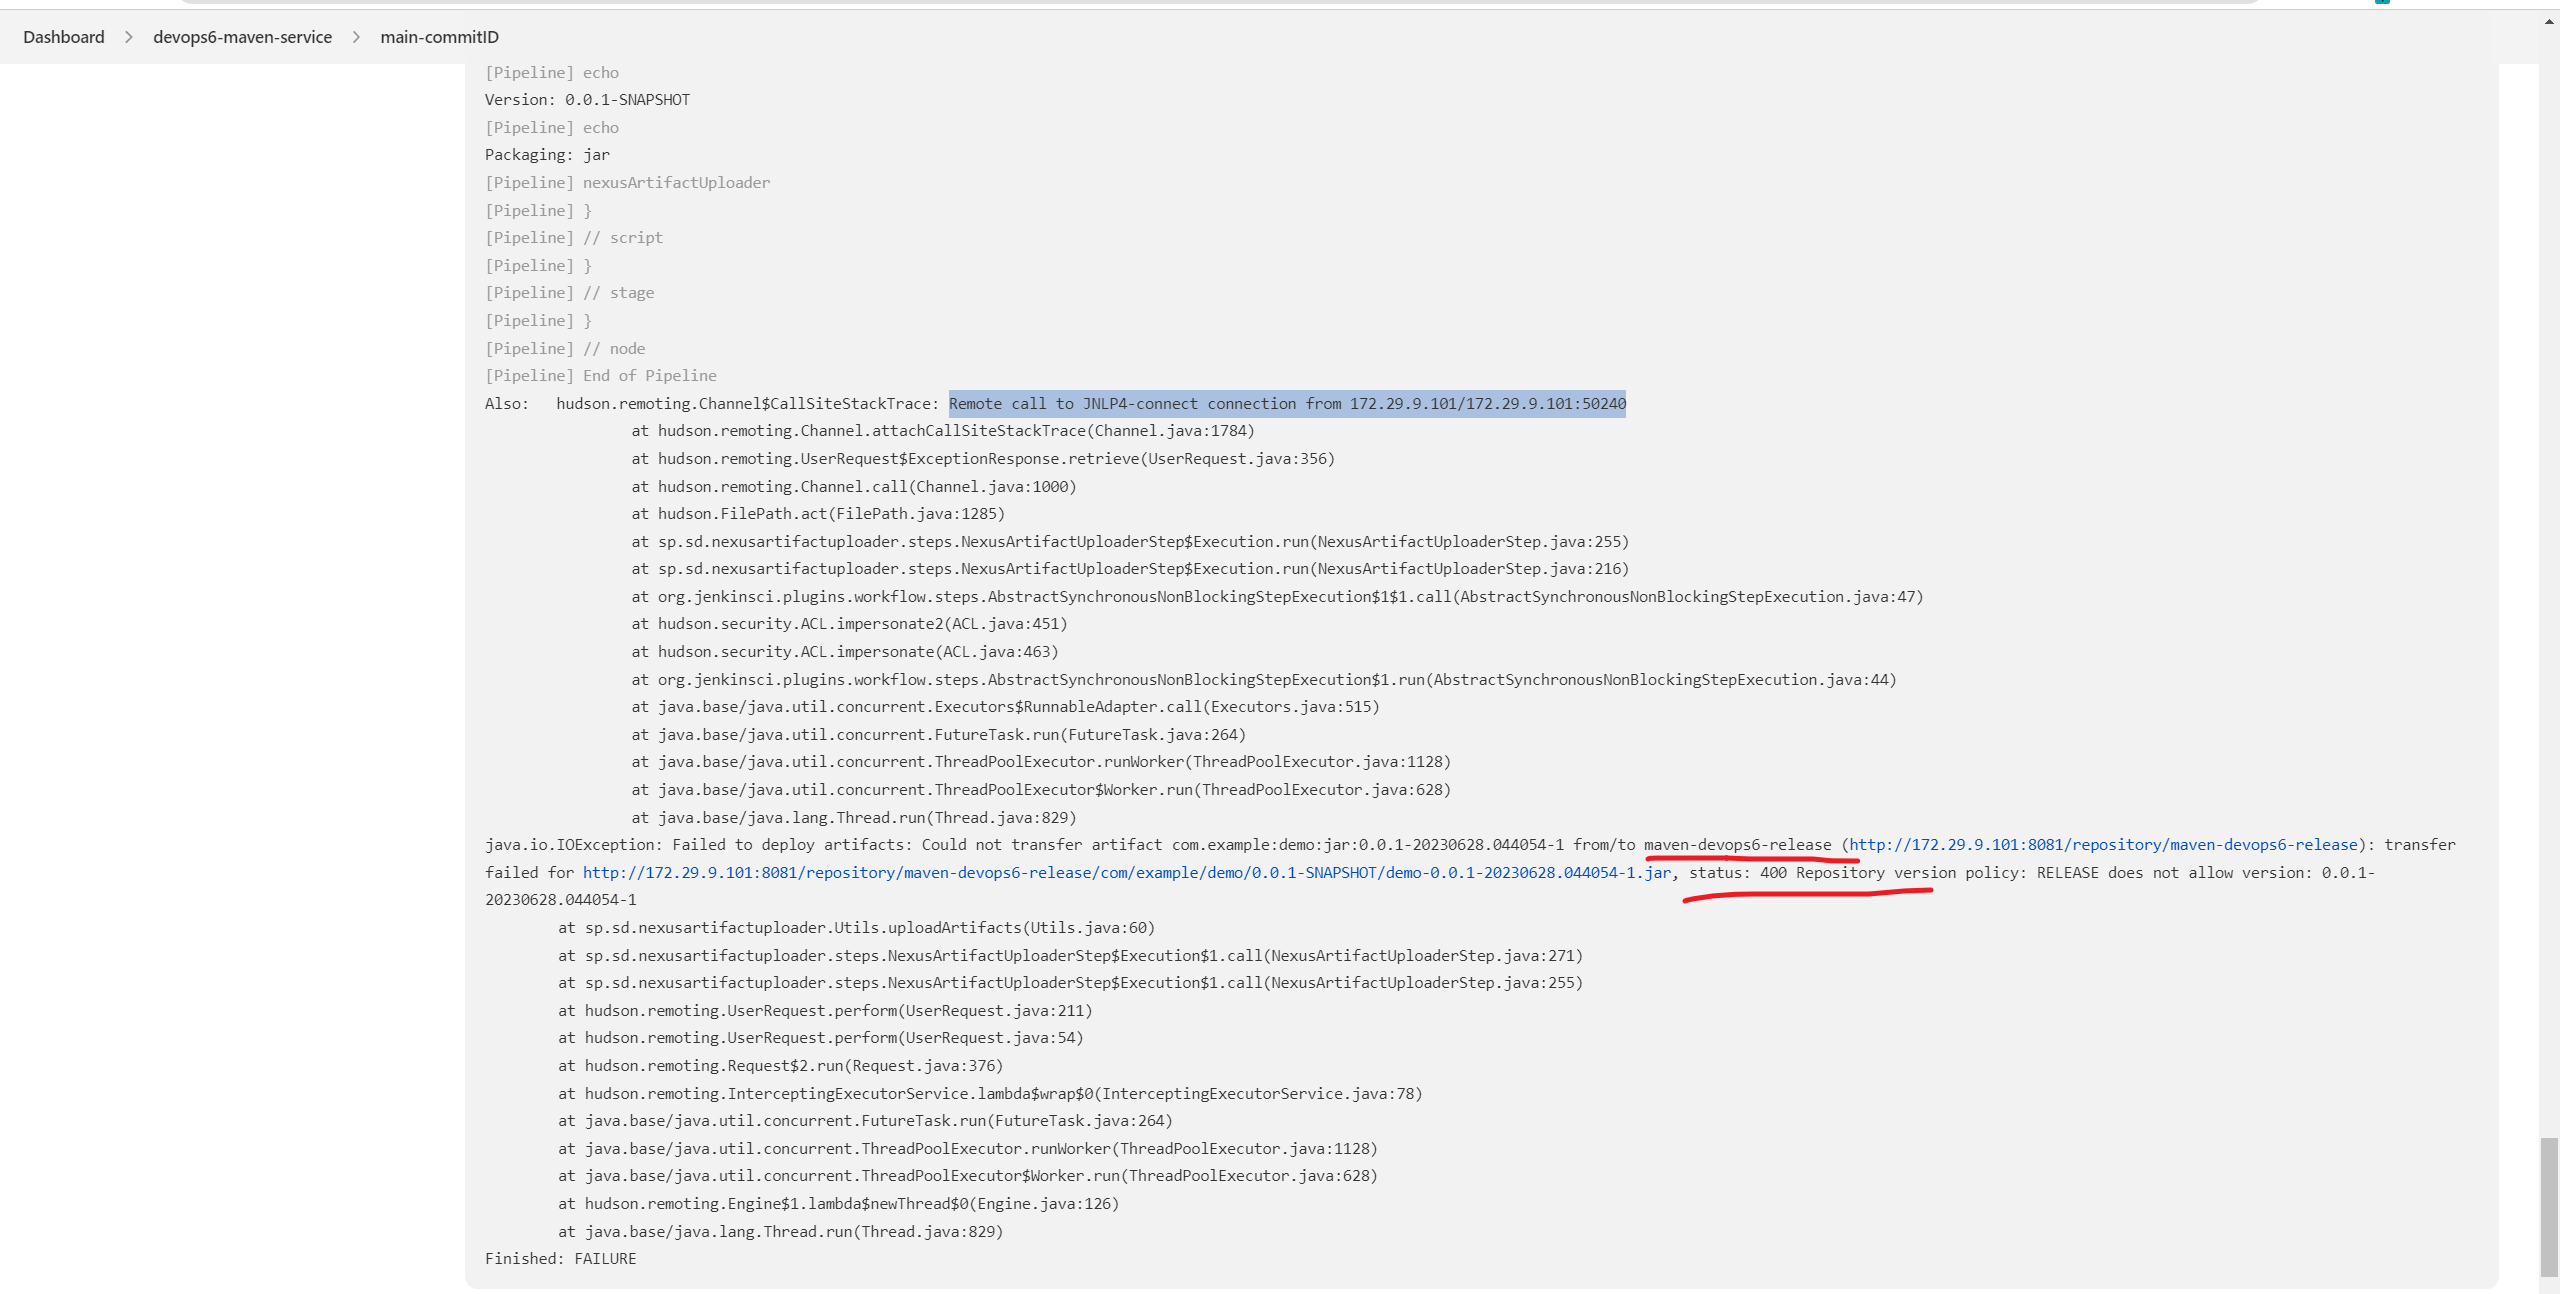
release类型的仓库只能上传release版本的包。如果你尝试用snapshot包上传到release类型的仓库时会遇到这些错误的。
[ERROR] Failed to execute goal org.apache.maven.plugins:maven-deploy-plugin:2.8.2:deploy-file (default-cli) on project demo: Failed to deploy artifacts: Could not transfer artifact com.example:demo:jar:0.0.1 from/to maven-hosted (http://192.168.1.200:8081/repository/maven-zeyang-test/): transfer failed for http://192.168.1.200:8081/repository/maven-zeyang-test/com/example/demo/0.0.1/demo-0.0.1.jar, status: 400 Repository version policy: SNAPSHOT does not allow version: 0.0.1 -> [Help 1]

解决方法: 1. 更新pom中的版本号 2. 对号入座,上传到对应类型的仓库。
<groupId>com.example</groupId>
<artifactId>myapp</artifactId>
<version>0.0.2-SNAPSHOT</version>    //改成0.0.2-RELEASE
3.使用Jenkins插件上传制品
① 方法1:使用Jenkins插件上传制品(把信息写死)
| 💘 实践:使用Jenkins插件上传制品(把信息写死)(测试成功)-2023.6.28 |
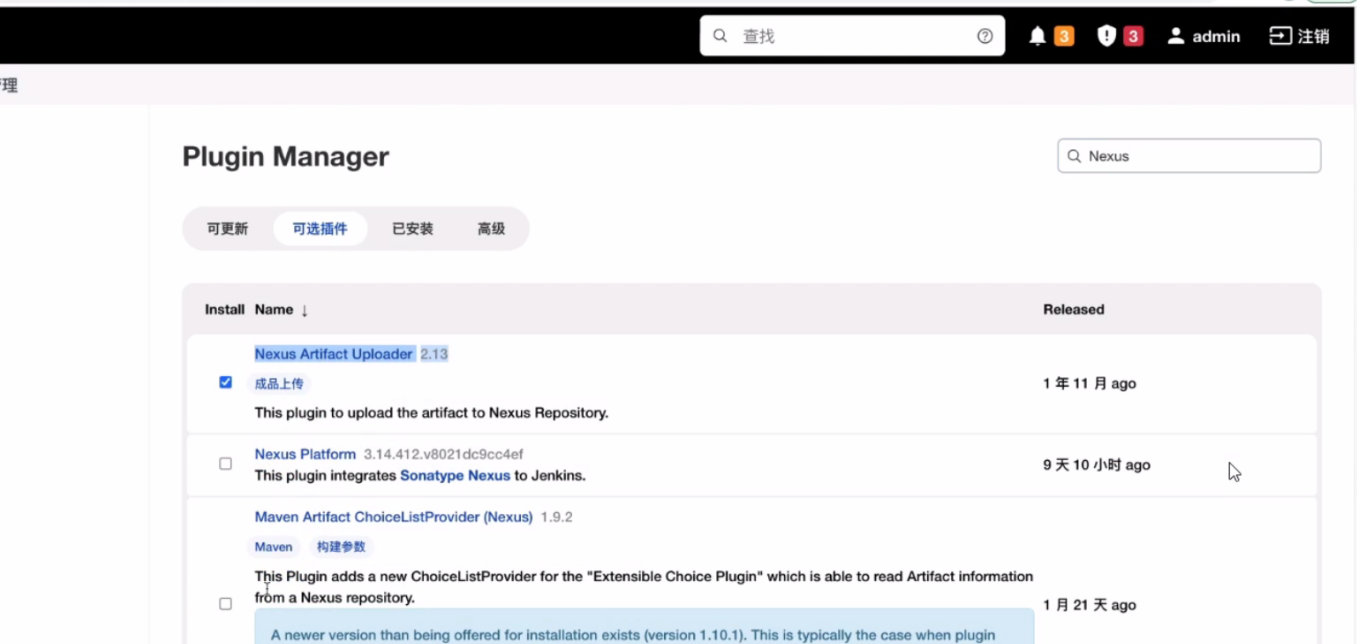
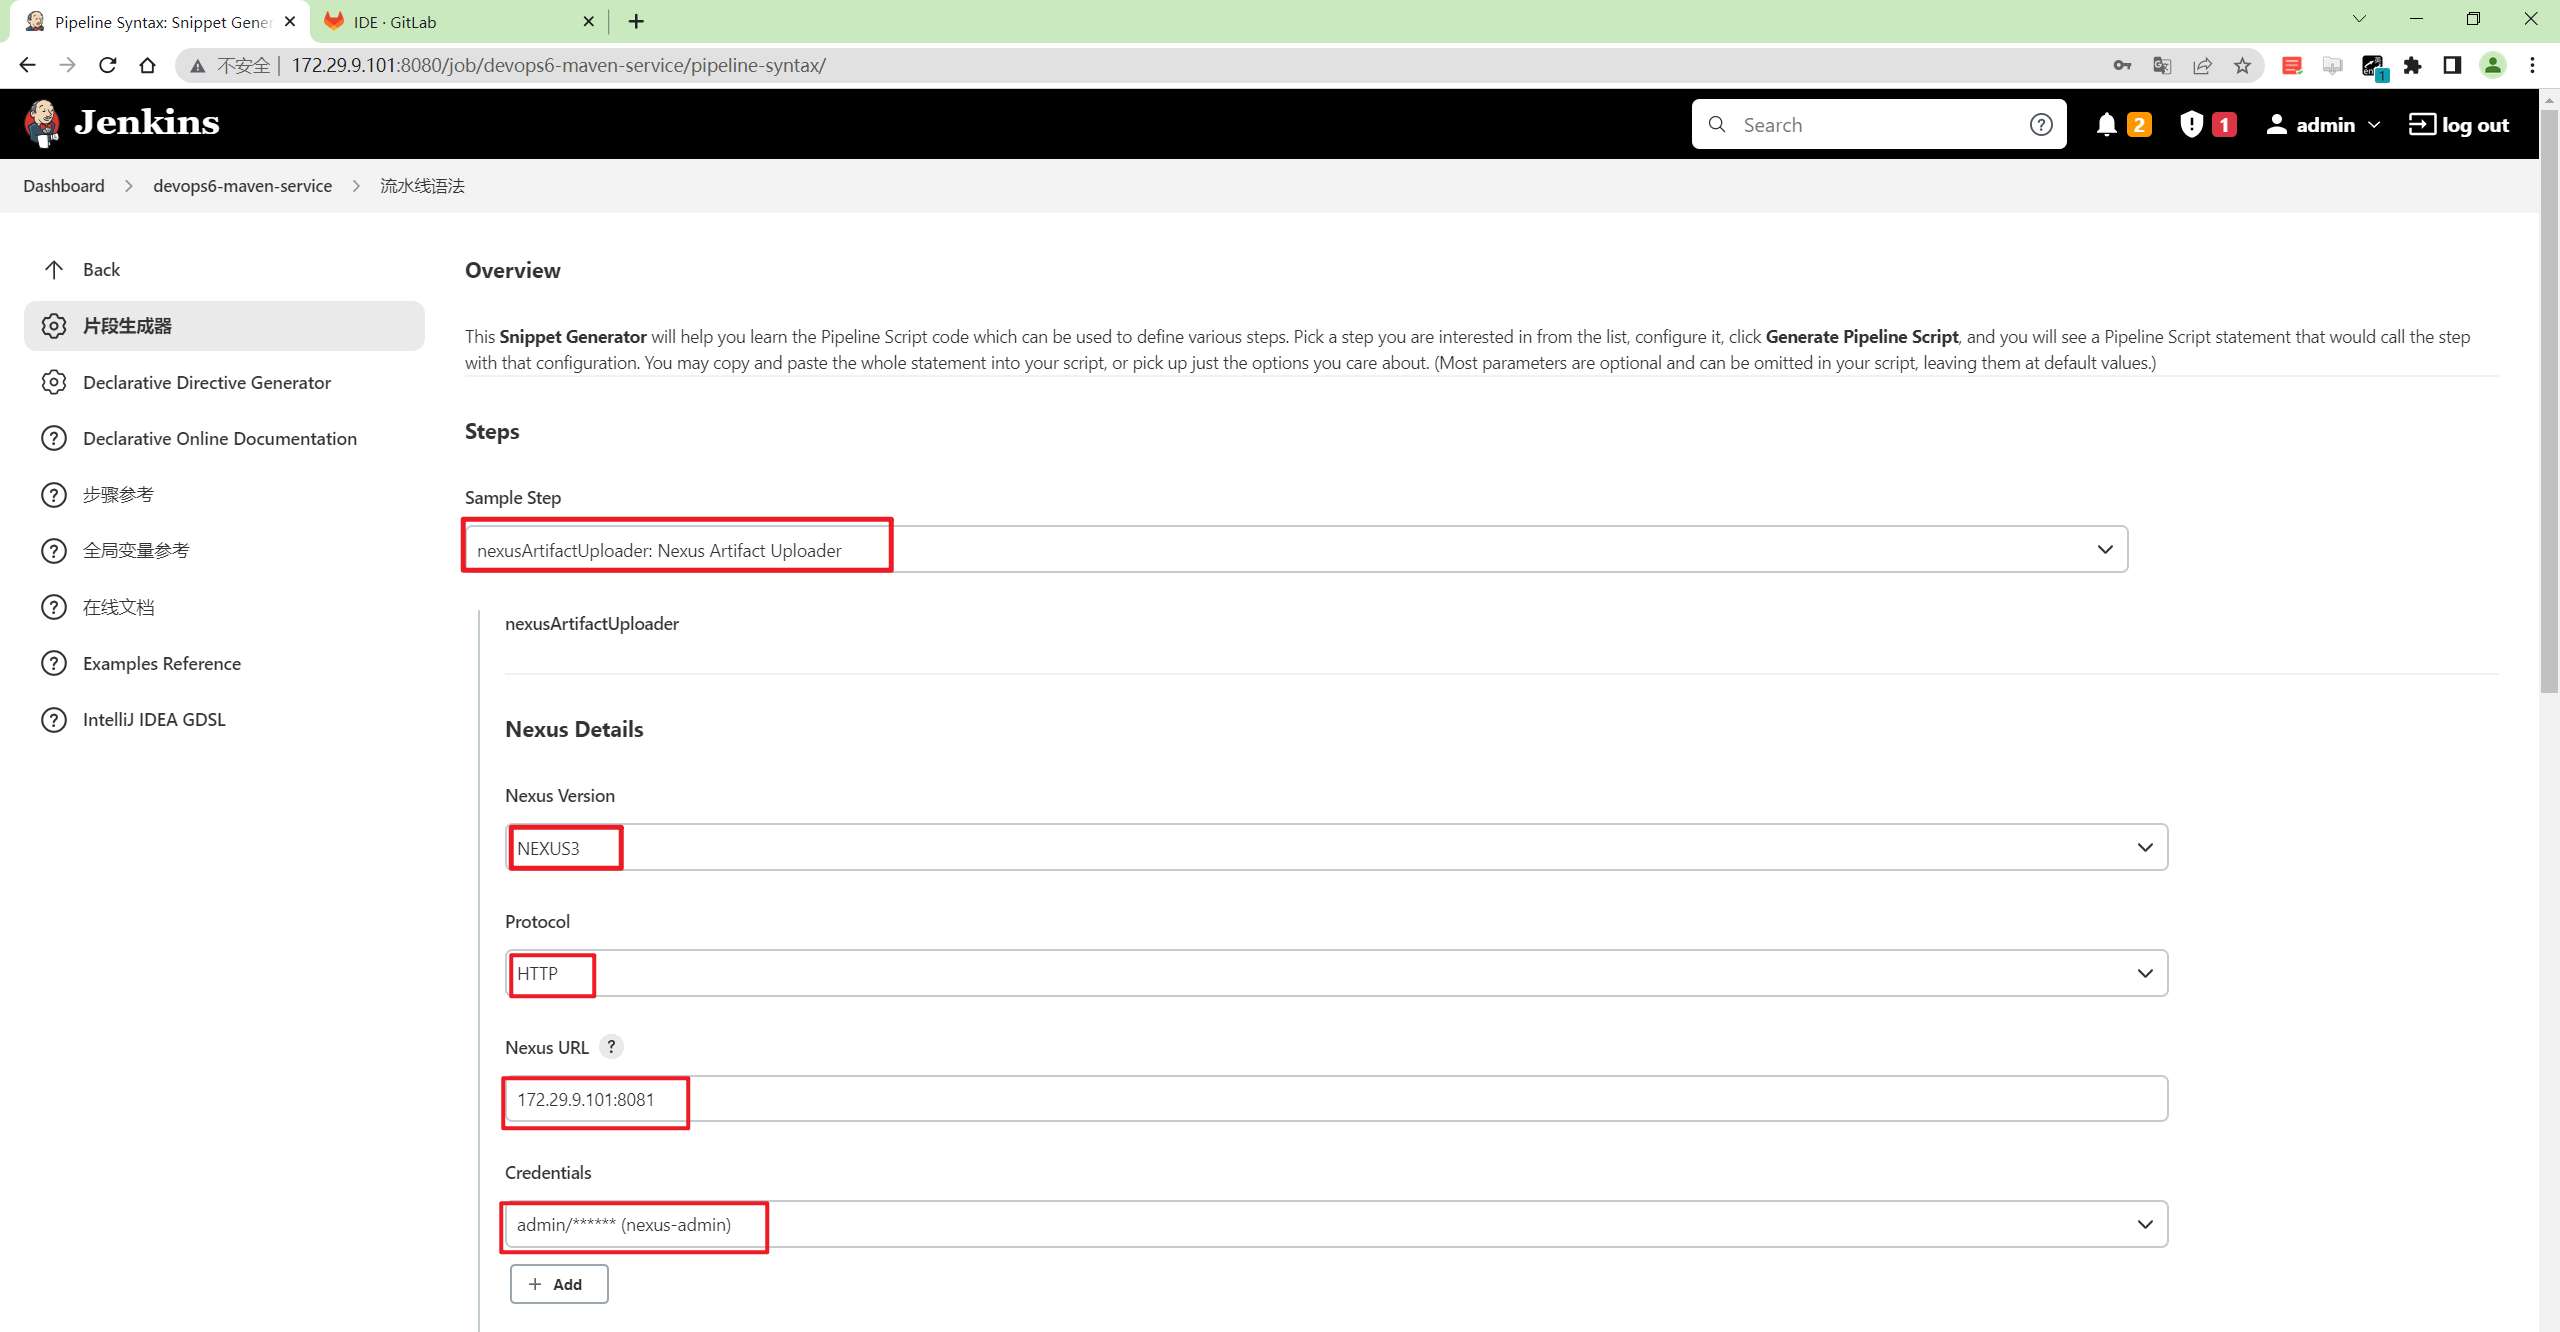
- 安装插件:
Nexus Aritifact Uploader
- 使用片段生成器生成DSL:
找一个pipeline项目,生成流水线脚本:
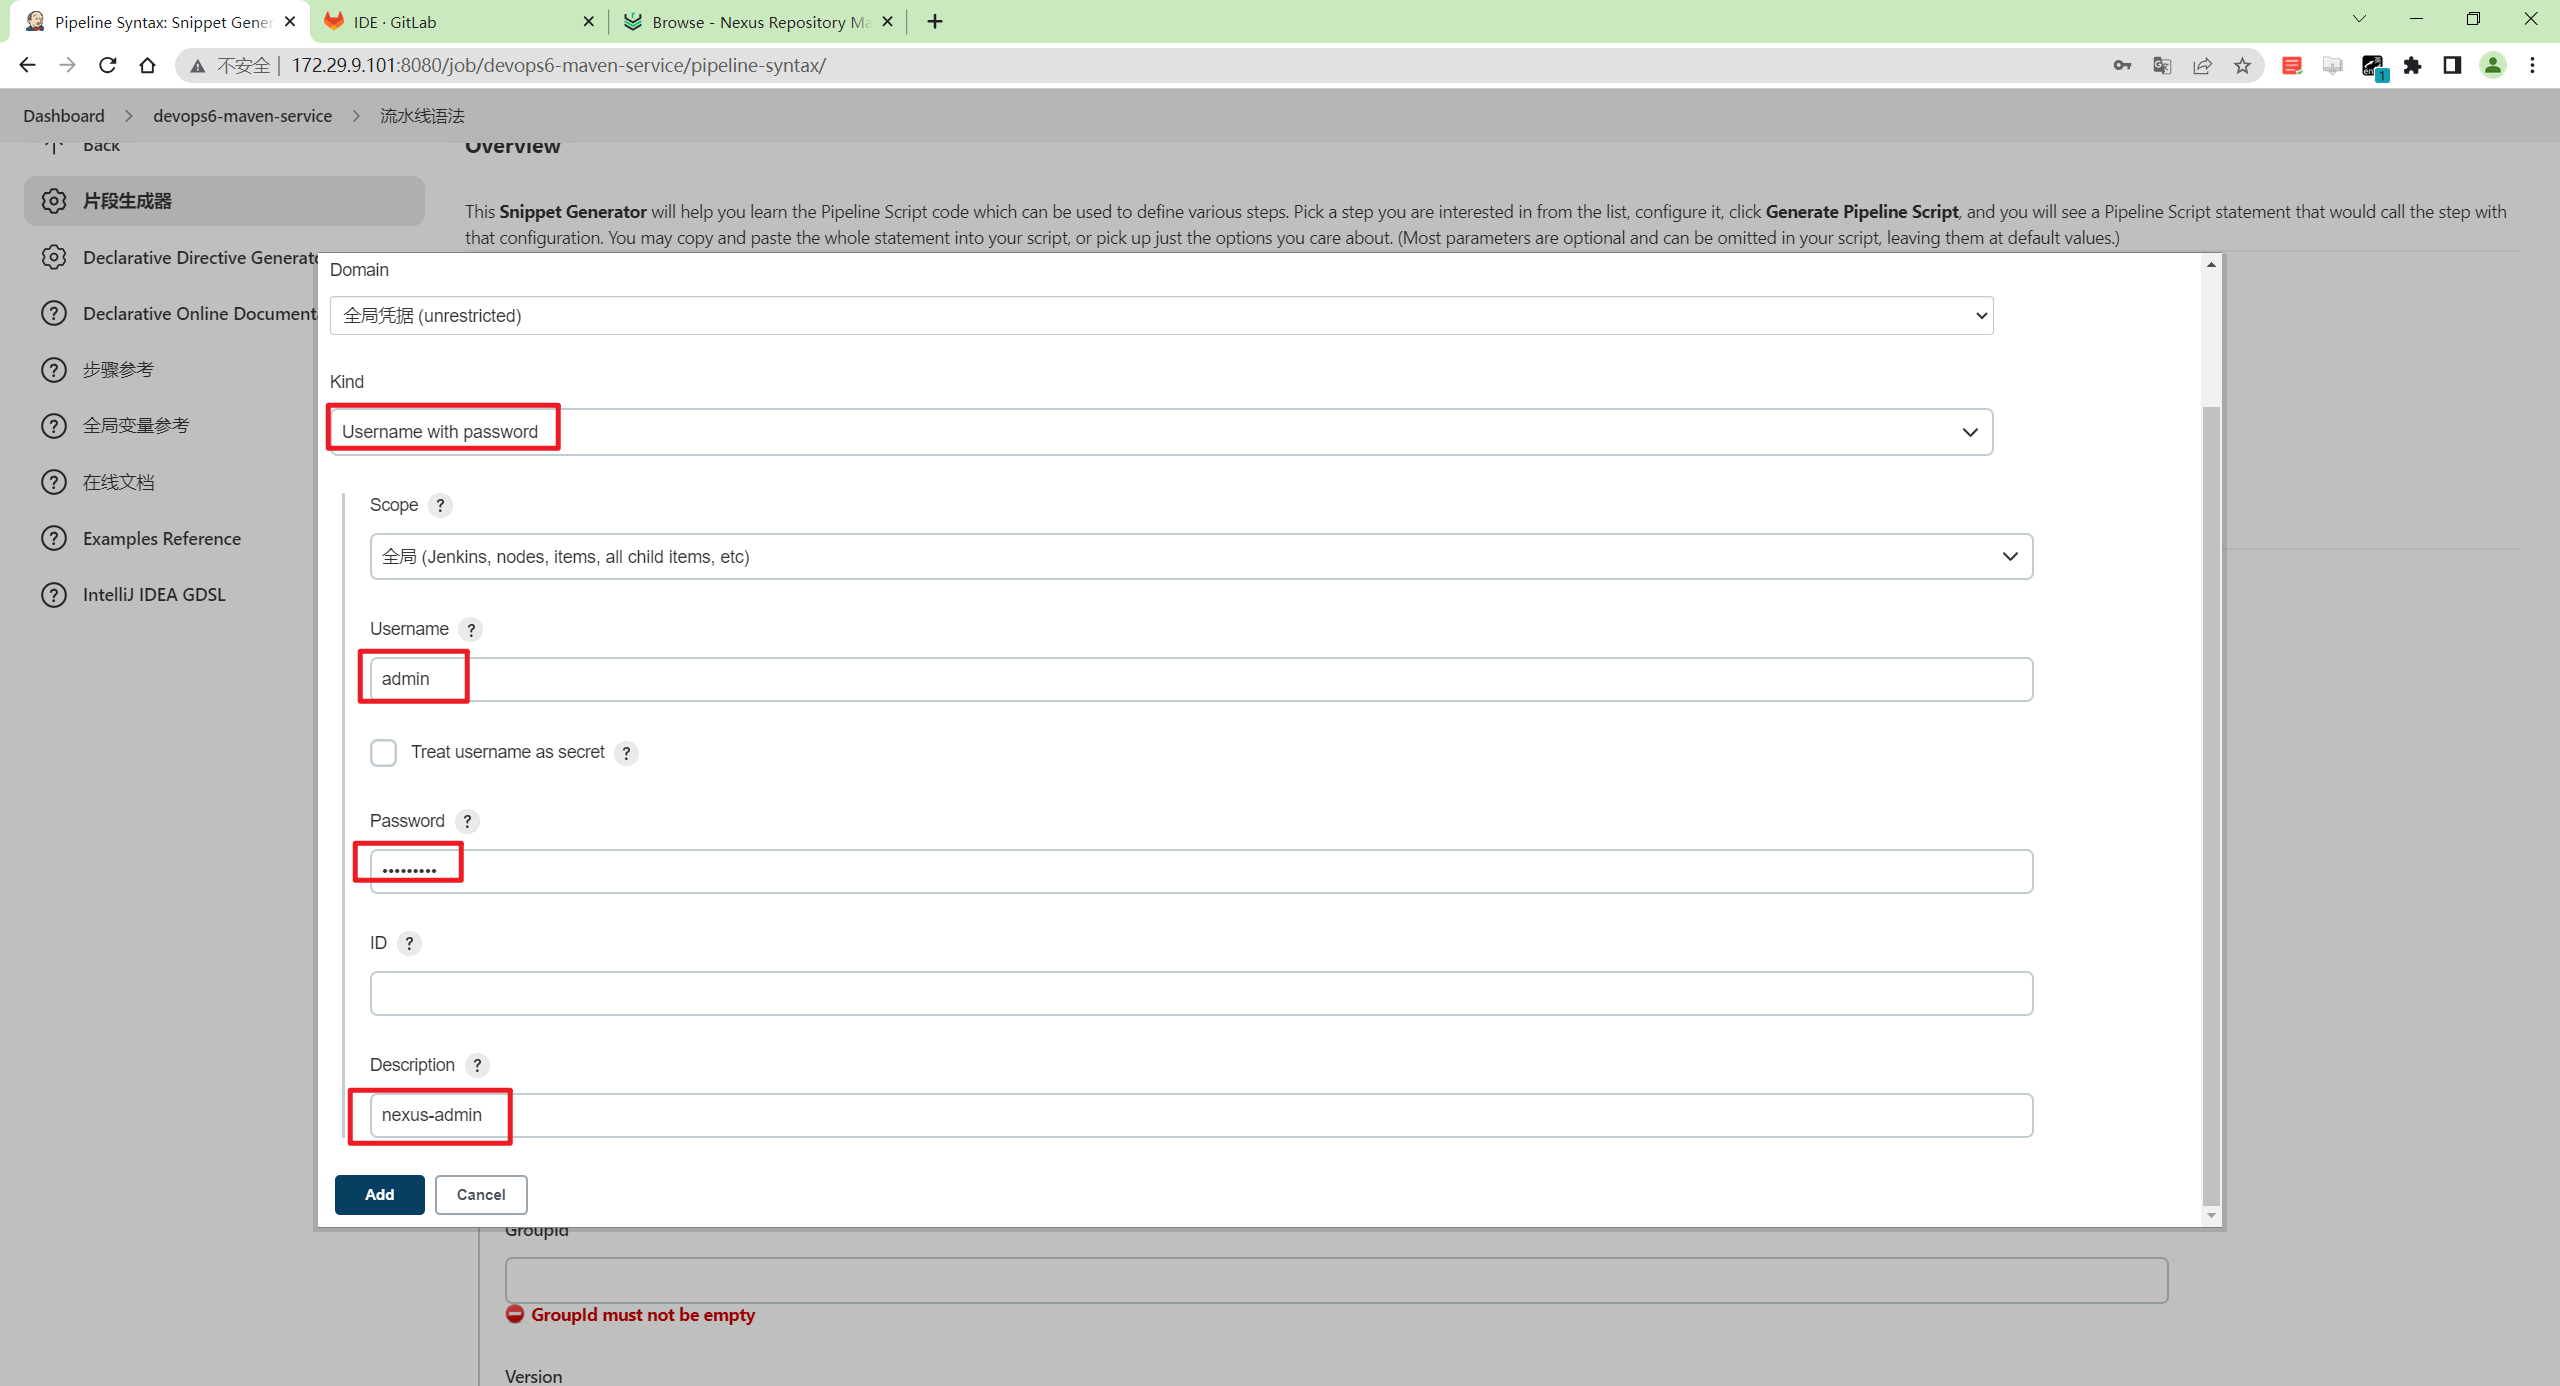
新建一个nexus凭据:
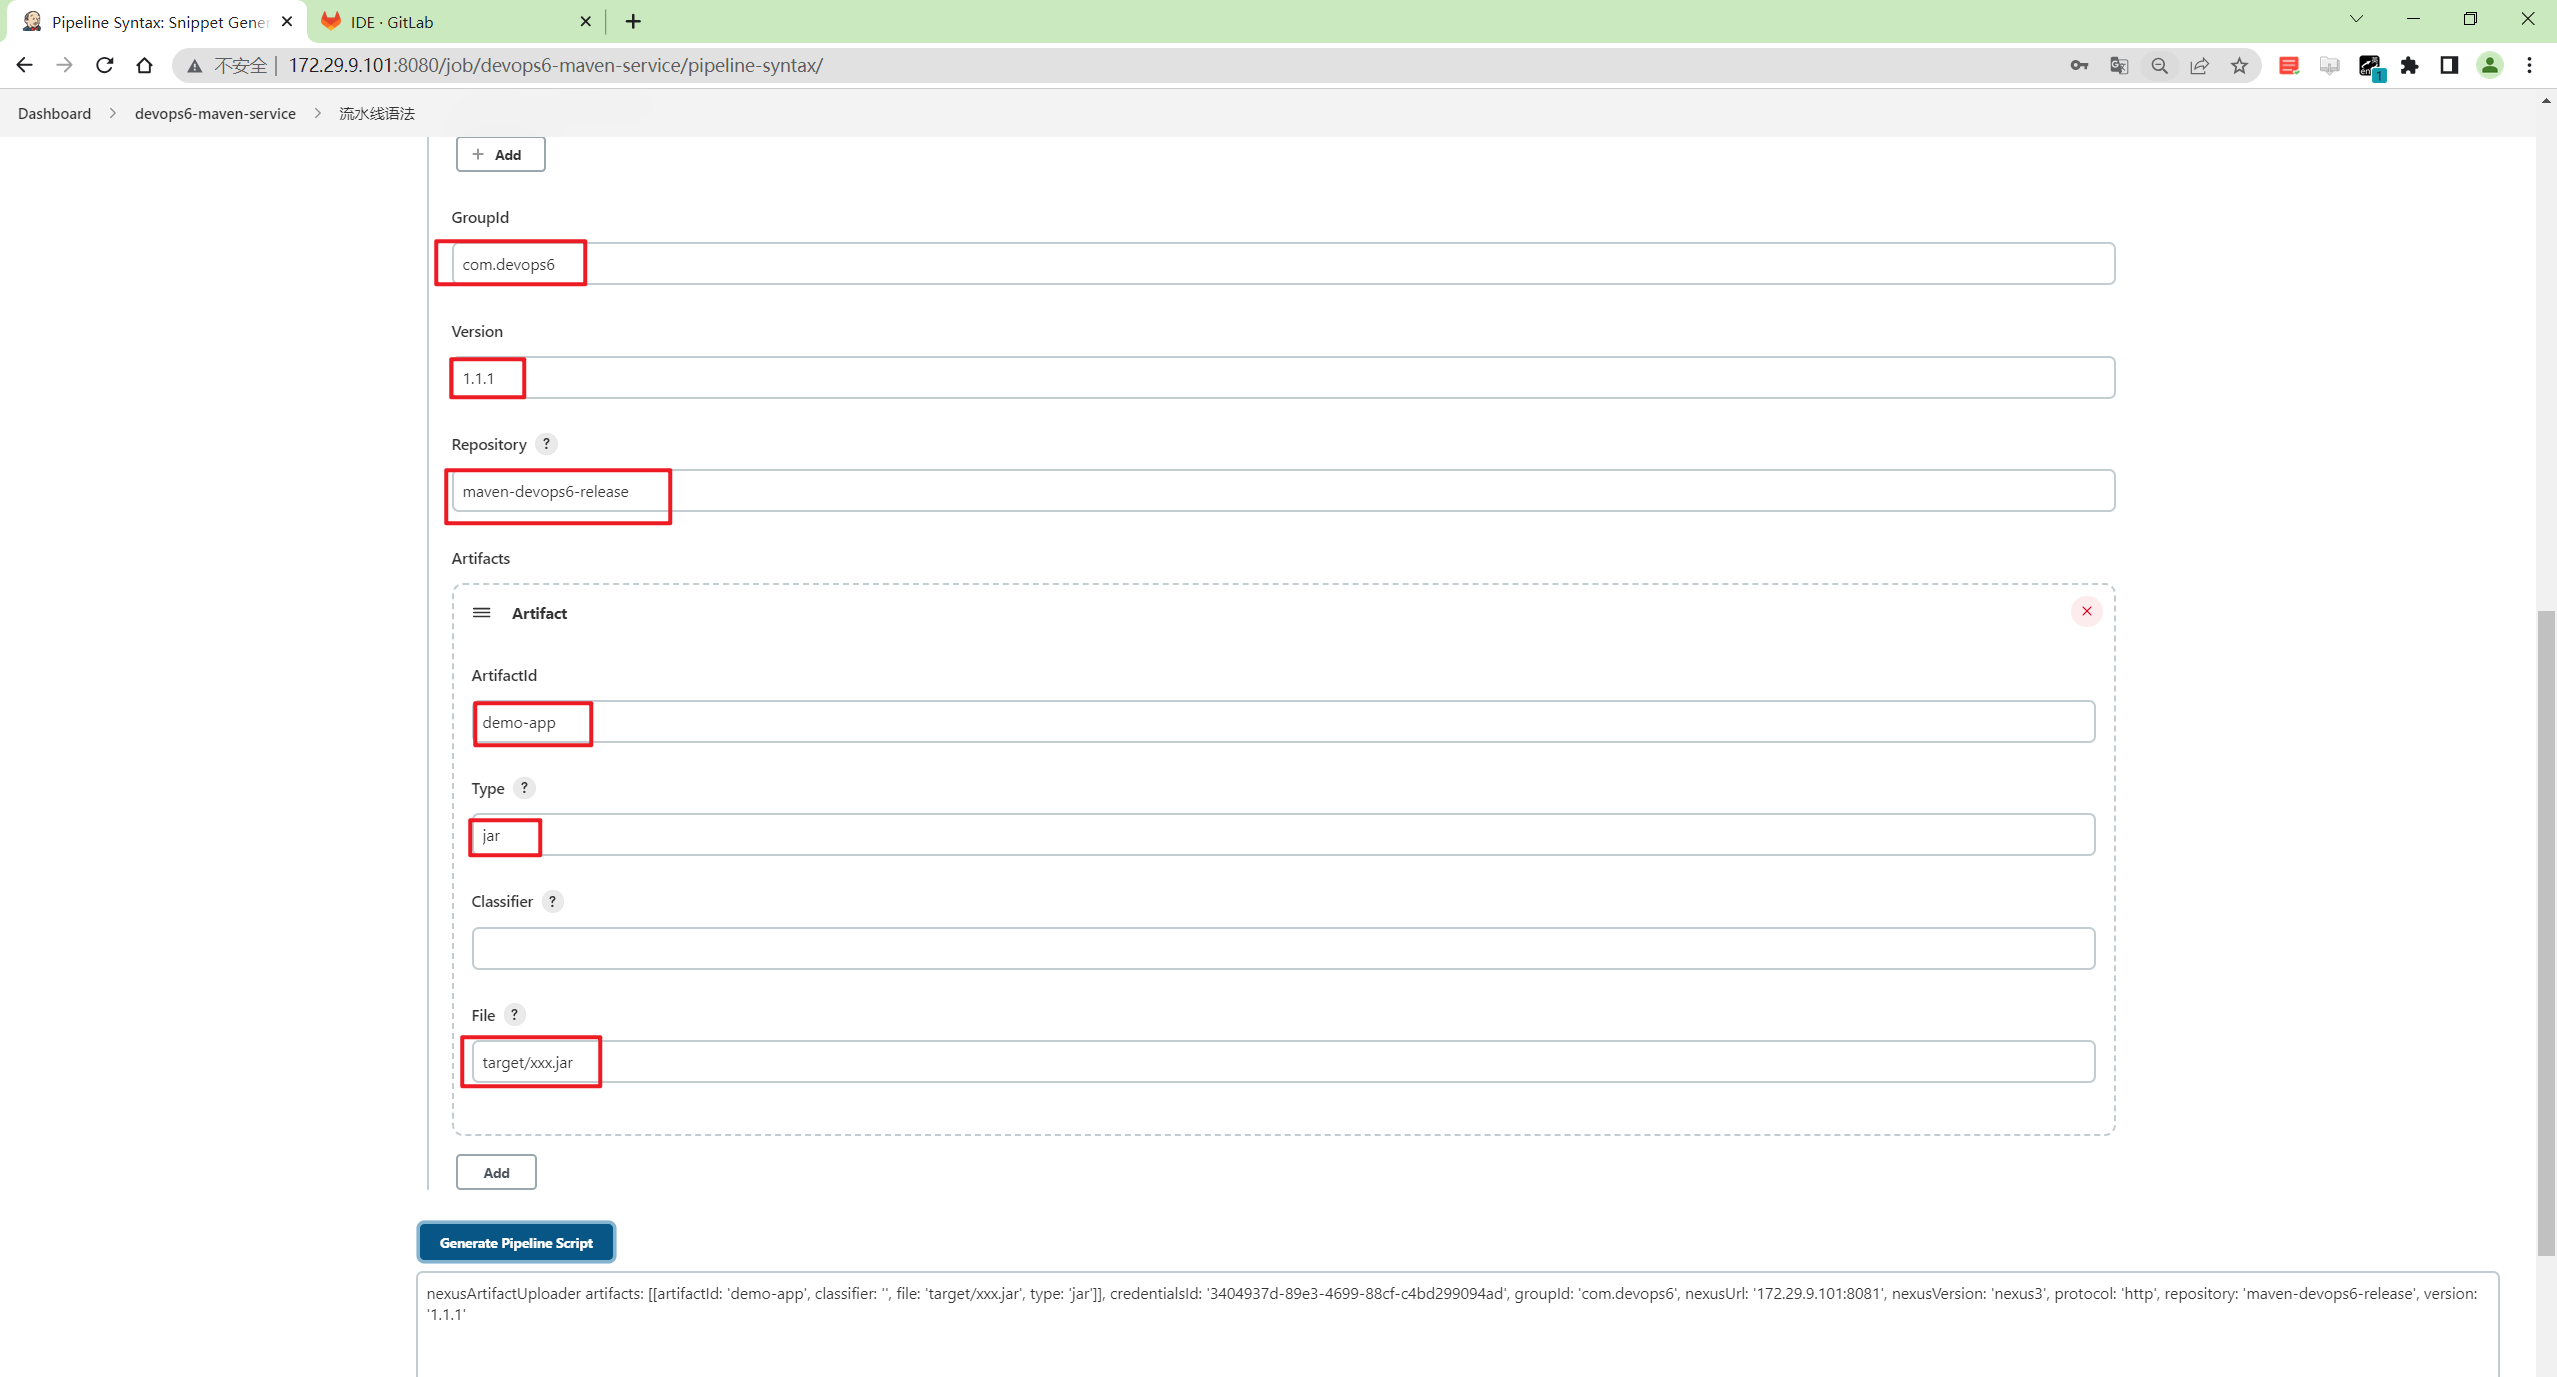
生成代码:
nexusArtifactUploader artifacts: [[artifactId: 'demo-app',
                                   classifier: '',
                                   file: 'target/xxx.jar',
                                   type: 'jar']],
    				credentialsId: '3404937d-89e3-4699-88cf-c4bd299094ad',
    				groupId: 'com.devops6',
    				nexusUrl: '172.29.9.101:8081',
                    nexusVersion: 'nexus3',
                    protocol: 'http',
                    repository: 'maven-devops6-release',
                    version: '1.1.1'
调整下格式:
nexusArtifactUploader artifacts: [[artifactId: 'demo-app',
classifier: '',
file: 'target/xxx.jar',
type: 'jar']],
credentialsId: '3404937d-89e3-4699-88cf-c4bd299094ad',
groupId: 'com.devops6',
nexusUrl: '172.29.9.101:8081',
nexusVersion: 'nexus3',
protocol: 'http',
repository: 'maven-devops6-release',
version: '1.1.1'
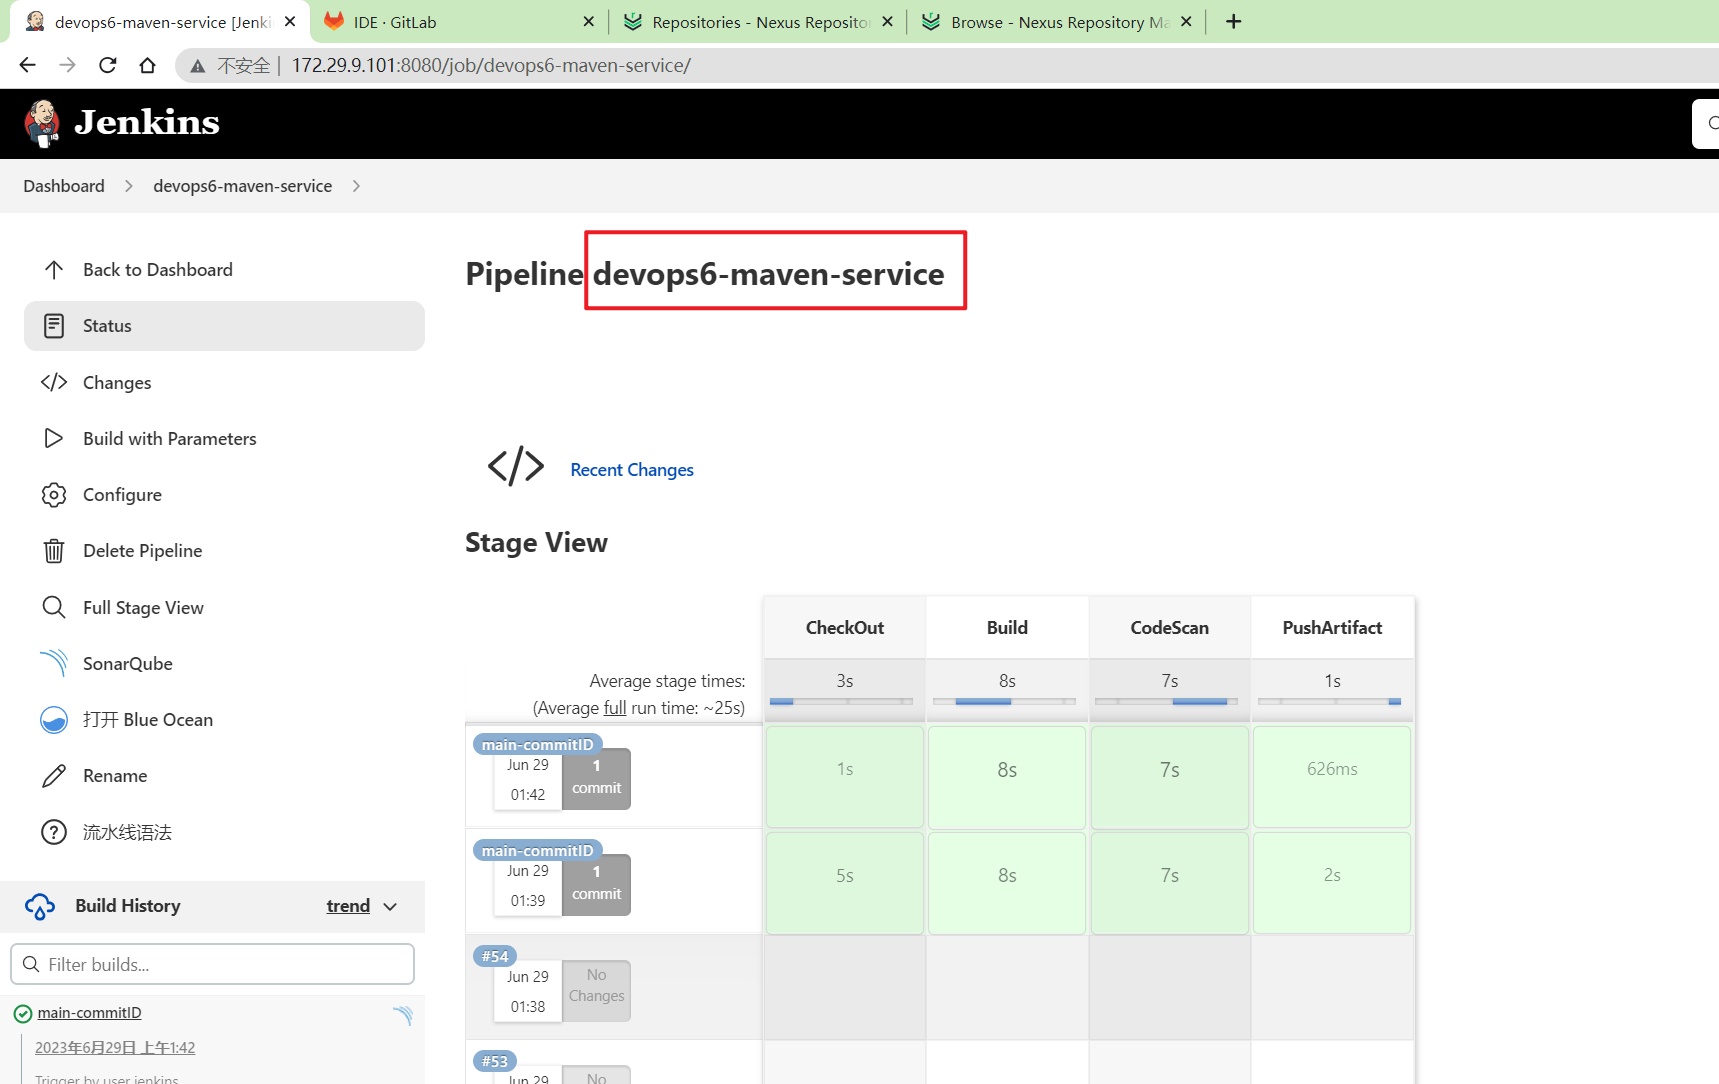
- 这边来到jenkins的
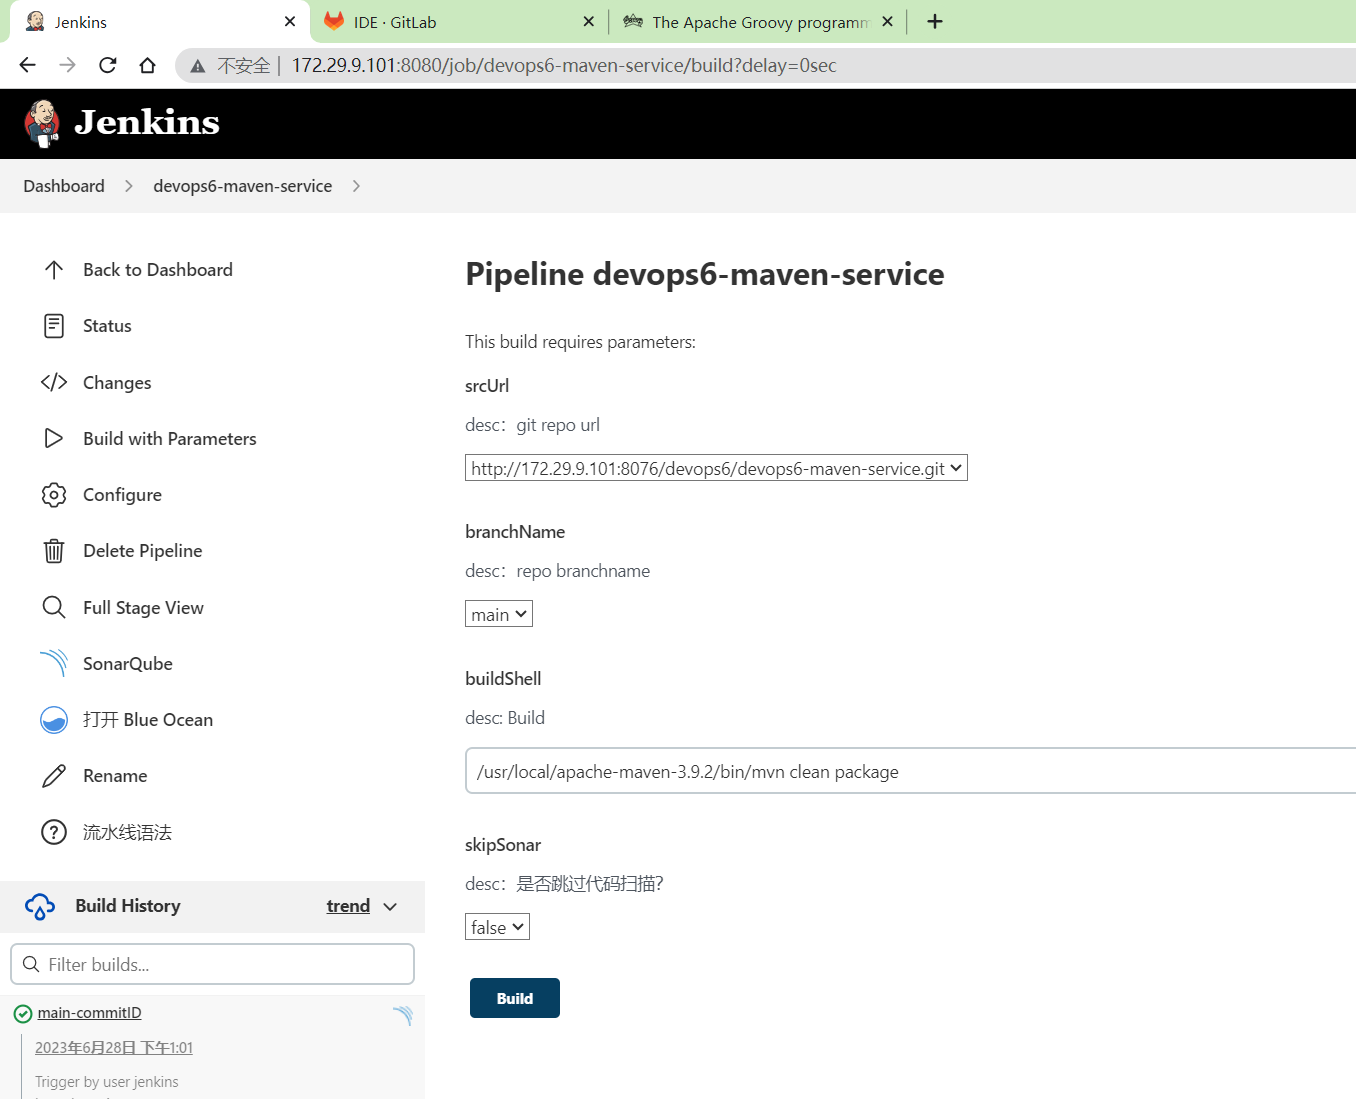
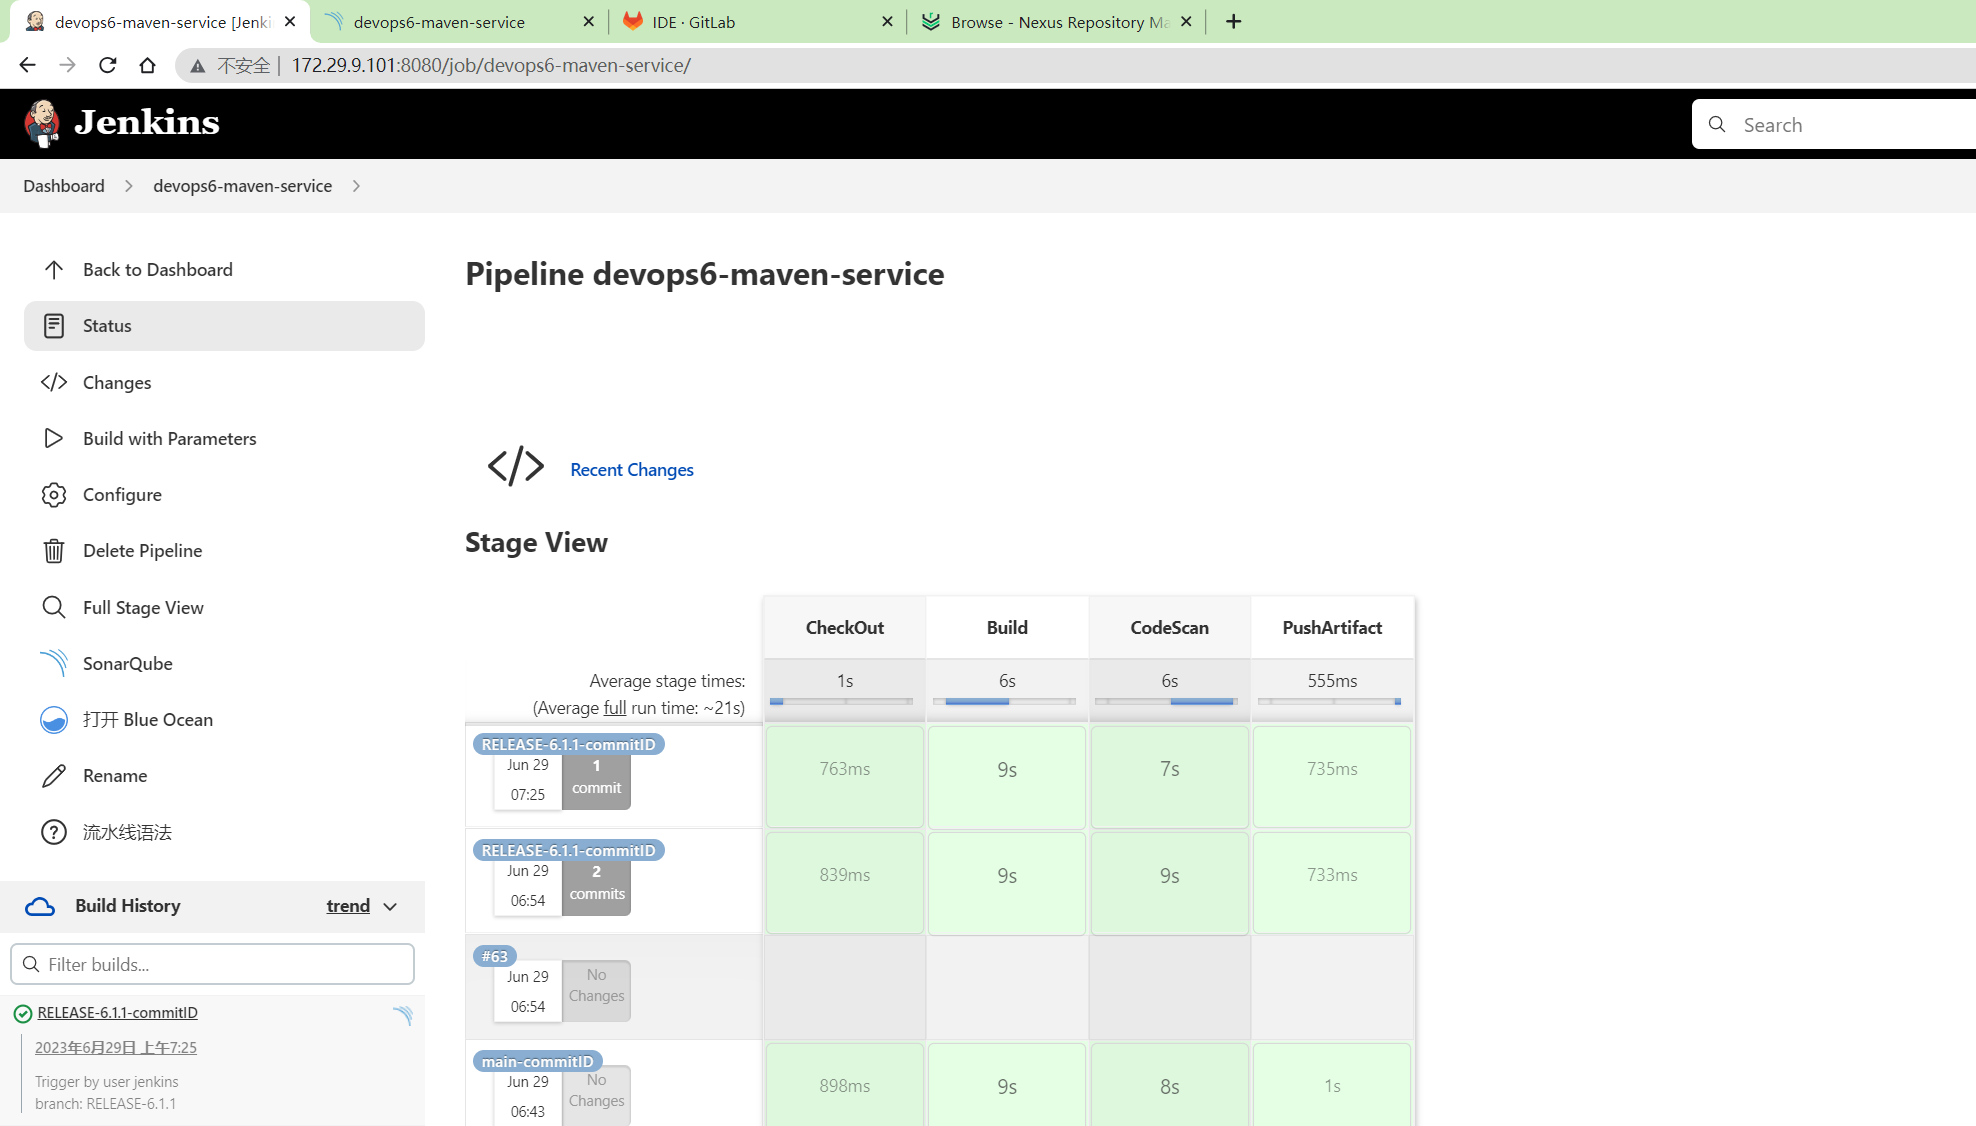
devops6-maven-service项目里,先跑一次流水线看下有问题没:

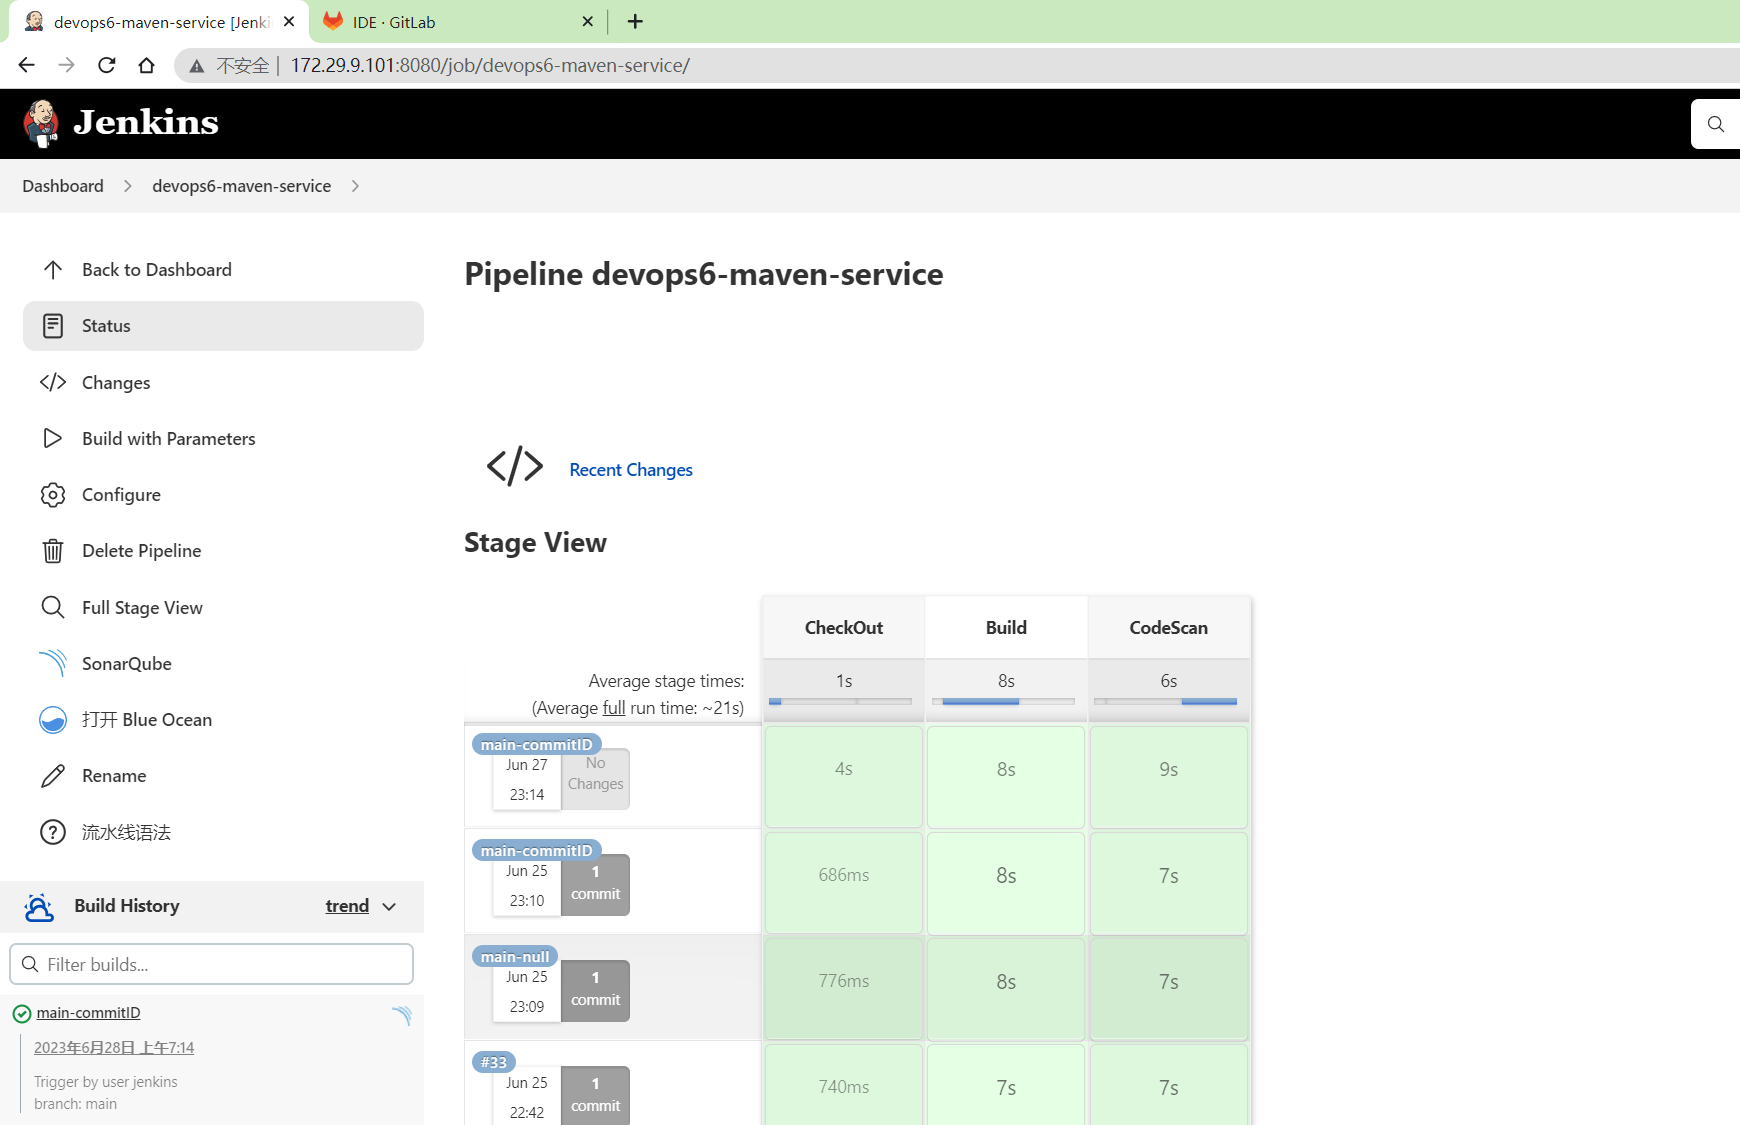
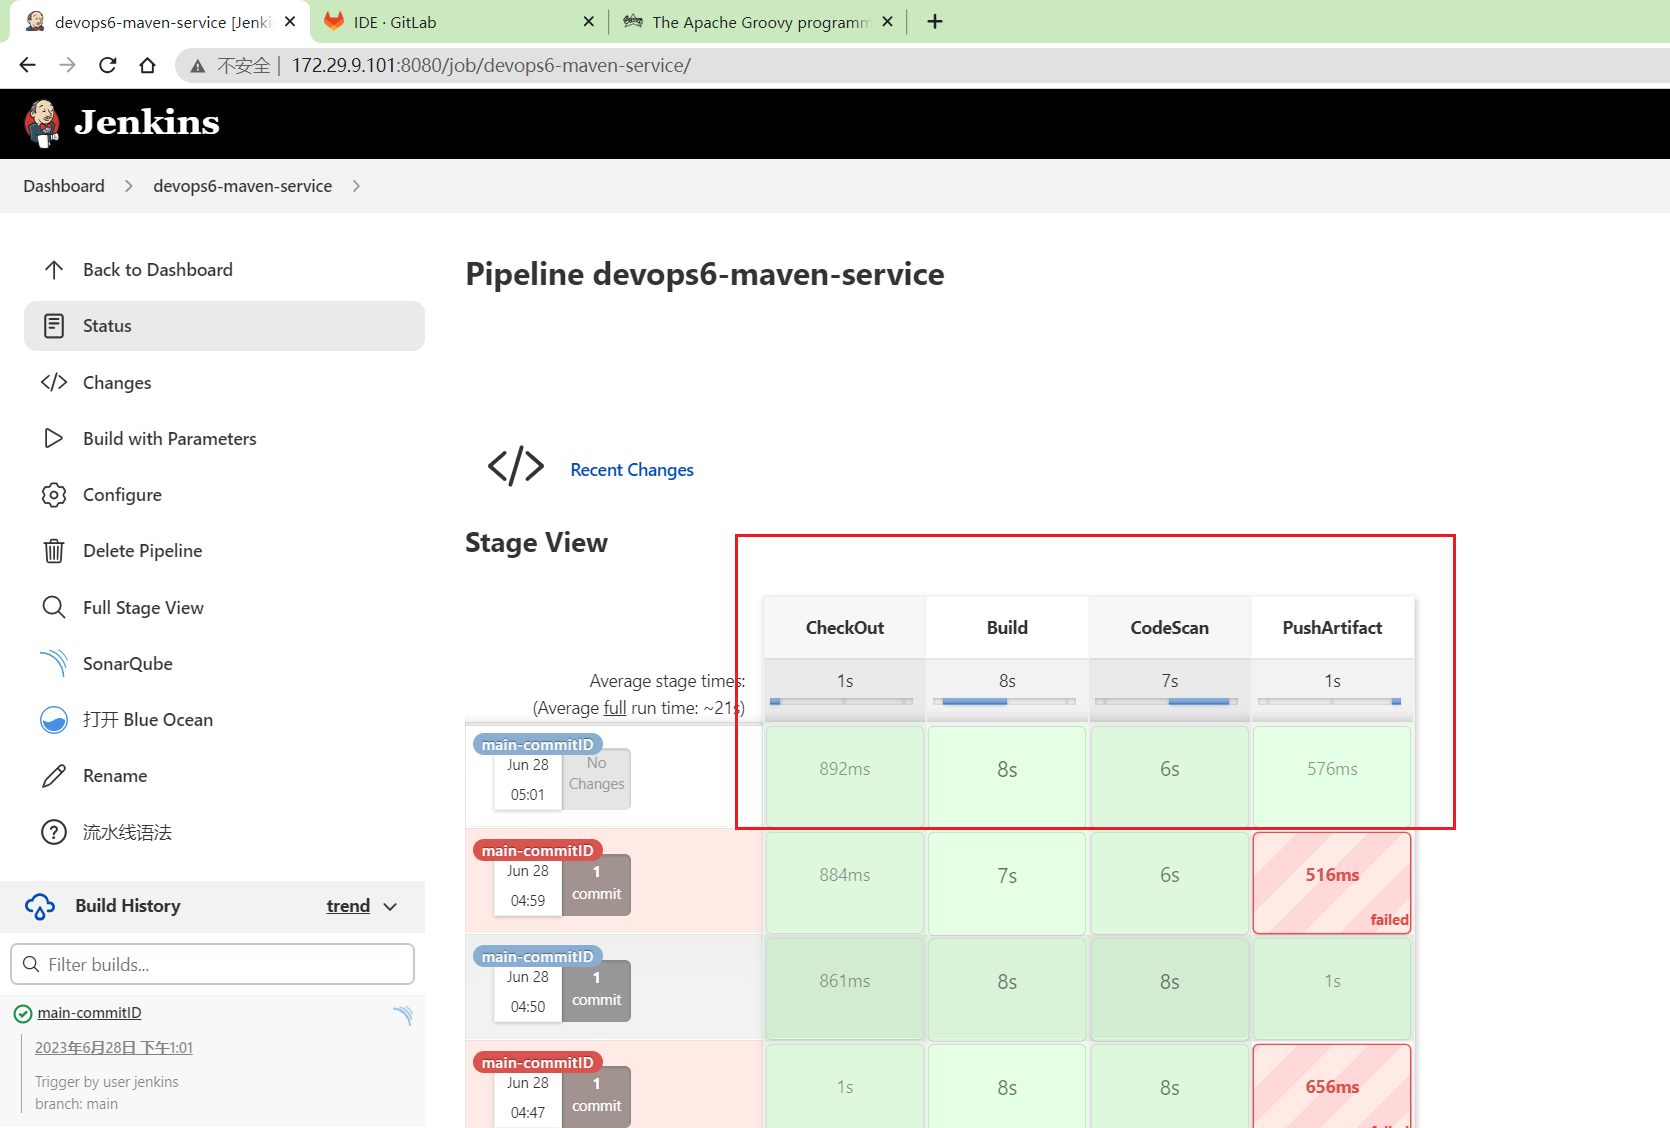
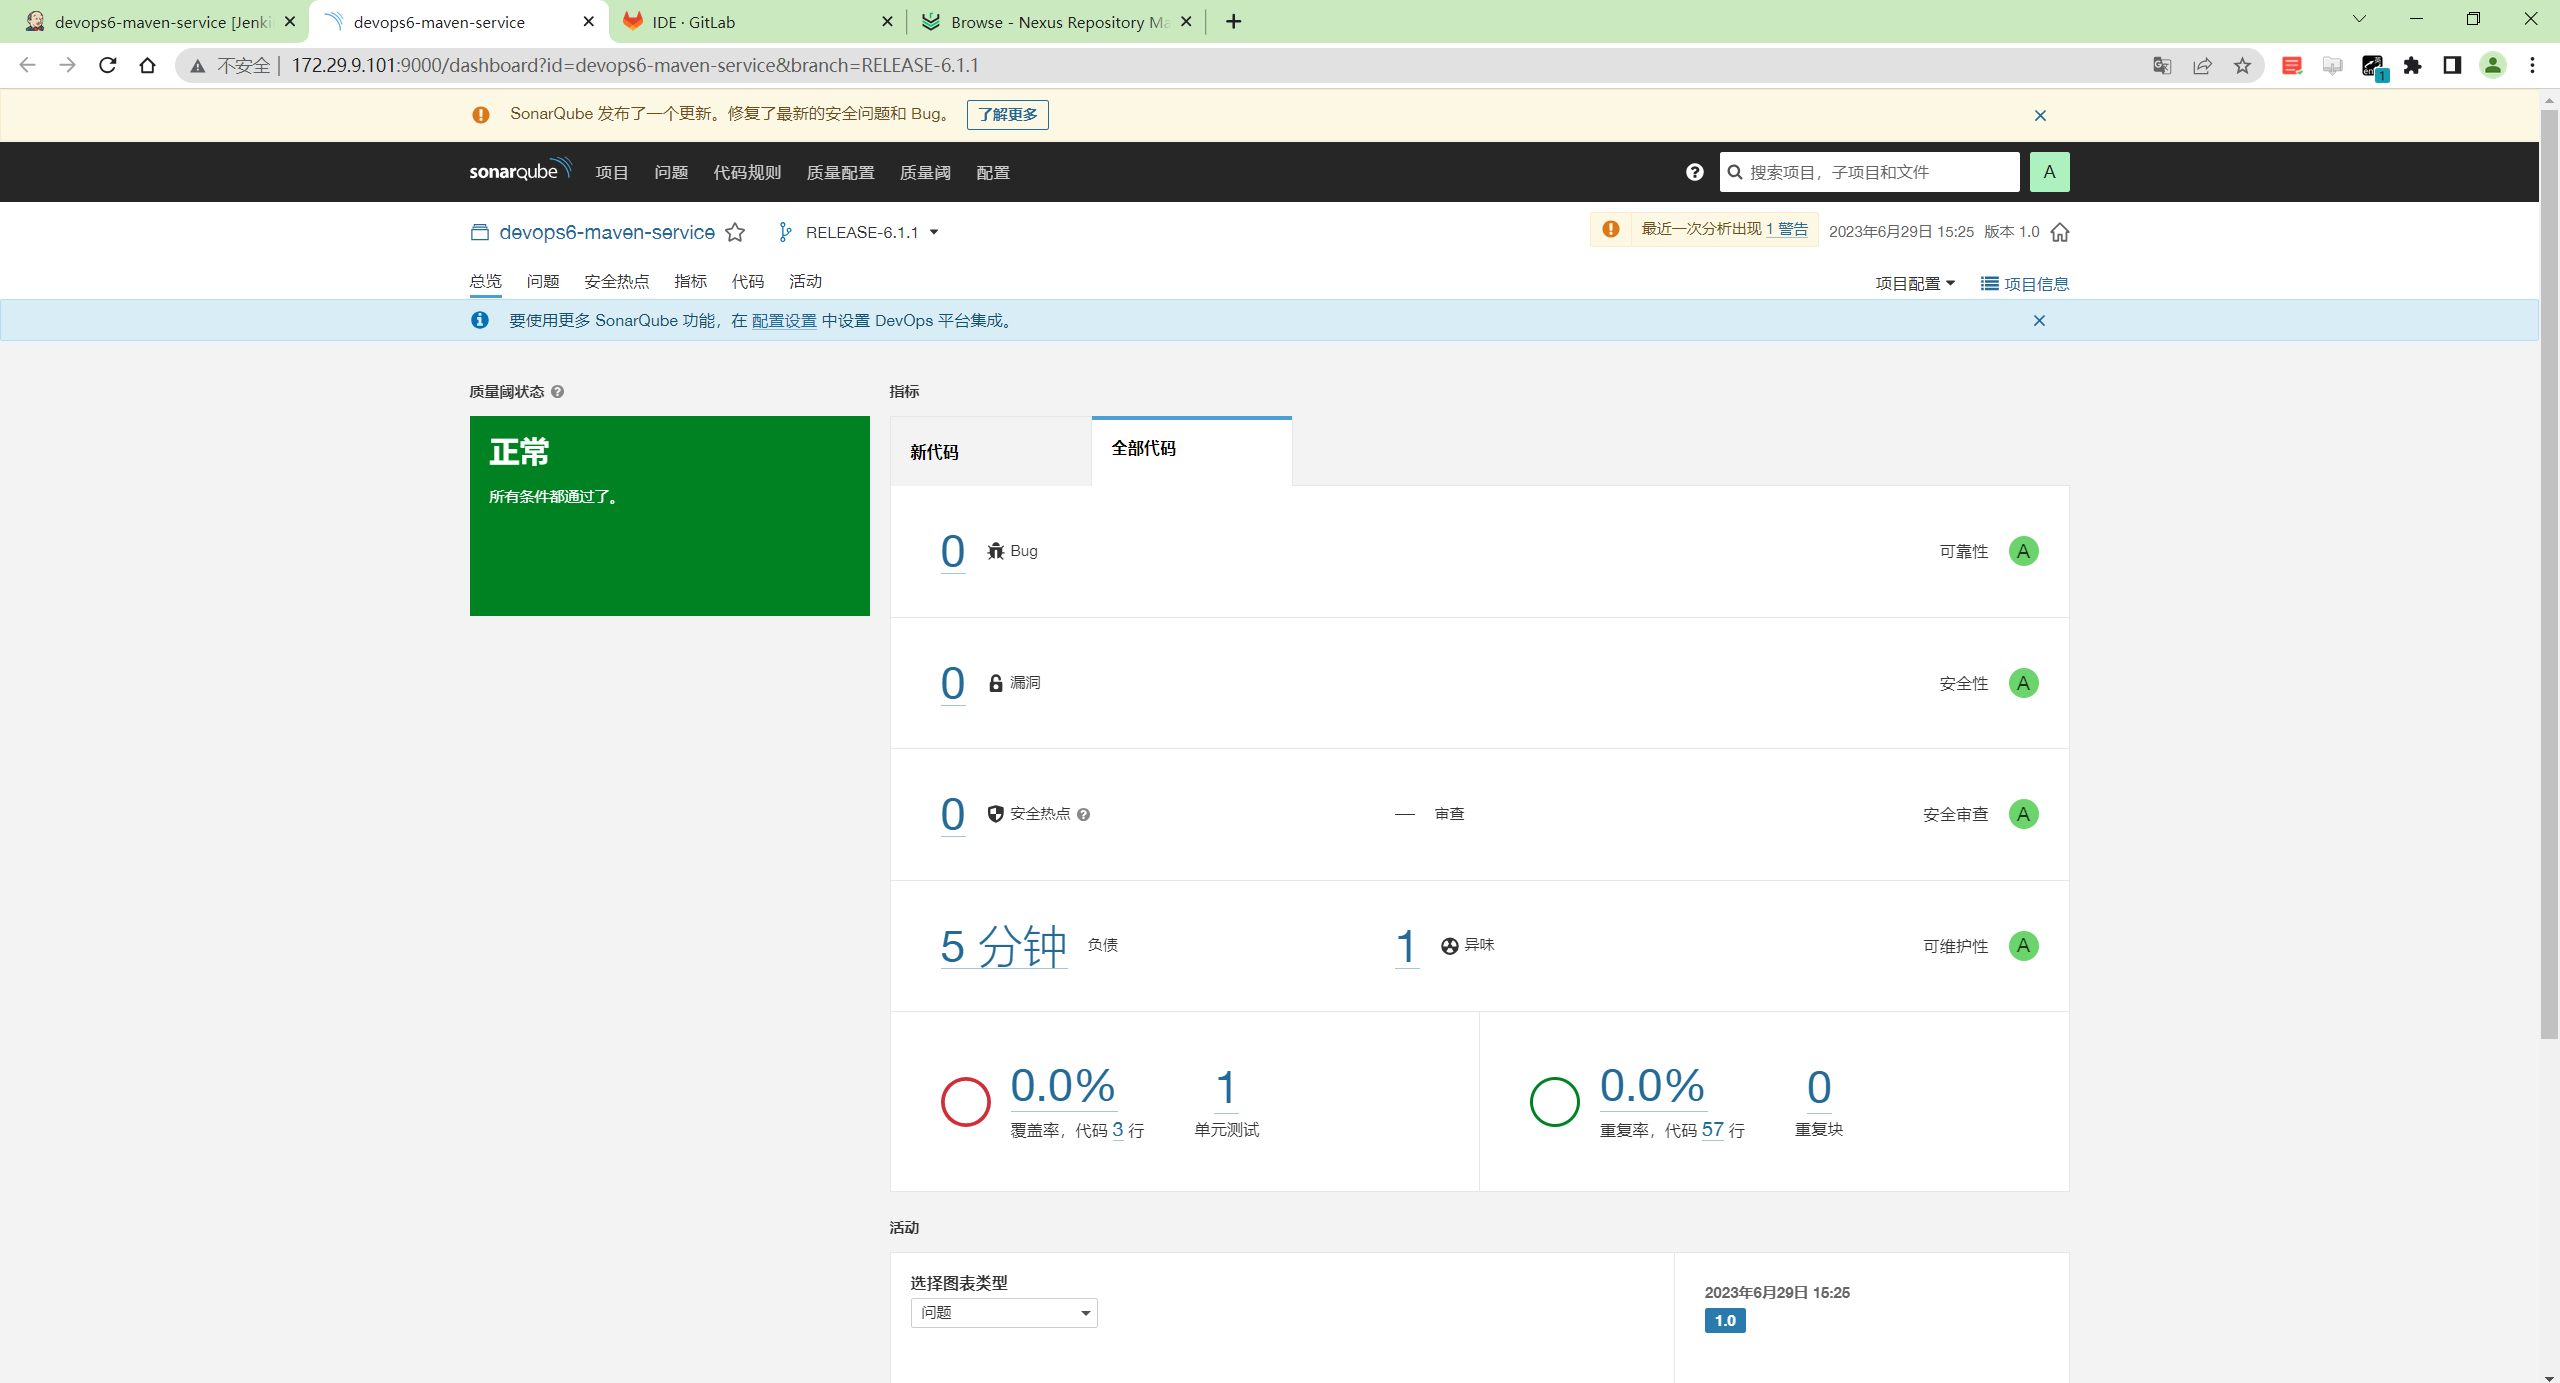
可以看到流水线是ok的。
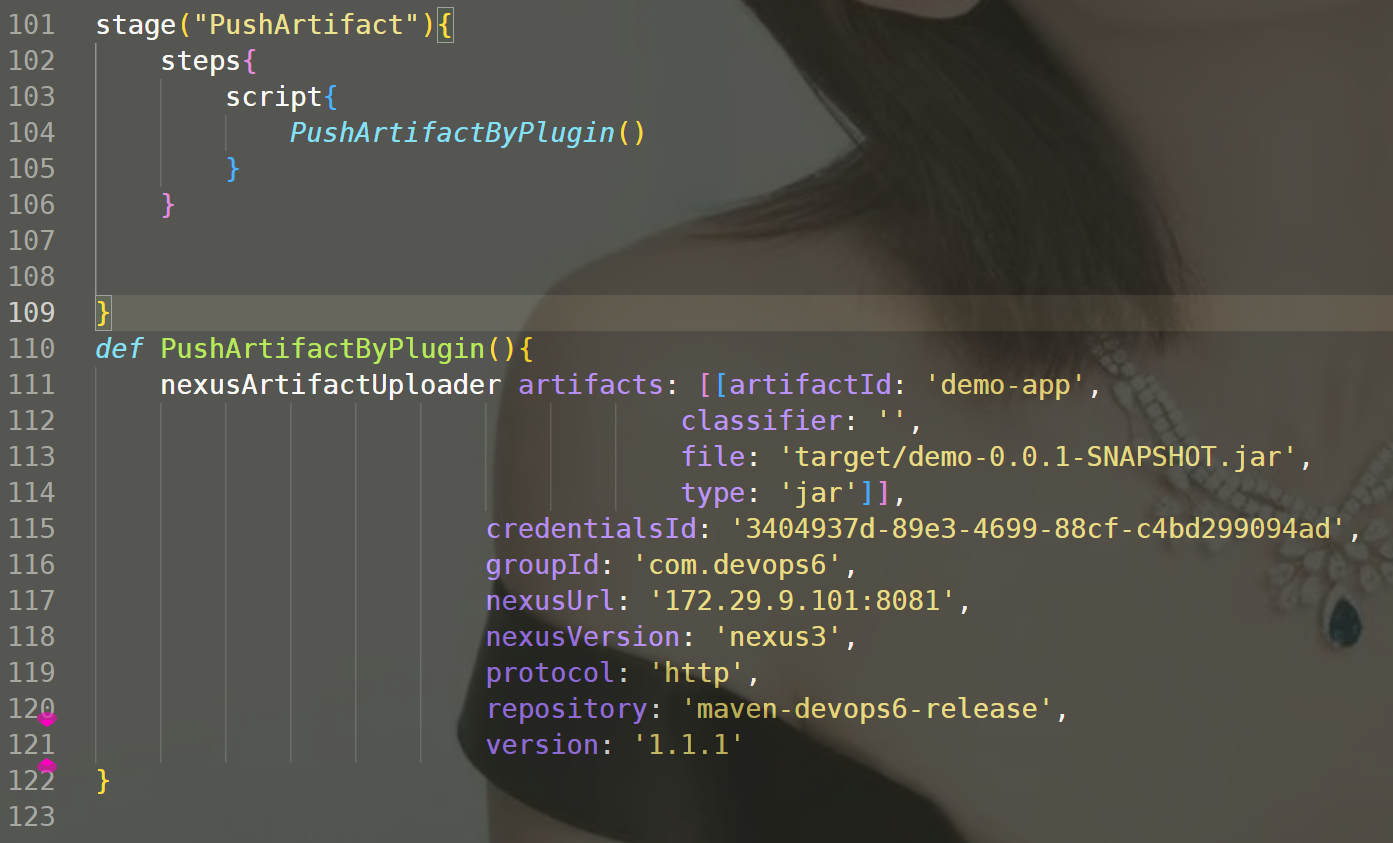
- 我们再来写一下流水线代码:
stage("PushArtifact"){
	steps{
		script{
			PushArtifactByPlugin()
		}
	}


}
def PushArtifactByPlugin(){
    nexusArtifactUploader artifacts: [[artifactId: 'demo-app',
                                    classifier: '',
                                    file: 'target/demo-0.0.1-SNAPSHOT.jar',
                                    type: 'jar']],
                        credentialsId: '3404937d-89e3-4699-88cf-c4bd299094ad',
                        groupId: 'com.devops6',
                        nexusUrl: '172.29.9.101:8081',
                        nexusVersion: 'nexus3',
                        protocol: 'http',
                        repository: 'maven-devops6-release',
                        version: '1.1.1'
}
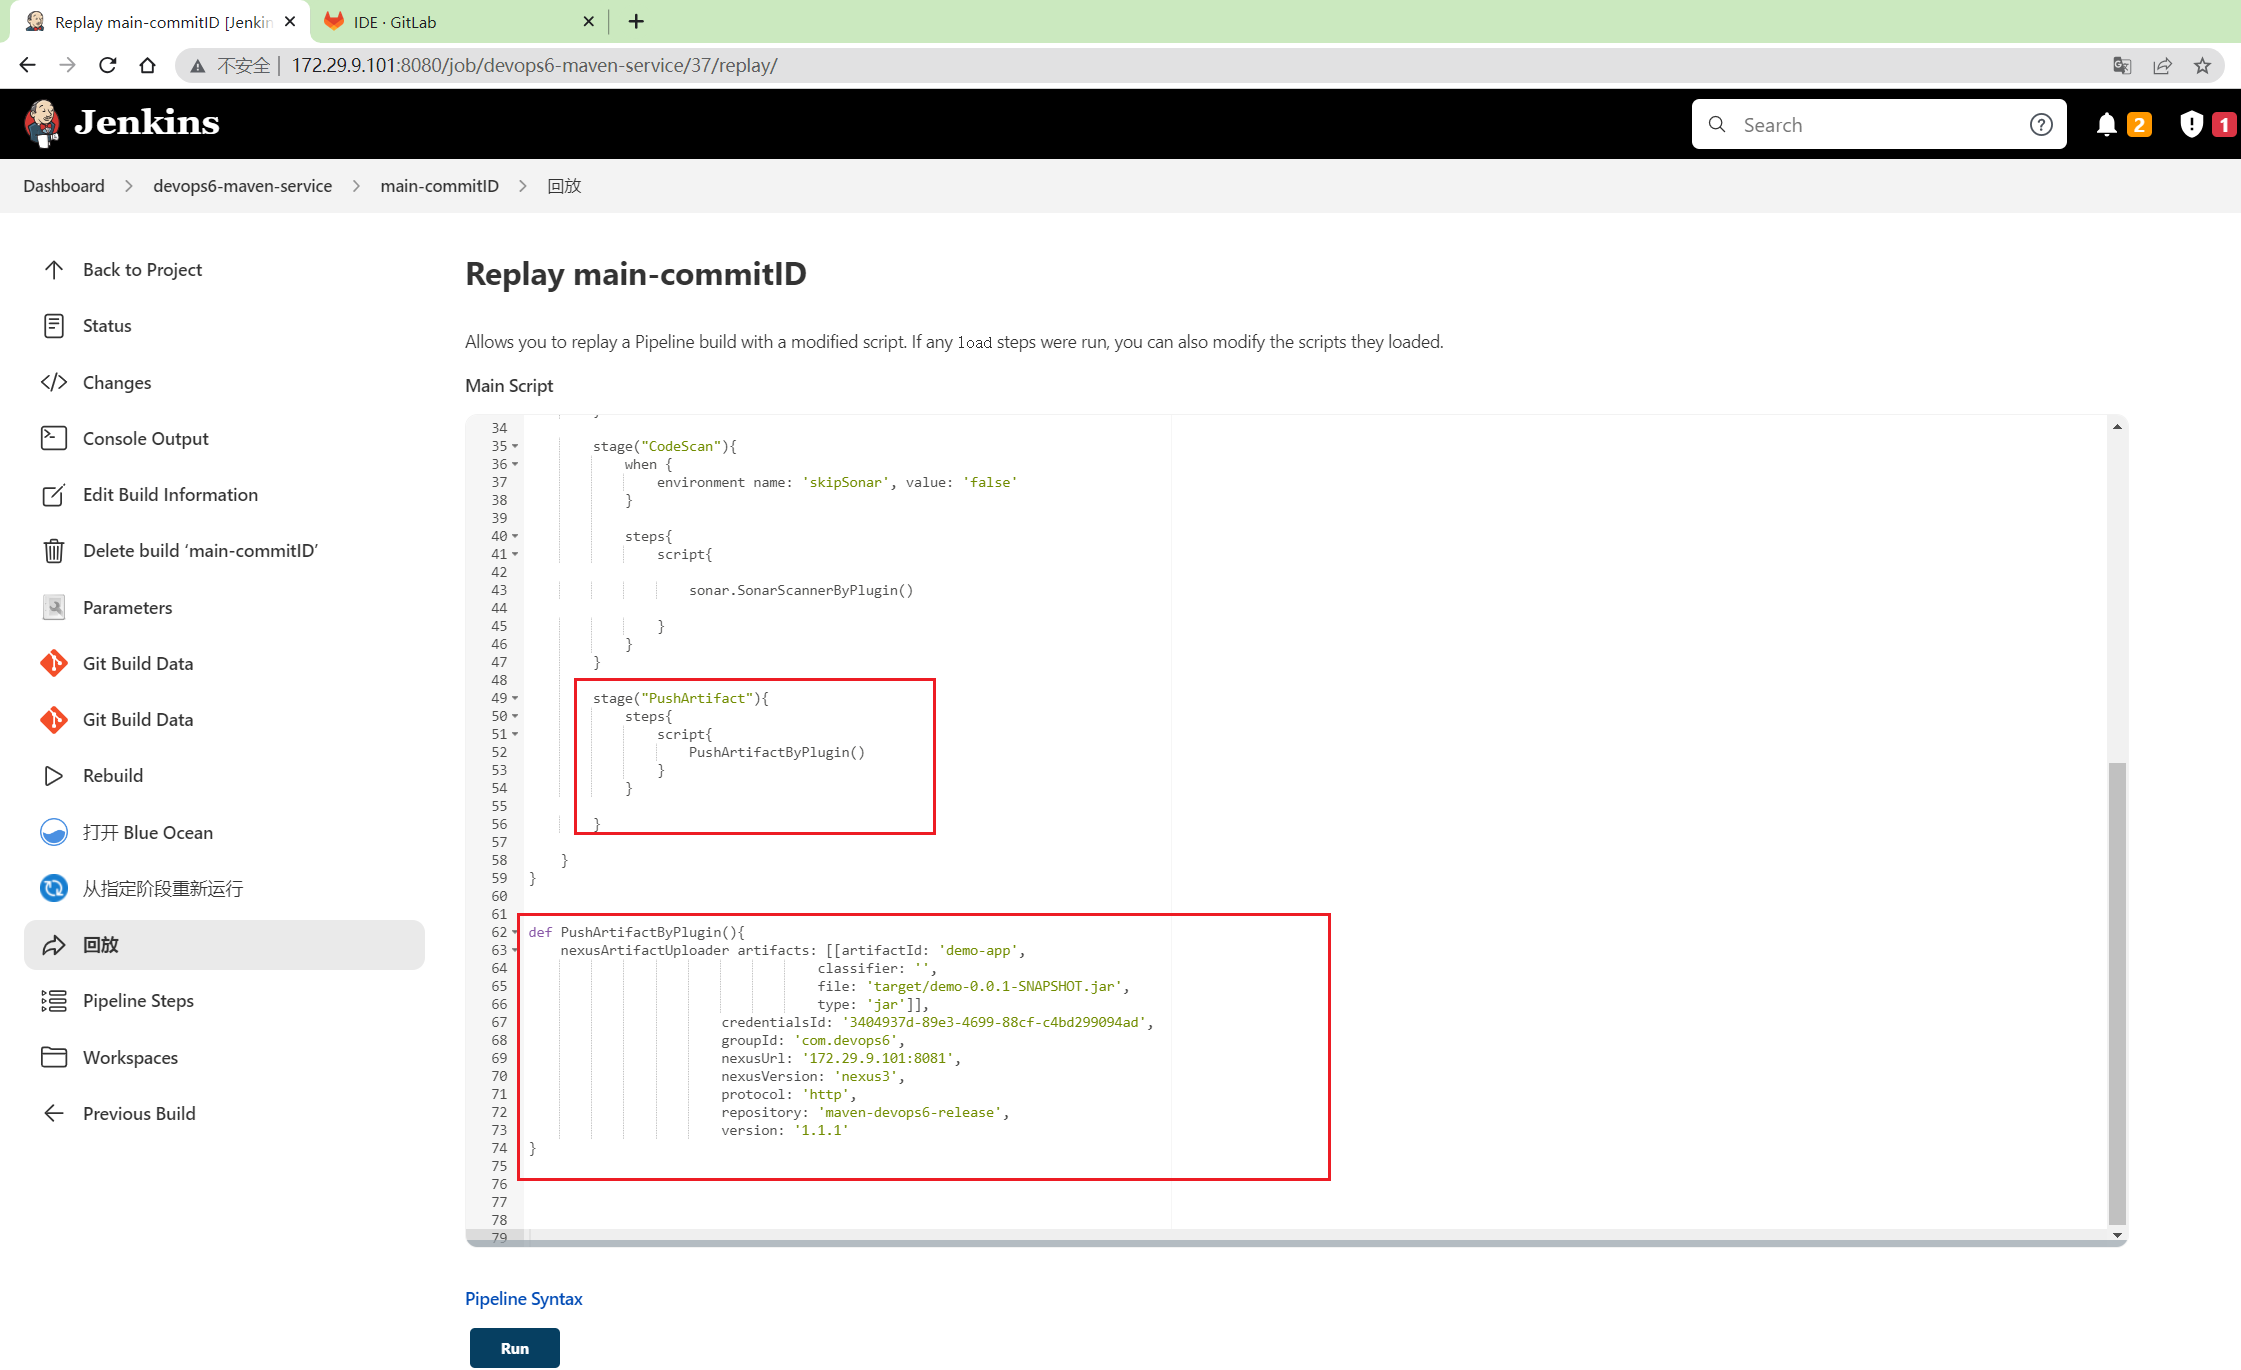
然后把这个代码放到上面项目的回放里,跑一次:
@Library("devops06@main") _

//import src/org/devops/Build.groovy
def build = new org.devops.Build()
def sonar = new org.devops.Sonar()

currentBuild.displayName = "${env.branchName}-commitID"
currentBuild.description = "Trigger by user jenkins \n branch: ${env.branchName}"

pipeline {
    agent {label "build"}
    options {
        skipDefaultCheckout true
    }


    stages{
        stage("CheckOut"){
            steps{
                script{
                    build.CheckOut()
                }
            }
        }

        stage("Build"){
            steps{
                script{
                    build.Build()
                }
            }

        }

        stage("CodeScan"){
            when {
                environment name: 'skipSonar', value: 'false'
            }

            steps{
                script{

                    sonar.SonarScannerByPlugin()

                }
            }
        }

        stage("PushArtifact"){
            steps{
                script{
                    PushArtifactByPlugin()
                }
            }

        }

    }
}


def PushArtifactByPlugin(){
    nexusArtifactUploader artifacts: [[artifactId: 'demo-app',
                                    classifier: '',
                                    file: 'target/demo-0.0.1-SNAPSHOT.jar',
                                    type: 'jar']],
                        credentialsId: '3404937d-89e3-4699-88cf-c4bd299094ad',
                        groupId: 'com.devops6',
                        nexusUrl: '172.29.9.101:8081',
                        nexusVersion: 'nexus3',
                        protocol: 'http',
                        repository: 'maven-devops6-release',
                        version: '1.1.1'
}
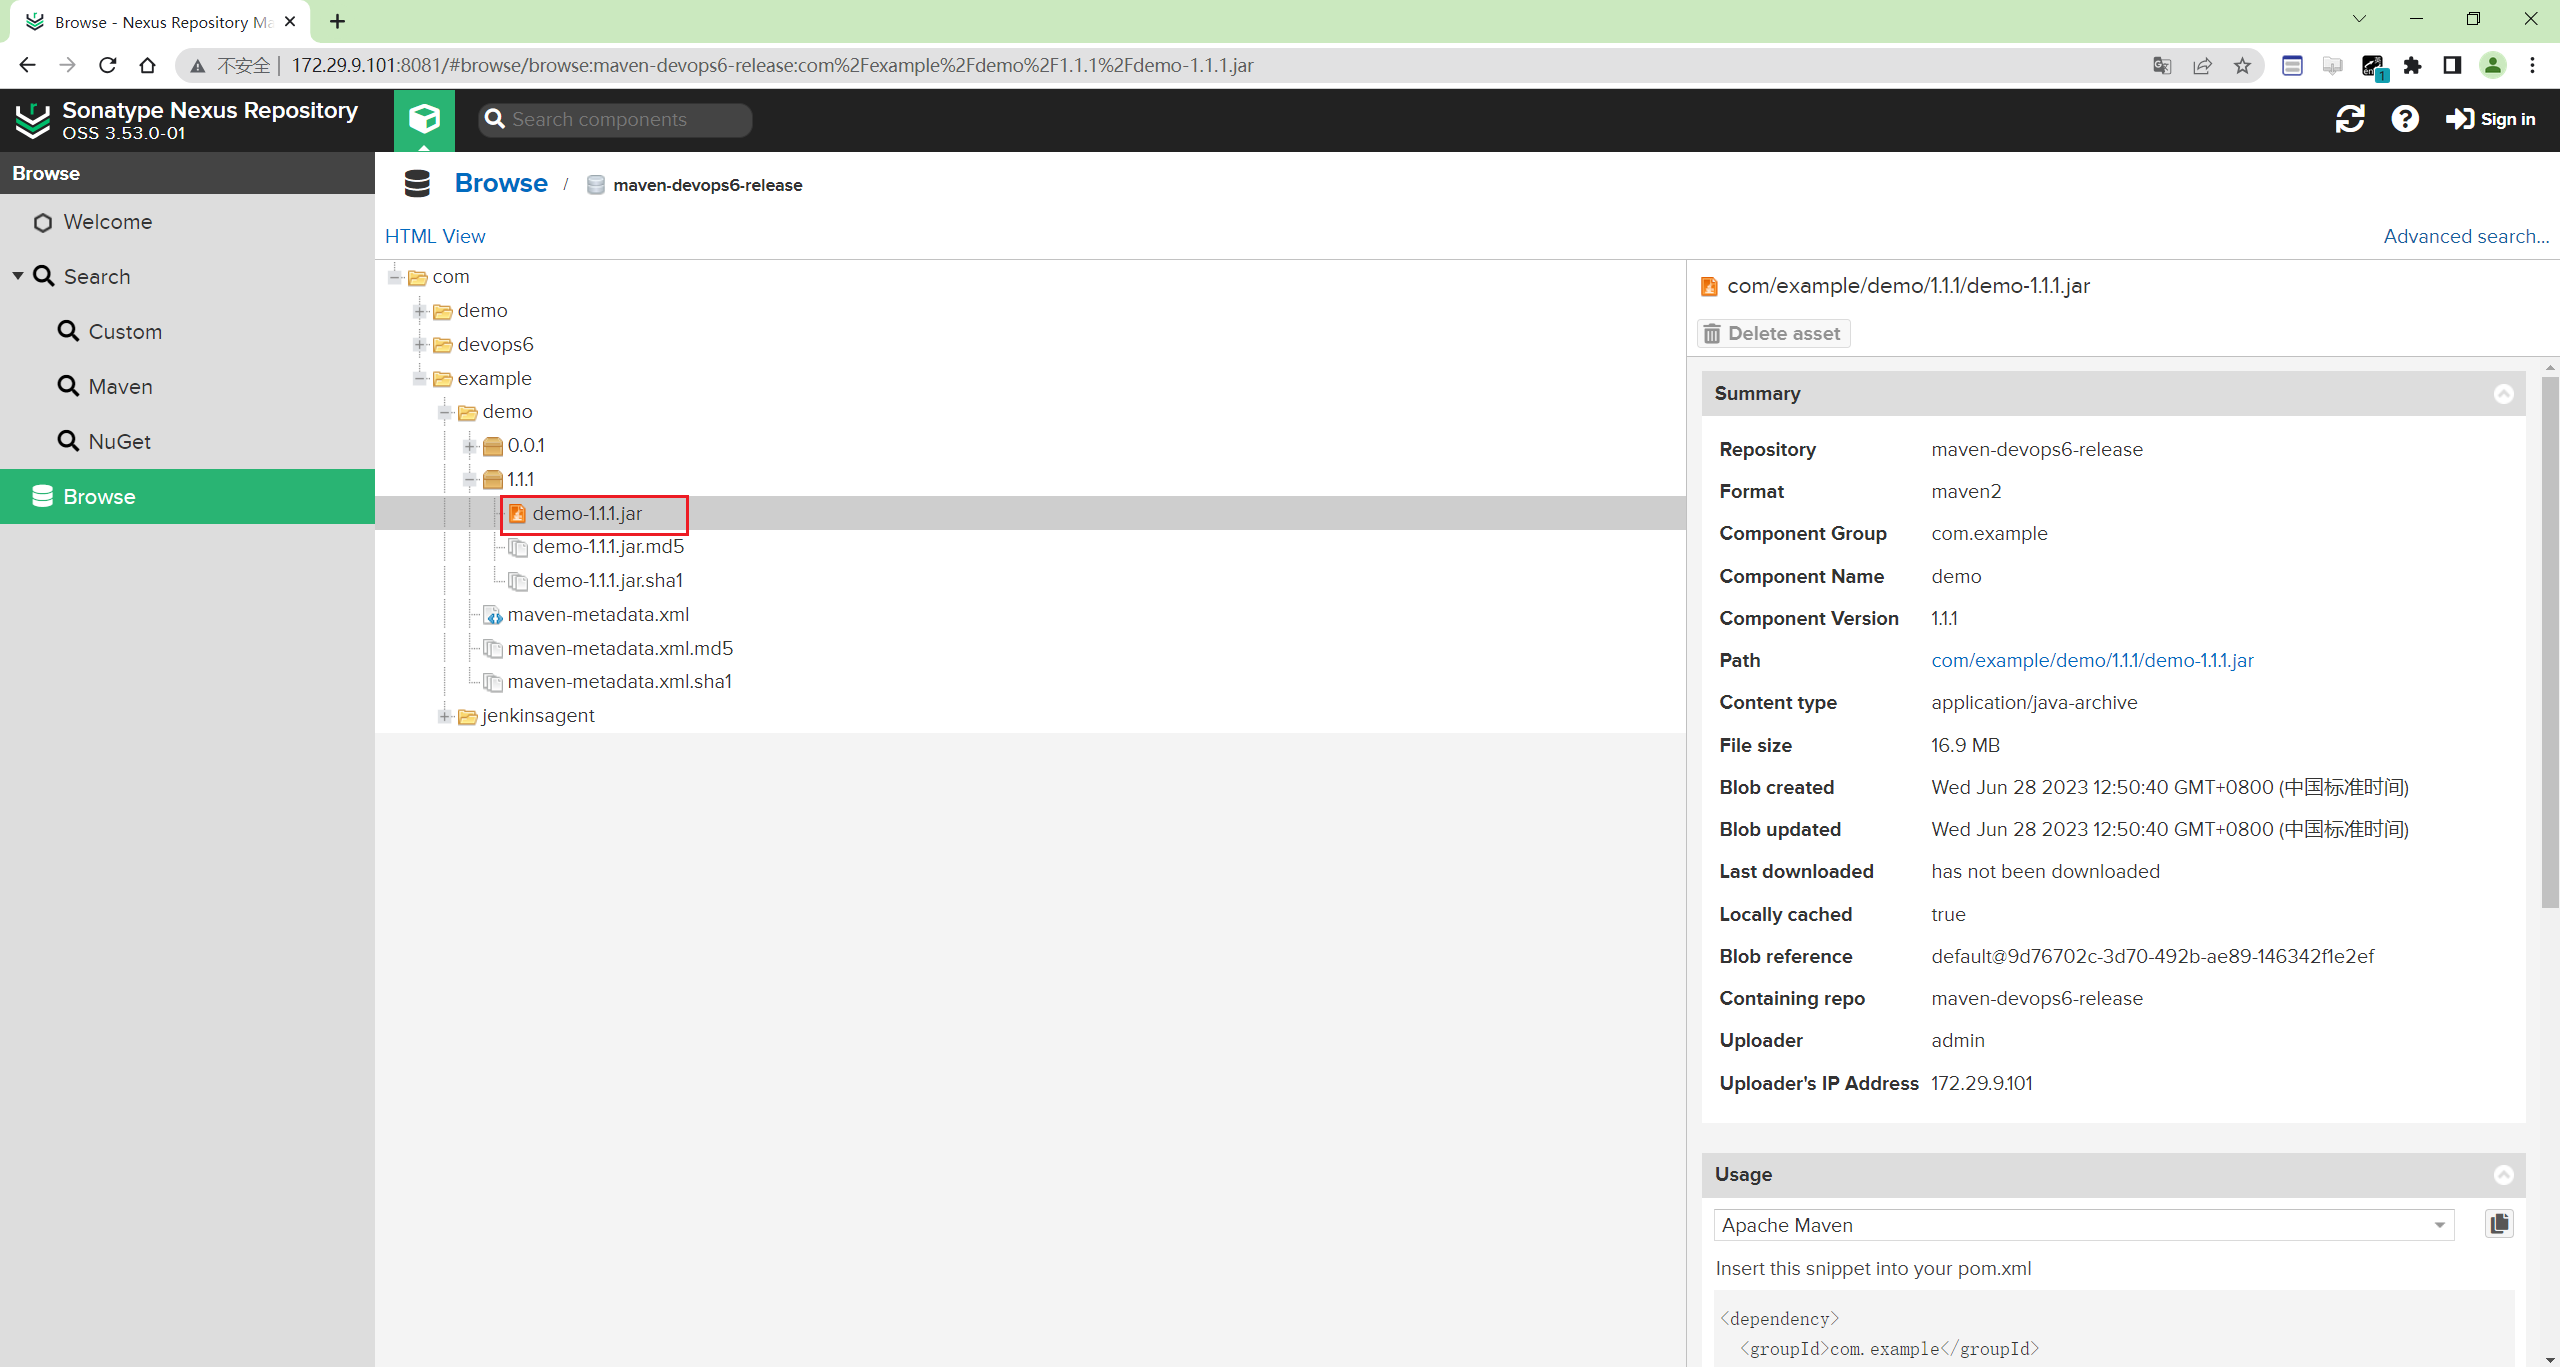
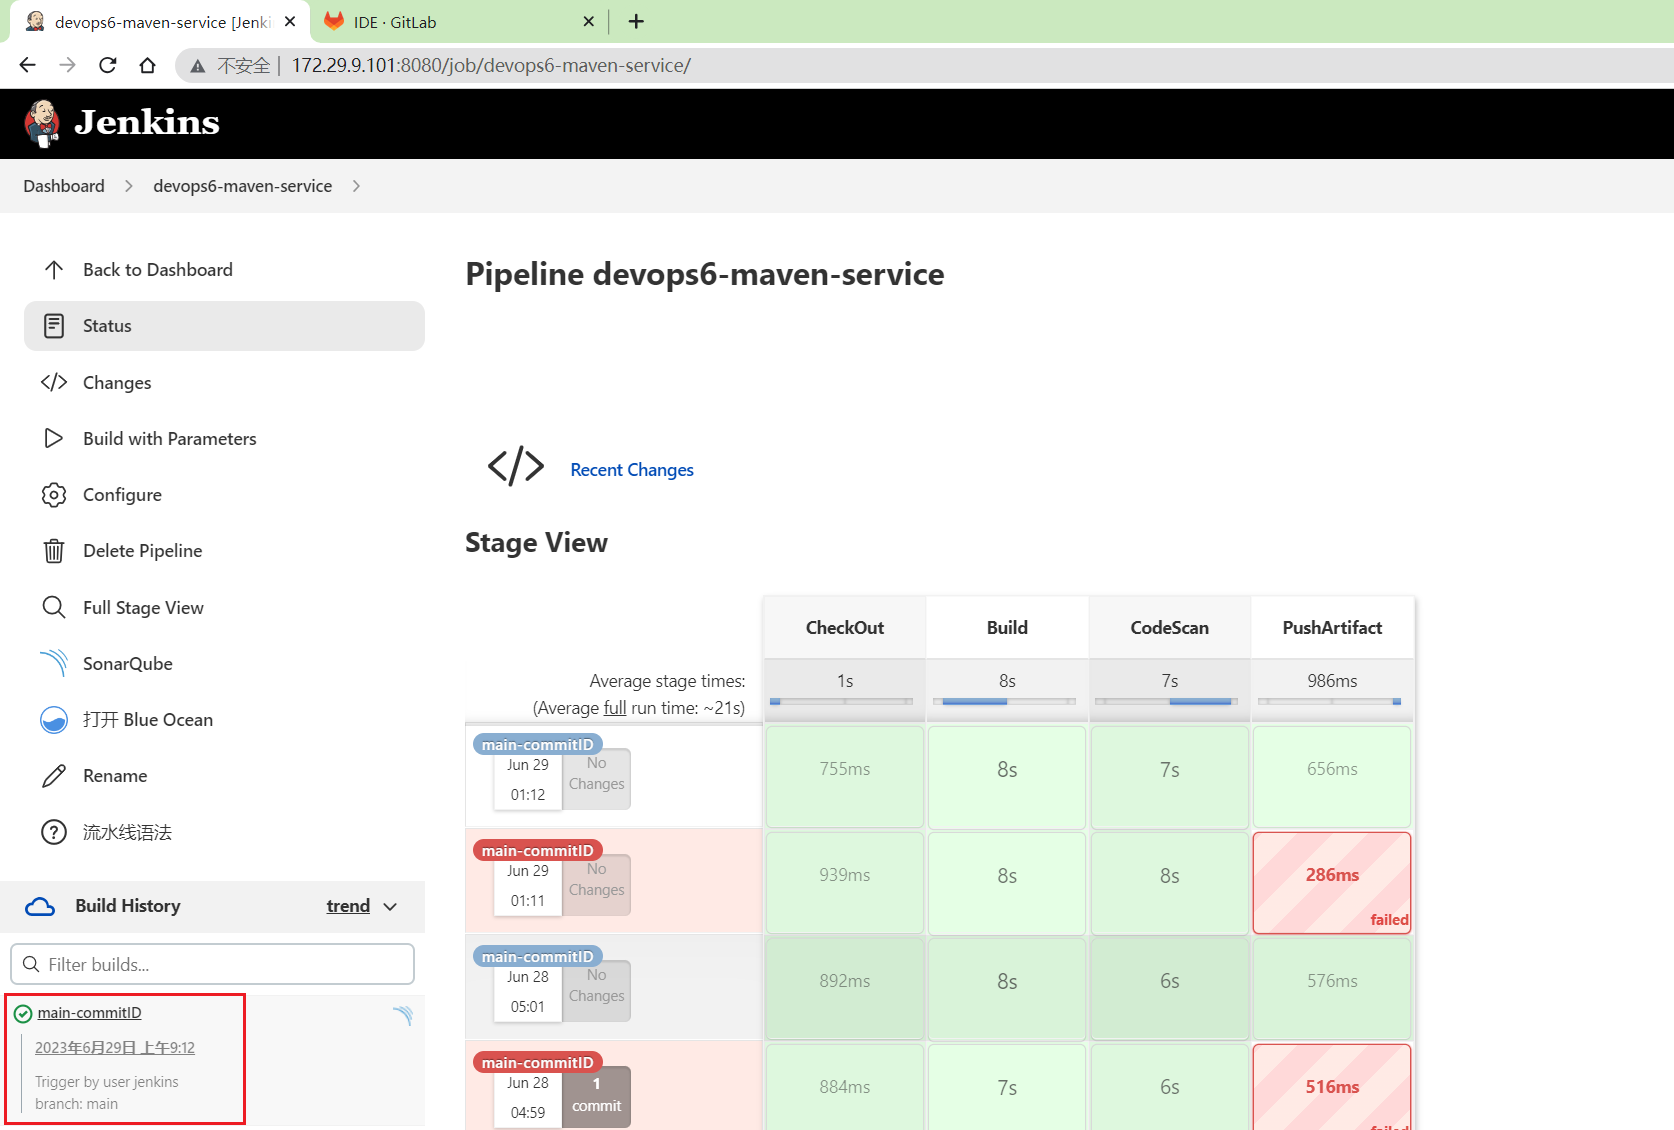
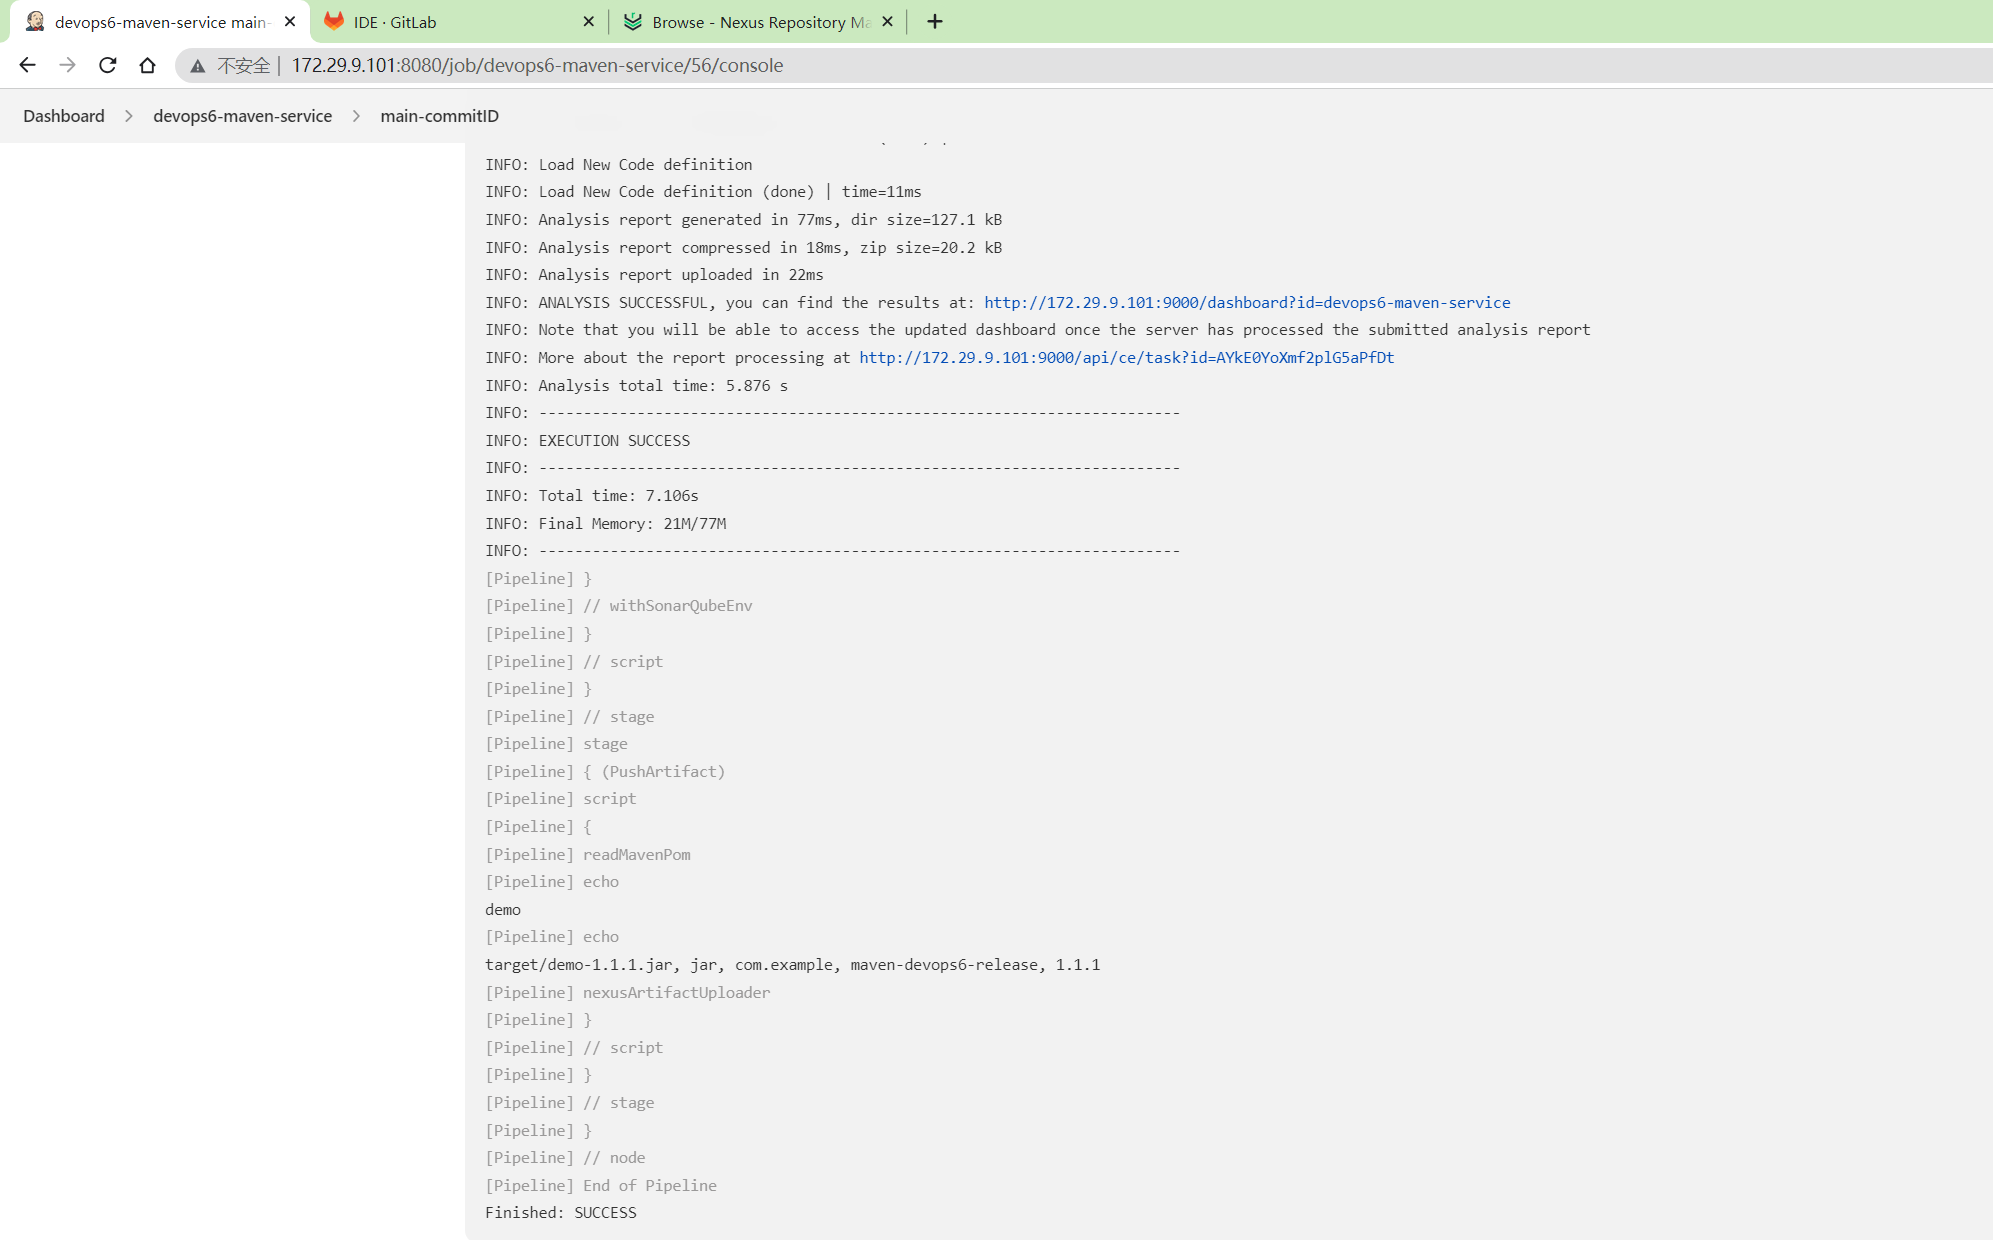
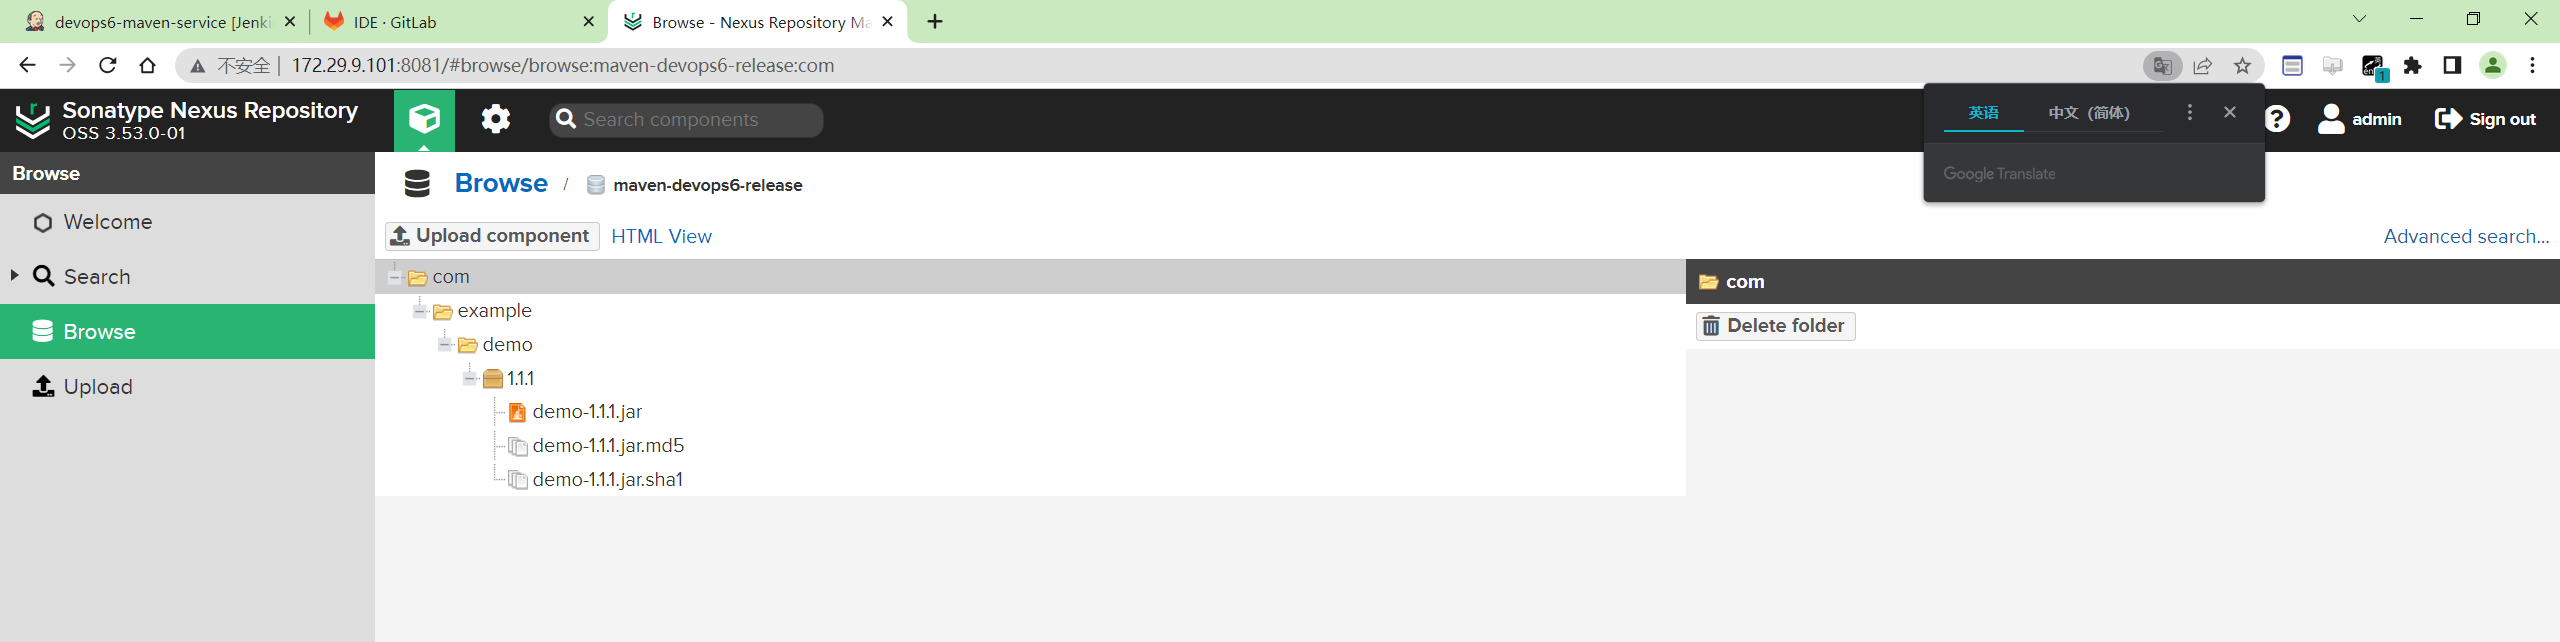
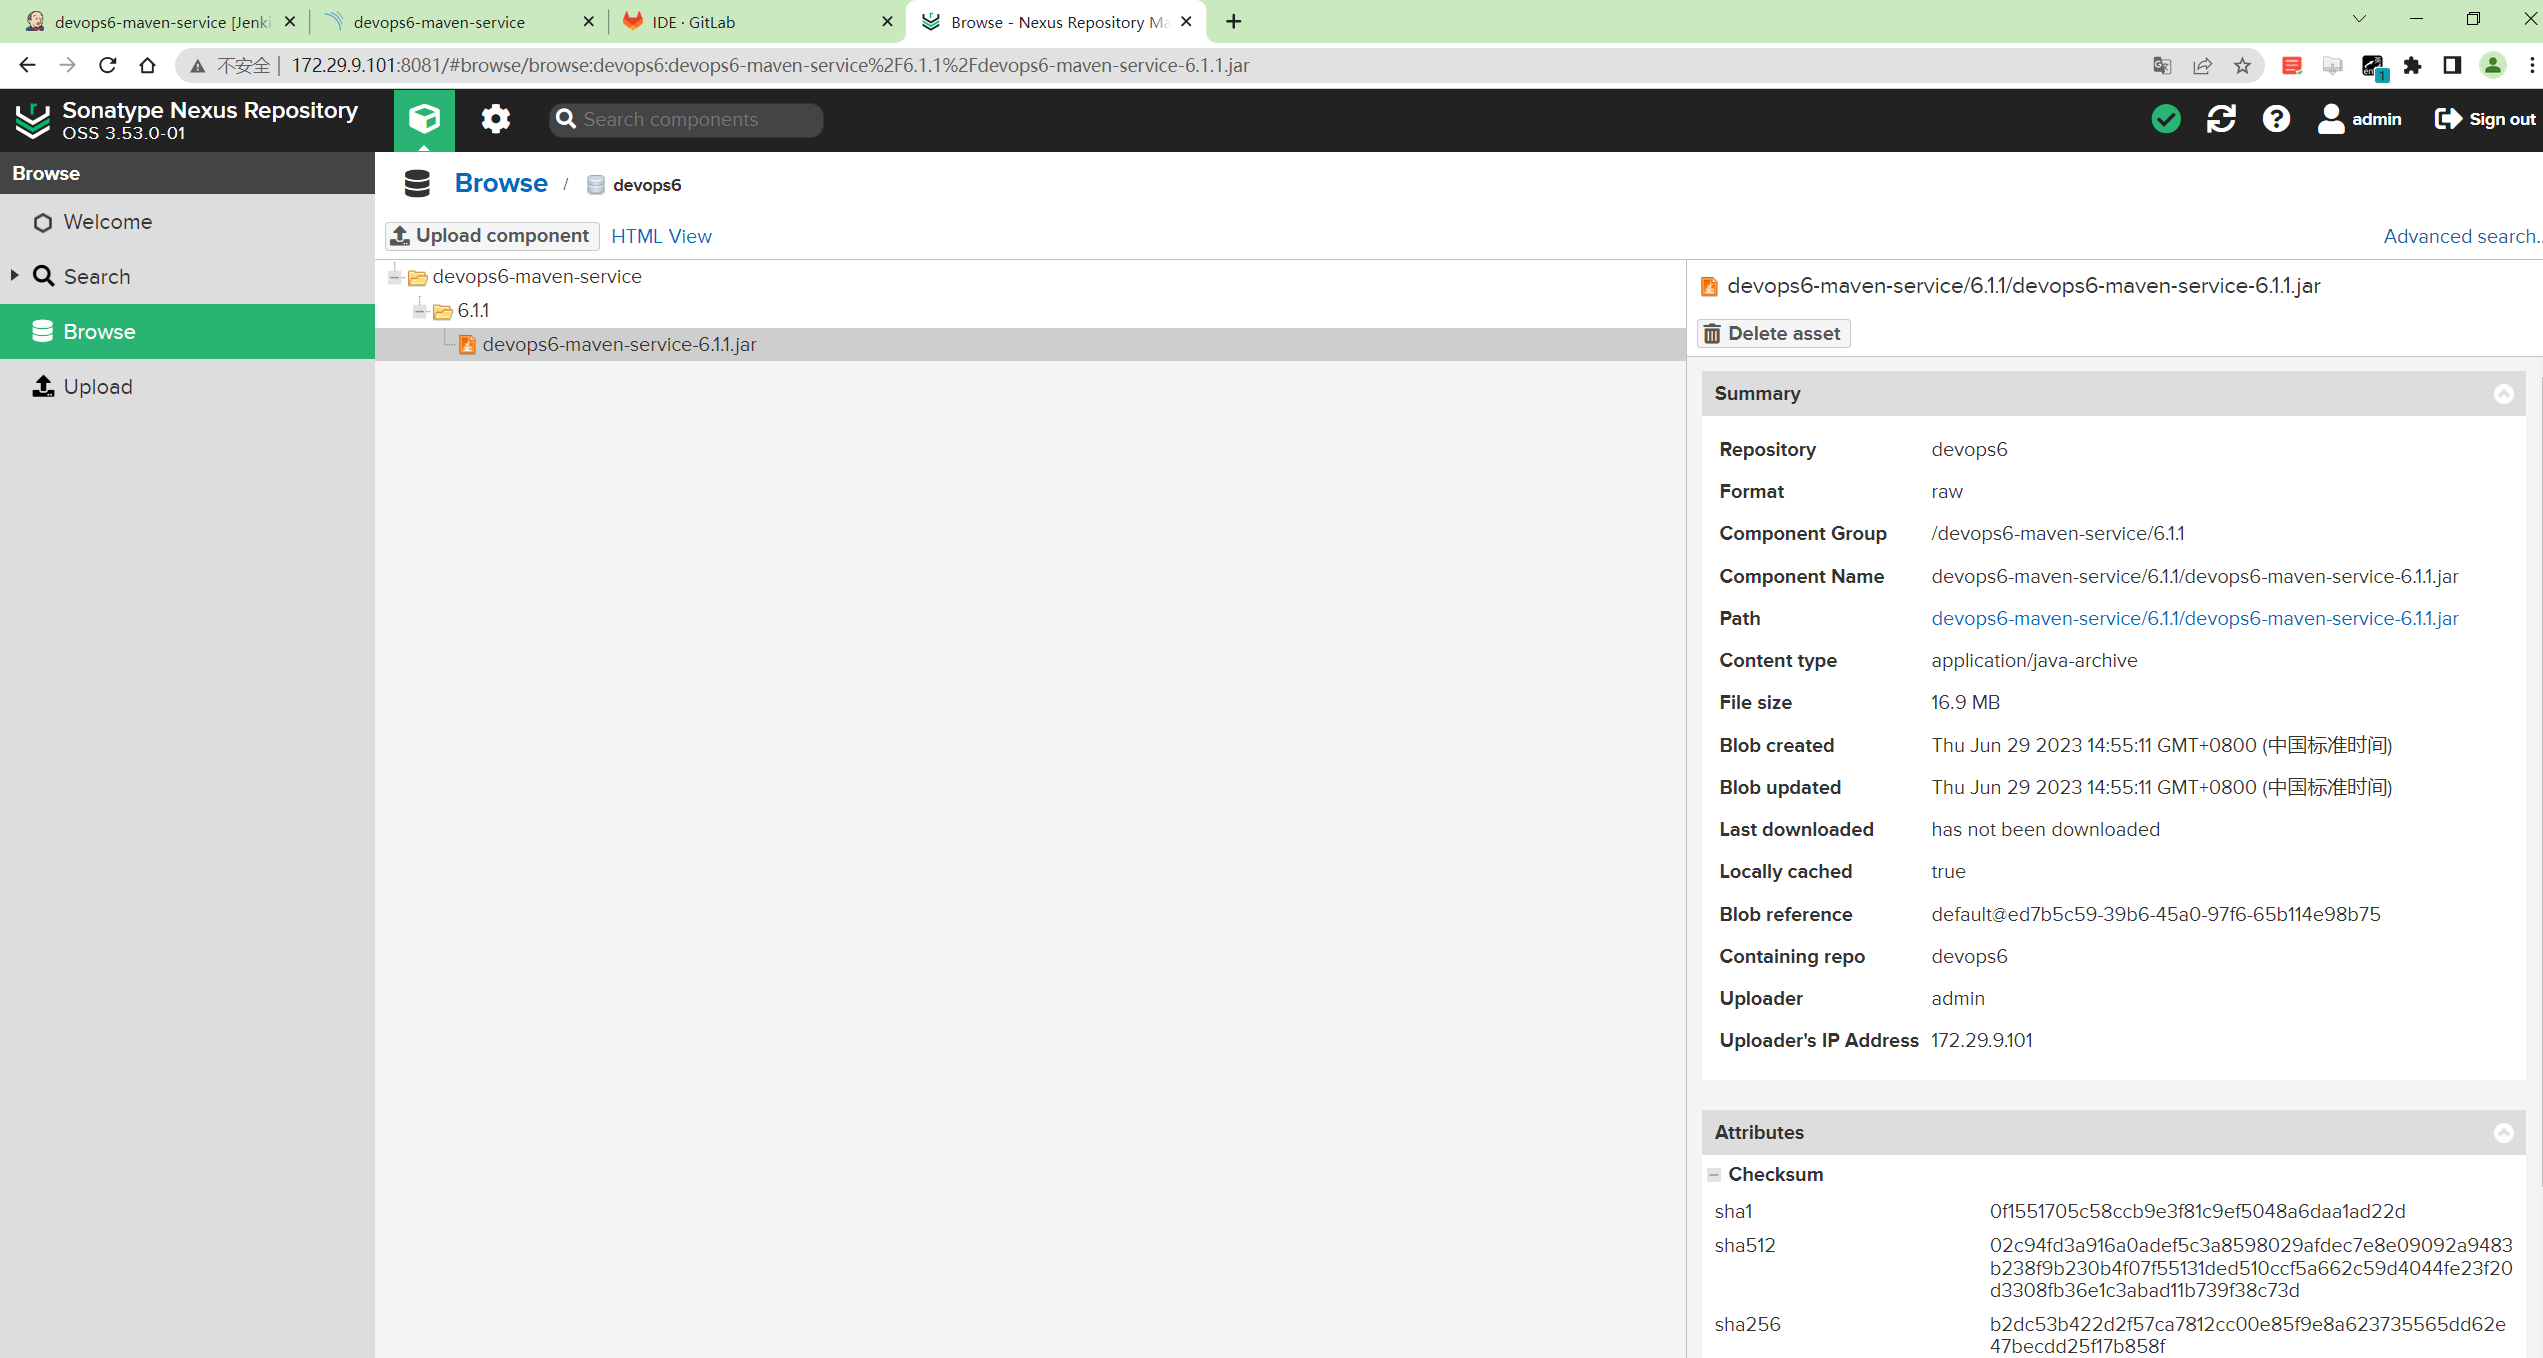
可以看到,上传制品成功了:
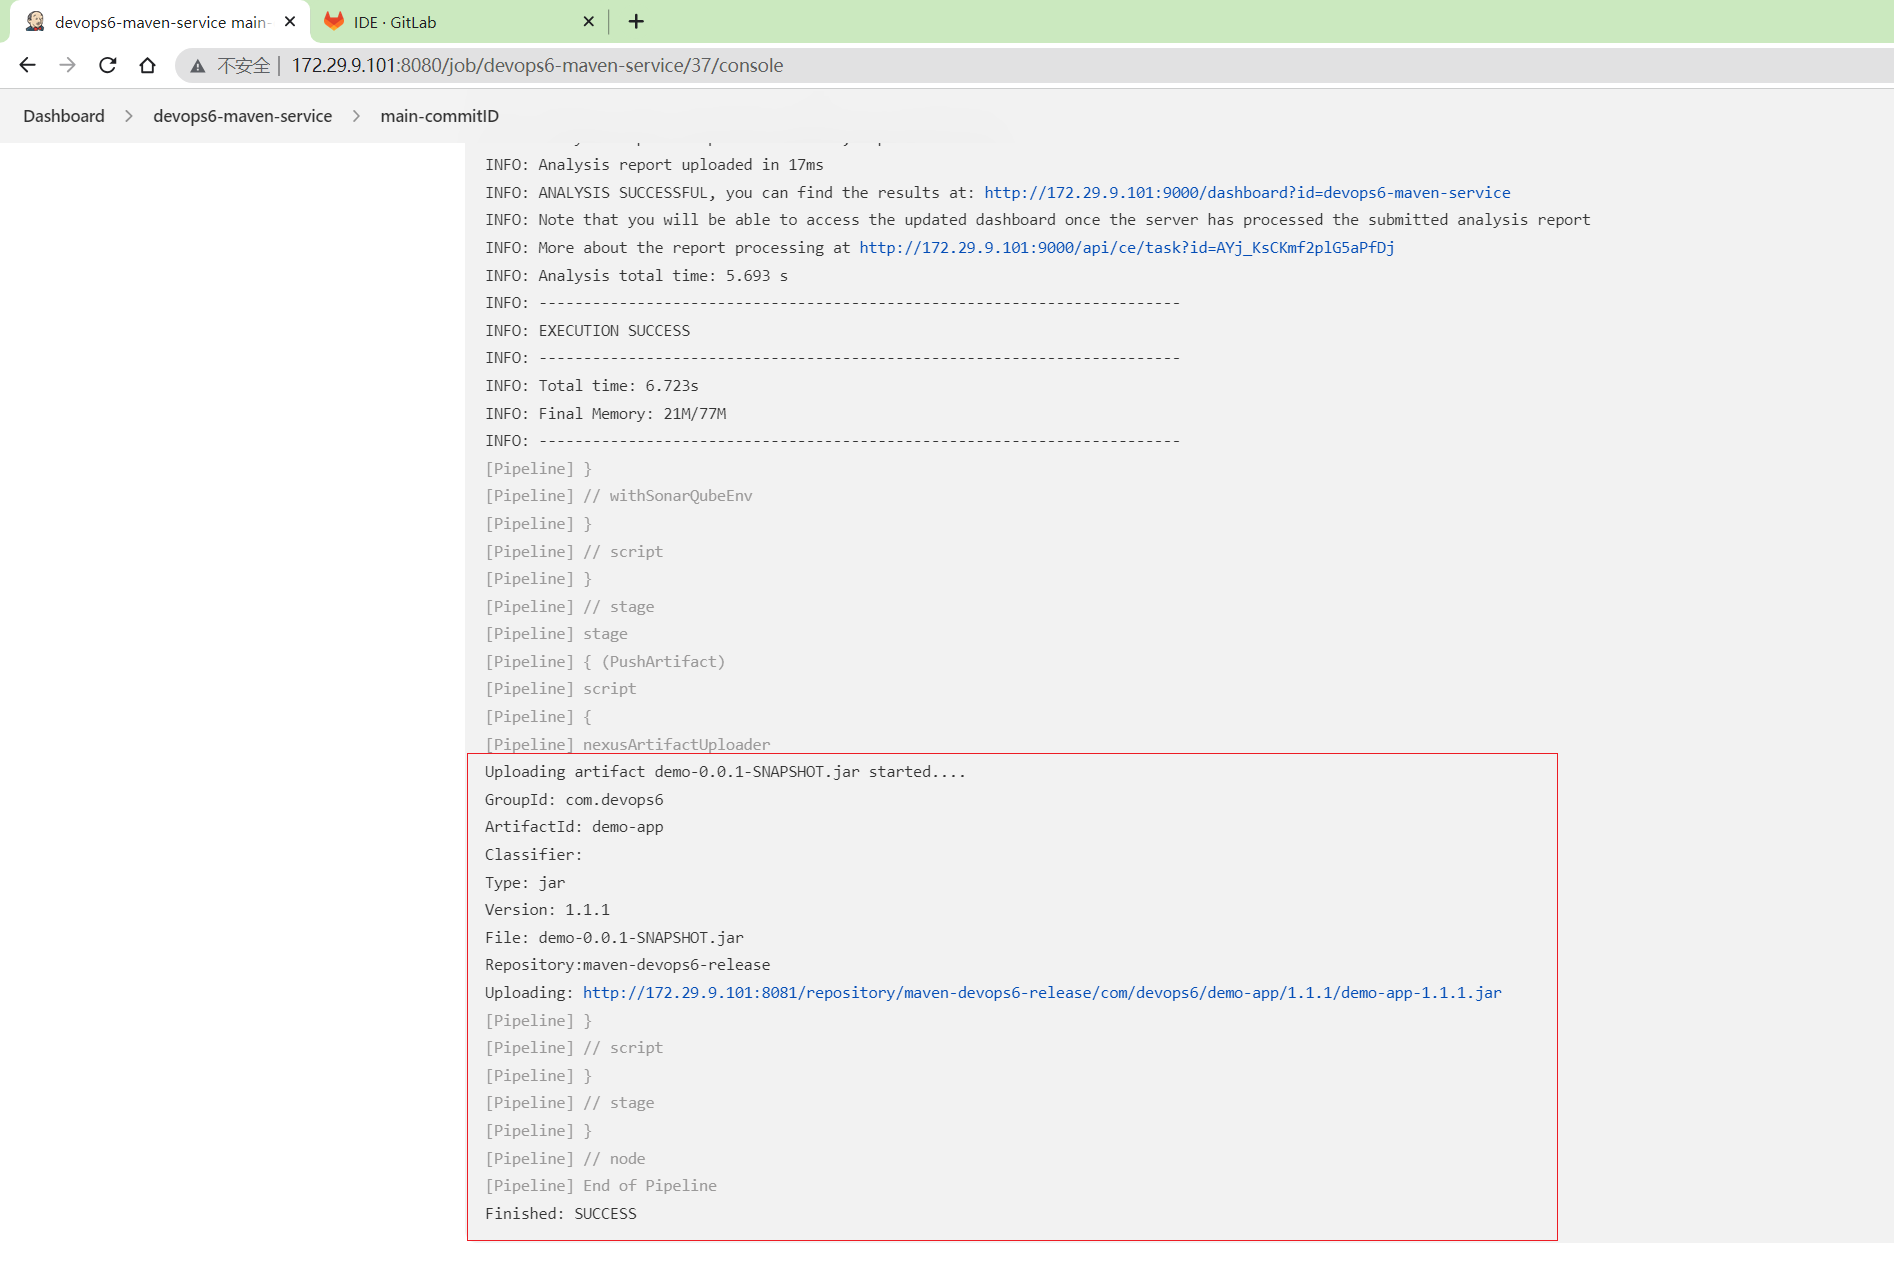
- 下载制品,点击链接,下载就ok了。
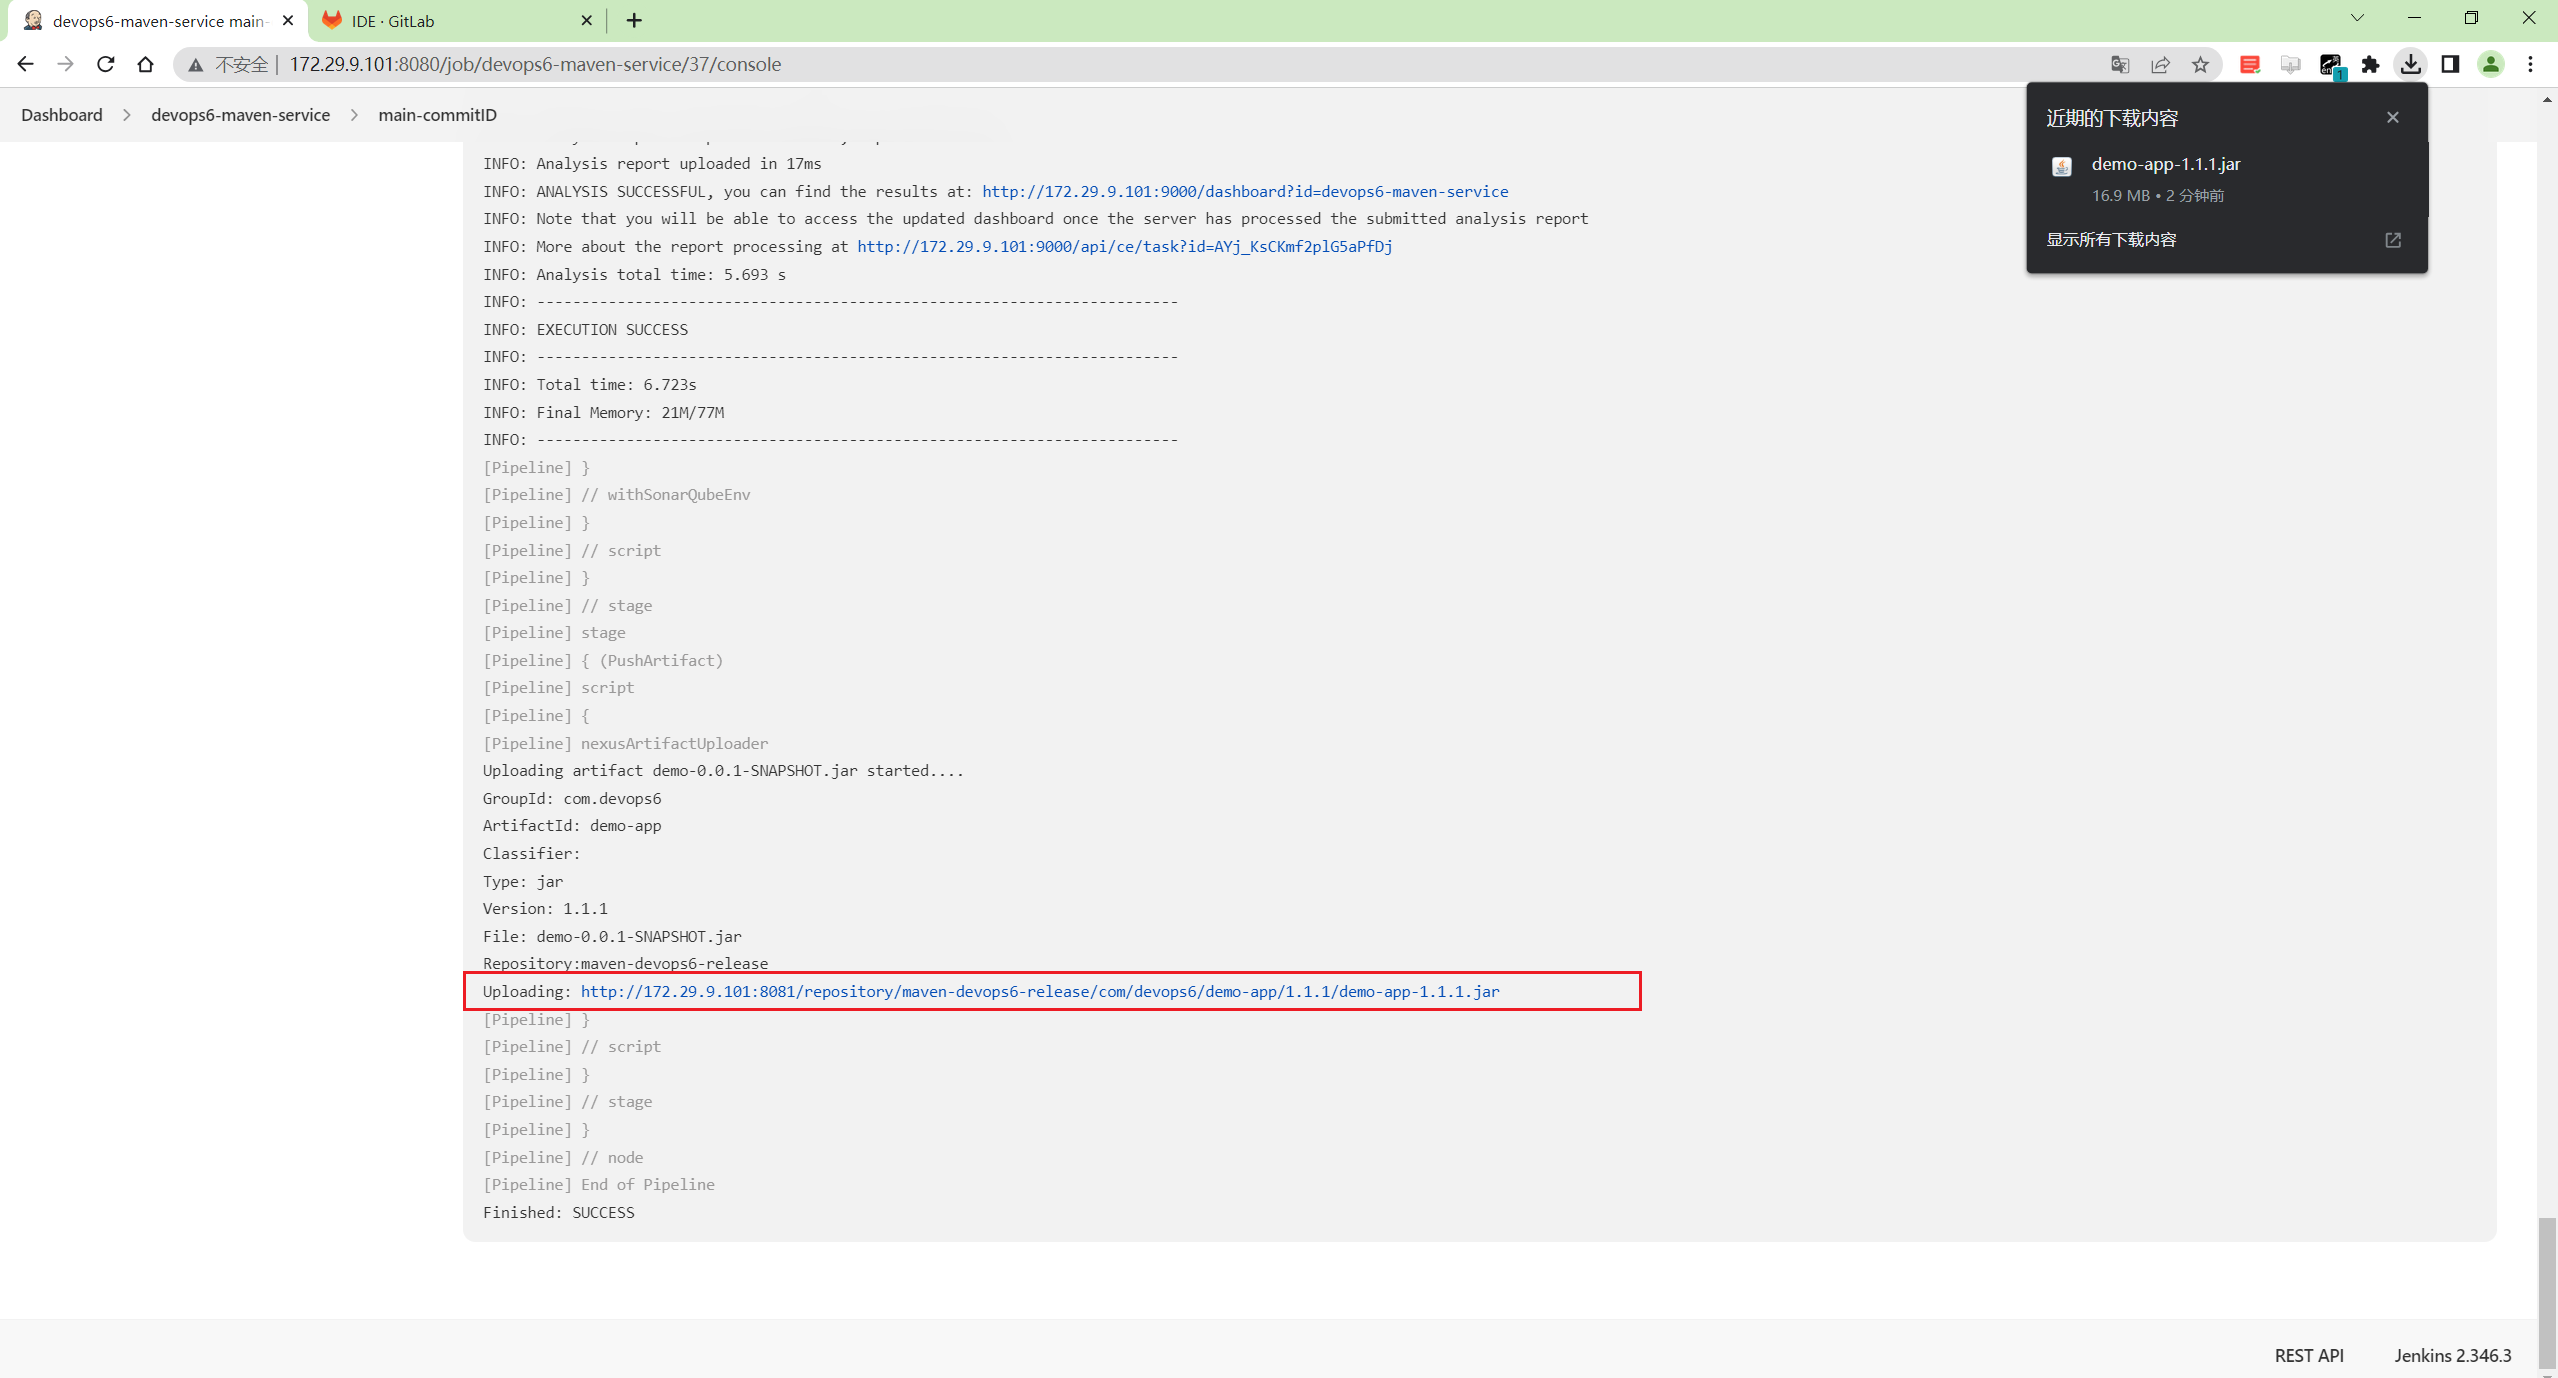
测试成功。😘
② 方法2:使用Jenkins插件上传制品(读取POM文件上传制品)
| 💘 实践:使用Jenkins插件上传制品(读取POM文件上传制品)(测试成功)-2023.6.28 |
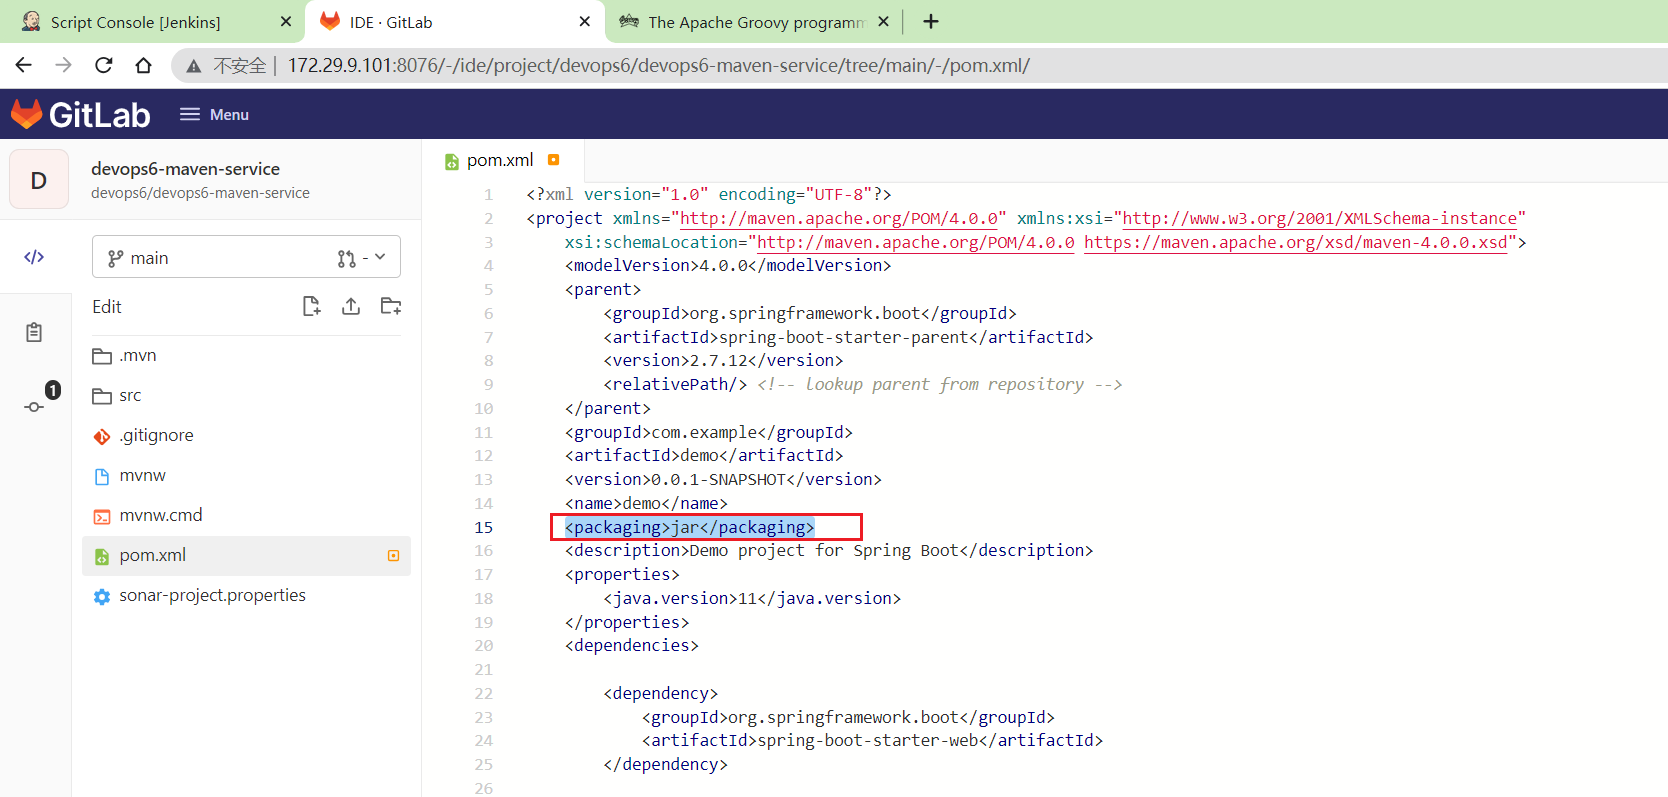
- 在
devops6-maven-servicegitlab项目里编辑下pom.xml文件,添加packaging选项并提交。
<packaging>jar</packaging>
- 编写pipeline代码
@Library("devops06@main") _
//import src/org/devops/Build.groovy
def build = new org.devops.Build()
def sonar = new org.devops.Sonar()
currentBuild.displayName = "${env.branchName}-commitID"
currentBuild.description = "Trigger by user jenkins \n branch: ${env.branchName}"
pipeline {
agent {label "build"}
options {
skipDefaultCheckout true
}
stages{
stage("CheckOut"){
steps{
script{
build.CheckOut()
}
}
}
stage("Build"){
steps{
script{
build.Build()
}
}
}
stage("CodeScan"){
when {
environment name: 'skipSonar', value: 'false'
}
steps{
script{
sonar.SonarScannerByPlugin()
}
}
}
stage("PushArtifact"){
steps{
script{
//PushArtifactByPlugin()
PushArtifactByPluginPOM()
}
}
}
}
}
def PushArtifactByPlugin(){
nexusArtifactUploader artifacts: [[artifactId: 'demo-app',
classifier: '',
file: 'target/demo-0.0.1-SNAPSHOT.jar',
type: 'jar']],
credentialsId: '3404937d-89e3-4699-88cf-c4bd299094ad',
groupId: 'com.devops6',
nexusUrl: '172.29.9.101:8081',
nexusVersion: 'nexus3',
protocol: 'http',
repository: 'maven-devops6-release',
version: '1.1.1'
}
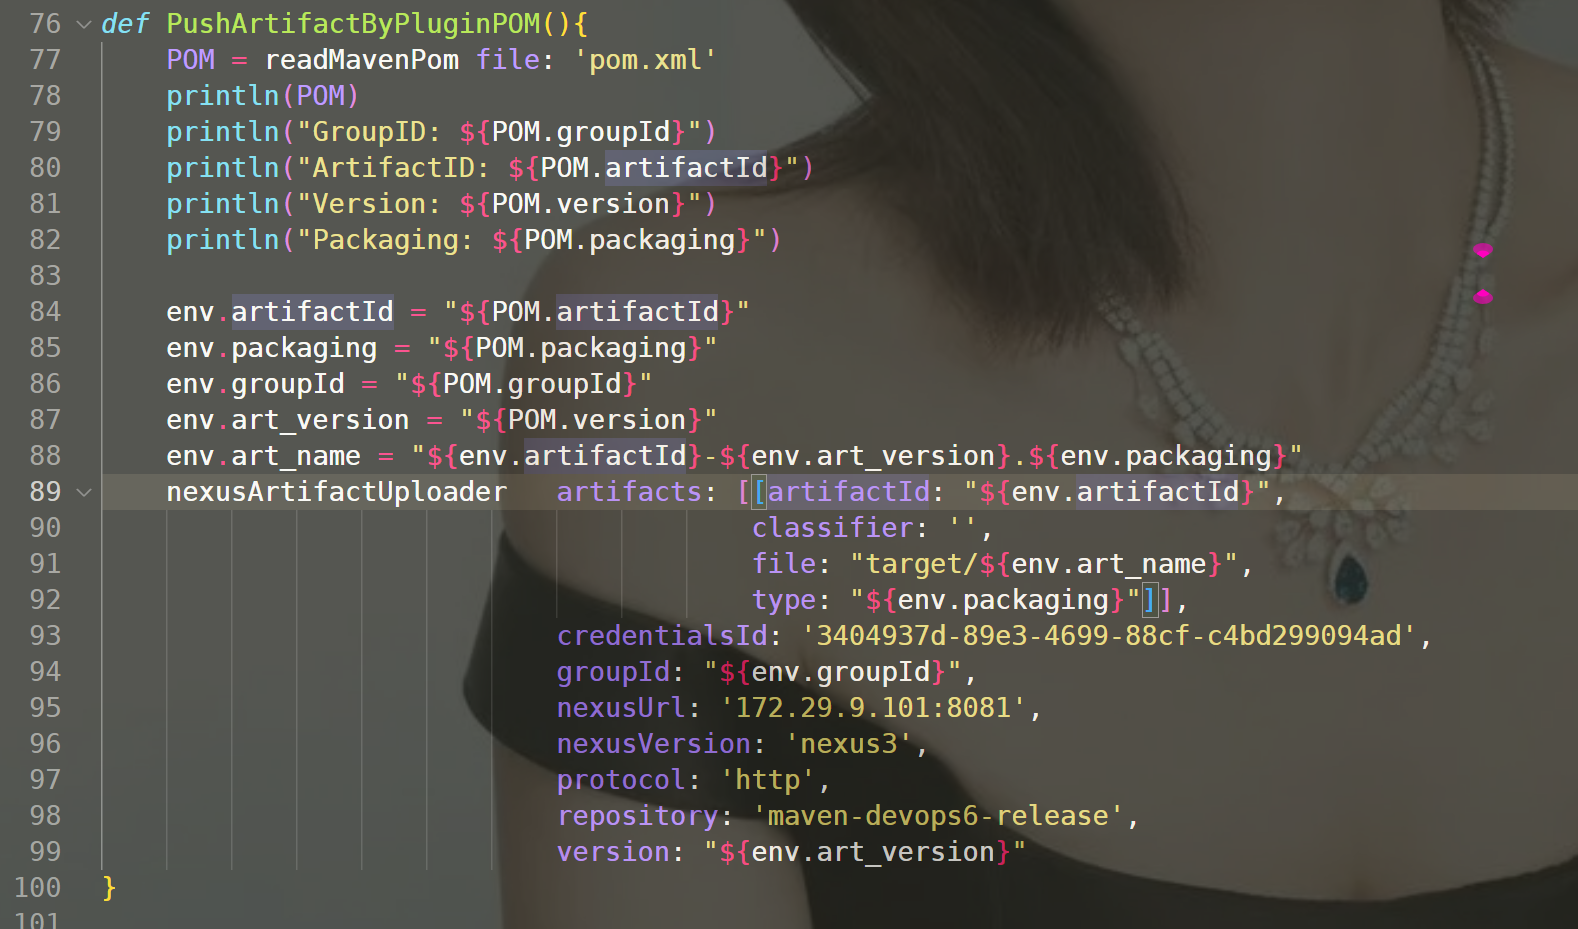
def PushArtifactByPluginPOM(){
POM = readMavenPom file: 'pom.xml'
println(POM)
println("GroupID: ${POM.groupId}")
println("ArtifactID: ${POM.artifactId}")
println("Version: ${POM.version}")
println("Packaging: ${POM.packaging}")
env.artifactId = "${POM.artifactId}"
env.packaging = "${POM.packaging}"
env.groupId = "${POM.groupId}"
env.art_version = "${POM.version}"
env.art_name = "${env.artifactId}-${env.art_version}.${env.packaging}"
nexusArtifactUploader artifacts: [[artifactId: "${env.artifactId}",
classifier: '',
file: "target/${env.art_name}",
type: "${env.packaging}"]],
credentialsId: '3404937d-89e3-4699-88cf-c4bd299094ad',
groupId: "${env.groupId}",
nexusUrl: '172.29.9.101:8081',
nexusVersion: 'nexus3',
protocol: 'http',
repository: 'maven-devops6-release',
version: "${env.art_version}"
}
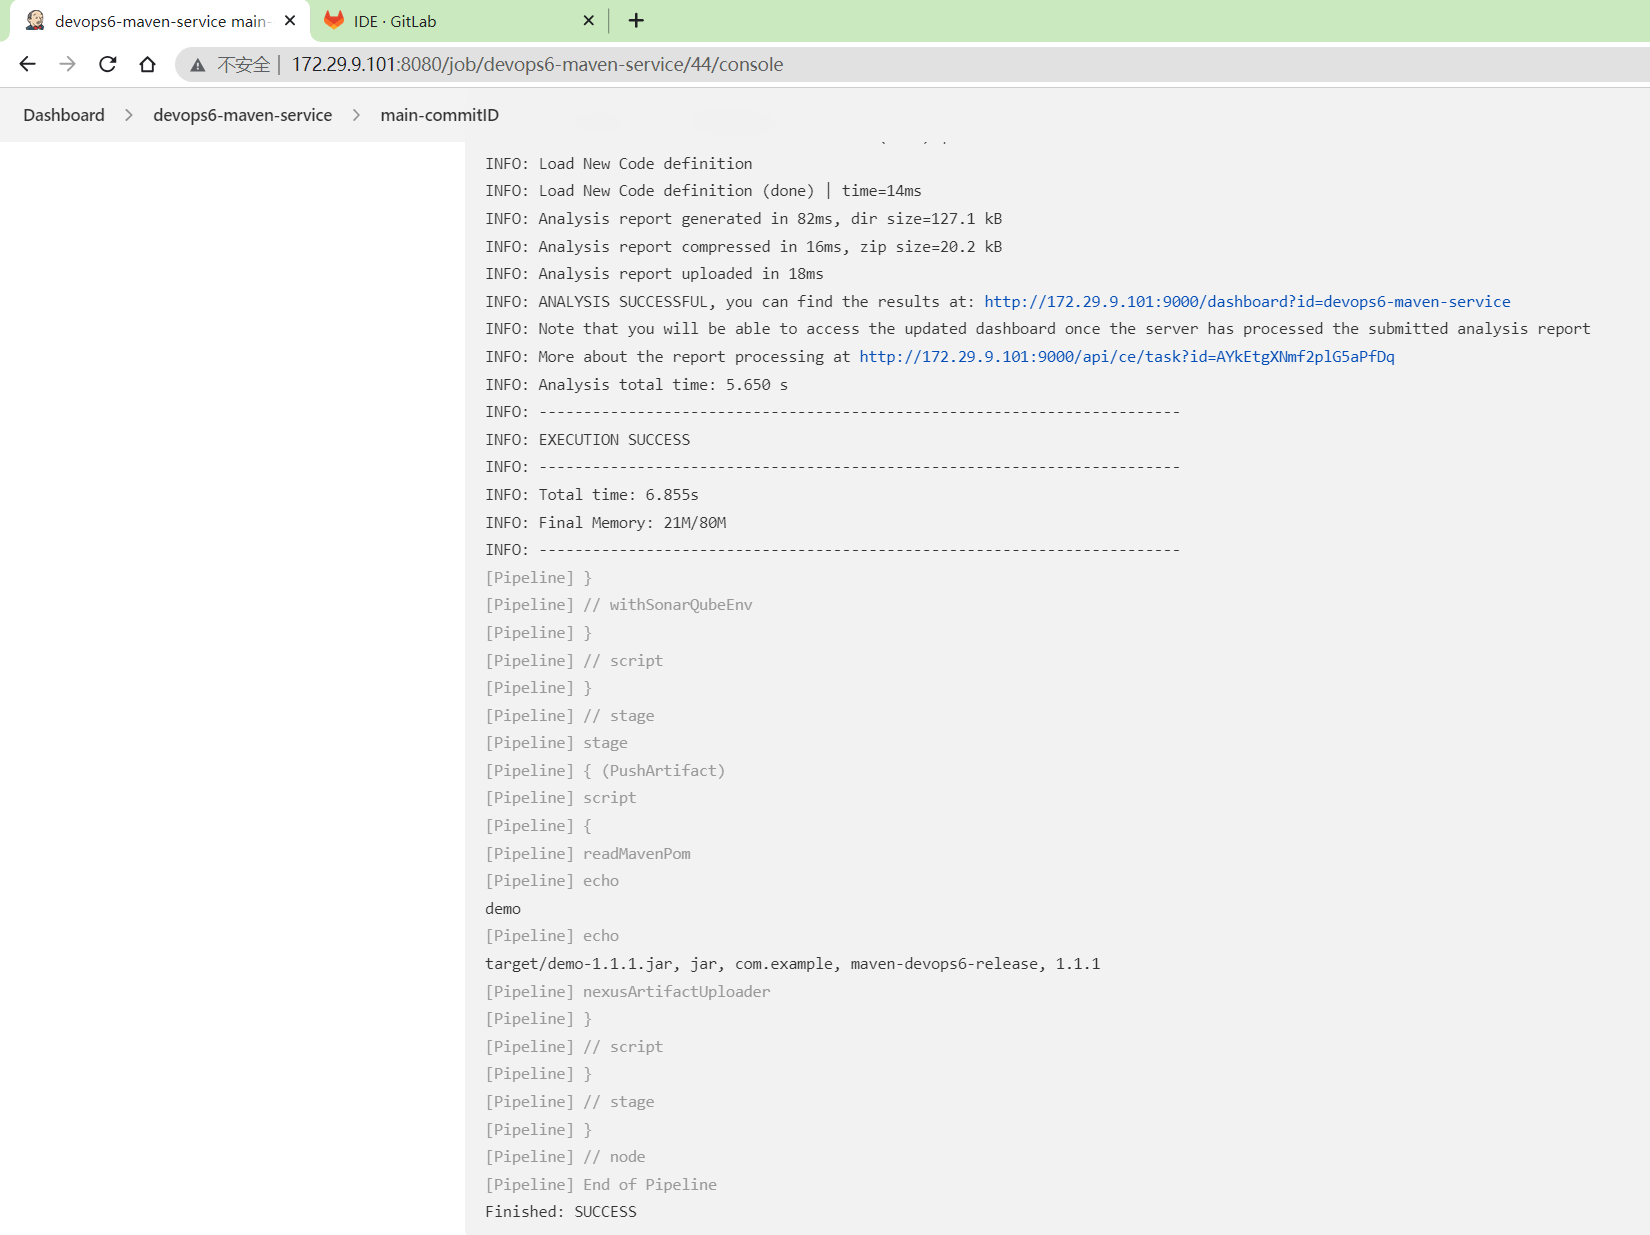
- 在回放里运行
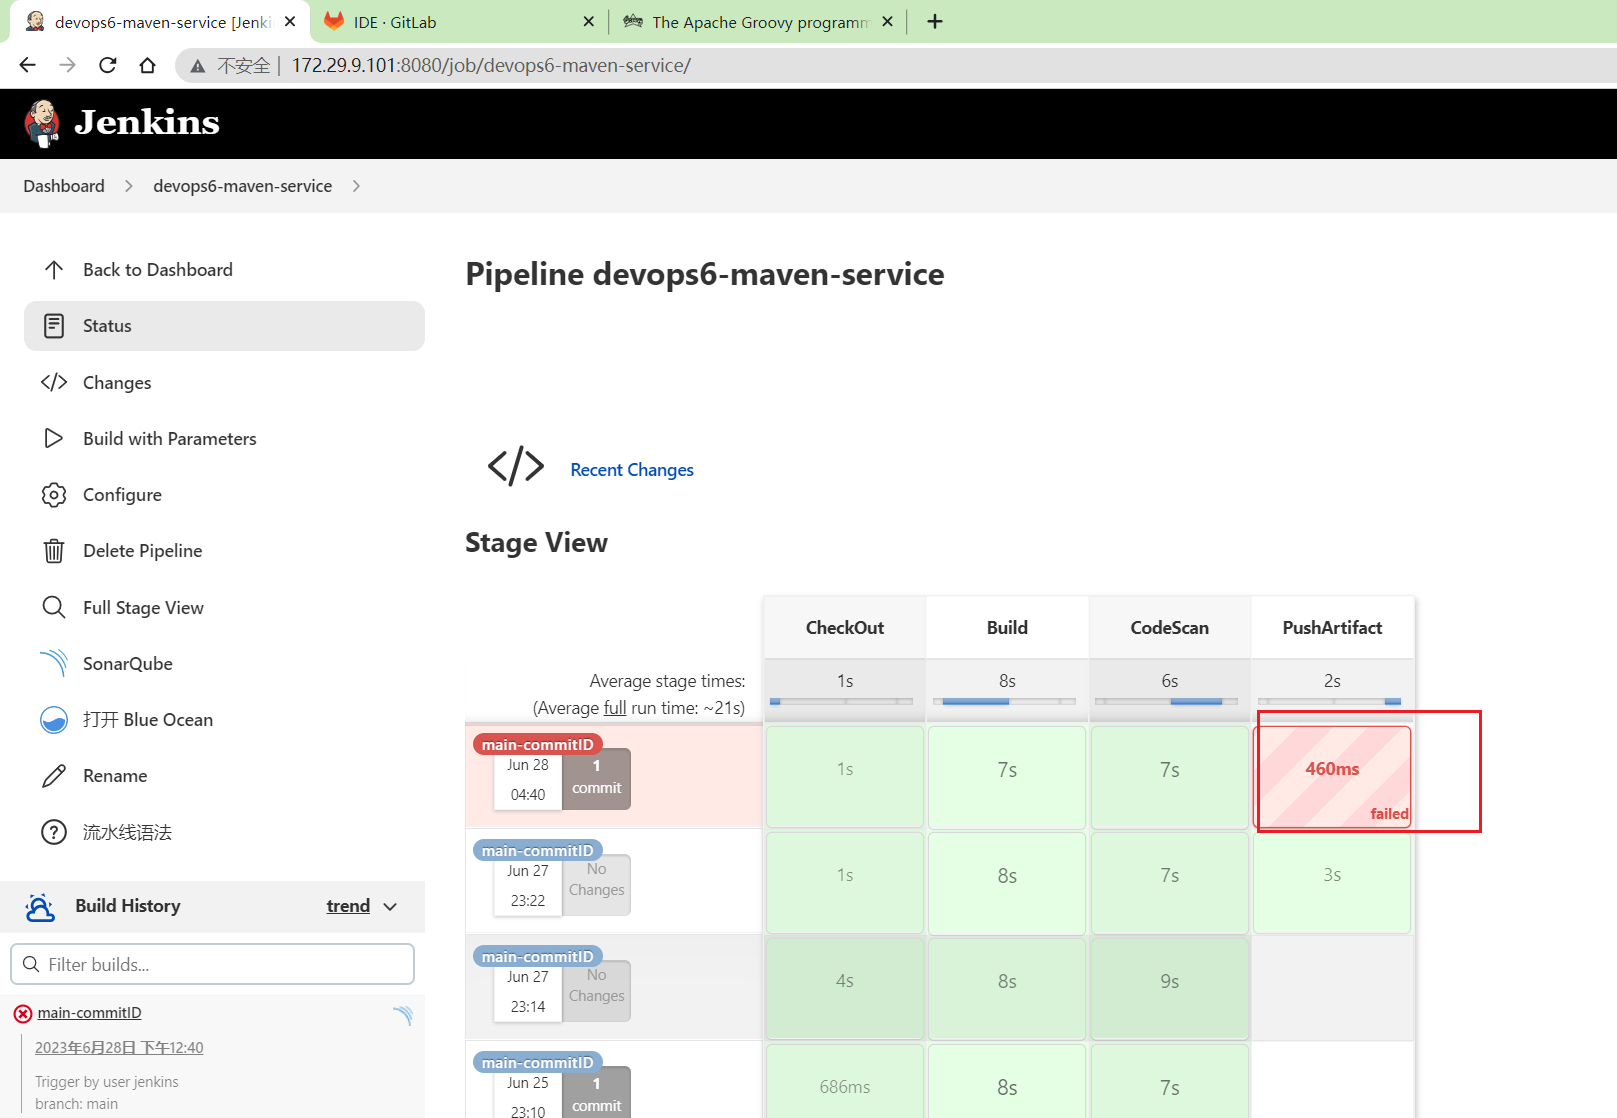
发现报错:
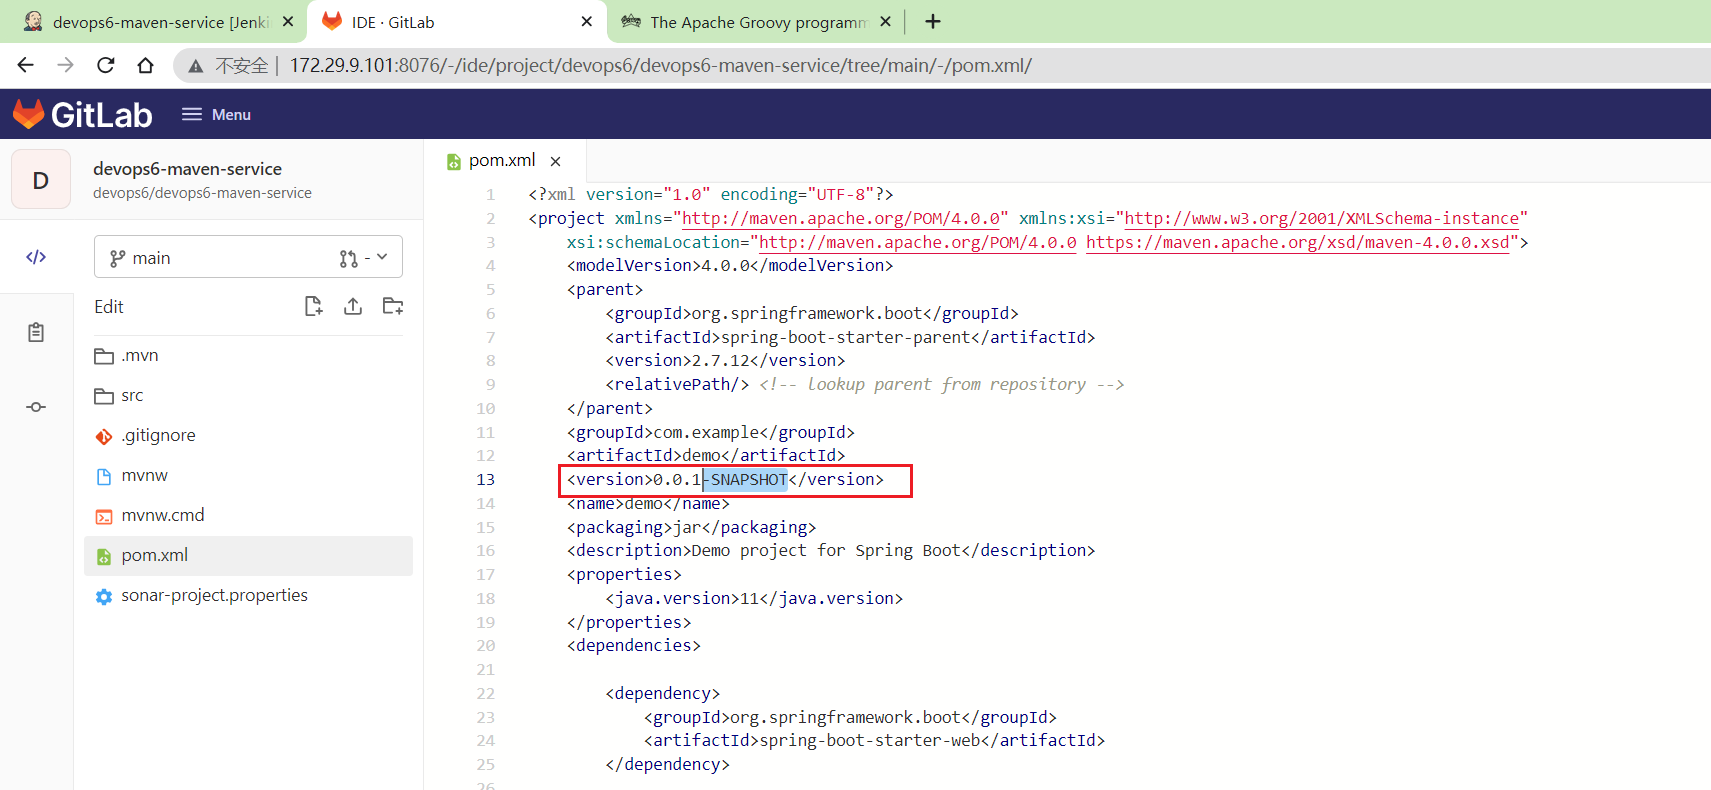
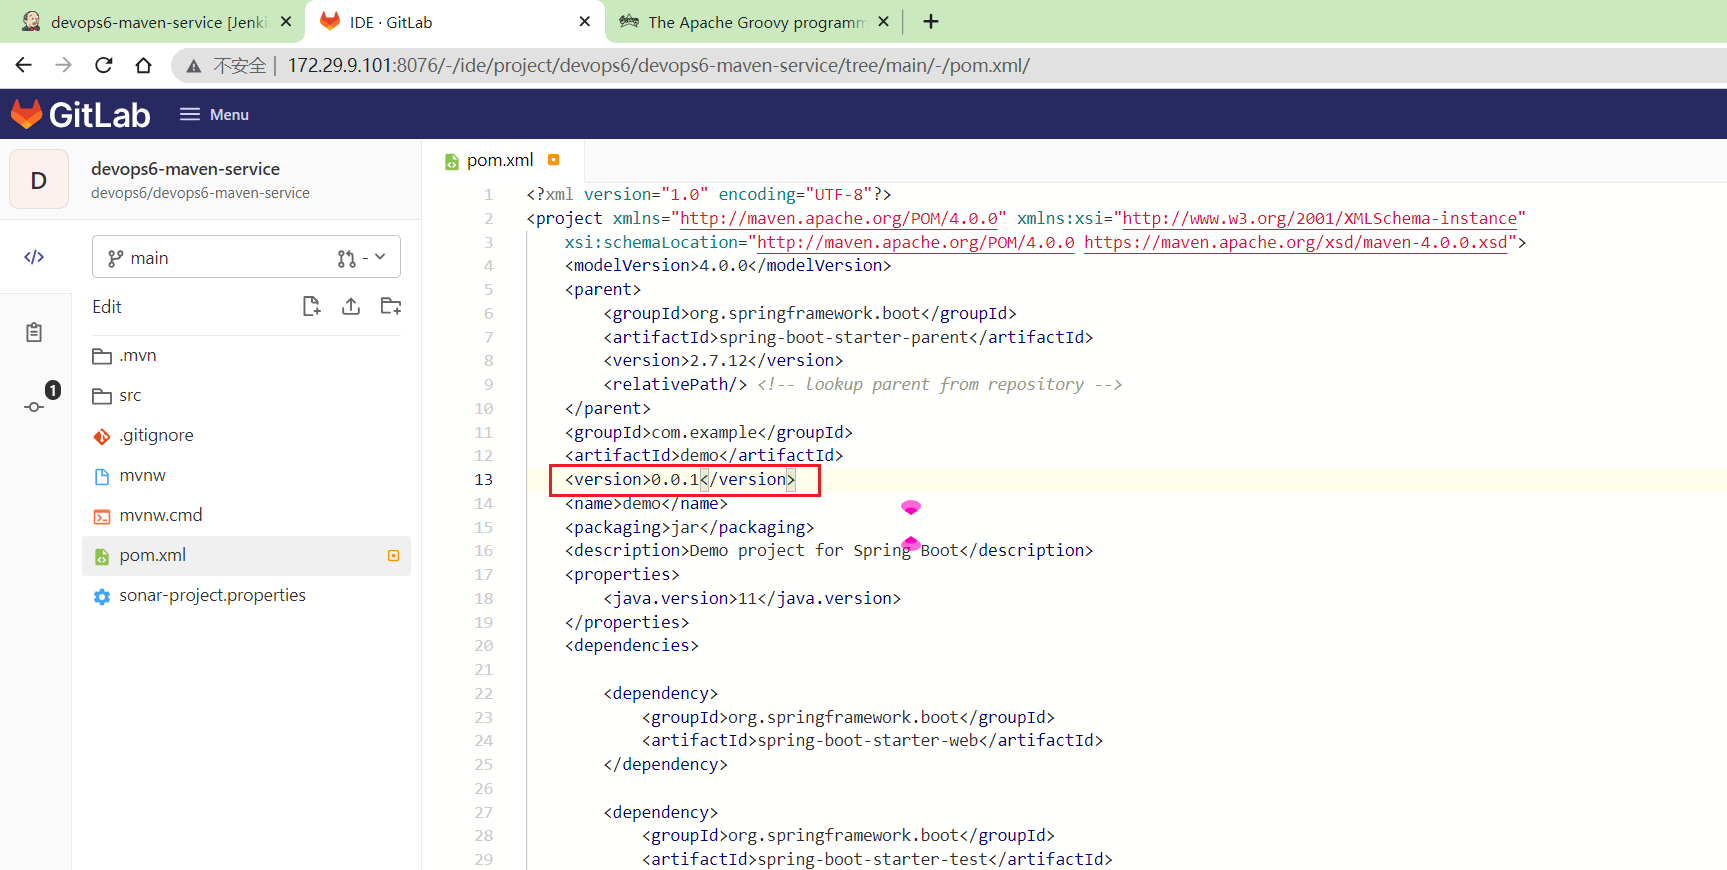
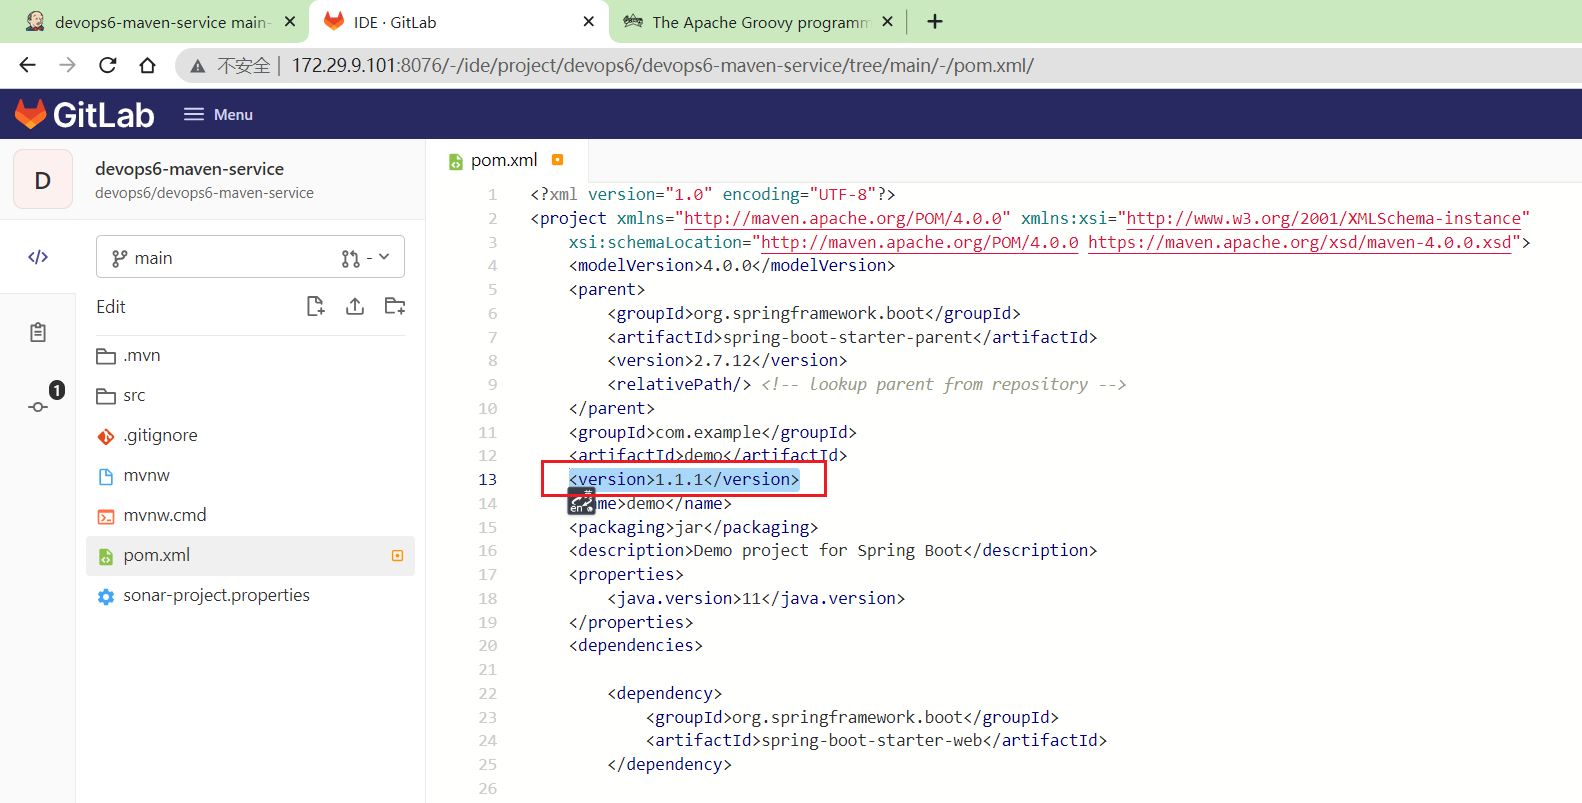
将项目里的pom文件改成RELEASE版本。
将
改成
然后再次运行:
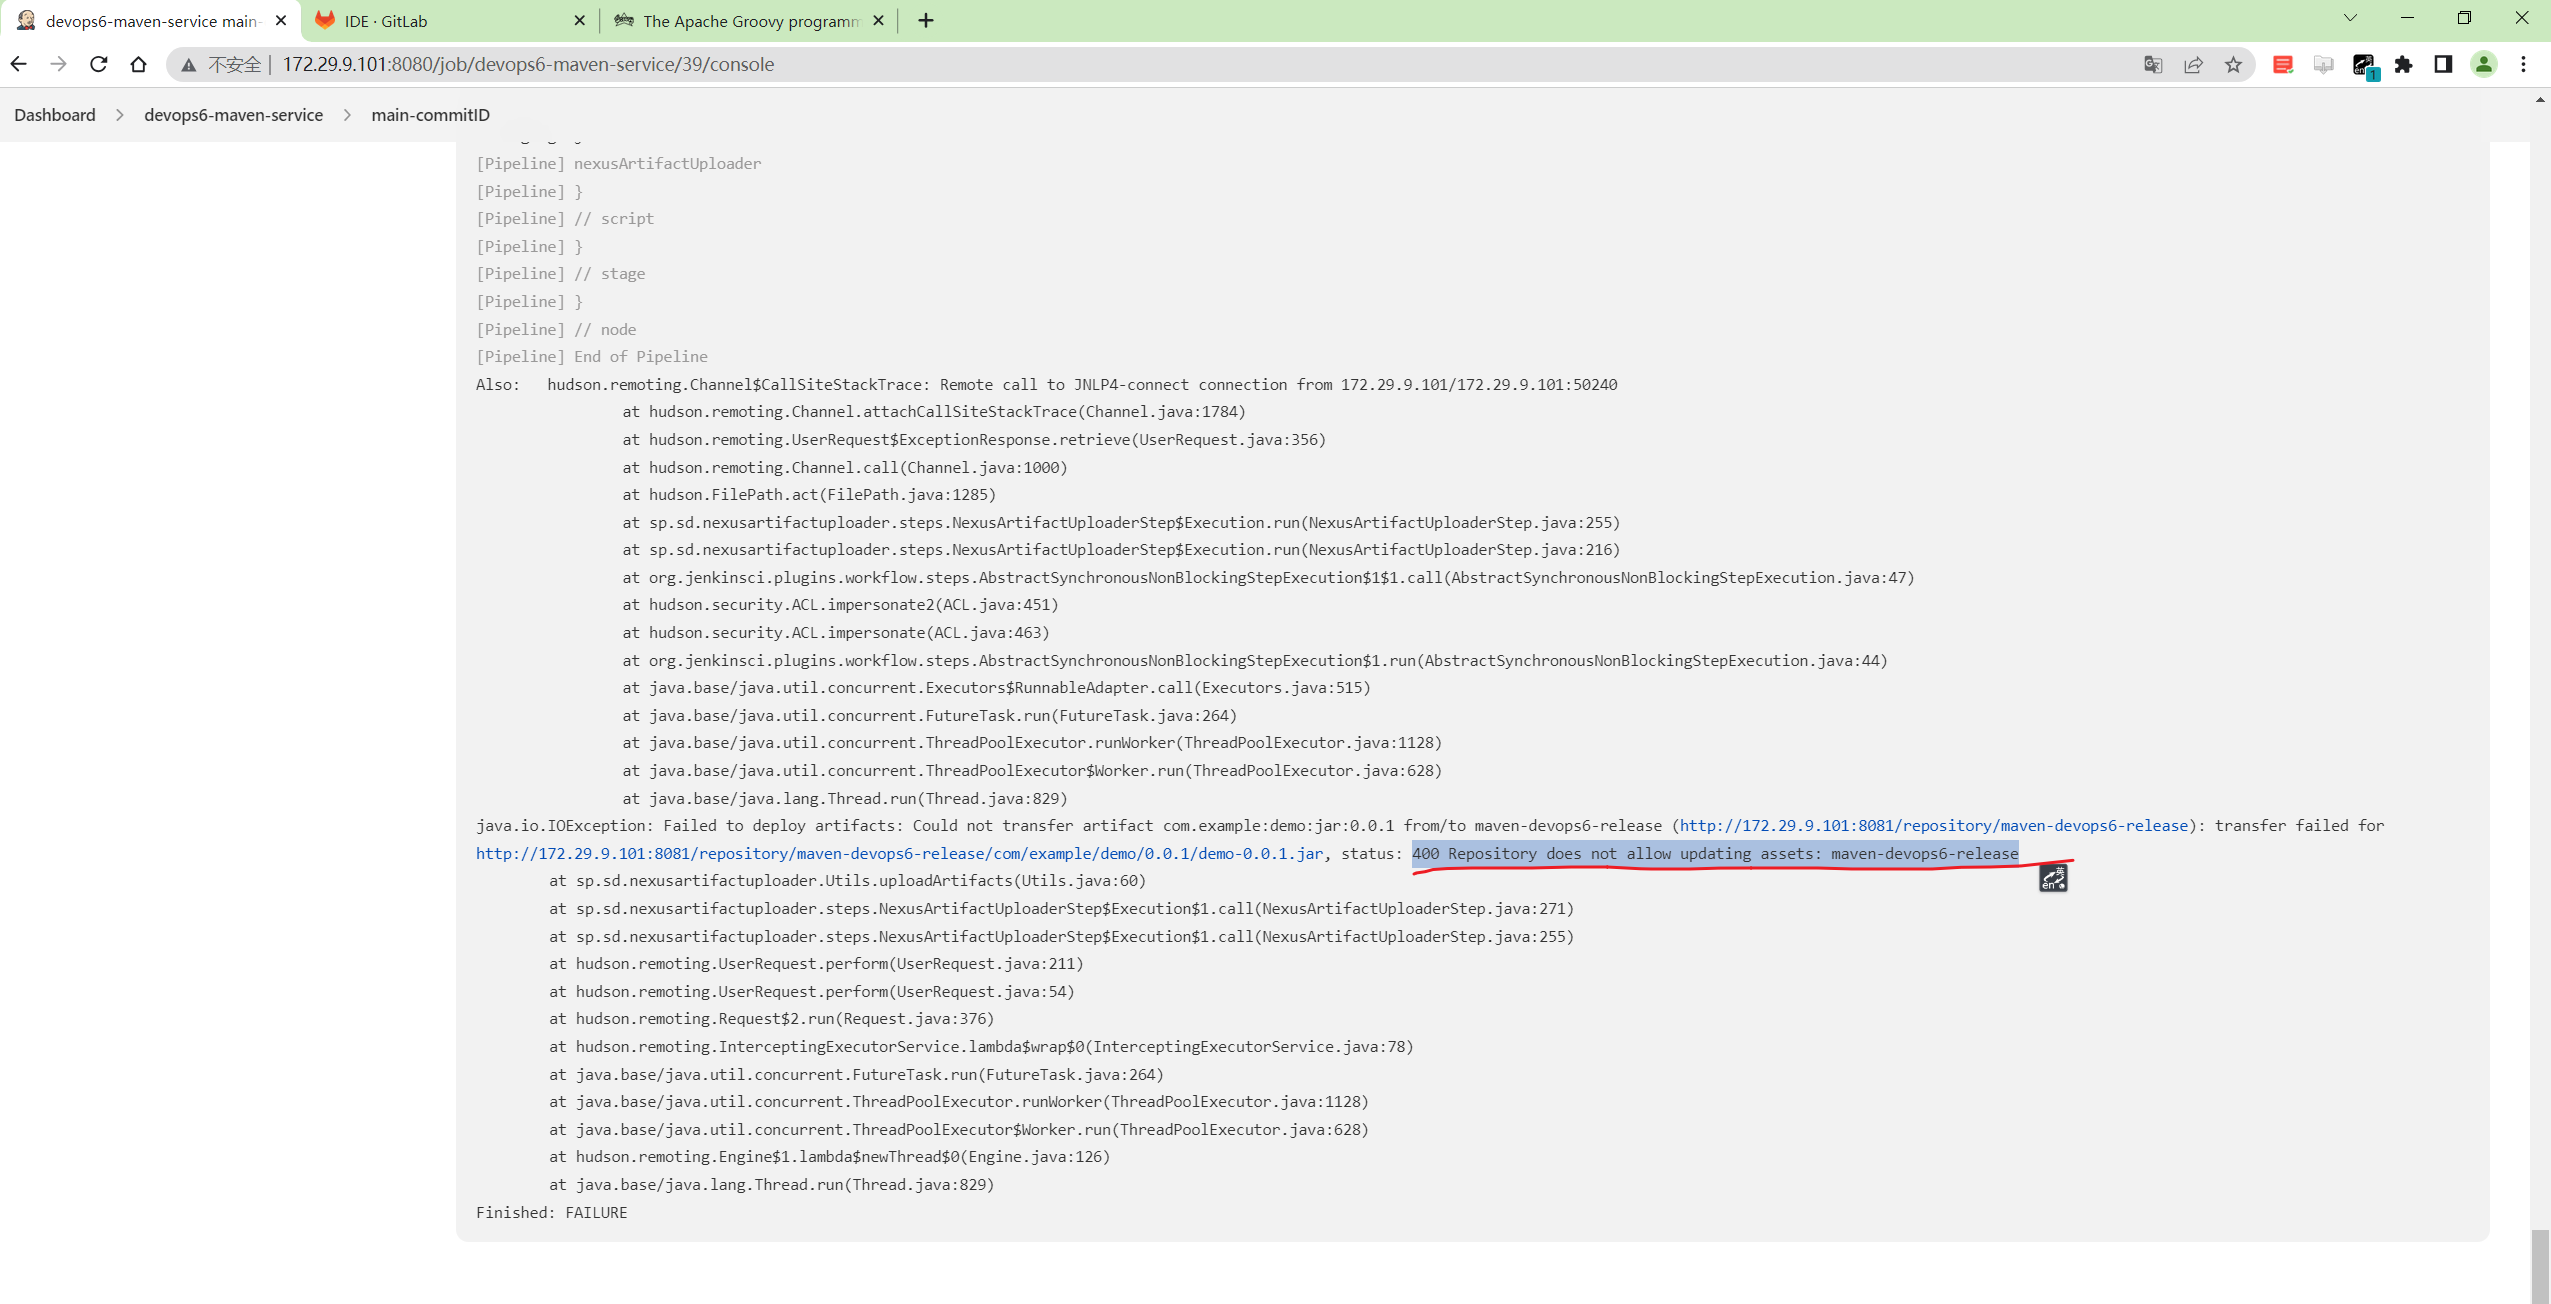
又一次报错,提示:status: 400 Repository does not allow updating assets: maven-devops6-release
应该是nexus3仓库里之前已经存在了这个包。
我们这里再改下version:
再次运行:
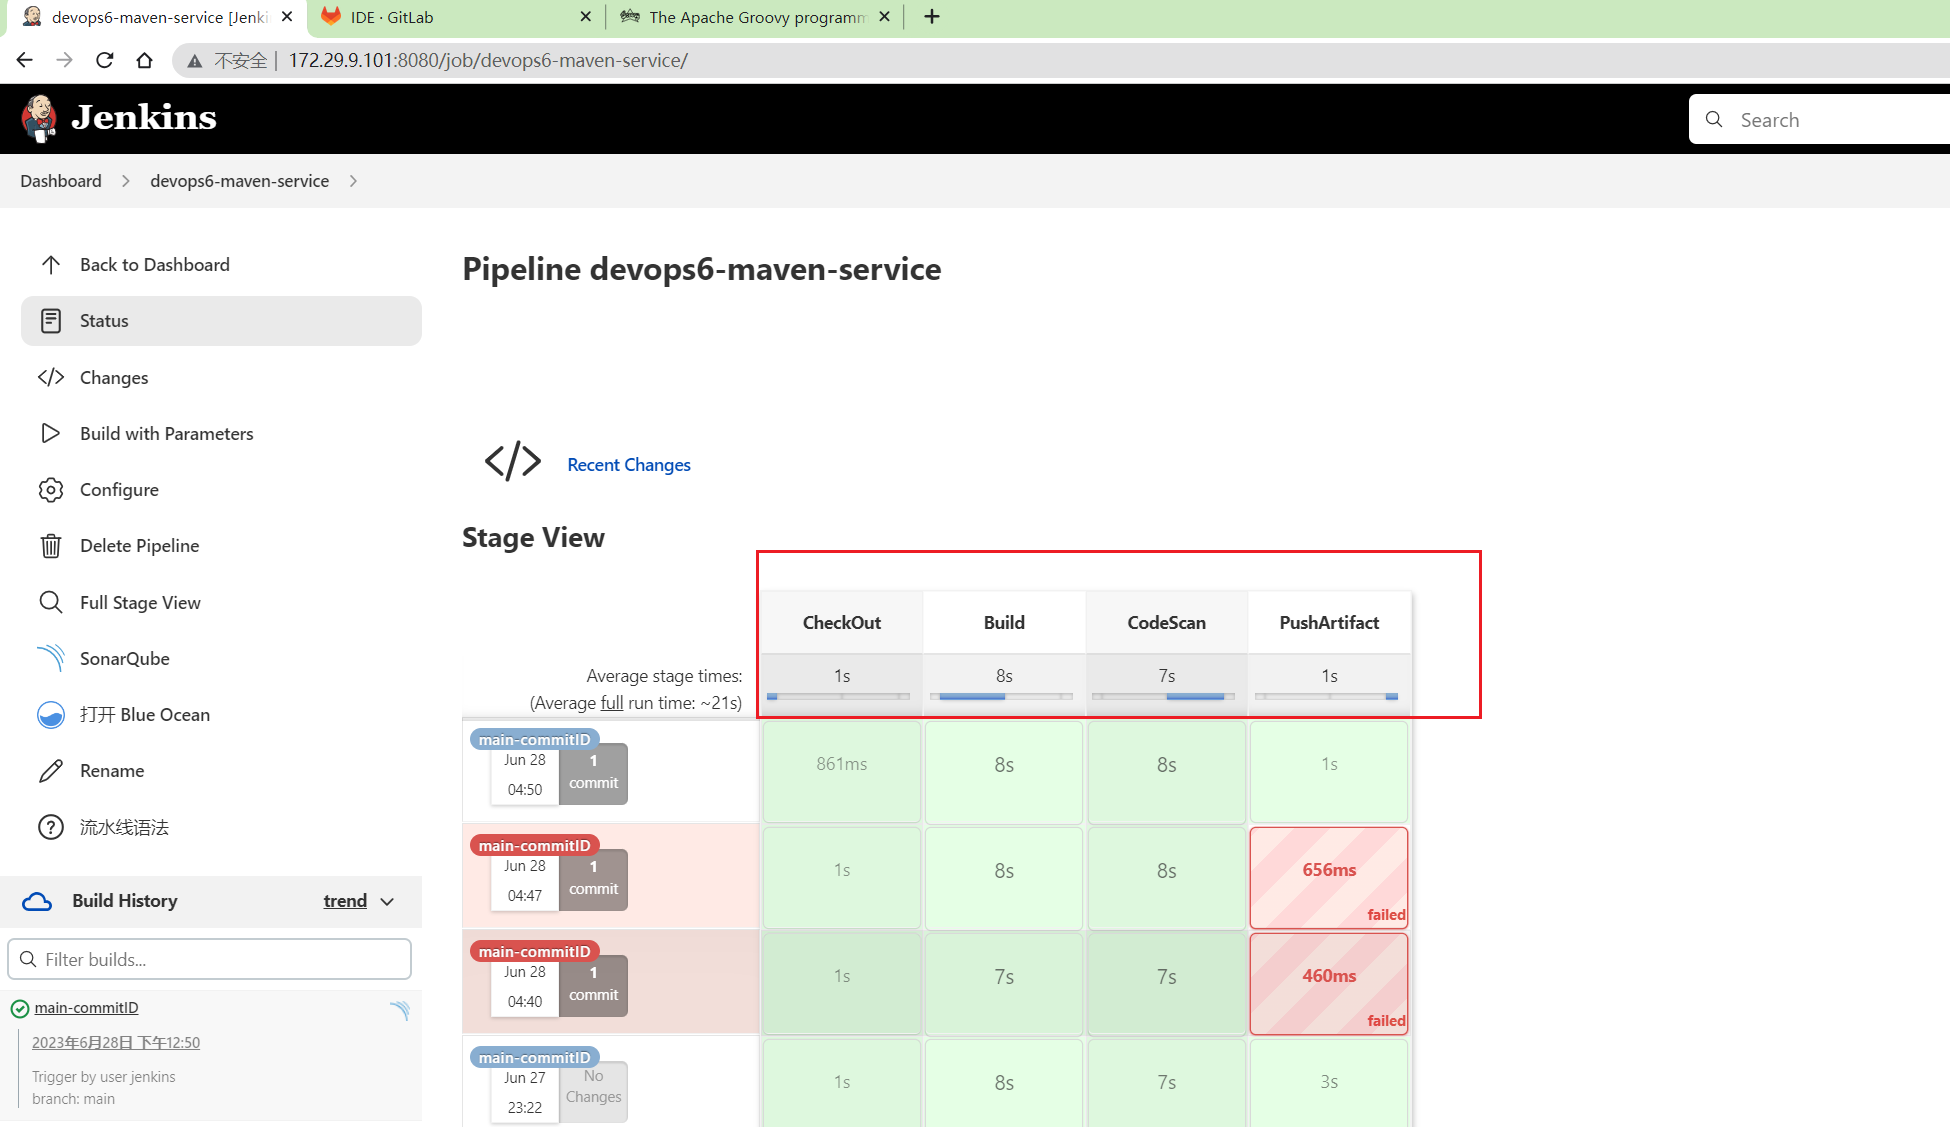
这次就运行成功了。
- 然后写到共享库里,再次运行测试
构建成功。
- 也可以修改上面这个版本,利用函数传参来演示
pipeline代码:
@Library("devops06@main") _
//import src/org/devops/Build.groovy
def build = new org.devops.Build()
def sonar = new org.devops.Sonar()
currentBuild.displayName = "${env.branchName}-commitID"
currentBuild.description = "Trigger by user jenkins \n branch: ${env.branchName}"
pipeline {
agent {label "build"}
options {
skipDefaultCheckout true
}
stages{
stage("CheckOut"){
steps{
script{
build.CheckOut()
}
}
}
stage("Build"){
steps{
script{
build.Build()
}
}
}
stage("CodeScan"){
when {
environment name: 'skipSonar', value: 'false'
}
steps{
script{
sonar.SonarScannerByPlugin()
}
}
}
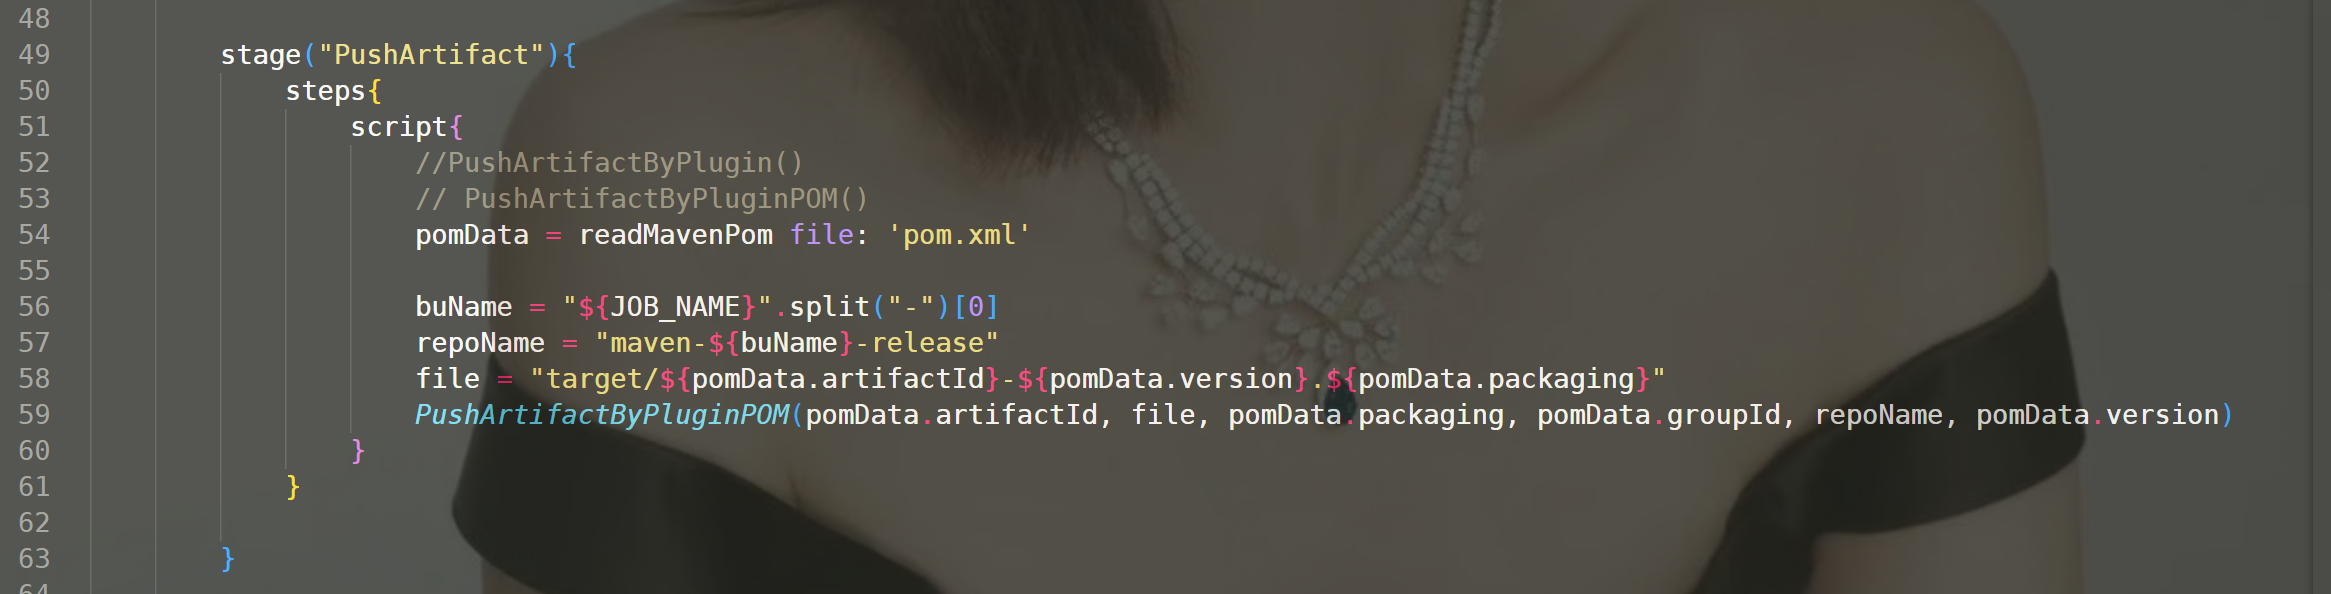
stage("PushArtifact"){
steps{
script{
//PushArtifactByPlugin()
// PushArtifactByPluginPOM()
pomData = readMavenPom file: 'pom.xml'
buName = "${JOB_NAME}".split("-")[0]
repoName = "maven-${buName}-release"
file = "target/${pomData.artifactId}-${pomData.version}.${pomData.packaging}"
PushArtifactByPluginPOM(pomData.artifactId, file, pomData.packaging, pomData.groupId, repoName, pomData.version)
}
}
}
}
}
def PushArtifactByPlugin(){
nexusArtifactUploader artifacts: [[artifactId: 'demo-app',
classifier: '',
file: 'target/demo-0.0.1-SNAPSHOT.jar',
type: 'jar']],
credentialsId: '3404937d-89e3-4699-88cf-c4bd299094ad',
groupId: 'com.devops6',
nexusUrl: '172.29.9.101:8081',
nexusVersion: 'nexus3',
protocol: 'http',
repository: 'maven-devops6-release',
version: '1.1.1'
}
// def PushArtifactByPluginPOM(){
// POM = readMavenPom file: 'pom.xml'
// println(POM)
// println("GroupID: ${POM.groupId}")
// println("ArtifactID: ${POM.artifactId}")
// println("Version: ${POM.version}")
// println("Packaging: ${POM.packaging}")
// env.artifactId = "${POM.artifactId}"
// env.packaging = "${POM.packaging}"
// env.groupId = "${POM.groupId}"
// env.art_version = "${POM.version}"
// env.art_name = "${env.artifactId}-${env.art_version}.${env.packaging}"
// nexusArtifactUploader artifacts: [[artifactId: "${env.artifactId}",
// classifier: '',
// file: "target/${env.art_name}",
// type: "${env.packaging}"]],
// credentialsId: '3404937d-89e3-4699-88cf-c4bd299094ad',
// groupId: "${env.groupId}",
// nexusUrl: '172.29.9.101:8081',
// nexusVersion: 'nexus3',
// protocol: 'http',
// repository: 'maven-devops6-release',
// version: "${env.art_version}"
// }
//函数方式
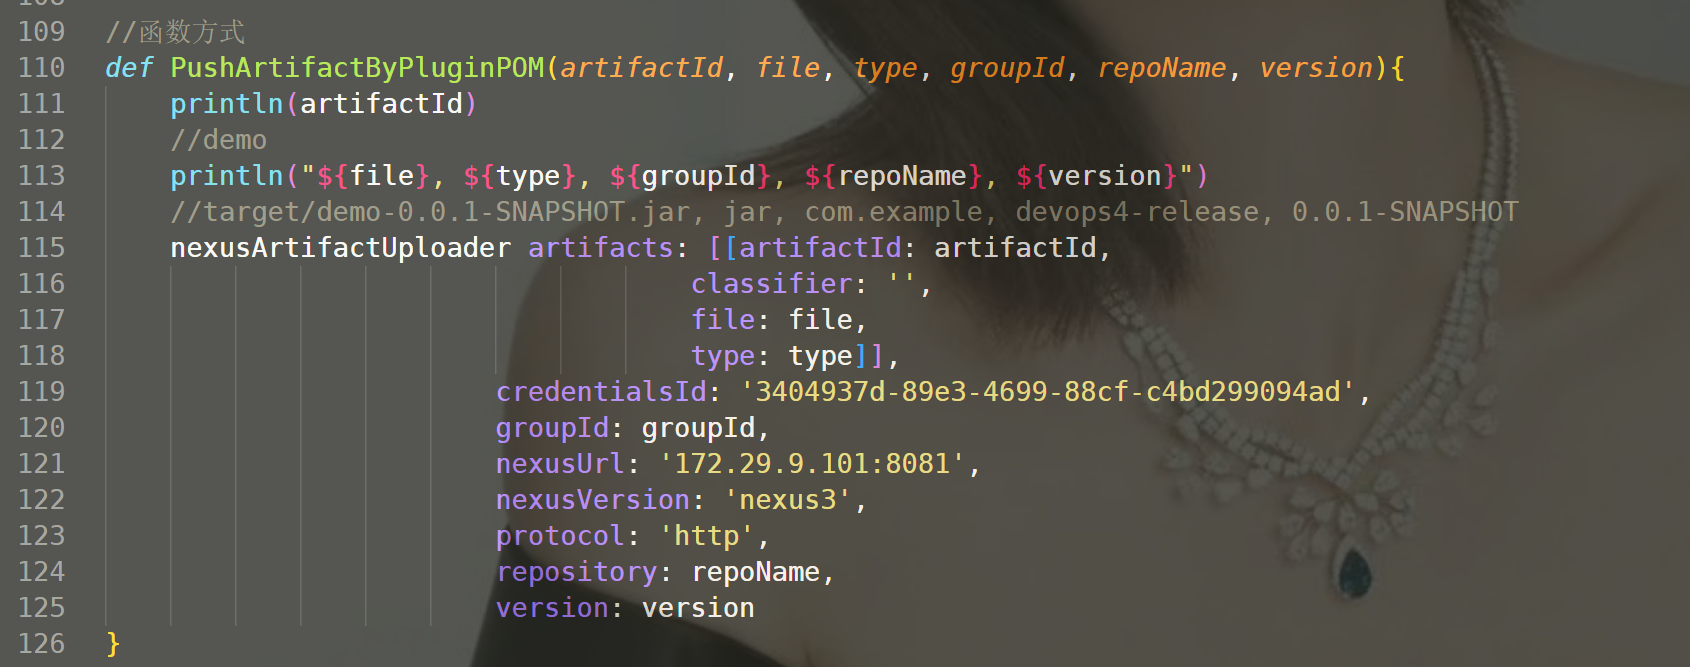
def PushArtifactByPluginPOM(artifactId, file, type, groupId, repoName, version){
println(artifactId)
//demo
println("${file}, ${type}, ${groupId}, ${repoName}, ${version}")
//target/demo-0.0.1-SNAPSHOT.jar, jar, com.example, devops4-release, 0.0.1-SNAPSHOT
nexusArtifactUploader artifacts: [[artifactId: artifactId,
classifier: '',
file: file,
type: type]],
credentialsId: '3404937d-89e3-4699-88cf-c4bd299094ad',
groupId: groupId,
nexusUrl: '172.29.9.101:8081',
nexusVersion: 'nexus3',
protocol: 'http',
repository: repoName,
version: version
}
再次运行:

发现这个方法也是ok的。(haha,函数方式感觉nb一点,那这里就采用函数方式了哦。😂)
然后把这部分代码放到共享库里,再次测试下:
符合预期。
此时共享库里玩转代码如下:
PushArtifact.groovy文件:
package org.devops

def PushArtifactByPlugin(){
    nexusArtifactUploader artifacts: [[artifactId: 'demo-app',
                                    classifier: '',
                                    file: 'target/demo-0.0.1-SNAPSHOT.jar',
                                    type: 'jar']],
                        credentialsId: '3404937d-89e3-4699-88cf-c4bd299094ad',
                        groupId: 'com.devops6',
                        nexusUrl: '172.29.9.101:8081',
                        nexusVersion: 'nexus3',
                        protocol: 'http',
                        repository: 'maven-devops6-release',
                        version: '1.1.1'
}

// def PushArtifactByPluginPOM(){
//     POM = readMavenPom file: 'pom.xml'
//     println(POM)
//     println("GroupID: ${POM.groupId}")
//     println("ArtifactID: ${POM.artifactId}")
//     println("Version: ${POM.version}")
//     println("Packaging: ${POM.packaging}")

//     env.artifactId = "${POM.artifactId}"
//     env.packaging = "${POM.packaging}"
//     env.groupId = "${POM.groupId}"
//     env.art_version = "${POM.version}"
//     env.art_name = "${env.artifactId}-${env.art_version}.${env.packaging}"
//     nexusArtifactUploader   artifacts: [[artifactId: "${env.artifactId}",
//                                         classifier: '',
//                                         file: "target/${env.art_name}",
//                                         type: "${env.packaging}"]],
//                             credentialsId: '3404937d-89e3-4699-88cf-c4bd299094ad',
//                             groupId: "${env.groupId}",
//                             nexusUrl: '172.29.9.101:8081',
//                             nexusVersion: 'nexus3',
//                             protocol: 'http',
//                             repository: 'maven-devops6-release',
//                             version: "${env.art_version}"
// }

//函数方式
def PushArtifactByPluginPOM(artifactId, file, type, groupId, repoName, version){
    println(artifactId)
    //demo
    println("${file}, ${type}, ${groupId}, ${repoName}, ${version}")
    //target/demo-0.0.1-SNAPSHOT.jar, jar, com.example, devops4-release, 0.0.1-SNAPSHOT
    nexusArtifactUploader artifacts: [[artifactId: artifactId,
                                    classifier: '',
                                    file: file,
                                    type: type]],
                        credentialsId: '3404937d-89e3-4699-88cf-c4bd299094ad',
                        groupId: groupId,
                        nexusUrl: '172.29.9.101:8081',
                        nexusVersion: 'nexus3',
                        protocol: 'http',
                        repository: repoName,
                        version: version
}
Jenkinsfile文件:
@Library("devops06@main") _

//import src/org/devops/Build.groovy
def build = new org.devops.Build()
def sonar = new org.devops.Sonar()
def pushartifact = new org.devops.PushArtifact()

currentBuild.displayName = "${env.branchName}-commitID"
currentBuild.description = "Trigger by user jenkins \n branch: ${env.branchName}"

pipeline {
    agent {label "build"}
    options {
        skipDefaultCheckout true
    }


    stages{
        stage("CheckOut"){
            steps{
                script{
                    build.CheckOut()
                }
            }
        }

        stage("Build"){
            steps{
                script{
                    build.Build()
                }
            }

        }

        stage("CodeScan"){
            when {
                environment name: 'skipSonar', value: 'false'
            }

            steps{
                script{

                    sonar.SonarScannerByPlugin()

                }
            }
        }

         stage("PushArtifact"){
            steps{
                script{
                    //PushArtifactByPlugin()
                    // PushArtifactByPluginPOM()
                    pomData = readMavenPom file: 'pom.xml'

                    buName = "${JOB_NAME}".split("-")[0]
                    repoName = "maven-${buName}-release"
                    file = "target/${pomData.artifactId}-${pomData.version}.${pomData.packaging}"
        			pushartifact.PushArtifactByPluginPOM(pomData.artifactId, file, pomData.packaging, pomData.groupId, repoName, pomData.version)
                }
            }

        }

    }
}
测试完成。😘
扩展: 可以在Jenkins页面添加参数, 让用户输入后进行发布
| 💘 扩展: 可以在Jenkins页面添加参数, 让用户输入后进行发布(测试成功)-2023.6.28 |
测试过程如下:
- 改写代码:
@Library("mylib@main") _     //加载共享库
import org.devops.*						// 导入库

def checkout = new Checkout()    //New实例化
def build = new Build()
def unittest = new UnitTest()
def sonar = new Sonar()
def gitcli = new GitLab()

//env.buildType = "${JOB_NAME}".split("-")[1]

//流水线
pipeline {
    agent { label "build" }

    options {
        skipDefaultCheckout true
    }

    stages{
        stage("Checkout"){
            steps{
                script {
                    println("GetCode")
                    checkout.GetCode("${env.srcUrl}", "${env.branchName}")
                }
            }
        }

        stage("Build"){
            steps{
                script{
                    println("Build")
                    //build.CodeBuild("${env.buildType}")
                    sh "${env.buildShell}"

                }
            }
        }

        /*stage("UnitTest"){
            steps{
                script{
                    unittest.CodeTest("${env.buildType}")
                }
            }
        }*/

        stage("CodeScan"){
            when {
                environment name: 'skipSonar', value: 'false'
            }
            steps{
                script{
                    profileName = "${JOB_NAME}".split("-")[0]
                    sonar.Init("${JOB_NAME}", "java", profileName)


                    //commit-status
                    commitID = gitcli.GetCommitID()
                    groupName =profileName
                    projectID = gitcli.GetProjectID("${JOB_NAME}", groupName)
                    sonar.CodeScan("${env.branchName}", commitID, projectID)
                    }

                }
        }

        stage("PushArtifact"){
        	steps{
        		script{
                    // 读取pom文件获取坐标信息
                    // pomData = readMavenPom file: 'pom.xml'
                    // println(pomData)
                    // println(pomData.getClass())
                    buName = "${JOB_NAME}".split("-")[0]
                    repoName = "${buName}-snapshot"
                    file = "target/${env.artifactId}-${env.version}.${env.packaging}"
                    // 用户输入获取坐标信息
        			PushArtifactByNexusPlugin(env.artifactId, file, env.packaging ,env.groupId, repoName, env.version)
        		}
        	}


        }

    }
}


def PushArtifactByNexusPlugin(artifactId, file, type, groupId, repoName, version){
    println(artifactId)
    //demo
    println("${file}, ${type}, ${groupId}, ${repoName}, ${version}")
    //target/demo-0.0.1-SNAPSHOT.jar, jar, com.example, devops4-release, 0.0.1-SNAPSHOT
    nexusArtifactUploader artifacts: [[artifactId: artifactId,
                                    classifier: '',
                                    file: file,
                                    type: type]],
                        credentialsId: '2b44f51a-2374-4275-aeed-b720f4fbf937',
                        groupId: groupId,
                        nexusUrl: '172.29.9.101:8081',
                        nexusVersion: 'nexus3',
                        protocol: 'http',
                        repository: repoName,
                        version: version
}
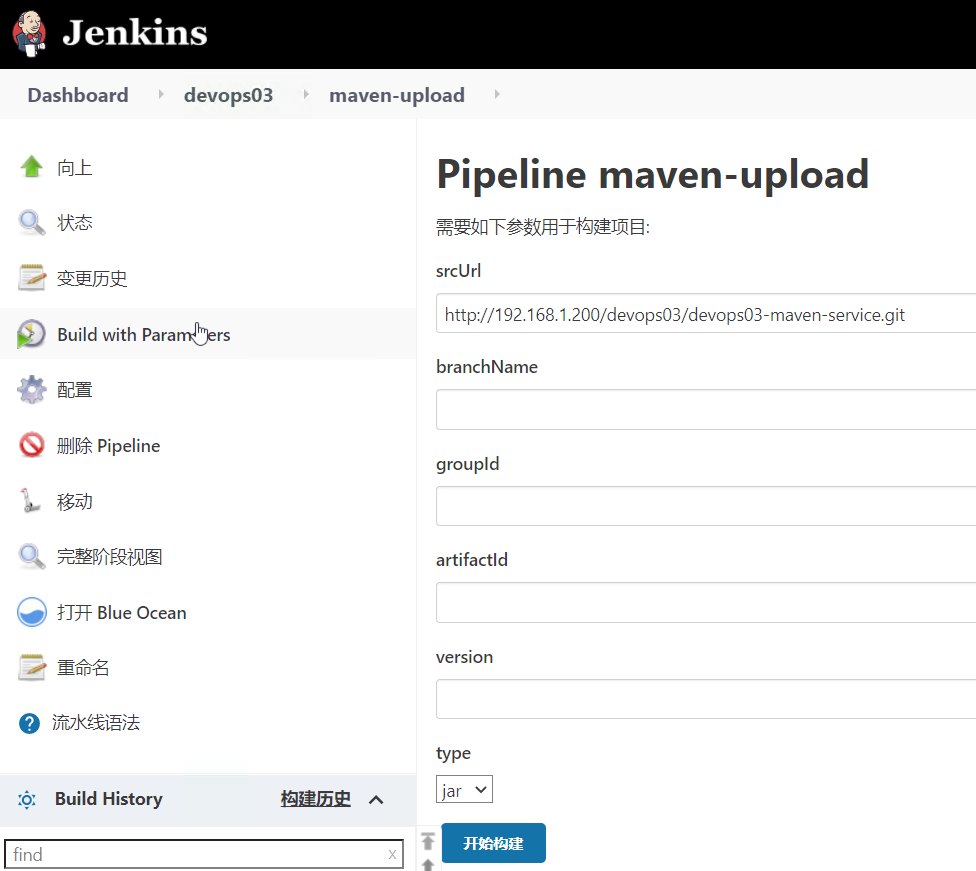
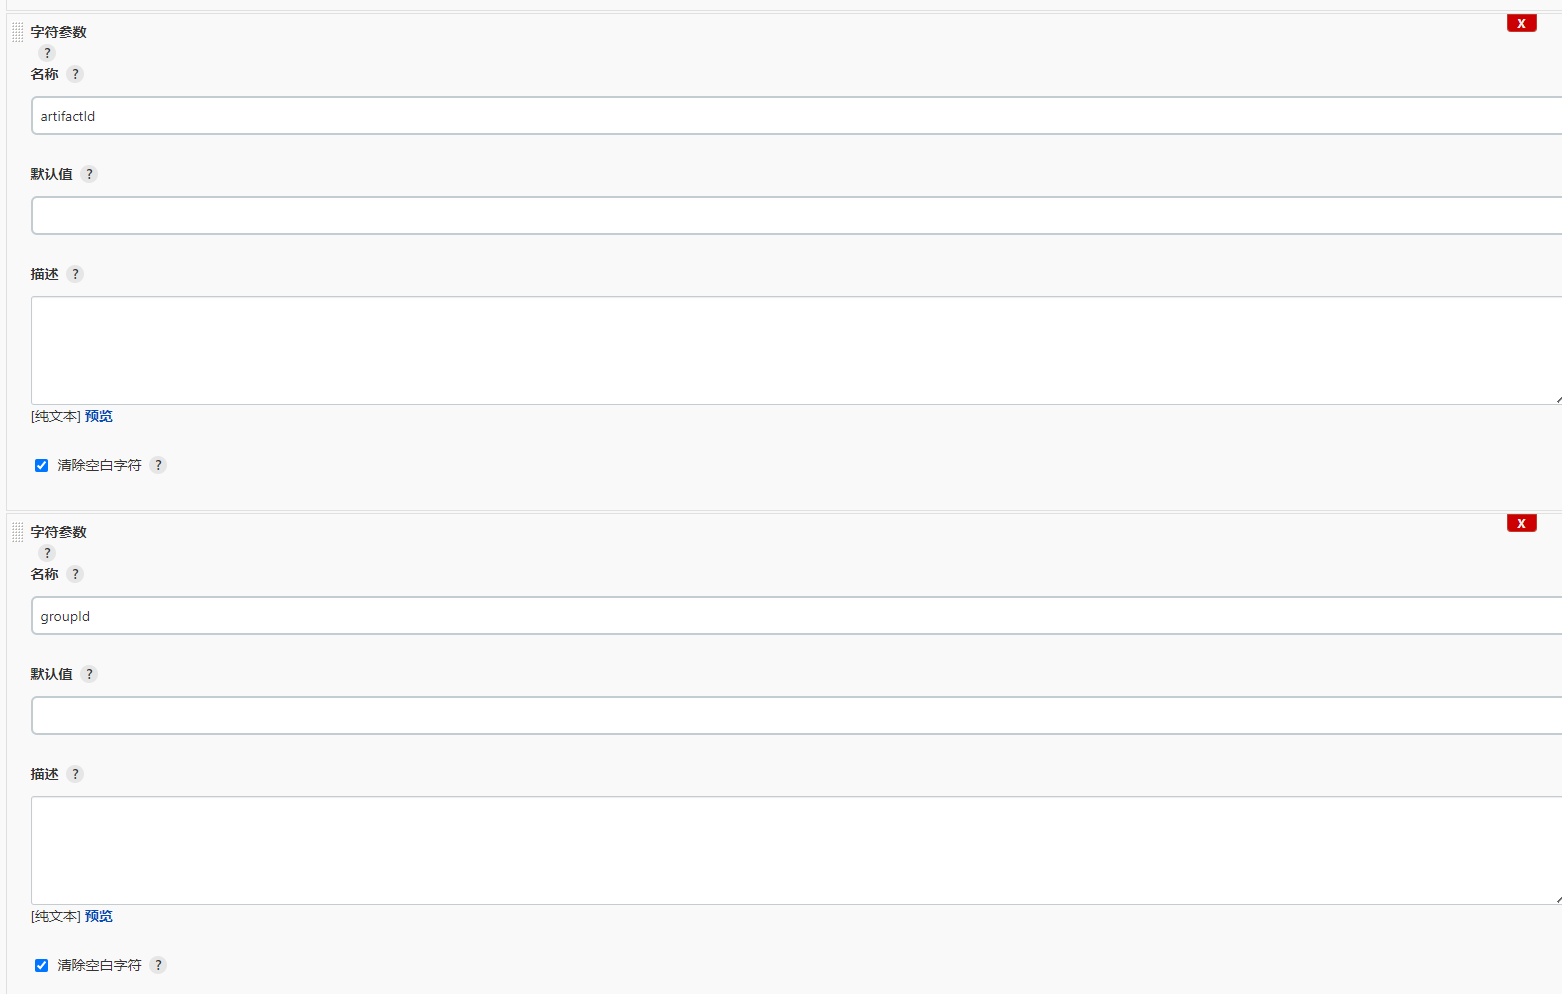
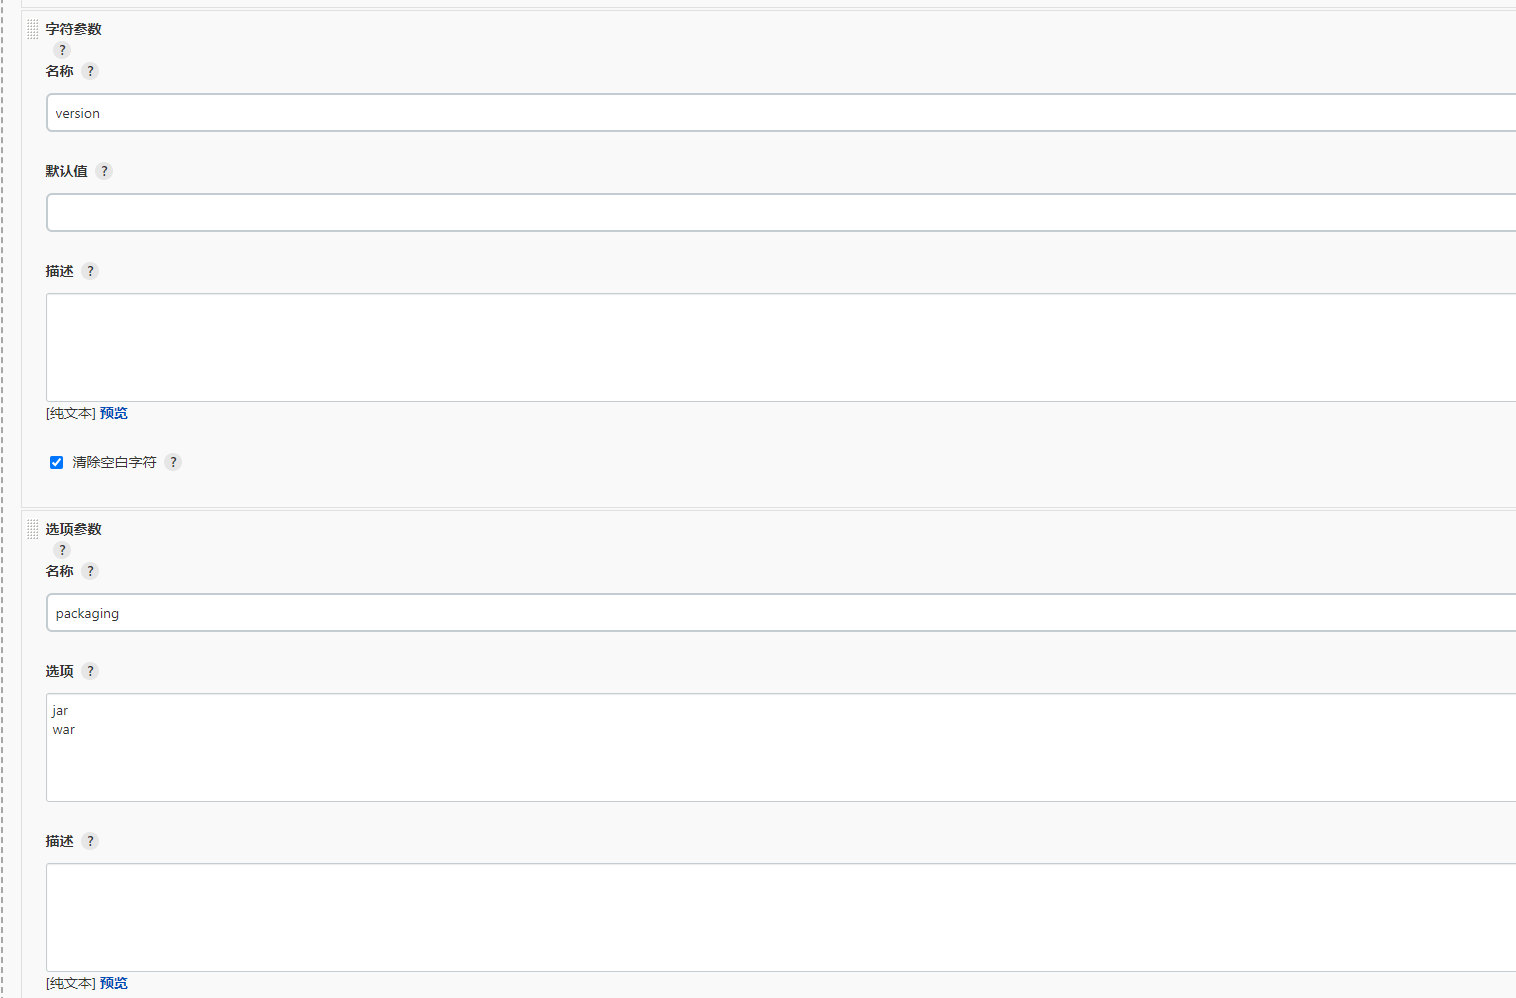
- 在流水线里添加字符参数和选项参数:
- 开始构建:
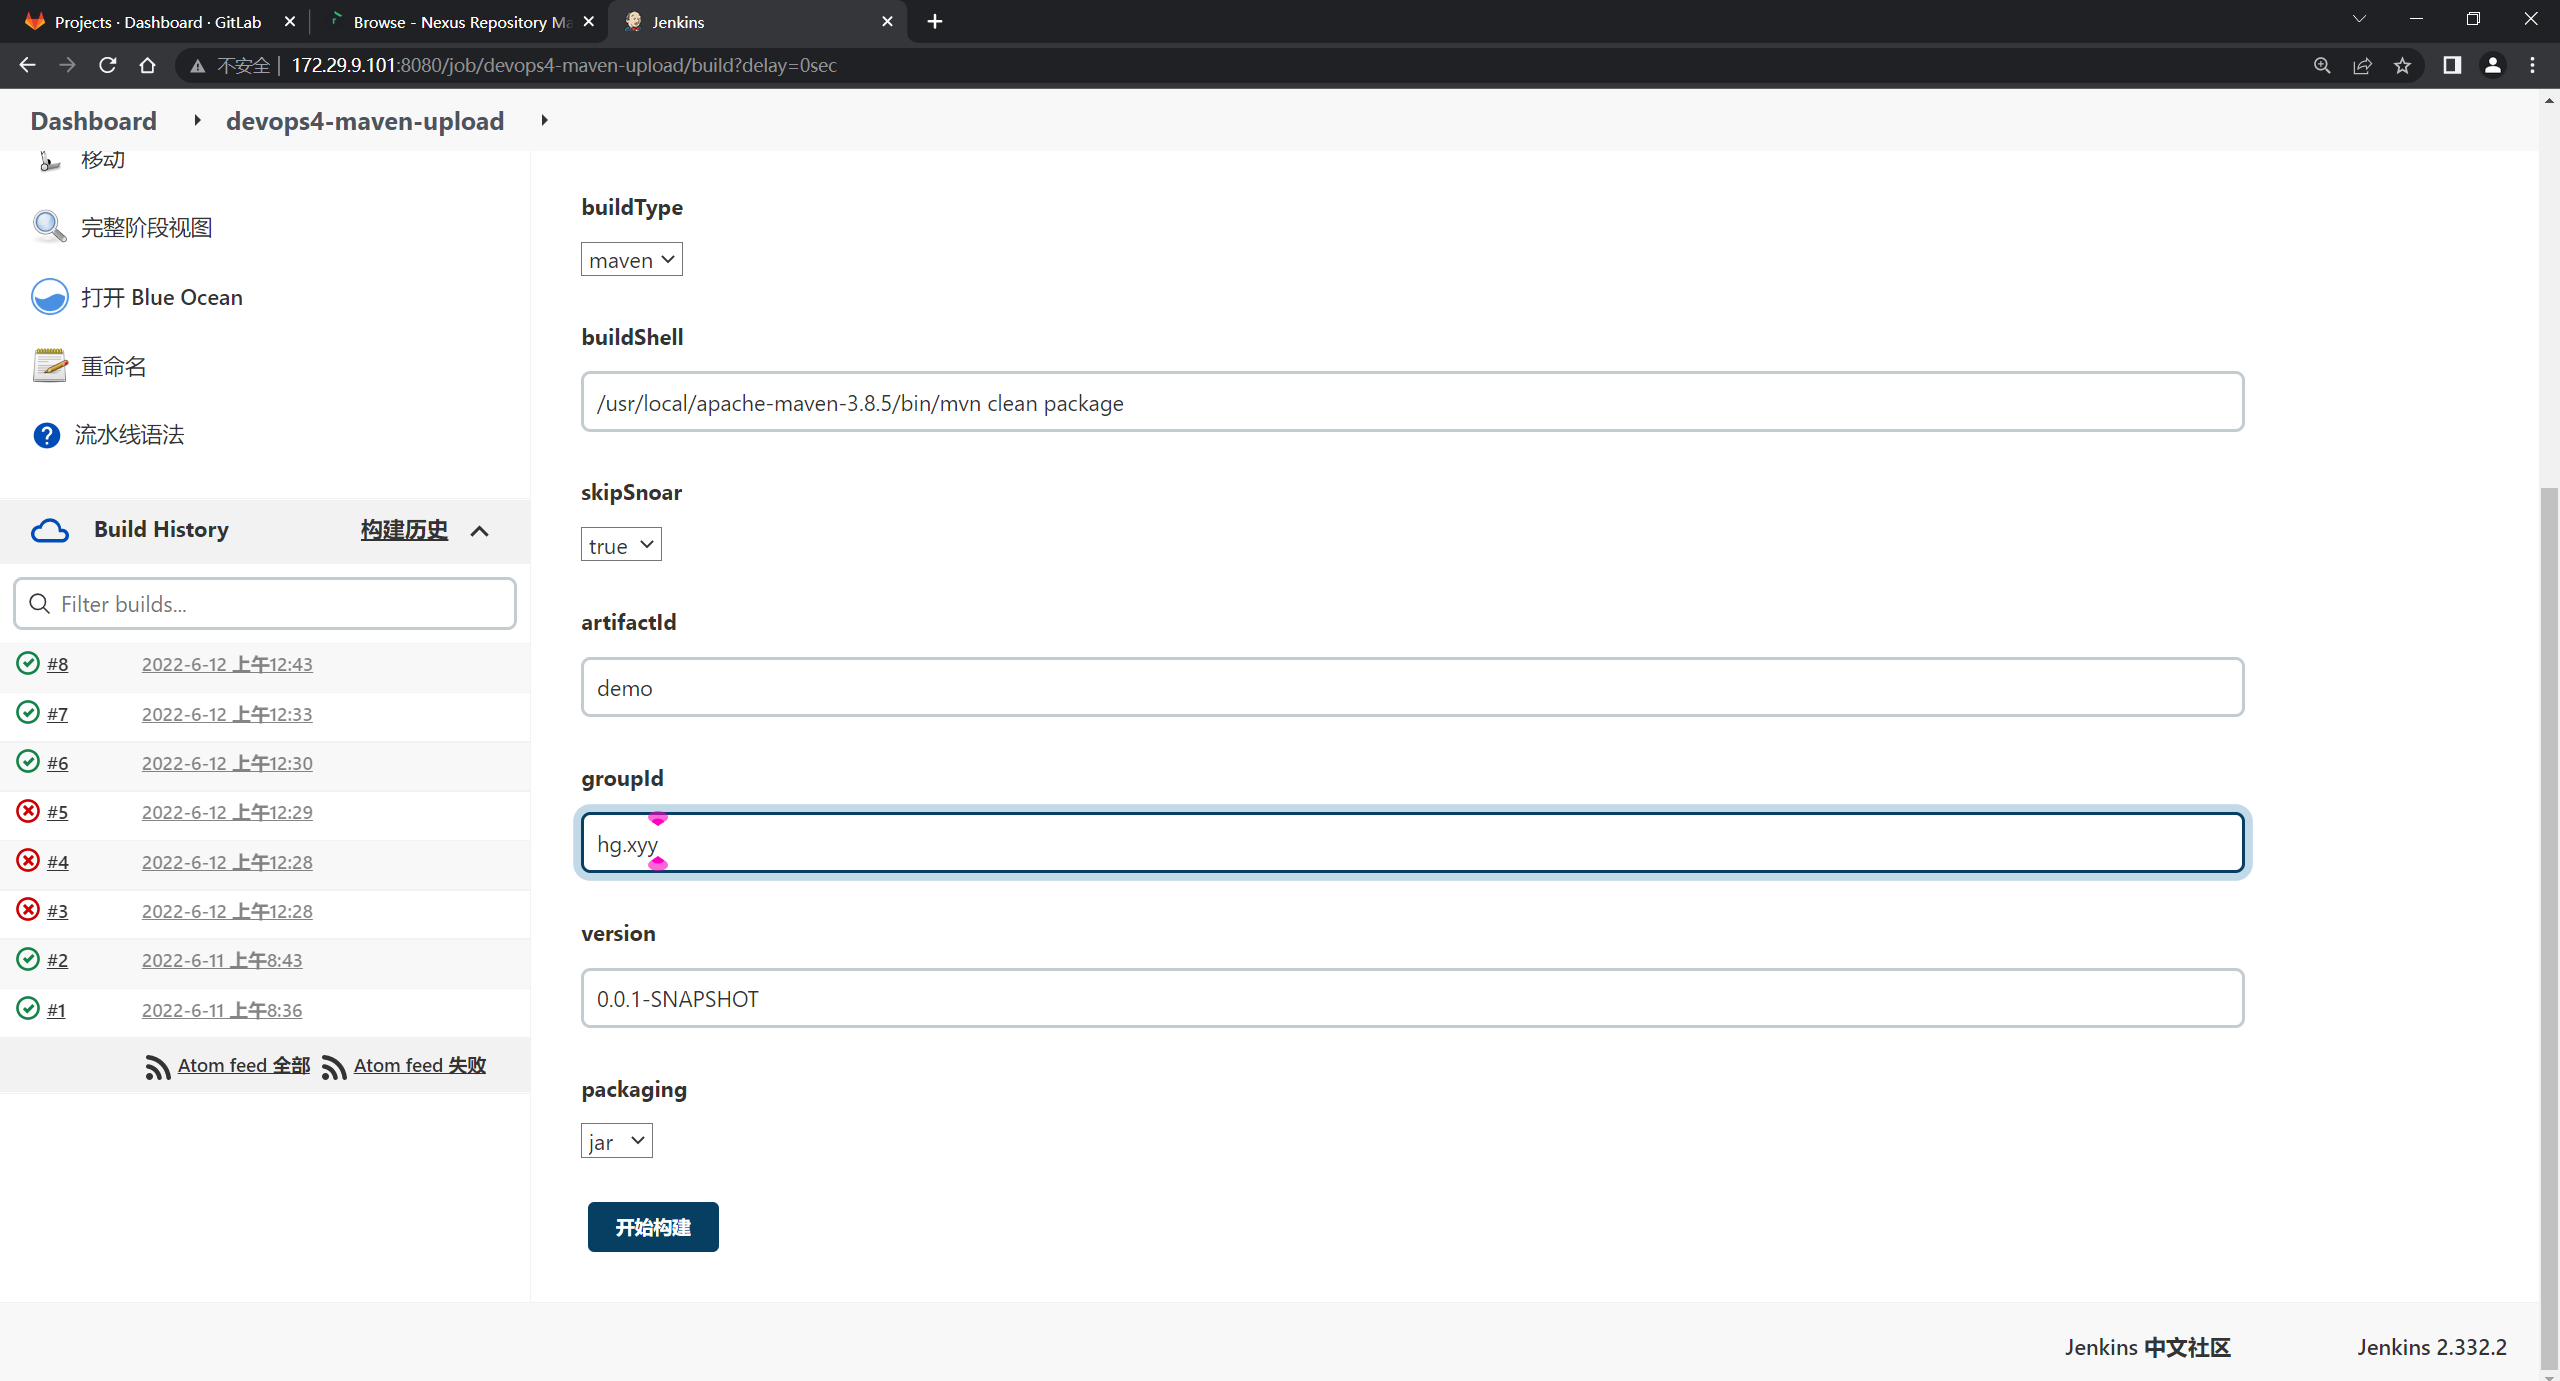
观察效果:

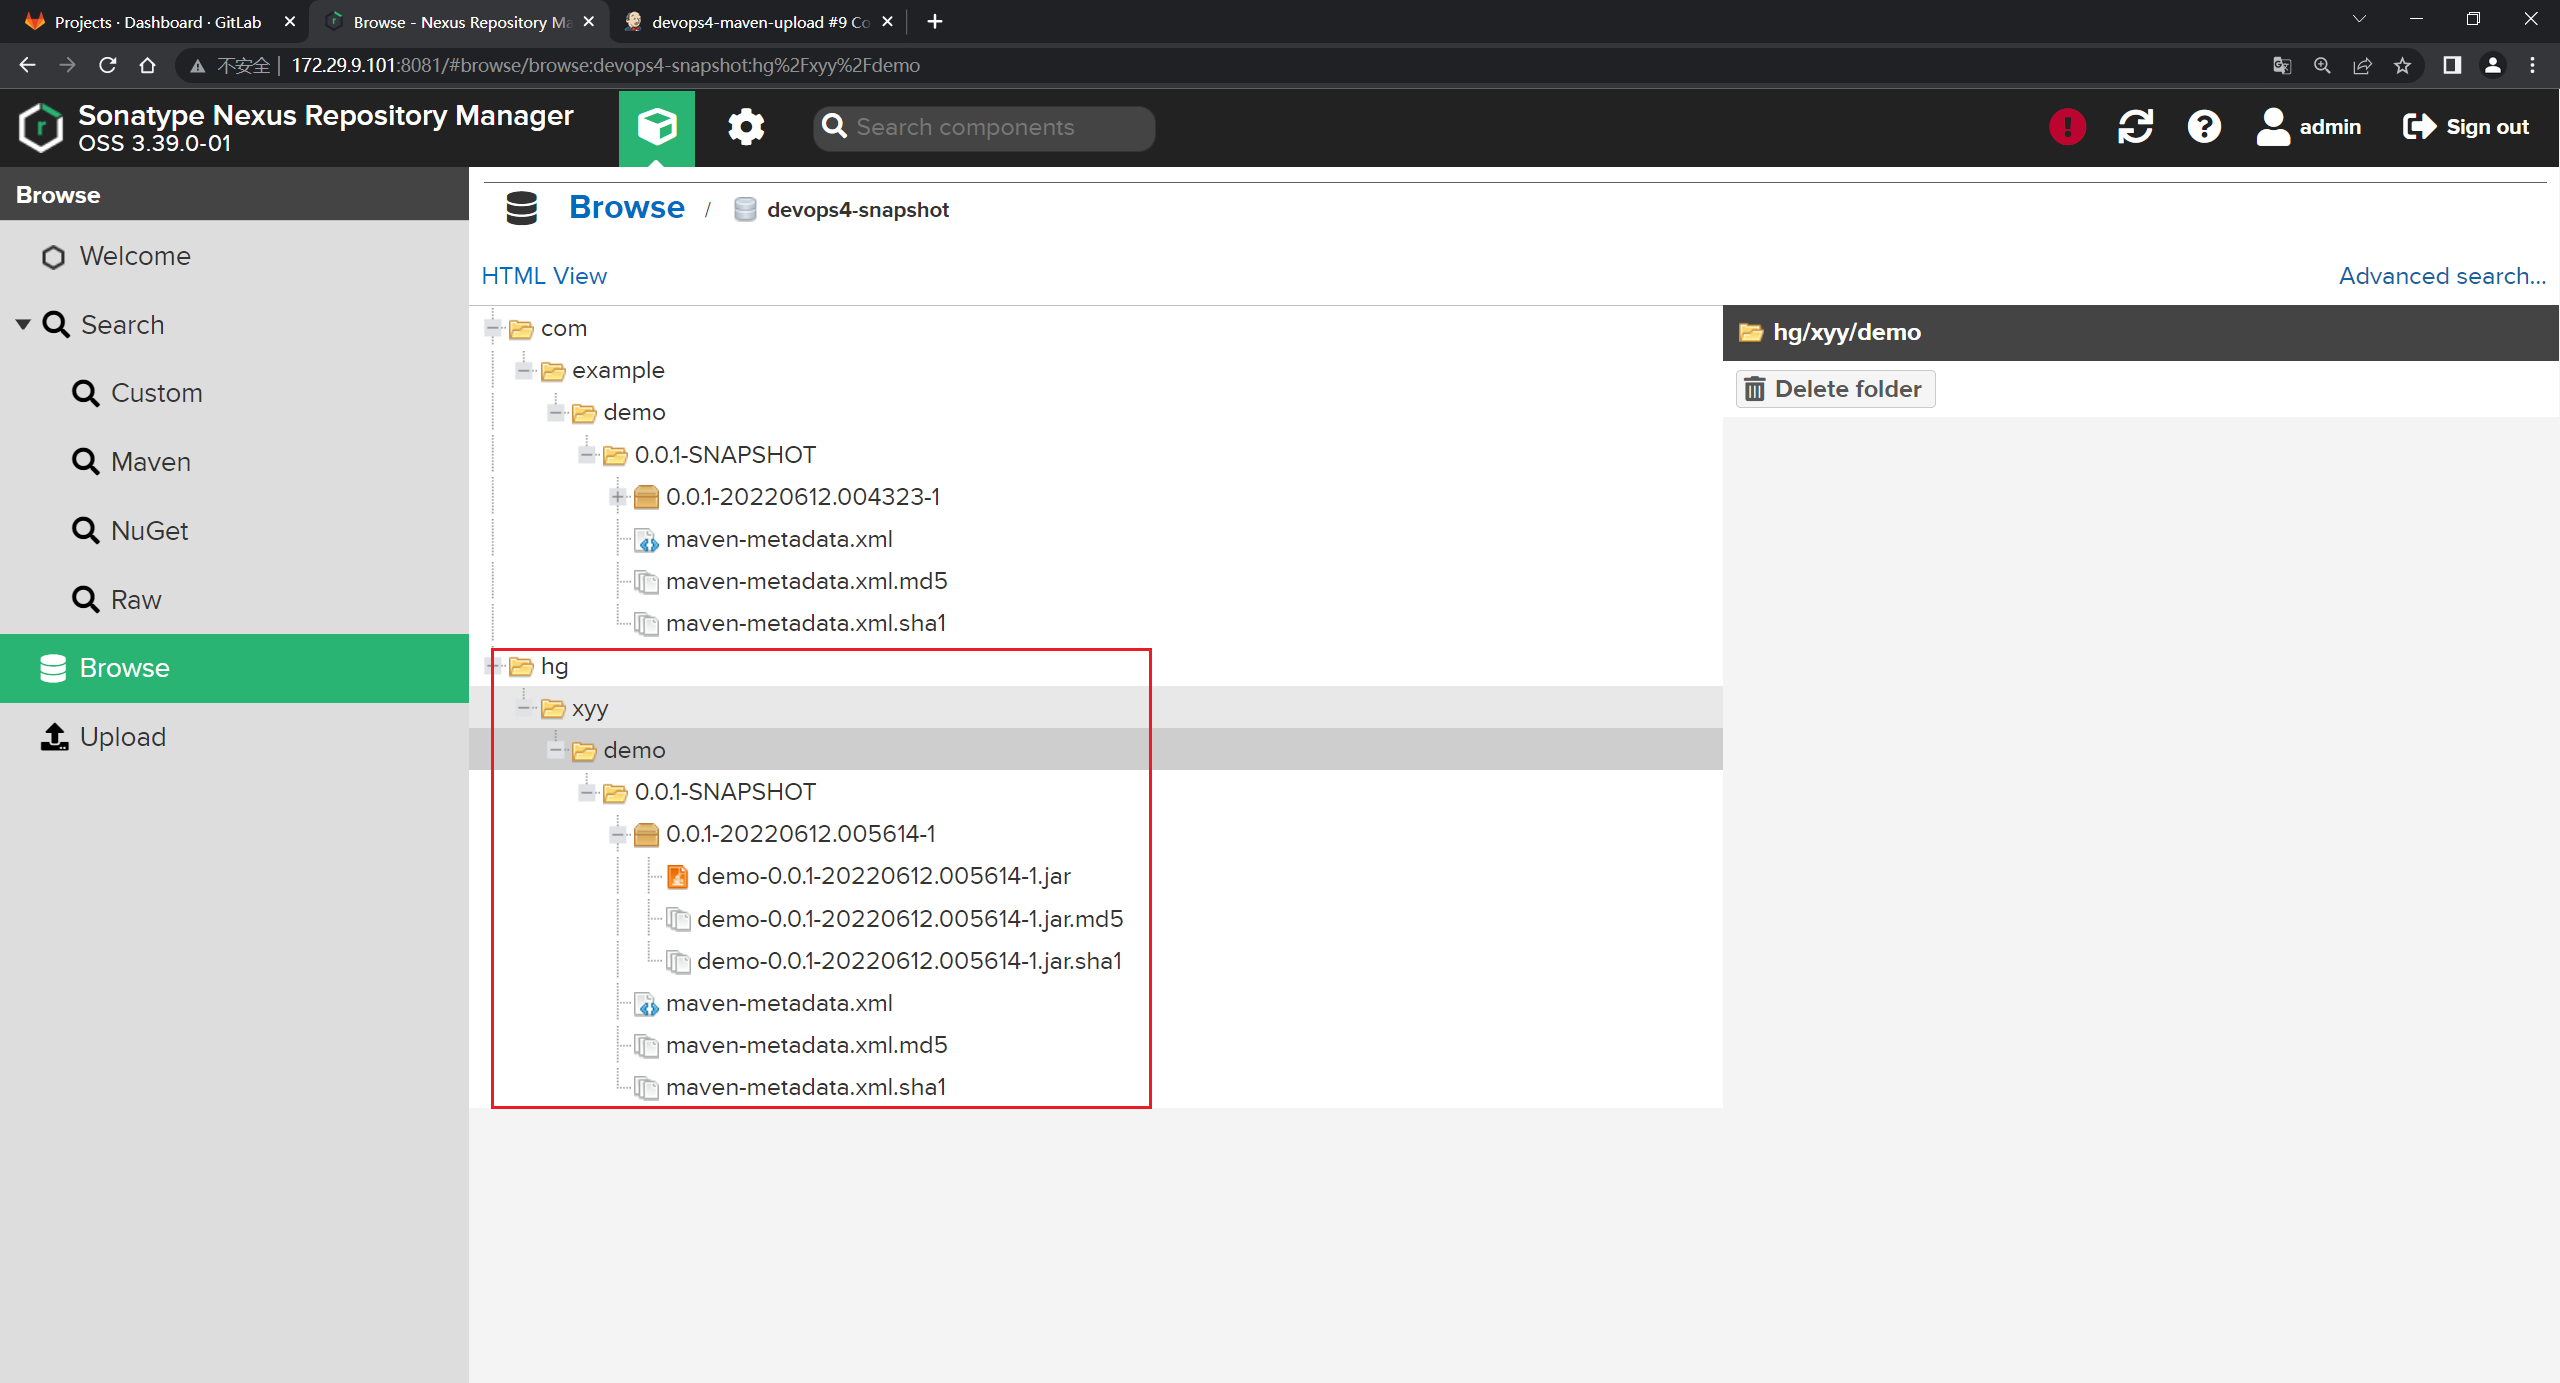
可以看到制品被成功上传到制品库了:
测试结束。😘
Jenkins插件获取包路径
发布其实就是下载制品,然后将制品发送到目标主机,最后通过脚本或者指令启动程序。
这个其实没多大意义。
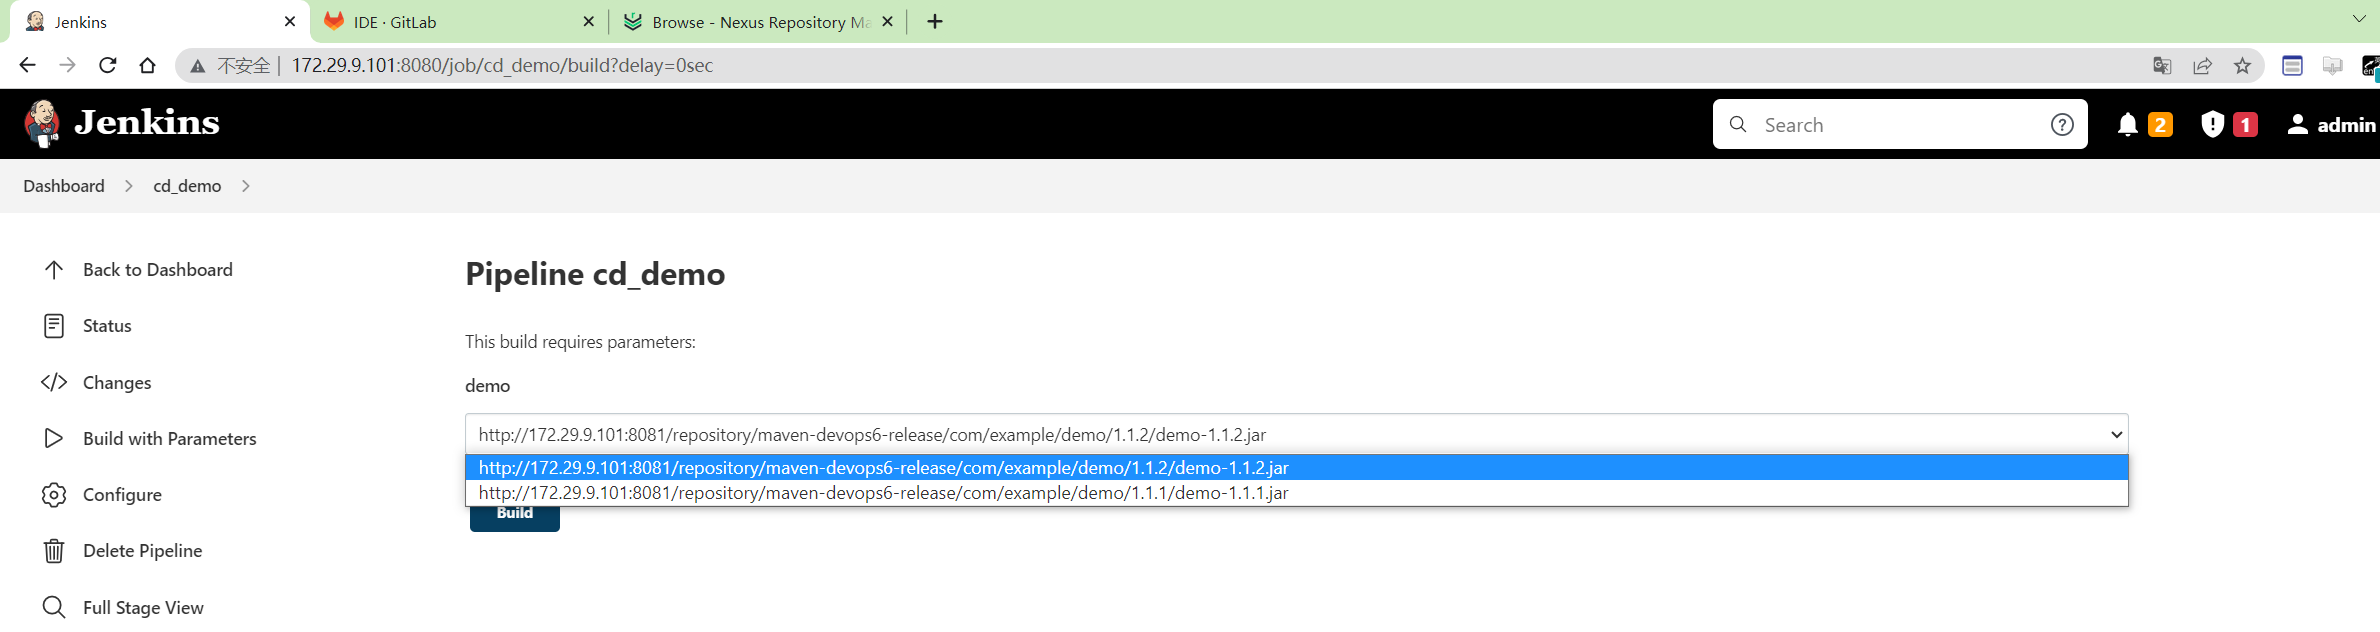
| 💘 实践:Jenkins插件获取包路径-2023.6.29(测试成功) |
- 实验环境
gitlab-ce:15.0.3-ce.0
jenkins:2.346.3-2-lts-jdk11
sonarqube:9.9.0-community
nexus3:3.53.0
- 实验软件(无)
下面是下载制品的示例:
curl http://192.168.1.200:8081/repository/devops-maven/com/example/demo/1.1.10/demo-1.1.10.jar -o app.jar -uadmin:admin123
或者:
- 安装插件
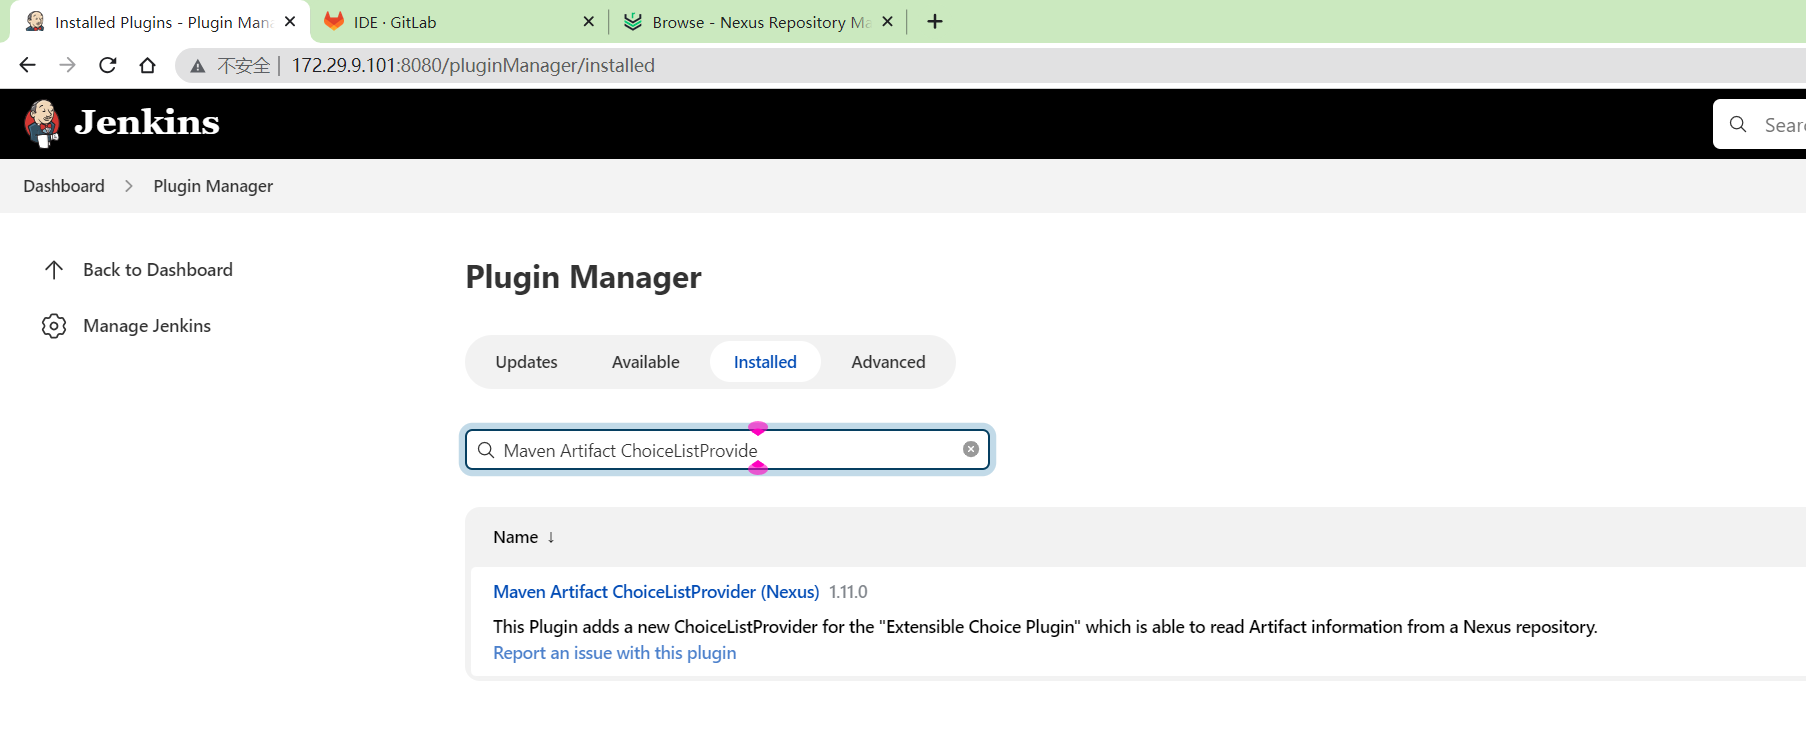
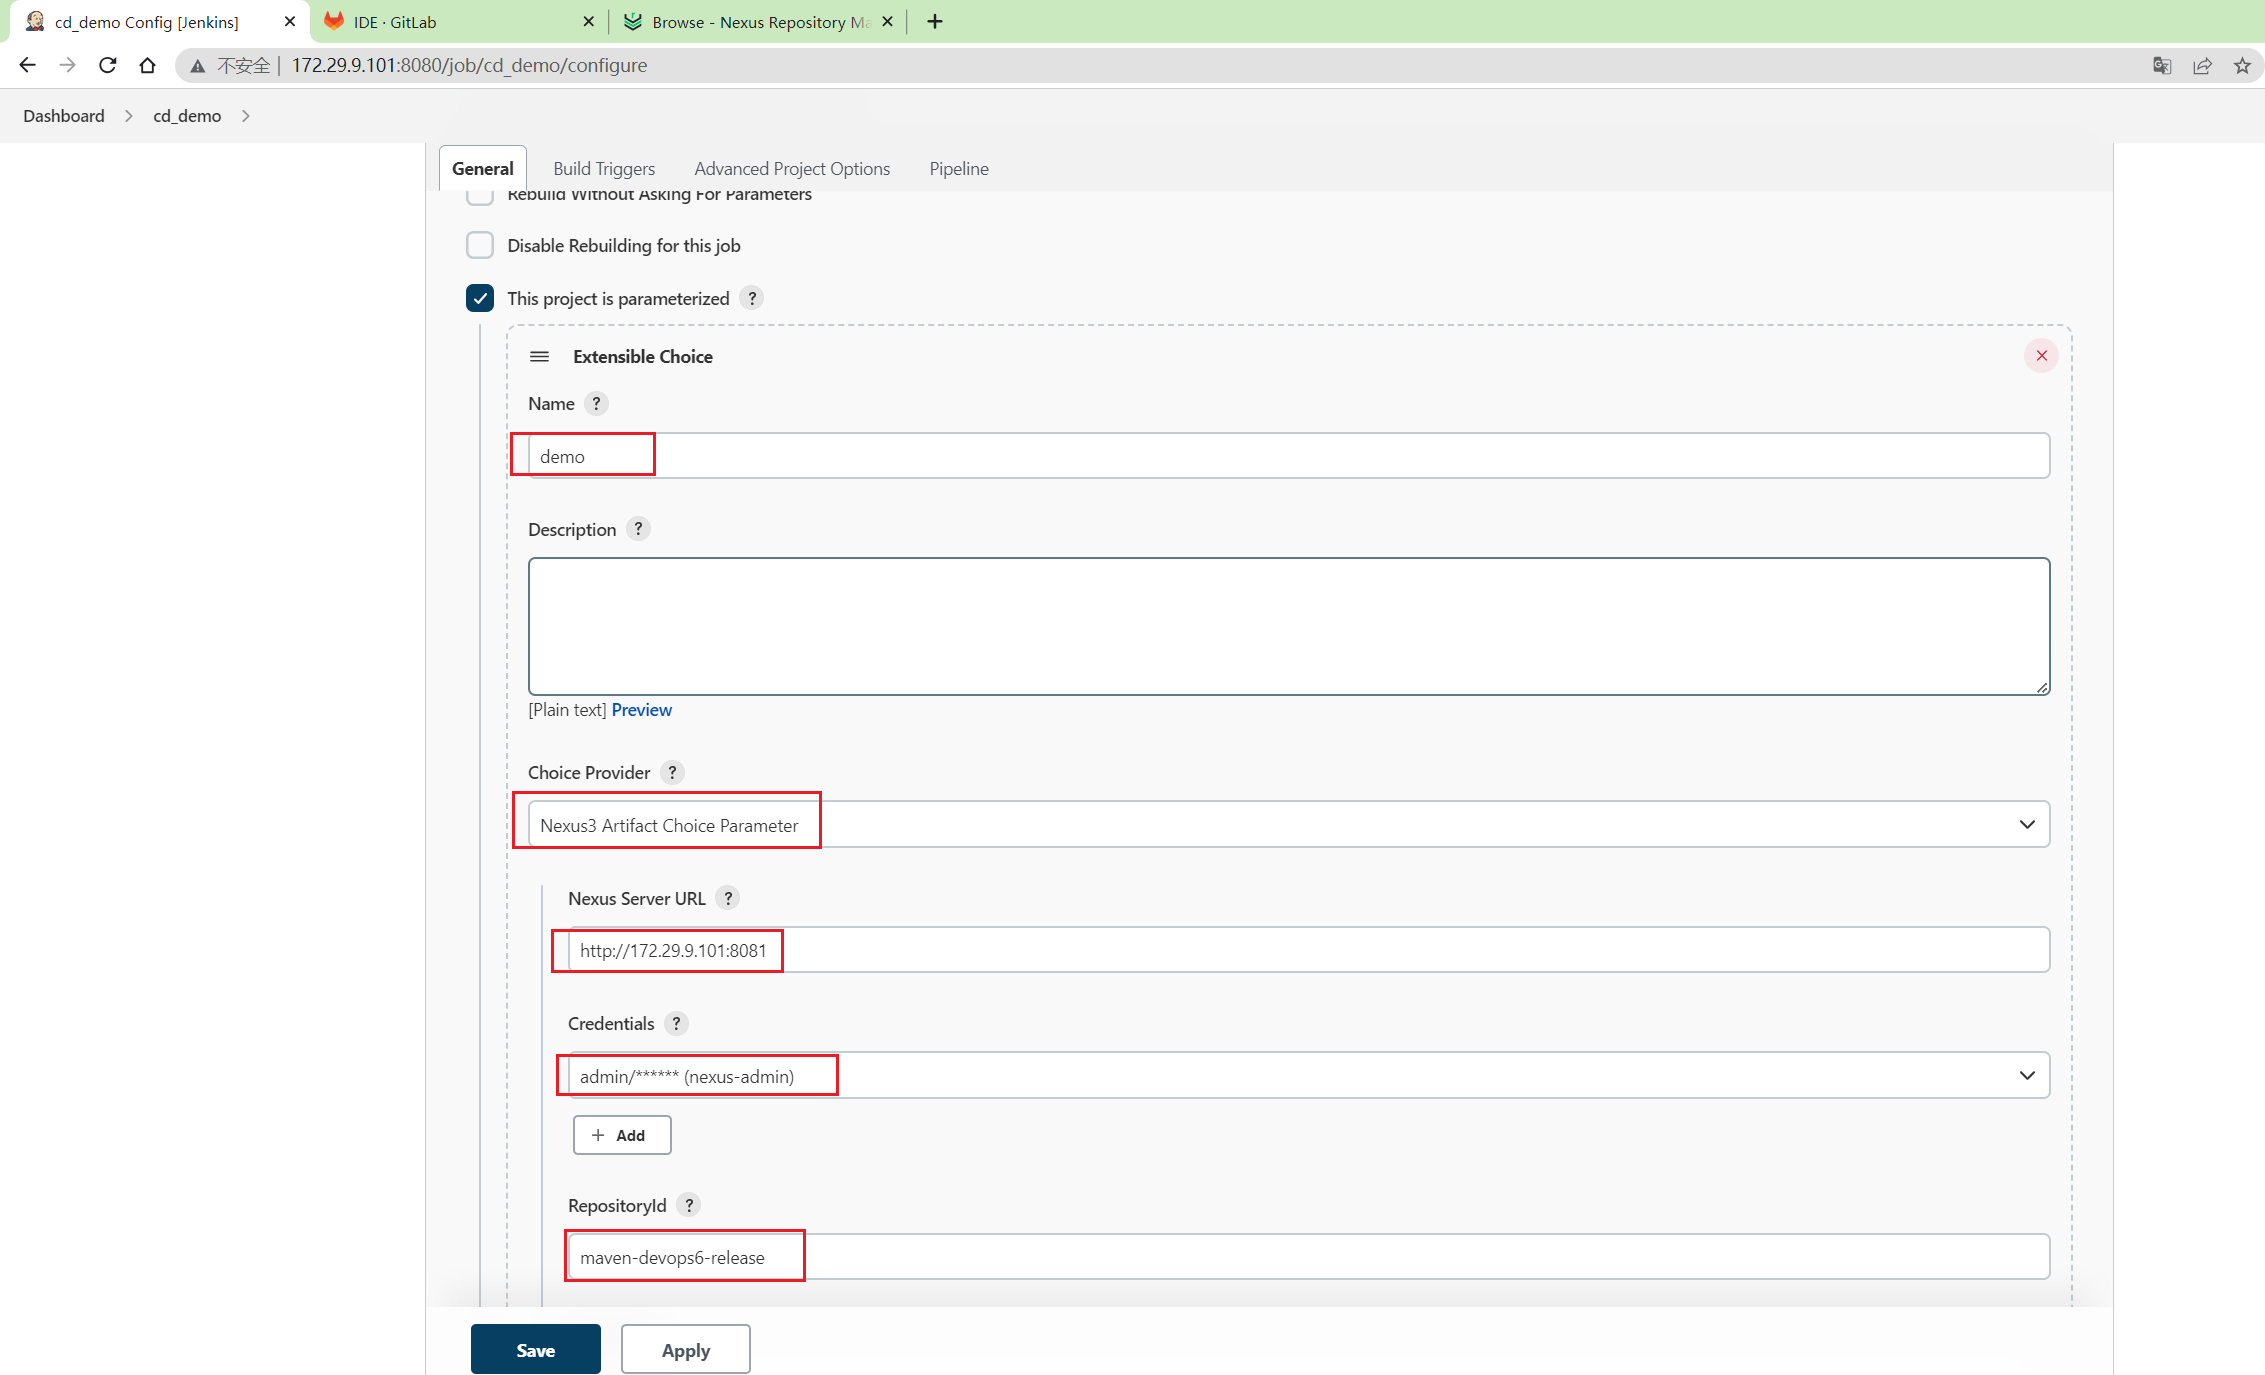
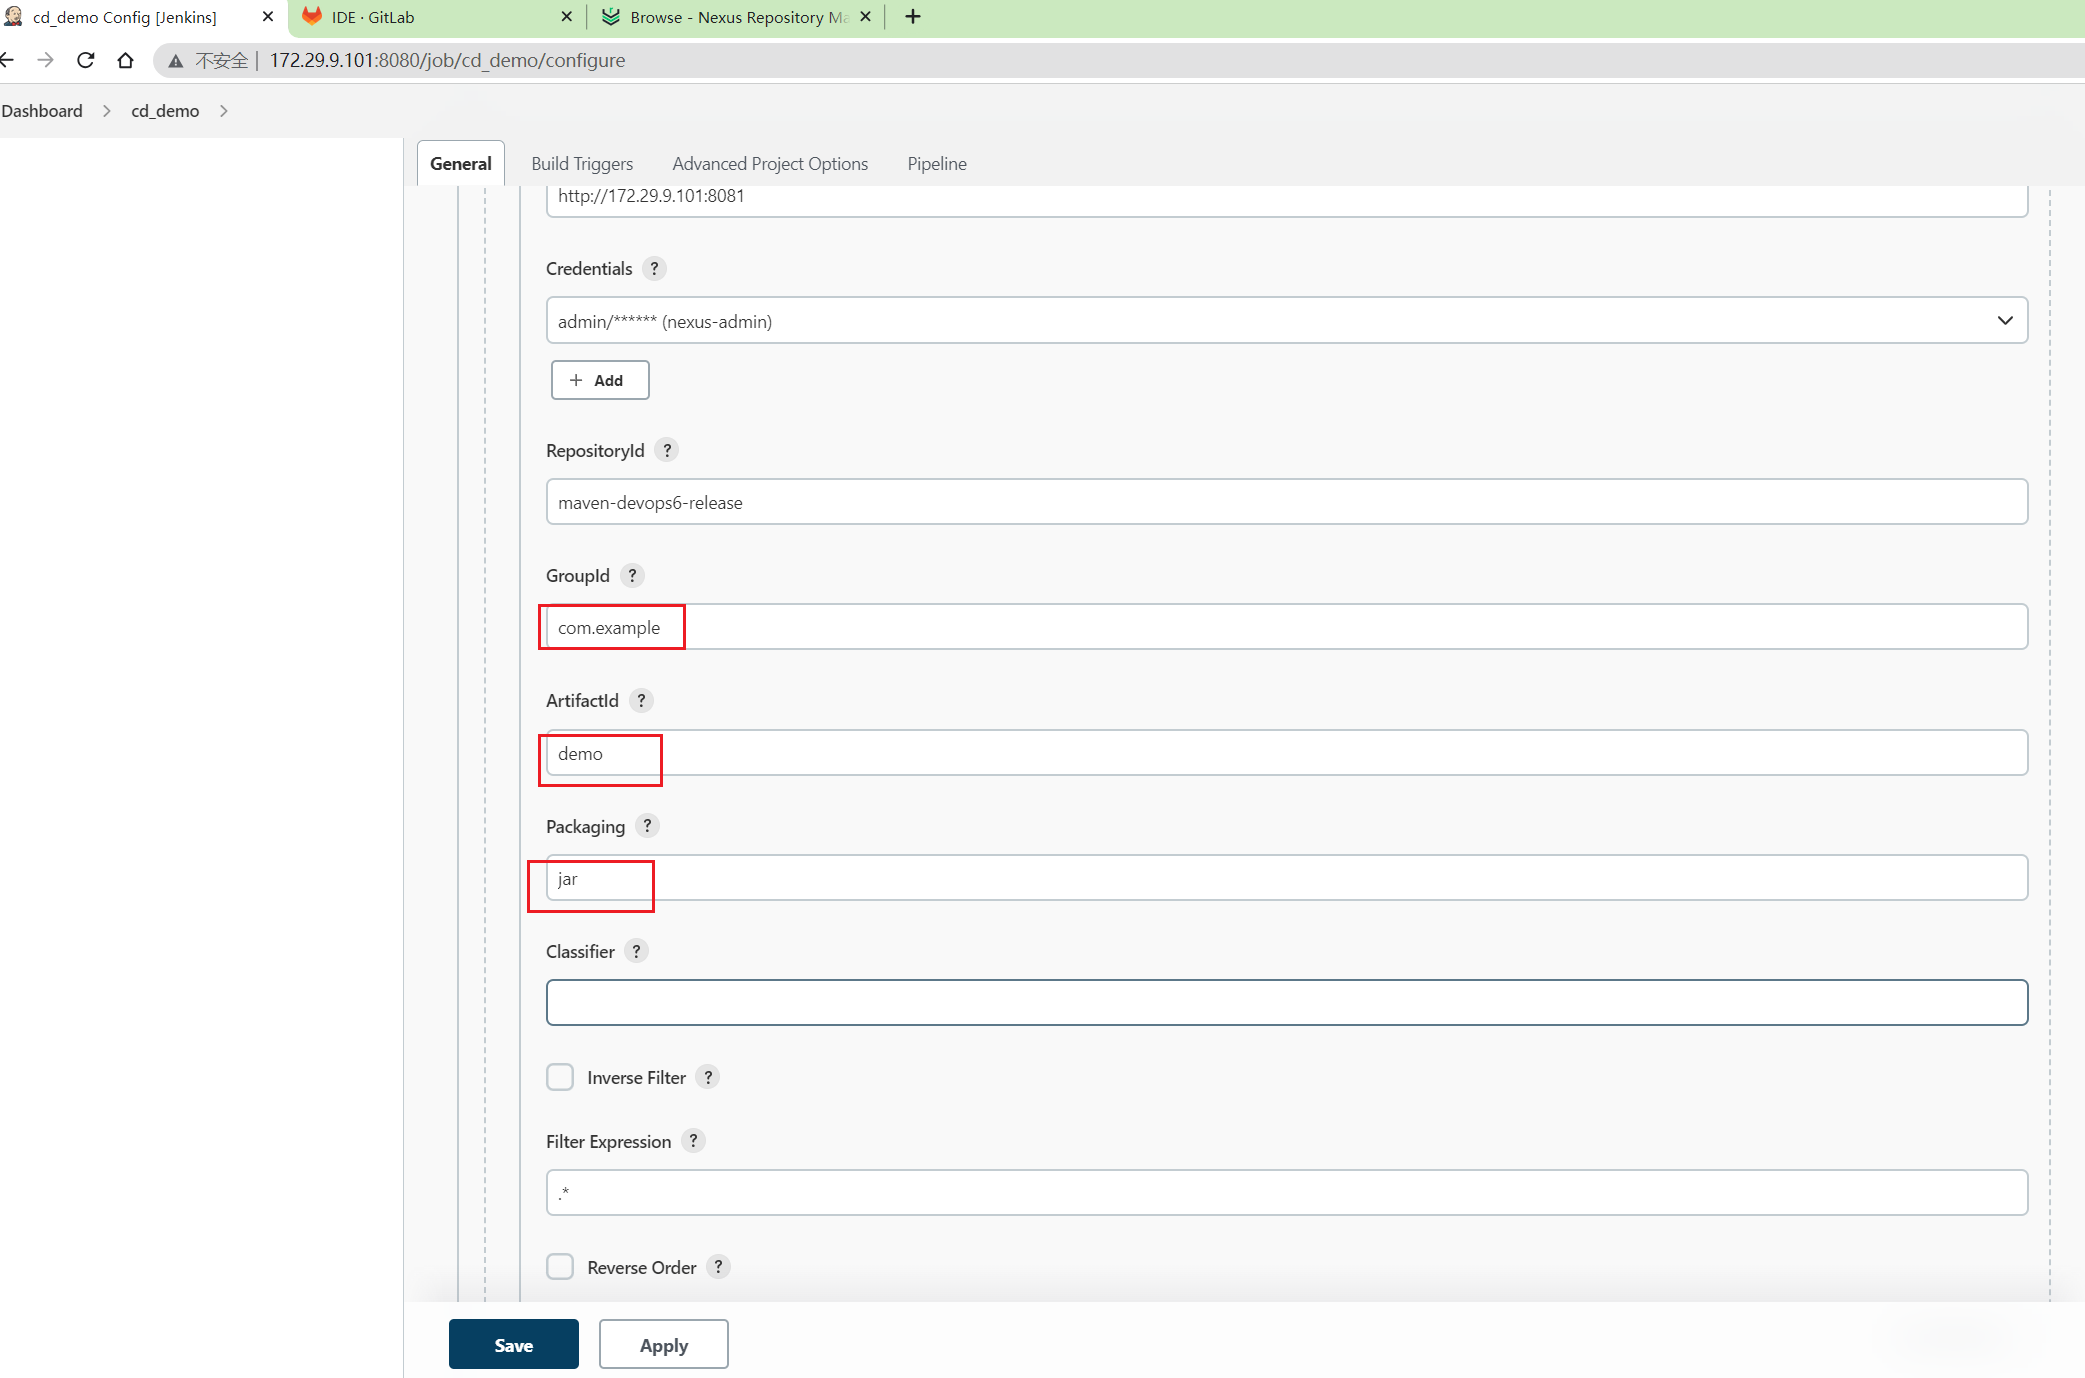
Maven Artifact ChoiceListProvider (Nexus)
- 创建一个流水线
创建选项参数,选择扩展选项参数,并配置:
- 点击构建,就出现效果了
用户选择制品后, 点击构建。此时可以想象,Jenkins下载这个包, 然后通过salt、ansible进行发布部署。
测试结束。😘
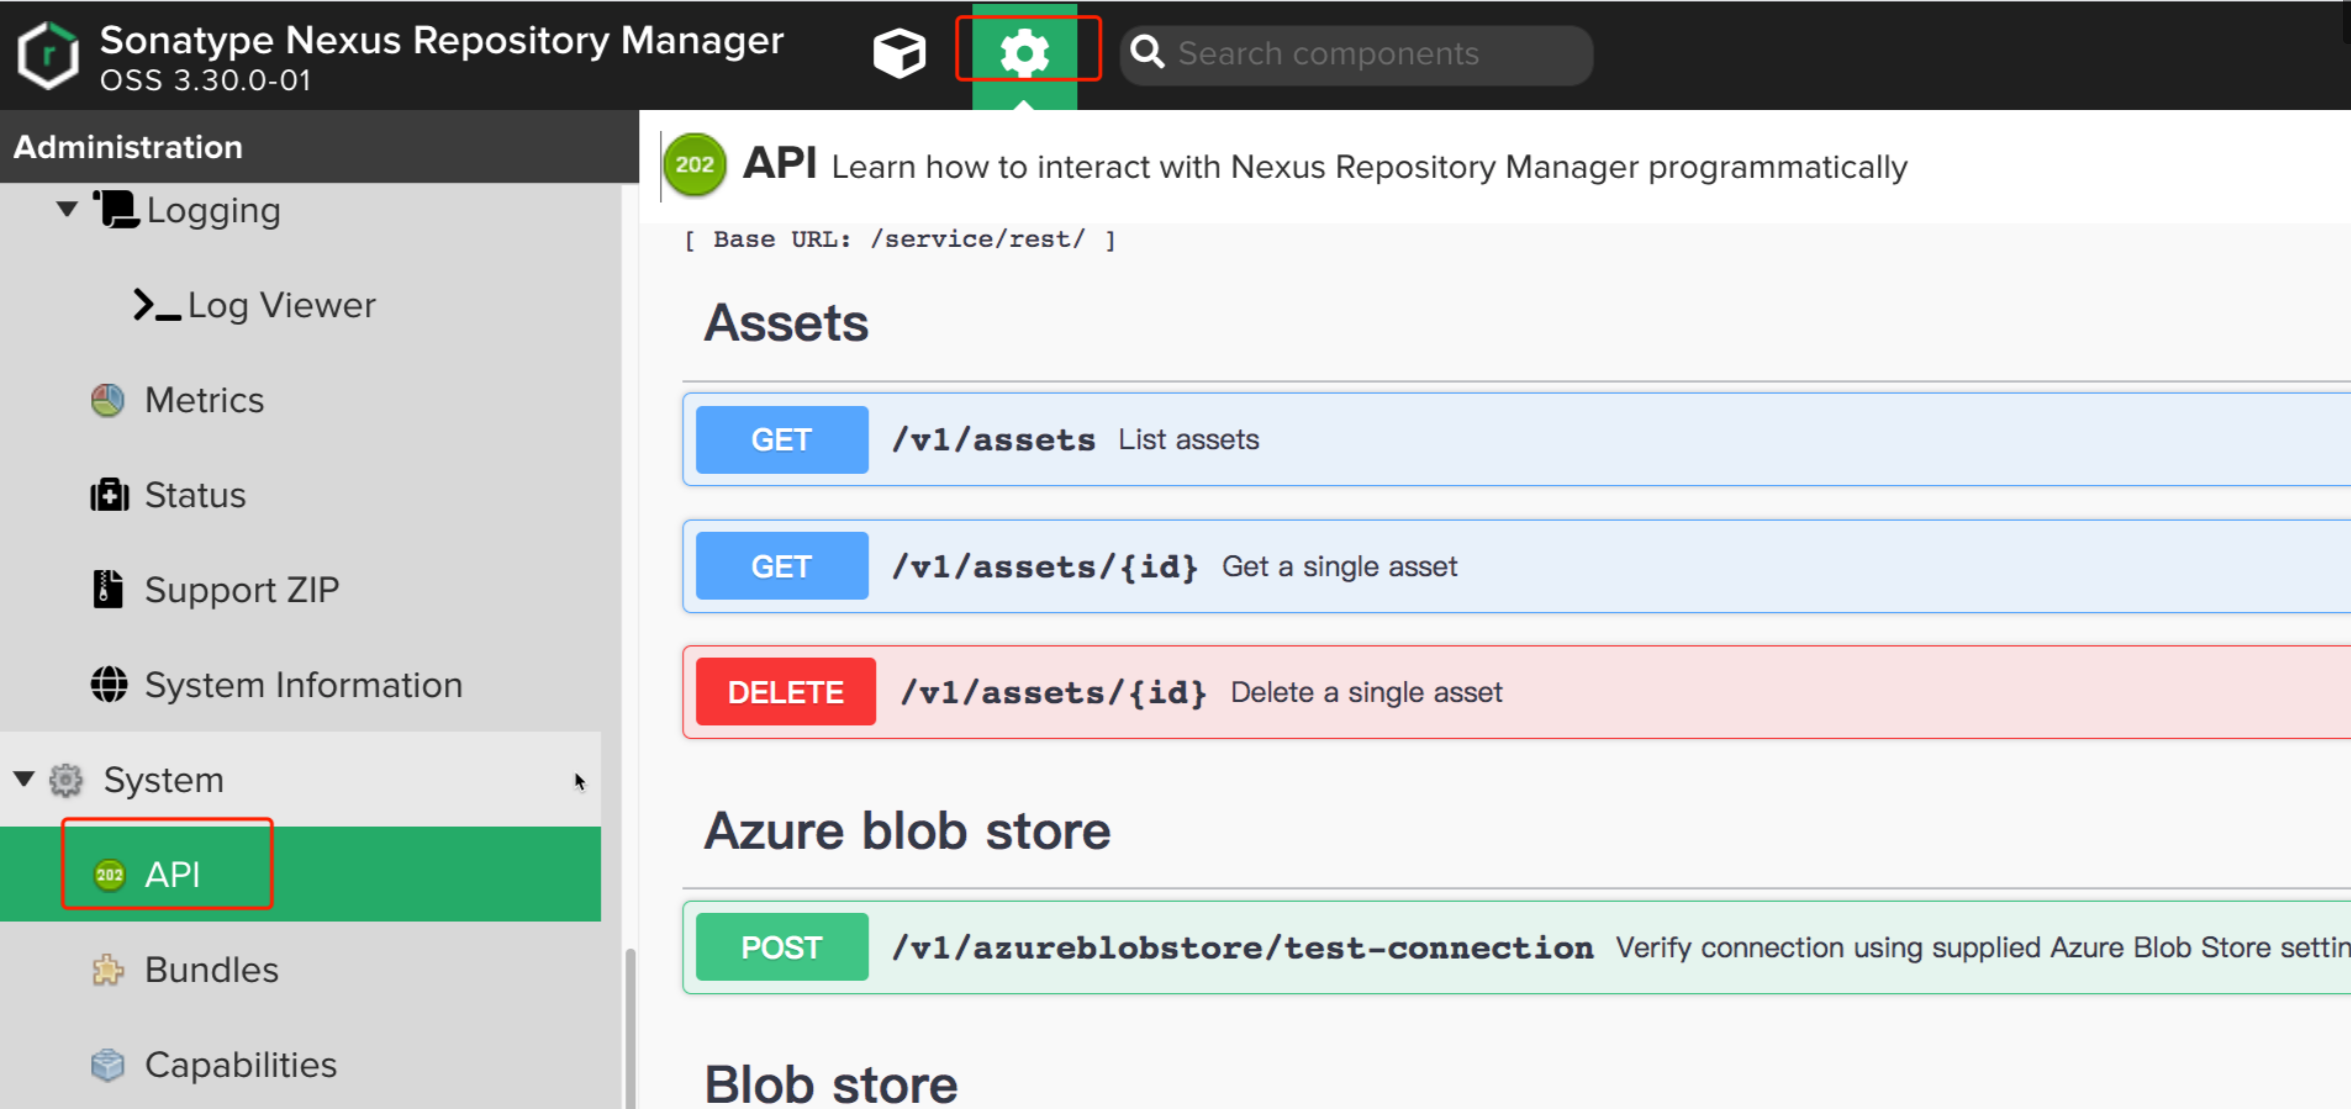
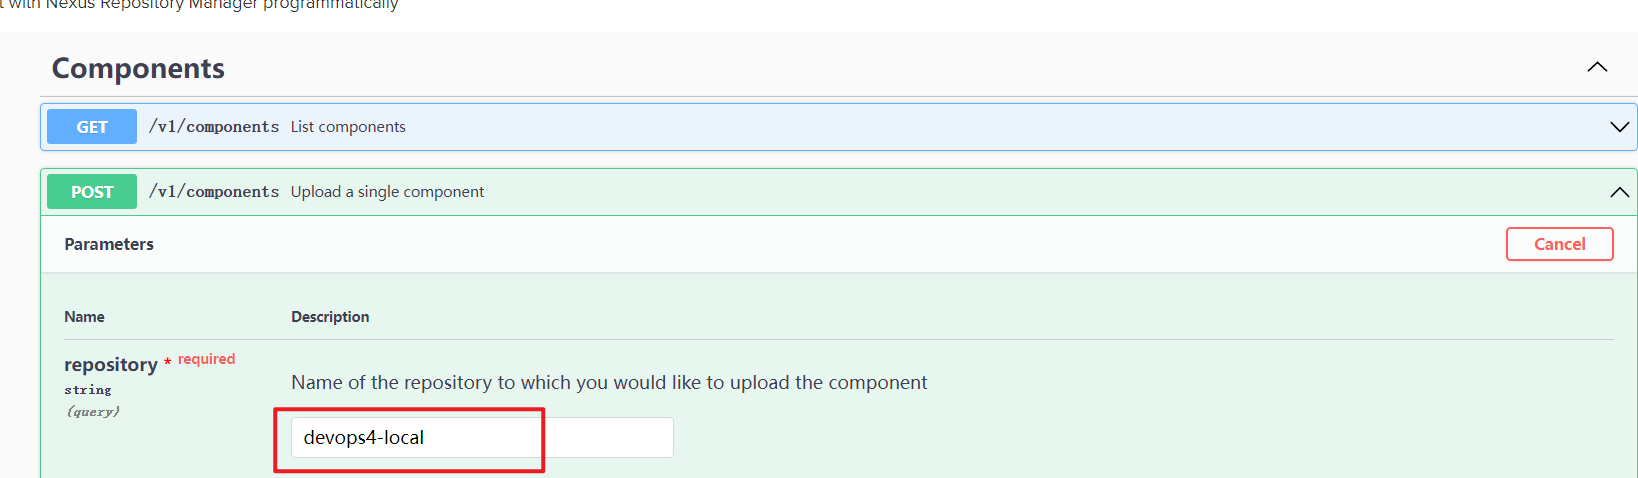
5、Nexus REST API
http://172.29.9.101:8081/#admin/system/api
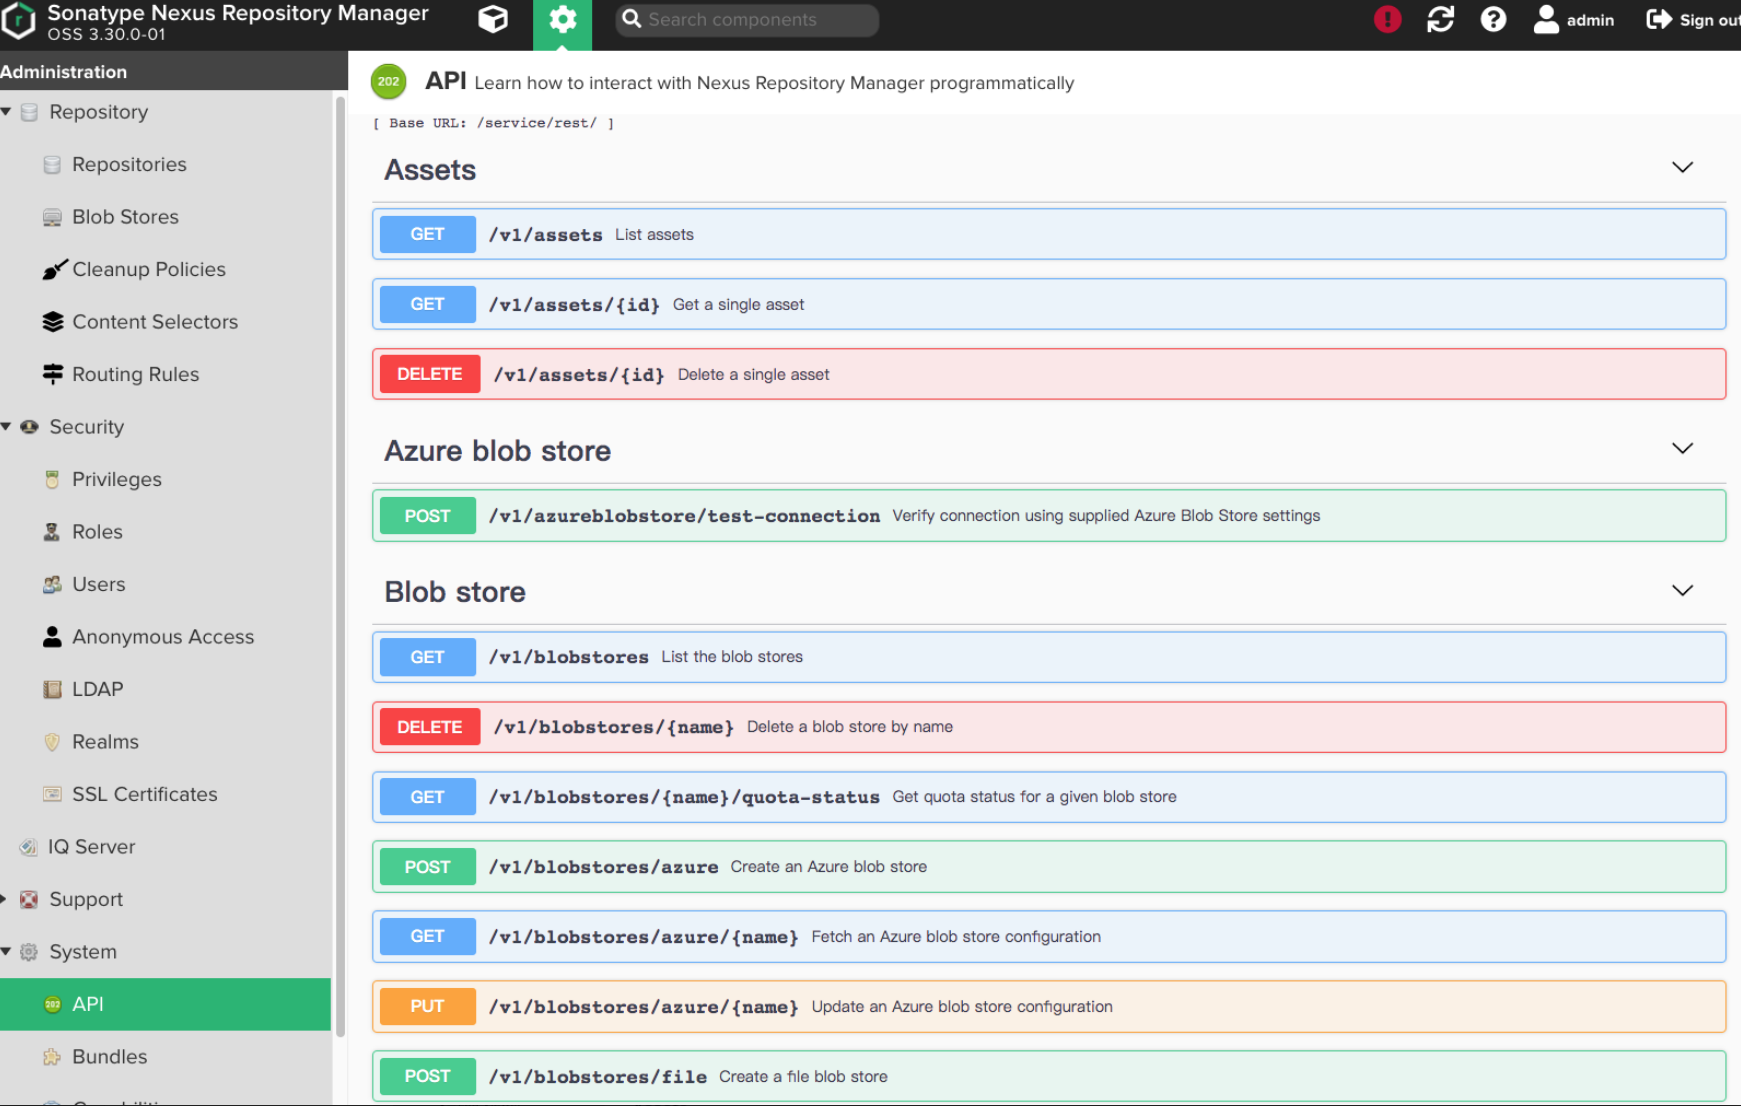
NexusAPI调试方法
进入设置页面, 找到System > API , 即可进入API调试页面。
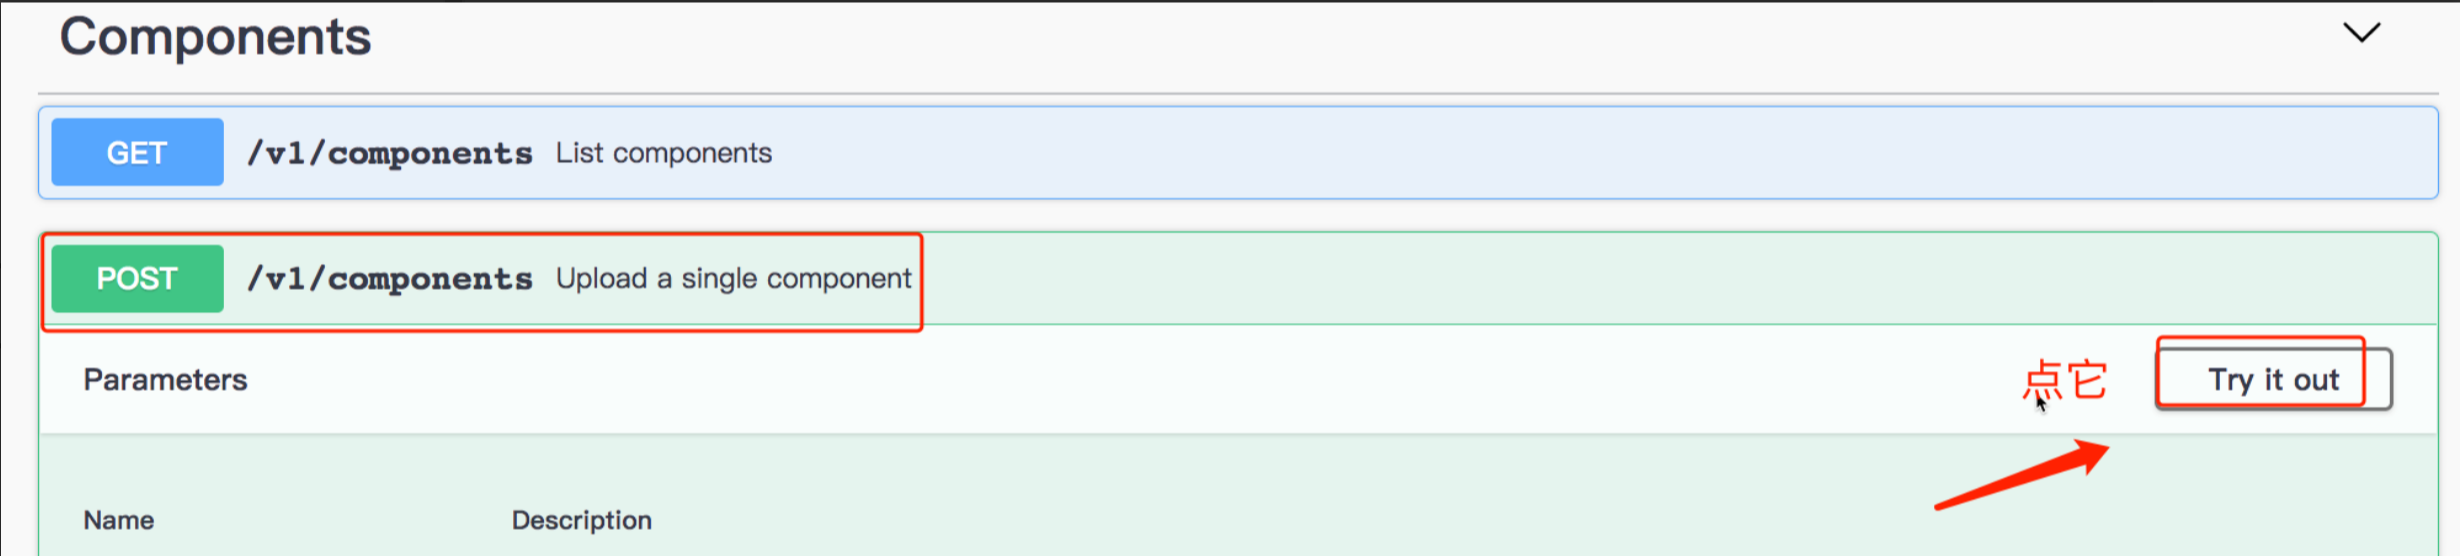
调试API /v1/components, 点击Try it out才能填写信息。
Maven格式仓库
- 填写信息

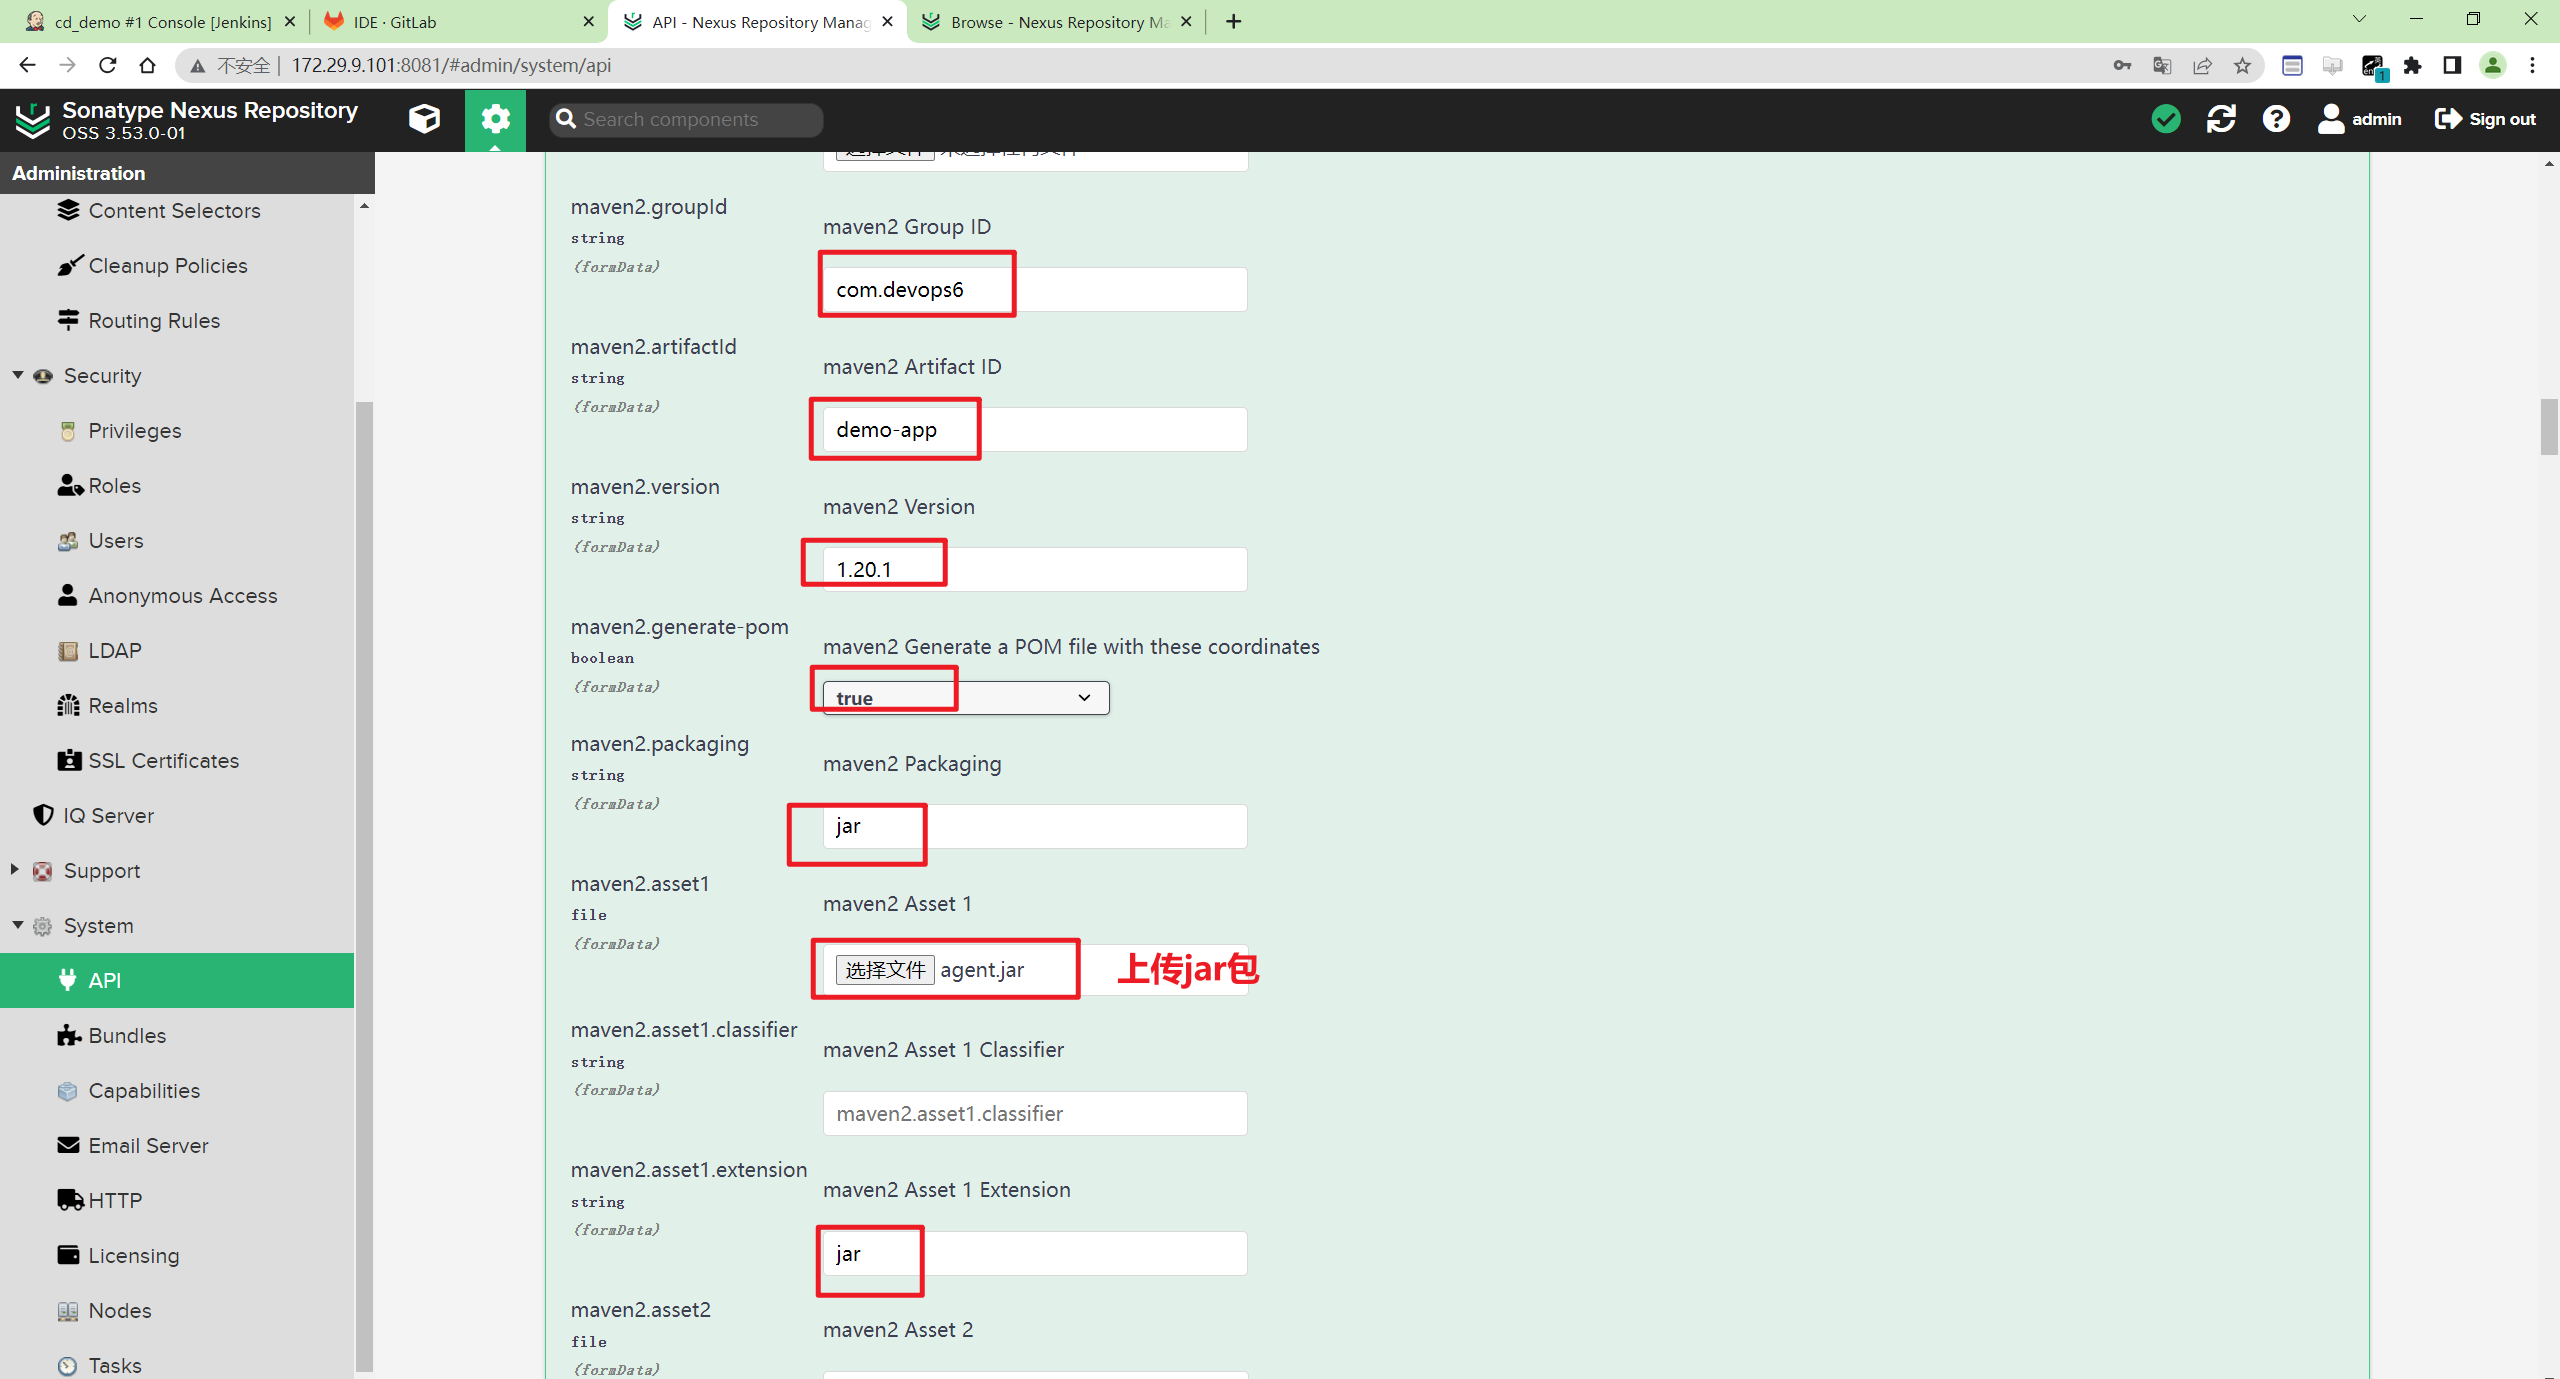
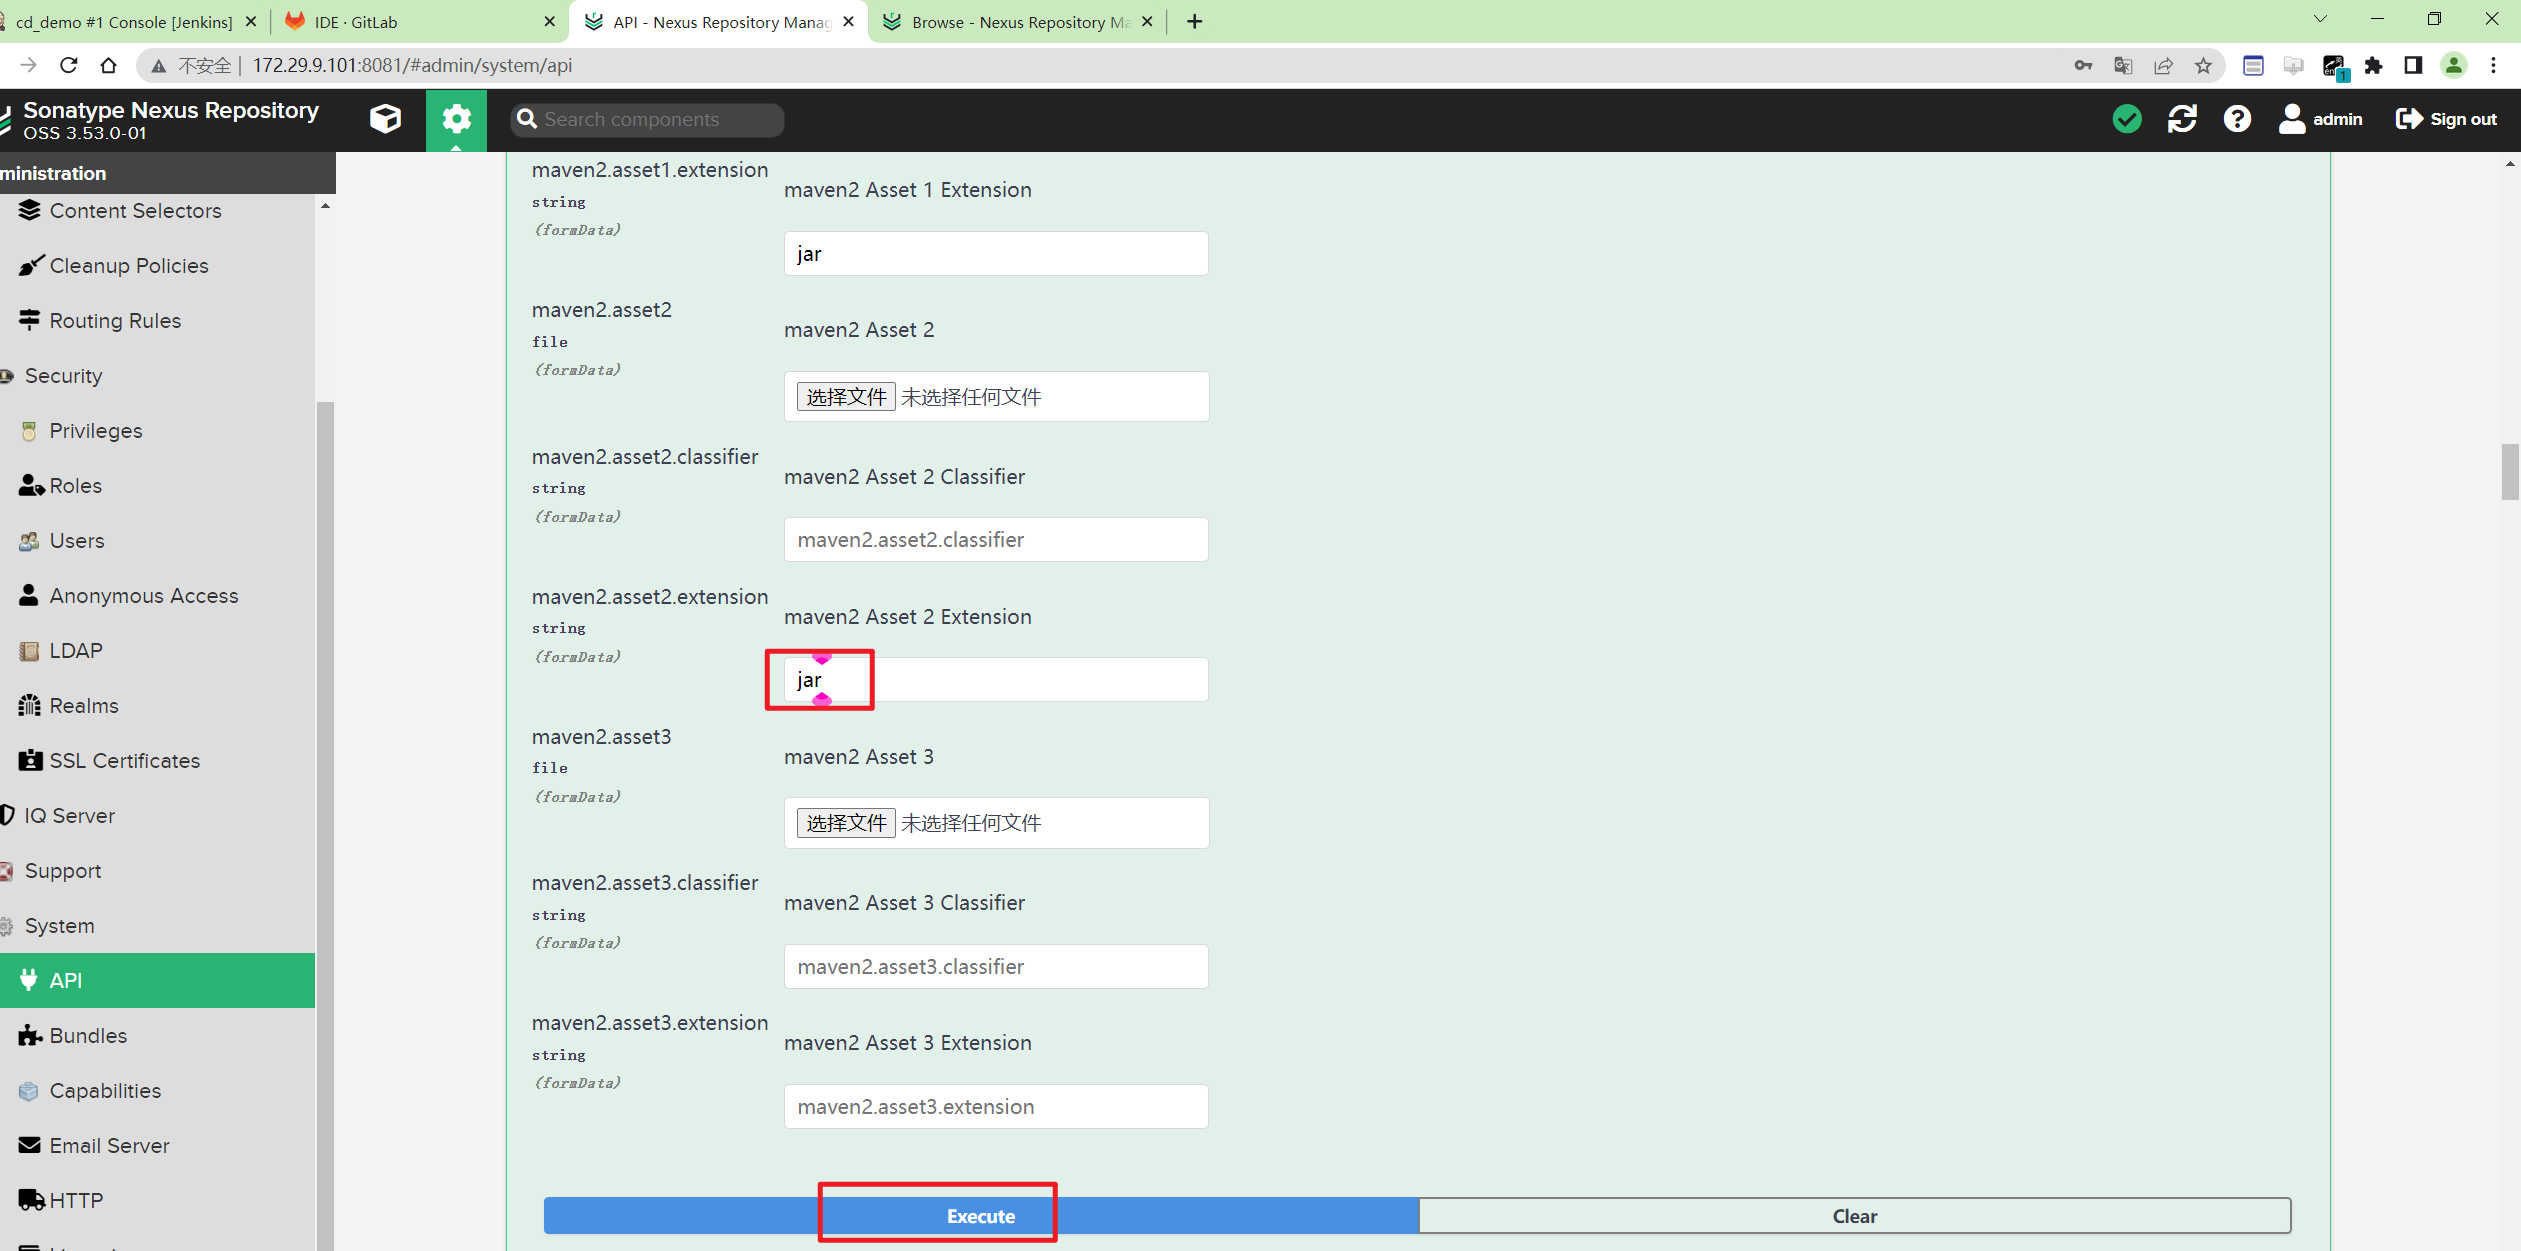
- 点击
Execute
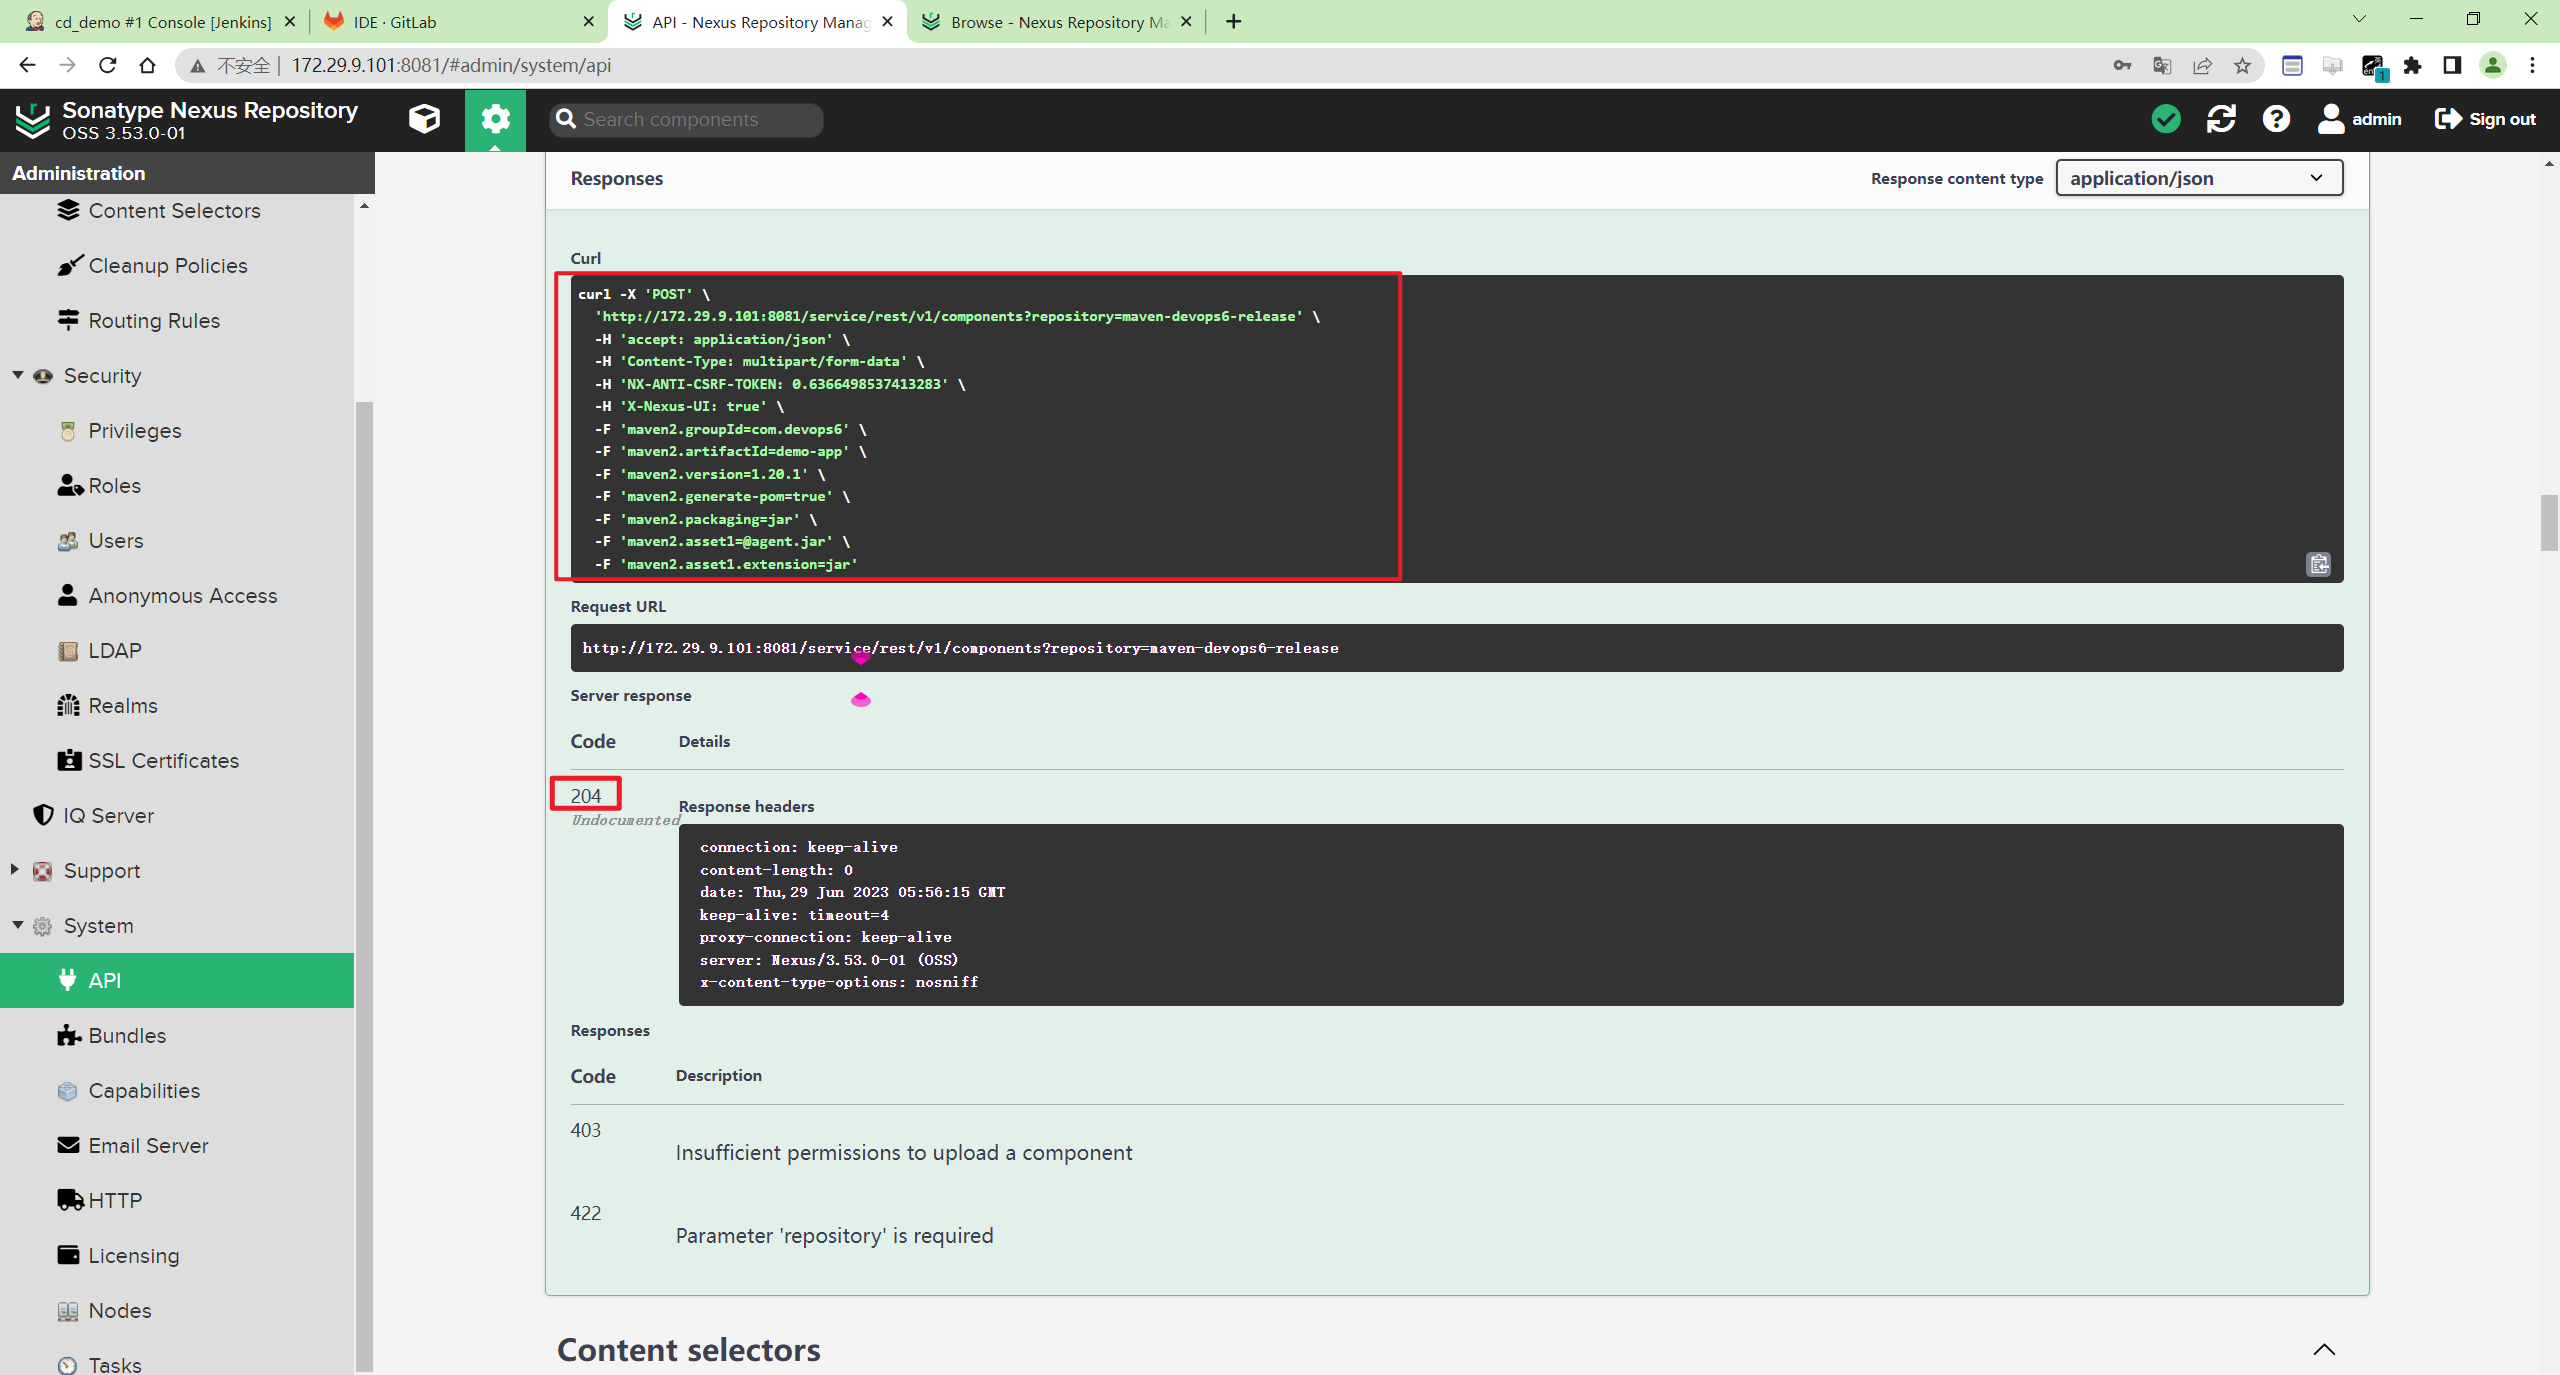
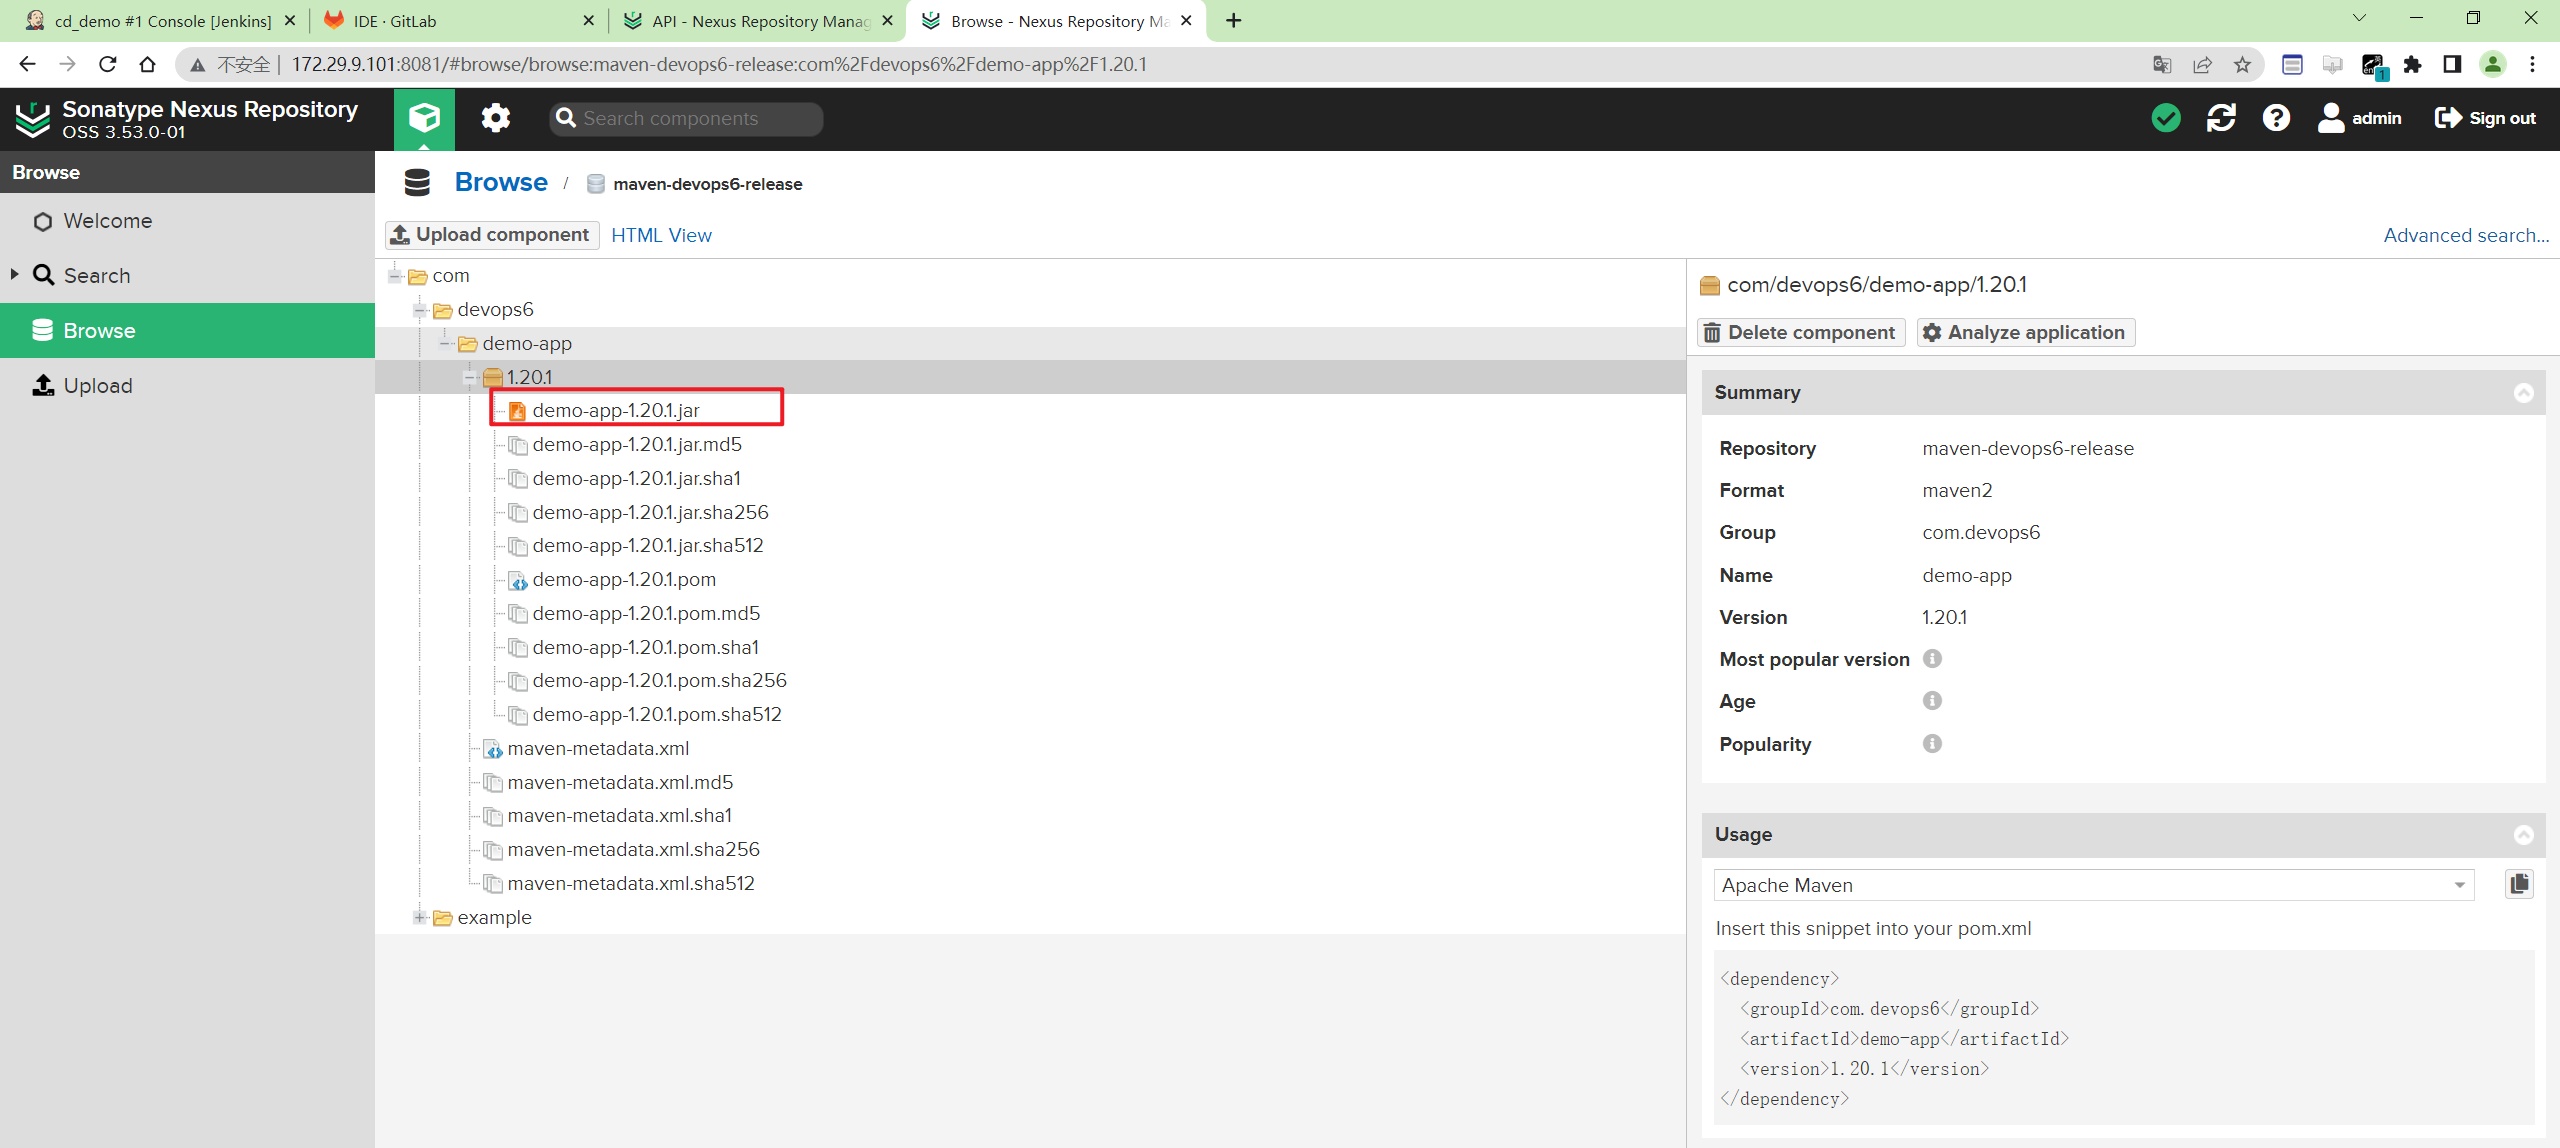
此时,包就上传到nexus仓库了,然后可以拷贝代码,放到流水线里集成。
curl -X 'POST' \
  'http://172.29.9.101:8081/service/rest/v1/components?repository=maven-devops6-release' \
  -H 'accept: application/json' \
  -H 'Content-Type: multipart/form-data' \
  -H 'NX-ANTI-CSRF-TOKEN: 0.6366498537413283' \
  -H 'X-Nexus-UI: true' \
  -F 'maven2.groupId=com.devops6' \
  -F 'maven2.artifactId=demo-app' \
  -F 'maven2.version=1.20.1' \
  -F 'maven2.generate-pom=true' \
  -F 'maven2.packaging=jar' \
  -F 'maven2.asset1=@agent.jar' \
  -F 'maven2.asset1.extension=jar'
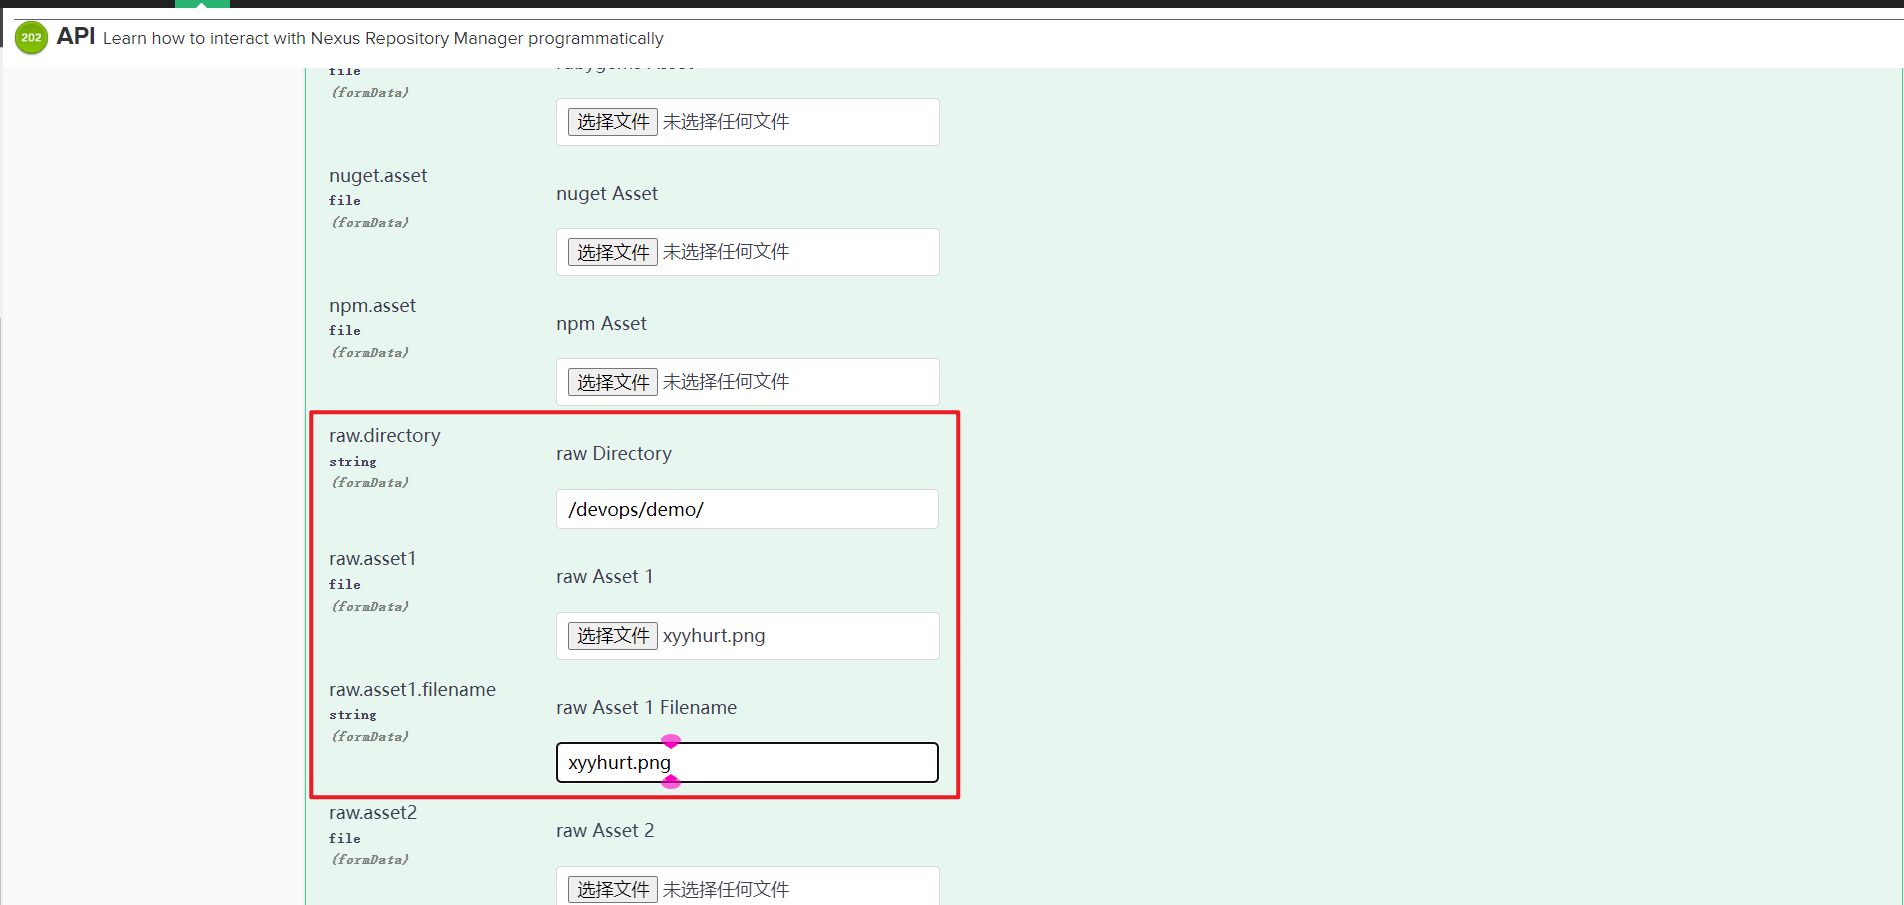
Raw格式仓库
上传jar包
- 填写参数信息

- 点击
 执行操作, 204表示成功。 我们可以复用这里的CURL指令, 最后封装到Jenkins流水线当中。

上传图片
- 填写参数:
- 点击
Excute上传:
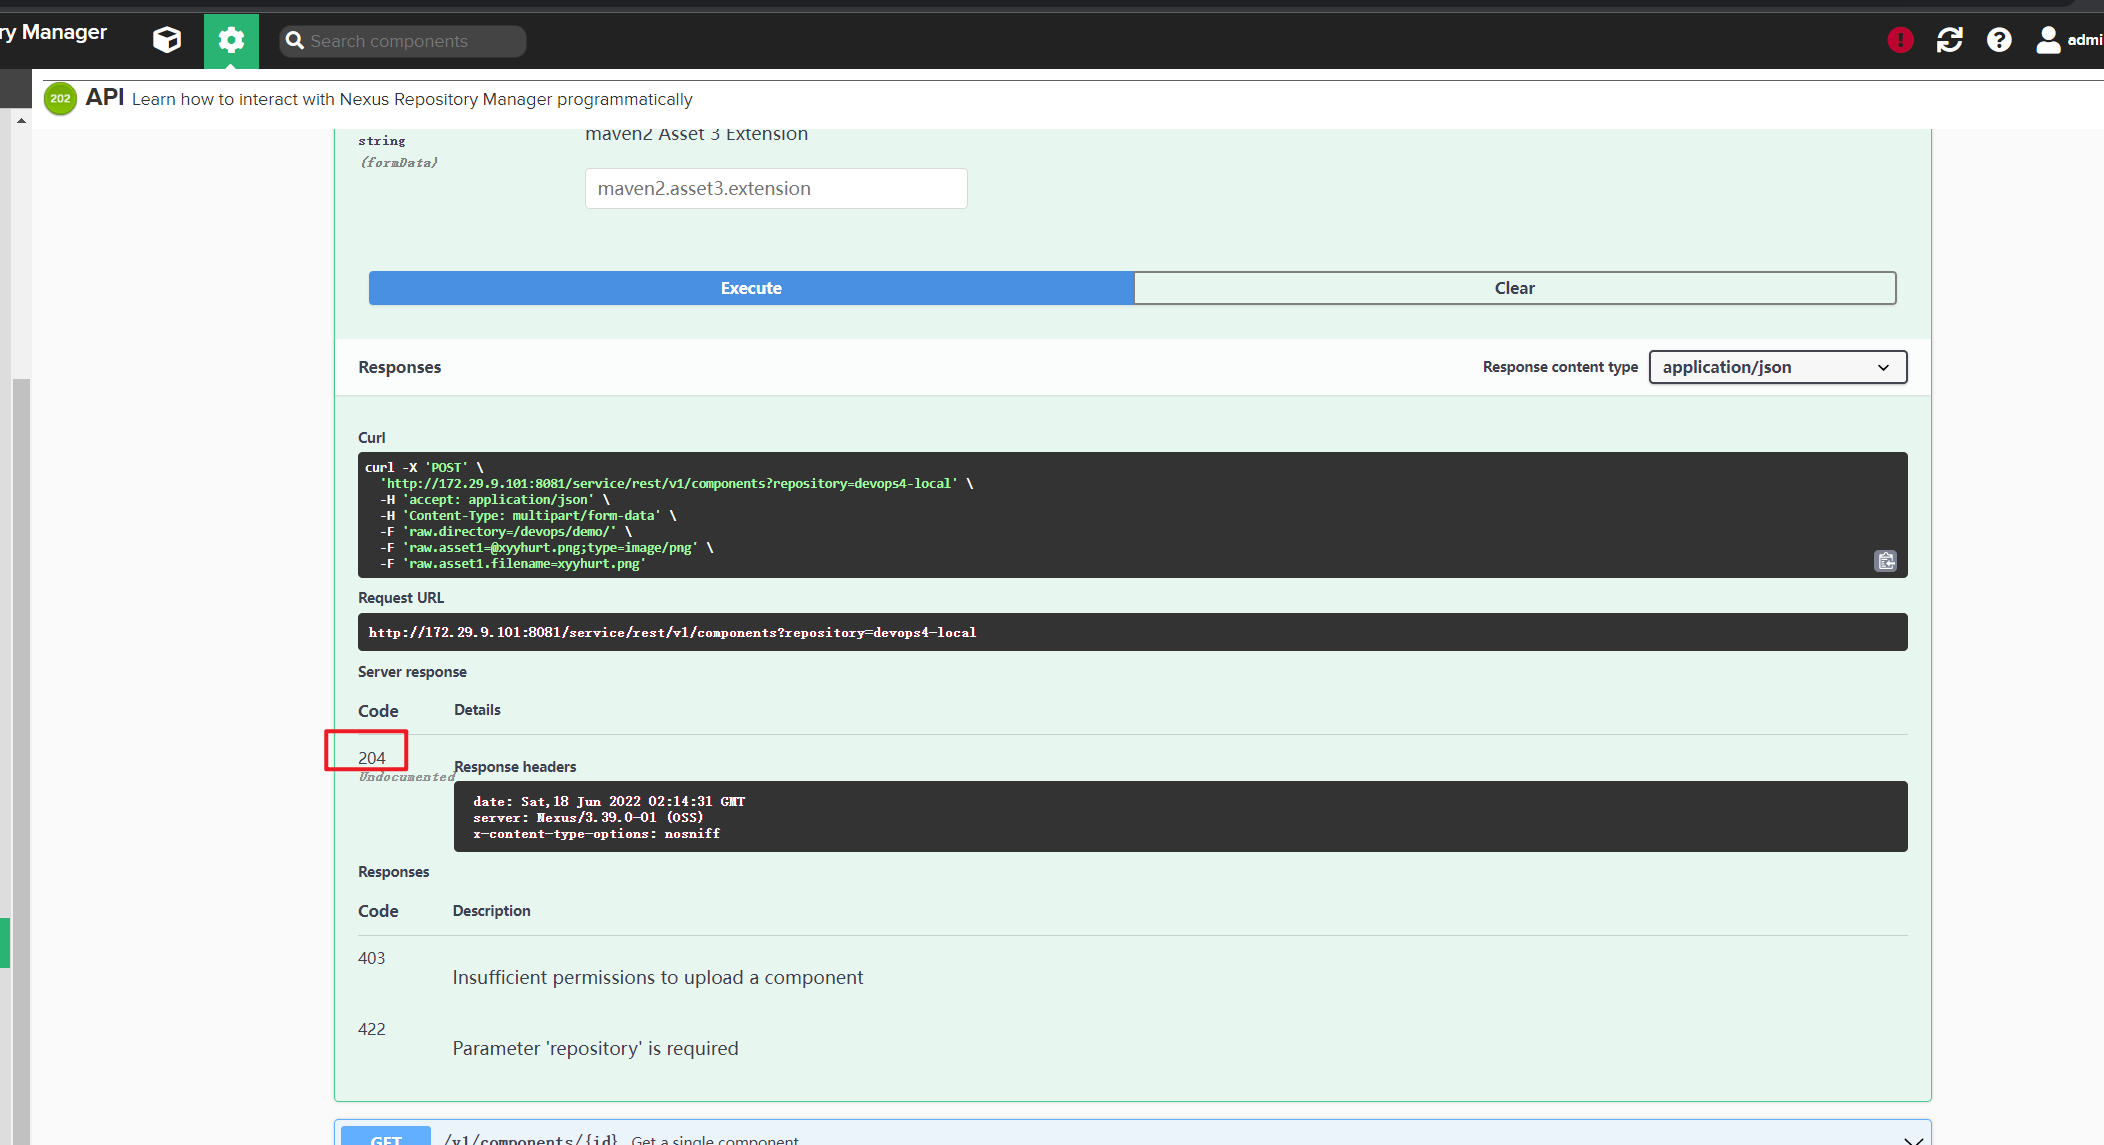
curl -X 'POST' \
  'http://172.29.9.101:8081/service/rest/v1/components?repository=devops6' \
  -H 'accept: application/json' \
  -H 'Content-Type: multipart/form-data' \
  -H 'NX-ANTI-CSRF-TOKEN: 0.6366498537413283' \
  -H 'X-Nexus-UI: true' \
  -F 'raw.directory=/devops/demo' \
  -F 'raw.asset1=@xyyhg.png;type=image/png'
- 观察效果:
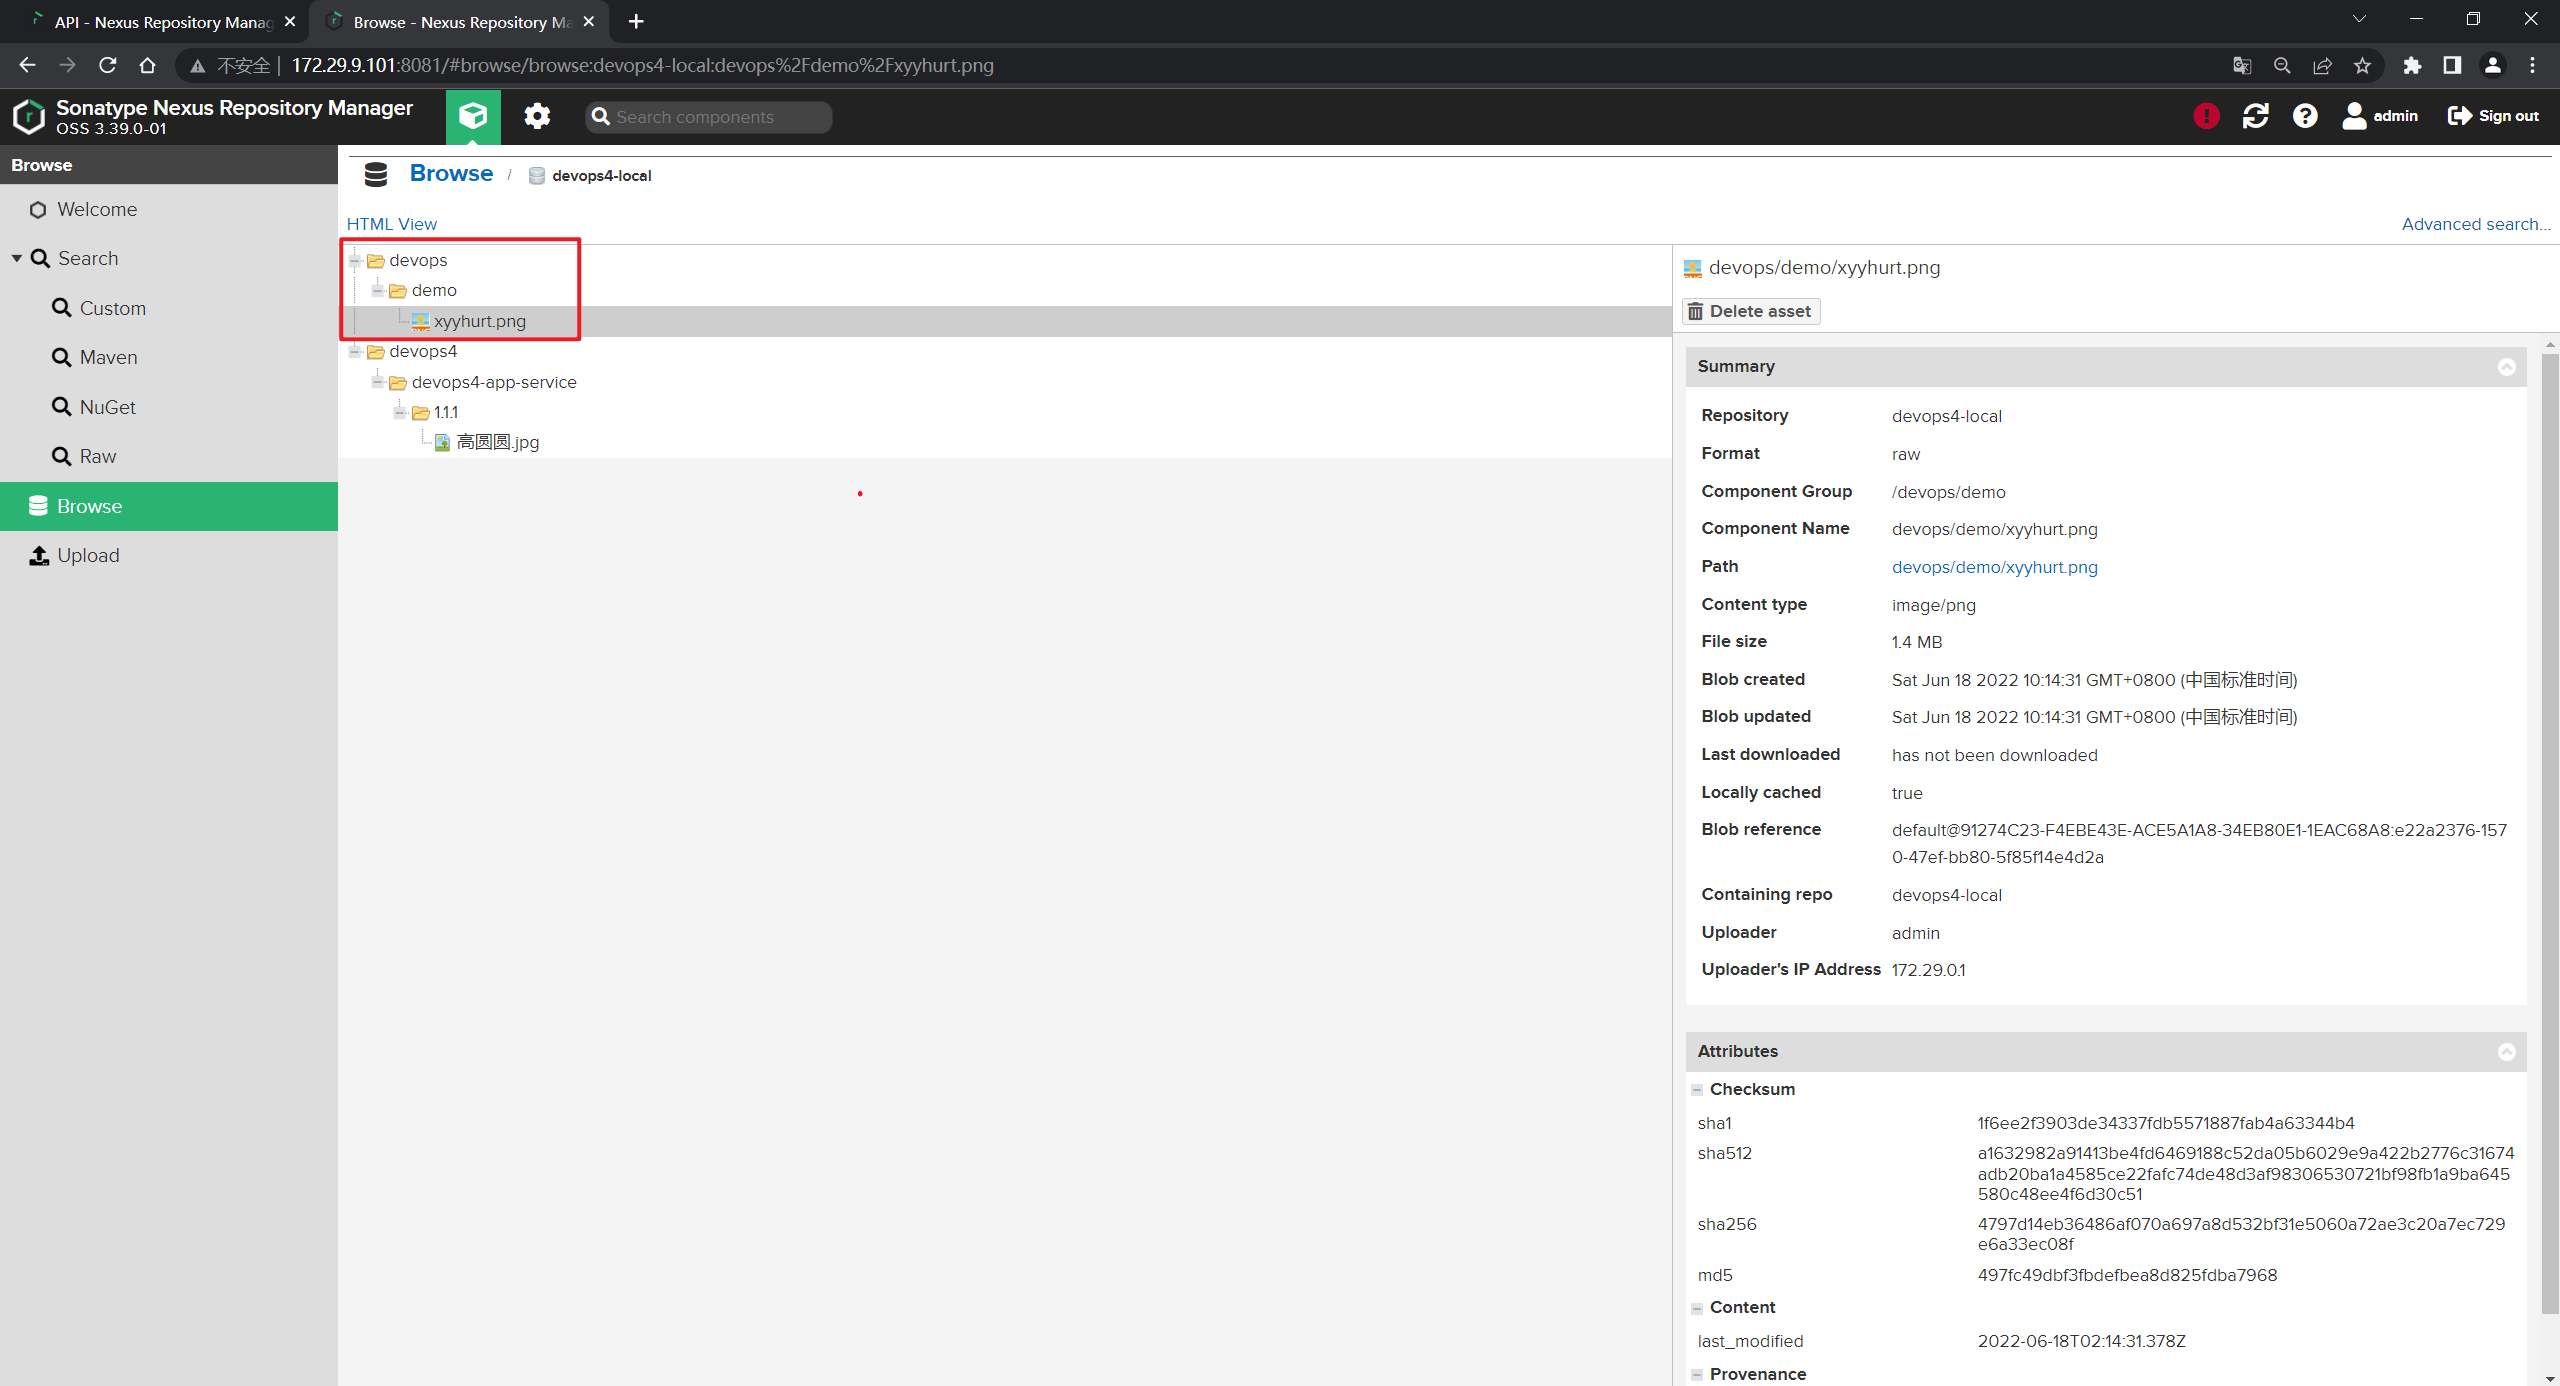
上传制品成功。
上传制品
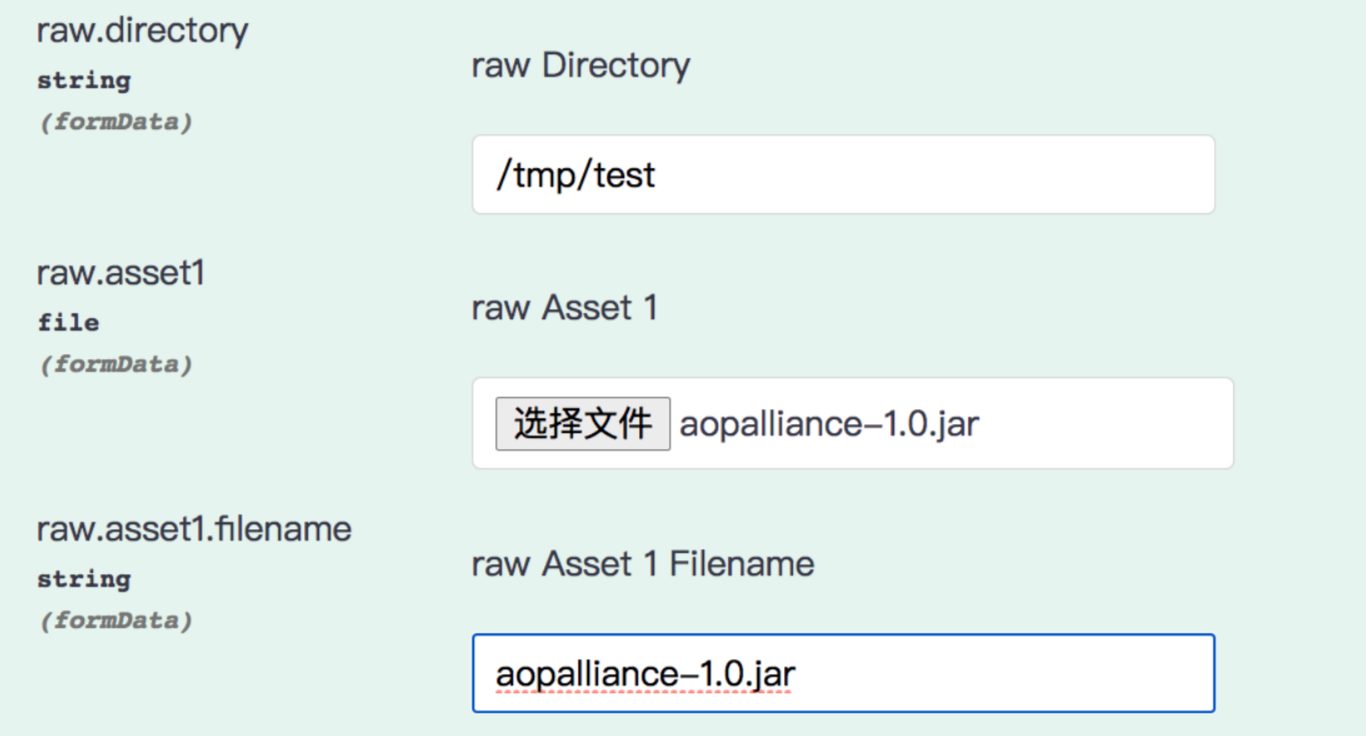
- curl -u admin:admin123 如果Nexus开启了认证需要配置认证信息才能正常访问。(不同的包的类型不同)
##PNG
curl -X POST "http://192.168.1.200:8081/service/rest/v1/components?repository=myrepo" \
-H "accept: application/json" \
-H "Content-Type: multipart/form-data" \
-F "raw.directory=/tmp" \
-F "raw.asset1=@默认标题_自定义px_2020-10-01-0.png;type=image/png" \
-F "raw.asset1.filename=默认标题_自定义px_2020-10-01-0.png"


## tar.gz & ZIP
curl -X POST "http://192.168.1.200:8081/service/rest/v1/components?repository=myrepo" \
-H "accept: application/json" \
-H "Content-Type: multipart/form-data" \
-F "raw.directory=/tmp" \
-F "raw.asset1=@nexus-3.30.0-01-unix.tar.gz;type=application/x-gzip" \
-F "raw.asset1.filename=aaa.tar.gz"


curl -X POST "http://192.168.1.200:8081/service/rest/v1/components?repository=myrepo" -H "accept: application/json" -H "Content-Type: multipart/form-data" -F "raw.directory=/tmp" -F "raw.asset1=@waypoint_0.1.5_linux_amd64.zip;type=application/x-gzip" -F "raw.asset1.filename=waypoint_0.1.5_linux_amd64.zip"


## Jar file
curl -X POST "http://192.168.1.200:8081/service/rest/v1/components?repository=myrepo" \
-H "accept: application/json" \
-H "Content-Type: multipart/form-data" \
-F "raw.directory=/tmp" \
-F "raw.asset1=@aopalliance-1.0.jar;type=application/java-archive" \
-F "raw.asset1.filename=aopalliance-1.0.jar"
- 上传制品(maven类型的制品):
 curl -X POST "http://192.168.1.200:8081/service/rest/v1/components?repository=devops-maven" \
 -H "accept: application/json" \
 -H "Content-Type: multipart/form-data" \
 -F "maven2.groupId=com.newdevops" \
 -F "maven2.artifactId=devopsapp" \
 -F "maven2.version=1.1.5" \
 -F "maven2.packaging=jar" \
 -F "maven2.asset1=@demo-0.0.1-SNAPSHOT.jar;type=application/java-archive" \
 -F "maven2.asset1.extension=demo-0.0.1-SNAPSHOT.jar" \
 -u admin:admin123
下载制品
cURL:
curl -u admin:admin123 http://192.168.1.200:8081/repository/anyops/com/anyops/a
nyops-devops-service/1.1.1/anyops-devops-service-1.1.1.jar -o anyops-devops-service-1.1.1.jar
Wget:
wget --http-user=admin --http-passwd=admin123 http://192.168.1.200:8081/repos
itory/anyops/com/anyops/anyops-devops-service/1.1.1/anyops-devops-service-1.1.1.jar
6、CI综合实践
| 💘 实践:CI综合实践-2023.6.29(测试成功) |
- 实验环境
gitlab-ce:15.0.3-ce.0
jenkins:2.346.3-2-lts-jdk11
sonarqube:9.9.0-community
nexus3:3.53.0
- 实验软件
链接:https://pan.baidu.com/s/1lxP-jO5gHKsvoNaJi7PE6A?pwd=0820
提取码:0820
2023.6.29-实践:CI综合实践(测试成功)

制品仓库规范
在开始引入制品的时候,就应该制定制品库的管理和使用规范。 有了标准化的规范之后, 就很容易实现自动化。(为什么有些工作无法做成自动化? -无标准)
-
版本号: 1.2.3 主次修
主版本号:表示项目的重大架构变更。 次版本号:表示较大范围的功能增加和变化。 修订版本号:表示重大Bug的修复。 里程碑版本:表示某一个版本的里程碑。 -
仓库名称: 每个项目组一个仓库 devops6

-
应用:
- 应用1: devops6-maven-service
- 应用2: devops6-gradle-service
-
包名: 应用名称-版本号-类型
- 应用1: devops6-maven-service-1.2.3.jar
- 应用2: devops6-gradle-service-1.2.3.jar
-
仓库目录结构: /应用名称/版本号/包名
- 应用1: /devops6-maven-service/1.2.3/devops6-maven-service-1.2.3.jar
- 应用2: /devops6-gradle-service/1.2.3/devops6-gradle-service-1.2.3.jar
创建nexus制品仓库
- 创建一个
raw类型的仓库存放制品

创建Jenkins作业
这里复用之前的项目。
项目仓库创建版本分支
- 基于main分支创建一个版本分支

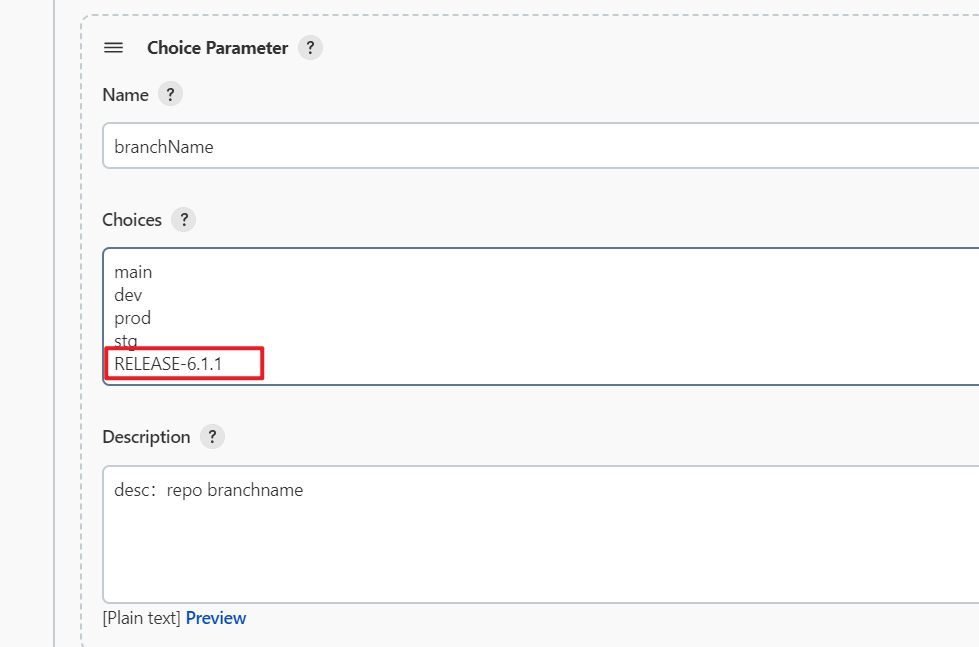
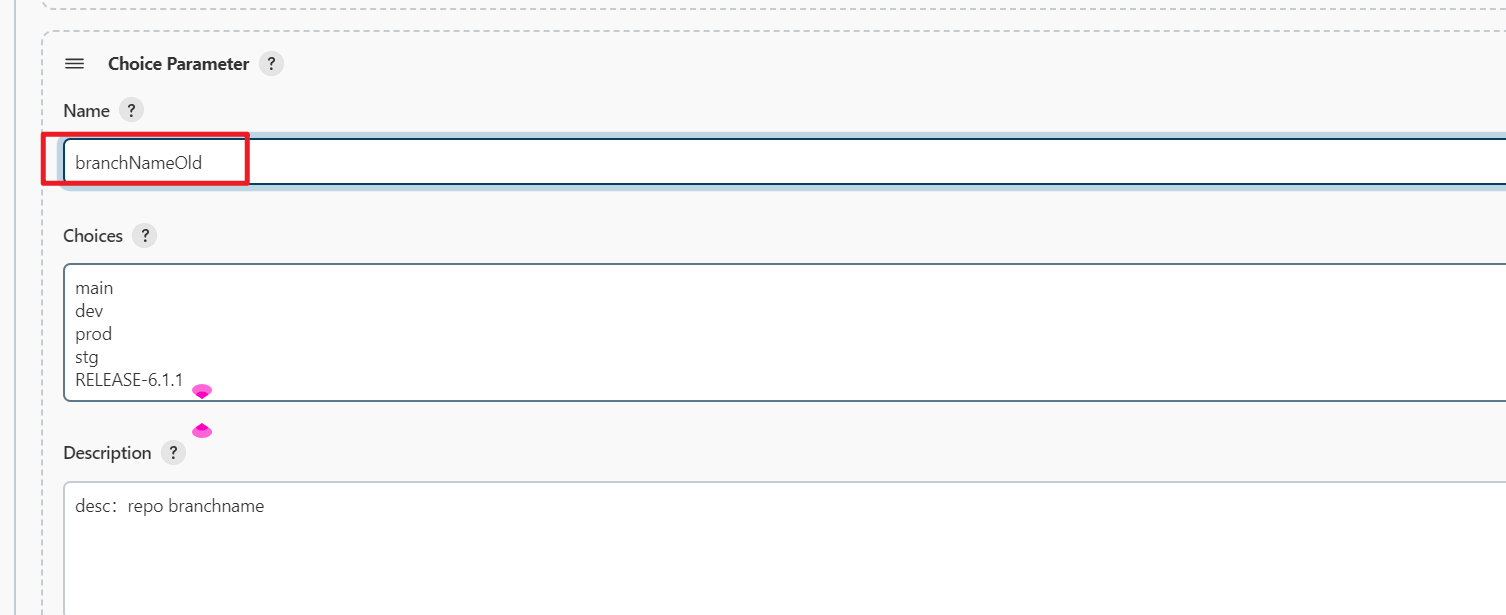
- 然后在Jenkins上修改选项参数
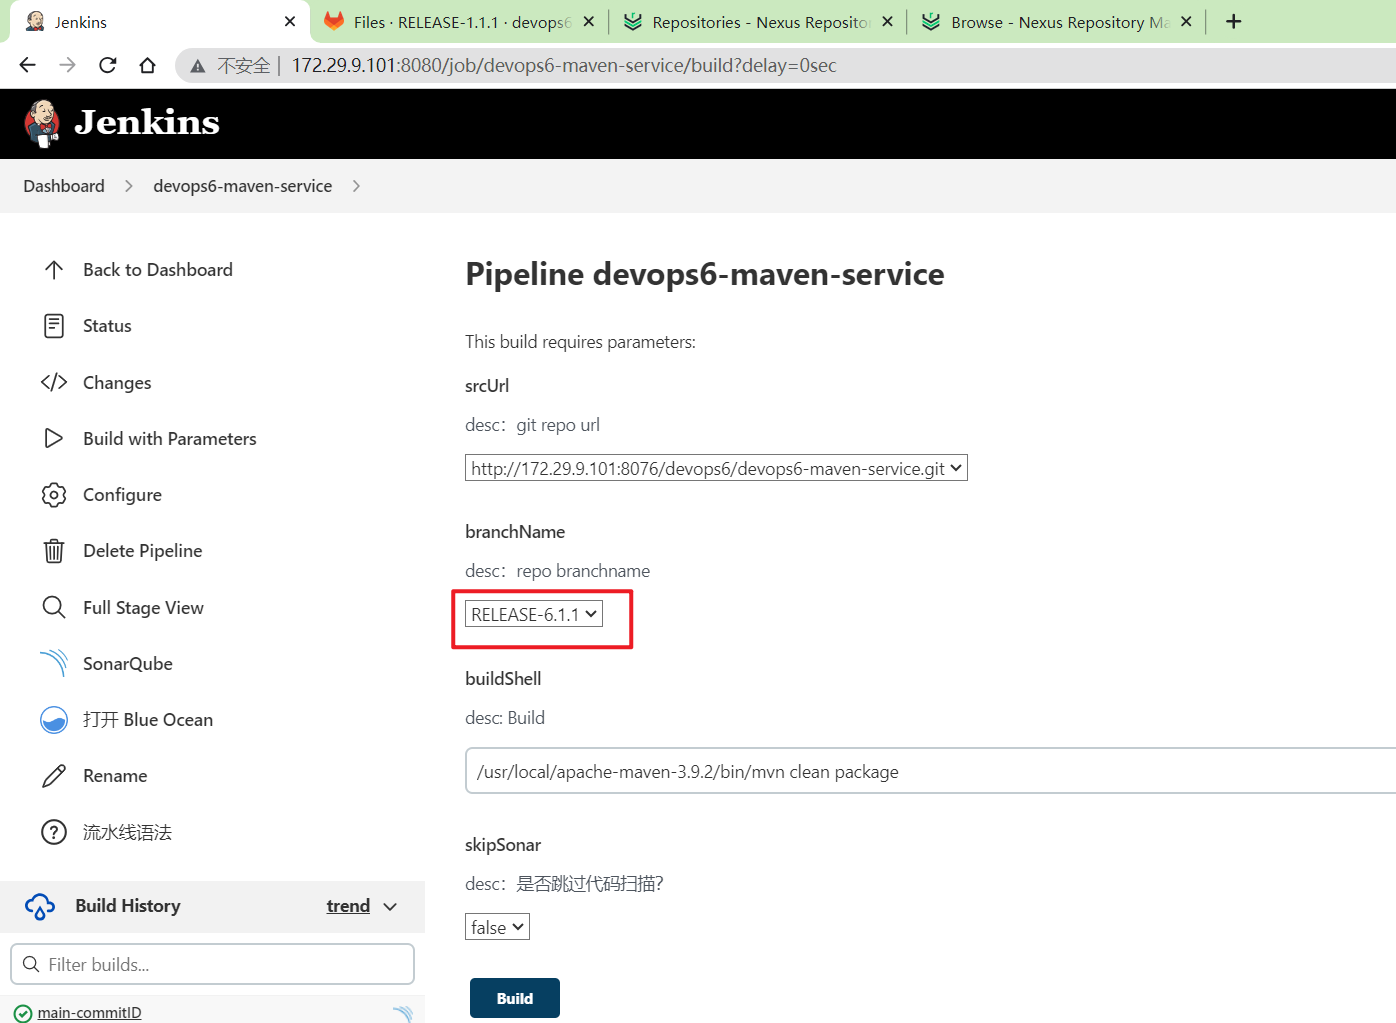
branchName,添加RELEASE-1.1.1内容
编写Jenkins代码
@Library("devops06@main") _

//import src/org/devops/Build.groovy
def build = new org.devops.Build()
def sonar = new org.devops.Sonar()

currentBuild.displayName = "${env.branchName}-commitID"
currentBuild.description = "Trigger by user jenkins \n branch: ${env.branchName}"

env.branchName = "RELEASE-6.1.1"
println(env.branchName)

pipeline {
    agent {label "build"}
    options {
        skipDefaultCheckout true
    }


    stages{
        stage("CheckOut"){
            steps{
                script{
                    build.CheckOut()
                }
            }
        }

        stage("Build"){
            steps{
                script{
                    build.Build()
                }
            }

        }

        stage("CodeScan"){
            when {
                environment name: 'skipSonar', value: 'false'
            }

            steps{
                script{

                    sonar.SonarScannerByPlugin()

                }
            }
        }

        stage("PushArtifact"){
            steps{
                script{
                    //PushArtifactByPlugin()
                    //PushArtifactByPluginPOM()

                    // init package info
                    appName = "${JOB_NAME}" //devops6-maven-service
                    repoName = appName.split('-')[0]   //devops6
                    appVersion = "${env.branchName}".split("-")[-1] // RELEASE-1.1.1   1.1.1
                    targetDir="${JOB_NAME}/${appVersion}"


                    // 通过pom文件获取包名称
                    POM = readMavenPom file: 'pom.xml'
                    env.artifactId = "${POM.artifactId}"
                    env.packaging = "${POM.packaging}"
                    env.groupId = "${POM.groupId}"
                    env.art_version = "${POM.version}"
                    sourcePkgName = "${env.artifactId}-${env.art_version}.${env.packaging}"

                    pkgPath = "target"
                    targetPkgName = "${appName}-${appVersion}.${env.packaging}"
                    PushNexusArtifact(repoName, targetDir, pkgPath, sourcePkgName,targetPkgName)

                }
            }

        }

    }
}

//通过nexus api上传制品--综合实践
def PushNexusArtifact(repoId, targetDir, pkgPath, sourcePkgName,targetPkgName){
    //nexus api
    withCredentials([usernamePassword(credentialsId: '3404937d-89e3-4699-88cf-c4bd299094ad', \
                                    passwordVariable: 'PASSWD',
                                    usernameVariable: 'USERNAME')]) {
        sh """
            curl -X 'POST' \
              "http://172.29.9.101:8081/service/rest/v1/components?repository=${repoId}" \
              -H 'accept: application/json' \
              -H 'Content-Type: multipart/form-data' \
              -F "raw.directory=${targetDir}" \
              -F "raw.asset1=@${pkgPath}/${sourcePkgName};type=application/java-archive" \
              -F "raw.asset1.filename=${targetPkgName}" \
              -u ${USERNAME}:${PASSWD}
        """
    }
}


//通过jenkins的nexus插件上传制品
def PushArtifactByPlugin(){
    nexusArtifactUploader artifacts: [[artifactId: 'demo-app',
                                    classifier: '',
                                    file: 'target/demo-0.0.1-SNAPSHOT.jar',
                                    type: 'jar']],
                        credentialsId: '3404937d-89e3-4699-88cf-c4bd299094ad',
                        groupId: 'com.devops6',
                        nexusUrl: '172.29.9.101:8081',
                        nexusVersion: 'nexus3',
                        protocol: 'http',
                        repository: 'maven-devops6-release',
                        version: '1.1.1'
}

// 通过jenkins的nexus插件上传制品(读取pom文件)
// def PushArtifactByPluginPOM(){
//     POM = readMavenPom file: 'pom.xml'
//     println(POM)
//     println("GroupID: ${POM.groupId}")
//     println("ArtifactID: ${POM.artifactId}")
//     println("Version: ${POM.version}")
//     println("Packaging: ${POM.packaging}")

//     env.artifactId = "${POM.artifactId}"
//     env.packaging = "${POM.packaging}"
//     env.groupId = "${POM.groupId}"
//     env.art_version = "${POM.version}"
//     env.art_name = "${env.artifactId}-${env.art_version}.${env.packaging}"
//     nexusArtifactUploader   artifacts: [[artifactId: "${env.artifactId}",
//                                         classifier: '',
//                                         file: "target/${env.art_name}",
//                                         type: "${env.packaging}"]],
//                             credentialsId: '3404937d-89e3-4699-88cf-c4bd299094ad',
//                             groupId: "${env.groupId}",
//                             nexusUrl: '172.29.9.101:8081',
//                             nexusVersion: 'nexus3',
//                             protocol: 'http',
//                             repository: 'maven-devops6-release',
//                             version: "${env.art_version}"
// }

// 通过jenkins的nexus插件上传制品(读取pom文件)-函数方式
def PushArtifactByPluginPOM(artifactId, file, type, groupId, repoName, version){
    println(artifactId)
    //demo
    println("${file}, ${type}, ${groupId}, ${repoName}, ${version}")
    //target/demo-0.0.1-SNAPSHOT.jar, jar, com.example, devops4-release, 0.0.1-SNAPSHOT
    nexusArtifactUploader artifacts: [[artifactId: artifactId,
                                    classifier: '',
                                    file: file,
                                    type: type]],
                        credentialsId: '3404937d-89e3-4699-88cf-c4bd299094ad',
                        groupId: groupId,
                        nexusUrl: '172.29.9.101:8081',
                        nexusVersion: 'nexus3',
                        protocol: 'http',
                        repository: repoName,
                        version: version
}
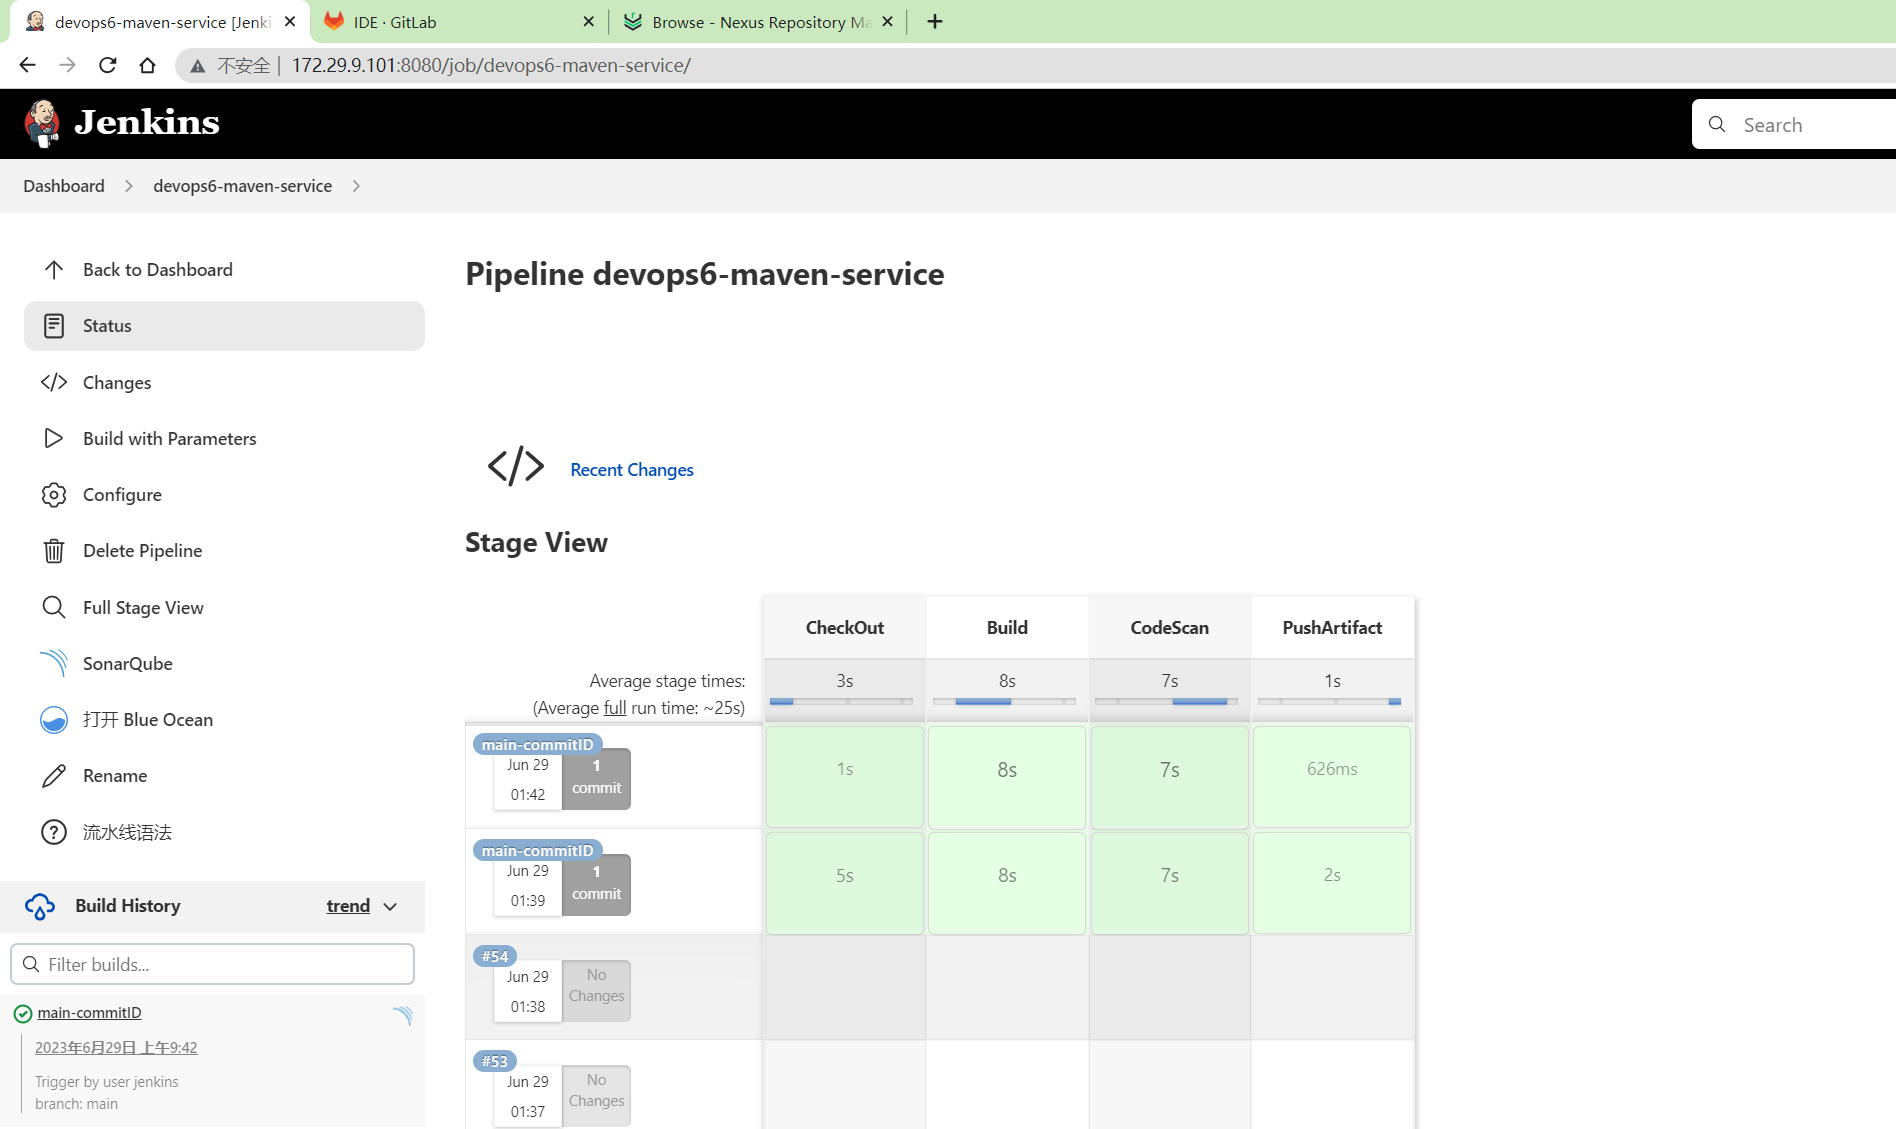
- 运行,观察效果:
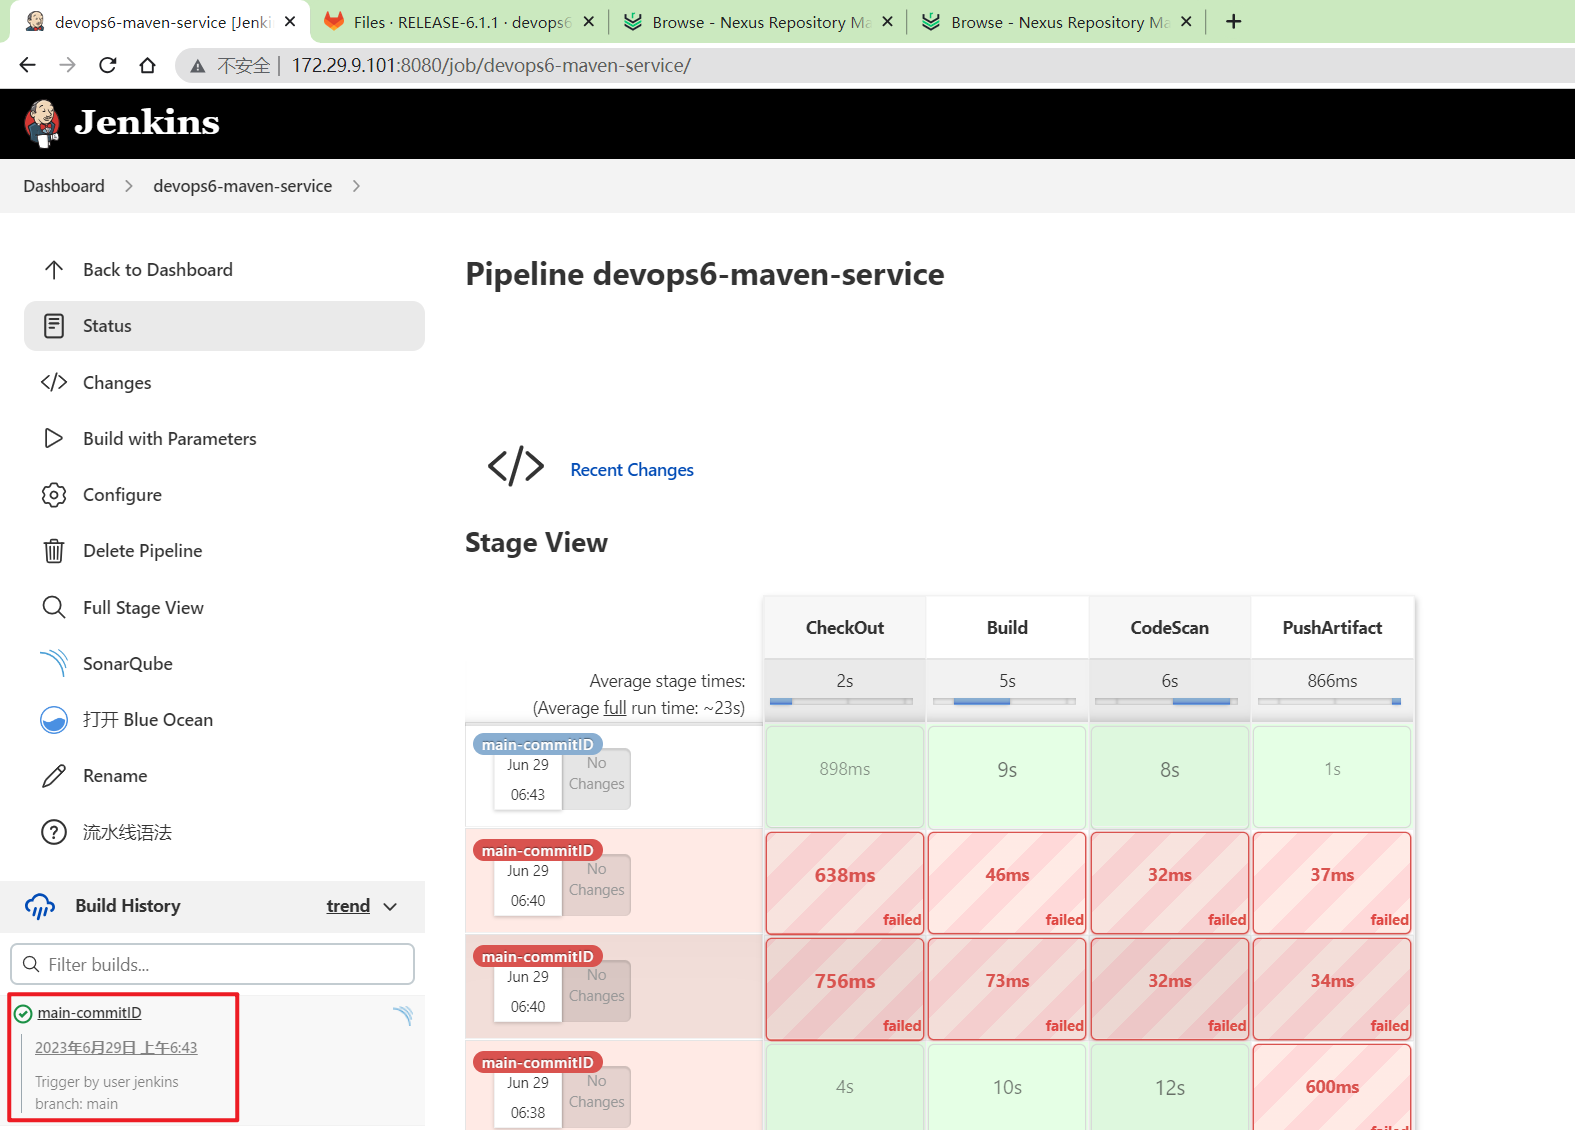
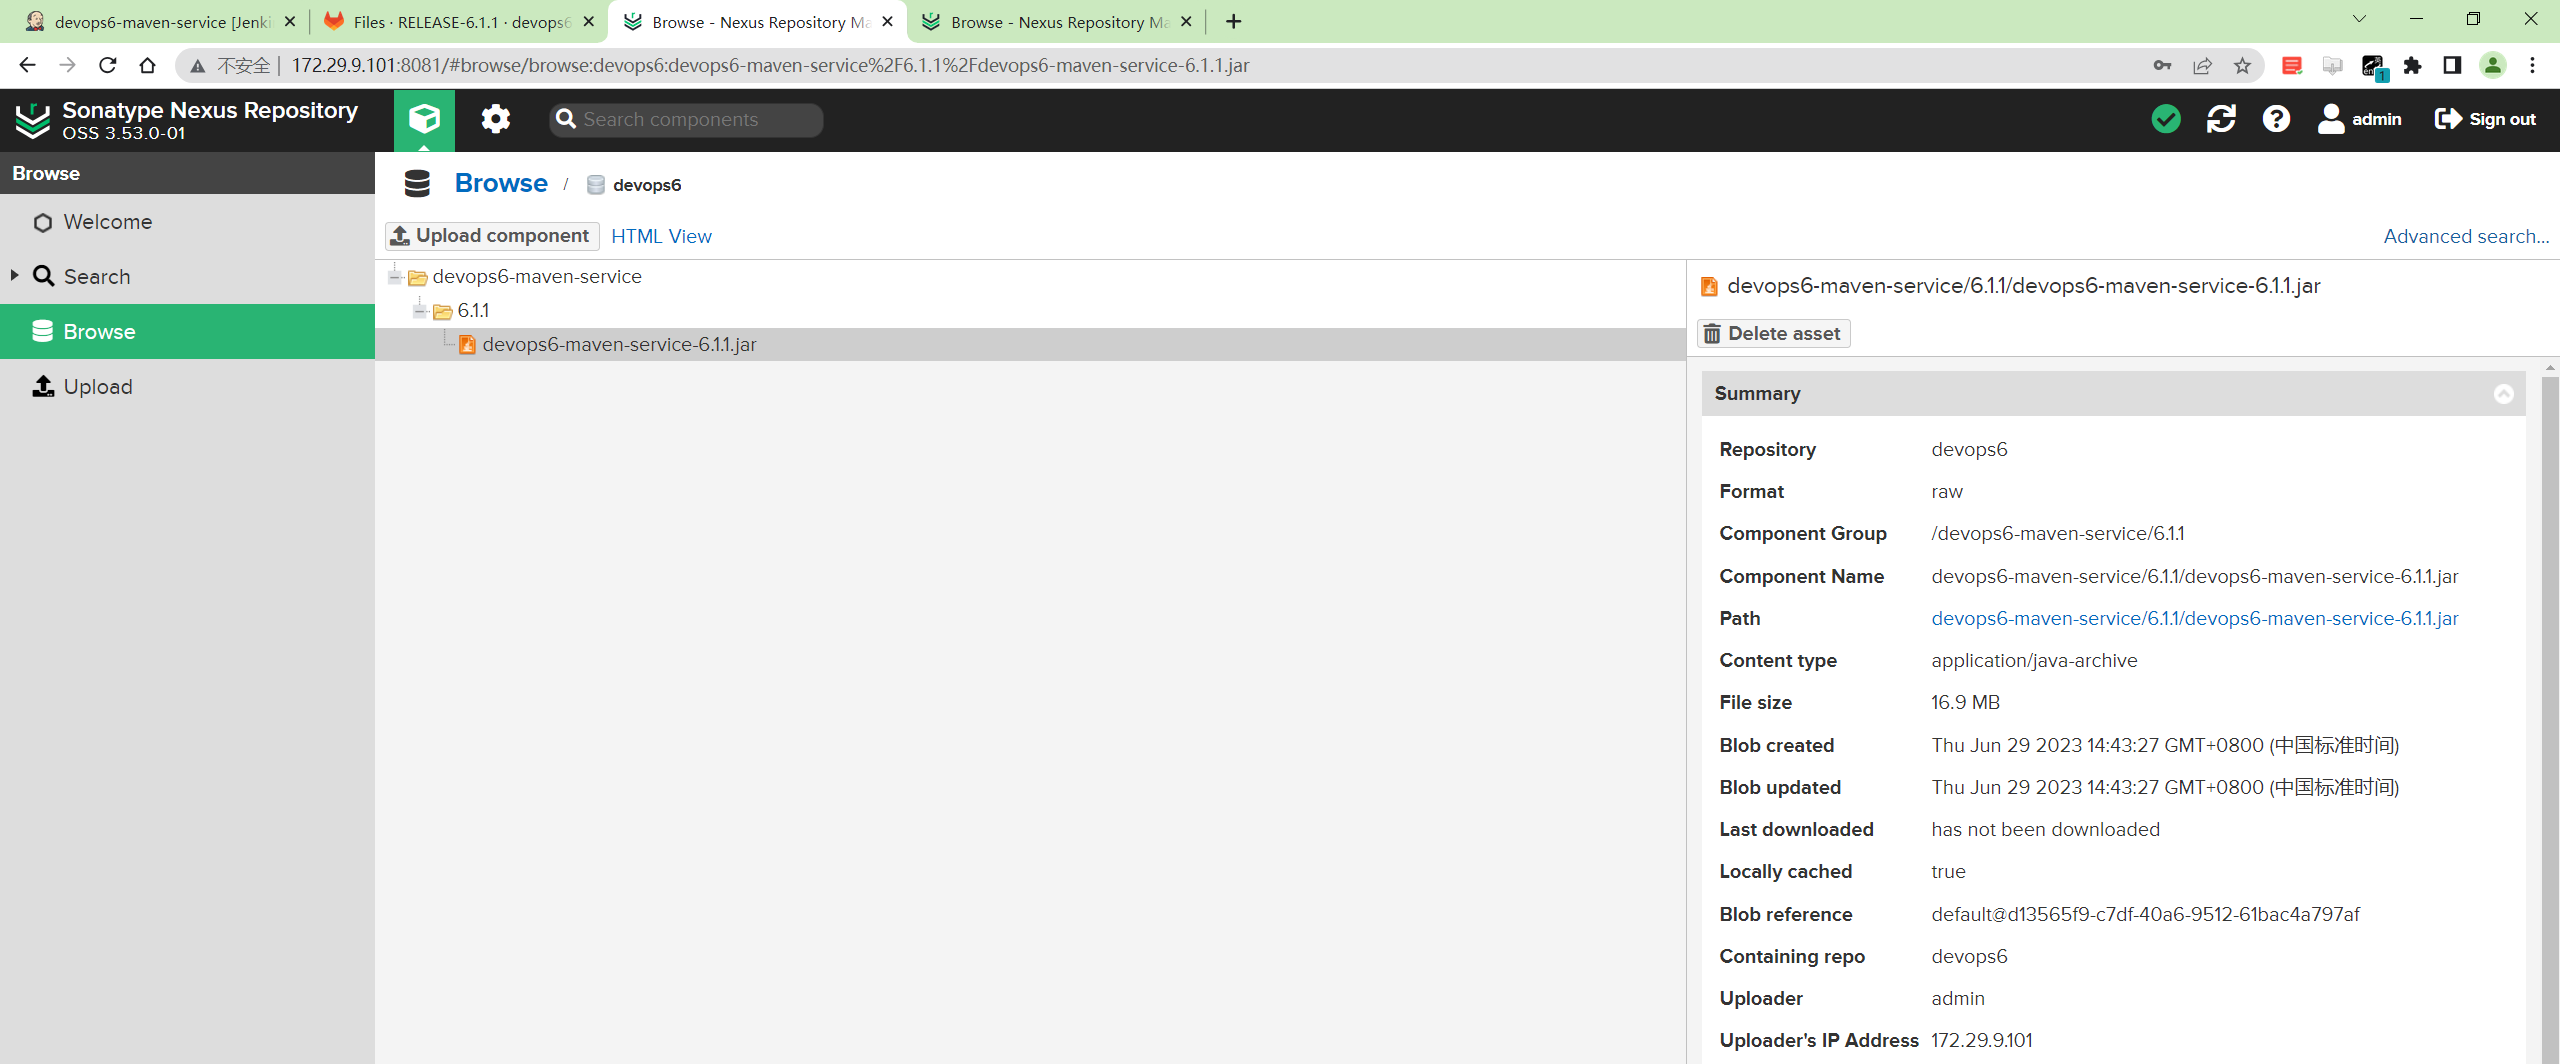
测试是ok的。
- 将代码集成到共享库
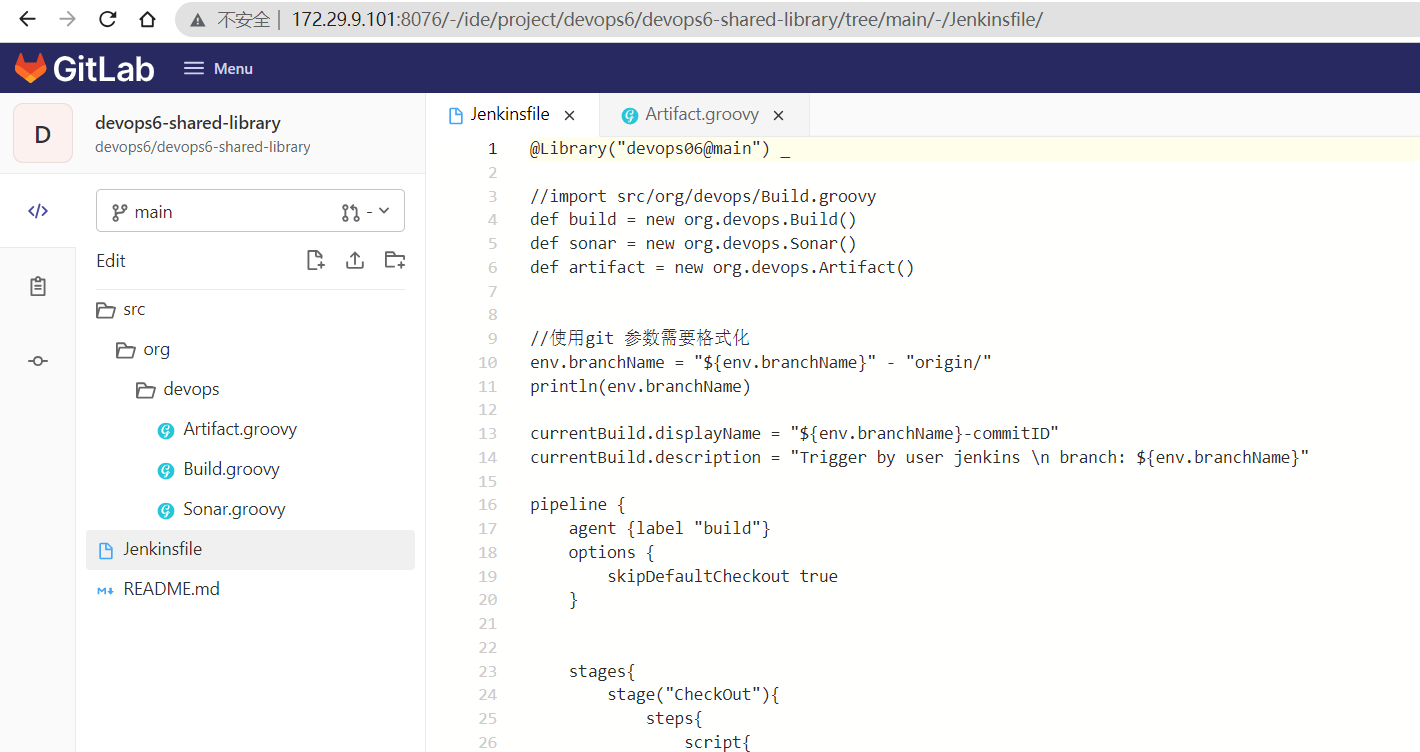
Jenkinsfile文件
@Library("devops06@main") _

//import src/org/devops/Build.groovy
def build = new org.devops.Build()
def sonar = new org.devops.Sonar()
def artifact = new org.devops.Artifact()

currentBuild.displayName = "${env.branchName}-commitID"
currentBuild.description = "Trigger by user jenkins \n branch: ${env.branchName}"

env.branchName = "RELEASE-6.1.1"
println(env.branchName)

pipeline {
    agent {label "build"}
    options {
        skipDefaultCheckout true
    }


    stages{
        stage("CheckOut"){
            steps{
                script{
                    build.CheckOut()
                }
            }
        }

        stage("Build"){
            steps{
                script{
                    build.Build()
                }
            }

        }

        stage("CodeScan"){
            when {
                environment name: 'skipSonar', value: 'false'
            }

            steps{
                script{

                    sonar.SonarScannerByPlugin()

                }
            }
        }

         stage("PushArtifact"){
            steps{
                script{
                    //PushArtifactByPlugin()
                    //PushArtifactByPluginPOM()

                    // init package info
                    appName = "${JOB_NAME}" //devops6-maven-service
                    repoName = appName.split('-')[0]   //devops6
                    appVersion = "${env.branchName}".split("-")[-1] // RELEASE-1.1.1   1.1.1
                    targetDir="${JOB_NAME}/${appVersion}"


                    // 通过pom文件获取包名称
                    POM = readMavenPom file: 'pom.xml'
                    env.artifactId = "${POM.artifactId}"
                    env.packaging = "${POM.packaging}"
                    env.groupId = "${POM.groupId}"
                    env.art_version = "${POM.version}"
                    sourcePkgName = "${env.artifactId}-${env.art_version}.${env.packaging}"

                    pkgPath = "target"
                    targetPkgName = "${appName}-${appVersion}.${env.packaging}"
                    artifact.PushNexusArtifact(repoName, targetDir, pkgPath, sourcePkgName,targetPkgName)
                }
            }

        }

    }
}
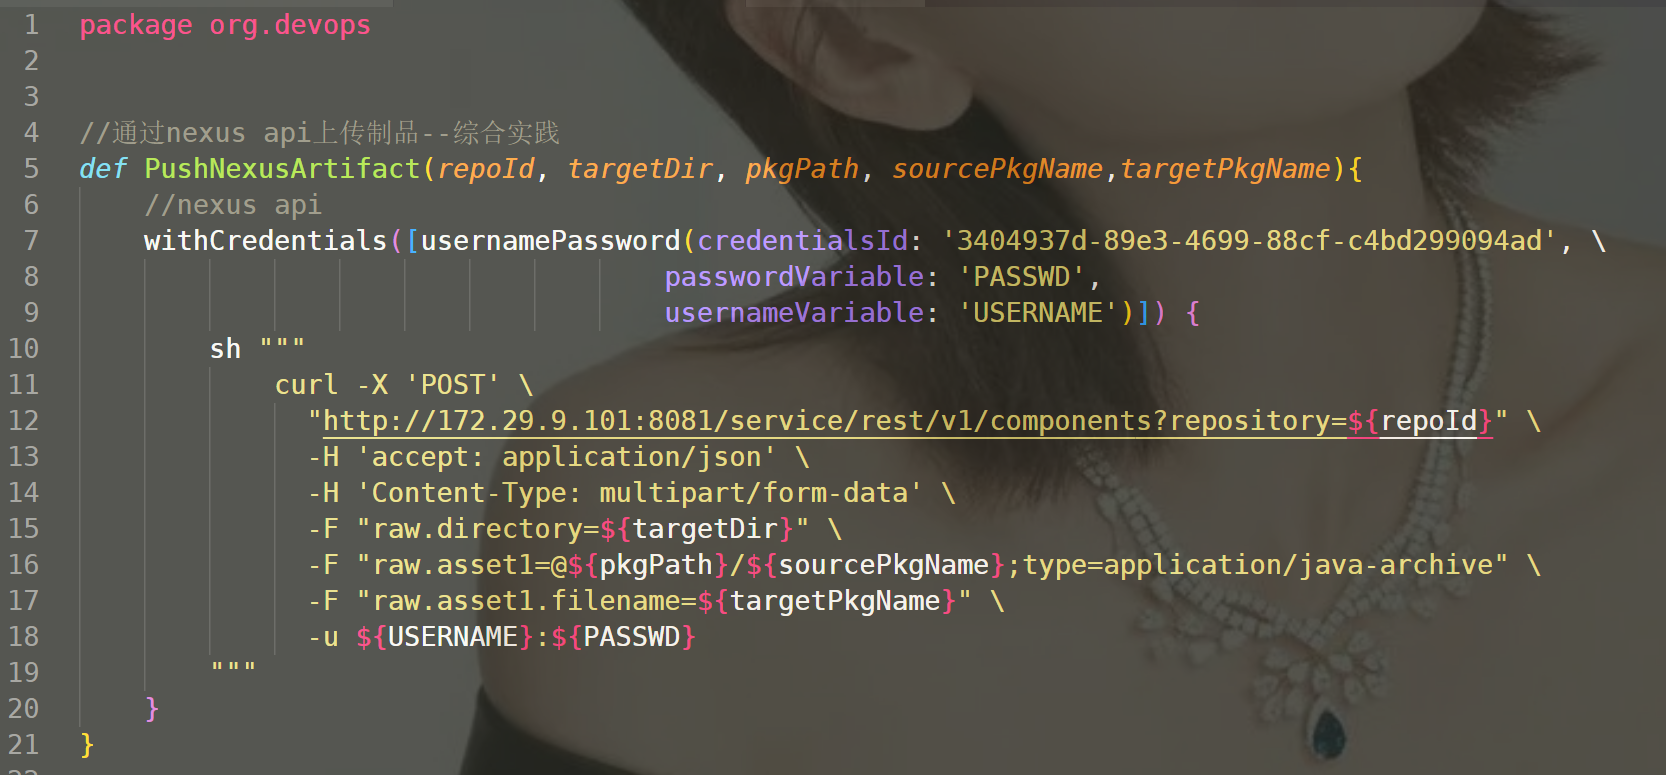
Artifact.groovy文件
package org.devops


//通过nexus api上传制品--综合实践
def PushNexusArtifact(repoId, targetDir, pkgPath, sourcePkgName,targetPkgName){
    //nexus api
    withCredentials([usernamePassword(credentialsId: '3404937d-89e3-4699-88cf-c4bd299094ad', \
                                    passwordVariable: 'PASSWD',
                                    usernameVariable: 'USERNAME')]) {
        sh """
            curl -X 'POST' \
              "http://172.29.9.101:8081/service/rest/v1/components?repository=${repoId}" \
              -H 'accept: application/json' \
              -H 'Content-Type: multipart/form-data' \
              -F "raw.directory=${targetDir}" \
              -F "raw.asset1=@${pkgPath}/${sourcePkgName};type=application/java-archive" \
              -F "raw.asset1.filename=${targetPkgName}" \
              -u ${USERNAME}:${PASSWD}
        """
    }
}


//通过jenkins的nexus插件上传制品
def PushArtifactByPlugin(){
    nexusArtifactUploader artifacts: [[artifactId: 'demo-app',
                                    classifier: '',
                                    file: 'target/demo-0.0.1-SNAPSHOT.jar',
                                    type: 'jar']],
                        credentialsId: '3404937d-89e3-4699-88cf-c4bd299094ad',
                        groupId: 'com.devops6',
                        nexusUrl: '172.29.9.101:8081',
                        nexusVersion: 'nexus3',
                        protocol: 'http',
                        repository: 'maven-devops6-release',
                        version: '1.1.1'
}

// 通过jenkins的nexus插件上传制品(读取pom文件)
// def PushArtifactByPluginPOM(){
//     POM = readMavenPom file: 'pom.xml'
//     println(POM)
//     println("GroupID: ${POM.groupId}")
//     println("ArtifactID: ${POM.artifactId}")
//     println("Version: ${POM.version}")
//     println("Packaging: ${POM.packaging}")

//     env.artifactId = "${POM.artifactId}"
//     env.packaging = "${POM.packaging}"
//     env.groupId = "${POM.groupId}"
//     env.art_version = "${POM.version}"
//     env.art_name = "${env.artifactId}-${env.art_version}.${env.packaging}"
//     nexusArtifactUploader   artifacts: [[artifactId: "${env.artifactId}",
//                                         classifier: '',
//                                         file: "target/${env.art_name}",
//                                         type: "${env.packaging}"]],
//                             credentialsId: '3404937d-89e3-4699-88cf-c4bd299094ad',
//                             groupId: "${env.groupId}",
//                             nexusUrl: '172.29.9.101:8081',
//                             nexusVersion: 'nexus3',
//                             protocol: 'http',
//                             repository: 'maven-devops6-release',
//                             version: "${env.art_version}"
// }

// 通过jenkins的nexus插件上传制品(读取pom文件)-函数方式
def PushArtifactByPluginPOM(artifactId, file, type, groupId, repoName, version){
    println(artifactId)
    //demo
    println("${file}, ${type}, ${groupId}, ${repoName}, ${version}")
    //target/demo-0.0.1-SNAPSHOT.jar, jar, com.example, devops4-release, 0.0.1-SNAPSHOT
    nexusArtifactUploader artifacts: [[artifactId: artifactId,
                                    classifier: '',
                                    file: file,
                                    type: type]],
                        credentialsId: '3404937d-89e3-4699-88cf-c4bd299094ad',
                        groupId: groupId,
                        nexusUrl: '172.29.9.101:8081',
                        nexusVersion: 'nexus3',
                        protocol: 'http',
                        repository: repoName,
                        version: version
}
- 运行,观察结果
符合预期。😘
如何自动识别项目的分支名选择进行构建
- Jenkins安装
Git Parameters插件
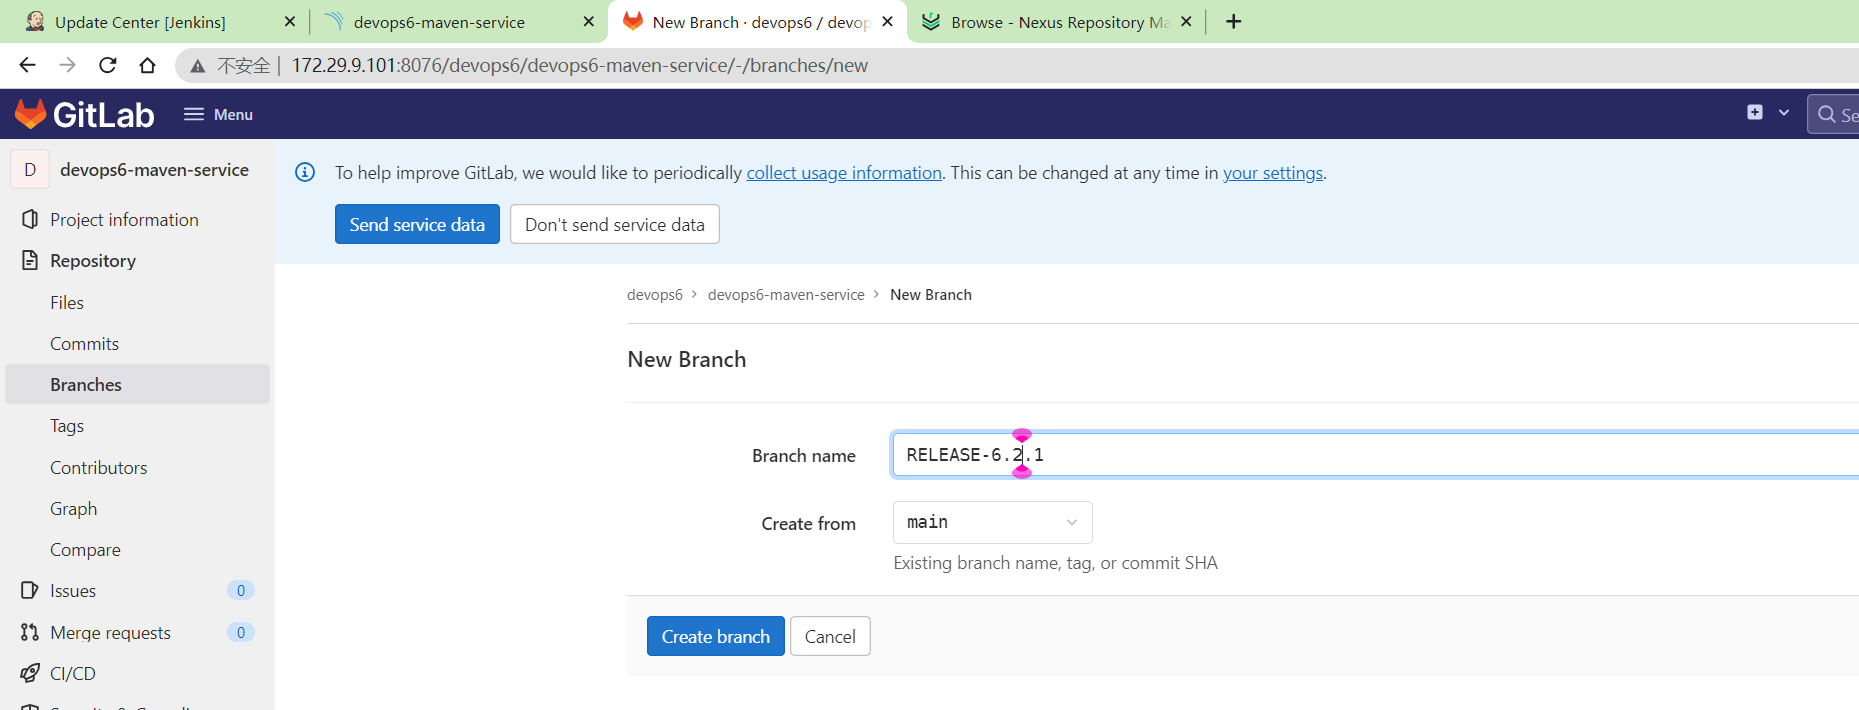
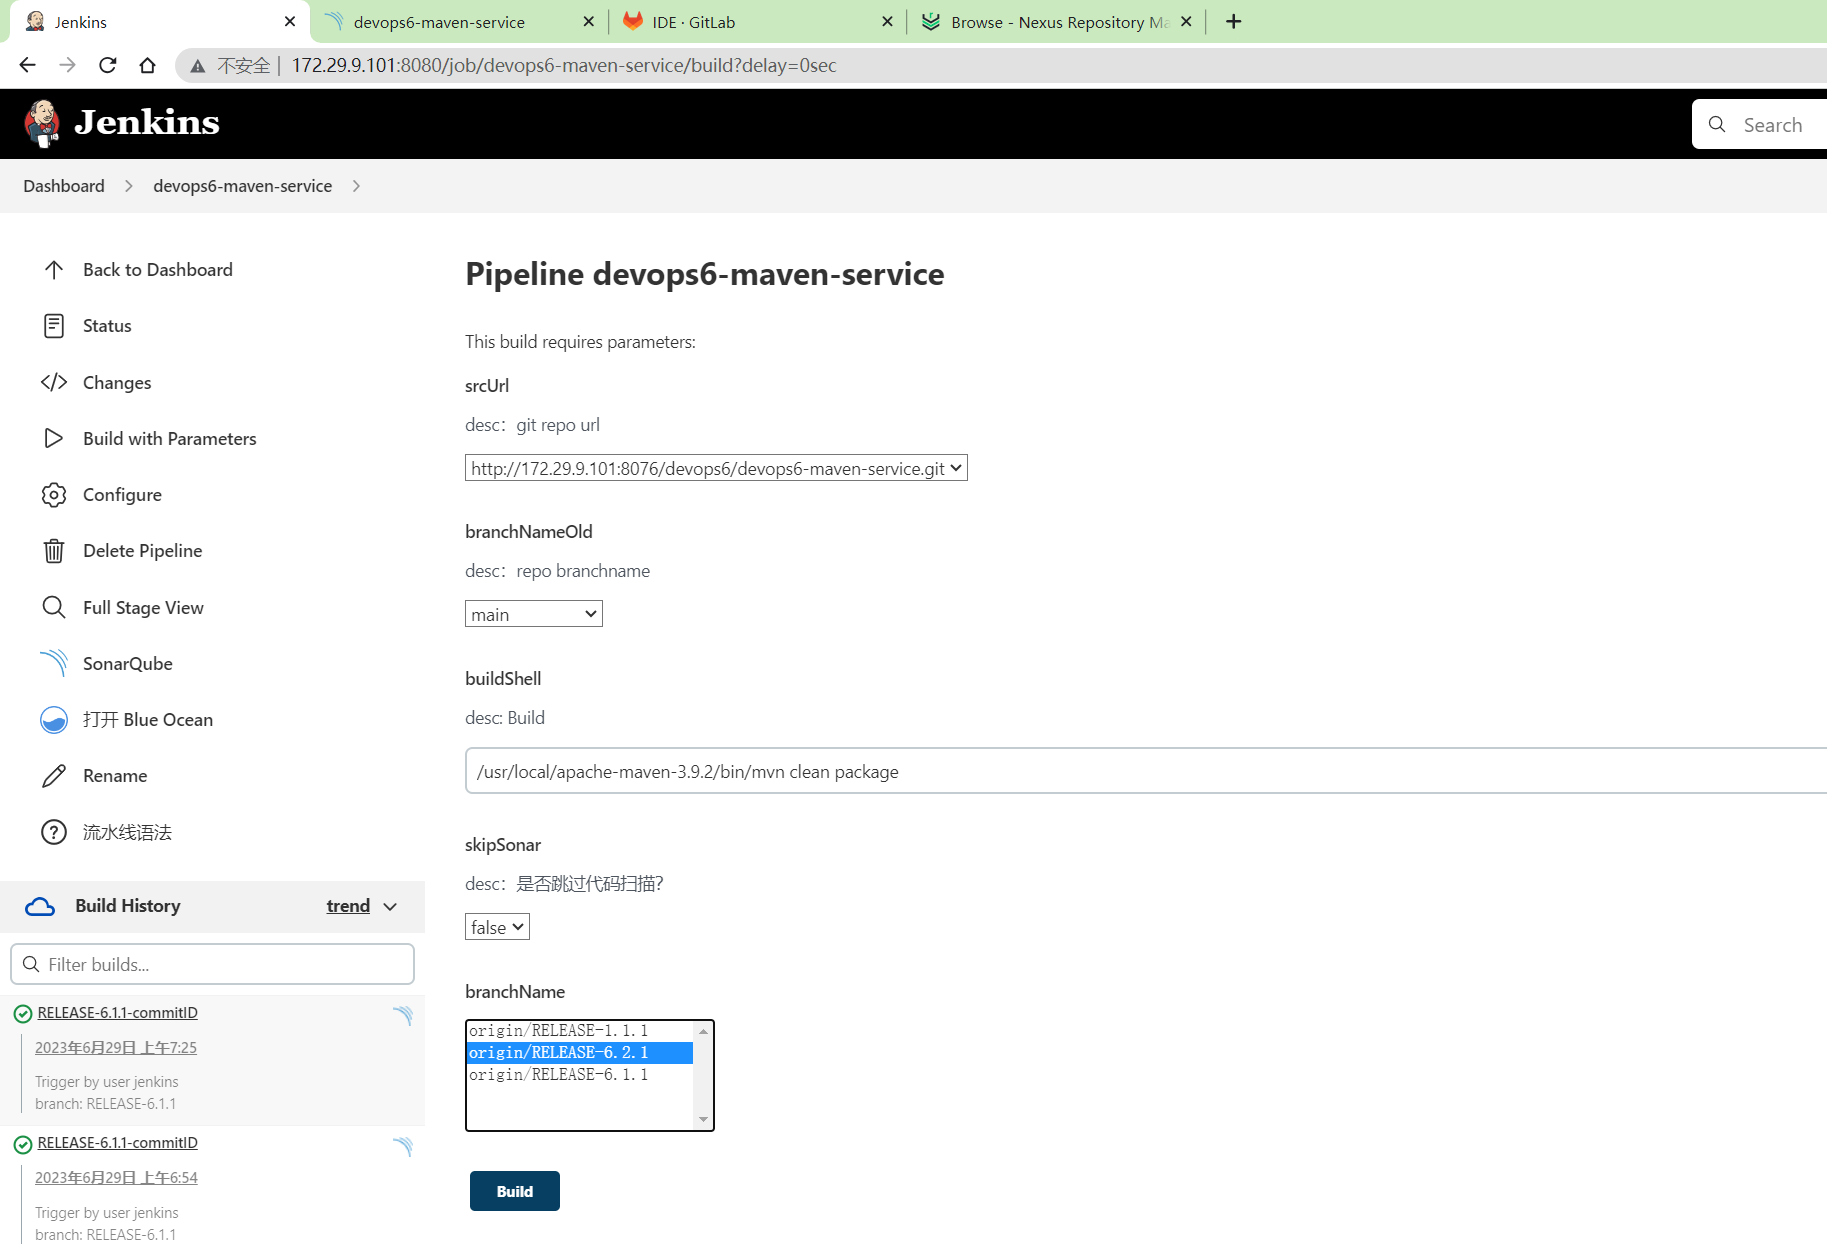
- 我们在
devops6-maven-service上基于main分支创建版本分支RELEASE-6.2.1
- 编辑Jenkins项目
devops6-maven-service,添加一个Git Parameter参数。
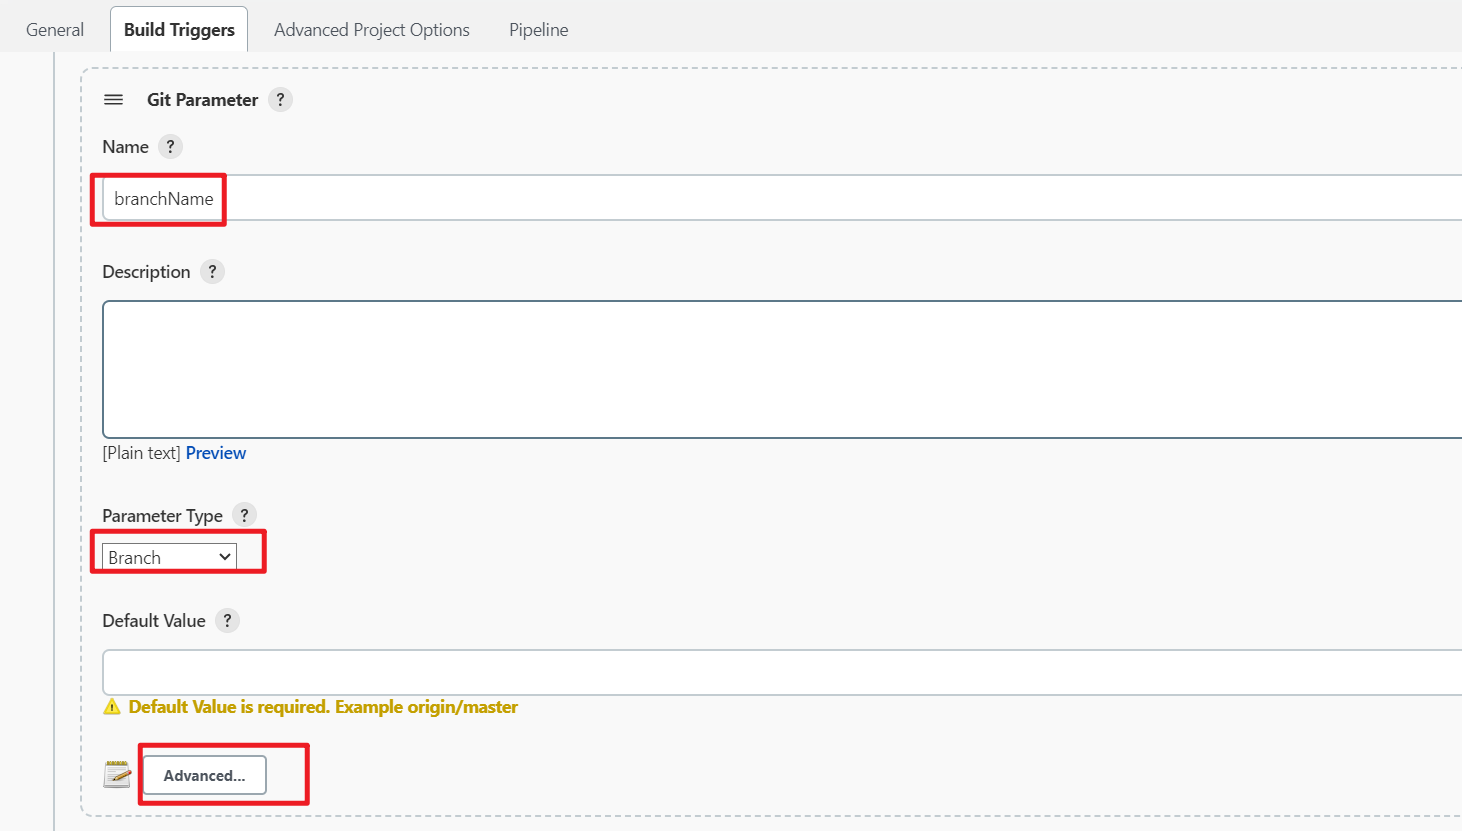
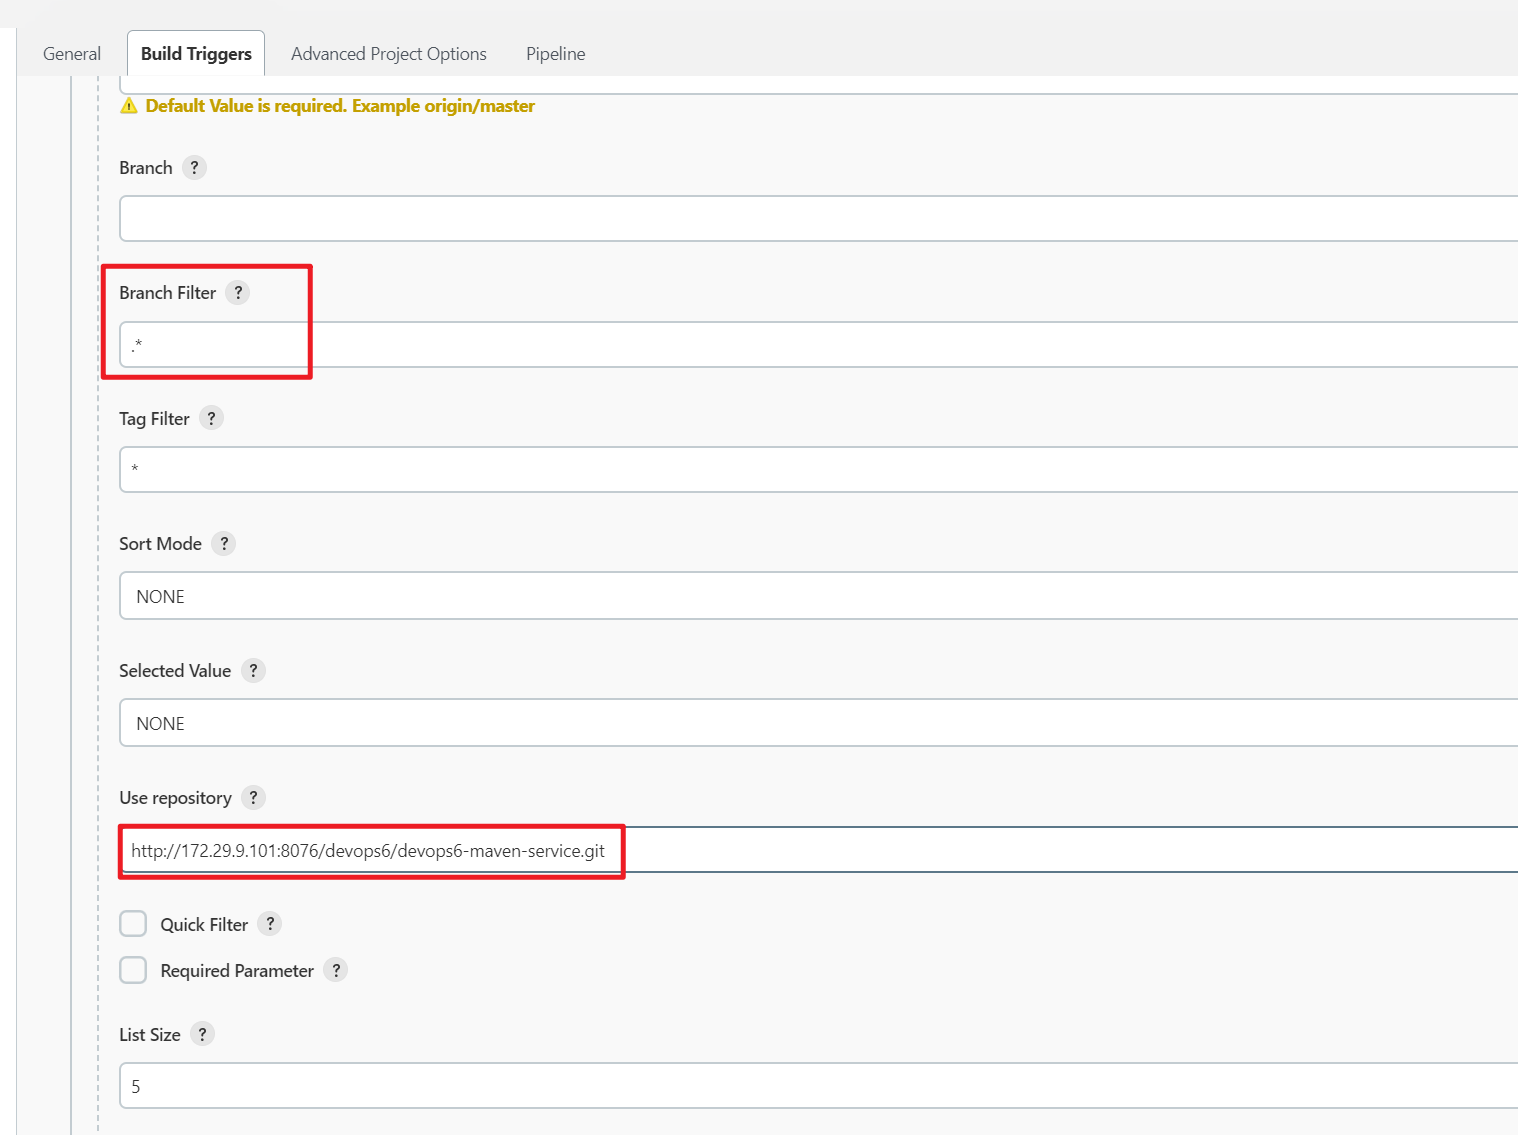
默认什么都不过滤的话,保存后,点击参数化构建,现象如下:
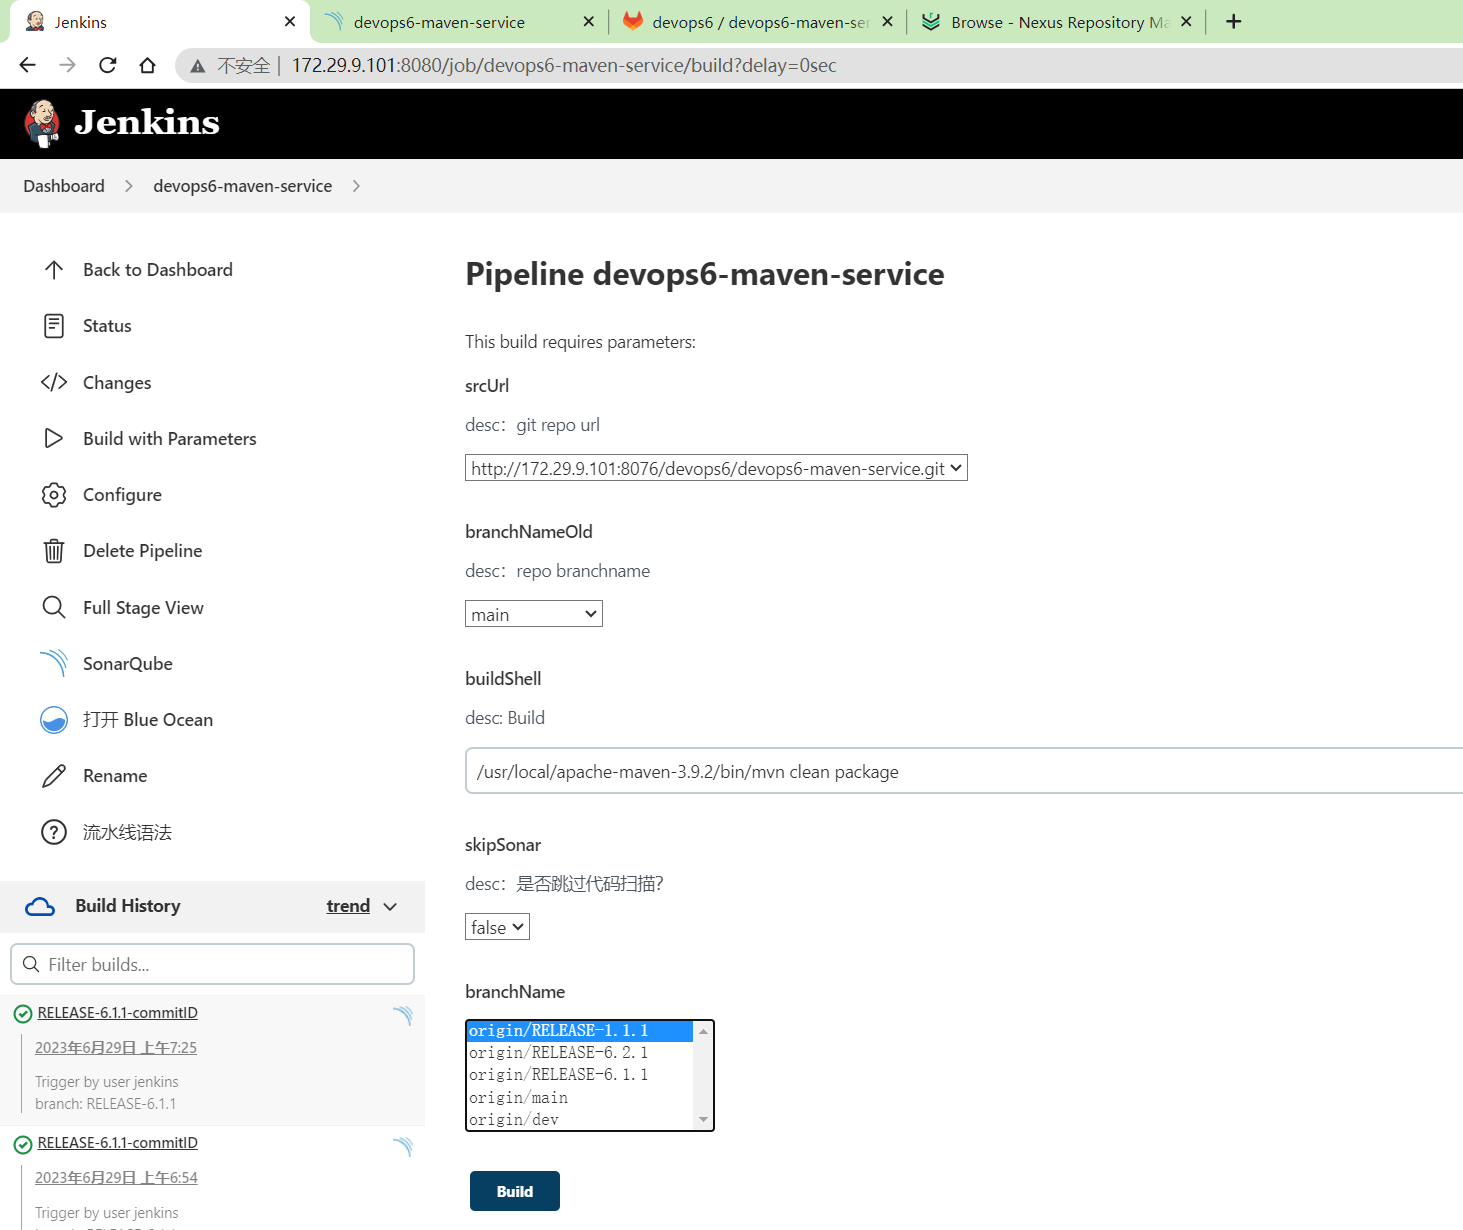
可以看到构建分支上回出现所有分支。
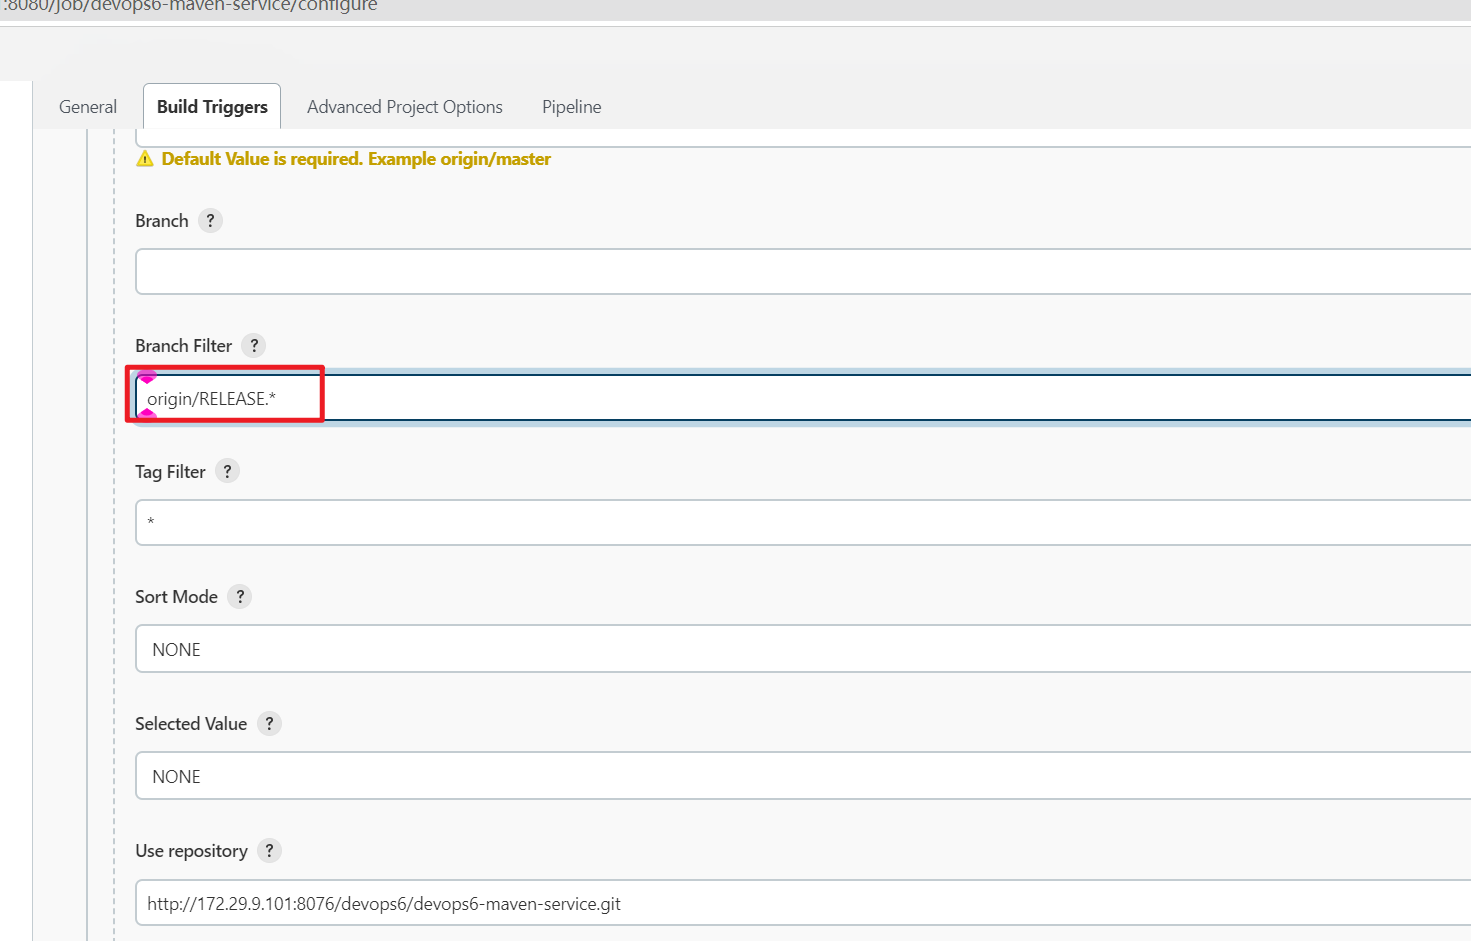
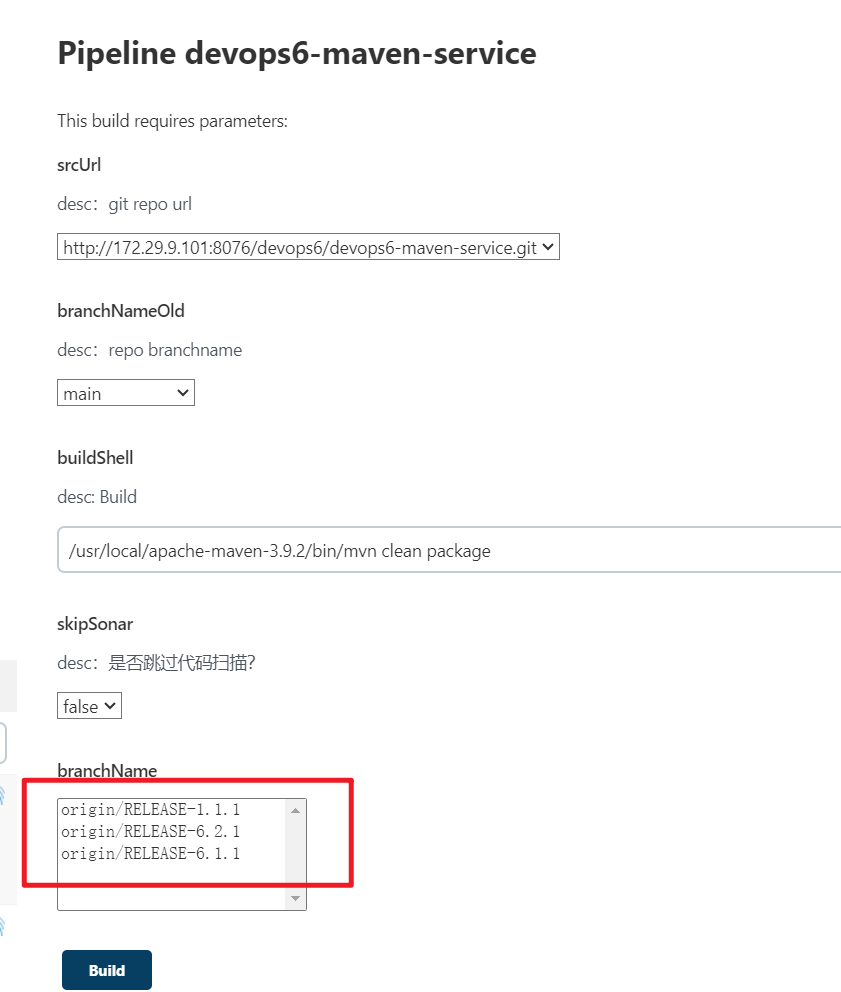
这里过滤下,只允许出现版本分支:
- 再次编辑共享库代码,重新修改下分支名
//使用git 参数需要格式化
env.branchName = "${env.branchName}" - "origin/"
println(env.branchName)
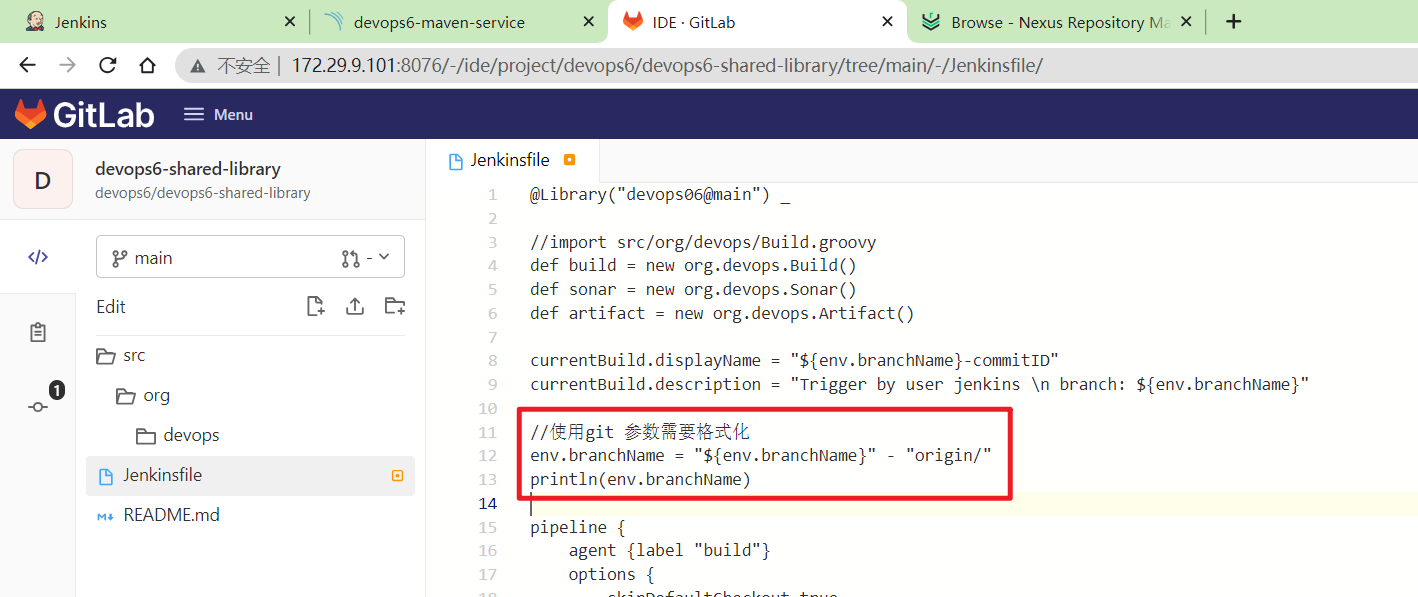
- 再次运行流水线,观察效果
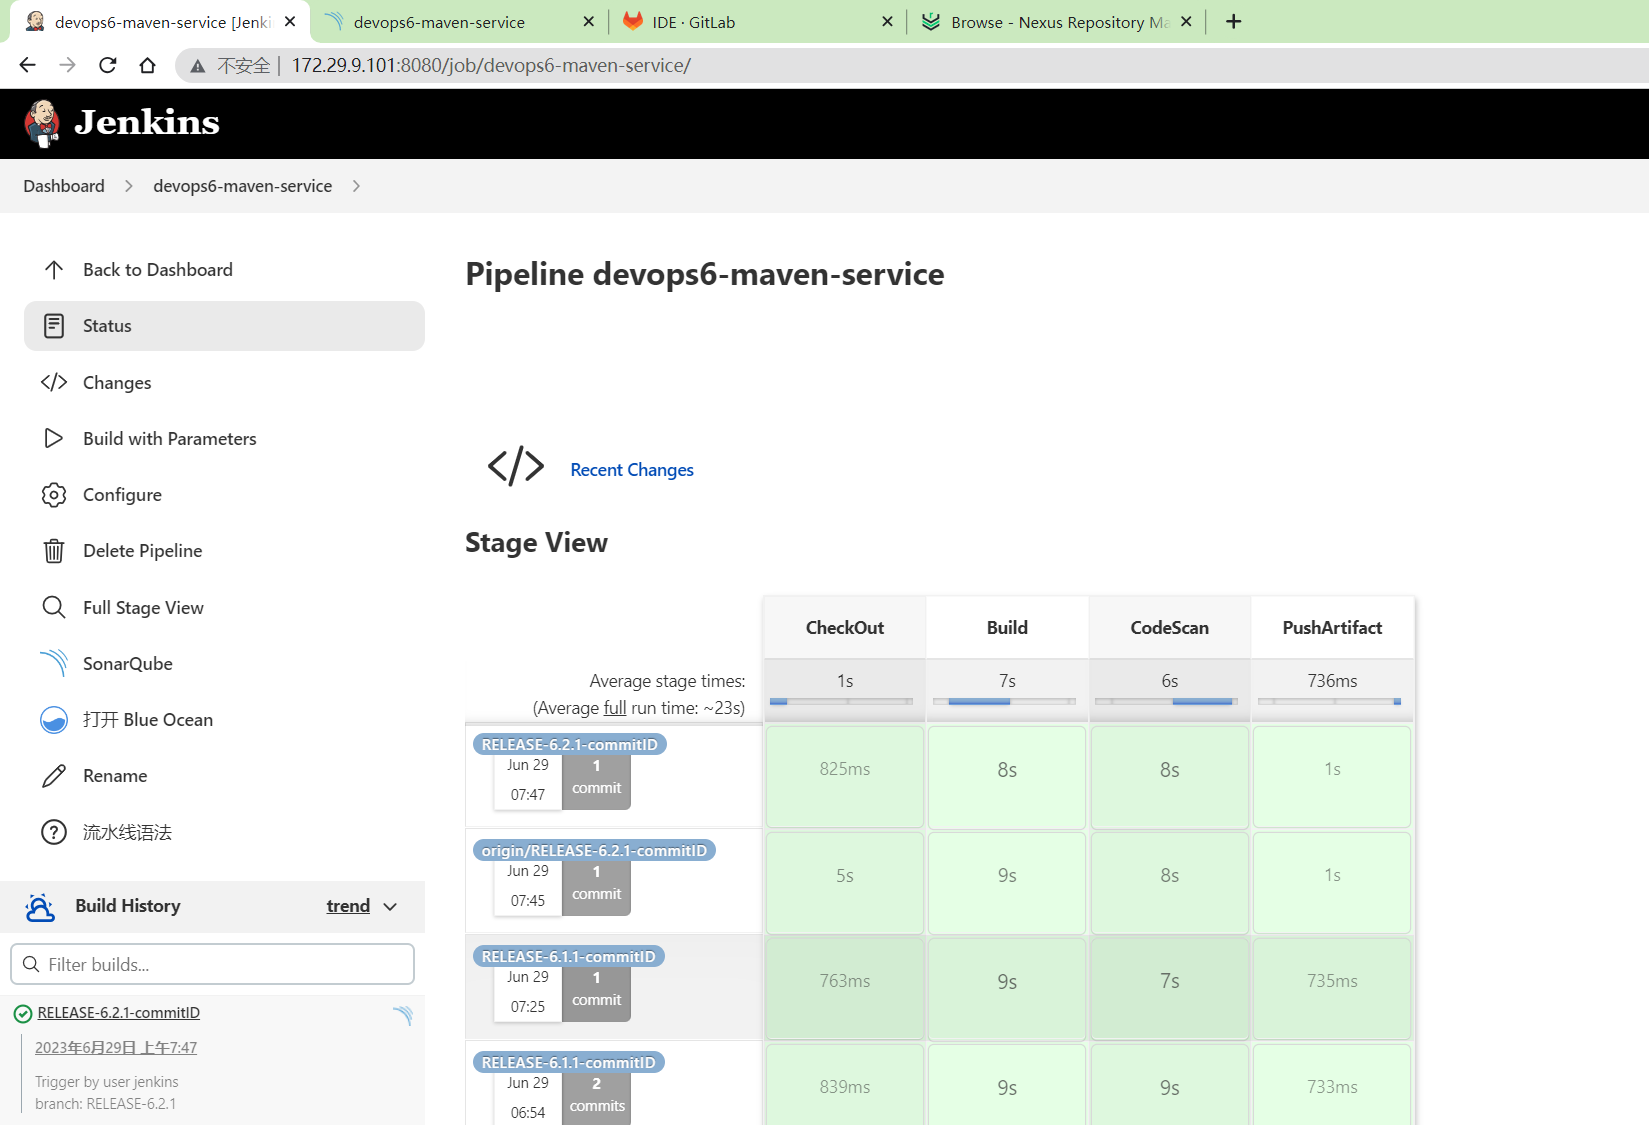
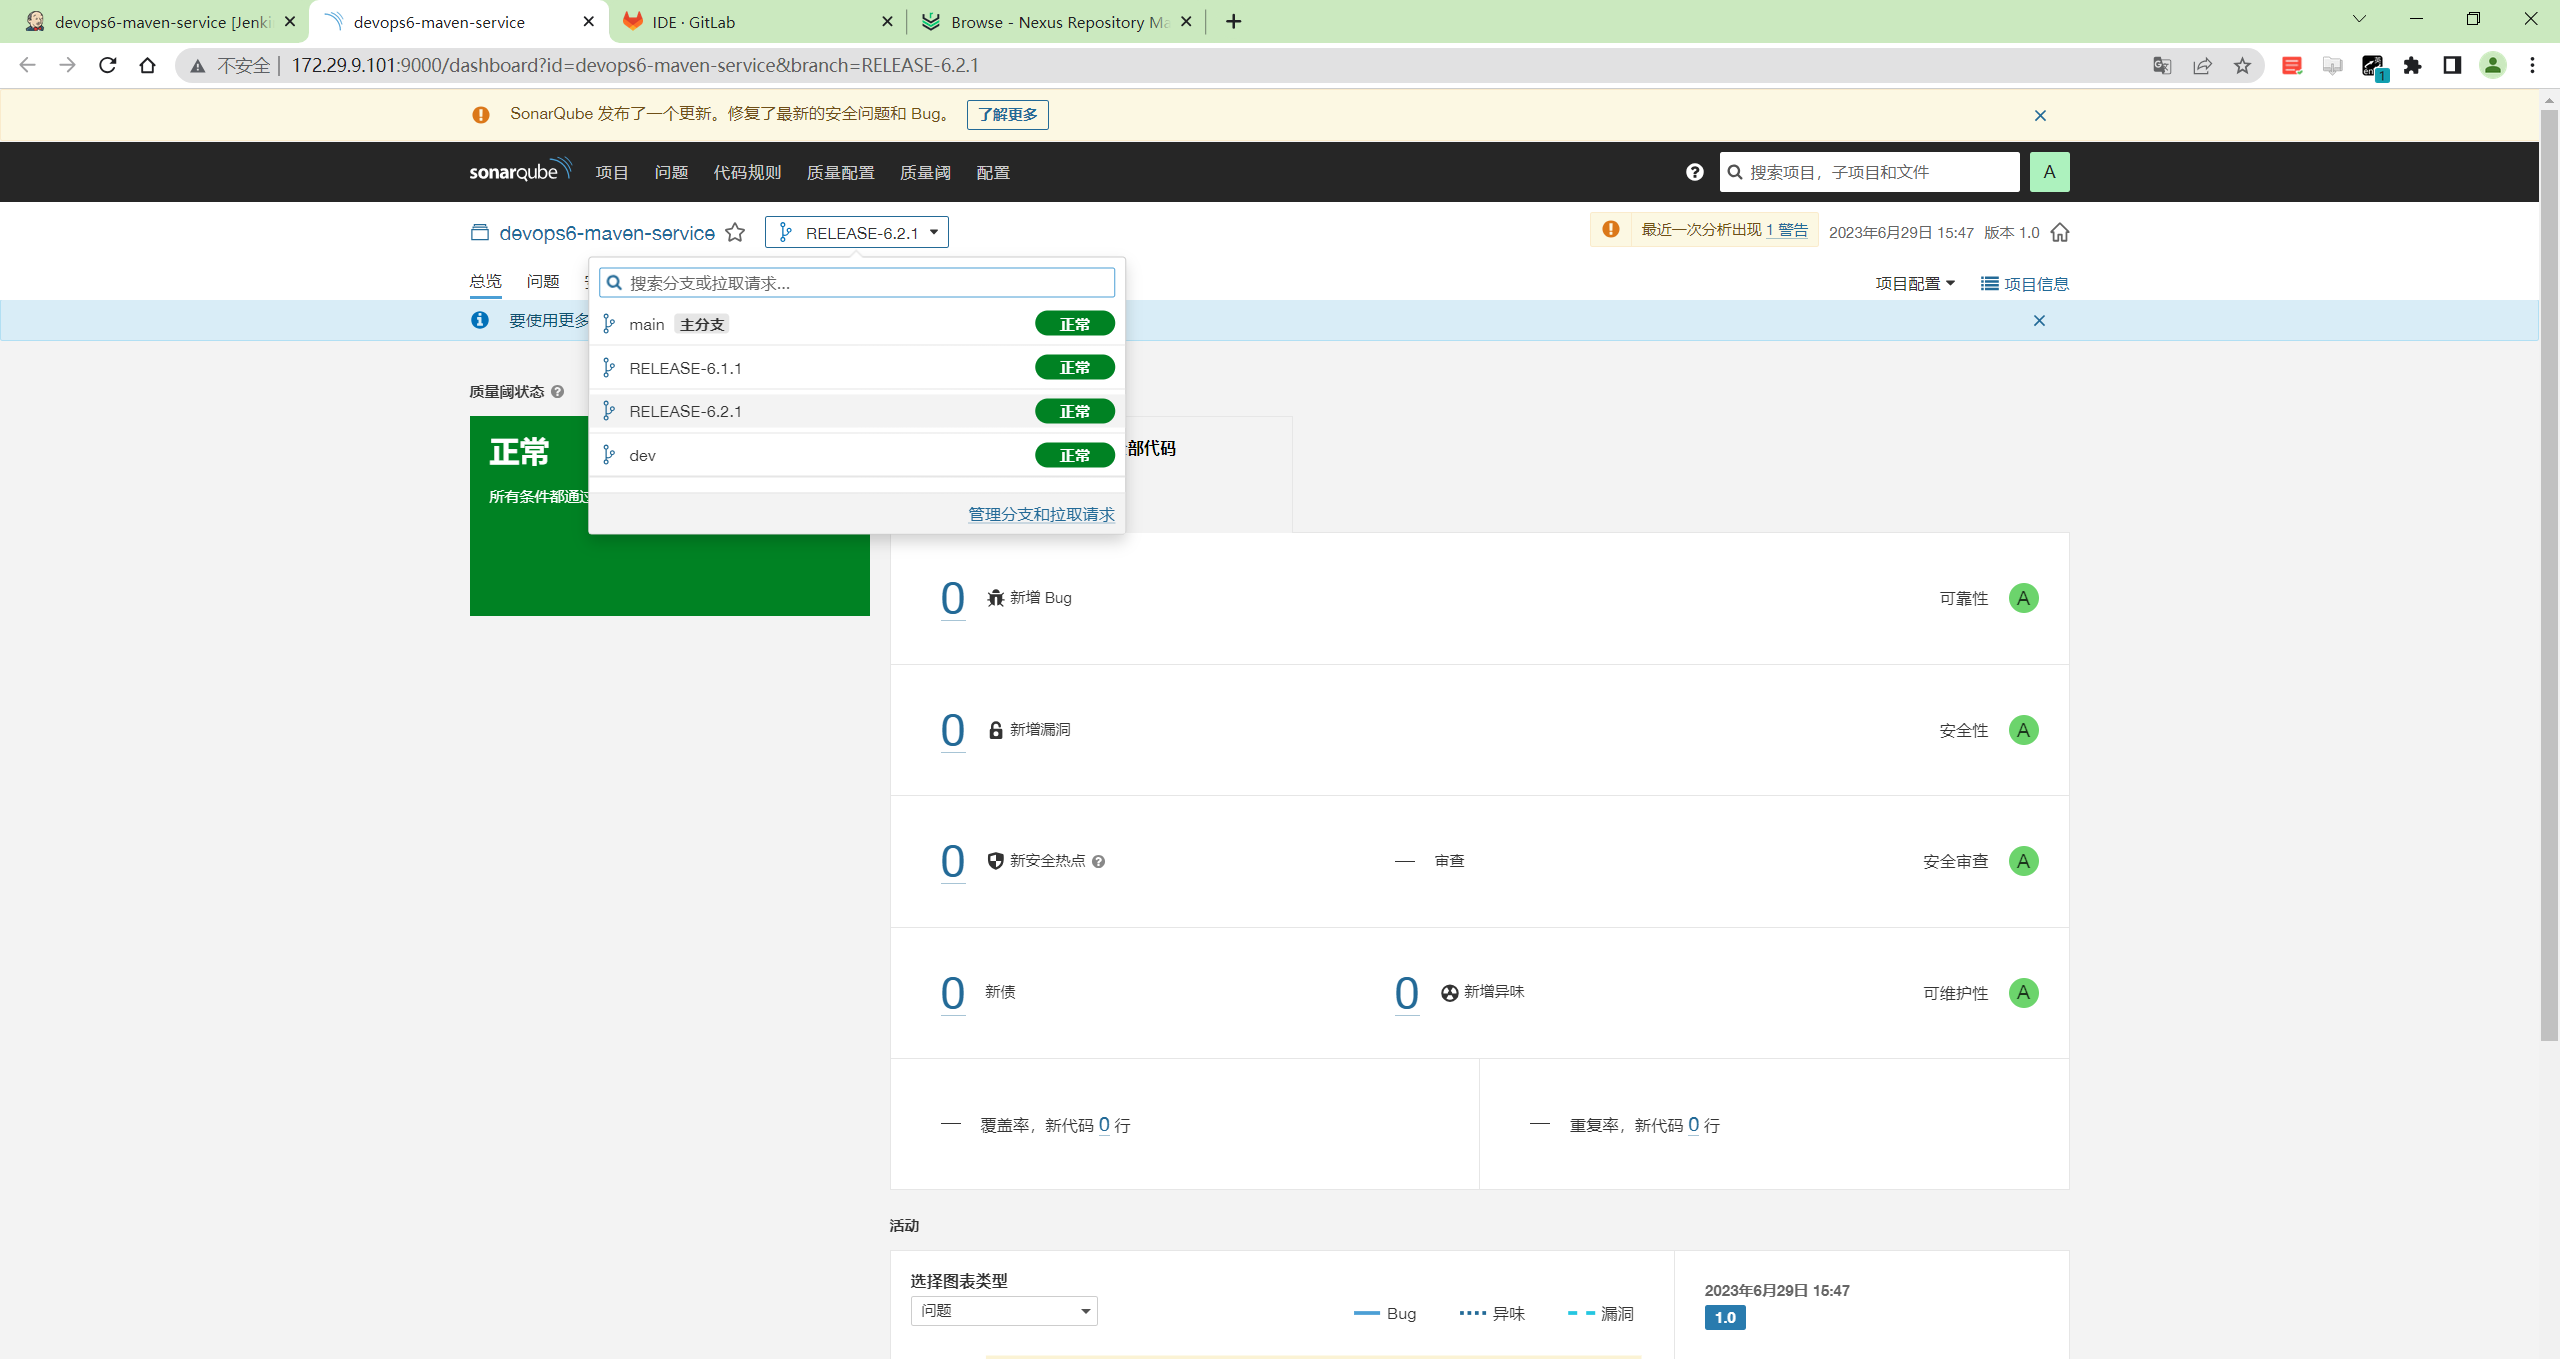
代码扫描:
CI上传制品:

测试结束。😘
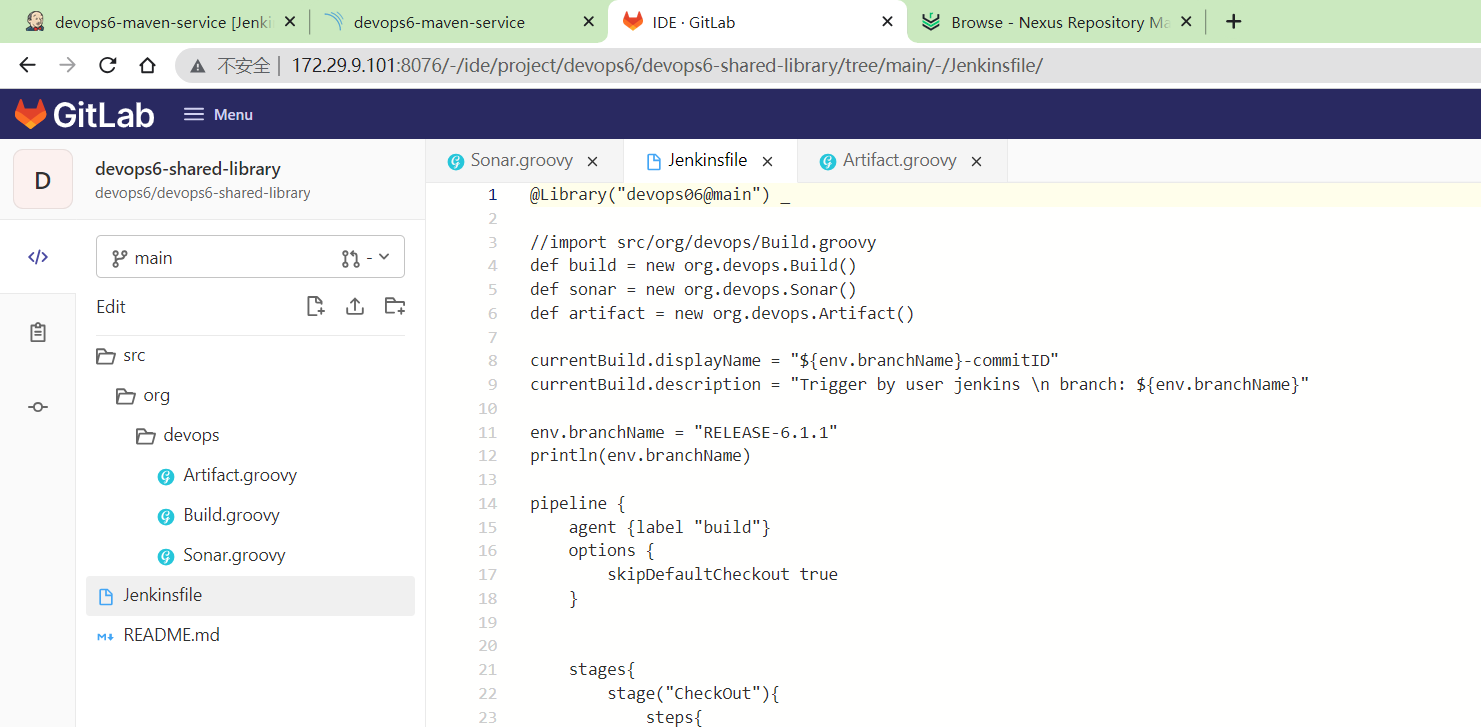
完整共享库代码
Jenkinsfile文件
@Library("devops06@main") _

//import src/org/devops/Build.groovy
def build = new org.devops.Build()
def sonar = new org.devops.Sonar()
def artifact = new org.devops.Artifact()


//使用git 参数需要格式化
env.branchName = "${env.branchName}" - "origin/"
println(env.branchName)

currentBuild.displayName = "${env.branchName}-commitID"
currentBuild.description = "Trigger by user jenkins \n branch: ${env.branchName}"

pipeline {
    agent {label "build"}
    options {
        skipDefaultCheckout true
    }


    stages{
        stage("CheckOut"){
            steps{
                script{
                    build.CheckOut()
                }
            }
        }

        stage("Build"){
            steps{
                script{
                    build.Build()
                }
            }

        }

        stage("CodeScan"){
            when {
                environment name: 'skipSonar', value: 'false'
            }

            steps{
                script{

                    sonar.SonarScannerByPlugin()

                }
            }
        }

         stage("PushArtifact"){
            steps{
                script{
                    //PushArtifactByPlugin()
                    //PushArtifactByPluginPOM()

                    // init package info
                    appName = "${JOB_NAME}" //devops6-maven-service
                    repoName = appName.split('-')[0]   //devops6
                    appVersion = "${env.branchName}".split("-")[-1] // RELEASE-1.1.1   1.1.1
                    targetDir="${JOB_NAME}/${appVersion}"


                    // 通过pom文件获取包名称
                    POM = readMavenPom file: 'pom.xml'
                    env.artifactId = "${POM.artifactId}"
                    env.packaging = "${POM.packaging}"
                    env.groupId = "${POM.groupId}"
                    env.art_version = "${POM.version}"
                    sourcePkgName = "${env.artifactId}-${env.art_version}.${env.packaging}"

                    pkgPath = "target"
                    targetPkgName = "${appName}-${appVersion}.${env.packaging}"
                    artifact.PushNexusArtifact(repoName, targetDir, pkgPath, sourcePkgName,targetPkgName)
                }
            }

        }

    }
}
Artifact.groovy文件
package org.devops


//通过nexus api上传制品--综合实践
def PushNexusArtifact(repoId, targetDir, pkgPath, sourcePkgName,targetPkgName){
    //nexus api
    withCredentials([usernamePassword(credentialsId: '3404937d-89e3-4699-88cf-c4bd299094ad', \
                                    passwordVariable: 'PASSWD',
                                    usernameVariable: 'USERNAME')]) {
        sh """
            curl -X 'POST' \
              "http://172.29.9.101:8081/service/rest/v1/components?repository=${repoId}" \
              -H 'accept: application/json' \
              -H 'Content-Type: multipart/form-data' \
              -F "raw.directory=${targetDir}" \
              -F "raw.asset1=@${pkgPath}/${sourcePkgName};type=application/java-archive" \
              -F "raw.asset1.filename=${targetPkgName}" \
              -u ${USERNAME}:${PASSWD}
        """
    }
}


//通过jenkins的nexus插件上传制品
def PushArtifactByPlugin(){
    nexusArtifactUploader artifacts: [[artifactId: 'demo-app',
                                    classifier: '',
                                    file: 'target/demo-0.0.1-SNAPSHOT.jar',
                                    type: 'jar']],
                        credentialsId: '3404937d-89e3-4699-88cf-c4bd299094ad',
                        groupId: 'com.devops6',
                        nexusUrl: '172.29.9.101:8081',
                        nexusVersion: 'nexus3',
                        protocol: 'http',
                        repository: 'maven-devops6-release',
                        version: '1.1.1'
}

// 通过jenkins的nexus插件上传制品(读取pom文件)
// def PushArtifactByPluginPOM(){
//     POM = readMavenPom file: 'pom.xml'
//     println(POM)
//     println("GroupID: ${POM.groupId}")
//     println("ArtifactID: ${POM.artifactId}")
//     println("Version: ${POM.version}")
//     println("Packaging: ${POM.packaging}")

//     env.artifactId = "${POM.artifactId}"
//     env.packaging = "${POM.packaging}"
//     env.groupId = "${POM.groupId}"
//     env.art_version = "${POM.version}"
//     env.art_name = "${env.artifactId}-${env.art_version}.${env.packaging}"
//     nexusArtifactUploader   artifacts: [[artifactId: "${env.artifactId}",
//                                         classifier: '',
//                                         file: "target/${env.art_name}",
//                                         type: "${env.packaging}"]],
//                             credentialsId: '3404937d-89e3-4699-88cf-c4bd299094ad',
//                             groupId: "${env.groupId}",
//                             nexusUrl: '172.29.9.101:8081',
//                             nexusVersion: 'nexus3',
//                             protocol: 'http',
//                             repository: 'maven-devops6-release',
//                             version: "${env.art_version}"
// }

// 通过jenkins的nexus插件上传制品(读取pom文件)-函数方式
def PushArtifactByPluginPOM(artifactId, file, type, groupId, repoName, version){
    println(artifactId)
    //demo
    println("${file}, ${type}, ${groupId}, ${repoName}, ${version}")
    //target/demo-0.0.1-SNAPSHOT.jar, jar, com.example, devops4-release, 0.0.1-SNAPSHOT
    nexusArtifactUploader artifacts: [[artifactId: artifactId,
                                    classifier: '',
                                    file: file,
                                    type: type]],
                        credentialsId: '3404937d-89e3-4699-88cf-c4bd299094ad',
                        groupId: groupId,
                        nexusUrl: '172.29.9.101:8081',
                        nexusVersion: 'nexus3',
                        protocol: 'http',
                        repository: repoName,
                        version: version
}
关于我
我的博客主旨:
- 排版美观,语言精炼;
- 文档即手册,步骤明细,拒绝埋坑,提供源码;
- 本人实战文档都是亲测成功的,各位小伙伴在实际操作过程中如有什么疑问,可随时联系本人帮您解决问题,让我们一起进步!
🍀 微信二维码
x2675263825 (舍得), qq:2675263825。

🍀 微信公众号
《云原生架构师实战》

🍀 csdn
https://blog.csdn.net/weixin_39246554?spm=1010.2135.3001.5421

🍀 博客
www.onlyyou520.com

🍀 知乎
https://www.zhihu.com/people/foryouone

🍀 语雀
https://www.yuque.com/books/share/34a34d43-b80d-47f7-972e-24a888a8fc5e?# 《不服来怼:宇宙中最好用的云笔记!》
最后
好了,关于本次就到这里了,感谢大家阅读,最后祝大家生活快乐,每天都过的有意义哦,我们下期见!