🚀作者:CAccept
🎂专栏:Qt Quick
文章目录
- 前言
- 内置视图View
- Repeater
- ListView
- GridView
- 代理delegate
- 总结

前言
在QML中,model和view由delegate连接,他们的关系如下👇
1、delegate 属性:delegate知道model的内容以及如何可视化它-怎么显示。
2、view知道delegate的概念以及如何布置它们-怎么摆放。
3、model属性:model只知道它所表示的数据-要显示的内容集合。
4、onItem 属性:当创建每个重复项时,可以访问该项的属性和方法。使用 onItem 属性,您可以处理每个重复项的信号、属性或方法。
本博客中工程使用的环境为:qt6 + Qt Creator10.0.1
内置视图View
Qt Quick提供了一组内置视图有:Repeat、ListView、GridView、TableView
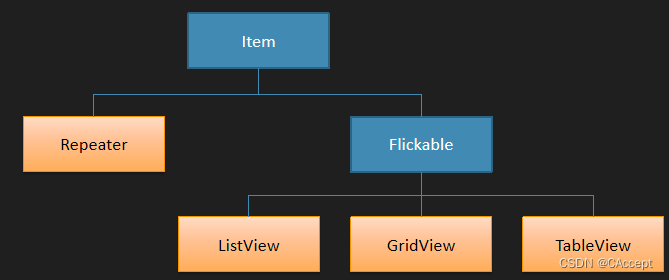
Repeater
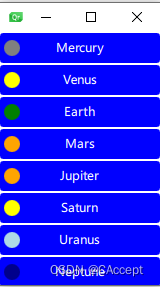
Repeater 元素提供了一种简单的方式来重复创建并显示其他元素的多个实例。您可以指定重复的次数或基于数据模型进行重复。
看代码示例吧👇
BlueBox.qml
import QtQuick

Rectangle {
    color:"blue"
    property alias text: label.text
    Text {
        id: label
        color:'white'
        anchors.centerIn: parent
        text: qsTr("text")
    }
}
main.qml
import QtQuick
Column{
    height: 160
    spacing:2
    Repeater{
        model: ListModel {
            ListElement { name: "Mercury"; surfaceColor: "gray" }
            ListElement { name: "Venus"; surfaceColor: "yellow" }
            ListElement { name: "Earth"; surfaceColor: "green" }
            ListElement { name: "Mars"; surfaceColor: "orange" }
            ListElement { name: "Jupiter"; surfaceColor: "orange" }
            ListElement { name: "Saturn"; surfaceColor: "yellow" }
            ListElement { name: "Uranus"; surfaceColor: "lightBlue" }
            ListElement { name: "Neptune"; surfaceColor: "darkBlue" }
        }
        //这样model中的每个元素都会用一个BlueBox进行表示
        delegate: BlueBox{
            required property string name
            required property color surfaceColor

            width:160;height:30
            text:name
            radius: 3

            Rectangle{
                anchors.left: parent.left
                anchors.verticalCenter: parent.verticalCenter
                anchors.leftMargin: 4
                width: 16;height:16;radius: 8
                color:parent.surfaceColor
            }
        }
    }
}
运行效果:
ListView
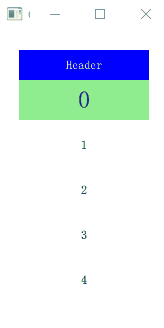
ListView 是 Qt Quick 中的一个内置视图组件,用于显示垂直或水平滚动的项目列表。它提供了一种方便的方式来展示和交互大量的项目,比较重要的属性有clip、orientation、highlight、header、footer、cacheBuffer。
GreenBox.qml
import QtQuick 2.0
Rectangle {
    color:"lightgreen"
    property alias text: label.text
    Text
    {
        id:label
        color:"white"
        anchors.centerIn: parent
    }
}
main.qml
import QtQuick 2.12
import QtQuick.Window 2.12

Window {
    visible: true
    width: 80
    height: 300
    ListView
    {
        id:lv
        anchors.fill:parent
        anchors.margins: 20
        //会让创建更加的柔顺,加载的时候就不会很突兀
        clip:true

        model:10
        spacing:5
        //缓存大小追加80像素(相对于高度来说)
        cacheBuffer:80

        //横向ListView
        //orientation:ListView.Horizontal
        highlight:hightComponent
        header:headerComponent
        footer:footerComponent
        focus:true
        delegate: Item
        {
            id:wrapper
            //required property int index
            width:lv.width
            height:40
            //每个代理在model上面的索引
            Text
            {
                anchors.centerIn: parent
                text:index
            }
            scale:(lv.currentIndex==index)?2:1
            Component.onCompleted:{console.log(index+" added!")}
            Component.onDestruction:{console.log(index+" deleted!")}
            //当点击当前这个项的时候,那么焦点就会变成当前的index
            MouseArea {
                anchors.fill: parent
                onClicked: {
                    lv.currentIndex = index
                }
            }
        }

    }

    Component
    {
        id:hightComponent
        GreenBox
        {
            id:gb
            width:lv.width
            y:lv.currentItem.y
            //当y发生改变时
            Behavior on y
            {
           		//颜色慢慢消失再慢慢出现
                SequentialAnimation
                {
                    PropertyAnimation
                    {
                        target: gb
                        property: "opacity"
                        to:0
                        duration: 200
                    }

                    NumberAnimation{duration:200}
                    PropertyAnimation
                    {
                        target: gb
                        property: "opacity"
                        to:1
                        duration: 200
                    }
                }
            }
        }
    }

    Component
    {
        id:headerComponent
        BlueBox
        {
            width: lv.width
            height: 30
            text:"Header"
        }

    }
    Component
    {
        id:footerComponent
        BlueBox
        {
            width: lv.width
            height: 30
            text:"footer"
        }

    }
}
运行效果:
GridView
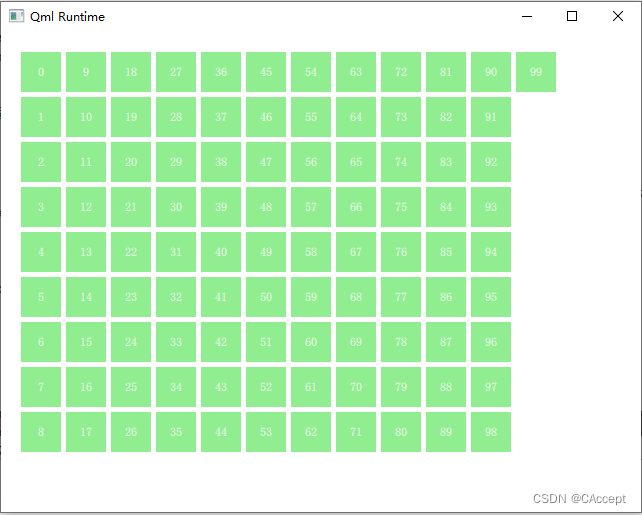
GridView 是 Qt Quick 中的一个内置视图组件,用于以网格形式展示项目列表。它适用于需要将项目以行和列的形式排列的情况。
import QtQuick 2.12
import QtQuick.Window 2.12

Window {
    visible: true
    width: 640
    height: 480
    GridView
    {
        id:gv
        anchors.fill:parent
        anchors.margins: 20
        clip:true
        model:100
        //每个单元格的宽度和高度
        cellWidth:45
        cellHeight:45
        flow:GridView.TopToBottom
        //delegate中的width和height优先级更高,如果cellWidth和cellHeight也设置的话,以delegate为优先
        delegate: GreenBox
        {
            width:40
            height:40
            text:index
        }
    }
}
运行效果:
代理delegate
每个代理都可以访问许多附加的属性,其中一些来自数据模型,另一些来自视图。
- 从模型中:属性将每个项目的数据传递给delegate。
- 从视图中:属性将状态信息传递与给delegate。
从视图附加的最常用属性是ListView.isCurrentItem和ListView.view。第一个是布尔值,指示项是否为当前项,而后面的是对实际视图的只读引用。
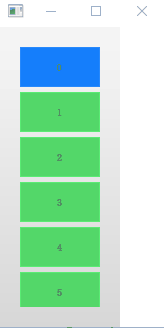
看一个代码示例吧👇
main.qml
import QtQuick 2.12
import QtQuick.Window 2.12

Rectangle {
    width: 120;height: 300

    gradient: Gradient {
        GradientStop { position: 0.0; color: "#f6f6f6" }
        GradientStop { position: 1.0; color: "#d7d7d7" }
     }

    ListView {
        id:lv
        anchors.fill: parent
        anchors.margins: 20
        focus: true
        model: 100
        //可以在外部定义进行使用
        delegate: numberDelegate
        spacing: 5
        //柔顺地进行消失和生成
        clip: true
    }

    Component {
        id: numberDelegate
        Rectangle {
            id: wrapper
            //拿到引用了这个delegate的ListView,用来更新数值
            width: ListView.view.width;height: 40
            color: ListView.isCurrentItem ? "#157efb" : "#53d769"
            //后面参数越大,颜色越浅
            border.color: Qt.lighter(color, 1.1)

            Text {
                anchors.centerIn: parent
                font.pixelSize: 10
                text: index
            }
            //点击信号更新currentIndex
            MouseArea{
                anchors.fill: parent
                onClicked: {
                    lv.currentIndex=index
                }
            }

        }
    }
}
运行效果:
总结
本篇博客对Model-View的整个关系进行了简单的梳理,并且提供了一些可供参考的代码示例,后期还会对此内容进行相应的补充,对本博客进行持续的更新,后面会对视图的一些信号进行讲解,希望本篇文章对您有所帮助,谢谢!!